【0元试用微软 Azure人工智能认知服务】这个人脸识别功能太强大啦
导读:这个由美丽的客服小姐姐提前申请好了企业试用的账号,个人的话还得需要visa卡。官网地址:azure.cn登录地址:portal.azure.cn1.简介按照官方的要求,我们这次只体验认知服务的部分功能即可。然后进入登录的主页,找到下面这个认知服务进行创建,这个第一次进来可能不好找,我刚开始也是找了半天,好多技术文档都是英文教程,看起来有点费劲,不过还有很多中文文档引导,还是很容易入门,找不到
导读:这个由美丽的客服小姐姐提前申请好了企业试用的账号,个人的话还得需要visa卡。
官网地址:azure.cn
登录地址:portal.azure.cn
目录
1.简介
按照官方的要求,我们这次只体验认知服务的部分功能即可。

然后进入登录的主页,找到下面这个认知服务进行创建,这个第一次进来可能不好找,我刚开始也是找了半天,好多技术文档都是英文教程,看起来有点费劲,不过还有很多中文文档引导,还是很容易入门,找不到的可以直接搜索认知服务。

主要有这几个认知服务相关的功能

先找一个比较好玩的【人脸AI】

创建face(注意:名称只能用字符数字及连接符)

创建虚拟网络

系统分配的托管标识

标记(默认)

创建资源组并验证成功

点击创建进行初始化部署,等待部署完成即可。

直接转到资源组

这里可以对标记进行编辑(增加名称及值即可:用于管理不同的资源组,标记是名称/值对,可便于将相同的标记应用于多个资源和资源组,从而对资源进行分类,并查看合并的帐单。标记名称不区分大小写,但标记值区分大小写。),也可以管理密钥,密钥一般有两个(密钥用于访问认知服务 API。请勿共享你的密钥。请安全地存储这些密钥(例如,使用 Azure Key Vault)。另外,建议定期重新生成这些密钥。执行 API 调用只需要一个密钥。在重新生成第一个密钥时,可以使用第二个密钥继续访问服务。)

2.Azure 认知服务是什么?
认知服务使每位开发人员无需具备机器学习的专业知识就能接触到 AI。只需要一个 API 调用,就可以将看、听、说、搜索、理解和加速决策的能力嵌入到应用中。让所有技能水平的开发人员都能轻松在其应用中添加 AI 功能。
 3.认知服务的四种职能
决策

语言

语音

影像

4.人脸API
用于分析图像中的人脸的 AI 服务,功能包括人脸检测功能(感知图像中的口罩、眼镜或人脸位置等面部特征和属性)和通过与专用存储库的匹配或照片 ID 识别人。
5.新建一个WPF应用实现以下功能:
- 选择图片后把原图显示出来
- 选中后马上进行识别
- 识别成功后把脸部用红框描述出来
- 当鼠标移动到红框内的时候显示详细脸部信息
安装SDK
使用nuget安装对于的sdk包
Install-Package Microsoft.Azure.CognitiveServices.Vision.Face -Version 2.5.0-preview.2
编辑MainWindow.xml放置图像显示区域、文件选中、描述显示区域
<Window x:Class="FaceWpf.MainWindow"
        xmlns="http://schemas.microsoft.com/winfx/2006/xaml/presentation"
        xmlns:x="http://schemas.microsoft.com/winfx/2006/xaml"
        xmlns:d="http://schemas.microsoft.com/expression/blend/2008"
        xmlns:mc="http://schemas.openxmlformats.org/markup-compatibility/2006"
        xmlns:local="clr-namespace:FaceWpf"
        mc:Ignorable="d"
        Title="MainWindow" Height="600" Width="800">
    <Grid x:Name="BackPanel">
        <Image x:Name="FacePhoto" Stretch="Uniform" Margin="0,0,0,50" MouseMove="FacePhoto_MouseMove" />
        <DockPanel DockPanel.Dock="Bottom">
            <Button x:Name="BrowseButton" Width="72" Height="80" VerticalAlignment="Bottom" HorizontalAlignment="Left"
                     Content="选择图片..."
                     Click="BrowseButton_Click" />
            <StatusBar VerticalAlignment="Bottom">
                <StatusBarItem>
                    <TextBlock Name="faceDescriptionStatusBar" Height="80" FontSize="20" Text="" Width="500" TextWrapping="Wrap"/>
                </StatusBarItem>
            </StatusBar>
        </DockPanel>
    </Grid>
</Window>
在编辑MainWindow类的构造函数初始化FaceClient等数据
 private IFaceClient _faceClient;

        //检测到的人脸
        private IList<DetectedFace> _faceList;
        //人脸描述信息
        private string[] _faceDescriptions;
        private double _resizeFactor;

        private const string _defaultStatusBarText =
            "鼠标移动到面部显示描述信息.";
        public MainWindow()
        {
            InitializeComponent();
            //faceid的订阅key
            string subscriptionKey = "";
            // faceid的终结的配置
            string faceEndpoint = "";
            _faceClient = new FaceClient(
                new ApiKeyServiceClientCredentials(subscriptionKey),
                new System.Net.Http.DelegatingHandler[] { });
            if (Uri.IsWellFormedUriString(faceEndpoint, UriKind.Absolute))
            {
                _faceClient.Endpoint = faceEndpoint;
            }
            else
            {
                MessageBox.Show(faceEndpoint,
                    "Invalid URI", MessageBoxButton.OK, MessageBoxImage.Error);
                Environment.Exit(0);
            }
        }
图片选择并显示
// 选择图片并上传
        private async void BrowseButton_Click(object sender, RoutedEventArgs e)
        {
            var openDlg = new Microsoft.Win32.OpenFileDialog();

            openDlg.Filter = "JPEG Image(*.jpg)|*.jpg";
            bool? result = openDlg.ShowDialog(this);

            if (!(bool)result)
            {
                return;
            }

            // Display the image file.
            string filePath = openDlg.FileName;

            Uri fileUri = new Uri(filePath);
            BitmapImage bitmapSource = new BitmapImage();

            bitmapSource.BeginInit();
            bitmapSource.CacheOption = BitmapCacheOption.None;
            bitmapSource.UriSource = fileUri;
            bitmapSource.EndInit();

            FacePhoto.Source = bitmapSource;

            // Detect any faces in the image.
            Title = "识别中...";
            _faceList = await UploadAndDetectFaces(filePath);
            Title = String.Format(
                "识别完成. {0}个人脸", _faceList.Count);

            if (_faceList.Count > 0)
            {
                // Prepare to draw rectangles around the faces.
                DrawingVisual visual = new DrawingVisual();
                DrawingContext drawingContext = visual.RenderOpen();
                drawingContext.DrawImage(bitmapSource,
                    new Rect(0, 0, bitmapSource.Width, bitmapSource.Height));
                double dpi = bitmapSource.DpiX;
                // Some images don't contain dpi info.
                _resizeFactor = (dpi == 0) ? 1 : 96 / dpi;
                _faceDescriptions = new String[_faceList.Count];

                for (int i = 0; i < _faceList.Count; ++i)
                {
                    DetectedFace face = _faceList[i];

                    //画方框
                    drawingContext.DrawRectangle(
                        Brushes.Transparent,
                        new Pen(Brushes.Red, 2),
                        new Rect(
                            face.FaceRectangle.Left * _resizeFactor,
                            face.FaceRectangle.Top * _resizeFactor,
                            face.FaceRectangle.Width * _resizeFactor,
                            face.FaceRectangle.Height * _resizeFactor
                            )
                    );

                    _faceDescriptions[i] = FaceDescription(face);
                }

                drawingContext.Close();

                RenderTargetBitmap faceWithRectBitmap = new RenderTargetBitmap(
                    (int)(bitmapSource.PixelWidth * _resizeFactor),
                    (int)(bitmapSource.PixelHeight * _resizeFactor),
                    96,
                    96,
                    PixelFormats.Pbgra32);

                faceWithRectBitmap.Render(visual);
                FacePhoto.Source = faceWithRectBitmap;

                faceDescriptionStatusBar.Text = _defaultStatusBarText;
            }
        }
调用SDK进行识别
// 上传图片使用faceclient识别
        private async Task<IList<DetectedFace>> UploadAndDetectFaces(string imageFilePath)
        {
            IList<FaceAttributeType> faceAttributes =
                new FaceAttributeType[]
                {
            FaceAttributeType.Gender, FaceAttributeType.Age,
            FaceAttributeType.Smile, FaceAttributeType.Emotion,
            FaceAttributeType.Glasses, FaceAttributeType.Hair
                };

            using (Stream imageFileStream = File.OpenRead(imageFilePath))
            {
                IList<DetectedFace> faceList =
                    await _faceClient.Face.DetectWithStreamAsync(
                        imageFileStream, true, false, faceAttributes);
                return faceList;
            }
        }
对人脸识别后的结果信息组装成字符串,当鼠标移动到人脸上的时候显示这些信息。
 private void FacePhoto_MouseMove(object sender, MouseEventArgs e)
        {
            if (_faceList == null)
                return;

            Point mouseXY = e.GetPosition(FacePhoto);

            ImageSource imageSource = FacePhoto.Source;
            BitmapSource bitmapSource = (BitmapSource)imageSource;

            var scale = FacePhoto.ActualWidth / (bitmapSource.PixelWidth / _resizeFactor);

            bool mouseOverFace = false;

            for (int i = 0; i < _faceList.Count; ++i)
            {
                FaceRectangle fr = _faceList[i].FaceRectangle;
                double left = fr.Left * scale;
                double top = fr.Top * scale;
                double width = fr.Width * scale;
                double height = fr.Height * scale;

                if (mouseXY.X >= left && mouseXY.X <= left + width &&
                    mouseXY.Y >= top && mouseXY.Y <= top + height)
                {
                    faceDescriptionStatusBar.Text = _faceDescriptions[i];
                    mouseOverFace = true;
                    break;
                }
            }

            if (!mouseOverFace) faceDescriptionStatusBar.Text = _defaultStatusBarText;
        }
private string FaceDescription(DetectedFace face)
{
StringBuilder sb = new StringBuilder();
sb.Append("人脸: ");
// 性别年龄
sb.Append(face.FaceAttributes.Gender.Value == Gender.Female ? "女性" : "男性");
sb.Append(", ");
sb.Append(face.FaceAttributes.Age.ToString() + "岁");
sb.Append(", ");
sb.Append(String.Format("微笑 {0:F1}%, ", face.FaceAttributes.Smile * 100));
// 显示超过0.1的表情
sb.Append("表情: ");
Emotion emotionScores = face.FaceAttributes.Emotion;
if (emotionScores.Anger >= 0.1f) sb.Append(
String.Format("生气 {0:F1}%, ", emotionScores.Anger * 100));
if (emotionScores.Contempt >= 0.1f) sb.Append(
String.Format("蔑视 {0:F1}%, ", emotionScores.Contempt * 100));
if (emotionScores.Disgust >= 0.1f) sb.Append(
String.Format("厌恶 {0:F1}%, ", emotionScores.Disgust * 100));
if (emotionScores.Fear >= 0.1f) sb.Append(
String.Format("恐惧 {0:F1}%, ", emotionScores.Fear * 100));
if (emotionScores.Happiness >= 0.1f) sb.Append(
String.Format("高兴 {0:F1}%, ", emotionScores.Happiness * 100));
if (emotionScores.Neutral >= 0.1f) sb.Append(
String.Format("自然 {0:F1}%, ", emotionScores.Neutral * 100));
if (emotionScores.Sadness >= 0.1f) sb.Append(
String.Format("悲伤 {0:F1}%, ", emotionScores.Sadness * 100));
if (emotionScores.Surprise >= 0.1f) sb.Append(
String.Format("惊喜 {0:F1}%, ", emotionScores.Surprise * 100));
sb.Append(face.FaceAttributes.Glasses);
sb.Append(", ");
sb.Append("头发: ");
if (face.FaceAttributes.Hair.Bald >= 0.01f)
sb.Append(String.Format("秃头 {0:F1}% ", face.FaceAttributes.Hair.Bald * 100));
IList<HairColor> hairColors = face.FaceAttributes.Hair.HairColor;
foreach (HairColor hairColor in hairColors)
{
if (hairColor.Confidence >= 0.1f)
{
sb.Append(hairColor.Color.ToString());
sb.Append(String.Format(" {0:F1}% ", hairColor.Confidence * 100));
}
}
return sb.ToString();
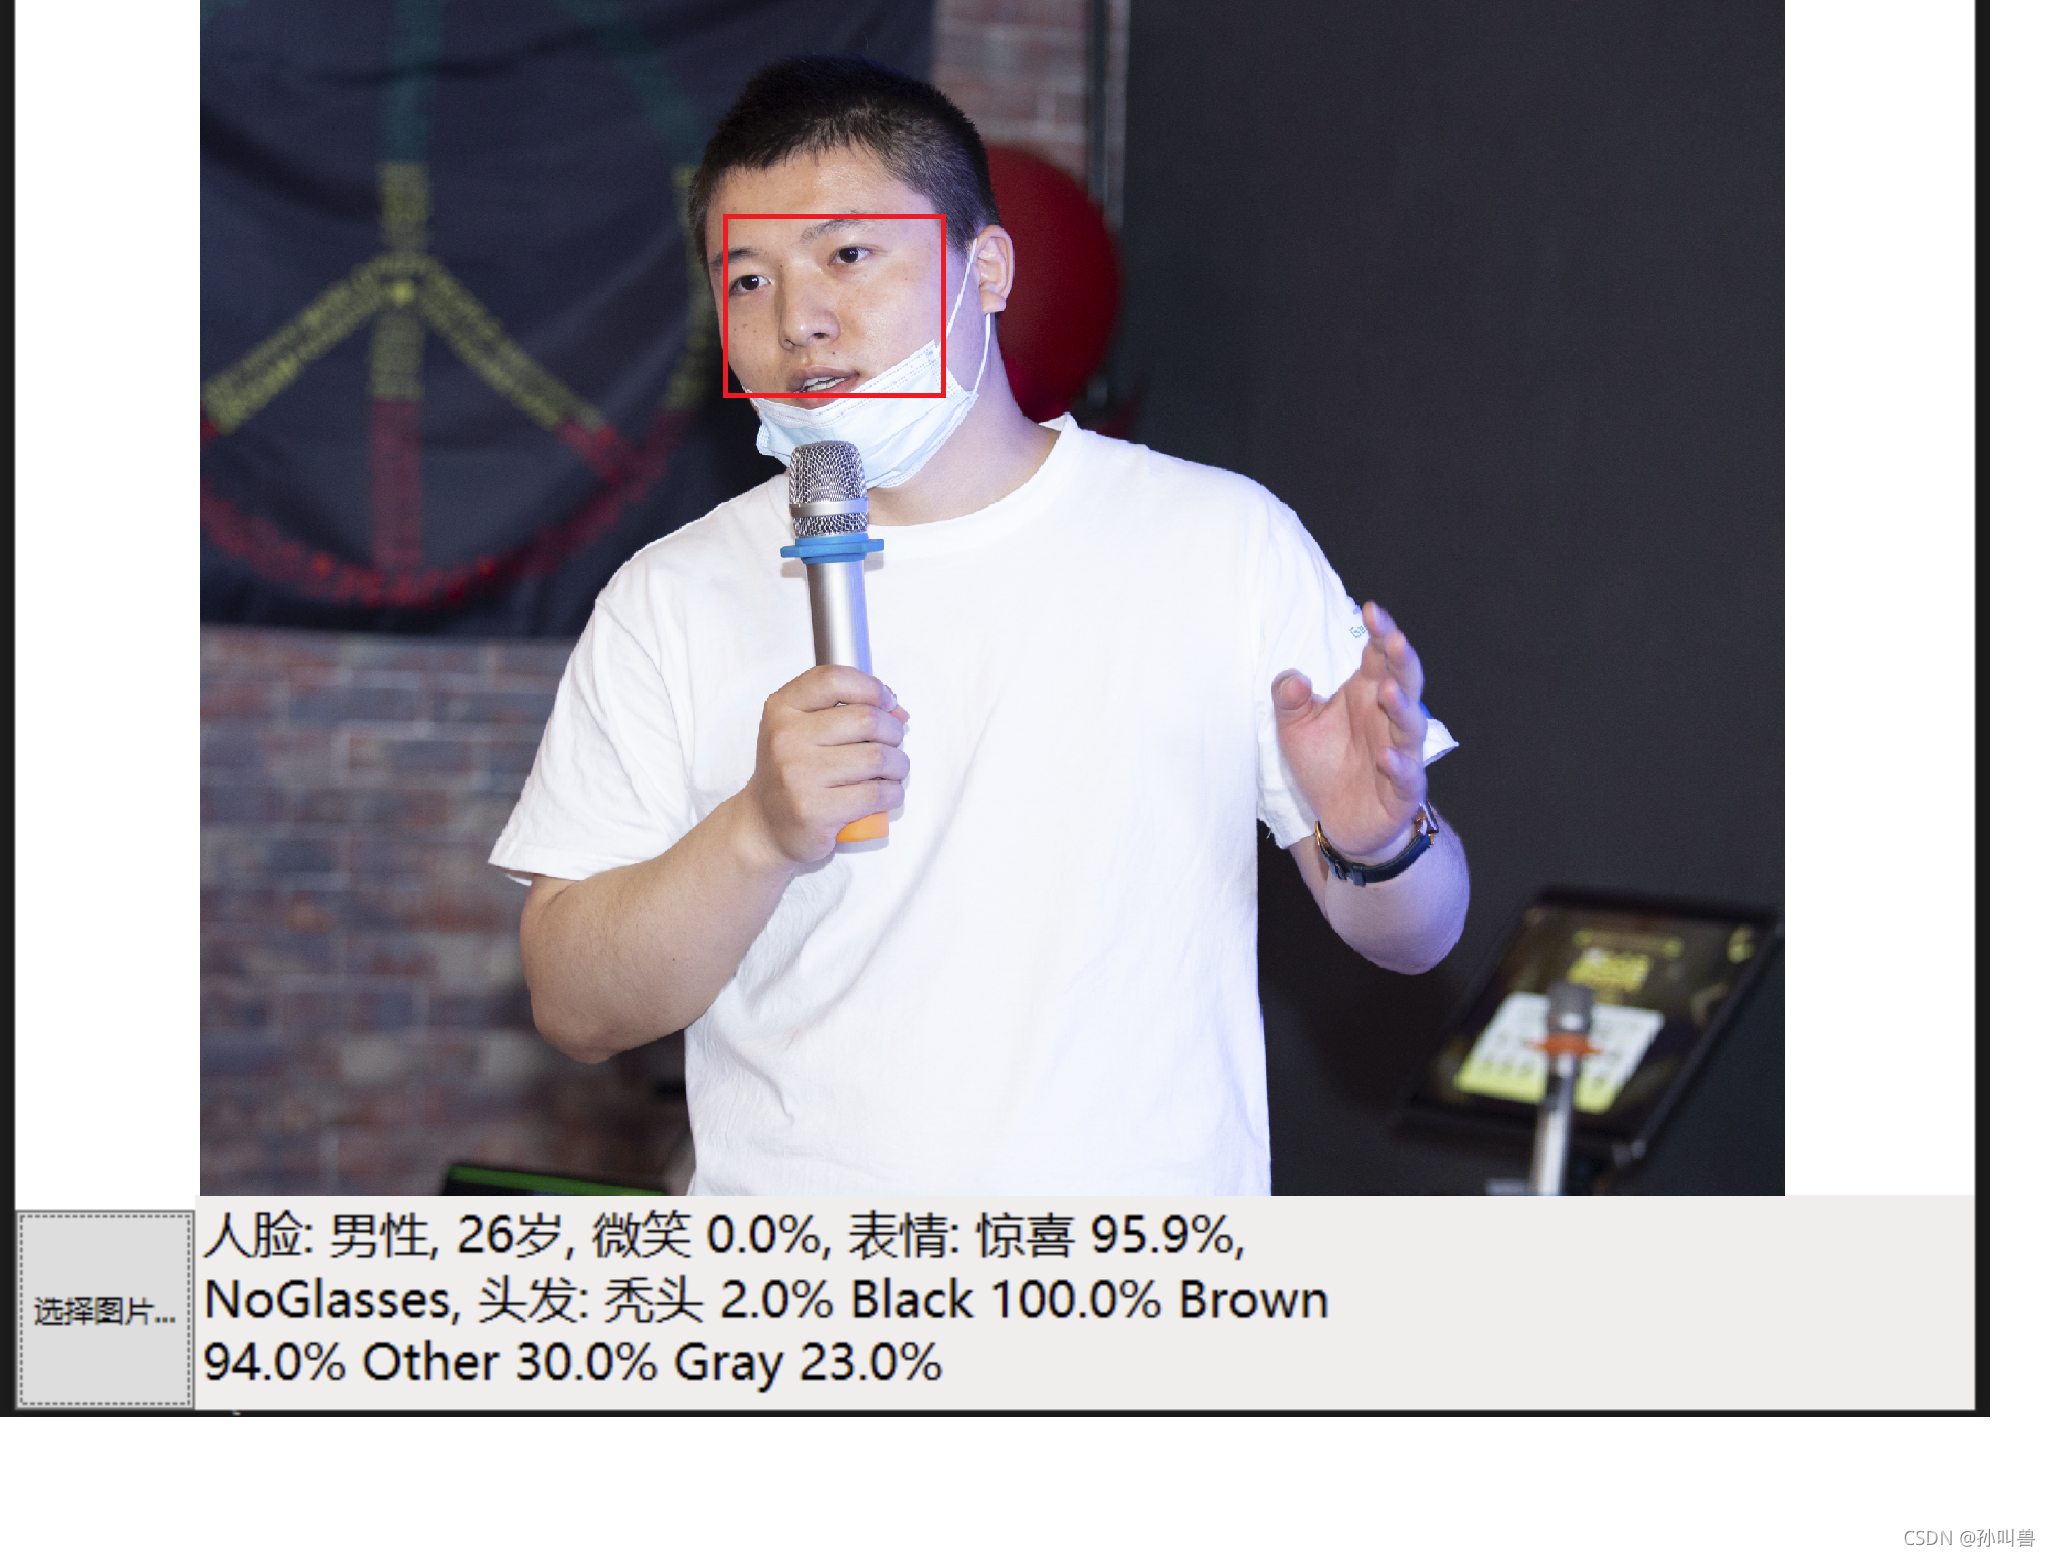
}到此我们的应用打造完成了。我们使用孙叫兽的演讲图片验证一下效果,和这个参数差不多,说明这个人脸识别的功能还是很强大的。

总结
使用更加通用的rest api来调用,这样可以适配任何开发语言,这种应用可以用在上下班的大屏测体温,检测员工有没有带口罩,还有钉钉外勤打卡拍照等场景。十分的便捷,刚好开始接触这个Azure还是有点懵比,好多东西都是英文文档,搞得我还得用谷歌浏览器右键一下,其实可以做一个智能机器人,聊天室这种工具,能覆盖一下这种认知服务,比如聊天框文本转语音,语音转文本,转表情包,图片识别文本,中英文翻译等功能,下次有机会再体验吧,确实挺智能的,官方的一些案例也很不错,大家可以参考一下!
 https://docs.microsoft.com/zh-cn/samples/browse/
 本期内容我们就分享到这里,我们下期见!

腾讯云面向开发者汇聚海量精品云计算使用和开发经验,营造开放的云计算技术生态圈。
更多推荐


 26
26 0
0- 0


 已为社区贡献1条内容

所有评论(0)