前端环境搭建react18+typescript+webpack5项目 - 项目初始化
pnpm 、npm和yarn都是Node.js和JavaScript项目的包管理器。每种都有自己的优点和缺点,选择使用哪一种最终取决于你的具体需求和偏好1.更快的安装和更新时间2.更少的磁盘空间使用3.更好地支持monorepos4. 更好地支持对等依赖5.更清晰的依赖树会在根目录生成一个在根目录新建基本的项目结构:index.html初始化cliD另外因为我们在App.tsx中引入了css文件,
·
1、项目的创建
这里使用pnpm 。pnpm 、 npm 和 yarn 都是 Node.js 和 JavaScript 项目的包管理器。每种都有自己的优点和缺点,
选择使用哪一种最终取决于你的具体需求和偏好
1. 更快的安装和更新时间
2. 更少的磁盘空间使用
3. 更好地支持 monorepos
4. 更好地支持对等依赖
5. 更清晰的依赖树
# 我的 pnpm 版本
pnpm -v
7.27.1
# 初始化package.json文件
pnpm init
会在根目录生成一个 package.json 文件:
{
"name": "fe",
"version": "1.0.0",
"description": "",
"main": "index.js",
"scripts": {
"test": "echo \"Error: no test specified\" && exit 1"
},
"keywords": [],
"author": "",
"license": "ISC"
}
2 、基本项目结构
在根目录新建基本的项目结构:
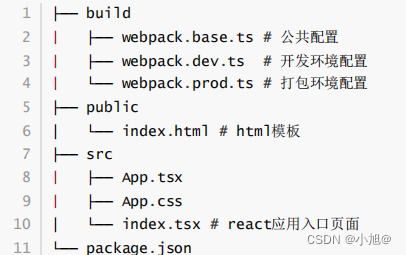
index.html 内容:
<!DOCTYPE html>
<html lang="en">
<head>
<meta charset="UTF-8">
<meta http-equiv="X-UA-Compatible" content="IE=edge">
<meta name="viewport" content="width=device-width, initial-scale=1.0">
<title>webpack5-react-ts</title>
</head>
<body>
<!-- 容器节点 -->
<div id="root"></div>
</body>
</html>
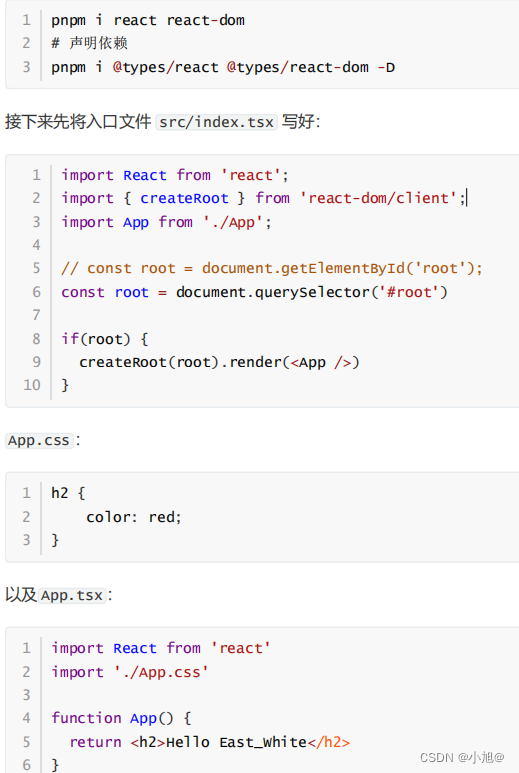
3、 引入react
安装依赖:
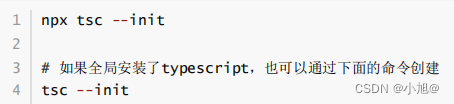
4、 引入typescript

初始化 tsconfig.json :
5、 webpack配置
安装依赖:
pnpm i webpack webpack-cli -D
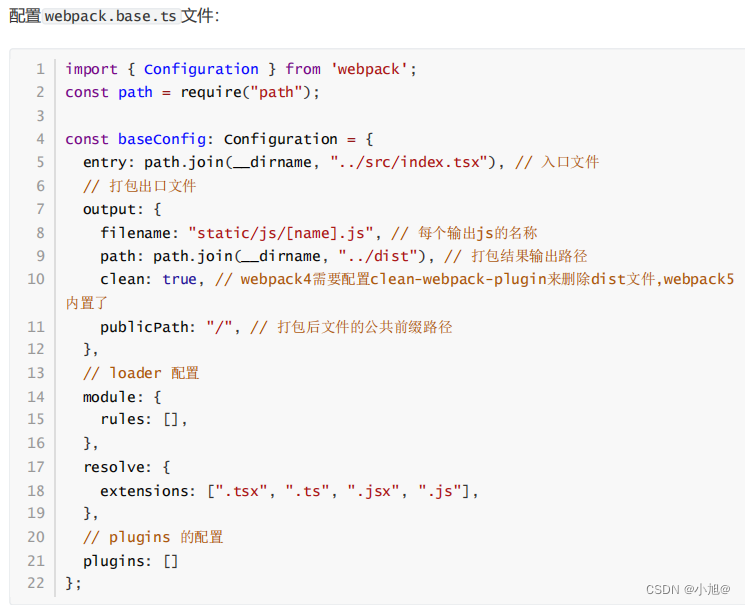
5.1 webpack.base.ts
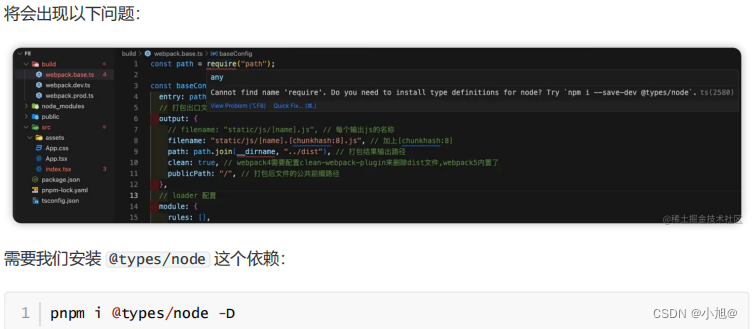
另外因为我们在 App.tsx 中引入了 css 文件,所以还需要安装相关的 loader :
import { Configuration } from "webpack";
import HtmlWebpackPlugin from "html-webpack-plugin";
const path = require("path");
const baseConfig: Configuration = {
entry: path.join(__dirname, "../src/index.tsx"), // 入口文件
// 打包出口文件
output: {
filename: "static/js/[name].js", // 每个输出js的名称
path: path.join(__dirname, "../dist"), // 打包结果输出路径
clean: true, // webpack4需要配置clean-webpack-plugin来删除dist文件,webpack5
内置了
publicPath: "/", // 打包后文件的公共前缀路径
},
// loader 配置
module: {
rules: [
{
test: /.(ts|tsx)$/, // 匹配.ts, tsx文件
use: {
loader: "babel-loader",
options: {
// 预设执行顺序由右往左,所以先处理ts,再处理tsx
presets: [
[
"@babel/preset-env",
{
// 设置兼容目标浏览器版本,也可以在根目录配置.browserslistrc文
件,babel-loader会自动寻找上面配置好的文件.browserslistrc
targets: { browsers: ["> 1%", "last 2 versions", "not ie
<= 8"] },
useBuiltIns: "usage", // 根据配置的浏览器兼容,以及代码中使用到
的api进行引入polyfill按需添加
corejs: 3, // 配置使用core-js使用的版本
loose: true,
},
],
// 如果您使用的是 Babel 和 React 17,您可能需要将 "runtime":
"automatic" 添加到配置中。
// 否则可能会出现错误:Uncaught ReferenceError: React is not
defined
["@babel/preset-react", { runtime: "automatic" }],
"@babel/preset-typescript",
],
},
},
},
{
test: /.css$/, //匹配 css 文件
use: ["style-loader", "css-loader"],
},
],
},
resolve: {
extensions: [".tsx", ".ts", ".jsx", ".js"],
},
// plugins
plugins: [
new HtmlWebpackPlugin({
// 复制 'index.html' 文件,并自动引入打包输出的所有资源(js/css)
template: path.join(__dirname, "../public/index.html"),
// 压缩html资源
minify: {
collapseWhitespace: true, //去空格
removeComments: true, // 去注释
},
}),
],
};
export default baseConfig
因为 webpack.base.ts 文件承载了基本的配置,随着 webpack 做的事情越来越多,会逐渐变得很庞大,我们可以将其中的 babel-loader 相关的配置抽离出来进行管理。在根目录新建babel.config.js :
module.exports = {
// 执行顺序由右往左,所以先处理ts,再处理jsx,最后再试一下babel转换为低版本语法
presets: [
[
"@babel/preset-env",
{
// 设置兼容目标浏览器版本,这里可以不写,babel-loader会自动寻找上面配置好的文
件.browserslistrc
// "targets": {
// "chrome": 35,
// "ie": 9
// },
targets: { browsers: ["> 1%", "last 2 versions", "not ie <= 8"] },
useBuiltIns: "usage", // 根据配置的浏览器兼容,以及代码中使用到的api进行引入
polyfill按需添加
corejs: 3, // 配置使用core-js使用的版本
loose: true,
},
],
// 如果您使用的是 Babel 和 React 17,您可能需要将 "runtime": "automatic" 添加到
配置中。
// 否则可能会出现错误:Uncaught ReferenceError: React is not defined
["@babel/preset-react", { runtime: "automatic" }],
"@babel/preset-typescript",
],
};
然后在 webpack.base.ts 文件中,就可以将 babel-loader 配置简化成:
module: {
rules: [
{
test: /.(ts|tsx)$/, // 匹配.ts, tsx文件
use: "babel-loader"
},
// ...
],
},
5.2 webpack.dev.ts
安装依赖:pnpm i webpack-dev-server webpack-merge -D
接着,配置开发环境配置: webpack.dev.ts
import path from "path";
import { merge } from "webpack-merge";
import { Configuration as WebpackConfiguration } from "webpack";
import { Configuration as WebpackDevServerConfiguration } from "webpack-devserver";
import baseConfig from "./webpack.base";
interface Configuration extends WebpackConfiguration {
devServer?: WebpackDevServerConfiguration;
}
const host = "127.0.0.1";
const port = "8082";
// 合并公共配置,并添加开发环境配置
const devConfig: Configuration = merge(baseConfig, {
mode: "development", // 开发模式,打包更加快速,省了代码优化步骤
devtool: "eval-cheap-module-source-map",
devServer: {
host,
port,
open: true, // 是否自动打开
compress: false, // gzip压缩,开发环境不开启,提升热更新速度
hot: true, // 开启热更新
historyApiFallback: true, // 解决history路由404问题
setupExitSignals: true, // 允许在 SIGINT 和 SIGTERM 信号时关闭开发服务器和退出
进程。
static: {
directory: path.join(__dirname, "../public"), // 托管静态资源public文件夹
},
headers: { "Access-Control-Allow-Origin": "*" }, // HTTP响应头设置,允许任何
来源进行跨域请求
},
});
export default devConfig;
然后在package.json中添加启动脚本:
"scripts": {
"dev": "webpack serve -c build/webpack.dev.ts"
},
只需要在 tsconfig.json 中加入一行 "jsx": "react-jsx" 即可:
{
"compilerOptions": {
"target": "es2016",
"esModuleInterop": true,
"module": "commonjs",
"forceConsistentCasingInFileNames": true,
"strict": true,
"skipLibCheck": true,
"jsx": "react-jsx" // 这里改成react-jsx,就不需要在tsx文件中手动引入React了
},
"include": ["./src"]
}
运行 pnpm run dev 脚本启动项目 ,就可以看到页面跑出来了!
5.3 webpack.prod.ts
配置 webpack.prod.ts :
import { Configuration } from "webpack";
import { merge } from "webpack-merge";
import baseConfig from "./webpack.base";
const prodConfig: Configuration = merge(baseConfig, {
mode: "production", // 生产模式,会开启tree-shaking和压缩代码,以及其他优化
});
export default prodConfig;
在 package.json 中添加:
"scripts": {
// ...
"build": "webpack -c build/webpack.prod.ts"
},
运行 pnpm run build
5.4 copy 静态资源
安装依赖:pnpm i copy - webpack - plugin - D
修改 webpack.base.ts :
const baseConfig: Configuration = {
// ...
plugins: [
new HtmlWebpackPlugin({
title: "webpack5-react-ts",
filename: "index.html",
// 复制 'index.html' 文件,并自动引入打包输出的所有资源(js/css)
template: path.join(__dirname, "../public/index.html"),
inject: true, // 自动注入静态资源
hash: true,
cache: false,
// 压缩html资源
minify: {
removeAttributeQuotes: true,
collapseWhitespace: true, //去空格
removeComments: true, // 去注释
minifyJS: true, // 在脚本元素和事件属性中缩小JavaScript(使用UglifyJS)
minifyCSS: true, // 缩小CSS样式元素和样式属性
}
})
],
};
export default baseConfig;
开发环境已经在 devServer 中配置了 static 托管了 public 文件夹,在开发环境使用绝对路径可以访问
到 public 下的文件,但打包构建时不做处理会访问不到,所以现在需要在打包配置文件
webpack.prod.ts 中新增 copy 插件配置。
import path from "path";
import { Configuration } from "webpack";
import { merge } from "webpack-merge";
import CopyPlugin from "copy-webpack-plugin";
import baseConfig from "./webpack.base";
const prodConfig: Configuration = merge(baseConfig, {
mode: "production", // 生产模式,会开启tree-shaking和压缩代码,以及其他优化
plugins: [
new CopyPlugin({
patterns: [
{
from: path.resolve(__dirname, "../public"), // 复制public下文件
to: path.resolve(__dirname, "../dist"), // 复制到dist目录中
filter: (source) => !source.includes("index.html"), // 忽略
index.html
},
],
}),
],
});
export default prodConfig;6、文件别名
先在 webpack.base.ts 中配置:
resolve: {
extensions: [".ts", ".tsx", ".js", ".jsx", ".less", ".css"],
// 别名需要配置两个地方,这里和 tsconfig.json
alias: {
"@": path.join(__dirname, "../src")
},
},
然后还需要在 tsconfig.json 中配置:
{
"compilerOptions": {
// ...
"baseUrl": ".",
"paths": {
"@/*": ["src/*"]
},
},
}
然后就可以在项目中使用了 ~
import '@/App.css'
function App() {
return <h2>webpack5-react-ts</h2>
}
export default App
腾讯云面向开发者汇聚海量精品云计算使用和开发经验,营造开放的云计算技术生态圈。
更多推荐


 26
26 0
0- 0


 已为社区贡献1条内容

所有评论(0)