ESP32使用外设RMT控制WS2812灯条
ESP32使用外设RMT控制WS2812,官方的库、例程以及使用方法,WS2812颜色渐变程序
目录
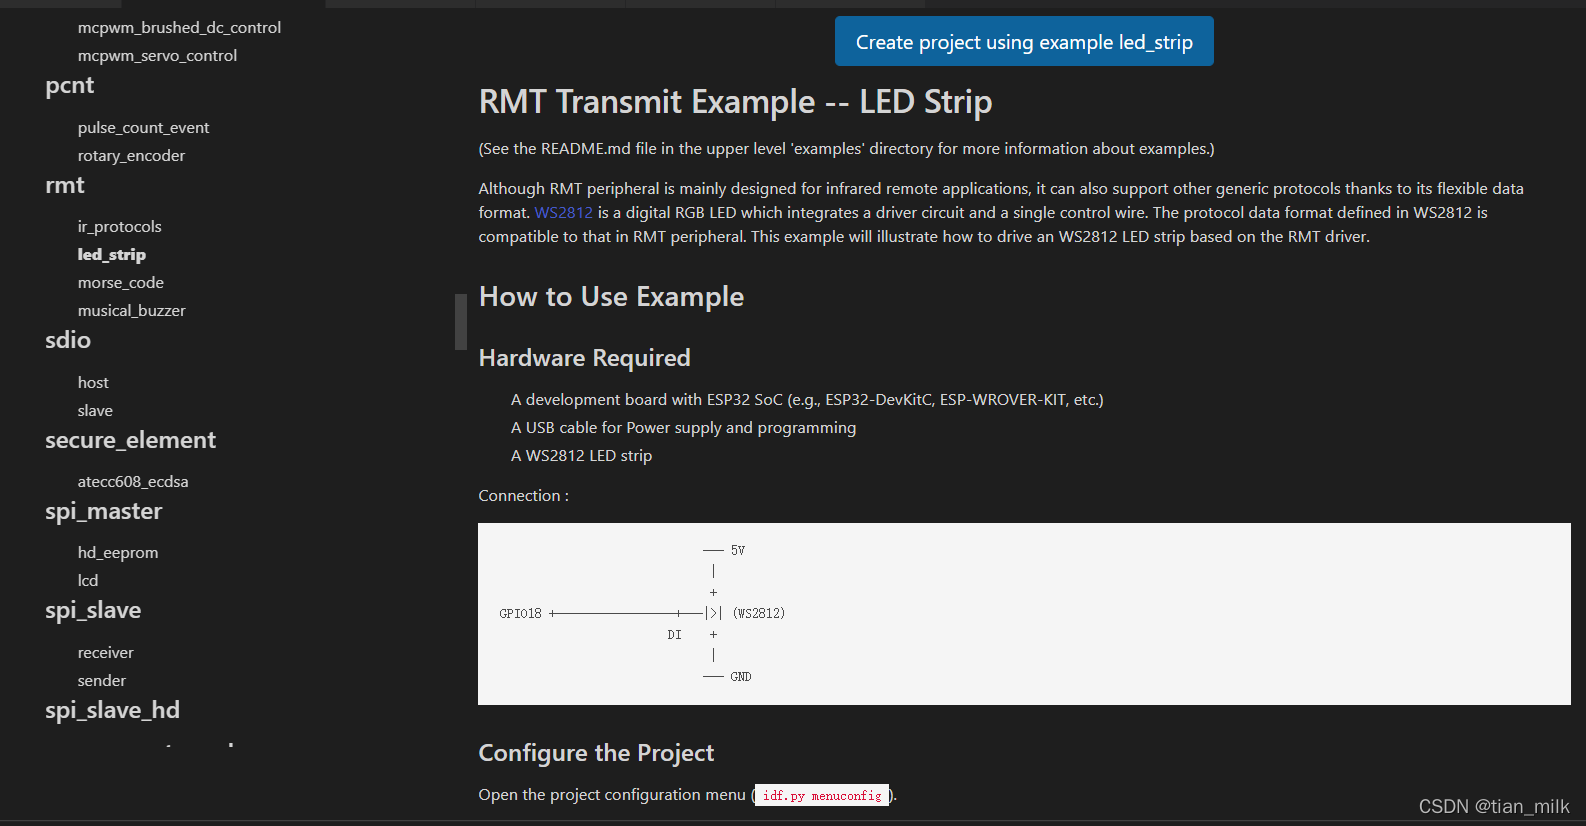
一、简介
官方关于RMT的介绍:RMT(红外遥控器)是一个红外发送/接收控制器, 其特殊设计支持生成各类信号。红外遥控发射器从内置的 RAM(随机存取存储器)区中读取连续的脉冲码, 并对输出信号进行载波调制。尽管RMT外设主要用于远程红外应用,由于其灵活的数据格式,RMT同样可支持其它协议。WS2812是集成了驱动电路和单线控制的数字RGB LED,其协议数据格式兼容于RMT外设。
详细参考:ESP-IDF 编程指南 Remote Control (RMT)
由于RMT的灵活特性,自然也可以编程以用于控制WS2812灯条。
二、所需材料
平台:VScode+ESP-IDF
ESP32开发板 ×1
WS2812灯条 ×1
连接线 若干
三、官方例程
官方给出了相关的库以及相应的参考例程,那只要学会怎么用轮子就可以了。
首先 ctrl+shift+p 打开命令面板,键入 ESP-IDF show examples projects :

打开ESP-IDF example界面,找到 led_strip 例程:
点击 使用例程i2s_adc_dac创建项目就可以了。
四、使用方法
4.1 RMT初始化
对RMT的初始化需要设置 rmt_config_t 中的相关参数,根据官方的说明:
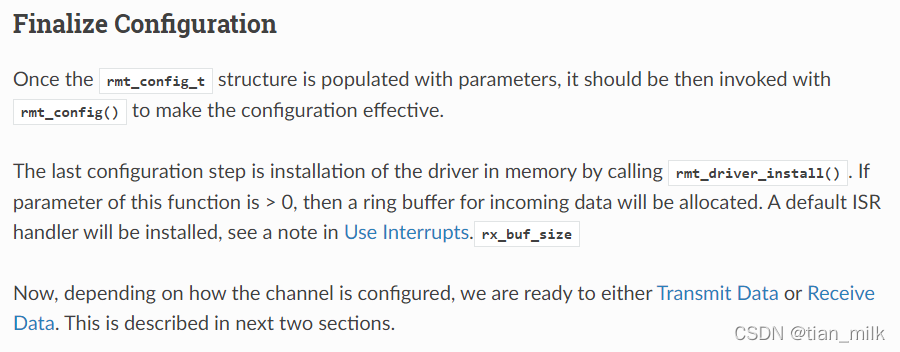
填好相关参数后,需要调用函数 rmt_config() 以使初始化参数有效和函数 rmt_driver_install() 安装驱动。相应代码:
// 使用默认参数填入rmt_config_t结构体
rmt_config_t config = RMT_DEFAULT_CONFIG_TX(CONFIG_EXAMPLE_RMT_TX_GPIO, RMT_TX_CHANNEL);
// 将时钟设置为40MHz
config.clk_div = 2;

// 调用两个函数完成初始化
ESP_ERROR_CHECK(rmt_config(&config));
ESP_ERROR_CHECK(rmt_driver_install(config.channel, 0, 0));
4.2 WS2812初始化
WS2812的初始化简单一点:
// install ws2812 driver 安装ws2812驱动
led_strip_config_t strip_config = LED_STRIP_DEFAULT_CONFIG(CONFIG_EXAMPLE_STRIP_LED_NUMBER, (led_strip_dev_t)config.channel);
led_strip_t *strip = led_strip_new_rmt_ws2812(&strip_config);
if (!strip) {
    ESP_LOGE(TAG, "install WS2812 driver failed");
}
// Clear LED strip (turn off all LEDs)关闭所有ws2812
ESP_ERROR_CHECK(strip->clear(strip, 100));
根据 led_strip_config_t 的定义,该结构体的第一个参数为WS2812灯的数量,第二个参数为RMT的通道值。
/**
* @brief LED Strip Configuration Type
*
*/
typedef struct {
    uint32_t max_leds;   /*!< Maximum LEDs in a single strip */
    led_strip_dev_t dev; /*!< LED strip device (e.g. RMT channel, PWM channel, etc) */
} led_strip_config_t;
这样就完成了初始化,可以开始使用了。
4.3 点亮WS2812
使用 led_strip_s 结构体中的 set_pixel 函数设置各个灯珠的8位RGB值。使用该函数逐一设置每个灯珠的值,灯珠的位置从0开始计数,每调用一次设置一个灯珠。
设置好灯珠颜色后,调用 refresh 函数将颜色更新到灯条上。
/**
* @brief Set RGB for a specific pixel 设置特定灯珠的RGB值
*
* @param strip: LED strip WS2812的结构体
* @param index: index of pixel to set 需要设置的灯的位置下标,从0开始
* @param red: red part of color 红色的值
* @param green: green part of color 绿色的值
* @param blue: blue part of color 蓝色的值
*
* @return
*      - ESP_OK: Set RGB for a specific pixel successfully
*      - ESP_ERR_INVALID_ARG: Set RGB for a specific pixel failed because of invalid parameters
*      - ESP_FAIL: Set RGB for a specific pixel failed because other error occurred
*/
esp_err_t (*set_pixel)(led_strip_t *strip, uint32_t index, uint32_t red, uint32_t green, uint32_t blue);

/**
* @brief Refresh memory colors to LEDs 用内存中的颜色更新LEDs
*
* @param strip: LED strip WS2812的结构体
* @param timeout_ms: timeout value for refreshing task 更新任务超时的值
*
* @return
*      - ESP_OK: Refresh successfully
*      - ESP_ERR_TIMEOUT: Refresh failed because of timeout
*      - ESP_FAIL: Refresh failed because some other error occurred
*
* @note:
*      After updating the LED colors in the memory, a following invocation of this API is needed to flush colors to strip.
*      在更新内存中的LED颜色值后,需要调用该API将颜色更新到灯条上。
*/
esp_err_t (*refresh)(led_strip_t *strip, uint32_t timeout_ms);
简单使用:
uint32_t Green=100, Red=100, Blue=100;
for(int j=0; j < LED_Number; j ++){
    // 设置ws2812的RGB的值
    ESP_ERROR_CHECK(strip->set_pixel(strip, j, Red, Green, Blue));
}

// 给WS2812发送RGB的值
ESP_ERROR_CHECK(strip->refresh(strip, 100));
五、LED颜色渐变
我写了一个颜色渐变的程序,三种颜色的值按照正弦变化,两两错开120°。原理如图
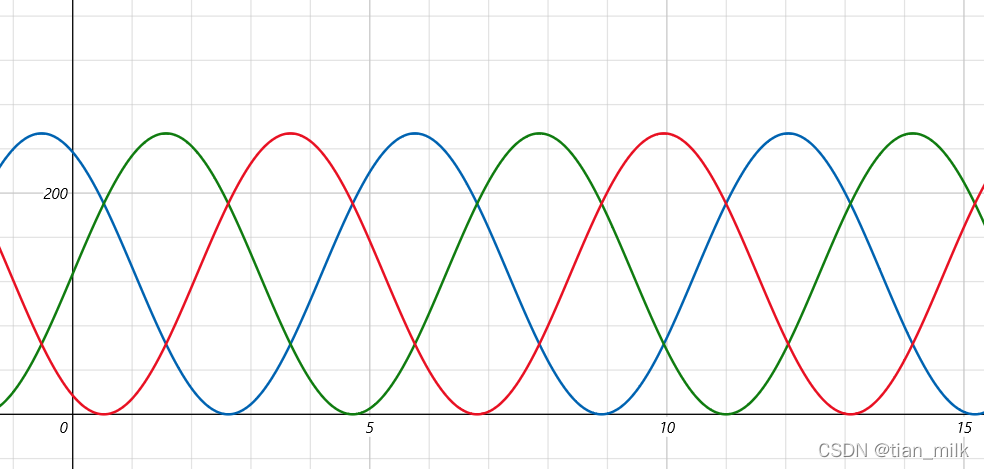
根据这个原理设计程序,LED灯颜色在渐变时的过度就会十分自然。LED所显示的颜色依次为红、橙、黄、绿、靛、紫。
具体代码如下:
5.1 第一种实现方法
第一种方法预先计算好正弦函数的样本值,并存储在一个数组中,然后依次把元素的值作为RGB的值发送给LED灯条,实现颜色渐变效果。
函数声明(放在头文件中):
/**
 * @brief 所有灯颜色渐变效果,注:必须同时包含SinValue[]数组才能使用
 *
 * @param strip LED灯带的结构体
 * @param LED_Number 点亮的LED的数量
 * @param GradualChangeRate LED渐变的速度,数值越大,速度越慢,一般为50
 */
void WS2812B_ColourGradualChange1(led_strip_t *strip,uint16_t LED_Number,uint16_t GradualChangeRate);
函数定义(放在库文件中):
/**
 * @brief sin()函数从0到2π的样本值,一共255个点,最大值为255,最小值为0
 *
 * 离散信号函数:SinValue(k)=(255*sin(2*k*π/255)+255)/2 (四舍五入取整数)
 *
 */
uint8_t  const SinValue[256]={	128,   131,   134,   137,   140,   143,   147,   150,   153,   156,
                                159,   162,   165,   168,   171,   174,   177,   180,   182,   185,
                                188,   191,   194,   196,   199,   201,   204,   206,   209,   211,
                                214,   216,   218,   220,   223,   225,   227,   229,   230,   232,
                                234,   236,   237,   239,   240,   242,   243,   245,   246,   247,
                                248,   249,   250,   251,   252,   252,   253,   253,   254,   254,
                                255,   255,   255,   255,   255,   255,   255,   255,   255,   254,
                                254,   253,   253,   252,   251,   250,   249,   249,   247,   246,
                                245,   244,   243,   241,   240,   238,   237,   235,   233,   231,
                                229,   228,   226,   224,   221,   219,   217,   215,   212,   210,
                                208,   205,   203,   200,   198,   195,   192,   189,   187,   184,
                                181,   178,   175,   172,   169,   166,   163,   160,   157,   154,
                                151,   148,   145,   142,   139,   136,   132,   129,   126,   123,
                                120,   117,   114,   111,   107,   104,   101,    98,    95,    92,
                                89,    86,    83,    80,    77,    74,    72,    69,    66,    63,
                                61,    58,    55,    53,    50,    48,    45,    43,    41,    38,
                                36,    34,    32,    30,    28,    26,    24,    22,    21,    19,
                                17,    16,    14,    13,    12,    10,     9,     8,     7,     6,
                                5,     4,     4,     3,     2,     2,     1,     1,     1,     0,
                                0,     0,     0,     0,     1,     1,     1,     2,     2,     3,
                                3,     4,     5,     6,     6,     7,     9,    10,    11,    12,
                                14,    15,    17,    18,    20,    21,    23,    25,    27,    29,
                                31,    33,    35,    37,    40,    42,    44,    47,    49,    52,
                                54,    57,    59,    62,    65,    67,    70,    73,    76,    79,
                                82,    85,    88,    91,    94,    97,   100,   103,   106,   109,
                                112,   115,   118,   121,   125,   128
};


void WS2812B_ColourGradualChange1(led_strip_t *strip, uint16_t LED_Number, uint16_t GradualChangeRate)
{
    uint32_t Green=0,Red=0,Blue=0;
	uint8_t i,ir,ib;
	for(i=0;i<255;i++)
	{
		ir=i+85;
		ib=i+170;
		Green=SinValue[i];
		Red=SinValue[ir];
		Blue=SinValue[ib];
        for(int j=0; j < LED_Number; j ++){
            // 设置ws2812的RGB的值
            ESP_ERROR_CHECK(strip->set_pixel(strip, j, Red, Green, Blue));
        }

        // 给WS2812发送RGB的值
        ESP_ERROR_CHECK(strip->refresh(strip, 100));
        vTaskDelay(pdMS_TO_TICKS(GradualChangeRate));
	}
}
将代码放在库中便可直接调用。
5.2 第二种实现方法
第二种方法使用 math.h 中的sin()函数,实时计算RGB各自的值,并发送给LED灯条。
函数声明(放在头文件中):
/**
 * @brief 所有灯颜色渐变效果
 *
 * @param strip:LED灯带的结构体
 * @param LED_Number:点亮的LED的数量
 * @param GradualChangeRate:LED渐变的速度,数值越大,速度越慢,一般为50
 */
void WS2812B_ColourGradualChange2(led_strip_t *strip,uint16_t LED_Number,uint16_t GradualChangeRate);
函数定义(放在库文件中):
// 必须包含math.h库
#include <math.h>

void WS2812B_ColourGradualChange2(led_strip_t *strip,uint16_t LED_Number,uint16_t GradualChangeRate)
{
    uint32_t Green=0,Red=0,Blue=0;
    for(uint16_t i=0; i<628; i++)
    {
        // 使用sin()函数分别计算三原色的值
        Green = (int)(127*sin(i/100.0)+127);
        Red = (int)(127*sin((i+209.3)/100)+127);
        Blue = (int)(127*sin((i+418.7)/100)+127);
        for(int j=0; j < LED_Number; j ++){
            // 设置ws2812的RGB的值
            ESP_ERROR_CHECK(strip->set_pixel(strip, j, Red, Green, Blue));
        }

        // 给WS2812发送RGB的值
        ESP_ERROR_CHECK(strip->refresh(strip, 100));
        vTaskDelay(pdMS_TO_TICKS(GradualChangeRate));
    }
}
两种实现方法的效果差别不大
5.3 彩虹跑马灯
依旧使用前述原理实现彩虹跑马灯效果,每个灯的颜色均不同。
函数声明(放在头文件中):
/**
 * @brief 彩虹跑马灯效果
 *
 * @param strip:LED灯带的结构体
 * @param LED_Number:点亮的LED的数量
 * @param GradualChangeRate:LED渐变的速度,数值越大,速度越慢,一般为50
 */
void WS2812B_TrottingHorseLamp1(led_strip_t *strip,uint16_t LED_Number,uint16_t GradualChangeRate);
函数定义(放在库文件中):
void WS2812B_TrottingHorseLamp1(led_strip_t *strip, uint16_t LED_Number, uint16_t GradualChangeRate)
{
    uint32_t Green=0,Red=0,Blue=0;
	uint8_t i,ir,ib;
	for(i=0;i<256;i++)
	{
		ir=i+85;
		ib=i+170;
        for(int j=0; j < LED_Number; j ++){
            // 根据灯珠的位置计算RGB的值
		    Green = SinValue[(i+10*j)%256];
		    Red = SinValue[(ir+10*j)%256];
		    Blue = SinValue[(ib+10*j)%256];
            // 设置ws2812的RGB的值
            ESP_ERROR_CHECK(strip->set_pixel(strip, j, Red, Green, Blue));
        }

        // 给WS2812发送RGB的值
        ESP_ERROR_CHECK(strip->refresh(strip, 100));
        vTaskDelay(pdMS_TO_TICKS(GradualChangeRate));
	}
}
这样便可实现平滑的彩虹跑马灯效果。

腾讯云面向开发者汇聚海量精品云计算使用和开发经验,营造开放的云计算技术生态圈。
更多推荐


 20
20 0
0- 0


 已为社区贡献1条内容

所有评论(0)