CentOS Stream 9 中部署 MySQL 8.0 MGR(MySQL Group Replication)一主两从高可用集群
当你上线一个数据库服务时,最怕的是什么?当然是——挂了!所以,我们需要让数据库高可用(High Availability),简单说就是:“就算有节点崩了,服务也不能停!那 MySQL 有哪些高可用的方案呢?我们来一一介绍。1 主从复制(经典老搭档)????原理:一个主库(Master)负责写,多个从库(Slave)负责读,通过二进制日志(binlog)同步数据。??优点架构简单,上手快性能可接受,
目录
一、前言
1、MySQL 8.0 中的高可用方案
当你上线一个数据库服务时,最怕的是什么?当然是——挂了!
所以,我们需要让数据库 高可用(High Availability),简单说就是:
“就算有节点崩了,服务也不能停!”
那 MySQL 有哪些高可用的方案呢?我们来一一介绍。
1 主从复制(经典老搭档)??
?? 原理:一个主库(Master)负责写,多个从库(Slave)负责读,通过 二进制日志(binlog)同步数据。
?? 优点:
-
架构简单,上手快
-
性能可接受,读写分离效果好
缺点:
-
没有自动故障转移(主挂了就得手动切)
-
延迟不可避免(主从延迟问题)
?? 通俗说法:
“老大干活,小弟抄笔记??。老大病倒了,小弟要等人吩咐才能接手。”
2 MySQL InnoDB Cluster(基于 MGR)??
?? 原理:MySQL 8.0 官方推出的高可用方案,基于 Group Replication(MGR),多个节点之间通过组协议互相复制,保持一致性。
?? 优点:
-
官方支持,紧跟版本
-
支持自动故障转移(Single Primary 模式)
-
数据强一致性(保证写入顺序)
缺点:
-
写入冲突需要处理(多主模式下尤为严重)
-
对网络延迟敏感
-
配置复杂度高于主从
?? 通俗说法:
“兄弟三人轮流做老大??,有规则决定谁上。兄弟有事,其他人自动接班,不用吩咐??。”
3 MHA(MySQL High Availability)??
?? 原理:由 Perl 脚本组成的主从复制管理器,能自动检测主库是否宕机,并迅速提升某个从库为新主。
?? 优点:
-
成熟稳定,广泛使用
-
可自动主从切换
缺点:
-
依赖外部监控与管理节点
-
依然是主从架构,存在数据延迟风险
-
项目已停止更新(社区维护中)
?? 通俗说法:
“一个看门人??不停盯着老大,一旦倒下,赶紧推个新老大上位。”

4 Galera Cluster(三强联盟)??
?? 原理:多主同步复制(multi-master synchronous replication),所有节点都可以读写,数据写入同步确认。
?? 优点:
-
每个节点都能写(真正多主)
-
同步复制,强一致性
缺点:
-
网络要求高,对时延非常敏感
-
复杂度高,不适合大批量写入业务
?? 通俗说法:
“三个老大同时写作业??,但必须每次都核对答案,才能交上去。”
5 ProxySQL + MGR / 主从(代理接力棒)??
?? 原理:通过 ProxySQL 把数据库访问做中间层代理,实现读写分离、故障转移等功能。
?? 优点:
-
灵活控制流量
-
可以和多种架构组合
-
支持连接池、SQL 规则分发
缺点:
-
需要额外组件维护
-
配置略复杂
?? 通俗说法:
“在你和数据库之间加个智商超高的中间人??,谁有能力他就安排谁来处理。”

2、适用场景
1 主从复制(经典老将)??
适用场景:
-
?? 内容管理系统、博客、论坛等中小型网站
-
?? 对写入要求不高,读多写少
-
?? 开发测试环境,数据可容忍一定延迟
2 MGR(MySQL Group Replication)??【官方推荐】
适用场景:
-
?? 银行、支付、电商等核心系统
-
?? 不能丢数据、强一致性要求
-
?? 需要自动故障转移、无需人工干预
3 MHA(MySQL High Availability)??【经典成熟方案】
适用场景:
-
?? 传统企业系统
-
使用已有主从架构,想补上自动故障转移
-
?? 中小型业务但需要保障主库稳定运行
4 Galera Cluster(真正多主)??
适用场景:
-
?? 跨地域写入需求
-
??? 同步数据共享协作系统(如 CRM、OA)
-
?? 高并发小事务业务(例如即时通信、IoT 数据采集)
5 MySQL + ProxySQL + Keepalived(高自由组合)??
适用场景:
-
?? 多读多写复杂业务
-
?? 自定义路由规则、SQL 中间件优化
-
?? 大型集群 + 运维自动化场景
?? 总结对比表
模式
自动选主
强一致性
多主写
网络要求
适合场景
主从复制
(需 MHA)
低
读多写少系统、小网站
MGR(单主)
中
金融、电商、核心服务
MGR(多主)
高
冲突可控的小事务系统
MHA
(主库)
中
主从架构增强容灾
Galera Cluster
很高
全球分布式写入业务
ProxySQL 组合
(配合 VIP)
视后端而定
取决于后端
中
高并发多维读写系统

二、环境准备
1、系统环境说明
- **MySQL高可用模式:**Group Replication(MGR)
- **MySQL版本:**8.0.42
- **操作系统:**Centos Stream 9
2、主机规划
这里我们使用3台Centos Stream 9 服务器,一主两从

3、系统基础配置
关闭SELinux、关闭防火墙,
3台机器配置时钟同步,确保时间一致
添加hosts记录
vim /etc/hosts
# 添加如下内容
192.168.40.121 mysql1
192.168.40.122 mysql2
192.168.40.123 mysql3
三、高可用搭建
1、安装MySQL
添加YUM仓库,三台机器上分别执行:
rpm -Uvh https://dev.mysql.com/get/mysql80-community-release-el9-1.noarch.rpm
安装mysql-server,三台机器上分别执行:
dnf install mysql-community-server -y
如果出现以下错误:
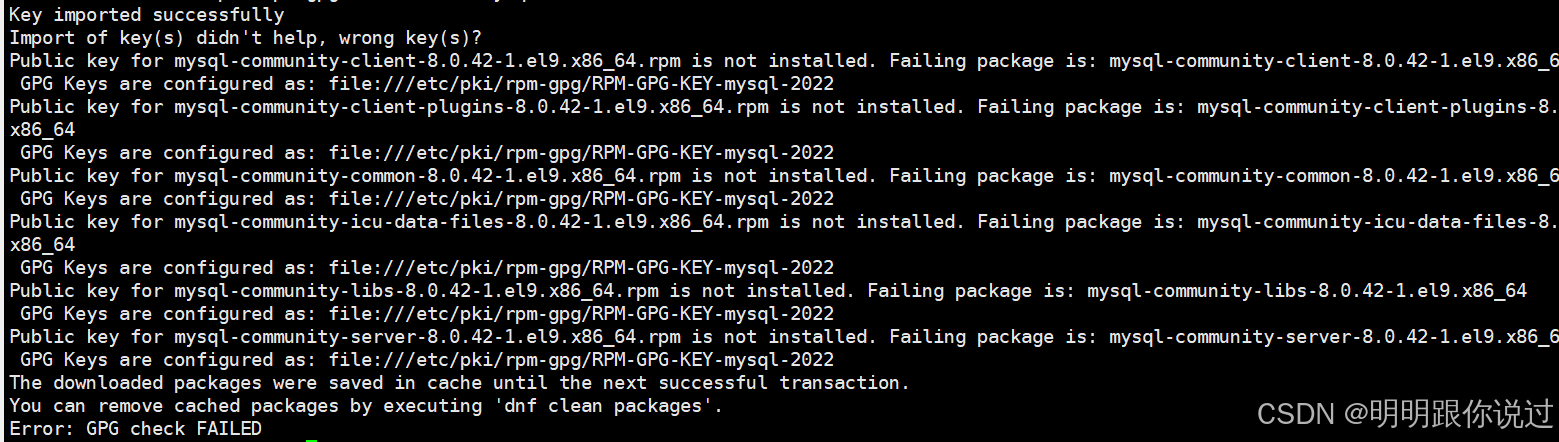
则执行这条命令:
rpm --import https://repo.mysql.com/RPM-GPG-KEY-mysql-2023
然后再次安装:
dnf install mysql-community-server -y
2、启动MySQL
执行以下命令,启动MySQL服务,三台都要执行
systemctl start mysqld
获取临时密码:
grep 'temporary password' /var/log/mysqld.log
运行安全配置向导:
mysql_secure_installation

[root@mysql1 log]# mysql_secure_installation

Securing the MySQL server deployment.

Enter password for user root:
The 'validate_password' component is installed on the server.
The subsequent steps will run with the existing configuration
of the component.
Using existing password for root.

# 是否修改root密码
Estimated strength of the password: 100
Change the password for root ? ((Press y|Y for Yes, any other key for No) : n

 ... skipping.
By default, a MySQL installation has an anonymous user,
allowing anyone to log into MySQL without having to have
a user account created for them. This is intended only for
testing, and to make the installation go a bit smoother.
You should remove them before moving into a production
environment.

# 是否删除匿名用户
Remove anonymous users? (Press y|Y for Yes, any other key for No) : y
Success.
Normally, root should only be allowed to connect from
‘localhost’. This ensures that someone cannot guess at
the root password from the network.
# 是否禁用Root用户远程登录
Disallow root login remotely? (Press y|Y for Yes, any other key for No) : n

 ... skipping.
By default, MySQL comes with a database named 'test' that
anyone can access. This is also intended only for testing,
and should be removed before moving into a production
environment.
# 是否删除测试数据库
Remove test database and access to it? (Press y|Y for Yes, any other key for No) : y
- Dropping test database…
Success.
 - Removing privileges on test database...
Success.

Reloading the privilege tables will ensure that all changes
made so far will take effect immediately.

# 是否刷新权限表
Reload privilege tables now? (Press y|Y for Yes, any other key for No) : y
Success.

All done!
3、修改配置文件
mysql1:
vim /etc/my.cnf

# 添加以下内容
server_id=1
gtid_mode=ON
enforce_gtid_consistency=ON
master_info_repository=TABLE
relay_log_info_repository=TABLE
transaction_write_set_extraction=XXHASH64
log_slave_updates=ON
log_bin=binlog
binlog_format=ROW
report_host=mysql1
auto_increment_increment=3
auto_increment_offset=2

plugin-load=group_replication.so
group_replication_group_name="aaaaaaaa-bbbb-cccc-dddd-eeeeeeeeeeee"
group_replication_local_address="192.168.40.121:33061"
group_replication_group_seeds="192.168.40.121:33061,192.168.40.122:33061,192.168.40.123:33061"
group_replication_bootstrap_group=OFF
group_replication_single_primary_mode=ON
group_replication_start_on_boot=ON
group_replication_enforce_update_everywhere_checks=OFF
mysql2:
vim /etc/my.cnf

# 添加以下内容
server_id=2
gtid_mode=ON
enforce_gtid_consistency=ON
master_info_repository=TABLE
relay_log_info_repository=TABLE
transaction_write_set_extraction=XXHASH64
log_slave_updates=ON
log_bin=binlog
binlog_format=ROW
report_host=mysql2
auto_increment_increment=3
auto_increment_offset=2

plugin-load=group_replication.so
group_replication_group_name="aaaaaaaa-bbbb-cccc-dddd-eeeeeeeeeeee"
group_replication_local_address="192.168.40.122:33061"
group_replication_group_seeds="192.168.40.121:33061,192.168.40.122:33061,192.168.40.123:33061"
group_replication_bootstrap_group=OFF
group_replication_single_primary_mode=ON
group_replication_start_on_boot=ON
group_replication_enforce_update_everywhere_checks=OFF
mysql3:
vim /etc/my.cnf

# 添加以下内容
server_id=3
gtid_mode=ON
enforce_gtid_consistency=ON
master_info_repository=TABLE
relay_log_info_repository=TABLE
transaction_write_set_extraction=XXHASH64
log_slave_updates=ON
log_bin=binlog
binlog_format=ROW
report_host=mysql3
auto_increment_increment=3
auto_increment_offset=2

plugin-load=group_replication.so
group_replication_group_name="aaaaaaaa-bbbb-cccc-dddd-eeeeeeeeeeee"
group_replication_local_address="192.168.40.123:33061"
group_replication_group_seeds="192.168.40.121:33061,192.168.40.122:33061,192.168.40.123:33061"
group_replication_bootstrap_group=OFF
group_replication_single_primary_mode=ON
group_replication_start_on_boot=ON
group_replication_enforce_update_everywhere_checks=OFF
基础配置部分:
server_id=1
- 当前 MySQL 实例的唯一标识,在复制集群中必须唯一。
gtid_mode=ON
enforce_gtid_consistency=ON
- 启用 GTID(全局事务标识)模式,并强制一致性,GTID 是 Group Replication 所必需的。
master_info_repository=TABLE
relay_log_info_repository=TABLE
- 使用表而非文件来存储主服务器和中继日志信息,便于管理与容灾恢复。
transaction_write_set_extraction=XXHASH64
- 启用事务写集提取(必须的配置),用来检测冲突,推荐使用 XXHASH64。
log_slave_updates=ON
- 表示从库接收到主库事务后,也会记录 binlog,这对多主架构(如 Group Replication)是必须的。
log_bin=binlog
binlog_format=ROW
- 启用二进制日志,并使用 ROW 格式(记录每一行的变化,适合复制)。
report_host=mysql1
- 当前节点在复制架构中的标识名,用于其他节点识别它(建议填写主机名或 IP)。
auto_increment_increment=3
auto_increment_offset=2
- 多主节点避免自动递增主键冲突的关键参数:
- 例如 3 个节点时,节点1 offset=1,节点2 offset=2,节点3 offset=3,这样每个节点产生的自增 ID 就不会冲突。
Group Replication 配置部分:
plugin-load=group_replication.so
- 加载 Group Replication 插件。
group_replication_group_name=“aaaaaaaa-bbbb-cccc-dddd-eeeeeeeeeeee”
- 集群的全局唯一 ID(UUID),所有节点必须一致。
group_replication_local_address=“192.168.40.121:33061”
- 当前节点用于与其他节点通信的地址和端口(33061 是默认的 group_replication 通信端口)。
group_replication_group_seeds=“192.168.40.121:33061,192.168.40.122:33061,192.168.40.123:33061”
- 所有节点的通信地址列表,用于节点之间互相发现。
group_replication_bootstrap_group=OFF
- 表示当前节点不是首次启动集群的引导节点。首次搭建集群时,在其中一个节点上设置为 ON 启动一次,然后改回 OFF。
group_replication_single_primary_mode=ON
- 表示开启单主模式(Single Primary Mode),只有一个节点对外提供读写服务,其余为只读。
group_replication_start_on_boot=ON
- 启动 MySQL 服务时自动启动 Group Replication。
group_replication_enforce_update_everywhere_checks=OFF
- 如果是多主模式(Multi-Primary),这个值需要设为 ON。但当前为单主模式,所以设为 OFF。
重启MySQL,三台全部执行
systemctl restart mysqld
4、配置高可用
分别登录到3台MySQL上面
[root@mysql log]# mysql -uroot -p
Enter password:
Welcome to the MySQL monitor.  Commands end with ; or g.
Your MySQL connection id is 22
Server version: 8.0.42 MySQL Community Server - GPL

Copyright (c) 2000, 2025, Oracle and/or its affiliates.

Oracle is a registered trademark of Oracle Corporation and/or its
affiliates. Other names may be trademarks of their respective
owners.

Type 'help;' or 'h' for help. Type 'c' to clear the current input statement.
创建数据同步账户(三台都要执行)
CREATE USER rpl_user@'%' IDENTIFIED BY '****************';
GRANT REPLICATION SLAVE ON *.* TO rpl_user@'%';
ALTER USER 'rpl_user'@'%' IDENTIFIED WITH mysql_native_password BY '****************';
RESET MASTER;
指定主从账户与指定通信频道(两台从节点执行)
CHANGE MASTER TO MASTER_USER="rpl_user", MASTER_PASSWORD="****************" FOR CHANNEL 'group_replication_recovery';
启动复制组(主节点执行)
SET GLOBAL group_replication_bootstrap_group=ON;
START GROUP_REPLICATION;
SET GLOBAL group_replication_bootstrap_group=OFF;
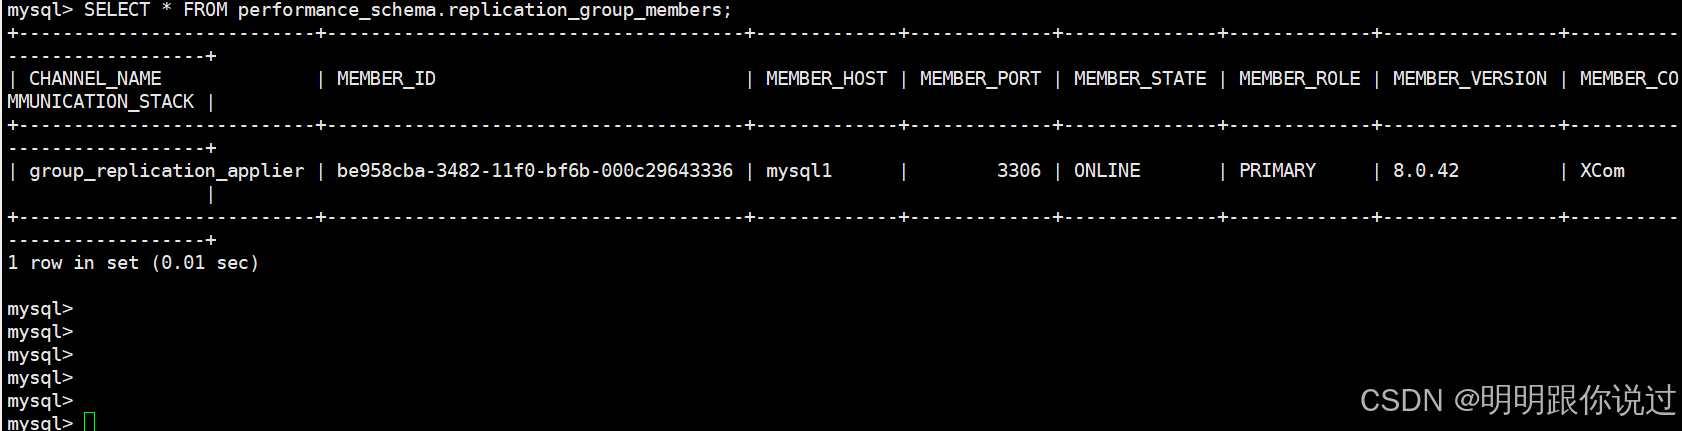
检查状态(主节点执行)
如果显示 ONLINE 则启动成功
SELECT * FROM performance_schema.replication_group_members;
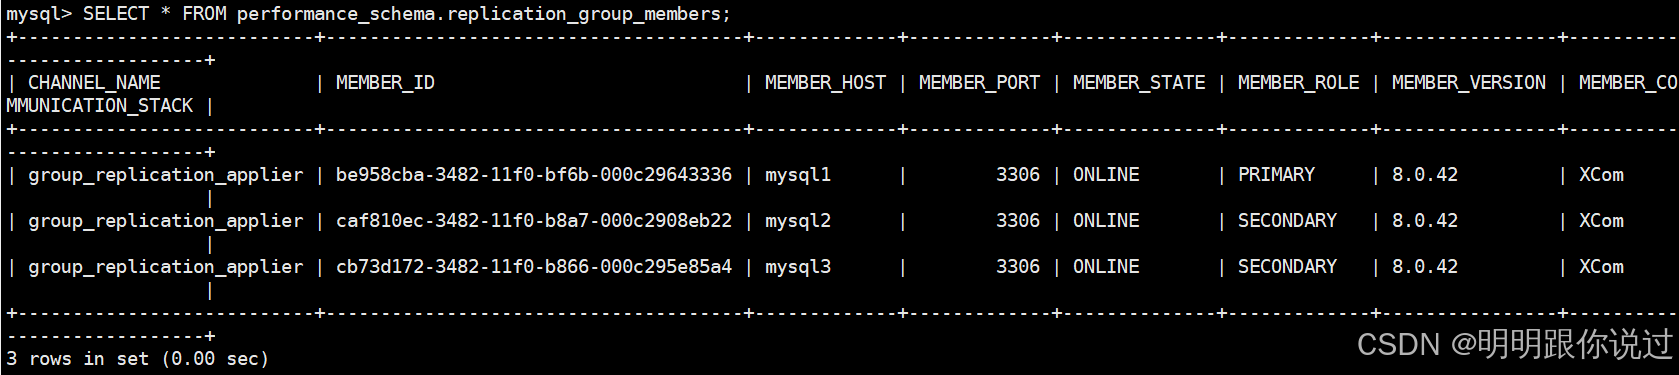
将两台从节点加入复制组(两台从节点执行)
START GROUP_REPLICATION;
检查状态(任意节点执行),如果全部显示 ONLINE 则启动成功
5、高可用测试
将主节点mysql1关机,然后查看集群状态
可以看到主节点已经从mysql1变成了mysql2

此时虽然挂了一个节点,但是MySQL集群仍可以继续访问
6、集群恢复
接下来将mysql1重新开机,观察集群状态,可以看到mysql1并没有自动加入集群,此时就需要我们手动恢复
登录到mysql1,执行以下命令,指定复制用户和密码
CHANGE REPLICATION SOURCE TO SOURCE_USER='rpl_user', SOURCE_PASSWORD='****************' FOR CHANNEL 'group_replication_recovery';
START GROUP_REPLICATION;
再次检查,可以看到,mysql1已经处于 ONLINE 状态,集群恢复正常


腾讯云面向开发者汇聚海量精品云计算使用和开发经验,营造开放的云计算技术生态圈。
更多推荐
 8
8 0
0- 0


 已为社区贡献1条内容

所有评论(0)