c++类函数代码打包成dll及其如何调用
调用c++ dll类库
目录
1. 调用dll时需要头文件形式
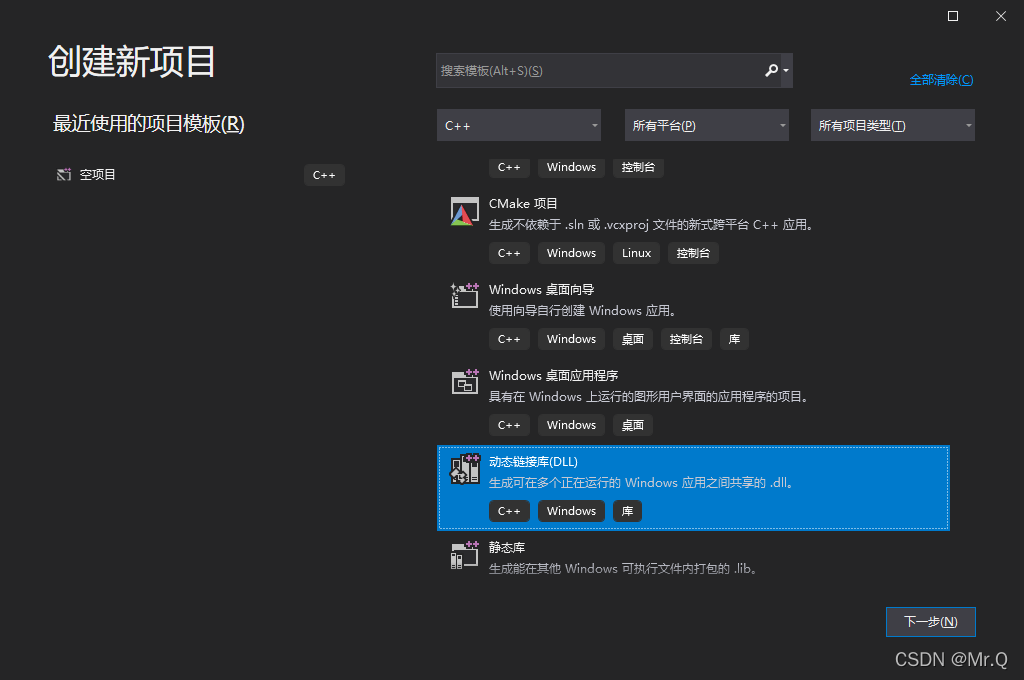
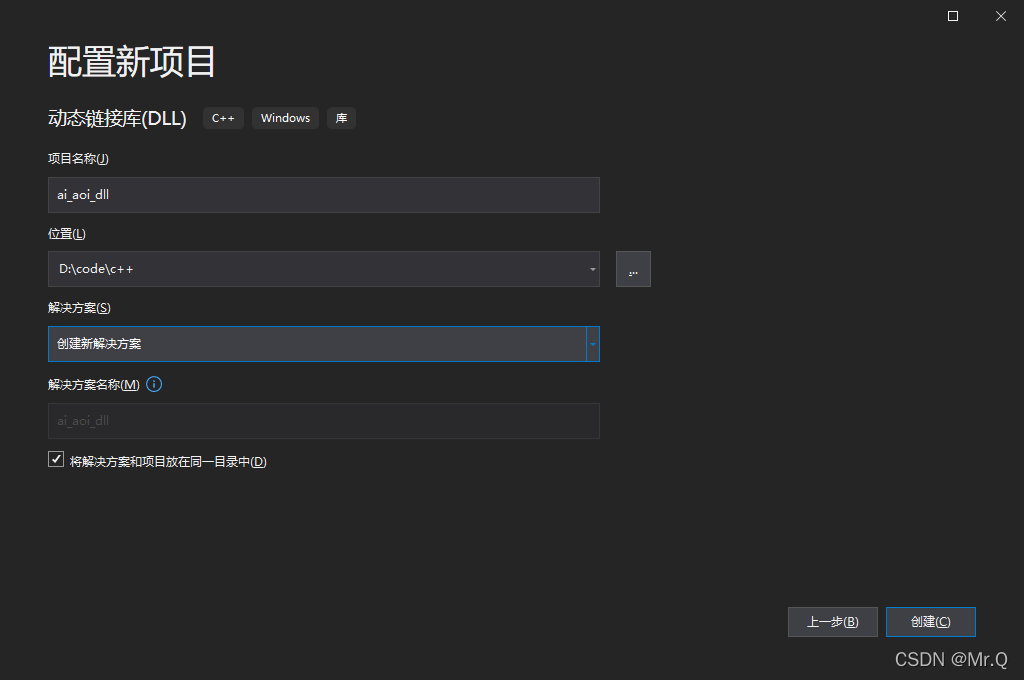
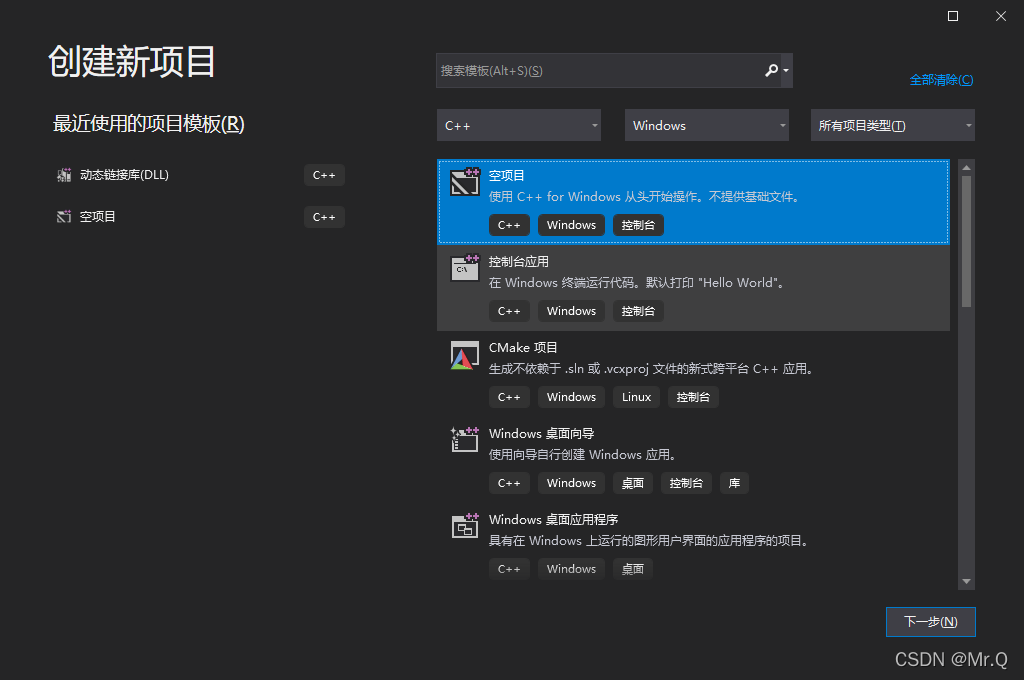
1.1 创建动态链接库 (DLL) 项目
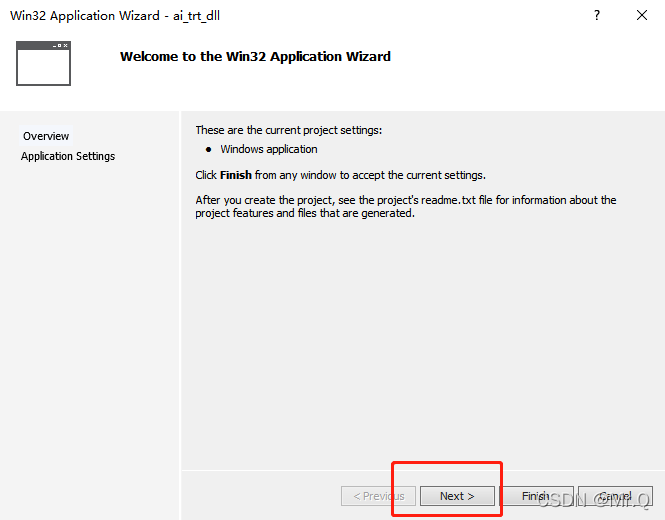
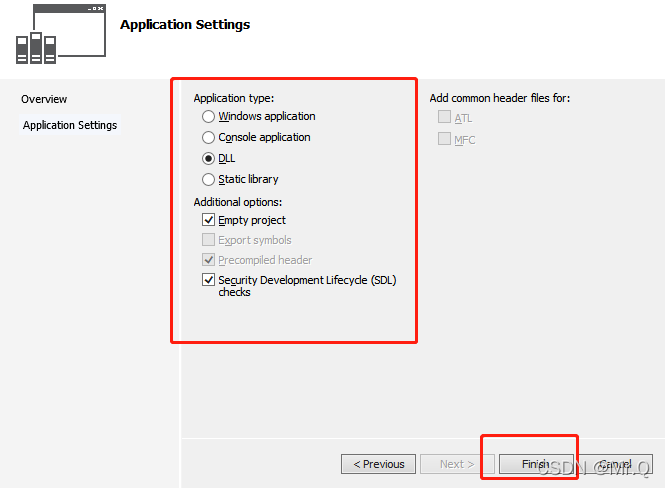
vs2019创建方式
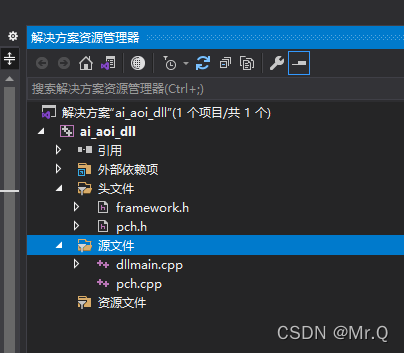
生成的文件如下所示。
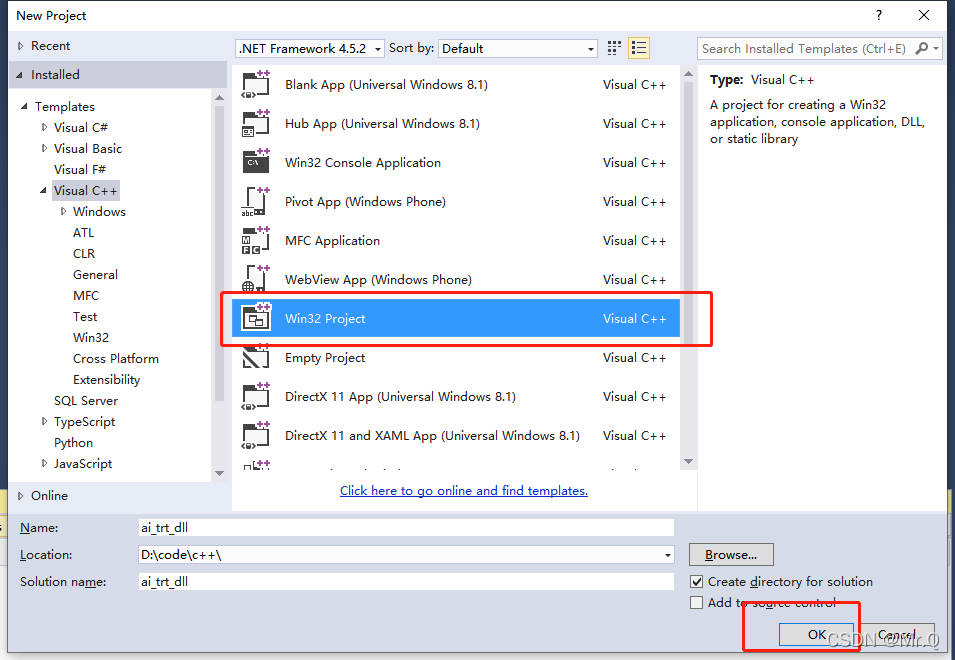
vs2015创建方式:
1.2. 向动态链接库添加类
1. 若要为新类创建头文件,请在菜单栏上,依次选择**“项目”、“添加新项”。 在“添加新项”对话框的左窗格中,在“Visual C++”下选择“代码”。 在中间窗格中,选择“头文件(.h)”。 为头文件指定名称(例如 MathFuncsDLL.h),然后选择“添加”**按钮。 将显示一个空白头文件。
2. 将以下代码添加到头文件
#pragma once
// MathFuncsDll.h
#include <iostream>
#include <opencv2/core/core.hpp>
#include <opencv2/highgui/highgui.hpp>
#include <opencv2/opencv.hpp>
#include <opencv2/imgproc/imgproc.hpp>

//
//#ifdef MATHFUNCSDLL_EXPORTS
//#define MATHFUNCSDLL_API __declspec(dllexport)
//#else
//#define MATHFUNCSDLL_API __declspec(dllimport)
//#endif

// 添加一个名为 MyMathFuncs 的基类,以执行常见的算术运算(例如加、减、乘和除)。 代码应类似如下
namespace MathFuncs
{
    // This class is exported from the MathFuncsDll.dll
    class MyMathFuncs
    {
    public:
        // Returns a + b
        static __declspec(dllexport) double Add(double a, double b);

        // Returns a - b
        static __declspec(dllexport) double Subtract(double a, double b);

        // Returns a * b
        static __declspec(dllexport) double Multiply(double a, double b);

        // Returns a / b
        // Throws const std::invalid_argument& if b is 0
        static __declspec(dllexport) double Divide(double a, double b);

        static __declspec(dllexport) bool testBuildOpencvDLL(cv::Mat& imgInput, cv::Mat& imgOutput);

    };
}
3. 实现源文件中 MyMathFuncs 的功能。 代码应类似如下。
//#include "stdafx.h"
#include "pch.h"
#include "MathFuncsDLL.h"
#include <stdexcept>

using namespace std;

// Defines the exported functions for the DLL application.

namespace MathFuncs
{
    double MyMathFuncs::Add(double a, double b)
    {
        return a + b;
    }

    double MyMathFuncs::Subtract(double a, double b)
    {
        return a - b;
    }

    double MyMathFuncs::Multiply(double a, double b)
    {
        return a * b;
    }

    double MyMathFuncs::Divide(double a, double b)
    {
        if (b == 0)
        {
            throw invalid_argument("b cannot be zero!");
        }

        return a / b;
    }

    bool MyMathFuncs::testBuildOpencvDLL(cv::Mat& imgInput, cv::Mat& imgOutput)
    {
        cv::cvtColor(imgInput, imgOutput, cv::COLOR_BGR2RGB);
        return false;
    }


}
4. 右键项目,设为启动项目,然后通过在菜单栏上依次选择**“生成”、“生成解决方案”**来编译动态链接库。
1.3. 调用 DLL
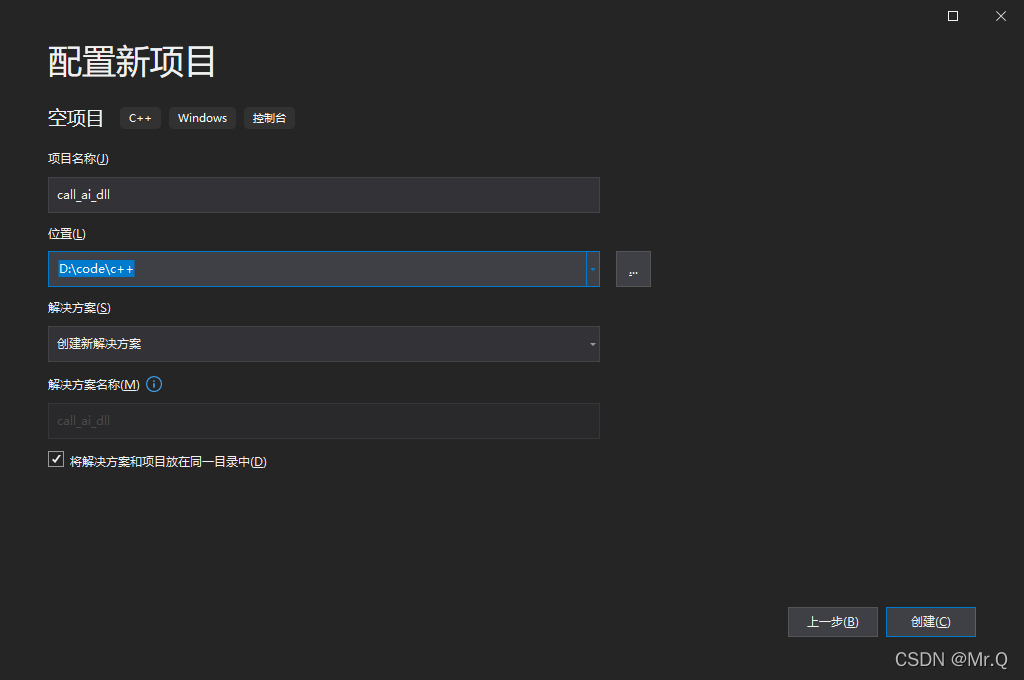
1)新建项目,命名。
2)调用dll内的类函数,cpp文件内容如下。
#include <iostream>
#include "MathFuncsDLL.h"

#include <iostream>
#include <iostream>
#include <opencv2/core/core.hpp>
#include <opencv2/highgui/highgui.hpp>
#include <opencv2/opencv.hpp>
//#include <opencv2/objdetect/objdetect.hpp>
#include <opencv2/imgproc/imgproc.hpp>


using namespace std;

int main()
{
    double a = 7.4;
    int b = 99;

    cout << "a + b = " <<
        MathFuncs::MyMathFuncs::Add(a, b) << endl;
    cout << "a - b = " <<
        MathFuncs::MyMathFuncs::Subtract(a, b) << endl;
    cout << "a * b = " <<
        MathFuncs::MyMathFuncs::Multiply(a, b) << endl;
    cout << "a / b = " <<
        MathFuncs::MyMathFuncs::Divide(a, b) << endl;

    try
    {
        cout << "a / 0 = " <<
            MathFuncs::MyMathFuncs::Divide(a, 0) << endl;
    }
    catch (const invalid_argument& e)
    {
        cout << "Caught exception: " << e.what() << endl;
    }


    cv::Mat src = cv::imread("gu.jpg");
    cv::imshow("src img", src);
    cv::Mat dst;
    MathFuncs::MyMathFuncs::testBuildOpencvDLL(src, dst);
    cv::imshow("dst img", dst);
    cv::waitKey(0);
    return 0;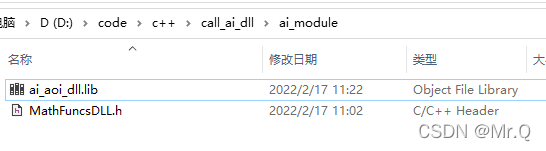
}3)包含上面保存的要被调用的头文件MathFuncsDLL.h和库文件ai_aoi_dll.lib,设置包含路径:
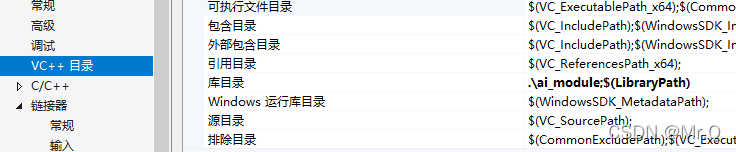
a. 项目-》属性-》VC++目录-》库目录-》指定ai_aoi_dll.lib文件的位置路径:
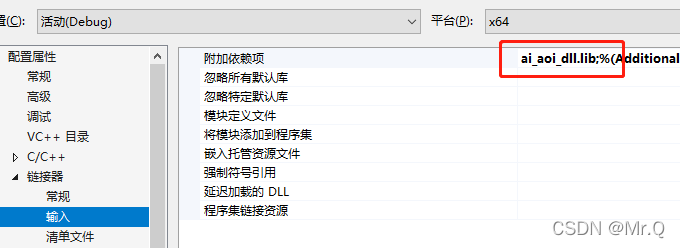
b. 配置属性->连接器-输入-附加依赖项-编辑加入lib的文件名(全名包含后缀)-确认
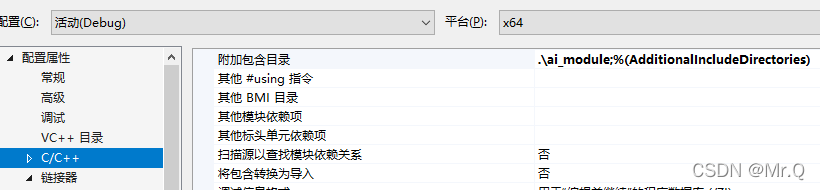
c. 项目-》属性-》C/C++-》附加包含目录-》指定 MathFuncsDll.h 头文件的位置路径:
4)将dll文件拷贝到debug文件夹下,与exe文件是同一个文件夹
5)生成,运行即可
参考:
 https://docs.microsoft.com/zh-cn/previous-versions/ms235636(v=vs.120)?redirectedfrom=MSDN
2. 直接路径调用dll,不使用头文件
2.1 创建类及其头文件
假设你有一个名为 MyClass 的简单类,并定义在 myclass.h 头文件中:
// myclass.h
#pragma once

#ifdef MYCLASS_EXPORTS
#define MYCLASS_API __declspec(dllexport)
#else
#define MYCLASS_API __declspec(dllimport)
#endif

class MYCLASS_API MyClass {
public:
    MyClass();
    int add(int a, int b);
};
2.2 实现类的方法
在 myclass.cpp 文件中实现类的方法:
// myclass.cpp
#include "myclass.h"

MyClass::MyClass() {
    // constructor implementation
}

int MyClass::add(int a, int b) {
    return a + b;
}
2.3 导出DLL
在你的项目中设置宏 MYCLASS_EXPORTS,以便在编译DLL时正确导出符号。在Visual Studio中,你可以在项目属性中设置宏。
2.4 编译为DLL
将 myclass.h 和 myclass.cpp 编译为DLL。确保在链接时正确指定导入库。在Visual Studio中,你可以选择 "DLL" 作为项目类型。
2.5 使用DLL
在其他项目中,你可以简单地调用DLL中的方法,无需包含头文件。只需在调用时声明类,并在链接时链接导入库即可:
// main.cpp
#include <iostream>
#include <Windows.h>  // 或者使用 #include <dllheader.h>

int main() {
    HMODULE dllHandle = LoadLibrary(L"YourDllName.dll");  // 加载DLL

    if (dllHandle) {
        // 声明类
        class MyClass {
        public:
            typedef int(__cdecl* ADD_FUNCTION)(int, int);
            ADD_FUNCTION add;

            MyClass() {
                add = reinterpret_cast<ADD_FUNCTION>(GetProcAddress(dllHandle, "??$add@H@@SAHHH@Z"));
            }
        };

        // 使用类
        MyClass myClass;
        int result = myClass.add(3, 4);

        std::cout << "Result: " << result << std::endl;

        // 释放DLL句柄
        FreeLibrary(dllHandle);
    } else {
        std::cerr << "Failed to load DLL" << std::endl;
    }

    return 0;
}

腾讯云面向开发者汇聚海量精品云计算使用和开发经验,营造开放的云计算技术生态圈。
更多推荐
 4
4 0
0- 0


 已为社区贡献9条内容

所有评论(0)