Pytorch与深度学习 —— 附录I. 如何在 Ubuntu 中使用 C/C++ 语言编写 Pytorch 程序
PyTorch 之所以会成为和 Tensorflow 并驾齐驱的两大深度学习框架,除了 PyTorch 有极其好用的动态计算图技术外,还在于它的相对开放和自由。此外,PyTorch 还添加了对C/C++/Java等语言的支持,这意味着我们可以先通过Python调试好模型后,再把模型送到 C/Java 为主的应用环境里,为程序赋能。
接下来的这篇文章将介绍如何在 Ubuntu 环境下部署 C/C++ 的Torch应用。
文章目录
下载 PyTorch C/C++ 库
首先我们先要回到官网,在官网的第一页就有 C/C++ 库包的下载链接。
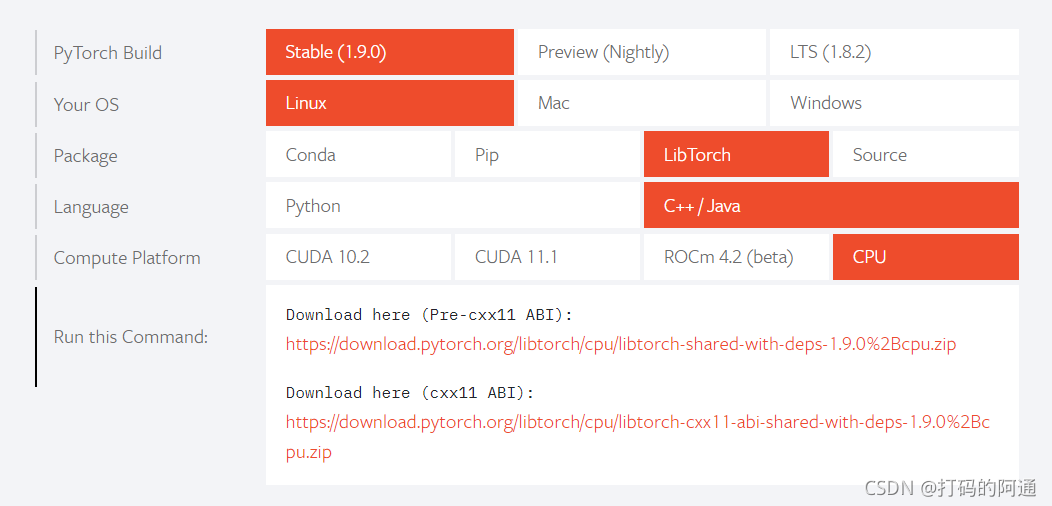
通常我们需要部署的环境是不包含GPU的,所以选择CPU版本,不过如果你的项目组比较土豪,GPU工作站随便用的话,那么就根据需要下载对应的CUDA版本。
目前官网提供的下载链接有两个,我们选第一个就可以了,你也可以直接执行如下命令下载,内容是差不多一样的。
	wget https://download.pytorch.org/libtorch/nightly/cpu/libtorch-shared-with-deps-latest.zip
	unzip libtorch-shared-with-deps-latest.zip
我建议你用迅雷或者其他下载工具下载这个链接,直接用wget下载,感觉非常慢。下载完成后,你就需要解压压缩包,这一步没什么可以详细说的了。
下载完成后,建议把libtorch放在合适位置,比方说 /opt 目录下。
准备测试用例
我们接下来需要为 C/C++ 准备一下用例
#include <torch/torch.h>
#include <iostream>

int main() {
  torch::Tensor tensor = torch::eye(3);
  std::cout << tensor << std::endl;
}
这个函数是生成一个3x3大小的单位矩阵,并且打印矩阵的内容。准备好这个用例后,我们就要编写一个CMake用的CMakeList.txt文件。
cmake_minimum_required(VERSION 3.0 FATAL_ERROR)
project(sample)

find_package(Torch REQUIRED)

add_executable(sample code.cpp)
target_link_libraries(sample "${TORCH_LIBRARIES}")
set_property(TARGET sample PROPERTY CXX_STANDARD 14)
如果不懂Cmake文件怎么编写的话,这部分你直接照抄就行。然后我们把这两个文件放在同一个文件夹下,例如:
sample/
---------/code.cpp
---------/CMakeLists.txt
注意:
如果你没安装cmake的话,那么可以执行如下命令安装CMake
sudo apt install cmake
编译程序
首先,cd到这个sample文件夹下,然后执行以下内容:
$> mkdir build
$> cd build
$> cmake -DCMAKE_PREFIX_PATH=/opt/libtorch ..
-- The C compiler identification is GNU 9.3.0
-- The CXX compiler identification is GNU 9.3.0
-- Check for working C compiler: /usr/bin/cc
-- Check for working C compiler: /usr/bin/cc -- works
-- Detecting C compiler ABI info
-- Detecting C compiler ABI info - done
-- Detecting C compile features
-- Detecting C compile features - done
-- Check for working CXX compiler: /usr/bin/c++
-- Check for working CXX compiler: /usr/bin/c++ -- works
-- Detecting CXX compiler ABI info
-- Detecting CXX compiler ABI info - done
-- Detecting CXX compile features
-- Detecting CXX compile features - done
-- Looking for pthread.h
-- Looking for pthread.h - found
-- Performing Test CMAKE_HAVE_LIBC_PTHREAD
-- Performing Test CMAKE_HAVE_LIBC_PTHREAD - Failed
-- Looking for pthread_create in pthreads
-- Looking for pthread_create in pthreads - not found
-- Looking for pthread_create in pthread
-- Looking for pthread_create in pthread - found
-- Found Threads: TRUE
-- Found Torch: /opt/libtorch/lib/libtorch.so
-- Configuring done
-- Generating done
-- Build files have been written to: /home/orlando/sample/build
出现以上内容后,这才说明编译成功,之后就是在build目录下执行make命令
$> make
Scanning dependencies of target sample
[ 50%] Building CXX object CMakeFiles/sample.dir/sample.cpp.o
[100%] Linking CXX executable sample
[100%] Built target sample
之后,执行生成的可执行程序,就可以看到输出结果了:
./sample
 1  0  0
 0  1  0
 0  0  1
[ CPUFloatType{3,3} ]
参考内容
* USING THE PYTORCH C++ FRONTEND,https://pytorch.org/tutorials/advanced/cpp_frontend.html
写在后面
尽管C/C++程序具有很高的执行效率,但是我们一般不会在训练网络时用C语言来做训练的,因为有很多参数或者模型要进行调试,直接用C/C++语言来做这件事其实效率反而低下。所以通常会使用Python做好模型后,再让模型在具体的C/C++环境下执行具体的任务。
不过,这也不是绝对的,你也可以按照自己喜好来做,毕竟编程语言只是工具而已。
如果你觉得这篇文章对你有所帮助,不妨点赞、收藏。有什么疑问也欢迎在文章下面留言。
祝你好运!
Adios~

腾讯云面向开发者汇聚海量精品云计算使用和开发经验,营造开放的云计算技术生态圈。
更多推荐
 2
2 0
0- 0


 已为社区贡献4条内容

所有评论(0)