react-native配置多环境步骤
最近用上新框架了,想整个多环境这样方便开发也方便打包,但是网上找了很多教程这种讲的全面的真的太少了,我自己记录一下吧。
注意:我用的是windows,这个配置windows可以跑通,mac也可以跑通(我同事用的mac测试过了),但是执行命令不一样需要对应修改。
1、安装react-native-config依赖
//我的依赖包
"react": "19.0.0",
"react-native": "^0.78.1",
"react-native-config": "^1.5.7"
2、打开android/app/build.gradle文件,修改配置
android {
    //你原来的其他代码
     defaultConfig {
        //你原来的其他代码
        resValue "string", "build_config_package", "你的包名"
    }
    buildTypes {
        //你原来的其他代码
        buildConfigField "boolean", "DEBUG", "false"

        // 添加更多调试信息
        buildConfigField "String", "BUILD_TYPE", "\"release\""
        buildConfigField "String", "BUILD_TIME", "\"${new Date().format('yyyy-MM-dd HH:mm:ss')}\""
        }
    }

   flavorDimensions "default"
    productFlavors {
        dev {
            applicationId "com.myapp.debug"
            manifestPlaceholders = [
                app_name: "@string/app_name_debug",
                app_icon: "@mipmap/ic_launcher"
            ]
            buildConfigField "String", "FLAVOR", "\"dev\""
            buildConfigField "String", "APP_API_URL", "\"https://test.xianzanwl.com\""
            buildConfigField "String", "ENVIRONMENT", "\"development\""
            buildConfigField "boolean", "DEBUG", "true"
        }
        staging {
            applicationId "com.myapp.staging"
            manifestPlaceholders = [
                app_name: "@string/app_name_staging",
                app_icon: "@mipmap/ic_launcher"
            ]
            buildConfigField "String", "FLAVOR", "\"staging\""
            buildConfigField "String", "ENVIRONMENT", "\"staging\""
            buildConfigField "String", "APP_API_URL", "\"https://test.xianzanwl.com\""
            buildConfigField "boolean", "DEBUG", "true"
        }
        prod {
            applicationId "com.myapp"
            manifestPlaceholders = [
                app_name: "@string/app_name",
                app_icon: "@mipmap/ic_launcher"
            ]
            buildConfigField "String", "FLAVOR", "\"prod\""
            buildConfigField "String", "APP_API_URL", "\"https://xianzanwl.com\""
            buildConfigField "String", "ENVIRONMENT", "\"production\""
            buildConfigField "boolean", "DEBUG", "false"

            // 为生产环境添加更多调试信息
            buildConfigField "String", "BUILD_TIME", "\"${new Date().format('yyyy-MM-dd HH:mm:ss')}\""
            buildConfigField "String", "BUILD_TYPE_NAME", "\"production\""

            // 添加调试字段,帮助诊断问题
            buildConfigField "String", "NATIVE_MODULES_ENABLED", "\"true\""
            buildConfigField "String", "HERMES_ENABLED", "\"${hermesEnabled}\""
        }
    }
}
3、打开android/app/src/main/AndroidManifest.xml文件进行设置
<manifest xmlns:android="http://schemas.android.com/apk/res/android"
    xmlns:tools="http://schemas.android.com/tools"
    package="你的应用名">

    <!-- 这里是你的其他配置 -->
    <application
      android:name=".MainApplication"
      android:label="${app_name}"
      android:icon="${app_icon}"
      android:roundIcon="@mipmap/ic_launcher_round"
      android:allowBackup="false"
      tools:replace="android:label"
      android:theme="@style/AppTheme"
      android:supportsRtl="true"
      android:usesCleartextTraffic="true"
      android:networkSecurityConfig="@xml/network_security_config"
      >

      <activity
        android:name=".MainActivity"
        android:label="${app_name}"
        android:configChanges="keyboard|keyboardHidden|orientation|screenLayout|screenSize|smallestScreenSize|uiMode"
        android:launchMode="singleTask"
        android:windowSoftInputMode="adjustResize"
        android:exported="true">
        <!--你的其他配置-->
      </activity>
       <!--你的其他配置-->
    </application>
</manifest>
4、打开android/app/src/main/res/values/strings.xml文件
<resources>
    <string name="app_name">MyApp</string>
    <string name="app_name_debug">MyApp_dev</string>
    <string name="app_name_staging">MyApp_test</string>
</resources>
5、根目录下创建
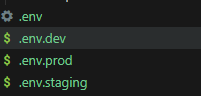
例如:参考这个去设置
.env.staging
# 测试环境配置
FLAVOR=staging
ENVIRONMENT=staging
APP_API_URL=https://test.api.com
DEBUG=true
6、这里就可以使用了(经测试,debug模式多种环境都可以拿到值,但是打包的环境获取不到config,这里需要使用其他方式)
//要调用的配置文件写功能,如:app.tsx
import Config from 'react-native-config';

//打印接口域名配置信息
console.log(Config.FLAVOR,'=Config==config',Config)
这个地方设置的配置是生产环境打包获取多环境的方式,以下是2个原生java文件配置环境
6.1、放到目录android\app\src\main\java\com\myapp文件下
https://download.csdn.net/download/qq_36821274/91790637?spm=1001.2014.3001.5503
https://download.csdn.net/download/qq_36821274/91790640?spm=1001.2014.3001.5503
6.2、打开文件android\app\src\main\java\com\myapp\MainApplication.kt进行修改
import com.myapp.ConfigPackage;

class MainApplication : Application(), ReactApplication {

  override val reactNativeHost: ReactNativeHost =
      object : DefaultReactNativeHost(this) {
        override fun getPackages(): List<ReactPackage> =
            PackageList(this).packages.apply {
             //你的其他文件
              add(ConfigPackage())
            }

        //你的其他方法
      }
}
6.3、使用方式(这个地方可以用在index.ts里面去整体调用看你自己的需求)
import { NativeModules, Platform } from 'react-native';

// 获取配置的多种方式
let nativeConfigCache: any = null;

const getConfigValue = async (key: string, defaultValue: string = ''): Promise<string> => {
  try {
    // 方式1: 优先从原生模块获取(缓存结果)
    if (Platform.OS === 'android' && NativeModules.ConfigModule) {
      if (nativeConfigCache === null) {
        try {
          nativeConfigCache = await NativeModules.ConfigModule.getConfig();
          console.log('Native config loaded and cached:', nativeConfigCache);
        } catch (error) {
          console.warn('Failed to load native config:', error);
          nativeConfigCache = {};
        }
      }

      if (nativeConfigCache && nativeConfigCache[key]) {
        console.log(`Config from native module: ${key}=${nativeConfigCache[key]}`);
        return nativeConfigCache[key];
      }
    }

    // 方式2: 尝试从react-native-config获取
    if (Config && Config[key]) {
      console.log(`Config from react-native-config: ${key}=${Config[key]}`);
      return Config[key];
    }

    // 方式3: 使用默认值
    console.log(`Using default value for ${key}: ${defaultValue}`);
    return defaultValue;
  } catch (error) {
    console.warn(`Failed to get config for ${key}:`, error);
    return defaultValue;
  }
};

// 同步版本的配置获取(用于初始化)
const getConfigValueSync = (key: string, defaultValue: string = ''): string => {
  try {
    // 优先从react-native-config获取
    if (Config && Config[key]) {
      console.log(`Config from react-native-config (sync): ${key}=${Config[key]}`);
      return Config[key];
    }

    // 使用默认值
    console.log(`Using default value for ${key} (sync): ${defaultValue}`);
    return defaultValue;
  } catch (error) {
    console.warn(`Failed to get config for ${key} (sync):`, error);
    return defaultValue;
  }
};

// 打印接口域名配置信息
console.log('Config.FLAVOR:', getConfigValueSync('FLAVOR'),'=Config==config', Config)


// 如果Config.FLAVOR为空,尝试从环境变量获取
if (!getConfigValueSync('FLAVOR')) {
  console.warn('Config.FLAVOR is undefined, trying to get from environment...')
  // 可以在这里添加备用方案
}
7、启动命令配置package.json(我这个地方只配置了android,我们项目目前只有安卓)
windows执行命令
"scripts": {
    "android": "react-native run-android --mode=devDebug",
    "android-staging": "cd android && gradlew.bat installStagingDebug && cd ..",
    "android-prod": "cd android && gradlew.bat installProdDebug && cd ..",
    "ios": "react-native run-ios",
    "start": "react-native start",
    "bundle-android-dev": "SET ENVFILE=.env.development && cd ./android && gradlew.bat assembleDevRelease && cd ..",
    "bundle-android-staging": "SET ENVFILE=.env.staging && cd ./android && gradlew.bat assembleStagingRelease && cd ..",
     "bundle-android-prod": "SET ENVFILE=.env.production && cd ./android && gradlew.bat assembleProdRelease && cd ..",
    "bundle:ios": "react-native bundle --platform ios --dev false --entry-file index.js --bundle-output ios/main.jsbundle --assets-dest ios",
    "clean": "cd android && ./gradlew clean && cd .. && rm -rf node_modules && npm install",
    "clean:android": "cd android && ./gradlew clean",
    "clean:ios": "cd ios && xcodebuild clean"
  },
mac执行命令-需要安装依赖cross-env 我的版本("cross-env": "^10.0.0")
"android-staging": "cd android && ./gradlew installStagingDebug && cd ..",
"android-prod": "cd android && ./gradlew installProdDebug && cd ..",
"bundle-android-prod": "cross-env ENVFILE=.env.production sh -c 'cd android && ./gradlew assembleProdRelease'",
"bundle-android-staging": "cross-env ENVFILE=.env.staging sh -c 'cd android && ./gradlew assembleStagingRelease'",
"bundle-android-dev": "cross-env ENVFILE=.env.development sh -c 'cd android && ./gradlew assembleDevRelease'",
8、安装生产的apk查看控制台命令,在当前项目根目录运行以下命令
#在真机运行命令安装包(需要到根目录执行命令)
adb install android\app\build\outputs\apk\prod\release\app-prod-release.apk
# 查看React Native相关日志
adb logcat *:S ReactNative:V ReactNativeJS:V

腾讯云面向开发者汇聚海量精品云计算使用和开发经验,营造开放的云计算技术生态圈。
更多推荐
 10
10 0
0- 0


 已为社区贡献1条内容

所有评论(0)