ESP32S3 AI CAM实现yolov8检测
使用的硬件是ESP32S3 AI CAMDFRobot DFR1154 ESP32-S3 AI CAM使用教程。
·
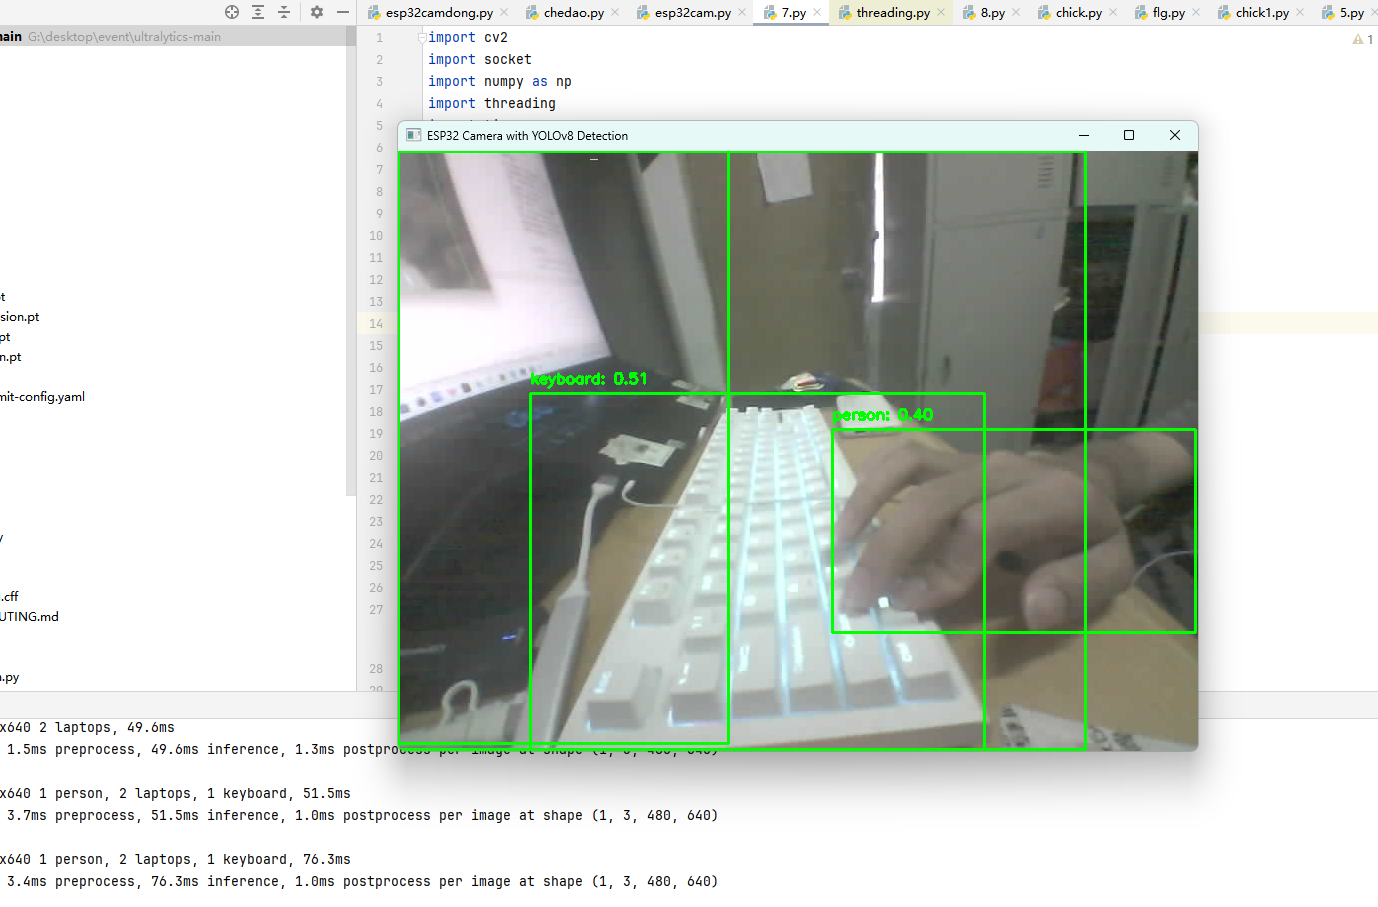
本项目将介绍如何实现esp32 AI cam的yolov8检测。
1、硬件介绍
使用的硬件是ESP32S3 AI CAM
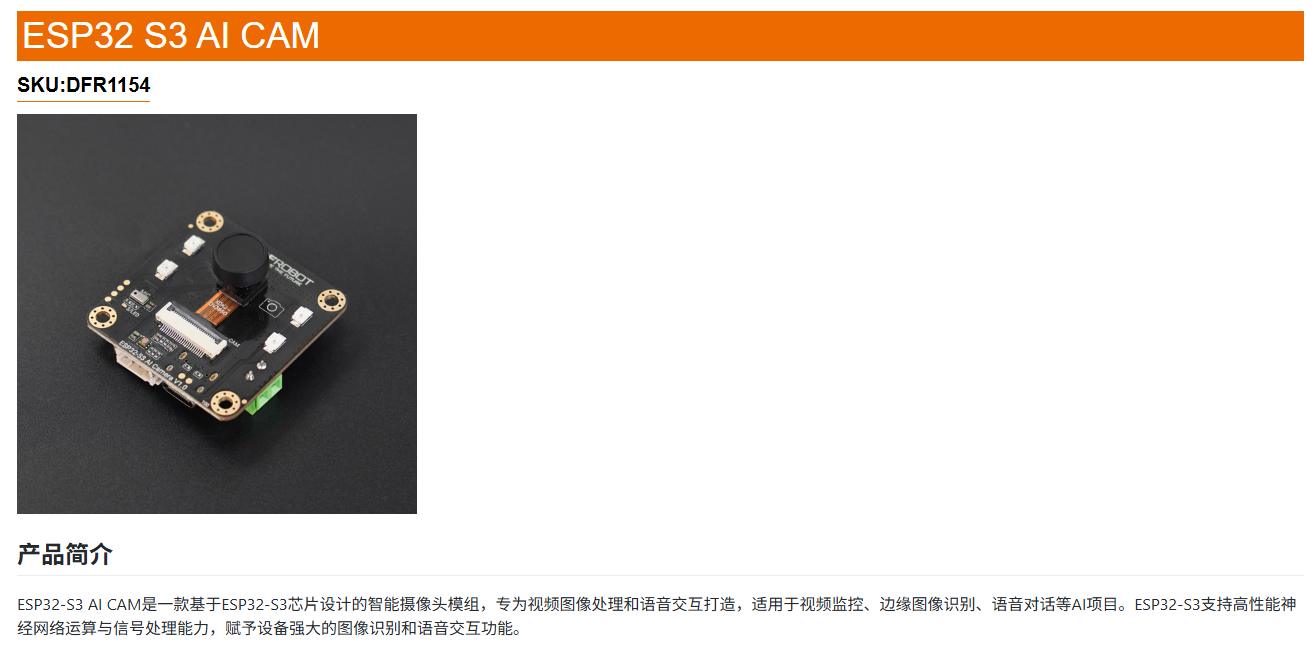
详细介绍请查看官网:DFRobot DFR1154 ESP32-S3 AI CAM使用教程
2、硬件客户端编程
编程需要利用Arduino
如何进行硬件的烧录请查看官网:DFRobot DFR1154 ESP32-S3 AI CAM使用教程
只要将下面代码修改到CameraWebServer示例中即可实现网络摄像头输出,注意硬件要与服务端在同一个局域网中。
注意修改自己的电脑ip地址、WiFi名、WiFi密码。
#include "esp_camera.h"
#include <WiFi.h>
#include <esp_netif.h>
#include <esp_system.h>
#include <netdb.h>
#include <string.h>
#include <algorithm>  // 新增:包含min函数的头文件

// 服务端IP和端口
const char* SERVER_IP = "192.168.61.188";#填写自己的电脑IP地址
const int SERVER_PORT = 9090;

// 摄像头引脚定义
#define PWDN_GPIO_NUM     -1
#define RESET_GPIO_NUM    -1
#define XCLK_GPIO_NUM     5
#define Y9_GPIO_NUM       4
#define Y8_GPIO_NUM       6
#define Y7_GPIO_NUM       7
#define Y6_GPIO_NUM       14
#define Y5_GPIO_NUM       17
#define Y4_GPIO_NUM       21
#define Y3_GPIO_NUM       18
#define Y2_GPIO_NUM       16
#define VSYNC_GPIO_NUM    1
#define HREF_GPIO_NUM     2
#define PCLK_GPIO_NUM     15
#define SIOD_GPIO_NUM  8
#define SIOC_GPIO_NUM  9

// WiFi凭证
const char *ssid = "love";#填写自己的wifi名
const char *password = "88888888";#填写自己的wifi密码

// 分片配置
const size_t MAX_CHUNK_SIZE = 1024;  // 修改:类型改为size_t,与size_t兼容
const int HEADER_SIZE = 0;        // 可选:若需要头部信息(如分片编号),可增加此值

// 函数声明
void setupLedFlash(int pin);
bool checkWiFiConnection();
void printSocketError(int sock, const char* message);
bool sendChunkedData(int sock, struct sockaddr_in* dest_addr, uint8_t* data, size_t size);

void setup() {
  Serial.begin(115200);
  Serial.setDebugOutput(true);
  Serial.println();

  camera_config_t config;
  config.ledc_channel = LEDC_CHANNEL_0;
  config.ledc_timer = LEDC_TIMER_0;
  config.pin_d0 = Y2_GPIO_NUM;
  config.pin_d1 = Y3_GPIO_NUM;
  config.pin_d2 = Y4_GPIO_NUM;
  config.pin_d3 = Y5_GPIO_NUM;
  config.pin_d4 = Y6_GPIO_NUM;
  config.pin_d5 = Y7_GPIO_NUM;
  config.pin_d6 = Y8_GPIO_NUM;
  config.pin_d7 = Y9_GPIO_NUM;
  config.pin_xclk = XCLK_GPIO_NUM;
  config.pin_pclk = PCLK_GPIO_NUM;
  config.pin_vsync = VSYNC_GPIO_NUM;
  config.pin_href = HREF_GPIO_NUM;
  config.pin_sccb_sda = SIOD_GPIO_NUM;
  config.pin_sccb_scl = SIOC_GPIO_NUM;
  config.pin_pwdn = PWDN_GPIO_NUM;
  config.pin_reset = RESET_GPIO_NUM;
  config.xclk_freq_hz = 20000000;

  // 优化:降低分辨率和质量以减少数据量
  config.frame_size = FRAMESIZE_SVGA;  // 从UXGA改为SVGA(800x600)
  config.pixel_format = PIXFORMAT_JPEG;
  config.grab_mode = CAMERA_GRAB_WHEN_EMPTY;
  config.fb_location = CAMERA_FB_IN_PSRAM;
  config.jpeg_quality = 5;  // 提高质量值(压缩率更高,数据量更小)
  config.fb_count = 1;

  // PSRAM配置
  if (config.pixel_format == PIXFORMAT_JPEG && psramFound()) {
    config.jpeg_quality = 15;
    config.fb_count = 2;
    config.grab_mode = CAMERA_GRAB_LATEST;
  } else {
    config.frame_size = FRAMESIZE_CIF;  // 若无PSRAM,进一步降低分辨率
  }

  // 摄像头初始化
  esp_err_t err = esp_camera_init(&config);
  if (err != ESP_OK) {
    Serial.printf("Camera init failed with error 0x%x", err);
    return;
  }

  sensor_t *s = esp_camera_sensor_get();
  if (s->id.PID == OV3660_PID) {
    s->set_vflip(s, 1);
    s->set_brightness(s, 1);
    s->set_saturation(s, -2);
    s->set_whitebal(s, 1);
  }

  // WiFi连接
  WiFi.begin(ssid, password);
  WiFi.setSleep(false);
  while (WiFi.status() != WL_CONNECTED) {
    delay(500);
    Serial.print(".");
  }
  Serial.println("\nWiFi connected");
  Serial.print("IP address: ");
  Serial.println(WiFi.localIP());
}

void loop() {
  if (!checkWiFiConnection()) {
    delay(1000);
    return;
  }

  camera_fb_t *fb = esp_camera_fb_get();
  if (!fb) {
    Serial.println("Failed to capture frame");
    delay(1000);
    return;
  }

  int sock = socket(AF_INET, SOCK_DGRAM, 0);
  if (sock < 0) {
    Serial.println("Failed to create socket");
    printSocketError(sock, "Socket creation failed");
    esp_camera_fb_return(fb);
    delay(1000);
    return;
  }

  // 设置发送超时
  struct timeval timeout;
  timeout.tv_sec = 2;
  timeout.tv_usec = 0;
  if (setsockopt(sock, SOL_SOCKET, SO_SNDTIMEO, &timeout, sizeof(timeout)) < 0) {
    Serial.println("Failed to set send timeout");
    printSocketError(sock, "Set timeout failed");
  }

  struct sockaddr_in dest_addr;
  dest_addr.sin_family = AF_INET;
  dest_addr.sin_port = htons(SERVER_PORT);
  if (inet_pton(AF_INET, SERVER_IP, &dest_addr.sin_addr) <= 0) {
    Serial.println("Invalid address/ Address not supported");
    close(sock);
    esp_camera_fb_return(fb);
    delay(1000);
    return;
  }

  // 分片发送数据
  bool sendSuccess = sendChunkedData(sock, &dest_addr, fb->buf, fb->len);
  if (sendSuccess) {
    Serial.printf("Successfully sent %d bytes in chunks\n", fb->len);
  } else {
    Serial.println("Failed to send data");
  }

  close(sock);
  esp_camera_fb_return(fb);
  delay(1000);
}

// 分片发送函数
bool sendChunkedData(int sock, struct sockaddr_in* dest_addr, uint8_t* data, size_t size) {
  size_t total_chunks = (size + MAX_CHUNK_SIZE - 1) / MAX_CHUNK_SIZE;
  size_t sent_bytes = 0;

  for (size_t i = 0; i < total_chunks; i++) {
    // 类型统一为size_t,无需强制转换
    size_t chunk_size = std::min(MAX_CHUNK_SIZE, size - sent_bytes);  // 使用std::min并指定命名空间
    int sent = sendto(sock,
                      data + sent_bytes,
                      chunk_size,
                      0,
                      (struct sockaddr*)dest_addr,
                      sizeof(*dest_addr));

    if (sent < 0) {
      Serial.printf("Chunk %d/%d failed. Error: ", i+1, total_chunks);
      printSocketError(sock, "Send failed");
      return false;
    }
    sent_bytes += sent;
    delay(5);  // 控制发送速率,避免丢包
  }
  return true;
}

bool checkWiFiConnection() {
  if (WiFi.status() != WL_CONNECTED) {
    Serial.println("WiFi connection lost");
    WiFi.disconnect();
    delay(1000);
    WiFi.begin(ssid, password);
    int attempts = 0;
    while (WiFi.status() != WL_CONNECTED && attempts < 10) {
      delay(500);
      attempts++;
      Serial.print(".");
    }
    if (WiFi.status() == WL_CONNECTED) {
      Serial.println("\nWiFi reconnected");
      return true;
    } else {
      Serial.println("\nFailed to reconnect WiFi");
      return false;
    }
  }
  return true;
}

void printSocketError(int sock, const char* message) {
  int err = errno;
  Serial.printf("%s: errno %d\n", message, err);
  // 错误处理逻辑不变
  switch (err) {
    case EMSGSIZE:
      Serial.println("Message too long (分片发送可解决此问题)");
      break;
    // 其他错误处理...
  }
}
3、服务端接收客户端图传和进行yolov8检测
编程需要利用pycharm
下面代码用于接收客户端的图传并对图传的内容进行yolov8目标检测,注意修改自己电脑的ip地址。
import cv2
import socket
import numpy as np
import threading
import time
from queue import Queue
from ultralytics import YOLO

# 配置参数
SERVER_IP = '192.168.61.188'  # 监听所有可用接口
SERVER_PORT = 9090  # 与ESP32代码中的端口保持一致
BUFFER_SIZE = 4096  # 缓冲区大小,应大于ESP32的分片大小
MAX_FRAME_QUEUE = 10  # 最大帧队列长度,防止内存溢出

# 创建UDP套接字
sock = socket.socket(socket.AF_INET, socket.SOCK_DGRAM)
sock.bind((SERVER_IP, SERVER_PORT))
print(f"服务器启动,监听 {SERVER_IP}:{SERVER_PORT}")

# 创建帧缓冲区和线程同步队列
frame_queue = Queue(maxsize=MAX_FRAME_QUEUE)
stop_event = threading.Event()

# 加载YOLOv8模型
model = YOLO('weights/yolov8n.pt')  # 这里使用yolov8n轻量级模型,可根据需求更换,如yolov8s、yolov8m等


def receive_frames():
    """接收UDP数据包并组装成完整帧"""
    frame_buffer = {}  # 按客户端IP存储帧数据
    while not stop_event.is_set():
        try:
            # 接收数据
            data, addr = sock.recvfrom(BUFFER_SIZE)
            client_ip = addr[0]

            # 简单帧重组逻辑(假设ESP32发送连续帧,无序号)
            if client_ip not in frame_buffer:
                frame_buffer[client_ip] = bytearray()

            # 追加数据到缓冲区
            frame_buffer[client_ip].extend(data)

            # 尝试解码JPEG图像
            try:
                # 检查是否为完整JPEG帧(JPEG以FF D8开头,以FF D9结尾)
                frame_data = bytes(frame_buffer[client_ip])
                if frame_data.startswith(b'\xff\xd8') and frame_data.endswith(b'\xff\xd9'):
                    # 如果队列已满,丢弃最旧的帧
                    if frame_queue.full():
                        frame_queue.get_nowait()
                    frame_queue.put_nowait((client_ip, frame_data))
                    frame_buffer[client_ip] = bytearray()  # 清空缓冲区
            except Exception as e:
                print(f"帧解码错误: {e}")
                continue

        except socket.timeout:
            continue
        except Exception as e:
            print(f"接收错误: {e}")
            time.sleep(0.1)


def display_frames():
    """从队列中获取帧并显示,同时进行目标检测"""
    cv2.namedWindow("ESP32 Camera with YOLOv8 Detection", cv2.WINDOW_NORMAL)

    while not stop_event.is_set():
        try:
            # 从队列获取帧数据
            if not frame_queue.empty():
                client_ip, frame_data = frame_queue.get_nowait()

                # 解码JPEG数据
                img_np = np.frombuffer(frame_data, np.uint8)
                frame = cv2.imdecode(img_np, cv2.IMREAD_COLOR)

                if frame is not None:
                    # 进行目标检测
                    results = model(frame)[0]
                    for result in results.boxes.data.tolist():
                        x1, y1, x2, y2, score, class_id = result
                        x1, y1, x2, y2 = int(x1), int(y1), int(x2), int(y2)
                        class_name = model.names[int(class_id)]
                        cv2.rectangle(frame, (x1, y1), (x2, y2), (0, 255, 0), 2)
                        cv2.putText(frame, f'{class_name}: {score:.2f}', (x1, y1 - 10),
                                    cv2.FONT_HERSHEY_SIMPLEX, 0.5, (0, 255, 0), 2)

                    # 显示图像
                    cv2.imshow("ESP32 Camera with YOLOv8 Detection", frame)

                    # 按ESC键退出
                    key = cv2.waitKey(1) & 0xFF
                    if key == 27:  # ESC键
                        stop_event.set()
            else:
                # 队列空时稍微等待,减少CPU占用
                time.sleep(0.01)
        except Exception as e:
            print(f"显示错误: {e}")
            time.sleep(0.1)

    # 清理资源
    cv2.destroyAllWindows()


# 启动接收线程
receive_thread = threading.Thread(target=receive_frames)
receive_thread.daemon = True
receive_thread.start()

# 启动显示线程
display_thread = threading.Thread(target=display_frames)
display_thread.daemon = True
display_thread.start()

try:
    # 主线程等待退出信号
    while not stop_event.is_set():
        time.sleep(1)
except KeyboardInterrupt:
    print("程序被用户中断")
finally:
    # 清理资源
    stop_event.set()
    sock.close()
    print("服务器已关闭")
4、实现的效果

腾讯云面向开发者汇聚海量精品云计算使用和开发经验,营造开放的云计算技术生态圈。
更多推荐
 3
3 0
0- 0


 已为社区贡献1条内容

所有评论(0)