【动手学深度学习】windows安装jupyter
最近想跟着李沐老师的视频手搭一些深度学习模型,需要用到Jupyter,在安装过程中遇到不少坑,现在记录一下完整的安装过程以及中间踩过的坑:
Step1:新建虚拟环境并激活
首先打开anaconda prompt并新建一个虚拟环境用于学习:
conda create -n d2l38 python=3.8 pip -y创建好之后进行激活:
conda activate d2l38Step 2:安装Jupyter Notebook
conda install jupyter在这个过程中主要遇到了以下两个问题:
1:Rust依赖
Collecting pywinpty>=2.0.1 (from jupyter-server<3,>=2.4.0->notebook->jupyter==1.0.0->d2l)
  Downloading pywinpty-2.0.14.tar.gz (27 kB)
  Installing build dependencies ... done
  Getting requirements to build wheel ... done
  Preparing metadata (pyproject.toml) ... error
  error: subprocess-exited-with-error

  × Preparing metadata (pyproject.toml) did not run successfully.
  │ exit code: 1
  ╰─> [6 lines of output]

      Cargo, the Rust package manager, is not installed or is not on PATH.
      This package requires Rust and Cargo to compile extensions. Install it through
      the system's package manager or via https://rustup.rs/

      Checking for Rust toolchain....
      [end of output]

  note: This error originates from a subprocess, and is likely not a problem with pip.
error: metadata-generation-failed

× Encountered error while generating package metadata.
╰─> See above for output.

note: This is an issue with the package mentioned above, not pip.
hint: See above for details.这个是因为之前使用的是pip安装,使用pip的时候会出现所需要的pywinpty需要用 Rust 语言的工具链(Cargo)来编译,但我的电脑里现在还没安装 Rust。本人使用C ++比较少,缺少Visual C++ 编译环境,于是使用
conda install jupyter
即可绕过需要Rust的问题
2:针对安装过程卡在solving environment
这里是因为之前一直使用的清华源,查阅了一些资料之后发现可能是镜像源导致的延迟以及缓存不完整等问题,改用默认官方源就可以了,代码如下:
conda config --remove-key channels
conda config --add channels defaults
conda config --set show_channel_urls true
然后重新运行:
conda install jupyter
当然我在我的电脑上安装也是花了小30分钟 才完成solving environment。所以不妨可以等30分钟摸摸鱼再检讨自己哈哈。
Step3:安装GPU版本的Pytorch
因为虚拟环境新建的时候使用Python 3.8版本,所以访问Start Locally | PyTorch官网时发现不能直接运行他的command,因为他需要3.9以上版本
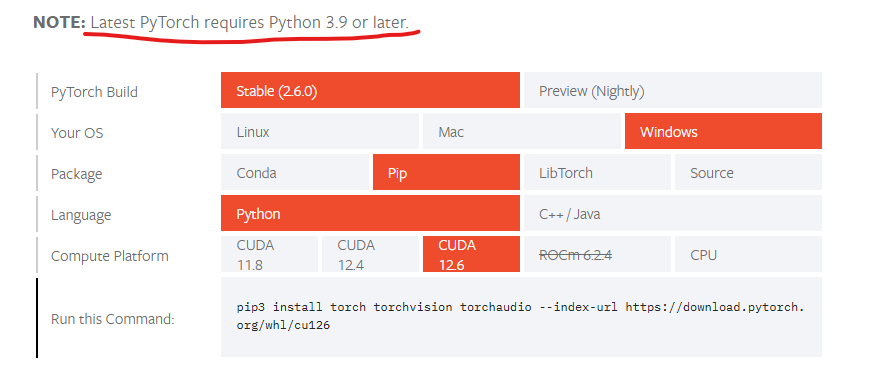
因为不想再重新安装python3.9版本,于是在查找了一些对应版本之后发现下面这个可以顺利下载并配置:
pip install torch==2.2.0+cu118 torchvision==0.17.0+cu118 torchaudio==2.2.0+cu118 --index-url https://download.pytorch.org/whl/cu118我的是python3.8环境,CUDA是12.6。
下载后可以运行如下代码进行验证:
(d2l38) C:\Users\A>python
>>> import torch
>>> print(torch.__version__)
2.2.0+cu118 #版本
>>> print(torch.cuda.is_available())
True #CUDA已启用
>>> print(torch.cuda.get_device_name(0))
NVIDIA GeForce RTX 4060 Laptop GPU #可使用的显卡名称下载d2l包,参考:【动手学深度学习v2】03 安装-windows下d2l安装详细教程-CSDN博客
pip install d2l==0.17.6 -i http://mirrors.aliyun.com/pypi/simple/ --trusted-host mirrors.aliyun.com
整个下载过程没有挂代理,使用的是默认的源。
Step4:下载配套代码并运行
在前言 — 动手学深度学习 2.0.0 documentation中点击“下载Jupyter记事本”下载对应的文件,并选一个地方进行解压。
然后可以重新打开Anaconda prompt,激活刚刚建立的环境
conda activate d2l38打开下载的记事本所在的路径,启动jupyter即可运行,以我保存的路径为例:
(base) C:\Users\A>conda activate d2l38 #激活环境
(d2l38) C:\Users\A>E:
(d2l38) E:\>cd E:\DL\d2l-zh\pytorch #进入文档下载的文件夹
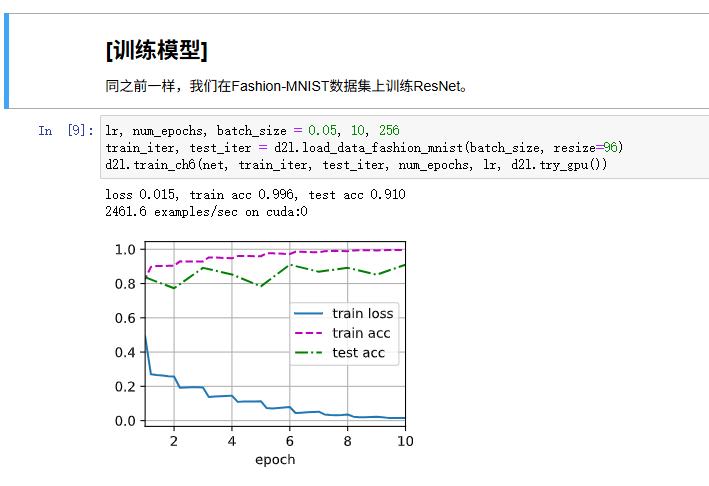
(d2l38) E:\DL\d2l-zh\pytorch>jupyter notebook #打开记事本可点击其中一个实例并尝试运行,可以发现现在可以调用GPU,并且进行训练了:
目录

腾讯云面向开发者汇聚海量精品云计算使用和开发经验,营造开放的云计算技术生态圈。
更多推荐
 4
4 0
0- 0


 已为社区贡献1条内容

所有评论(0)