vscode配置MCP
·
AI编程已经是现在编程的必备选项,而MCP能极大的提升我们AI编程的便利性。我们今天来看看vscode这个代码编辑器如何配置MCP。
首先vscode要集成copilot的插件,来支持AI编程,我们只需要下载2个插件GitHub Copilot,以及
GitHub Copilot Chat。copilot需要付费才能使用更多的模型,建议大家使用付费版,10美金/月。
接下来我们要使用MCP还需要下载一个插件Copilot MCP,这个插件作为MCP的一个client。
接下来就是配置MCP tool。我们在vscode的全局目录C:\Users\Administrator\AppData\Roaming\Code\User下配置一个mcp.json文件,这样所有的项目工程都能读到这个mcp工具的配置。如果我们只需要某个项目单独使用,可以配置项目目录/.vscode/setting.json,这样就只是在当前项目能使用这个mcp tool。
mcp.json配置格式如下
{
	"servers": {
    "filesystem": {
      "command": "npx",
      "args": [
        "-y",
        "@modelcontextprotocol/server-filesystem",
        "."
      ]
    },
    "git": {
      "command": "npx",
      "args": [
        "-y",
        "@modelcontextprotocol/server-git",
        "--repository",
        "."
      ]
    },
    "web": {
      "command": "npx",
      "args": [
        "-y",
        "@modelcontextprotocol/server-fetch"
      ]
    }
  },
	"inputs": []
}
setting.json配置如下
{
    "security.workspace.trust.untrustedFiles": "open",
    "redhat.telemetry.enabled": true,
    "github.copilot.nextEditSuggestions.enabled": true,
    "chat.mcp.serverSampling": {},
    "github.copilot.enable": {
    "*": true
  },
  "github.copilot.chat.enabled": true,
  "mcp.mcpServers": {
    "filesystem": {
      "command": "npx",
      "args": [
        "-y",
        "@modelcontextprotocol/server-filesystem",
        "."
      ]
    },
    "git": {
      "command": "npx",
      "args": [
        "-y",
        "@modelcontextprotocol/server-git",
        "--repository",
        "."
      ]
    },
    "web": {
      "command": "npx",
      "args": [
        "-y",
        "@modelcontextprotocol/server-fetch"
      ]
    }
  }
}
配置好以后我们回到copilot chat
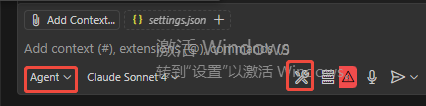
选择agent模式,右边有个工具按钮,点开它
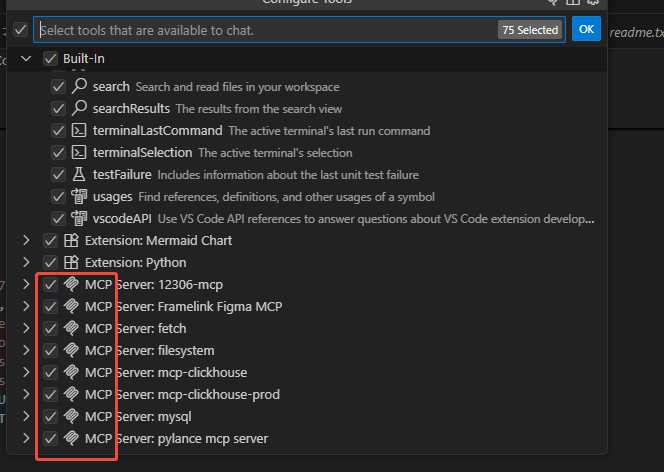
可以看到我们刚才配置的mcp tools,勾选,然后确定,这样就能使用了
我们只要在对话框告诉copilot,使用哪个mcp做什么任务,就能帮我们自动编程了

腾讯云面向开发者汇聚海量精品云计算使用和开发经验,营造开放的云计算技术生态圈。
更多推荐
 9
9 0
0- 0


 已为社区贡献3条内容

所有评论(0)