海康visionmaster使用python脚本进行读码
本文介绍了基于VisionMaster和Python的二维码识别优化方案。针对海康软件读码算法在PPM过大时识别不佳的问题,作者通过Python脚本结合OpenCV和pyzbar库实现了更高效的二维码识别。文章详细记录了开发过程:1)安装必要的Python依赖包;2)图像数据在VisionMaster和numpy数组间的转换方法;3)二维码解码和结果绘制的核心代码实现;4)与VisionMaste
灵感: 编写这篇文章,主要是我发现软件中自带的读码算法不能很好的读取ppm过大的码,需要先进行图片缩放才能正常读取,当然海康深度学习包里面的DL读码算法是能正常读取的,但是相应的耗时又会增加很多,刚好最近又在研究vm(visionmaster,一下都统称vm)的python脚本模块,想了想干脆直接手搓一个了。
1. 编写python的代码,第一步肯定是先确定下自己需要用的什么库,然后就是导入依赖包,我这里主要是使用了opencv和pyzbar这两个来进行处理。
1.1.首先我查阅了海康官方社区的问答模块,发现已经有朋友在提问怎么安装依赖包文件了,我这里就简单讲解下,
VM4.4安装路径下,找到该路径:\VisionMaster4.4.0\Applications\ModuleProxy\x64,运行cmd
Cmd窗口输入python .\get-pip.py 来安装pip 。随后可以用 python -m pip 检查是否安装成功
再用 python -m pip install numpy 这种来安装第三方库即可。
1.2.安装完第三方库肯定就可以进行代码编写了,这里我犯了一个错误,我没有先查看一下官方给到的结构体, 我查看了一下vm输入模块中的image数据,发现只给到了我一个widht、height、pixel_format3个数据,我直接进行编写,但结果可想而知,虽然没有出现报错,但是最终也没有图像出现在vm这边,一直百思不得其解,怎么不报错,又不出现图像呢?偶然间看到篇文章 VisionMaster4.4 python脚本 图像处理 转换函数 爱之初体验(文章原名)https://blog.csdn.net/u014584014/article/details/145689285?ops_request_misc=&request_id=&biz_id=102&utm_term=%E6%B5%B7%E5%BA%B7visionmasterpython%E8%84%9A%E6%9C%AC&utm_medium=distribute.pc_search_result.none-task-blog-2~all~sobaiduweb~default-0-145689285.142^v102^pc_search_result_base3&spm=1018.2226.3001.4187
一下子就通透了,参考了下作者编写的Imagetonumpy和numpytoImage这两个函数,重新运行,结果就正常了。实在感谢上面文章作者大大。
1.3.能正常转化,剩下的步骤其实就很简单了, 我这里就直接将我的代码贴出来了
# coding: utf-8
import sys
import cv2
import numpy as np
from pyzbar import pyzbar
from ioHelper import *


def ImagetoNumpy(ImageData):


    if not (ImageData and ImageData.buffer):
        return None


    h, w = ImageData.height, ImageData.width
    buffer_len = len(ImageData.buffer)


    if buffer_len == h * w:
        # 灰度图:直接reshape,无颜色转换
        return np.frombuffer(ImageData.buffer, dtype=np.uint8).reshape((h, w))
    elif buffer_len == h * w * 3:
        # 彩色图:reshape后直接转BGR(一次到位)
        arr = np.frombuffer(ImageData.buffer, dtype=np.uint8).reshape((h, w, 3))
        return cv2.cvtColor(arr, cv2.COLOR_RGB2BGR)
    else:
        return None

def NumpytoImage(numpy_image, pixel_format, template_image_data):

    if numpy_image is None or template_image_data is None:
        return None

    h, w = numpy_image.shape[:2]
    channels = 1 if len(numpy_image.shape) == 2 else numpy_image.shape[2]
    target_format = pixel_format


    if target_format == 35127316 and channels == 3:
        numpy_image = cv2.cvtColor(numpy_image, cv2.COLOR_BGR2RGB)
    elif target_format == 17301505 and channels == 3:
        numpy_image = cv2.cvtColor(numpy_image, cv2.COLOR_BGR2GRAY)


    image_data = type(template_image_data)()
    image_data.width = w
    image_data.height = h
    image_data.pixel_format = target_format
    image_data.buffer = numpy_image.tobytes()
    image_data.dataLen = len(image_data.buffer)

    return image_data

# ==============================================================================
# 2. 二维码处理
# ==============================================================================
def decode_qr(image):
    """解码二维码"""
    # 仅当图像为彩色时才转灰度,避免重复操作
    gray = cv2.cvtColor(image, cv2.COLOR_BGR2GRAY) if len(image.shape) == 3 else image
    try:
        codes = pyzbar.decode(gray)
        results = [code.data.decode('utf-8', errors='ignore') for code in codes]
        return results, codes
    except Exception as e:
        PrintMsg(f"Decoding error: {str(e)}")
        return [], []

def draw_codes(image, codes):
    """绘制二维码"""
    if not codes:
        return image


    FONT = cv2.FONT_HERSHEY_SIMPLEX
    FONT_SCALE = 0.6
    THICKNESS = 2
    is_gray = len(image.shape) == 2

    # 统一颜色定义,减少重复判断
    contour_color = (155,155,155) if is_gray else (0, 255, 0)
    text_color = (155,155,155) if is_gray else (0, 0, 255)

    for code in codes:
        text = code.data.decode('utf-8', errors='ignore')

        # 绘制轮廓
        if len(code.polygon) >= 4:
            pts = np.array([[p.x, p.y] for p in code.polygon], np.int32).reshape((-1, 1, 2))
            cv2.polylines(image, [pts], True, contour_color, 3)

        # 文本居中计算
        rect = code.rect
        center_x = rect.left + rect.width // 2
        center_y = rect.top + rect.height // 2

        (tw, th), bl = cv2.getTextSize(text, FONT, FONT_SCALE, THICKNESS)
        text_x = center_x - tw // 2
        text_y = center_y + th // 2

        cv2.putText(image, text, (text_x, text_y), FONT, FONT_SCALE, text_color, THICKNESS)

    return image

# ==============================================================================
# 3. 主处理逻辑
# ==============================================================================
def Process(data) -> int:
    """
    VM Script: QR Code Detection
    Input: in0 (ImageData)
    Output: out0 (ImageData), out1 (StringArray), error (String)
    Return: 0=Success, non-0=Failure
    """

    moduleVar = IoHelper(data, INIT_MODULE_VAR)
    moduleVar.out0 = None
    moduleVar.out1 = []
    moduleVar.error = ""

    try:
        # 1. 输入校验
        vm_input = moduleVar.in0
        if not vm_input:
            moduleVar.error = "Input image in0 is empty"
            PrintMsg(moduleVar.error)
            return 1

        # 2. 图像转换
        cv_input = ImagetoNumpy(vm_input)
        if cv_input is None:
            moduleVar.error = "Failed to convert input image"
            PrintMsg(moduleVar.error)
            return 1

        # 3. 二维码解码
        decoded_results, codes = decode_qr(cv_input)

        # 4. 绘制结果
        if codes:
            output_image = draw_codes(cv_input.copy(), codes)
        else:
            output_image = cv_input

        # 5. 转换回VM格式
        vm_output = NumpytoImage(output_image, vm_input.pixel_format, vm_input)
        if not vm_output:
            moduleVar.error = "Failed to convert result image"
            PrintMsg(moduleVar.error)
            return 1

        # 6. 赋值输出
        moduleVar.out0 = vm_output
        moduleVar.out1 = decoded_results
        return 0

    except Exception as e:
        error_msg = f"Process error: {str(e)}"
        moduleVar.error = error_msg
        PrintMsg(error_msg)
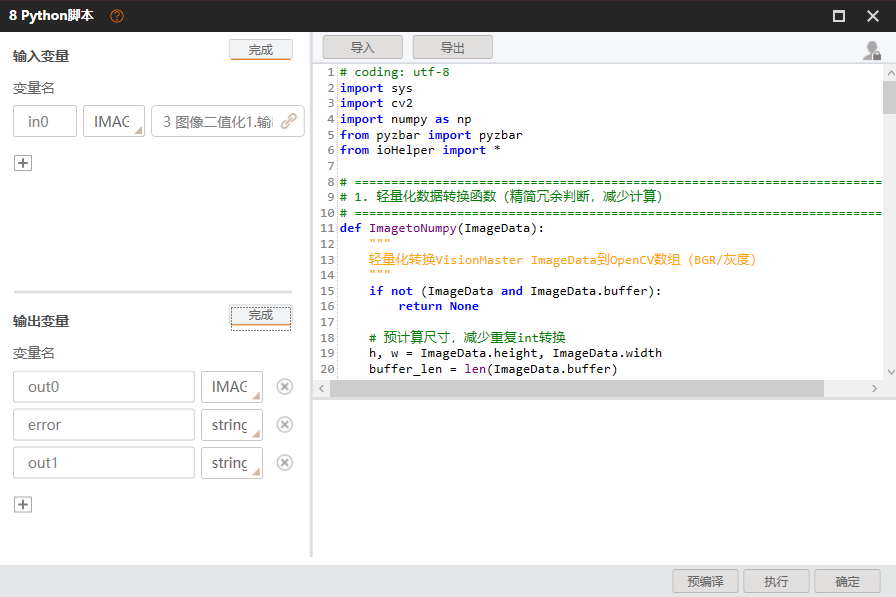
return 11.4.必须要在vm这边将image数据传入以及设置输出的image和string类型,代码中我是将输入的image类型命名为in0,输出的image类型命名为out0,输出的string类型命名为out2和error(分别管理读取到的数据以及报错信息)
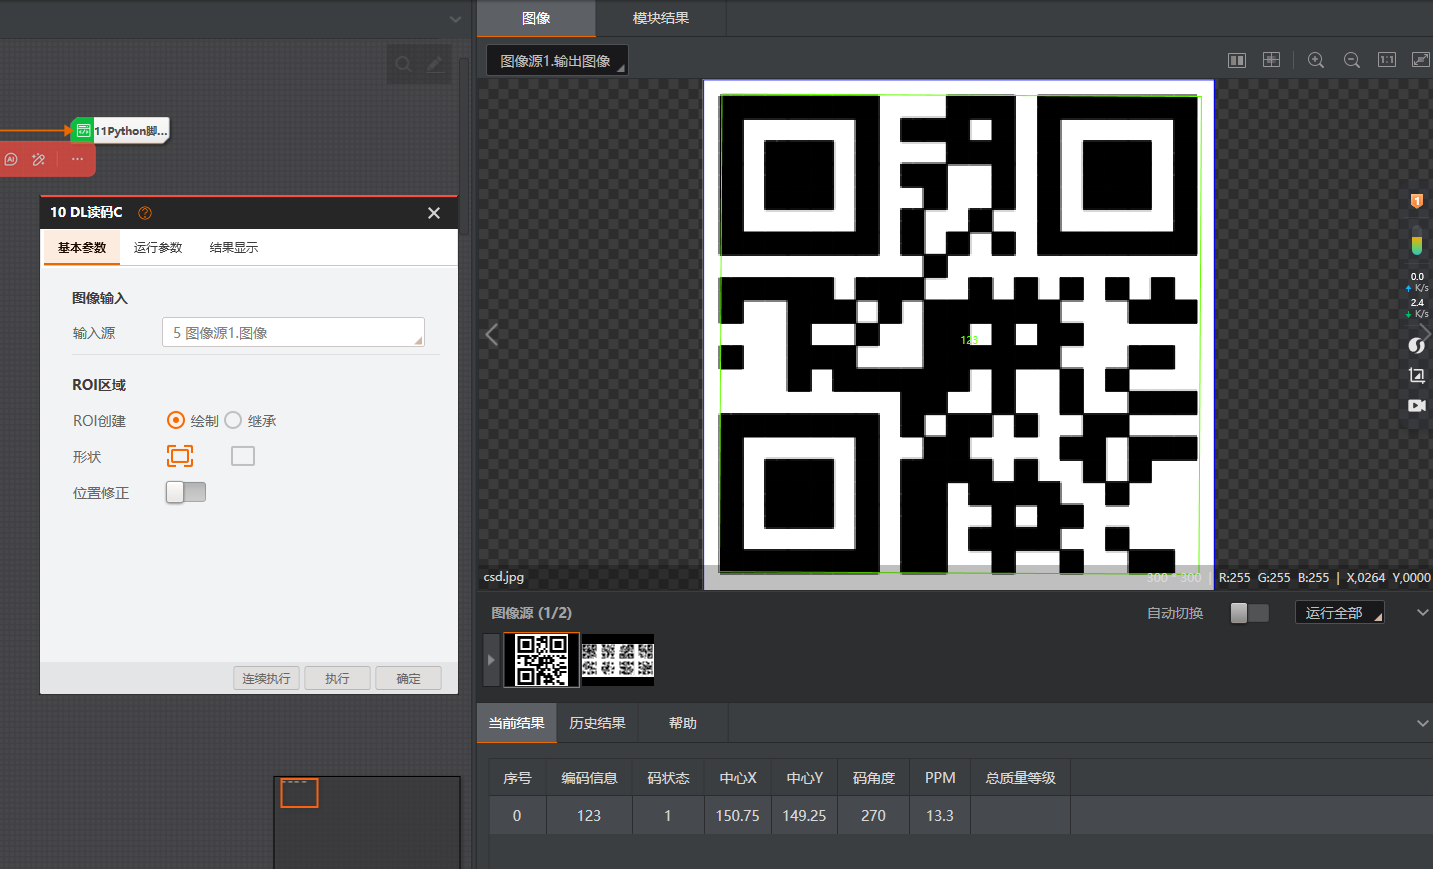
1.5.最后贴上这边用二维码识别、DL读码C、代码的最终运行效果和这几个模块的运行耗时


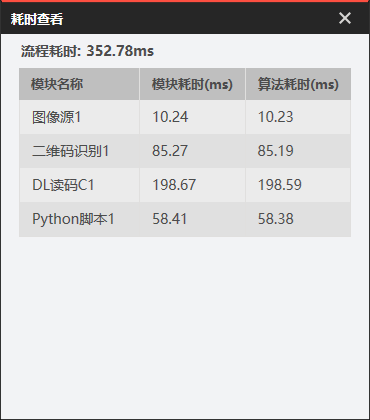
1.5.最后在此感谢下各位在我遇到问题时,就已经踩过坑并且寻找到解决方法的大佬,让我遇到的问题都能比较快速的进行解决

腾讯云面向开发者汇聚海量精品云计算使用和开发经验,营造开放的云计算技术生态圈。
更多推荐
 8
8 0
0- 0


 已为社区贡献1条内容

所有评论(0)