openclaw 运维及使用
openclaw 安装
·
一 安装
1.1 ubuntu24.04 系统安装openclaw
1.1.1 操作系统
ubuntu 24.04
ubuntu@localos:~/下载$ sudo cat /etc/os-release
PRETTY_NAME="Ubuntu 24.04.4 LTS"
NAME="Ubuntu"
VERSION_ID="24.04"
VERSION="24.04.4 LTS (Noble Numbat)"
VERSION_CODENAME=noble
ID=ubuntu
ID_LIKE=debian
HOME_URL="https://www.ubuntu.com/"
SUPPORT_URL="https://help.ubuntu.com/"
BUG_REPORT_URL="https://bugs.launchpad.net/ubuntu/"
PRIVACY_POLICY_URL="https://www.ubuntu.com/legal/terms-and-policies/privacy-policy"
UBUNTU_CODENAME=noble
LOGO=ubuntu-logo
ubuntu@localos:~/下载$
1.1.2 镜像下载
在该地址下载 https://hub.docker.com/r/alpine/openclaw/tags
1.1.3 docker-compose 脚本
ubuntu@localos:~/openclaw$ cat docker-compose.yml
services:
  openclaw:
    image: alpine/openclaw:2026.3.13-1
    container_name: openclaw
    restart: unless-stopped
    # 网络:host 模式最稳定(推荐)
    network_mode: host
    # 端口映射(非host模式时用)
    # ports:
    #   - "18789:18789"
    #   - "18792:18792"
    volumes:
      # 持久化配置与数据
      - ./data:/root/.openclaw
      - ./logs:/var/log/openclaw
      # 可选:挂载宿主机docker(用于沙箱/agent)
      # - /var/run/docker.sock:/var/run/docker.sock
    environment:
      - TZ=Asia/Shanghai
      # 允许未配置启动(首次初始化用)
      - OPENCLAW_ALLOW_UNCONFIGURED=true
    # 启动命令(镜像内置入口)
    command: ["node", "openclaw.mjs", "gateway", "--allow-unconfigured"]
    # 健康检查
    healthcheck:
      test: ["CMD", "wget", "-q", "-O", "/dev/null", "http://127.0.0.1:18789/health"]
      interval: 30s
      timeout: 5s
      retries: 3
      start_period: 20s

ubuntu@localos:~/openclaw$
1.1.4 配置token
1.1.4.1 获取token
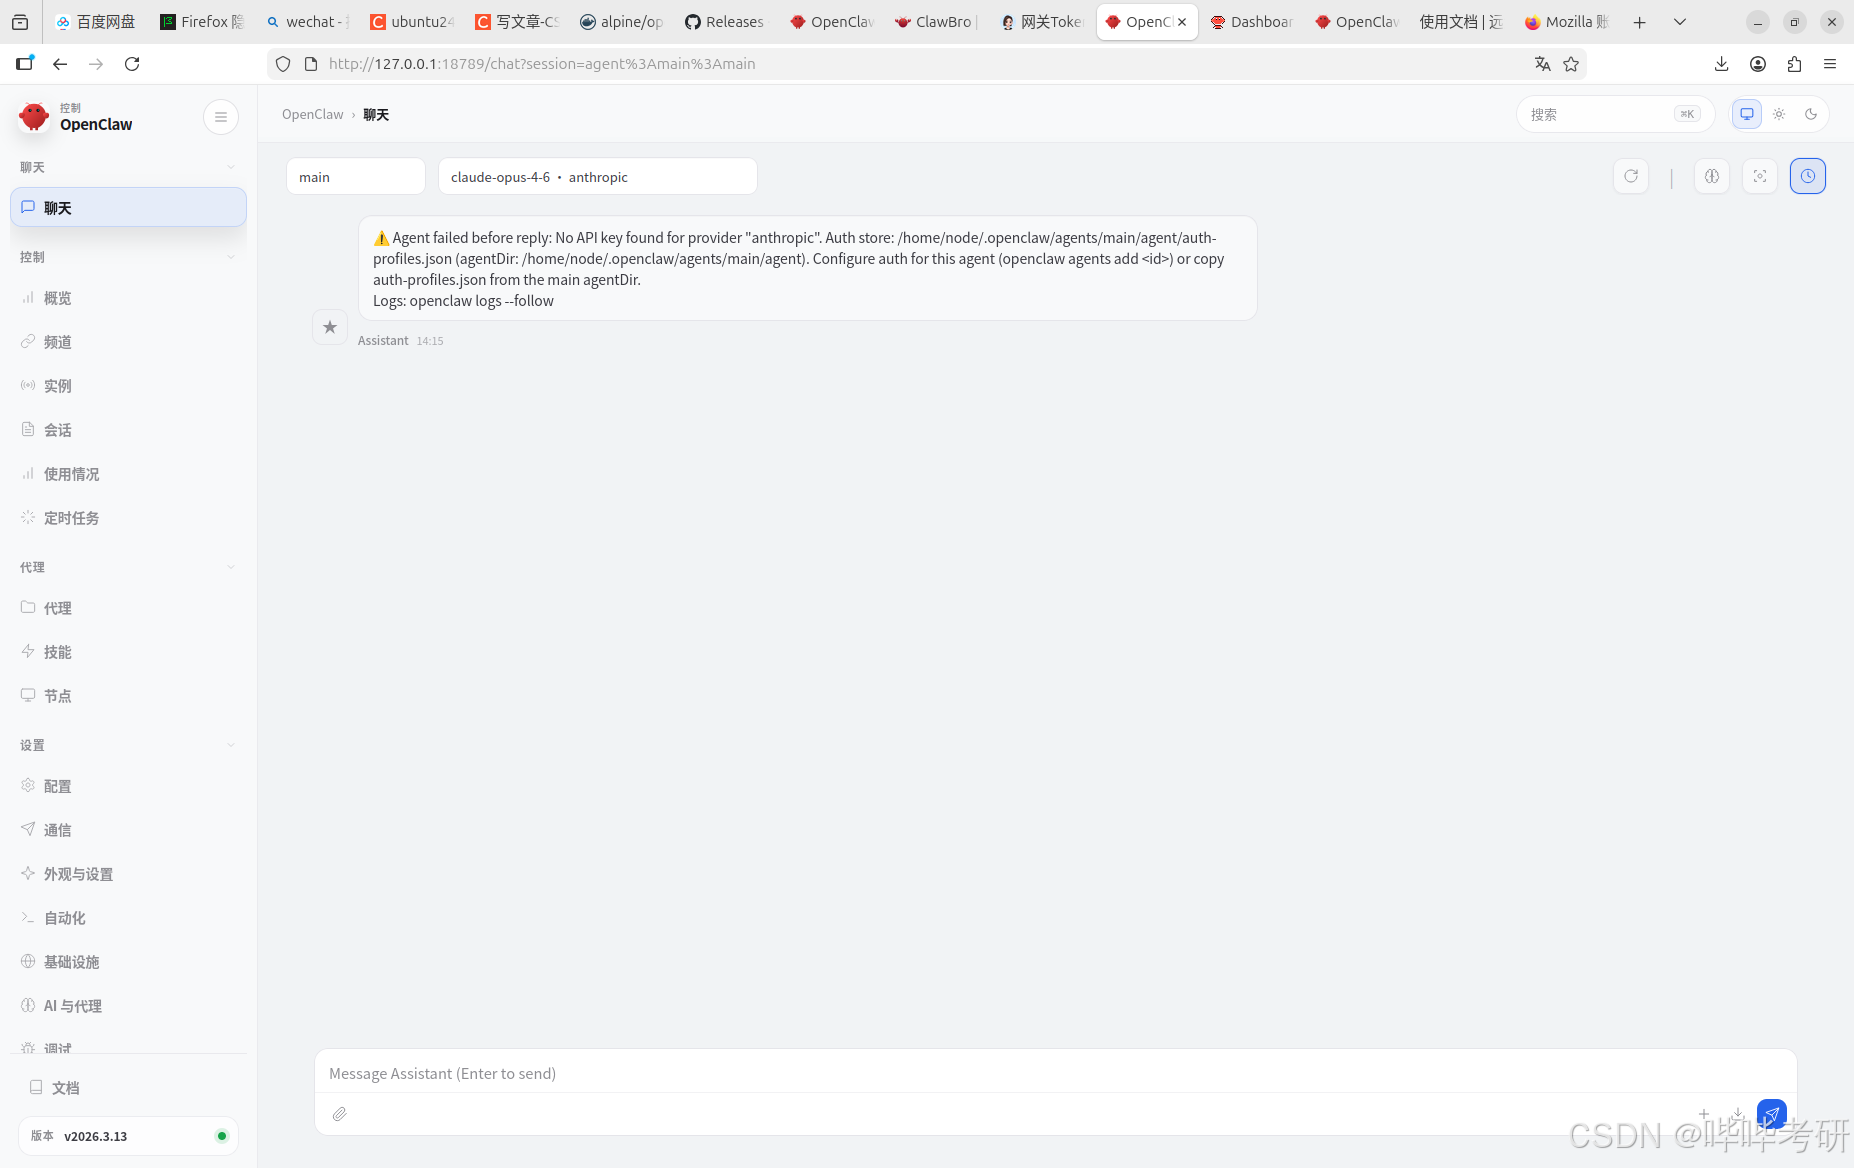
首先启动应用,然后进入容器内部执行命令获取token
ubuntu@localos:~/openclaw$ docker ps -a
CONTAINER ID   IMAGE                         COMMAND                   CREATED         STATUS                   PORTS     NAMES
6bbed3825e0b   alpine/openclaw:2026.3.13-1   "docker-entrypoint.s…"   4 minutes ago   Up 4 minutes (healthy)             openclaw
ubuntu@localos:~/openclaw$ docker exec -it openclaw bash
node@localos:/app$ openclaw gateway run

🦞 OpenClaw 2026.3.13 (unknown) — I'm the reason your shell history looks like a hacker-movie montage.

14:01:11 Gateway start blocked: set gateway.mode=local (current: unset) or pass --allow-unconfigured.
14:01:11 Config write audit: /home/node/.openclaw/logs/config-audit.jsonl
node@localos:/app$ openclaw dashboard --no-open

🦞 OpenClaw 2026.3.13 (unknown) — I don't sleep, I just enter low-power mode and dream of clean diffs.

Dashboard URL: http://127.0.0.1:18789/#token=645842f97c0084d23a7d6f7064cbcad479ea404d7374309d
Copy to clipboard unavailable.
Browser launch disabled (--no-open). Use the URL above.
node@localos:/app$
1.1.4.2 配置token
有两个方式
3.1.2.2.1 方式一
页面登陆 输入
3.1.2.2.2 方式二 永久配置
配置到环境变量里
1.2 欧拉24.03 系统安装openclaw
安装逻辑与上相同,但上面安装还有几个问题未解决
问题一:只能127.0.0.1:18789 访问,而不能使用业务ip:18789 访问;
问题二:目录映射不对
1.2.1 docker-compose 脚本
services:
  openclaw-gateway:
    image: ${OPENCLAW_IMAGE:-openclaw:local}
    environment:
      HOME: /home/node
      TERM: xterm-256color
      OPENCLAW_GATEWAY_TOKEN: ${OPENCLAW_GATEWAY_TOKEN:-}
      OPENCLAW_ALLOW_INSECURE_PRIVATE_WS: ${OPENCLAW_ALLOW_INSECURE_PRIVATE_WS:-}
      CLAUDE_AI_SESSION_KEY: ${CLAUDE_AI_SESSION_KEY:-}
      CLAUDE_WEB_SESSION_KEY: ${CLAUDE_WEB_SESSION_KEY:-}
      CLAUDE_WEB_COOKIE: ${CLAUDE_WEB_COOKIE:-}
    volumes:
      - ${OPENCLAW_DIR}/openclaw:/home/node/.openclaw
      - ${OPENCLAW_DIR}/workspace:/home/node/.openclaw/workspace
      ## Uncomment the lines below to enable sandbox isolation
      ## (agents.defaults.sandbox). Requires Docker CLI in the image
      ## (build with --build-arg OPENCLAW_INSTALL_DOCKER_CLI=1) or use
      ## docker-setup.sh with OPENCLAW_SANDBOX=1 for automated setup.
      ## Set DOCKER_GID to the host's docker group GID (run: stat -c '%g' /var/run/docker.sock).
      # - /var/run/docker.sock:/var/run/docker.sock
    # group_add:
    #   - "${DOCKER_GID:-999}"
    ports:
      - "${OPENCLAW_GATEWAY_PORT:-18789}:18789"
      - "${OPENCLAW_BRIDGE_PORT:-18790}:18790"
    init: true
    restart: unless-stopped
    command:
      [
        "node",
        "dist/index.js",
        "gateway",
        "--bind",
        "${OPENCLAW_GATEWAY_BIND:-lan}",
        "--port",
        "18789",
      ]
    healthcheck:
      test:
        [
          "CMD",
          "node",
          "-e",
          "fetch('http://127.0.0.1:18789/healthz').then((r)=>process.exit(r.ok?0:1)).catch(()=>process.exit(1))",
        ]
      interval: 30s
      timeout: 5s
      retries: 5
      start_period: 20s

  openclaw-cli:
    image: ${OPENCLAW_IMAGE:-openclaw:local}
    network_mode: "service:openclaw-gateway"
    cap_drop:
      - NET_RAW
      - NET_ADMIN
    security_opt:
      - no-new-privileges:true
    environment:
      HOME: /home/node
      TERM: xterm-256color
      OPENCLAW_GATEWAY_TOKEN: ${OPENCLAW_GATEWAY_TOKEN:-}
      OPENCLAW_ALLOW_INSECURE_PRIVATE_WS: ${OPENCLAW_ALLOW_INSECURE_PRIVATE_WS:-}
      BROWSER: echo
      CLAUDE_AI_SESSION_KEY: ${CLAUDE_AI_SESSION_KEY:-}
      CLAUDE_WEB_SESSION_KEY: ${CLAUDE_WEB_SESSION_KEY:-}
      CLAUDE_WEB_COOKIE: ${CLAUDE_WEB_COOKIE:-}
    volumes:
      - ${OPENCLAW_DIR}/openclaw:/home/node/.openclaw
      - ${OPENCLAW_DIR}/workspace:/home/node/.openclaw/workspace
    stdin_open: true
    tty: true
    init: true
    entrypoint: ["node", "dist/index.js"]
    depends_on:
      - openclaw-gateway
1.2.2 创建映射目录,并修改权限
openclaw 容器一般运行用户是node,uid 是1000
我们要修改宿主机映射目录权限
# 创建目录(如果不存在)
[root@localhost openclawdata]# mkdir {openclaw,workspace}
[root@localhost openclawdata]# pwd
/data/yunweipro/openclawapp/openclawdata
[root@localhost openclawdata]# chown -R 1000:1000 /data/yunweipro/openclawapp/openclawdata/openclaw/ /data/yunweipro/openclawapp/openclawdata/workspace/
1.2.3 onboard 方式启动
1.2.3.1 启动
# 1. 安装 socat
dnf install -y socat  # CentOS/RHEL
# apt install -y socat  # Ubuntu/Debian

# 2. 创建自启动转发服务
cat > /etc/systemd/system/openclaw-forward.service << EOF
[Unit]
Description=OpenClaw Port Forward
After=network.target docker.service

[Service]
Type=simple
# 将 0.0.0.0:28789 转发到 127.0.0.1:18789
ExecStart=/usr/bin/socat TCP4-LISTEN:28789,bind=0.0.0.0,reuseaddr,fork TCP4:127.0.0.1:18789
Restart=always
RestartSec=5
User=root

[Install]
WantedBy=multi-user.target
EOF

# 3. 启动并启用转发服务
systemctl daemon-reload
systemctl start openclaw-forward
systemctl enable openclaw-forward

# 4. 放行防火墙端口(关键)
firewall-cmd --add-port=18789/tcp --permanent
firewall-cmd --reload
验证访问ip:28789 即可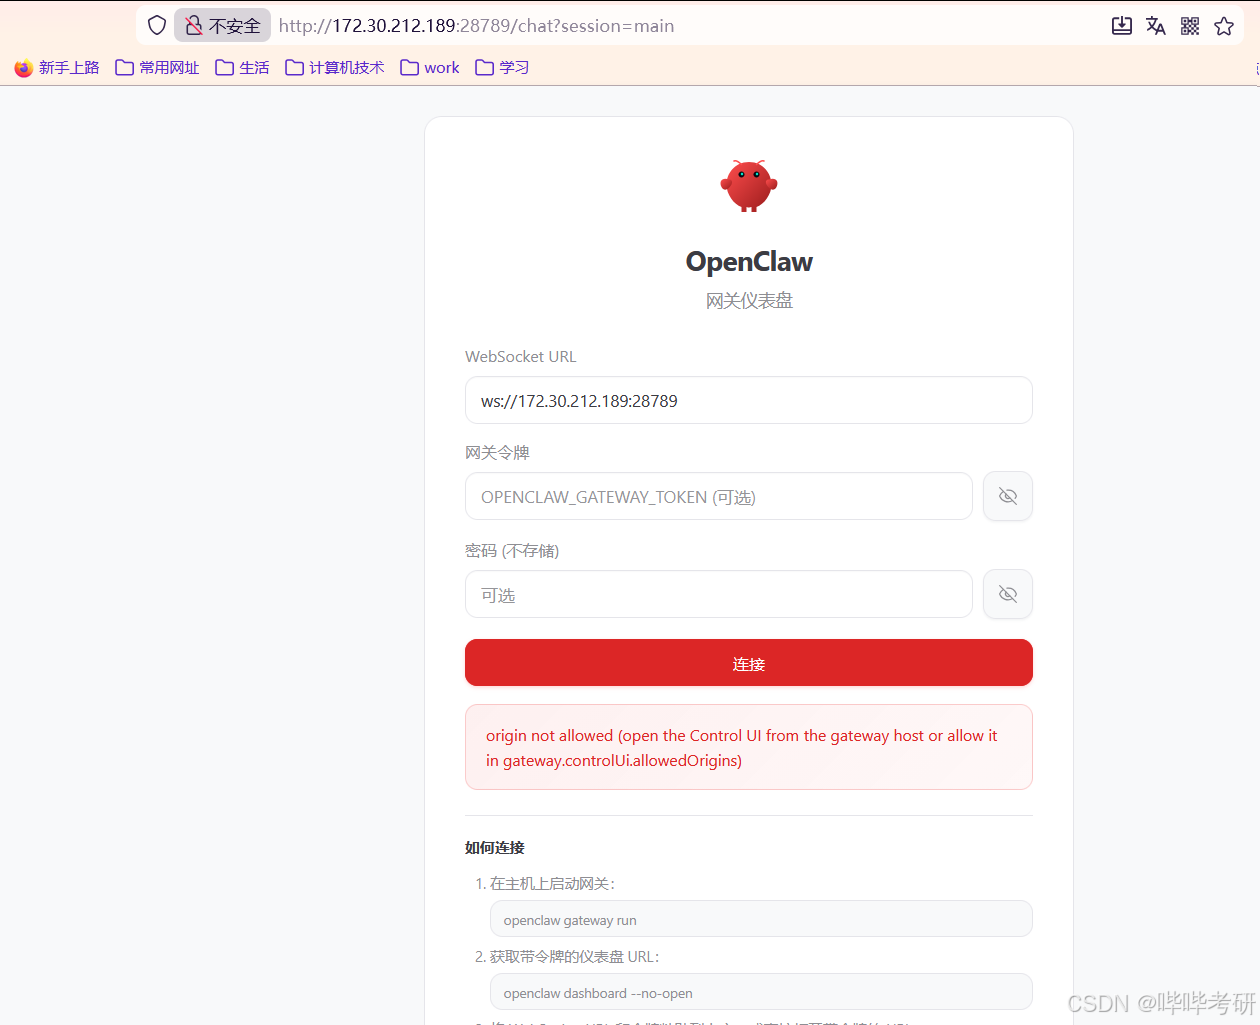
1.2.4 配置nginx 反向代理
server {
    listen 8080;
    server_name xxxx.com; # 替换为你的 Nginx 域名/IP

    # 核心:代理远程 Server A 的 28789 端口
    location / {
        proxy_pass http://172.30.212.189:28789; # 替换为 Server A 的 IP

        # ========== 基础 HTTP 头(原有) ==========
        proxy_set_header Host $host;
        proxy_set_header X-Real-IP $remote_addr;
        proxy_set_header X-Forwarded-For $proxy_add_x_forwarded_for;
        proxy_set_header X-Forwarded-Proto $scheme;

        # ========== 新增:WebSocket 必需配置 ==========
        proxy_set_header Origin $scheme://$host; # 关键:传递真实的 Origin 给 OpenClaw
        proxy_http_version 1.1;                 # WebSocket 要求 HTTP/1.1
        proxy_set_header Upgrade $http_upgrade; # 升级协议为 WebSocket
        proxy_set_header Connection "upgrade";  # 保持连接升级

        # ========== 超时配置(适配 WebSocket 长连接) ==========
        proxy_connect_timeout 60s;
        proxy_send_timeout 3600s;    # WebSocket 长连接超时设为1小时
        proxy_read_timeout 3600s;
        proxy_buffering off;         # 关闭缓冲区,避免 WebSocket 消息延迟

        # ========== 跨域配置(增强) ==========
        add_header Access-Control-Allow-Origin $http_origin; # 动态匹配 Origin
        add_header Access-Control-Allow-Credentials true;    # 允许携带凭证
        add_header Access-Control-Allow-Methods 'GET, POST, PUT, DELETE, OPTIONS, WEBSOCKET';
        add_header Access-Control-Allow-Headers 'User-Agent, Content-Type, Authorization, X-Requested-With, Upgrade, Connection';

        # 处理 OPTIONS 预检请求
        if ($request_method = OPTIONS) {
            return 204;
        }
    }

    # 日志配置
    access_log /var/log/nginx/proxy_openclaw_access.log main;
    error_log /var/log/nginx/proxy_openclaw_error.log warn;
}

腾讯云面向开发者汇聚海量精品云计算使用和开发经验,营造开放的云计算技术生态圈。
更多推荐
 0
0 0
0- 0


 已为社区贡献4条内容

所有评论(0)