

ionic 验证表单
I have to be honest. This task seems to look easy but it was quite a while for me to understand how to do it. From an Ionic development perspective, the tricky part here is to figure out the Captcha part, which took me awhile to figure out but I eventually did.
老实说 这个任务看起来很简单,但是我花了相当长的时间才知道如何去做。 从离子开发的角度来看,这里最棘手的部分是弄清楚验证码部分,这花了我一段时间才弄清楚,但我最终做到了。
Firebase Phone Authentication was just very recently made available in my country, so I’m quite excited about this. In this article, I will integrate the Firebase Phone Authentication with an Ionic Angular Progressive Web App (PWA).
Firebase电话身份验证是最近才在我的国家/地区推出的,因此我对此感到非常兴奋。 在本文中,我将把Firebase电话身份验证与Ionic Angular渐进式Web应用程序(PWA)集成在一起。
This is a simple step by step guide on how to create a Firebase Phone Authentication Login with Ionic 5 and hopefully everyone reading this succeeds in creating a phone based authentication login with your Ionic 5 progressive web app.
这是有关如何使用Ionic 5创建Firebase电话身份验证登录的简单分步指南,希望阅读此指南的每个人都可以使用Ionic 5渐进式Web应用程序成功创建基于电话的身份验证登录。
Read on!
继续阅读!
Step 0: Make sure you are familiar with Ionic 5 and Firebase
第0步:确保您熟悉Ionic 5和Firebase
Not to discourage, but if you are brand new to Angular and Ionic, it will be a little bit difficult to follow. Having said that however…
不要气our,但是如果您是Angular和Ionic的新手,它将很难理解。 话虽如此...
If you are unfamiliar with Ionic 5, it would be a good idea to have a look at Ionic 5 for your future development because it is basically building an app with HTML, TypeScript and CSS and the unique feature about building hybrid apps with Ionic 5? It works everywhere whether as a Progressive Web App or as an Android, iOS and even a fully fledged computer program.
如果您不熟悉Ionic 5,那么最好看一下Ionic 5的未来发展,因为它基本上是在用HTML,TypeScript和CSS来构建应用程序,以及有关用Ionic 5来构建混合应用程序的独特功能? 无论是作为渐进式Web应用程序,还是作为Android,iOS甚至是成熟的计算机程序,它都可以在任何地方工作。
Coupled with Firebase and you don’t even have to worry about the back end because all of this is taken care off for you. I’ve written a few articles about the Ionic Framework and Firebase by Google, so you can refer to my past articles about both.
再加上Firebase,您甚至不必担心后端,因为所有这些都为您准备了。 我已经写了几篇有关Ionic Framework和Firebase的文章,因此您可以参考我过去有关这两者的文章。
To find out about Ionic Framework and Firebase, the following are links to their official websites.
要了解有关Ionic Framework和Firebase的信息,以下是其官方网站的链接。
第1步:确保在Ionic 5项目中配置了Firebase (Step 1: Make sure you have Firebase configured in your Ionic 5 project)
The first thing to do is to install Firebase in your Ionic Application. To do this, simply run the following command in your command prompt:
首先要做的是在您的Ionic应用程序中安装Firebase。 为此,只需在命令提示符下运行以下命令:
npm install firebaseThat’s it. This will install Firebase for you.
而已。 这将为您安装Firebase。
步骤2:建立Firebase专案 (Step 2: Create a Firebase project)
I’ve written about this before, so all you to do is just follow the instructions on how to install, setup and initialize a Firebase project from this article that I have written previously:
我之前已经写过有关此内容的文章,因此您所要做的只是按照我先前撰写的文章中有关如何安装,设置和初始化Firebase项目的说明进行操作:
Just in case its too long for you to read, here’s an excerpt from the article above that I wrote:
以防万一您读的时间太长,以下是我写的上述文章的摘录:
Setting up Firebase
设置Firebase
- Click ‘Add Project’. Give your project a name and click ‘Continue’ 点击“添加项目”。 为您的项目命名,然后单击“继续”

2. The first thing you will be asked is to add analytics. This is up to your discretion if you want to add analytics or otherwise. If you do not want to, just uncheck this part.
2.将首先要求您添加分析。 如果要添加分析或其他方式,这取决于您的判断。 如果不想,只需取消选中此部分。
3. Firebase will automatically create a project for you, this will take about 2 minutes.
3. Firebase会自动为您创建一个项目,这大约需要2分钟。
4. Once this is done, you will need to add an application to this project. Ionic Angular projects are essentially Angular projects, therefore, create a web based project
4.完成后,您将需要向该项目添加一个应用程序。 Ionic Angular项目本质上是Angular项目,因此,创建一个基于Web的项目
5. You will then be presented with a bunch of configuration keys. Copy and paste this keys, we will need this later. Click on Done.
5.然后,您将看到一堆配置密钥。 复制并粘贴此密钥,稍后我们将需要它。 单击完成。
6. Go to Authentication tab, click on ‘Sign in method’ and make sure you enable phone. I would recommend adding your own phone number for testing and also add a simple code to remember so that you do not have to wait for a code each time.
6.转到身份验证选项卡,单击“登录方法”,并确保启用电话。 我建议您添加自己的电话号码进行测试,并建议您记住一个简单的代码,这样您就不必每次都等待代码了。
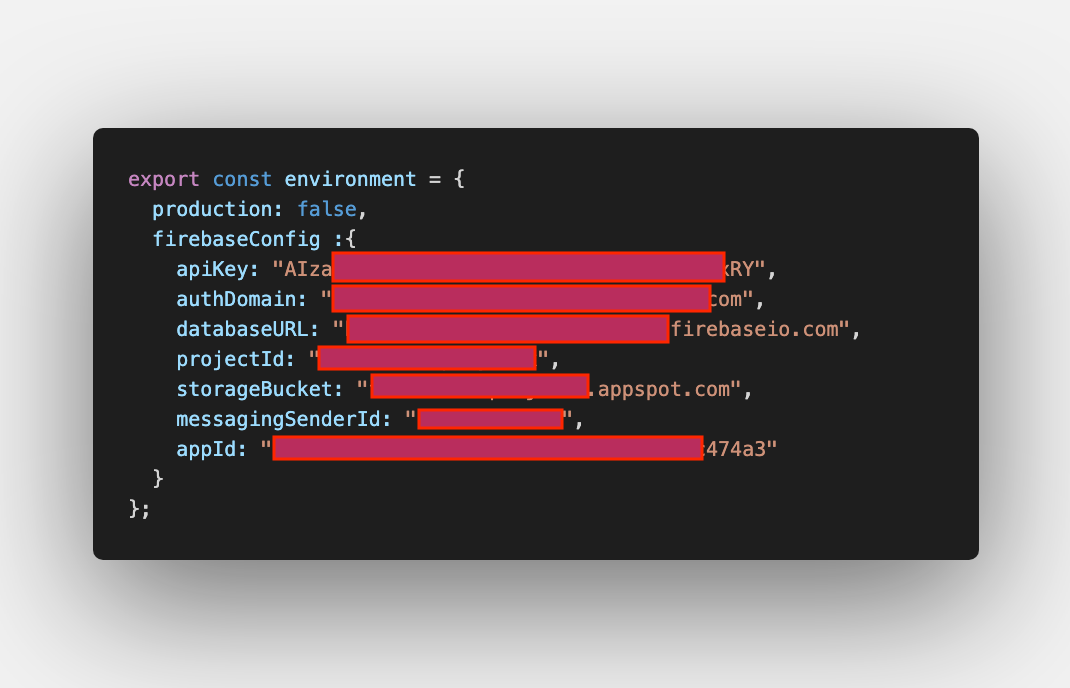
7. BACK TO YOUR IONIC PROJECT, add the configuration keys from Step 5 into environment.ts like so:
7.返回您的离子项目,将步骤5中的配置密钥添加到environment.ts中,如下所示:
8. Initialise your Firebase project inside your app.module.ts file
8.在app.module.ts文件中初始化Firebase项目
import * as firebase from 'firebase';
import { environment } from '../environment/environment';....firebase.initialiseApp(environment.firebaseConfig);
步骤3:将全局调用添加到窗口引用 (Step 3: Add a global call to window ref)
You have to create a service to call windows globally. After creating a window service, you will need to create a windowRef (credits for this solution given to Fireship Youtube channel). This was the tricky part but thanks to Fireship, I was able to find the solution in their video.
您必须创建一个服务才能全局调用Windows。 创建窗口服务后,您将需要创建windowRef(此解决方案的信用分配给Fireship Youtube频道)。 这是棘手的部分,但是由于有了Fireship,我得以在他们的视频中找到解决方案。
I recommend you guys to subscribe to the Fireship Youtube channel for more Angular and Firebase related development:
我建议你们订阅Fireship Youtube频道,以进行更多与Angular和Firebase相关的开发:
So, all you need to do to get the windows solution is to just add the following in a service that you have created:
因此,获取Windows解决方案所需要做的只是在已创建的服务中添加以下内容:
In window.service.ts
在window.service.ts中
get windowRef(){    return window;
}
步骤4:在ionViewWillEnter()中添加以下几行,以确保在页面准备就绪时,这是第一批加载的东西。 您还需要创建一个函数来登录: (Step 4: Add the following lines in ionViewWillEnter() to make sure it is the first things loaded when the page is ready. You will also need to create a function to login:)
In home.page.ts, add the following:
在home.page.ts中,添加以下内容:
import * as firebase from 'firebase';import {WindowService} from '../service/window.service';...windowRef:any;prefix:any;
line:any;verifCode:any;...constructor(public windowService : WindowService){}
//Initiate windowRef from WindowServiceionViewWillEnter(){  this.windowRef=await this.windowService.windowRef;  this.windowRef.recaptchaVerifier=await new firebase.auth.RecaptchaVerifier('recaptcha-container');  await this.windowRef.recaptchaVerifier.render()}sendLoginCode(){//Make sure phone number in e164 format   const num=this.prefix.toString()+this.line.toString();   const appVerifier=this.windowRef.recaptchaVerifier;   firebase.auth().signInWithPhoneNumber(num,appVerifier)
   .then(result=>{   this.windowRef.confirmationResult=result;   }).catch(err=>console.log('err1',err))}submitVerif(){   this.windowRef.confirmationResult.confirm(this.verifCode)
   .then(async result=>{

    //If the result is successful...   })
   .catch(err=>{
    console.log('err2',err)
   });
第5步:创建一个“验证码框” div并创建一个按钮来执行调用Firebase的功能,以将SMS发送到用户的电话号码 (Step 5: Create a ‘recaptcha box’ div and create a button to execute a function to call Firebase to send an SMS to user’s phone number)
<ion-grid>
 <ion-row>    <ion-col size='3' style="font-size:0.8em;font-weight:bolder;">      <strong>        PRE FIX      </strong>    </ion-col>    <ion-col size='9' style="font-size:0.8em;font-weight:bolder;">      <strong>        PHONE NUMBER      </strong>    </ion-col> </ion-row><ion-row>     <ion-col size='3'>        <ion-input [(ngModel)]="prefix" placeholder="6012" type="tel" maxlength='4'></ion-input>     </ion-col>     <ion-col size='9'>        <ion-input [(ngModel)]="line" placeholder="2345678" type="tel"></ion-input>     </ion-col></ion-row>
  <div class='ion-center' style="position:relative;z-index:10;width:100%;margin-left:2em;margin-right:auto;">    <div id="recaptcha-container"></div>  </div></ion-grid><ion-button (click)="sendLoginCode()" color="primary" style="z-index:4;width:100%;">      <ion-icon name="chevron-forward" slot="end"></ion-icon>
      SUBMIT</ion-button>
步骤6:验证用户的验证码 (Step 6: Verify the user’s verification code)
If all is well, the user should receive an SMS from Firebase. This SMS will contain a verification code. The user will input this code into our application and we need to verify this code.
如果一切顺利,则用户应从Firebase接收SMS。 该SMS将包含验证码。 用户会将此代码输入到我们的应用程序中,我们需要验证此代码。
To receive the code in HTML, just enter a simple ion-input box into the HTML and then in the TS file we will need to end over the verification code to Firebase to verify.
要接收HTML中的代码,只需在HTML中输入一个简单的离子输入框,然后在TS文件中,我们需要将验证代码移交给Firebase进行验证。
Please note, in this example, I am using the type="number" instead of password, but its really up to you what type of input you want, this really depends on your creativity, maybe you could create several different boxes that would eventually be combined later, just some ideas, but the SMS will definitely contain numbers that the users will then need to enter into the input box.
请注意,在此示例中,我使用的是type="number"而不是密码,但这取决于您所需的输入类型,这实际上取决于您的创造力,也许您可以创建几个不同的框,最终稍后再组合,只是一些想法,但是SMS肯定会包含用户随后需要在输入框中输入的数字。
So, with that in mind, in home.page.html
因此,请记住,在home.page.html中
<ion-input [(ngModel)]="verifCode" type="number">
</ion-input><ion-button (click)="verifyCode()">Verify Code</ion-button>
If the verifyCode() function is successful, your should be able to verify your user. Just a quick note: Google gives out 10,000 SMS for free for you to verify your user. Anything beyond 10,000 is at your cost charged through your Firebase Blaze plan.
如果verifyCode()函数成功,则您应该能够验证您的用户。 快速说明:Google免费提供10,000条SMS,供您验证用户。 超过10,000的费用将通过Firebase Blaze计划收费。
AND THAT’S IT, you should be able to verify your user and if the user is new, you should be able to automatically create a new user in your authentication list in Firebase.
而且,您应该能够验证您的用户,如果该用户是新用户,则应该能够在Firebase的身份验证列表中自动创建一个新用户。
DO give it a try folks!
尝试一下吧!
Selamat Mengaturcara
塞拉玛特(Selamat Mengaturcara)
翻译自: https://medium.com/swlh/firebase-phone-authentication-login-with-ionic-5-601fd0831e23
ionic 验证表单


 已为社区贡献11条内容

所有评论(0)