

深度堆叠卷积神经网络
Introduction
介绍
“Hello, world!” The name’s Matthew, and this is my first entry in the world of Medium. I’m a data scientist who builds things with numbers and computers. No need to bother with my life story; none of you came here for that.
“你好,世界!” 名字是Matthew,这是我在Medium领域的第一个条目。 我是一位数据科学家,他用数字和计算机来构建事物。 无需理会我的生活故事; 你们没人来这儿。
This article aims to hit two main points:
本文旨在强调两个主要观点:
-
Developing an intuition for stacking models. I have seen so many good explanations-for-five-year-olds of bagging and boosting but seldom for stacking.
为堆叠模型开发直觉 。 对于5岁的装袋和提起玩具,我见过很多很好的解释,但很少有人进行堆叠。
-
Providing a guided example to implement a stacking neural net using Keras’ subclassing technique.
提供一个指导性示例,以使用Keras的子分类技术实现堆叠神经网络。
Without further ado…
无需再费周折…
直觉和元学习者 (Intuition and Meta-learners)
Story time
讲故事的时间
Let’s take ourselves back to the days of schooling and imagine a nice, young man named Calvin. His take-home calculus exam is due tomorrow, and, although the teacher warned that working in groups will weaken his education as a whole, we all know what he’s going to do: later that day we’ll find him with his friends, Alyssa and Bobby, scrambling through the exam as one.
让我们回到上学的日子,想象一下一个名叫卡尔文的好年轻人。 他的带回家的微积分考试将于明天到期,尽管老师警告说,与小组合作会削弱他的整体教育,但我们都知道他会做什么:那天晚些时候,我们将和他的朋友Alyssa一起找到他。和鲍比(Bobby)一起参加考试。
First, let’s shed some light on this group of friends. Alyssa is a stand-up student who gets A’s on every exam, regardless of the subject. She is, however, quite arrogant about her intellect and is unlikely to take someone else’s advice or opinion. Bobby is a bit more average, but she has a certain gift for series convergence, one of the topics being covered on this particular test. And Calvin? Well I hate to to say it, but he would be flunking if it weren’t for his two buddies. Thankfully, they don’t mind helping him along.
首先,让我们对这组朋友进行一些说明。 阿丽莎(Alyssa)是一个独立的学生,每门考试都获得A(无论科目)。 但是,她对自己的才智非常自大,不太可能接受别人的建议或意见。 Bobby的平均水平更高一些,但是她对系列收敛有一定的天赋,该特定测试涵盖了其中一个主题。 还有卡尔文? 好吧,我不想这么说,但是如果不是他的两个哥们,他会失败的。 值得庆幸的是,他们不介意帮助他。
Days later the test scores are handed back:
几天后,考试成绩还给您:
Alyssa: 92%
艾丽莎:92%
Bobby: 83%
鲍比:83%
Calvin: 94%
加尔文:94%
In a rage, Alyssa yells at him, “how is this possible!? You didn’t even learn the material you numskull!” Chuckling under his breath, Calvin responds, “but I certainly learned you two.” He copied most of Alyssa’s answers, but when her series-related answers differed from Bobby’s, he sided with Bobby. Now he just has to hope there isn’t a pop quiz…
阿丽莎大怒地对他吼道:“怎么可能!? 您甚至都没有学过胡说八道的材料!” 卡尔文轻笑着笑着,“但我当然学会了你们两个。” 他复制了Alyssa的大部分答案,但是当她与系列相关的答案与Bobby的答案有所不同时,他支持Bobby。 现在他只希望没有一个流行测验……
Meta-learning and Ensembles
元学习和合奏
Lets start to generalize here: Model A = Alyssa, Model B = Bobby, and, drum-roll please… Model C = Calvin. Both Alyssa and Bobby learned the more traditional way from textbooks and practice problems, but Calvin took a different approach to learning. Instead of learning the material, he learned the details and intricacies of how Alyssa and Bobby had learned and performed! This is precisely what meta-learning is: learning about learning.
让我们在这里开始概括一下:模型A = Alyssa,模型B = Bobby,然后鼓式转鼓……模型C =卡尔文。 艾丽莎和鲍比都从教科书和习题中学习了更传统的方式,但加尔文采取了不同的学习方式。 他没有学习材料,而是了解了Alyssa和Bobby如何学习和表演的细节和错综复杂的知识! 这正是元学习: 学习学习。
Crossing the bridge to machine learning, we can utilize this concept in a direct way. When a data scientist is poking around the vast space of potential models to use for a classification problem, it can become a daunting task to find something suitable. Even experts who can pinpoint the better models will have several degrees of freedom to explore via hyper-parameters. At the end of the day, we’ll likely have a handful of different models that have varying degrees of performance. Now, how to choose?
跨过机器学习的桥梁,我们可以直接使用此概念。 当数据科学家四处寻找用于分类问题的大量潜在模型时,寻找合适的东西可能成为一项艰巨的任务。 即使是能够找到更好模型的专家,也可以通过超参数探索多个自由度。 归根结底,我们可能会有少数几种不同的模型,它们具有不同程度的性能。 现在,如何选择?
Although it’s tempting to just pick the model that has performed the best, know that accuracy (or whatever metric you are using for “model goodness”) is not a full measure of what your entire set of models has learned. Yes, Alyssa may be better than Bobby overall, but Bobby has his strengths, and if we can figure out how to incorporate them together with Alyssa’s, we can potentially outshine both of their individual performances. This brings us to the idea of ensemble models: using multiple models in unison to achieve a better result.
尽管只选择性能最佳的模型很诱人,但要知道准确度(或您用于“模型优度”的任何度量标准)并不能完全衡量整个模型集所学的内容。 是的,Alyssa总体上可能比Bobby更好,但是Bobby有他的优势,如果我们能弄清楚如何将它们与Alyssa融合在一起,我们有可能超越他们的个人表现。 这使我们想到了集成模型的思想:统一使用多个模型以获得更好的结果。
“Ensembling” is a broad idea, and there are several ways of going about it. A couple that are popular are known as bagging and boosting. The former uses the same base model but it’s fitted on different, resampled versions (bootstrapping) of the original data. These models are then aggregated up as an ensemble. This method is useful for reducing model variance. The latter technique, boosting, focuses on training a sequence of models where each successive model aims to correct the errors that the previous models had; this technique is better at reducing model bias. These two concepts warrant there own full length discussion.
“集成”是一个广泛的想法,有几种解决方法。 一对受欢迎的夫妻被称为袋装和加强。 前者使用相同的基本模型,但适用于原始数据的不同重采样版本(自举)。 然后将这些模型汇总为一个整体。 该方法对于减少模型方差很有用。 后一种技术,Boosting,专注于训练一系列模型,其中每个后续模型都旨在纠正先前模型所具有的错误; 该技术更适合于减少模型偏差。 这两个概念需要进行完整的讨论。
Stacking
堆码
Another ensemble method, stacking, will be our focus for the rest of this article. The idea behind stacking falls in line neatly with our student example above: take two or more base models that are performing the same classification task and let a new model, a meta-learner, take the predictions of all the base models and assemble its own prediction. This is precisely what happened between Alyssa, Bobby, and Calvin. The good news is that the results from that story can carry through to machine learning too…
本文的其余部分将重点讨论另一种集成方法,即堆叠。 堆叠背后的想法与我们上面的学生示例非常吻合:采用两个或多个执行相同分类任务的基础模型,然后让一个新模型(元学习器)采用所有基础模型的预测并组装自己的模型预测。 这正是Alyssa,Bobby和Calvin之间发生的事情。 好消息是,该故事的结果也可以延续到机器学习中……
With a caveat.
警告。
Remember how we said Calvin would be flunking without his friends and their brains? This also carries over, unfortunately. If we take two models on a binary classification problem that both perform about equally to a model that just guesses, our meta-learner isn’t going to learn jack. We need a certain level of competence from our base models so that our meta-learner can do something with the predictions they give out. This goes along with the ol’ data mantra: garbage in, garbage out.
还记得我们曾说过加尔文如果没有他的朋友和他们的大脑会失败吗? 不幸的是,这也延续了下来。 如果我们在二进制分类问题上采用两个模型,它们的性能与仅仅猜测的模型差不多,那么我们的元学习者将不会学习jack。 我们需要基本模型具有一定水平的能力,以便我们的元学习者可以对他们给出的预测有所作为。 这与所有的数据口号相伴:垃圾进,垃圾出。
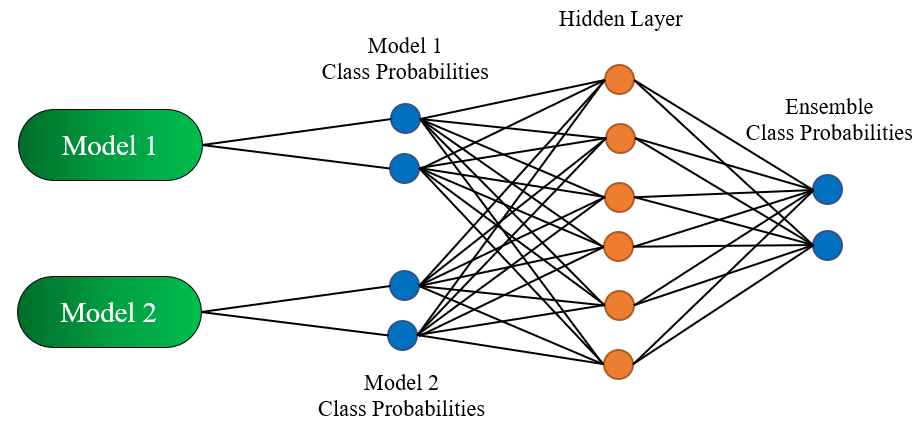
As we move towards implementing a stacking model, we’ll narrow our focus from general models to neural networks for image classification. I’m assuming a general understanding of neural nets on the reader’s end, so if this is brand new to you I’d suggest learning about them first. The diagram below is an example of a stacking model for a binary classification task that may be a useful reference:
随着我们朝着实现堆叠模型的方向发展,我们将把注意力从通用模型缩小到用于图像分类的神经网络。 我假设读者对神经网络有一个大致的了解,因此,如果这对您来说是全新的,我建议您先学习一下。 下图是二进制分类任务的堆栈模型示例,可能是有用的参考:
实现 ( 有趣的东西) (Implementation (the fun stuff))
Before we get into it, let’s put out a top level summary of all the tools we’ll be using:
在开始讨论之前,让我们给出将要使用的所有工具的顶级摘要:
- Keras, TensorFlow 2 (gpu accelerated), Python 3 Keras,TensorFlow 2(gpu加速),Python 3
Our plan of attack is to first create a CNN that serves as a base model. This will be able to perform image classification just fine in its own right. We’ll allow for some flexibility in the specifics of the model so that we can create many CNNs that differ from each other in structure. Next, we will create a full model that will include training the CNNs and linking up all of the bases to a meta-learner (a simple ANN). We will lastly apply this stacking model to actual datasets and see how it performs. Let’s get to it.
我们的攻击计划是首先创建一个充当基本模型的CNN。 这样就可以执行图像分类。 我们将在模型细节方面留出一定的灵活性,以便我们可以创建许多结构互不相同的CNN。 接下来,我们将创建一个完整的模型,其中包括训练CNN并将所有基础链接到元学习器(简单的ANN)。 我们最后将这个堆叠模型应用于实际数据集,并查看其性能。 让我们开始吧。
Base Model (Convolutional Neural Network)
基本模型(卷积神经网络)
First, let’s build up a base model. We are going to work off of the LeNet architecture, a common approach for image classification. LeNet consists of two general pieces: a feature extraction piece and a classification piece. The former is responsible for picking out ‘relevant’ portions of an image, and the latter is explained by its name alone. See here for a more detailed description on LeNet, or follow along in the next two paragraphs for a general idea.
首先,让我们建立一个基本模型。 我们将以LeNet架构为基础,该架构是图像分类的常用方法。 LeNet由两部分组成:特征提取部分和分类部分。 前者负责挑选图像的“相关”部分,而后者仅通过其名称来解释。 有关LeNet的详细说明,请参见此处 ;有关一般性概念,请参见以下两段。
Feature Extraction:
特征提取:
Once an input image is fed into our CNN, it is passed to a convolutional layer, then to a max pooling layer which down-samples the image so that the training computations stay feasible. We can then rinse and repeat this process a few times to give our model more flexibility in picking out features. I’m glossing over the gritty details here such as the filter, filter size, and output channels, but a full explanation of CNN layers is out of the scope of this article; we’ll leave it at a broad explanation.
将输入图像输入到我们的CNN中之后,它会传递到卷积层,然后传递到最大池化层,该层会对图像进行下采样,从而使训练计算保持可行。 然后,我们可以冲洗并重复几次此过程,以使我们的模型在选择功能时更具灵活性。 我在这里详细介绍了诸如过滤器,过滤器大小和输出通道之类的细节,但是对CNN层的完整说明不在本文的讨论范围之内。 我们将对其进行广泛的解释。
Classification Piece:
分类件:
After the feature extraction piece, we will be left with an image of shape (height, width, number of channels). All of the actual values will depend directly on the input image size and the feature extraction piece of the model, but all we need to know at the moment is the structure of the tensor we’re looking at. This image gets passed into a flattening layer which converts the tensor into a vector of length height*width*channels. The rest of the CNN is then carried out by fully connected layers with a softmax activation at the end. Note that we will need to specify our last layer to include as many nodes as we have categories in our data.
在特征提取部分之后,我们将得到一个形状(高度,宽度,通道数)的图像。 所有的实际值将直接取决于输入图像的大小和模型的特征提取部分,但是目前我们所需要知道的只是我们正在查看的张量的结构。 该图像被传递到平坦化层,该层将张量转换为长度为height * width * channels的向量。 然后,通过完全连接的层执行CNN的其余部分,并在最后进行softmax激活。 请注意,我们将需要指定最后一层,以包含与数据中类别相同数量的节点。
Let’s get into some code, finally. We’re going to use Keras and its subclassing scheme to build this model; this is particularly good for creating not-so-standard machine learning models. Also, if you are an object oriented programmer at heart, this is probably for you. For the interested reader, here is the source code repo to run yourself. Note: some of the code has been altered for brevity. Source code and Gists will not be identical.
最后,让我们看一些代码。 我们将使用Keras及其子类化方案来构建此模型。 这对于创建非标准的机器学习模型特别有用。 另外,如果您是一个面向对象的程序员,那么这可能适合您。 对于感兴趣的读者,这是可以自己运行的源代码库 。 注意:为简洁起见,对某些代码进行了更改。 源代码和Gist不会完全相同。
We will be working from the the Keras parent class, Model. There are two necessary components to build out a Keras Model (or Keras Layer) subclass. First, you need to update the initialization method to include all of the layers you will use. Second, you need to write a call method that instructs how the input will flow to the final output in the model.
我们将在Keras父类Model中进行工作。 有两个必要的组件来构建Keras模型(或Keras层)子类。 首先,您需要更新初始化方法以包括将要使用的所有层。 其次,您需要编写一个调用方法,该方法指示输入如何流到模型中的最终输出。
We start with our initialization method. We’ve added in a few parameters here that will give us the flexibility to adjust our base model structure so we can make several of these bad boys later on. The parameters dense_units and conv_features are assumed to be lists that give us detail on the dense layers and convolutional layers in LeNet. E.g., dense_units = [20, 30] would give us a fully connected layer from the flattened image to a vector of size 20 followed by another fully connected layer of size 30, and conv_features = [16, 32] would give us a convolutional layer with 16 filters followed by (after max pooling) another convolutional layer with 32 filters.
我们从初始化方法开始。 我们在此处添加了一些参数,这些参数将使我们能够灵活地调整基本模型的结构,以便以后可以制作多个这些坏男孩。 假设参数density_units和conv_features是列表,这些列表为我们提供了LeNet中密集层和卷积层的详细信息。 例如, density_units = [20,30]会给我们一个从扁平化图像到大小为20的向量的完全连接层,然后是另一个大小为30的完全连接层,而conv_features = [16,32]会给我们一个卷积层包含16个滤镜,然后(在最大池化之后)是另一个包含32个滤镜的卷积层。
You’ll note that there are several batch normalization and drop out layers: these are fairly common practice and are to reduce model overfitting. This is a little hand-wavy, but the full topic is for another day. Another thing to note is that, within the initialization, the layers don’t appear in the order they will be used; this was to take advantage of list comprehensions.
您会注意到,有几个批处理规范化和退出层:这是相当普遍的做法,并且可以减少模型的过拟合。 这有点麻烦,但是整个话题又要讨论了。 要注意的另一件事是,在初始化期间,各层的显示顺序并不相同。 这是为了利用列表理解。
Moving down to our call method, we actually do construct how the layers are ordered. Our input gets moved into a loop of convolutional/max-pooling layers followed by iterations of fully connected layers. This corresponds to first doing feature extraction followed by classification.
向下移动到我们的call方法,我们实际上确实构造了如何对图层进行排序。 我们的输入被移动到卷积/最大池化层的循环中,然后是全连接层的迭代。 这对应于首先进行特征提取,然后进行分类。
Since we inherited from keras.Model, we are now good to go on compiling and fitting our CNN… but that’s not what we are after. Instead, we want to generate several CNNs to utilize in a grander model. But where do we even begin with that? Well, we need another model that doesn’t fit into the scheme that we just wrote. We’ll need to code out another subclass.
由于我们继承自keras.Model,因此现在可以继续进行编译和拟合CNN了……但这不是我们要追求的。 相反,我们希望生成多个CNN以便在更大的模型中使用。 但是我们从哪里开始呢? 好吧,我们需要另一个不适合我们刚刚编写的方案的模型。 我们需要编写另一个子类。
堆叠模型(合奏) (Stacking Model (Ensemble))
Same strategy here: initialize model layers and then call them in the correct order on the input. “But one of the layers, the input to the meta-learner, depends on other models entirely,” you may think. Well, let’s not overthink this! As part of the init method, let’s train out internal CNNs*. We’ll include a means of passing in our base model compiling/fitting parameters upon instantiation.
这里的策略相同:初始化模型层,然后在输入上以正确的顺序调用它们。 您可能会认为:“但其中一层是元学习器的输入,完全取决于其他模型。” 好吧,我们不要想太多! 作为init方法的一部分,让我们训练内部的CNN *。 我们将包括一种在实例化时传入基本模型的编译/拟合参数的方法。
Once training of our base models is complete, we’ll turn off their ability to be trained further. This is not theoretically required, nor is it necessarily helpful for learning. More on this later**.
基本模型的训练完成后,我们将关闭其进一步训练的能力。 从理论上讲这不是必需的,也不一定对学习有帮助 。 稍后会详细介绍**。
Our meta-learner layers are then defined: the only thing to note here is that the fully connected layer after the base model outputs is chosen to be twice as large as the concatenation of the last layers in the base models. This is arbitrary, but it would be a good idea in general to make sure this layer is at least larger than the concatenation layer.
然后定义了我们的元学习器层:这里唯一要注意的是,选择基本模型后的完全连接层的大小是基本模型中最后一层的串联的两倍。 这是任意的,但是通常最好确保此层至少大于连接层。
Finally, we define our call method. No real surprises here. Feed the input data into each base model, concatenate the outputs, then it’s a standard MLP from there.
最后,我们定义调用方法。 这里没有真正的惊喜。 将输入数据输入每个基本模型,连接输出,然后是那里的标准MLP。
结果和讨论 (Results and Discussion)
I’m not going to go into the code associated with data cleansing; I’ll simply give a few quick descriptions of relevant pieces here and there, but feel free to dig into the project repo. We’ll start out with old reliable.
我不打算讨论与数据清理相关的代码; 我将在这里和那里简单地简要介绍相关的部分,但是随时可以深入研究项目仓库 。 我们将从旧的可靠产品开始。
MNIST Digits
MNIST数字
This dataset is easy to work with and easy to achieve a high classification accuracy on. For that reason, the usage of the stacking model here is really just a check to make sure our theory and implementation work correctly. Note that, since MNIST digits is a fairly balanced dataset, accuracy is an acceptable choice of metrics to examine here.
该数据集易于使用,并且易于实现较高的分类精度。 因此,这里使用堆栈模型实际上只是一项检查,以确保我们的理论和实现正确运行。 请注意,由于MNIST数字是一个相当平衡的数据集,因此准确性是可以在此处检查的指标的可接受选择。
We’ll make three base models and vary the size of the convolutional and fully connected layers to make each of them a bit different from each other. For the convolutional layers, it is common practice to keep the output channel set to a power of 2 (there’s a hardware optimization underlying this). We also want the feature set to expand into the network, so we’ll make sure to sort the number of output channels from smallest to largest. For the dense layers… I don’t have a particular reason to choose any sizes, so let’s just sample from [100, 500]. Below is a summary of the models and their resulting test accuracy.
我们将制作三个基本模型,并改变卷积层和完全连接层的大小,以使它们彼此之间有所不同。 对于卷积层,通常的做法是将输出通道设置为2的幂(存在硬件优化基础)。 我们还希望功能集扩展到网络中,因此,请确保将输出通道的数量从最小到最大排序。 对于密集层……我没有选择任何尺寸的特殊原因,所以让我们从[100,500]中取样。 以下是模型及其得出的测试准确性的摘要。
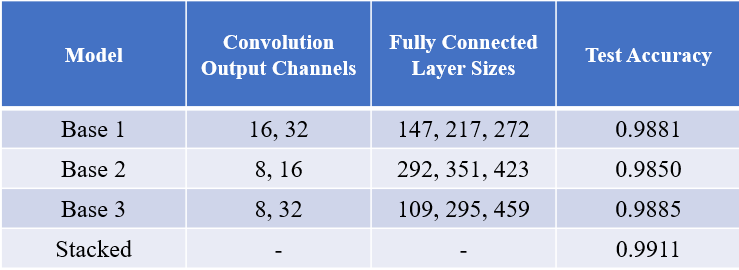
The stacking model seems to be working as intended: we see an increase in overall accuracy when compared to the individual models; although, the increase is quite small. Putting all the effort into an ensemble for this dataset is not worth the time. At least we can rest assured that our implementation functions. Moving on.
堆叠模型似乎按预期工作:与单个模型相比,我们看到了整体准确性的提高; 虽然,增长幅度很小。 将所有精力放在这个数据集中是不值得的 。 至少我们可以放心我们的实现功能。 继续。
Dogs vs. Cats
狗与猫
This dataset is composed of images of dogs and cats with 12,500 images to train on. Again, this is a balanced dataset so let’s push forward using accuracy as our metric. Since this task is more difficult than the last, we will use 5 base models with a higher number of convolutional output channels as well as larger dense layers for classification.
该数据集由猫和狗的图像组成,其中有12,500张图像需要训练。 同样,这是一个平衡的数据集,因此让我们使用准确性作为度量标准来进行推进。 由于此任务比上一个任务困难,因此我们将使用5个具有更多卷积输出通道以及更大密度层的基本模型进行分类。
Since this classification model is more involved, both early stopping and learning rate reduction (on validation loss plateaus) were utilized in order to avoid overfitting. Data augmentation (horizontal flipping, small rotations, shearing, and small width/height shifts) was also used in order to increase model accuracy. Training was done over 50 epochs at max with batch gradient descent using the RMSProp optimizer. I’d like to acknowledge Kaggle user Uysim who’s kernel was invaluable for working through portions of data handling.
由于此分类模型涉及更多,因此使用了早期停止和学习率降低(在验证损失平稳阶段),以避免过度拟合。 为了提高模型的准确性,还使用了数据扩充(水平翻转,较小的旋转,剪切以及较小的宽度/高度偏移)。 使用RMSProp优化器,最多可以进行50个历元的训练,并具有批次梯度下降功能。 我想感谢Kaggle用户Uysim 谁的内核对于处理部分数据处理而言是无价的。
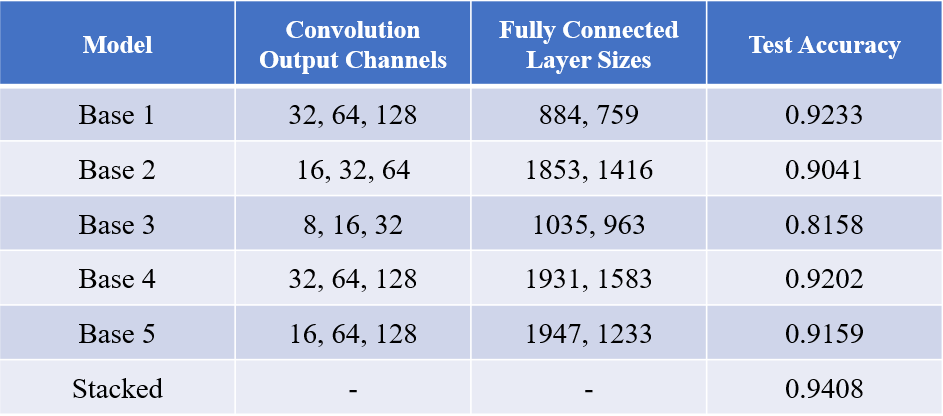
Better! We have a notable increase in test accuracy when comparing between our best base model and our ensemble. Since we took the time to list out the details of the training method (not to mention the time to do the actual training), let’s reward ourselves with a nice visual of each base model’s validation accuracy/loss throughout the fitting period.
更好! 在我们的最佳基础模型和集成之间进行比较时,我们的测试准确性显着提高。 由于我们花时间列出了训练方法的详细信息(更不用说进行实际训练的时间了),因此让我们在整个拟合期间以良好的视觉效果欣赏每个基本模型的验证准确性/损失。
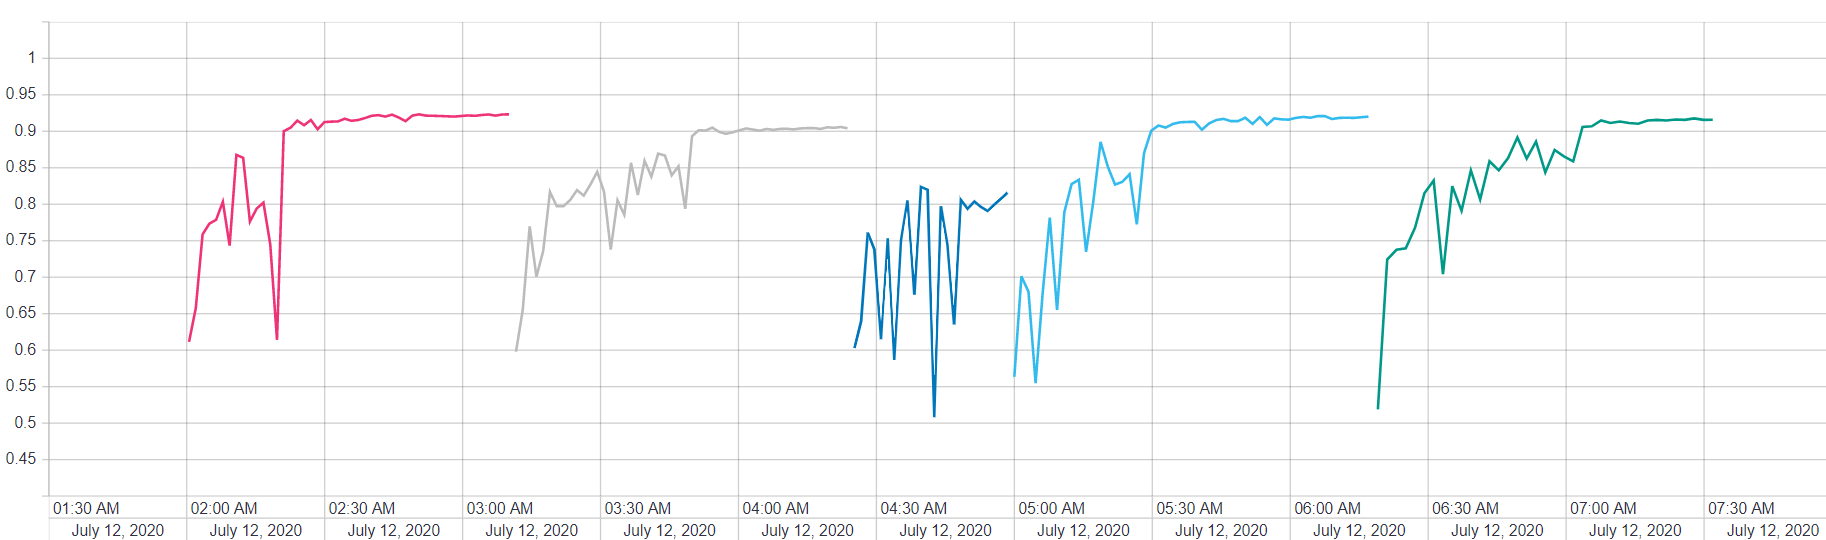
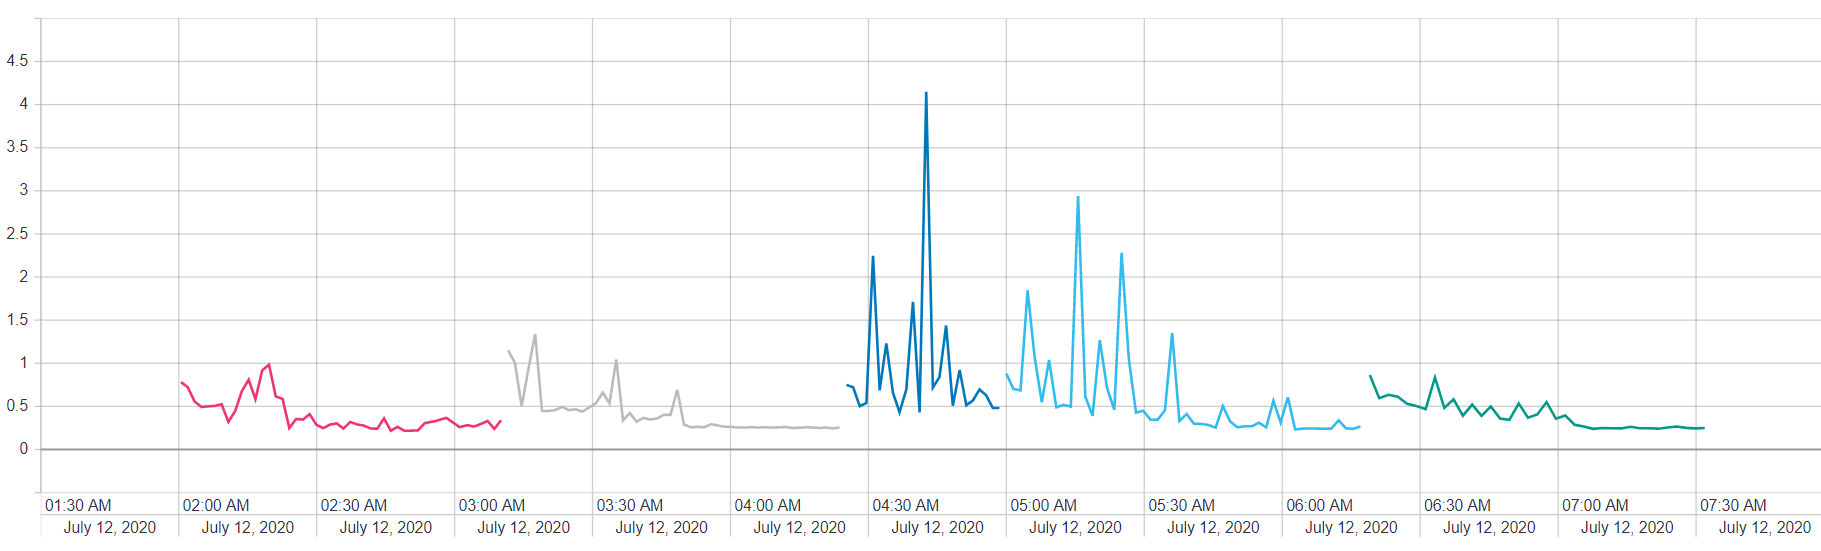
The above plots are a nice reminder of how much these hyper-parameter choices can influence our model. Considering our weakest and strongest base models, we see a difference of nearly 12% in terms of final validation accuracy.
上面的曲线图很好地提醒了这些超参数选择会在多大程度上影响我们的模型。 考虑到我们最弱和最强的基本模型,我们发现最终验证准确性相差近12%。
Speculating a bit, it is possible that base model number 1 is our ‘Alyssa’, so to speak. It’s not possible to tell how much our stacked model is utilizing each base model without looking directly at the dense layer weights connecting everything to the meta learner. For our ‘Bobby’, I’m at a complete loss: it could be any combination of the base models.
推测一下,可以说基本型号1是我们的“ Alyssa”。 在不直接查看将所有内容都连接到元学习器的密集层权重的情况下,不可能说出我们的堆叠模型在利用每个基本模型中有多少。 对于我们的“鲍比”来说,我完全不知所措:它可以是基本模型的任意组合。
But we can certainly say that our ‘Calvin’, the meta-learner, did in fact learn something beneficial about our base models and outperformed its cohorts. Whether or not the accuracy gain was worth the time invested in building the ensemble itself is something that everyone has to decide for themselves.
但是我们可以肯定地说,我们的元学习者“加尔文”确实从基础模型中学到了一些有益的知识,并且胜过了同类研究。 每个团队都必须自己决定是否要获得准确性,而值得花费时间来构建整体。
Or, if you have bosses, investors, or shareholders, they may very well tell you themselves at less than kind decibel levels. Always keep in mind your goal at hand and what “good enough” means for you.
或者,如果您有老板,投资者或股东,他们很可能以低于分贝的水平告诉您自己。 始终牢记您的目标以及“足够好”对您意味着什么。
总结思想 (Closing Thoughts)
One concern I have is that the third base model (comprised of convolutional filters expanding from 8 to 16 to 32) wasn’t stable during the fitting process. It is likely that a larger number of filters is needed to handle the dogs vs cats dataset. This is further evinced by its 4 counterparts performing better in pretty much every way.
我要担心的是,第三基本模型(由从8扩展到16到32的卷积滤波器组成)在拟合过程中不稳定。 可能需要大量过滤器来处理“狗与猫”数据集。 它的4个对手在几乎所有方面的表现都更好,这进一步证明了这一点。
I am content with the model as it demonstrates the idea behind stacking. It is amusing that the dogs vs cats validation accuracy amounted to roughly 94%, the same score I gave to Calvin in the beginning of the article. This was not intended, but a happy accident.
我对模型感到满意,因为它演示了堆栈背后的想法。 有趣的是,狗与猫的验证准确率大约为94%,与我在本文开头给加尔文的评分相同。 这不是故意的,而是一次不幸的事故。
There are improvements to be made and other avenues to explore. One particular route I’d like to explore is implementing an ensemble with entirely different base models, expanding beyond just the possibilities (and restrictions) of neural nets. Other things that could still be adjusted within this existing framework include the CNN filter-size, deeper networks, and many other hyper-parameter tunings.
有待改进和探索其他途径。 我想探索的一种特定途径是使用完全不同的基本模型实现集成,而不仅仅是神经网络的可能性(和限制)。 在现有框架内仍然可以调整的其他内容包括CNN过滤器大小,更深的网络以及许多其他超参数调整。
For those of you that have read this far, thank you for your time. If you have any comments/suggestions/criticisms, please drop a comment. I have plenty of places to improve on be it theory, coding, or writing.
对于那些到目前为止已经读过的人,谢谢您的时间。 如果您有任何意见/建议/批评,请发表评论。 无论是理论,编码还是写作,我都有很多地方可以改进。
Asterisks
星号
(*) If any readers have thoughts or suggestions on better approaches to this particular part, I’d appreciate hearing them. In a production setting, I’m sure there are more ideal ways of going about this.
(*)如果有任何读者对这个特定部分的更好方法有想法或建议,我将不胜感激。 在生产环境中,我敢肯定会有更多理想的方法来解决这个问题。
(**) I mentioned above the choice I made to keep my base models “untrainable” once the training on the stacked model started. This choice was made entirely on the fact that this whole process was done on a home computer. Granted, my home PC isn’t bad, but I’m sure not fitting all 5 base model weights PLUS the weights of the meta-learner on my GPU at once. Not to mention the time to train such a beast will be considerably worse than training the 5 bases then leaving them fixed. It is worth noting that this choice does have some mathematical consequences as well: fixing the base models imposes constraints on our stacked model’s loss function. Something to keep in mind if you ever plan to build an ensemble.
(**)我在上面提到,一旦开始对堆叠模型进行训练,我就选择保持基本模型“不可训练”。 完全基于整个过程都是在家用计算机上进行的事实来做出此选择。 当然,我的家用电脑还不错,但是我确定我的GPU不能同时满足所有5种基本模型的权重以及元学习器的权重。 更不用说训练这种野兽的时间比训练5个基地然后把它们固定不动要糟糕得多。 值得注意的是,这种选择也会带来一些数学上的后果:修复基本模型会对堆叠模型的损失函数施加约束。 如果您打算建立一个整体,请记住一些注意事项。
See more at my main site: http://matthewcampbell.io
在我的主要网站上查看更多信息:http://matthewcampbell.io
翻译自: https://levelup.gitconnected.com/stacking-convolutional-neural-nets-c1e9dded5ce3
深度堆叠卷积神经网络


 已为社区贡献11条内容

所有评论(0)