

github api
介绍 (Introduction)
With the advent of countless templates and web page design applications, the task of creating a personal portfolio transitioned from a painful endeavor into a painless task. However, the act of constantly updating the hard coded information and rebuilding and redeploying your portfolio turns into a tiresome burden.
随着无数模板和网页设计应用程序的出现,创建个人作品集的任务从一项艰苦的工作转变为一项轻松的工作。 但是,不断更新硬编码信息并重建和重新部署您的产品组合的行为变成了沉重的负担。
In this tutorial, I will show you how I integrated the Github api into my portfolio architecture to pull the most recent project information, solving the issue of directly updating and redeploying my portfolio.
在本教程中,我将向您展示如何将Github api集成到我的投资组合体系结构中,以获取最新的项目信息,解决直接更新和重新部署我的投资组合的问题。
议程 (Agenda)
- Setup 建立
- Service 服务
- Integrate 整合
建立 (Setup)
Before we build the solution, let’s first understand the core idea and configure Github to ease the integration.
在构建解决方案之前,让我们首先了解核心思想并配置Github以简化集成。
First, let’s talk about the Github repositories. To elaborate, I house my projects in the repositories themselves: I host the source code, keep detailed descriptions, and maintain links to demo gifs or images.
首先,让我们讨论一下Github仓库。 详细说来,我将我的项目放在存储库中:我托管源代码,保留详细说明并维护指向演示gif或图像的链接。

Consider the above repository. This repository houses my Path Finding Visualizer project. In the right side, the section outlined in blue contains the description of the project. On the other hand, the section outlined in red has a link to the demo. Finally, the section outlined in black contains topics associated with the project. To sum it all up, the Github api will return the above fields upon a http request, and as a result, we can access the description, demo link, and topics of a given project and directly use that data within our portfolio. Later on, I will show you exactly how to call the specific endpoint and fetch the data. For now, let’s talk a bit more about Github’s api.
考虑上述存储库。 该存储库包含我的“路径查找可视化工具”项目。 右侧的蓝色部分包含了对该项目的描述。 另一方面,以红色概述的部分具有到演示的链接。 最后,以黑色概述的部分包含与项目相关的主题。 总而言之,Github api将在http请求时返回上述字段,因此,我们可以访问给定项目的描述,演示链接和主题,并直接在我们的产品组合中使用该数据。 稍后,我将向您确切演示如何调用特定端点并获取数据。 现在,让我们更多地谈论Github的api。
To begin, Github has a fantastic api that allows developers to easily interface the different functionality it provides. For our application, we will only focus on one endpoint:
首先,Github具有出色的api ,它使开发人员可以轻松地接口其提供的不同功能。 对于我们的应用程序,我们将仅关注一个端点:
GET /users/{username}/reposThis endpoint will return a list of json objects containing fields for each public repository a user maintains. Here is what the json object would look like for the Path Finding Visualizer repository (I will show you later how I made the request).
该端点将返回一个json对象列表,其中包含用户维护的每个公共存储库的字段。 这是“路径查找可视化工具”存储库的json对象的外观(稍后我将向您展示如何发出请求)。
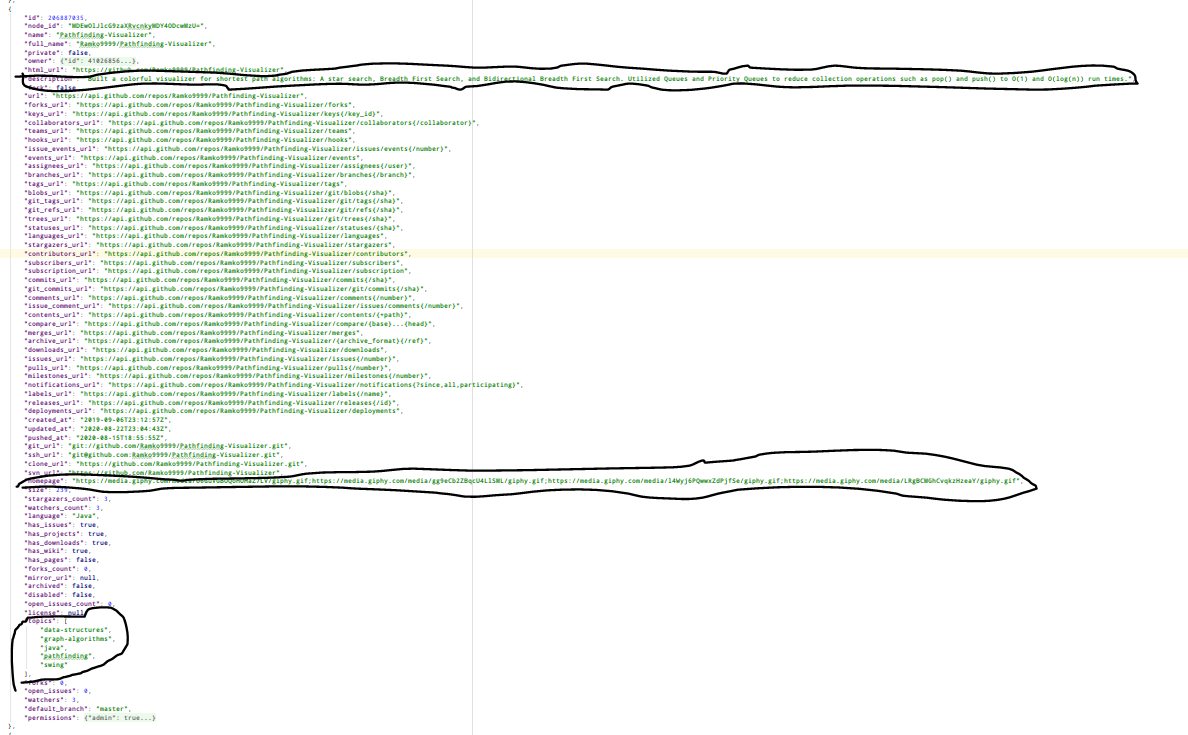
Although it is a bit difficult to see, I want to point out that the repository fields outlined in black, description, homepage and topics, are the exact same fields we discussed earlier. This is fantastic news, since it shows that we can store and retrieve information from our repositories.
尽管很难看,但我想指出的是,以黑色,说明,主页和主题概述的存储库字段与我们之前讨论的字段完全相同。 这是一个了不起的消息,因为它表明我们可以从存储库中存储和检索信息。
Let’s now work on configuring Github to simplify the integration.
现在让我们配置Github来简化集成。
All we need to do is generate a personal access token in the developer settings. We will use the personal access token to authenticate our requests to the Github api so we can take advantage of the generous rate limits.
我们需要做的就是在开发人员设置中生成一个个人访问令牌。 我们将使用个人访问令牌来验证对Github API的请求,以便我们可以利用慷慨的速率限制。
First, navigate to your profile settings.
首先,浏览至您的个人资料设置。
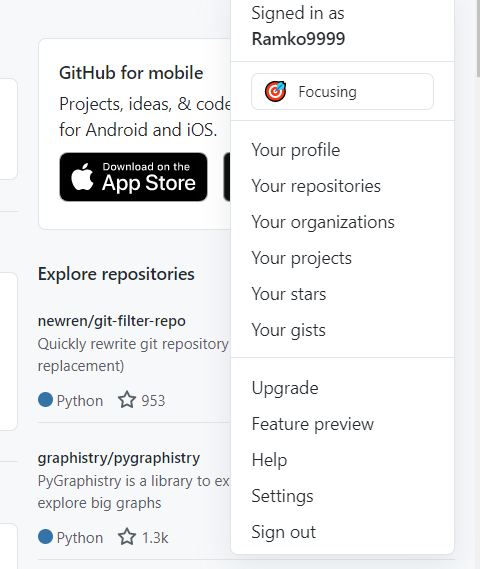
From your profile settings, navigate to the developer settings.
在您的个人资料设置中,导航到开发者设置。

Finally, go to the personal access tokens tab.
最后,转到“个人访问令牌”标签。
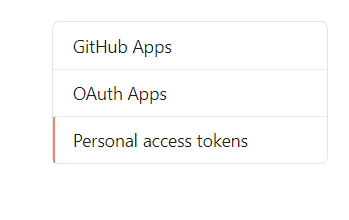
At this point, you can click “Generate new token” and Github will walk you through the rest. Once you have generated the token, make sure you save it to the clipboard, since we will need it for later.
此时,您可以单击“ Generate new token”(生成新令牌),Github将引导您完成其余的操作。 生成令牌后,请确保将其保存到剪贴板,因为稍后将需要它。
Now that we have generated our personal access token, we can work on the actual integration.
现在,我们已经生成了个人访问令牌,我们可以进行实际的集成了。
服务 (Service)
To start, let’s conceptualize how the portfolio would interact with the Github api.
首先,让我们概念化投资组合如何与Github api交互。
Essentially, I thought that building a separate service that handles the communication between the portfolio and the Github api would be a good idea, since the CORS issue will prevent us from making a request from the browser itself and we need to house our Github personal access token in a secure environment. Here is a depiction of the network flow:
本质上,我认为构建一个单独的服务来处理投资组合和Github api之间的通信是一个好主意,因为CORS问题将阻止我们从浏览器本身发出请求,并且我们需要容纳我们的Github个人访问权限安全环境中的令牌。 这是网络流的描述:
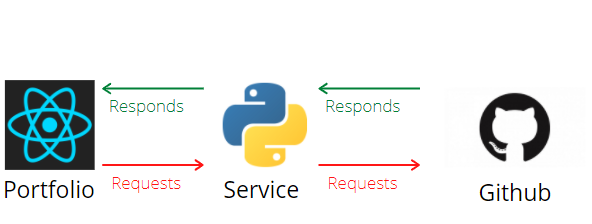
Now that we understand how the service fits in, let’s start building it out. To build it out, I will be using Python and Flask, but just understand that you can use any stack of your choice. To put it simply, Flask is a lightweight web framework. Check this source out if you would like to read more about it.
现在我们了解了服务的适用范围,让我们开始构建它。 为了构建它,我将使用Python和Flask,但要了解您可以使用您选择的任何堆栈。 简而言之,Flask是一个轻量级的Web框架。 如果您想了解更多信息,请查看此资源 。
First, let’s create a config.py file. In this file, we will store our Github username and our personal access token. Make sure you do not push this file to version control.
首先,让我们创建一个config.py文件。 在此文件中,我们将存储Github用户名和个人访问令牌。 确保您不将此文件推送到版本控制。
USERNAME = "YOUR GITHUB USERNAME"
TOKEN = "YOUR PERSONAL ACCESS TOKEN FROM EARLIER"
Let’s create a server.py file and make a simple Flask app.
让我们创建一个server.py文件并创建一个简单的Flask应用程序。
from flask import *
from flask_cors import CORS
from config import *app = Flask(__name__)
CORS(app)if __name__ == "__main__":
   app.run()
Now, let’s expose a endpoint that our portfolio can call to get the project data.
现在,让我们公开一个端点,我们的产品组合可以调用该端点来获取项目数据。
@app.route("/projects", methods=["GET"])
def getProjects():
   pass
The getProjects() method will do three things.
getProjects()方法将完成三件事。
- It will make a request to the Github api for the repository data. 它将向Github api请求存储库数据。
- It will extract the relevant fields from each of the repositories. 它将从每个存储库中提取相关字段。
- It will return the filtered data back to the portfolio. 它将过滤后的数据返回到投资组合。
Let’s tackle these steps one by one.
让我们一步一步地解决这些步骤。
Making a request to Github
向Github请求
We can simply use the Python requests library to make the HTTP request.
我们可以简单地使用Python请求库来发出HTTP请求。
url = "https://api.github.com/users/USERNAME/repos"
headers = {"Accept":"application/vnd.github.mercy-preview+json"}        repos = requests.get(url, headers=headers, auth=(USERNAME,TOKEN)).json()
For clarification, by passing in the variable “headers” with the specified content as a parameter to the request, the Github api will also include the “topics” field for each of the repositories. If all goes correct, the request should have a status of 200 and the “repos” variable should be a list of json objects.
为了澄清起见,通过将带有指定内容的变量“标头”作为请求的参数传递,Github api还将为每个存储库包括“主题”字段。 如果一切正确,则请求的状态应为200,“ repos”变量应为json对象的列表。
Extracting relevant fields
提取相关字段
Earlier in the article, I showed a photo of all the fields that a json object would have for a given repository. Some of the fields may be useless when it comes to displaying information on the portfolio, so our task now is to select a few fields to keep. The fields I selected are “id”, “name”, “html_url”, “description”, “topics”, and “homepage”. To provide a bit of context, the “html_url” field represents the web url of the repository. The “homepage” field represents the text stored in the black outlined area:
在本文的前面,我展示了JSON对象对于给定存储库将具有的所有字段的照片。 在显示投资组合中的信息时,某些字段可能没有用,因此我们现在的任务是选择一些要保留的字段。 我选择的字段是“ id”,“ name”,“ html_url”,“ description”,“ topics”和“ homepage”。 为了提供一些上下文,“ html_url”字段表示存储库的Web URL。 “主页”字段表示存储在黑色轮廓区域中的文本:
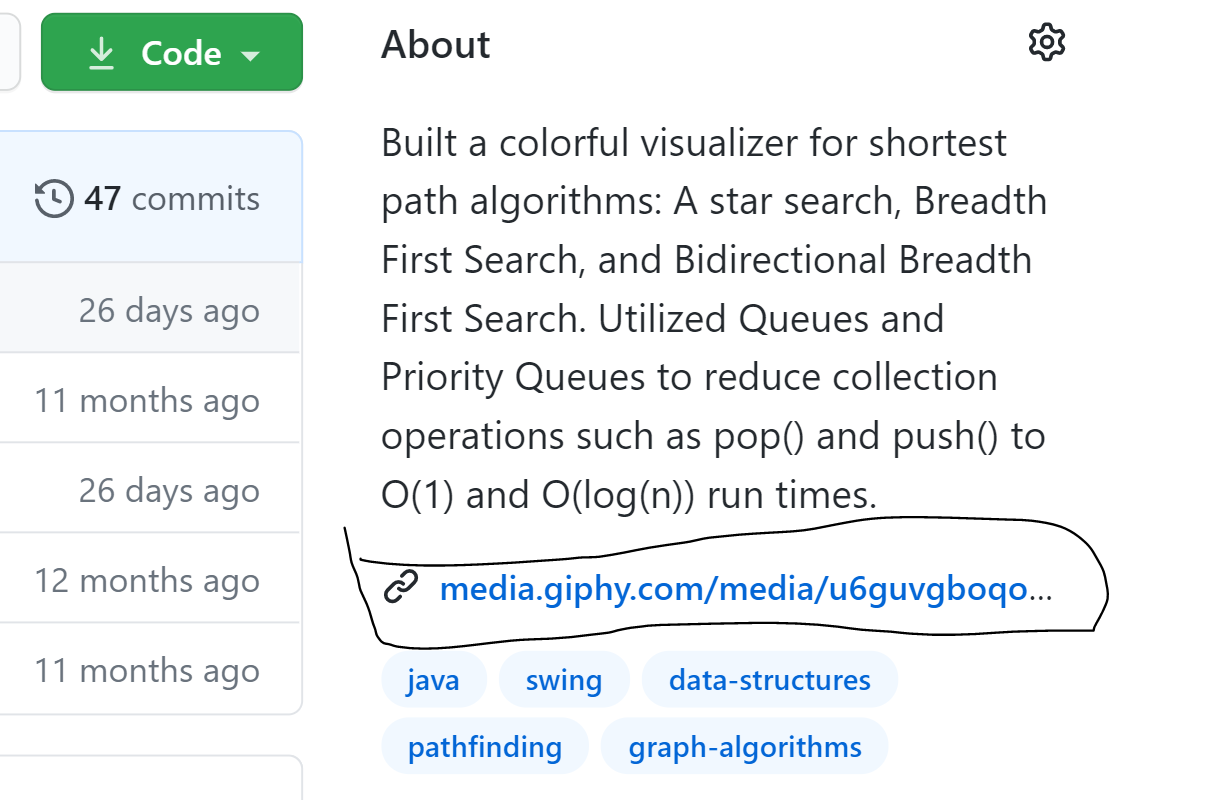
Basically, the “homepage” field contains demo gifs for each of the projects. Thus, the code to parse each of the repositories and extract the relevant fields would look like this:
基本上,“主页”字段包含每个项目的演示gif。 因此,用于解析每个存储库并提取相关字段的代码如下所示:
projects = []for repo in repos:if repo["homepage"]:
        project = {"id": repo["id"],"name": repo["name"],"url": repo["html_url"],"description": repo["description"],"topics":repo["topics"],"images": repo["homepage"].split(";")
        }
        projects.append(project)
Just to clarify, I actually added more than one demo link for certain projects. I essentially separated each link with a semi colon. This is exactly why you are seeing me split the repo[“homepage”] string by the semi colon. Moreover, I am not considering repositories for which I have not provided demo links for. The line if repo[“homepage”]: makes it so that only repositories with a demo link are considered. Here is what the “project” dictionary would look like for the Path Finding Visualizer repository:
为了澄清,我实际上为某些项目添加了多个演示链接。 我基本上用半冒号分隔了每个链接。 这就是为什么您看到我用半冒号分割repo [“ homepage”]字符串的原因。 此外,我不考虑我没有为其提供演示链接的存储库。 if repo [“ homepage”]行:使其仅考虑具有演示链接的存储库。 这是“路径查找可视化工具”存储库的“项目”字典的外观:
{"id": 206887035,"name": "Pathfinding-Visualizer","url": "https://github.com/Ramko9999/Pathfinding-Visualizer","description": "Built a colorful visualizer for shortest path algorithms: A star search, Breadth First Search, and Bidirectional Breadth First Search. Utilized Queues and Priority Queues to reduce collection operations such as pop() and push() to O(1) and O(log(n)) run times.","topics": ["data-structures","graph-algorithms","java","pathfinding","swing"],"images": ["https://media.giphy.com/media/U6GuVGBOQoHUHaZ7LV/giphy.gif","https://media.giphy.com/media/gg9eCb2ZBqcU4LlSML/giphy.gif","https://media.giphy.com/media/l4Wyj6PQwwxZdPjfSe/giphy.gif","https://media.giphy.com/media/LRgBCMGhCvqkzHzeaY/giphy.gif"]
},
All that remains now is to return the projects array back to the initiator of the request.
现在剩下的就是将项目数组返回给请求的发起者。
Returning a response
返回回应
We can return the filtered data back to the client with the following:
我们可以使用以下方法将过滤后的数据返回给客户端:
return {"projects": projects, "error": False}So with all the pieces put together, the getProjects() method will look as such:
因此,将所有部分放在一起,getProjects()方法将如下所示:
@app.route("/projects", methods=["GET"])def getRepos():try:
        url = "https://api.github.com/users/Ramko9999/repos"headers = {"Accept":"application/vnd.github.mercy-preview+json"}
        repos = requests.get(url, headers=headers, auth=(USERNAME,TOKEN)).json()
        projects = []for repo in repos:if repo["homepage"]:
                project = {"id": repo["id"],"name": repo["name"],"url": repo["html_url"],"description": repo["description"],"topics":repo["topics"],"images": repo["homepage"].split(";")
                }
                projects.append(project)return {"projects": projects, "error": False}except Exception as e:return {"error": True, "message": str(e)}, 500
For quick clarification, I added basic exception handling so our Flask app doesn’t terminate upon an error. Please be sure to test your service locally by calling the /projects endpoint. Once you are convinced that the service is working, you can deploy it wherever you like. Personally, I deployed the service on pythonanywhere.com.
为了快速澄清,我添加了基本的异常处理,因此我们的Flask应用程序不会因错误而终止。 请确保通过调用/ projects端点在本地测试您的服务。 一旦确信该服务正在运行,就可以将其部署到任何位置。 我个人将服务部署在pythonanywhere.com上 。
Pat yourself on the back, as the hardest part is now over!
轻拍自己的背部,因为最困难的部分已经结束!
整合 (Integrate)
All that remains now is that we have to make a http request from our portfolio website to the service we have just created. For example, I used to React to build out my portfolio, so here is how I made the call and fetched the projects.
现在剩下的就是,我们必须从投资组合网站向我们刚刚创建的服务发出http请求。 例如,我以前使用React构建我的投资组合,所以这是我进行呼叫和获取项目的方式。
import fetch from "node-fetch";
import CONFIG from "../config";


class ProjectApi{


    static async getProjects(){
        let ep = CONFIG.URL + "/projects";
        try{
            let response = await fetch(ep);
            if(response.status !== 200){
                throw Error("Failed to get projects")
            }
            let json = await response.json();
            return json;
        }
        catch(error){
            throw Error(error.message);
        }
    }
}


export default ProjectApi;
The “CONFIG” object I have imported simply stores the web url of my service so that I can keep it secure.
我导入的“ CONFIG”对象只是存储服务的Web网址,以便确保其安全。
All you need to do now is to build out the user interface based on the data.
您现在要做的就是根据数据构建用户界面。
With that said, feel free to head over to my portfolio to check out how I implemented my user interface.
话虽如此,请随时访问我的产品组合,以查看我如何实现用户界面。
结论 (Conclusion)
To conclude, let’s reflect on what we accomplished throughout this article. For starters, we explored Github’s api and generated a token to take advantage of the rate limits. Then, we built a standalone service to interact with the Github api. Finally, we connected both the portfolio and the service through a http request. This is a lot to accomplish, so well done!
总而言之,让我们回顾一下我们在本文中所取得的成就。 首先,我们探索了Github的api并生成了令牌以利用速率限制。 然后,我们构建了一个独立的服务来与Github api进行交互。 最后,我们通过http请求连接了产品组合和服务。 这是要完成的很多事,做得好!
Please let me know if you liked or disliked some part of the article and how I can improve. Thank you for reading!
如果您喜欢或不喜欢本文的某些部分,请告诉我,我该如何改善。 感谢您的阅读!
Linkedin:
Linkedin:
Portfolio:
作品集:
翻译自: https://medium.com/swlh/build-a-dynamic-portfolio-with-the-github-api-6d74081e5164
github api


 已为社区贡献2条内容

所有评论(0)