hadoop mysql rpm 安装_从零搭建hadoop集群之mysql安装
Linux RPM 方式安装 MySQL在 hadoop02机器上
1、 安装新版mysql前,需将系统自带的mariadb-lib卸载
[root@hadoop02 ~]# rpm -qa|grep mariadb #查询系统自带得mariadb-lib
mariadb-libs-5.5.68-1.el7.x86_64
[root@hadoop02 ~]# rpm -e --nodeps mariadb-libs-5.5.68-1.el7.x86_64 #卸载系统自带得mariadb-lib
[root@hadoop02 ~]# rpm -qa|grep mariadb #检查系统自带得mariadb-lib是否已卸载

3.可以使用xftp上传到hadoop02机器得/opt/mysql目录下

4. 解压安装包并
[root@hadoop02 mysql]# tar -xvf mysql-5.7.32-1.el7.x86_64.rpm-bundle.tarmysql-community-client-5.7.32-1.el7.x86_64.rpm
mysql-community-common-5.7.32-1.el7.x86_64.rpm
mysql-community-devel-5.7.32-1.el7.x86_64.rpm
mysql-community-embedded-5.7.32-1.el7.x86_64.rpm
mysql-community-embedded-compat-5.7.32-1.el7.x86_64.rpm
mysql-community-embedded-devel-5.7.32-1.el7.x86_64.rpm
mysql-community-libs-5.7.32-1.el7.x86_64.rpm
mysql-community-libs-compat-5.7.32-1.el7.x86_64.rpm
mysql-community-server-5.7.32-1.el7.x86_64.rpm
mysql-community-test-5.7.32-1.el7.x86_64.rpm
[root@hadoop02 mysql]# ll
总用量1060072
-rw-r--r-- 1 root root 542750720 12月 15 14:21 mysql-5.7.32-1.el7.x86_64.rpm-bundle.tar
-rw-r--r-- 1 7155 31415 26460548 9月 25 12:48 mysql-community-client-5.7.32-1.el7.x86_64.rpm-rw-r--r-- 1 7155 31415 314936 9月 25 12:48 mysql-community-common-5.7.32-1.el7.x86_64.rpm-rw-r--r-- 1 7155 31415 3918236 9月 25 12:48 mysql-community-devel-5.7.32-1.el7.x86_64.rpm-rw-r--r-- 1 7155 31415 47479624 9月 25 12:48 mysql-community-embedded-5.7.32-1.el7.x86_64.rpm-rw-r--r-- 1 7155 31415 23263144 9月 25 12:48 mysql-community-embedded-compat-5.7.32-1.el7.x86_64.rpm-rw-r--r-- 1 7155 31415 130933732 9月 25 12:48 mysql-community-embedded-devel-5.7.32-1.el7.x86_64.rpm-rw-r--r-- 1 7155 31415 2457204 9月 25 12:48 mysql-community-libs-5.7.32-1.el7.x86_64.rpm-rw-r--r-- 1 7155 31415 1260336 9月 25 12:48 mysql-community-libs-compat-5.7.32-1.el7.x86_64.rpm-rw-r--r-- 1 7155 31415 181712536 9月 25 12:49 mysql-community-server-5.7.32-1.el7.x86_64.rpm-rw-r--r-- 1 7155 31415 124941892 9月 25 12:49 mysql-community-test-5.7.32-1.el7.x86_64.rpm
为了避免出现权限问题,给mysql解压文件所在目录赋予最大权限
[root@hadoop02 opt]# chmod -R 777 mysql/[root@hadoop02 opt]# ll
总用量4drwxrwxrwx2 root root 4096 12月 15 14:23mysql
drwxr-xr-x. 2 root root 6 10月 31 2018 rh
严格按照顺序安装:mysql-community-common-5.7.29-1.el7.x86_64.rpm、mysql-community-libs-5.7.29-1.el7.x86_64.rpm、mysql-community-client-5.7.29-1.el7.x86_64.rpm、mysql-community-server-5.7.29-1.el7.x86_64.rpm这四个包
rpm -ivh mysql-community-common-5.7.32-1.el7.x86_64.rpmrpm -ivh mysql-community-libs-5.7.32-1.el7.x86_64.rpmrpm -ivh mysql-community-client-5.7.32-1.el7.x86_64.rpm
rpm -ivh mysql-community-server-5.7.32-1.el7.x86_64.rpm
5. 配置数据库
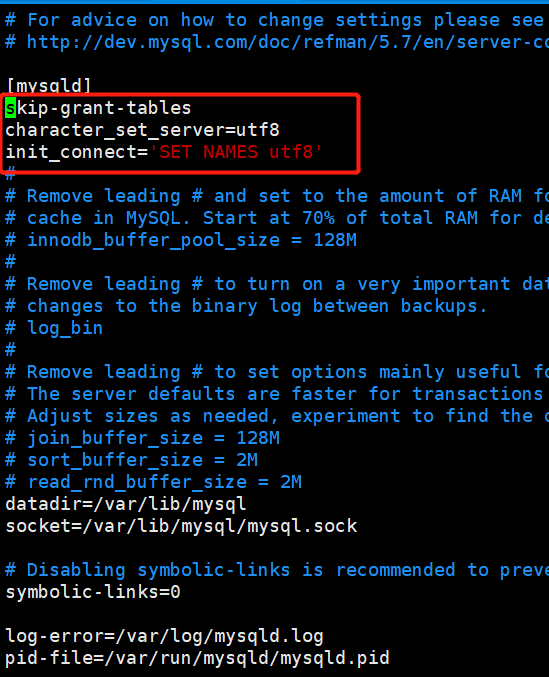
vim /etc/my.cnf
添加这三行
skip-grant-tables:跳过登录验证
character_set_server=utf8:设置默认字符集UTF-8
init_connect='SET NAMES utf8':设置默认字符集UTF-8
6 . 启动mysql服务
[root@hadoop02 mysql]# systemctl start mysqld.service #设置开机启动
[root@hadoop02 mysql]# mysql #启动mysql
Welcome to the MySQL monitor. Commands end with ; or \g.
Your MySQL connection id is 2
Server version: 5.7.32 MySQL Community Server (GPL)
Copyright (c) 2000, 2020, Oracle and/or its affiliates. All rights reserved.
Oracle is a registered trademark of Oracle Corporation and/or its
affiliates. Other names may be trademarks of their respective
owners.
Type 'help;' or '\h' for help. Type '\c' to clear the current input statement.
mysql>
7. 设置密码和开启远程登录
设置一个简单的密码
mysql> update mysql.user set authentication_string=password('123456') where user='root';
Query OK, 1 row affected, 1 warning (0.00 sec)
Rows matched: 1 Changed: 1 Warnings: 1
mysql> flush privileges; #立即生效
Query OK, 0 rows affected (0.01 sec)
退出mysql并停止mysql服务
mysql> quit;
Bye
[root@hadoop02 mysql]# systemctl stop mysqld.service
编辑/etc/my.cnf配置文件将:skip-grant-tables这一行注释掉 ,并重启mysql服务
[root@hadoop02 mysql]# vim /etc/my.cnf
[root@hadoop02 mysql]# systemctl start mysqld.service
再次登录mysql
[root@hadoop02 mysql]# mysql -uroot -p123456
重新重设密码
ALTER USER USER() IDENTIFIED BY '123456';
如果出现如下错误:
mysql> ALTER USER 'root'@'localhost' IDENTIFIED BY '123456';
ERROR1819 (HY000): Your password does not satisfy the current policy requirements
是密码的复杂度不符合默认规定,查看密码得设置策略
mysql> SHOW VARIABLES LIKE 'validate_password%';
+--------------------------------------+-------+
| Variable_name | Value |
+--------------------------------------+-------+
| validate_password_check_user_name | OFF |
| validate_password_dictionary_file | | #指定密码验证的文件路径
| validate_password_length | 6 | #固定密码的总长度;
| validate_password_mixed_case_count | 1 | # 整个密码中至少要包含大/小写字母的总个数
| validate_password_number_count | 1 | #整个密码中至少要包含阿拉伯数字的个数
| validate_password_policy | LOW | #指定密码的强度验证等级,默认为 MEDIUM
| validate_password_special_char_count | 1 |
+--------------------------------------+-------+
设置密码的验证强度等级,设置 validate_password_policy 的全局参数为 LOW
set global validate_password_policy=LOW; #只验证密码得长度
set global validate_password_length=6; #密码验证得长度修改成功
开启mysql远程访问
grant all privileges on *.* to 'root'@'%' identified by '123123' with grant option;
by后面的就是远程登录密码,远程登录密码可以和用户密码不一样

腾讯云面向开发者汇聚海量精品云计算使用和开发经验,营造开放的云计算技术生态圈。
更多推荐
 0
0 0
0- 0


 已为社区贡献1条内容

所有评论(0)