hi3559鸿蒙单系统烧写,鸿蒙HI3861模块中WiFi IoT智能家居套件 - UART2串口通信实现...
在HI3861模块中,UART2使用GPIO11和GPIO12管脚,串口通信一般是一个单片机最基本通信,我们一般调试的时候一个是点灯,另外一个就是打通串口虽然目前的开发板已经有串口输出了(UART0),但是这个串口是官方自带的,我们还是要熟悉一下串口的使用过程。GPIO11->UART2_TXGPIO12->UART2_RX下面我们实现UART2的初始化,并将UART2接收到的数据从U

在HI3861模块中,UART2使用GPIO11和GPIO12管脚,串口通信一般是一个单片机最基本通信,我们一般调试的时候一个是点灯,另外一个就是打通串口
虽然目前的开发板已经有串口输出了(UART0),但是这个串口是官方自带的,我们还是要熟悉一下串口的使用过程。
GPIO11->UART2_TX
GPIO12->UART2_RX
下面我们实现UART2的初始化,并将UART2接收到的数据从UART2发送出去。
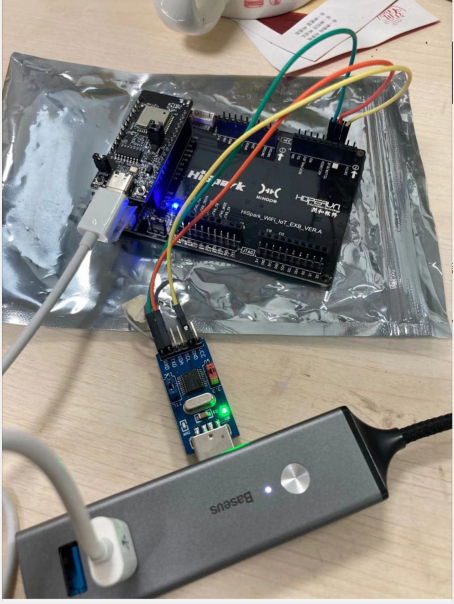
硬件连接图
串口相关的函数如下:
code\base\iot_hardware\frameworks\wifiiot_lite\src\wifiiot_uart.c
//初始化函数
unsigned intUartInit(WifiIotUartIdx id, const WifiIotUartAttribute *param, const WifiIotUartExtraAttr *extraAttr)
//读数据函数
intUartRead(WifiIotUartIdx id, unsignedchar*data, unsignedintdataLen)
//写数据函数
intUartWrite(WifiIotUartIdx id, const unsignedchar*data, unsignedintdataLen)
开发过程:
1. 使能UART2
在 vendor\hisi\hi3861\hi3861\build\config\usr_config.mk 修改 CONFIG_UART2_SUPPORT=y
2. 初始化GPIO为UART2(注意,如果已经执行步骤1,则不需要本过程)
如果已经配置 CONFIG_UART2_SUPPORT=y,则以下文件中的GPIO11,12会被自动初始化为UART2
vendor\hisi\hi3861\hi3861\app\wifiiot_app\init\app_io_init.c
#ifdef CONFIG_UART2_SUPPORT
/* uart2 sigma认证使用串口 */
hi_io_set_func(HI_IO_NAME_GPIO_11, HI_IO_FUNC_GPIO_11_UART2_TXD); /* uart2 tx */
hi_io_set_func(HI_IO_NAME_GPIO_12, HI_IO_FUNC_GPIO_12_UART2_RXD); /* uart2 rx */
#endif
3. 初始化UART2配置
intusr_uart2_config(void)
{
intret;
//初始化UART2配置,115200,数据bit为8,停止位1,奇偶校验为NONE,流控为NONE
WifiIotUartAttribute g_uart2_cfg = {115200, 8, 1, WIFI_IOT_UART_PARITY_NONE, 0};
ret = UartInit(WIFI_IOT_UART_IDX_2, &g_uart2_cfg,NULL);
if (ret != 0)
{
printf("uart2 init fail\r\n");
}
returnret;
}
4. 调用UART读写函数
unsignedcharbuff[50] = {0};
unsigned intlen = 0;
unsigned intui = 0;
len = UartRead(WIFI_IOT_UART_IDX_2, buff, 50);//接收串口2数据
if(len > 0)
{
printf("UART2 recv len=%d\r\n", len);
for(ui = 0 ; ui
{
printf("0x%x\r\n", buff[ui]);
}
UartWrite(WIFI_IOT_UART_IDX_2, buff, len);//数据发送给串口2
}
5. 完整的代码 uart2_demo.c
路径:code\applications\sample\wifi-iot\app\hello_world\uart2_demo.c
#include
#include
#include "ohos_init.h"
#include "cmsis_os2.h"
#include "wifiiot_gpio.h"
#include "wifiiot_gpio_ex.h"
#include "wifiiot_uart.h"
#include "wifiiot_uart_ex.h"
/*
2020年11月19日
作者:hcl0317
链接:
实现功能:
GPIO11->UART2_TX
GPIO12->UART2_RX
1. 在 vendor\hisi\hi3861\hi3861\build\config\usr_config.mk 修改 CONFIG_UART2_SUPPORT=y
2. 打开上面的宏定义后,在 vendor\hisi\hi3861\hi3861\app\wifiiot_app\init\app_io_init.c中会自动对 GPIO11和GPIO12进行初始化
//#ifdef CONFIG_UART2_SUPPORT
// //uart2 sigma认证使用串口
// hi_io_set_func(HI_IO_NAME_GPIO_11, HI_IO_FUNC_GPIO_11_UART2_TXD); // uart2 tx
// hi_io_set_func(HI_IO_NAME_GPIO_12, HI_IO_FUNC_GPIO_12_UART2_RXD); // uart2 rx
//#endif
//3.初始化UART2配置,115200,数据bit为8,停止位1,奇偶校验为NONE,流控为NONE
//4.在任务中调用串口读写函数,收到什么数据,发送什么数据
*/
intusr_uart2_config(void)
{
intret;
//初始化UART2配置,115200,数据bit为8,停止位1,奇偶校验为NONE,流控为NONE
WifiIotUartAttribute g_uart2_cfg = {115200, 8, 1, WIFI_IOT_UART_PARITY_NONE, 0};
ret = UartInit(WIFI_IOT_UART_IDX_2, &g_uart2_cfg,NULL);
if (ret != 0)
{
printf("uart2 init fail\r\n");
}
returnret;
}
//1.任务处理函数
staticvoid* Uart2Demo_Task(constchar* arg)
{
unsigned charbuff[50] = {0};
unsigned intlen = 0;
(void)arg;
printf("[Uart2Demo] Uart2Demo_Task()\n");
GpioInit();//使用GPIO,都需要调用该接口
printf("UART2 init...\r\n");
usr_uart2_config();
while(1)
{
//logic code fortask
unsigned intui = 0;
len = UartRead(WIFI_IOT_UART_IDX_2, buff, 50);//接收串口2数据
if(len > 0)
{
printf("UART2 recv len=%d\r\n", len);
for(ui = 0 ; ui
{
printf("0x%x\r\n", buff[ui]);
}
UartWrite(WIFI_IOT_UART_IDX_2, buff, len);//数据发送给串口2
}
//usleep(500000);
usleep(100000);
}
returnNULL;
}
//2.任务入口函数
staticvoid Uart2Demo_Entry(void)
{
osThreadAttr_t attr = {0};
printf("[Uart2Demo] Uart2Demo_Entry()\n");
attr.name="Uart2Demo_Task";
attr.attr_bits = 0U;
attr.cb_mem = NULL;
attr.cb_size = 0U;
attr.stack_mem = NULL;
attr.stack_size = 1024;//堆栈大小
attr.priority = osPriorityNormal;//优先级
if (osThreadNew((osThreadFunc_t)Uart2Demo_Task, NULL, &attr) ==NULL)
{
printf("[Uart2Demo] Falied to create LedTask!\n");
}
}
//3.注册模块
SYS_RUN(Uart2Demo_Entry);
6. 业务代码的编译脚本 BUILD.gn
路径:code\applications\sample\wifi-iot\app\uart2_demo\BUILD.gn
static_library("uart2_demo_app") {
sources = [
"uart2_demo.c"
]
include_dirs = [
"//utils/native/lite/include",
"//kernel/liteos_m/components/cmsis/2.0",
"//base/iot_hardware/interfaces/kits/wifiiot_lite",
]
}
7. 模块的编译脚本BUILD.gn
路径:code\applications\sample\wifi-iot\app\BUILD.gn
import("//build/lite/config/component/lite_component.gni")
lite_component("app") {
features = [
"startup",
#"hello_world:hello_world_app",
"uart2_demo:uart2_demo_app"
]
}
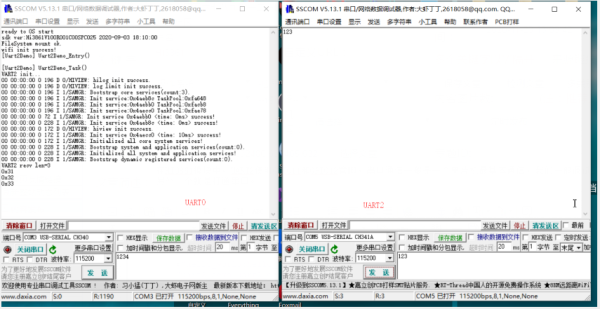
执行结果,左侧是开发板原来的串口0,右侧是新增的串口2
【编辑推荐】
【责任编辑:jianghua TEL:(010)68476606】
点赞 0

腾讯云面向开发者汇聚海量精品云计算使用和开发经验,营造开放的云计算技术生态圈。
更多推荐
 1
1 0
0- 0


 已为社区贡献3条内容

所有评论(0)