docker desktop(Windows)使用docker login远程登录Harbor私有镜像仓库解决自动访问https报错问题
docker desktop(Windows)使用docker login远程登录Harbor私有镜像仓库解决自动访问https报错问题
0、环境说明
- harbor私有镜像仓库部署在华为云ECS上
- 本机电脑环境是windows10 + docker desktop + IDEA(spring boot + spring cloud项目)
- 需要把Java项目现在本地通过mvn docker:build生成的docker镜像推送到远程的harbor私有镜像仓库中
1、遇到的问题
使用docker login远程登录harbor私有镜像仓库时报错如下:
Error response from daemon: Get “https://docker.wongoing.net/v2/”: dial tcp x.x.x.x:443: connect: connection refused
2、解决方案一:本地配置docker以允许http方式进行push镜像
2.1、问题解决方法-网上查阅的
网上的解决方法基本都是2种:
1、修改/etc/docker/daemon.json
{
	"insecure-registries": ["harbor服务器的ip:端口或域名"]
}
2、修改/usr/lib/systemd/system/docker.service
ExecStart=/usr/bin/dockerd --insecure-registry harbor服务器的ip:端口或域名
但是没有说明是改本地(客户端,就是使用docker login的电脑)的docker配置,因为我的harbor也是基于docker部署到,开始我改的服务端,导致一直未生效。
2.2、正确的解决方法
1、(window10环境下)你已经正确安装了docker desktop
2、在任务栏docker desktop图标上鼠标右键,选择"setting"菜单,如下图: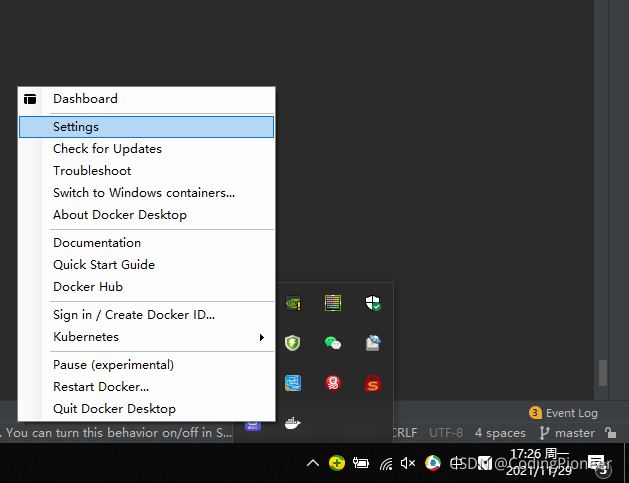
3、打开的docker设置界面中选择左侧的Docker Engine,在右侧内容中增加以下配置代码:
"insecure-registries": ["docker.wongoing.net"]
如下图:
4、然后点击“Apply & Restart”按钮进行docker服务重启。
2.3、重新执行docker login,并push本地镜像至远程harbor仓库
执行如下图: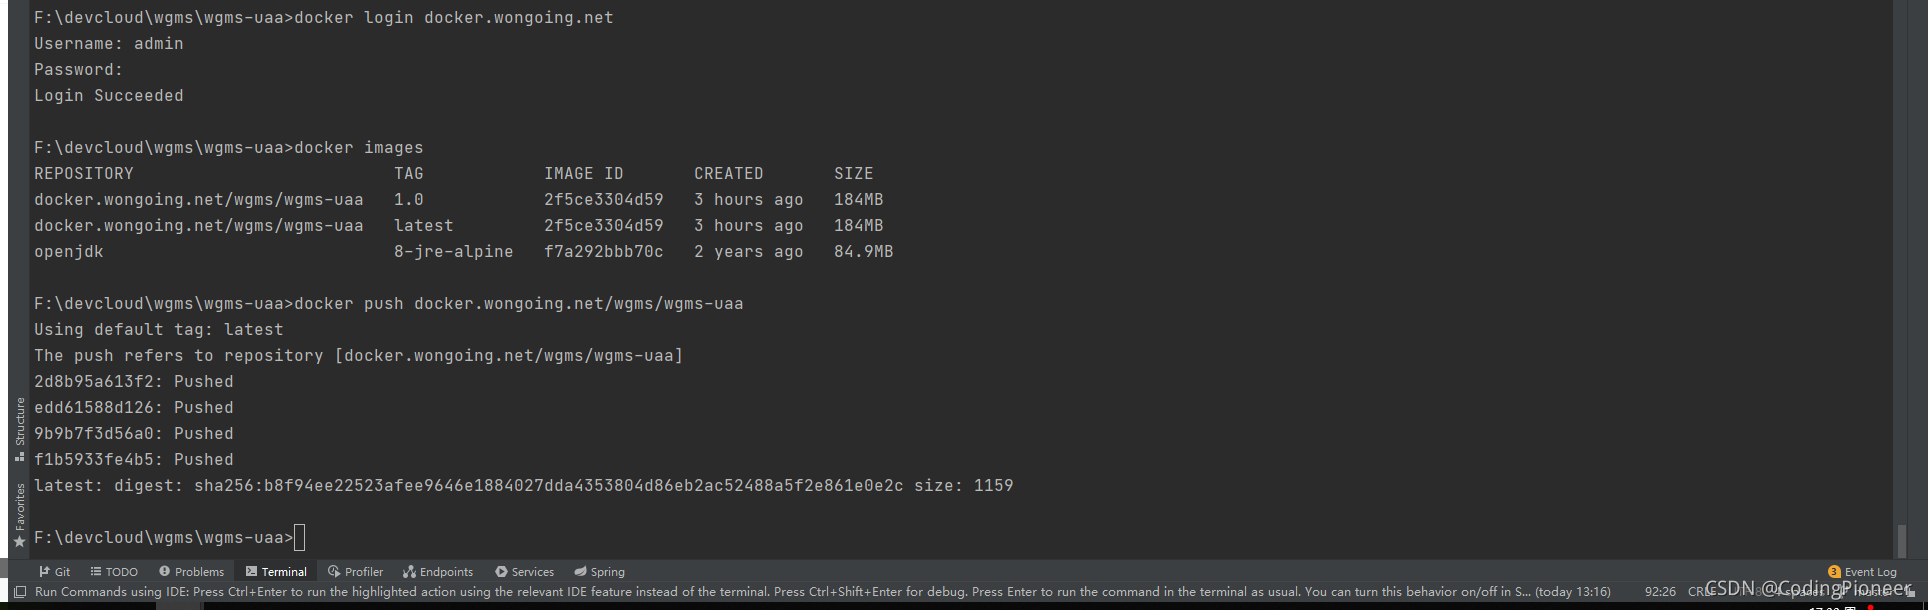
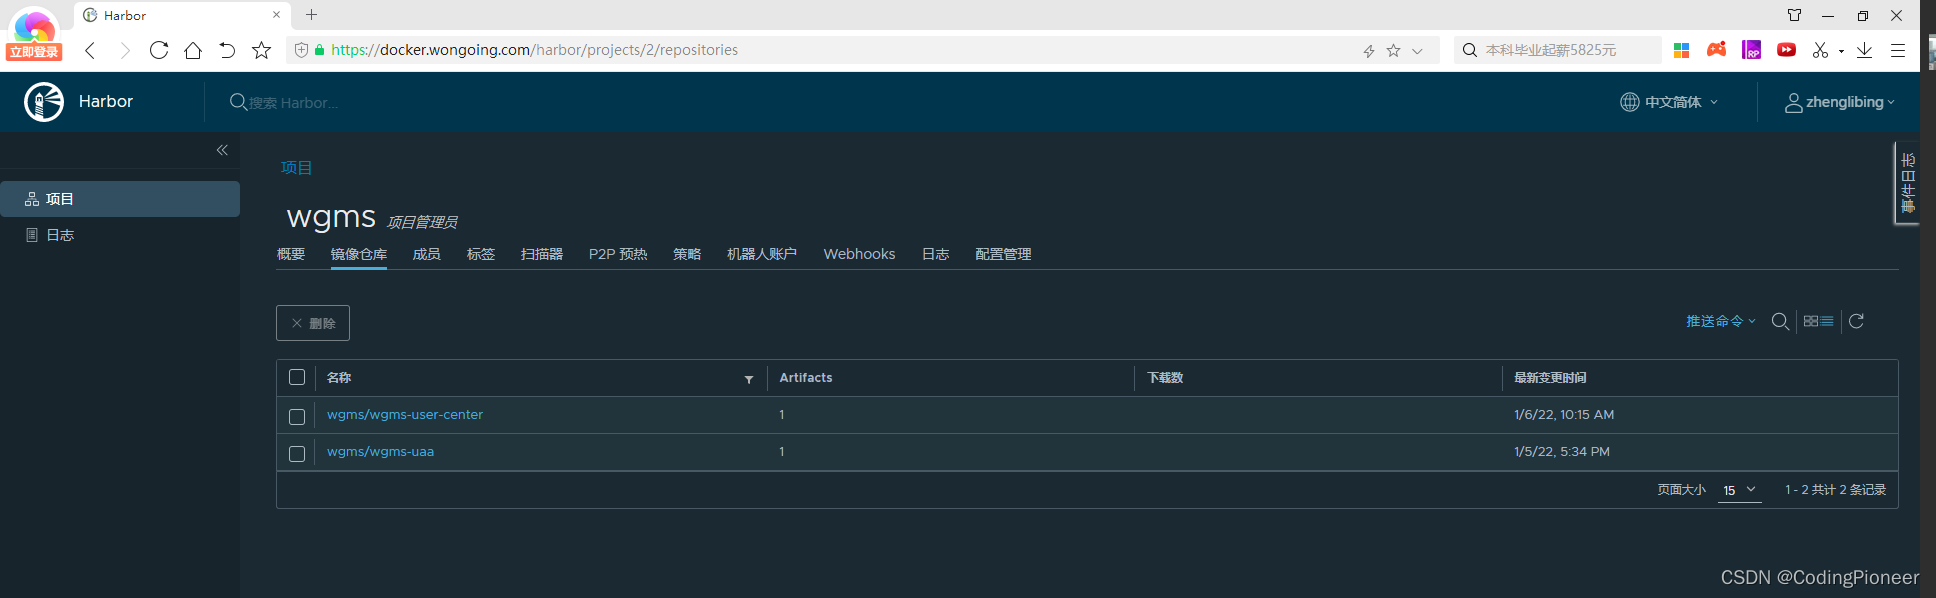
登录harbor控制台,可以看到如下图:
3、解决方案二:配置harbor以允许https方式进行push镜像
1、进入/usr/local/harbor目录
2、编辑harbor.yml开启ssl相关的配置,关键内容如下:
/opt/data/cert/6911202_docker.wongoing.com.pem和/opt/data/cert/6911202_docker.wongoing.com.key是根据域名购买ssl证书(可以申请免费的),下载nginx服务器的证书。
详细内容如下:
# Configuration file of Harbor

# The IP address or hostname to access admin UI and registry service.
# DO NOT use localhost or 127.0.0.1, because Harbor needs to be accessed by external clients.
hostname: docker.wongoing.com

customize_crt: false
# http related config
http:
  # port for http, default is 80. If https enabled, this port will redirect to https port
  port: 80

  ## https related config
https:
  ## https port for harbor, default is 443
  port: 443
  ## The path of cert and key files for nginx
  certificate: /opt/data/cert/6911202_docker.wongoing.com.pem
  private_key: /opt/data/cert/6911202_docker.wongoing.com.key

# # Uncomment following will enable tls communication between all harbor components
# internal_tls:
#   # set enabled to true means internal tls is enabled
#   enabled: true
#   # put your cert and key files on dir
#   dir: /etc/harbor/tls/internal

# Uncomment external_url if you want to enable external proxy
# And when it enabled the hostname will no longer used
# external_url: https://reg.mydomain.com:8433

# The initial password of Harbor admin
# It only works in first time to install harbor
# Remember Change the admin password from UI after launching Harbor.
harbor_admin_password: wongoing@123

# Harbor DB configuration
database:
  # The password for the root user of Harbor DB. Change this before any production use.
  password: mesnac@123
  # The maximum number of connections in the idle connection pool. If it <=0, no idle connections are retained.
  max_idle_conns: 50
  # The maximum number of open connections to the database. If it <= 0, then there is no limit on the number of open connections.
  # Note: the default number of connections is 1024 for postgres of harbor.
  max_open_conns: 1000

# The default data volume
data_volume: /mnt/sdc/data

# Harbor Storage settings by default is using /data dir on local filesystem
# Uncomment storage_service setting If you want to using external storage
# storage_service:
#   # ca_bundle is the path to the custom root ca certificate, which will be injected into the truststore
#   # of registry's and chart repository's containers.  This is usually needed when the user hosts a internal storage with self signed certificate.
#   ca_bundle:

#   # storage backend, default is filesystem, options include filesystem, azure, gcs, s3, swift and oss
#   # for more info about this configuration please refer https://docs.docker.com/registry/configuration/
#   filesystem:
#     maxthreads: 100
#   # set disable to true when you want to disable registry redirect
#   redirect:
#     disabled: false

# Trivy configuration
#
# Trivy DB contains vulnerability information from NVD, Red Hat, and many other upstream vulnerability databases.
# It is downloaded by Trivy from the GitHub release page https://github.com/aquasecurity/trivy-db/releases and cached
# in the local file system. In addition, the database contains the update timestamp so Trivy can detect whether it
# should download a newer version from the Internet or use the cached one. Currently, the database is updated every
# 12 hours and published as a new release to GitHub.
trivy:
  # ignoreUnfixed The flag to display only fixed vulnerabilities
  ignore_unfixed: false
  # skipUpdate The flag to enable or disable Trivy DB downloads from GitHub
  #
  # You might want to enable this flag in test or CI/CD environments to avoid GitHub rate limiting issues.
  # If the flag is enabled you have to download the `trivy-offline.tar.gz` archive manually, extract `trivy.db` and
  # `metadata.json` files and mount them in the `/home/scanner/.cache/trivy/db` path.
  skip_update: false
  #
  # insecure The flag to skip verifying registry certificate
  insecure: false
  # github_token The GitHub access token to download Trivy DB
  #
  # Anonymous downloads from GitHub are subject to the limit of 60 requests per hour. Normally such rate limit is enough
  # for production operations. If, for any reason, it's not enough, you could increase the rate limit to 5000
  # requests per hour by specifying the GitHub access token. For more details on GitHub rate limiting please consult
  # https://developer.github.com/v3/#rate-limiting
  #
  # You can create a GitHub token by following the instructions in
  # https://help.github.com/en/github/authenticating-to-github/creating-a-personal-access-token-for-the-command-line
  #
  # github_token: xxx

jobservice:
  # Maximum number of job workers in job service
  max_job_workers: 10

notification:
  # Maximum retry count for webhook job
  webhook_job_max_retry: 10

chart:
  # Change the value of absolute_url to enabled can enable absolute url in chart
  absolute_url: disabled

# Log configurations
log:
  # options are debug, info, warning, error, fatal
  level: info
  # configs for logs in local storage
  local:
    # Log files are rotated log_rotate_count times before being removed. If count is 0, old versions are removed rather than rotated.
    rotate_count: 50
    # Log files are rotated only if they grow bigger than log_rotate_size bytes. If size is followed by k, the size is assumed to be in kilobytes.
    # If the M is used, the size is in megabytes, and if G is used, the size is in gigabytes. So size 100, size 100k, size 100M and size 100G
    # are all valid.
    rotate_size: 200M
    # The directory on your host that store log
    location: /var/log/harbor

  # Uncomment following lines to enable external syslog endpoint.
  # external_endpoint:
  #   # protocol used to transmit log to external endpoint, options is tcp or udp
  #   protocol: tcp
  #   # The host of external endpoint
  #   host: localhost
  #   # Port of external endpoint
  #   port: 5140

#This attribute is for migrator to detect the version of the .cfg file, DO NOT MODIFY!
_version: 2.2.0

# Uncomment external_database if using external database.
# external_database:
#   harbor:
#     host: harbor_db_host
#     port: harbor_db_port
#     db_name: harbor_db_name
#     username: harbor_db_username
#     password: harbor_db_password
#     ssl_mode: disable
#     max_idle_conns: 2
#     max_open_conns: 0
#   notary_signer:
#     host: notary_signer_db_host
#     port: notary_signer_db_port
#     db_name: notary_signer_db_name
#     username: notary_signer_db_username
#     password: notary_signer_db_password
#     ssl_mode: disable
#   notary_server:
#     host: notary_server_db_host
#     port: notary_server_db_port
#     db_name: notary_server_db_name
#     username: notary_server_db_username
#     password: notary_server_db_password
#     ssl_mode: disable

# Uncomment external_redis if using external Redis server
# external_redis:
#   # support redis, redis+sentinel
#   # host for redis: <host_redis>:<port_redis>
#   # host for redis+sentinel:
#   #  <host_sentinel1>:<port_sentinel1>,<host_sentinel2>:<port_sentinel2>,<host_sentinel3>:<port_sentinel3>
#   host: redis:6379
#   password:
#   # sentinel_master_set must be set to support redis+sentinel
#   #sentinel_master_set:
#   # db_index 0 is for core, it's unchangeable
#   registry_db_index: 1
#   jobservice_db_index: 2
#   chartmuseum_db_index: 3
#   trivy_db_index: 5
#   idle_timeout_seconds: 30

# Uncomment uaa for trusting the certificate of uaa instance that is hosted via self-signed cert.
# uaa:
#   ca_file: /path/to/ca

# Global proxy
# Config http proxy for components, e.g. http://my.proxy.com:3128
# Components doesn't need to connect to each others via http proxy.
# Remove component from `components` array if want disable proxy
# for it. If you want use proxy for replication, MUST enable proxy
# for core and jobservice, and set `http_proxy` and `https_proxy`.
# Add domain to the `no_proxy` field, when you want disable proxy
# for some special registry.
proxy:
  http_proxy:
  https_proxy:
  no_proxy:
  components:
    - core
    - jobservice
    - trivy

# metric:
#   enabled: false
#   port: 9090
#   path: /metrics
3、如果已经启动了harbor,请先停止harbor的相关服务,如下:
docker-compose down -v
4、执行/usr/local/harbor/install.sh,使harbor.yml的修改生效,并完成服务的启动,如下:
./install.sh
5、本地把java项目打包成docker镜像
mvn docker:build
执行结果如下:
F:\devcloud\microservice\wgms\wgms-business\wgms-user-center>mvn docker:build
[INFO] Scanning for projects...
[INFO]
[INFO] -------------------< com.wongoing:wgms-user-center >--------------------
[INFO] Building wgms-user-center 1.0
[INFO] --------------------------------[ jar ]---------------------------------
[INFO]
[INFO] --- docker-maven-plugin:1.2.2:build (default-cli) @ wgms-user-center ---
[INFO] Using authentication suppliers: [ConfigFileRegistryAuthSupplier]
[INFO] Copying F:\devcloud\microservice\wgms\wgms-business\wgms-user-center\target\wgms-user-center.jar -> F:\devcloud\microservice\wgms\wgms-business\wgms-user-center\target\docker\wgm
s-user-center.jar
[INFO] Building image wongoing.com/wgms/wgms-user-center
Step 1/5 : FROM openjdk:8-jre-alpine

 ---> f7a292bbb70c
Step 2/5 : ENV JAVA_OPTS -Xms128m -Xmx128m

 ---> Using cache
 ---> 20bfe28ad8b1
Step 3/5 : ADD /wgms-user-center.jar //

 ---> Using cache
 ---> f1506a531d17
Step 4/5 : ENTRYPOINT ["sh","-c","java $JAVA_OPTS -Djava.security.egd=file:/dev/./urandom -jar /wgms-user-center.jar"]

 ---> Using cache
 ---> 404e80276040
Step 5/5 : VOLUME /tmp

 ---> Using cache
 ---> 9cfffb8f3809
ProgressMessage{id=null, status=null, stream=null, error=null, progress=null, progressDetail=null}
Successfully built 9cfffb8f3809
Successfully tagged wongoing.com/wgms/wgms-user-center:latest
[INFO] Built wongoing.com/wgms/wgms-user-center
[INFO] Tagging wongoing.com/wgms/wgms-user-center with 1.0
[INFO] Tagging wongoing.com/wgms/wgms-user-center with latest
[INFO] ------------------------------------------------------------------------
[INFO] BUILD SUCCESS
[INFO] ------------------------------------------------------------------------
[INFO] Total time:  02:58 min
[INFO] Finished at: 2022-01-06T10:05:50+08:00
[INFO] ------------------------------------------------------------------------

F:\devcloud\microservice\wgms\wgms-business\wgms-user-center>mvn docker:build
[INFO] Scanning for projects...
[INFO]
[INFO] -------------------< com.wongoing:wgms-user-center >--------------------
[INFO] Building wgms-user-center 1.0
[INFO] --------------------------------[ jar ]---------------------------------
[INFO]
[INFO] --- docker-maven-plugin:1.2.2:build (default-cli) @ wgms-user-center ---
[INFO] Using authentication suppliers: [ConfigFileRegistryAuthSupplier]
[INFO] Copying F:\devcloud\microservice\wgms\wgms-business\wgms-user-center\target\wgms-user-center.jar -> F:\devcloud\microservice\wgms\wgms-business\wgms-user-center\target\docker\wgm
s-user-center.jar
[INFO] Building image docker.wongoing.com/wgms/wgms-user-center
Step 1/5 : FROM openjdk:8-jre-alpine

 ---> f7a292bbb70c
Step 2/5 : ENV JAVA_OPTS -Xms128m -Xmx128m

 ---> Using cache
 ---> 20bfe28ad8b1
Step 3/5 : ADD /wgms-user-center.jar //

 ---> d1f9c907ee15
Step 4/5 : ENTRYPOINT ["sh","-c","java $JAVA_OPTS -Djava.security.egd=file:/dev/./urandom -jar /wgms-user-center.jar"]

 ---> Running in 4969092f91ab
Removing intermediate container 4969092f91ab
 ---> fdf8b66d13fb
Step 5/5 : VOLUME /tmp

 ---> Running in de5f90a35c56
Removing intermediate container de5f90a35c56
 ---> d181f2f61b9b
ProgressMessage{id=null, status=null, stream=null, error=null, progress=null, progressDetail=null}
Successfully built d181f2f61b9b
Successfully tagged docker.wongoing.com/wgms/wgms-user-center:latest
[INFO] Built docker.wongoing.com/wgms/wgms-user-center
[INFO] Tagging docker.wongoing.com/wgms/wgms-user-center with 1.0
[INFO] Tagging docker.wongoing.com/wgms/wgms-user-center with latest
[INFO] ------------------------------------------------------------------------
[INFO] BUILD SUCCESS
[INFO] ------------------------------------------------------------------------
[INFO] Total time:  02:59 min
[INFO] Finished at: 2022-01-06T10:11:26+08:00
[INFO] ------------------------------------------------------------------------
F:\devcloud\microservice\wgms\wgms-business\wgms-user-center>docker images
REPOSITORY                                  TAG            IMAGE ID       CREATED         SIZE
docker.wongoing.com/wgms/wgms-user-center   1.0            d181f2f61b9b   2 minutes ago   180MB
docker.wongoing.com/wgms/wgms-user-center   latest         d181f2f61b9b   2 minutes ago   180MB
docker.wongoing.com/wgms/wgms-uaa           1.0            009ef77f44ec   44 hours ago    85MB
docker.wongoing.com/wgms/wgms-uaa           latest         009ef77f44ec   44 hours ago    85MB
openjdk                                     8-jre-alpine   f7a292bbb70c   2 years ago     84.9MB
6、本地执行docker login,登录至harbor服务器,如下:
docker login docker.wongoing.com
7、执行docker push,把本地镜像推送至harbor私有镜像仓库
docker push docker.wongoing.com/wgms/wgms-user-center
执行结果如下:
F:\devcloud\microservice\wgms\wgms-business\wgms-user-center>docker push docker.wongoing.com/wgms/wgms-user-center
Using default tag: latest
The push refers to repository [docker.wongoing.com/wgms/wgms-user-center]
65d91ac0cddc: Pushed
edd61588d126: Mounted from wgms/wgms-uaa
9b9b7f3d56a0: Mounted from wgms/wgms-uaa
f1b5933fe4b5: Mounted from wgms/wgms-uaa
latest: digest: sha256:7c3b0520a4ee14395c678d80b20fdd4816d194730ee902b56841468f98a629d7 size: 1159

腾讯云面向开发者汇聚海量精品云计算使用和开发经验,营造开放的云计算技术生态圈。
更多推荐
 7
7 0
0- 0


 已为社区贡献5条内容

所有评论(0)