END-TO-END OPTIMIZED IMAGE COMPRESSION代码报错记录(tensorflow-gpu2.5版本,代码2.2版)
对应github地址
gihub
首先安装tensorflow-compression
pip install tensorflow-compression==2.2
安装tensorflow-datasets
pip install tensorflow-datasets
数据集用的是imagenet的验证集
数据集改用CLIC dataset CLIC
前言
一些命令的记录
(1)运行python文件的训练模型命令(只针对当前代码)
python bls2017.py --verbose train --train_glob="/home/ll/END-TO-END-OPTIMIZED-IMAGE-COMPRESSION/image/*JPEG"
如果默认数据集CLIC下载
python bls2017.py -V train
(2)linux下的数据集压缩包解压
tar
tar -xvf ILSVRC2012_img_val.tar -C image

zip
unzip kodak.zip


(3)screen
screen -S <作业名称> 创建新的页
screen -ls 查询已经存在的页面
screen -r <作业名称/作业编号> 进入页面
Ctrl+a+d 离开页面,页面进入后台
Screen -S screenID -X quit 删除对应编号screen
进入页面后 exit 退出页面
快键键Ctrl+a+d实现分离
详细教程可以参考screen基本操作
(4)输出训练日志
输出训练日志
训练
1、默认按照命令训练
如果默认数据集CLIC下载
python bls2017.py -V train
没有报错
训练成功后的部分日志

:01:41.058725: W tensorflow/core/lib/png/png_io.cc:88] PNG warning: iCCP: known incorrect sRGB profile
2022-03-30 19:01:41.059903: W tensorflow/core/lib/png/png_io.cc:88] PNG warning: iCCP: known incorrect sRGB profile
2022-03-30 19:01:41.063225: W tensorflow/core/lib/png/png_io.cc:88] PNG warning: iCCP: known incorrect sRGB p1000/1000 [==============================] - 540s 540ms/step - loss: 0.9337 - bpp: 0.4624 - mse: 47.1311 - val_loss: 0.8934 - val_bpp: 0.3957 - val_mse: 49.7729
bls2017 args.model_path
W0330 19:01:48.329876 140611135039296 continuous_batched.py:276] Computing quantization offsets using offset heuristic within a tf.function. Ideally, the offset heuristic should only be used to determine offsets once after training. Depending on the prior, estimating the offset might be computationally expensive.
W0330 19:01:49.131051 140611135039296 continuous_batched.py:276] Computing quantization offsets using offset heuristic within a tf.function. Ideally, the offset heuristic should only be used to determine offsets once after training. Depending on the prior, estimating the offset might be computationally expensive.
W0330 19:01:49.467364 140611135039296 continuous_batched.py:276] Computing quantization offsets using offset heuristic within a tf.function. Ideally, the offset heuristic should only be used to determine offsets once after training. Depending on the prior, estimating the offset might be computationally expensive.
W0330 19:01:49.860946 140611135039296 continuous_batched.py:276] Computing quantization offsets using offset heuristic within a tf.function. Ideally, the offset heuristic should only be used to determine offsets once after training. Depending on the prior, estimating the offset might be computationally expensive.
W0330 19:01:52.657727 140611135039296 save.py:265] Found untraced functions such as gdn_0_layer_call_fn, gdn_0_layer_call_and_return_conditional_losses, gdn_1_layer_call_fn, gdn_1_layer_call_and_return_conditional_losses, igdn_0_layer_call_fn while saving (showing 5 of 8). These functions will not be directly callable after loading.
INFO:tensorflow:Assets written to: bls2017/assets
I0330 19:01:54.141711 140611135039296 builder_impl.py:780] Assets written to: bls2017/assets
2、整理训练流程
这里我在打断点看到整个代码的运行过程的时候,发现在model中只有model.compile和model.fit,但是具体的损失还有bpp、mse的计算都在model类的call方法中,但是没有找到在哪里调用了call
def train(args):
  """Instantiates and trains the model.实例化并训练模型。"""
  if args.check_numerics:
    tf.debugging.enable_check_numerics() # 张量数字有效检查

  model = BLS2017Model(args.lmbda, args.num_filters)
  # 配置训练方法,算bpp、mse、lose的加权平均
  model.compile(
      optimizer=tf.keras.optimizers.Adam(learning_rate=1e-4), # 用优化器传入学习率进行梯度下降
  )

  if args.train_glob: # 给了数据集路径(不过滤大小直接裁剪)
    train_dataset = get_custom_dataset("train", args)
    validation_dataset = get_custom_dataset("validation", args)
  else: # 没给数据集路径,默认下载clic数据集(过滤大小、裁剪)
    train_dataset = get_dataset("clic", "train", args)
    validation_dataset = get_dataset("clic", "validation", args)
  validation_dataset = validation_dataset.take(args.max_validation_steps)

  model.fit(
      train_dataset.prefetch(8), # 开启预加载数据
      epochs=args.epochs,
      steps_per_epoch=args.steps_per_epoch,
      validation_data=validation_dataset.cache(),
      validation_freq=1,
      callbacks=[
          tf.keras.callbacks.TerminateOnNaN(),
          tf.keras.callbacks.TensorBoard(
              log_dir=args.train_path,
              histogram_freq=1, update_freq="epoch"),
          tf.keras.callbacks.experimental.BackupAndRestore(args.train_path),
      ],
      verbose=int(args.verbose), # 日志显示
  )
  print(args.model_path, 'args.model_path')
  model.save(args.model_path)
所以去查询了一下tensorflow2.x的init、build、call
Tensorflow2自定义Layers之__init__,build和call详解
这边博客的代码如下
import tensorflow as tf
class MyDenseLayer(tf.keras.layers.Layer):
  def __init__(self, num_outputs):
    super(MyDenseLayer, self).__init__()
    print('init 被执行')
    self.num_outputs = num_outputs
    self.i = 0
    print('Init:This is i',self.i)
    self.i = self.i +1
  def build(self,input_shape):
    print('build 被执行')
    print('input_shape',input_shape)
    print('Build:This is i',self.i)
    self.kernel = self.add_weight("kernel",
                                  shape=[int(input_shape[-1]),
                                         self.num_outputs])

  def call(self, input):
    print('call 被执行')
    return tf.matmul(input, self.kernel)

layer = MyDenseLayer(10)
_ = layer(tf.zeros([10, 5])) # Calling the layer `.builds` it.
print([var.name for var in layer.trainable_variables])
_ = layer(tf.ones([10, 5]))
print([var.name for var in layer.trainable_variables])
执行结果可以看原博客,整个执行过程就是当第一次类被实例化之后,__ init__、build、call都会被执行一次,后面每次调用一次,call都会重新执行一次。
应用到我们的代码当中
class BLS2017Model(tf.keras.Model):
  """Main model class."""

  def __init__(self, lmbda, num_filters): # 这里的self就是实例化对象
    super().__init__()
    self.lmbda = lmbda
    self.analysis_transform = AnalysisTransform(num_filters)
    self.synthesis_transform = SynthesisTransform(num_filters)
    self.prior = tfc.NoisyDeepFactorized(batch_shape=(num_filters,)) #先验概率
    self.build((None, None, None, 3))

  def call(self, x, training):
    """Computes rate and distortion losses."""
    # 该库中的熵模型类简化了设计率失真优化代码的过程。在训练期间,它们的行为类似于似然模型。
    entropy_model = tfc.ContinuousBatchedEntropyModel(
        self.prior, coding_rank=3, compression=False)
    y = self.analysis_transform(x)
    y_hat, bits = entropy_model(y, training=training)
    x_hat = self.synthesis_transform(y_hat)
    # Total number of bits divided by total number of pixels.
    #  tf.reduce_prod 计算一个张量的各个维度上元素的乘积.(长乘宽)
    num_pixels = tf.cast(tf.reduce_prod(tf.shape(x)[:-1]), bits.dtype)
    # 码率
    # 码率的单位是bpp,每像素占的bit
    bpp = tf.reduce_sum(bits) / num_pixels
    # Mean squared error across pixels.
    mse = tf.reduce_mean(tf.math.squared_difference(x, x_hat))
    print(mse, 'mse')
    # The rate-distortion Lagrangian.
    loss = bpp + self.lmbda * mse
    return loss, bpp, mse

  # model.compile()方法用于在配置训练方法时,告知训练时用的优化器、损失函数和准确率评测标准
  def compile(self, **kwargs):
    super().compile(
        loss=None,
        metrics=None,
        loss_weights=None,
        weighted_metrics=None,
        **kwargs,
    )
    self.loss = tf.keras.metrics.Mean(name="loss") # tf.keras.metrics.Mean计算给定值的(加权)平均值。
    self.bpp = tf.keras.metrics.Mean(name="bpp")
    self.mse = tf.keras.metrics.Mean(name="mse")

  # 迭代训练模型
  def fit(self, *args, **kwargs):
    retval = super().fit(*args, **kwargs) # 返回值
    # After training, fix range coding tables.
    self.entropy_model = tfc.ContinuousBatchedEntropyModel(
        self.prior, coding_rank=3, compression=True)
    return retval
在我们的train方法中进行了实例化之后首先执行了init和init中的build,进而执行了call,构建了基本的框架图,没有执行到具体的其他方法
再之后就是通过model.compile、model.fit传入数据进行具体的训练
整理一下具体的过程
- 实例化对象
init中初始化一些参数,比如非线性分析变换、非线性综合变换、添加均匀噪声、获得先验概率等
call中通过熵模型计算bpp、mse、loss
其中非线性分析变换即cnn卷积的过程,其中有一步补零的过程是为了输入与输出图片尺寸相等 - model.compile
通过model.compile配置训练方法,使用优化器进行梯度下降、算bpp、mse、lose的加权平均 - 过滤剪裁数据集
通过参数查看是否给定了数据集路径
给定数据集路径:直接剪裁成256x256(统一剪裁成256*256送入网络训练,后面压缩的图片不会改变大小)
未给定数据集路径:用CLIC数据集,过滤出图片大小大于256x256的三通的图片,然后进行剪裁
分出训练数据集与验证数据集 - model.fit
传入训练数据集,设置相关参数(epoch等)进行训练
通过retval = super().fit(*args, **kwargs)进入model的train_step(不得不说这里封装的太严实了…但从单文件的代码根本找不到怎么跳进去的)
  def train_step(self, x):
    with tf.GradientTape() as tape:
      loss, bpp, mse = self(x, training=True)
    variables = self.trainable_variables
    gradients = tape.gradient(loss, variables)
    self.optimizer.apply_gradients(zip(gradients, variables))
    self.loss.update_state(loss)
    self.bpp.update_state(bpp)
    self.mse.update_state(mse)
    return {m.name: m.result() for m in [self.loss, self.bpp, self.mse]}
def outer_factory():
    self = None
    step_function = None

    def inner_factory(ag__):

        def tf__train_function(iterator):
            'Runs a training execution with a single step.'
            with ag__.FunctionScope('train_function', 'fscope', ag__.ConversionOptions(recursive=True, user_requested=True, optional_features=(), internal_convert_user_code=True)) as fscope:
                do_return = False
                retval_ = ag__.UndefinedReturnValue()
                try:
                    do_return = True
                    retval_ = ag__.converted_call(ag__.ld(step_function), (ag__.ld(self), ag__.ld(iterator)), None, fscope)
                except:
                    do_return = False
                    raise
                return fscope.ret(retval_, do_return)
        return tf__train_function
    return inner_factory
- train_step
self.trainable_variables获取变量集,通过传入变量集与定义的损失函数,进行前向传播与反向误差传播更新参数。然后更新loss, bpp, mse - 接下来就是重复训练的过程,直到到终止条件(比如epoch达到10000)
这里我在后期纠结的一个问题,传统图像处理方法会先对图像进行padding,然后进行切片处理,最后复原的时候根据切片复原,可以参考图像切片相关。
我们在数据集预处理的时候,将所有图片随机剪裁随机剪裁方法成256*256,然后送入神经网络进行训练,学习权重相关参数,学习结束后,模型训练成功,送入压缩的图片尺寸可以任意,因为针对具体卷积核的权重已经学习完毕,不需要再次改变送入压缩图片的尺寸
3、在gpu资源跑代码的问题
这个代码在网上搜索了一下如何在gpu资源上跑代码(安装的tensorflow是gpu版本的),查看使用的设备
import os
os.environ['CUDA_VISIBLE_DEVICES'] = "0,1" # 使用gpu
# 查看使用设备
from tensorflow.python.client import device_lib
print(device_lib.list_local_devices())
但运行结果仍然是cpu上跑的
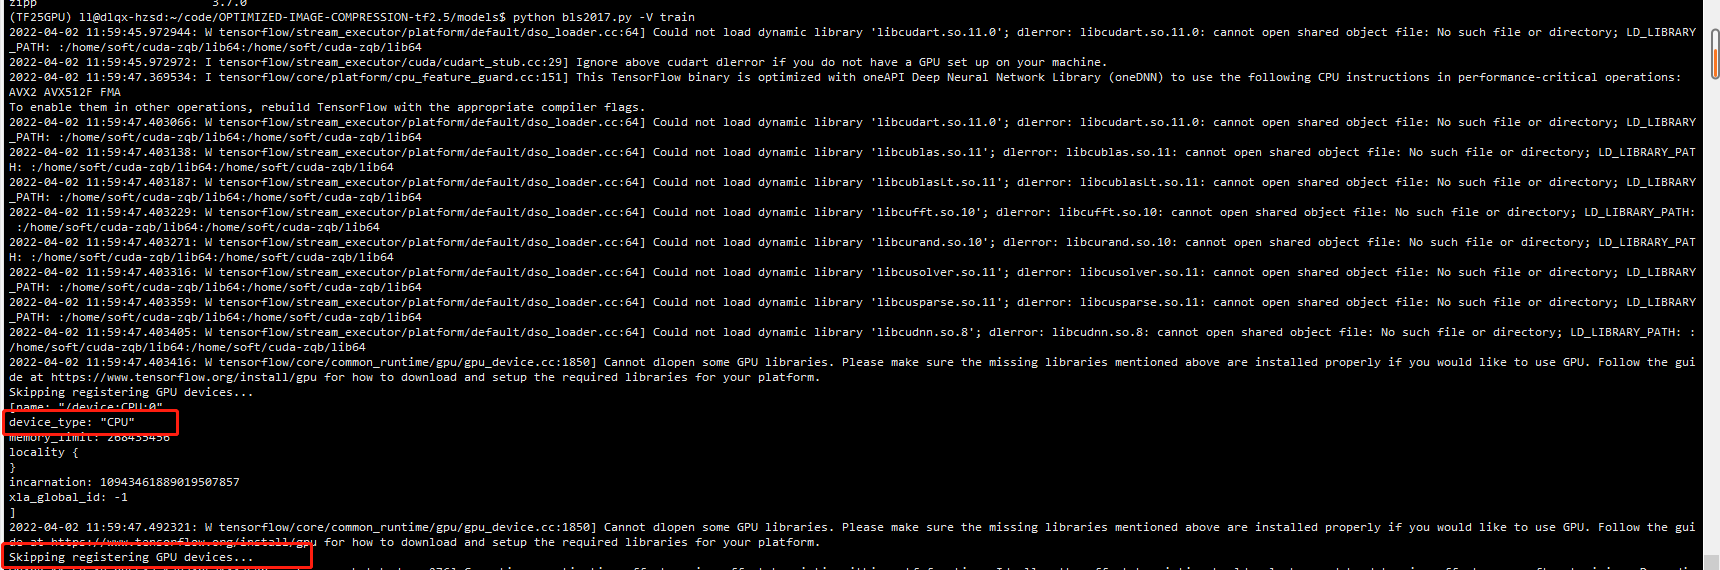
2022-04-02 11:59:47.403405: W tensorflow/stream_executor/platform/default/dso_loader.cc:64] Could not load dynamic library 'libcudnn.so.8'; dlerror: libcudnn.so.8: cannot open shared object file: No such file or directory; LD_LIBRARY_PATH: :/home/soft/cuda-zqb/lib64:/home/soft/cuda-zqb/lib64
2022-04-02 11:59:47.403416: W tensorflow/core/common_runtime/gpu/gpu_device.cc:1850] Cannot dlopen some GPU libraries. Please make sure the missing libraries mentioned above are installed properly if you would like to use GPU. Follow the guide at https://www.tensorflow.org/install/gpu for how to download and setup the required libraries for your platform.
Skipping registering GPU devices...
[name: "/device:CPU:0"
device_type: "CPU"
memory_limit: 268435456
locality {
}
incarnation: 10943461889019507857
xla_global_id: -1
]
2022-04-02 11:59:47.492321: W tensorflow/core/common_runtime/gpu/gpu_device.cc:1850] Cannot dlopen some GPU libraries. Please make sure the missing libraries mentioned above are installed properly if you would like to use GPU. Follow the guide at https://www.tensorflow.org/install/gpu for how to download and setup the required libraries for your platform.
Skipping registering GPU devices...
Could not load dynamic library 'libcudart.so.11.0'; dlerror: libcudart.so.11.0: cannot open shared object file: No such file or directory; LD_LIBRARY_PATH: :/home/soft/cuda-zqb/lib64:/home/soft/cuda-zqb/lib64
更改了cuda版本为11.1
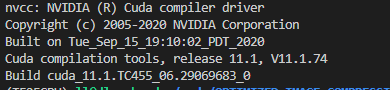
还是不行,于是自己在服务器上安装了cuda11.2的安装包,安装教程可以参考cuda11.2安装
非常详细(注意如果和其他人共用的话最好更改自己的安装路径)
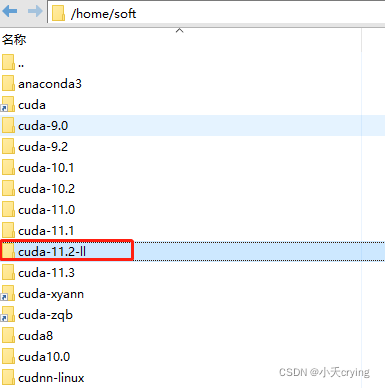
#Cuda Path
export CUDA_HOME=$CUDA_HOME:/home/soft/cuda-11.2-ll
export PATH=$PATH:/home/soft/cuda-11.2-ll/bin
export LD_LIBRARY_PATH=$LD_LIBRARY_PATH:/home/soft/cuda-11.2-ll/lib64
安装成功后通过nvcc -V查看版本
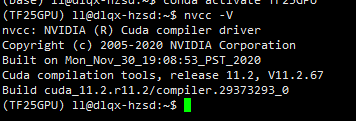
再次进行训练代码

 tensorflow/stream_executor/platform/default/dso_loader.cc:53] Successfully opened dynamic library libcudart.so.11.0
2022-04-06 17:18:55.138732: I tensorflow/stream_executor/platform/default/dso_loader.cc:53] Successfully opened dynamic library libcuda.so.1
成功打开
在查看gpu占用情况(0.5s更新状态)
watch -n 0.5 nvidia-smi
静态查看
nvidia-smi
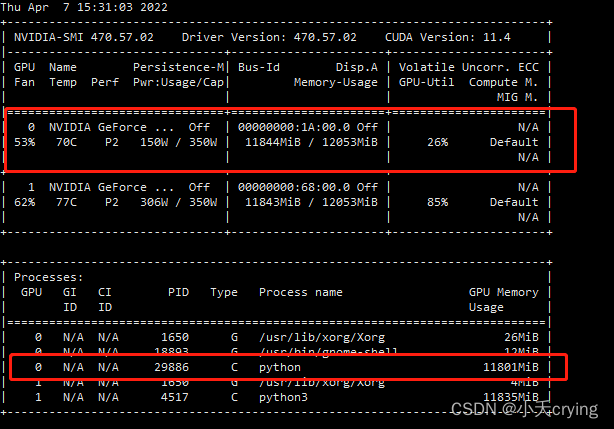
通过id查询进程使用者
ps -f -p 29886

此外,需要限制cpu核数(线程数)
# 限制cpu核数
import tensorflow as tf
os.environ["OMP_NUM_THREADS"] = "1" # 1为一个核,设置为5的时候,系统显示用了10个核,不太清楚之间的具体数量关系
tf.config.threading.set_intra_op_parallelism_threads(1)
tf.config.threading.set_inter_op_parallelism_threads(1)
4、json解析问题
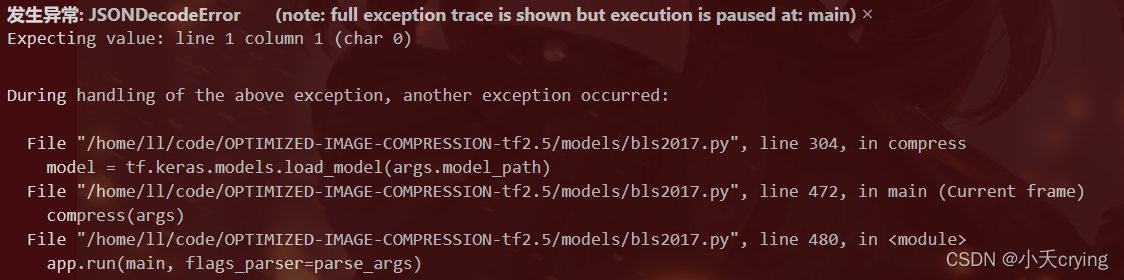
发生异常: JSONDecodeError       (note: full exception trace is shown but execution is paused at: main)
Expecting value: line 1 column 1 (char 0)
这个应该是我没有改路径直接进行了重新训练,导致的问题,我重新改了路径训练了一个新的模型,把目前这个删掉了。
压缩一张图片
压缩命令
python bls2017.py [options] compress original.png compressed.tfci
我这里是
python bls2017.py -V compress ./models/kodim01.png ./models/kodim01.tfci
1、路径错误

No file or directory found at bls2017
在训练完成后的日志打印了路径明明是这个路径,但是由于我的根文件路径不是models
所以改变默认model_path
default="./models/bls2017"
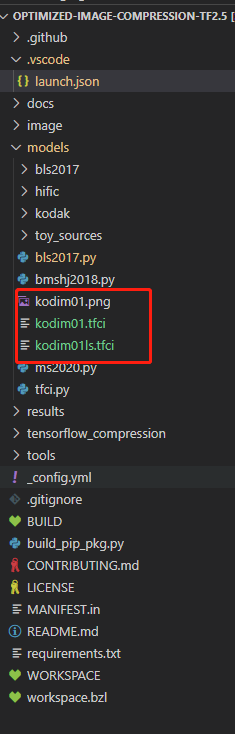
2、基于新的路径进行压缩一张图片

2022-04-08 21:23:28.671522: W tensorflow/core/lib/png/png_io.cc:88] PNG warning: iCCP: known incorrect sRGB p1000/1000 [==============================] - 52s 52ms/step - loss: 0.9309 - bpp: 0.4639 - mse: 46.6982 - val_loss: 0.8605 - val_bpp: 0.3871 - val_mse: 47.3404
.bls2017_01 args.model_path
Tensor("bl_s2017model/Mean:0", shape=(), dtype=float32) mse
Tensor("Mean:0", shape=(), dtype=float32) mse
Tensor("Mean:0", shape=(), dtype=float32) mse
Tensor("Mean:0", shape=(), dtype=float32) mse
Tensor("Mean:0", shape=(), dtype=float32) mse
Tensor("Mean:0", shape=(), dtype=float32) mse
Tensor("Mean:0", shape=(), dtype=float32) mse
Tensor("Mean:0", shape=(), dtype=float32) mse
Tensor("Mean:0", shape=(), dtype=float32) mse
WARNING:tensorflow:From /home/ll/.conda/envs/TF25GPU/lib/python3.7/site-packages/tensorflow/python/util/deprecation.py:602: calling map_fn_v2 (from tensorflow.python.ops.map_fn) with dtype is deprecated and will be removed in a future version.
Instructions for updating:
Use fn_output_signature instead
W0408 21:23:36.111028 140683297310528 deprecation.py:534] From /home/ll/.conda/envs/TF25GPU/lib/python3.7/site-packages/tensorflow/python/util/deprecation.py:602: calling map_fn_v2 (from tensorflow.python.ops.map_fn) with dtype is deprecated and will be removed in a future version.
Instructions for updating:
Use fn_output_signature instead
W0408 21:23:38.065705 140683297310528 save.py:243] Found untraced functions such as gdn_0_layer_call_and_return_conditional_losses, gdn_0_layer_call_fn, gdn_1_layer_call_and_return_conditional_losses, gdn_1_layer_call_fn, igdn_0_layer_call_and_return_conditional_losses while saving (showing 5 of 20). These functions will not be directly callable after loading.
INFO:tensorflow:Assets written to: .bls2017_01/assets
I0408 21:23:38.899453 140683297310528 builder_impl.py:775] Assets written to: .bls2017_01/assets
训练完成后。
压缩命令
原命令
(1)根路径为models
python bls2017.py [options] compress original.png compressed.tfci
我这里是(在服务器终端输入命令,因为服务器是基于根路径为models)
python bls2017.py -V compress ./kodim02.png ./kodim02.tfci
如果根路径是model的上一层记得更改default对应的path(如果是当前直接调试(根路径是model上一级))
"--model_path", default=".bls2017_01",
(2)根路径是models的上一层
这种情况是我读取文件夹路径为根路径上一层
"--model_path", default="./models/.bls2017_01",
launch.json 输入命令进行终端调试的话也需要相应更改
"args": ["--verbose","compress","./models/kodim02.png", "./models/kodim02.tfci"] // 压缩一张图
然后压缩出现了错误
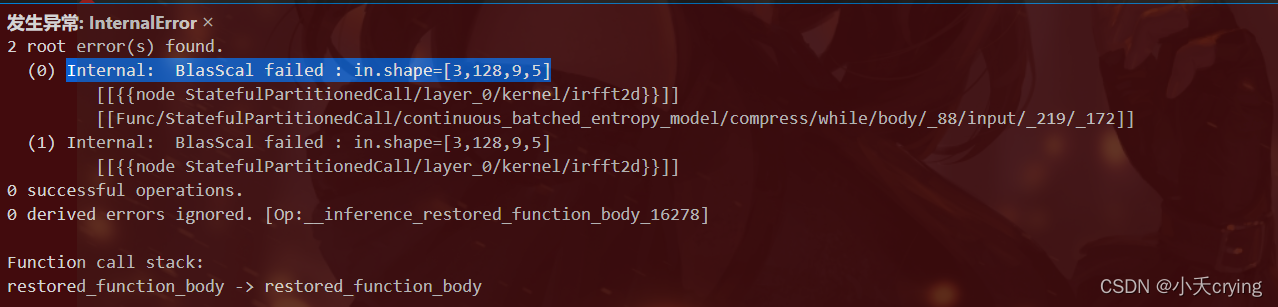
2 root error(s) found.
  (0) Internal:  BlasScal failed : in.shape=[3,128,9,5]
	 [[{{node StatefulPartitionedCall/layer_0/kernel/irfft2d}}]]
	 [[Func/StatefulPartitionedCall/continuous_batched_entropy_model/compress/while/body/_88/input/_219/_172]]
  (1) Internal:  BlasScal failed : in.shape=[3,128,9,5]
	 [[{{node StatefulPartitionedCall/layer_0/kernel/irfft2d}}]]
显存不足?
3、重新运行压缩命令又出现新的问题
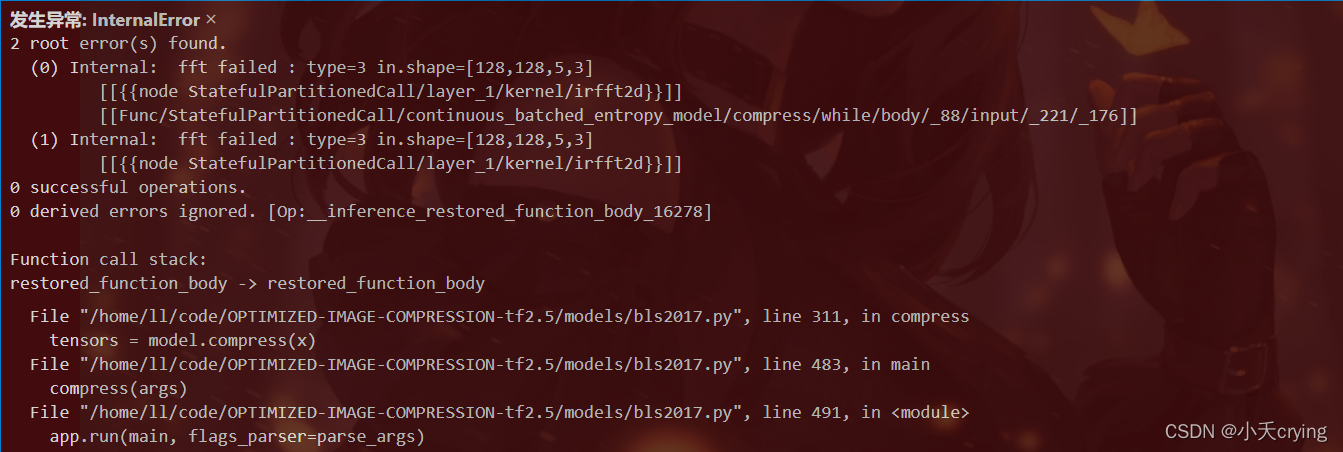
2 root error(s) found.
  (0) Internal:  fft failed : type=3 in.shape=[128,128,5,3]
	 [[{{node StatefulPartitionedCall/layer_1/kernel/irfft2d}}]]
	 [[Func/StatefulPartitionedCall/continuous_batched_entropy_model/compress/while/body/_88/input/_221/_176]]
  (1) Internal:  fft failed : type=3 in.shape=[128,128,5,3]
	 [[{{node StatefulPartitionedCall/layer_1/kernel/irfft2d}}]]
0 successful operations.
0 derived errors ignored. [Op:__inference_restored_function_body_16278]
2、3两个问题是关联的,首先解决显存不足的问题
import tensorflow as tf
config = tf.compat.v1.ConfigProto()
config.gpu_options.per_process_gpu_memory_fraction = 0.8  # 程序最多只能占用指定gpu50%的显存
config.gpu_options.allow_growth = True      #程序按需申请内存
sess = tf.compat.v1.Session(config = config)
进而出现了新的报错
4、No algorithm worked
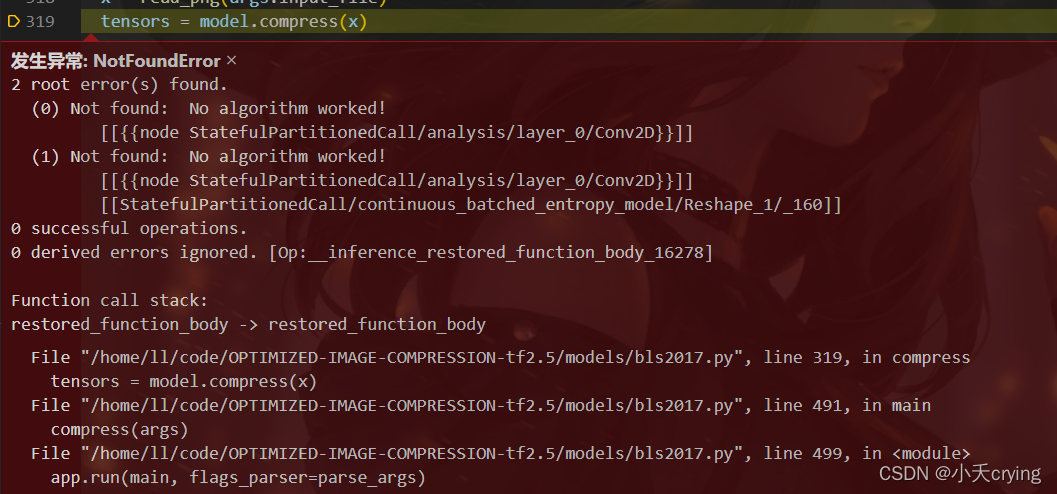
 root error(s) found.
  (0) Not found:  No algorithm worked!
	 [[{{node StatefulPartitionedCall/analysis/layer_0/Conv2D}}]]
  (1) Not found:  No algorithm worked!
	 [[{{node StatefulPartitionedCall/analysis/layer_0/Conv2D}}]]
	 [[StatefulPartitionedCall/continuous_batched_entropy_model/Reshape_1/_160]]
0 successful operations.
0 derived errors ignored. [Op:__inference_restored_function_body_16278]
此问题出现在2.X版本,并且基本都是RTX20X0、RTX20X0 Super、GTX16X0和GTX16X0 Super显卡可能会出现类似报错。
总得来说还是版本不匹配问题
网上看到了一个方法
from tensorflow.compat.v1 import ConfigProto
from tensorflow.compat.v1 import InteractiveSession

config = ConfigProto()
config.gpu_options.allow_growth = True
session = InteractiveSession(config=config)
但是我这里并不起作用
发现了版本问题之后,我直接卸载了cudnn
conda uninstall cudnn
再次进行压缩操作

2022-04-11 18:34:20.077585: I tensorflow/core/platform/profile_utils/cpu_utils.cc:114] CPU Frequency: 3699850000 Hz
Mean squared error: 85.5837
PSNR (dB): 28.81
Multiscale SSIM: 0.9688
Multiscale SSIM (dB): 15.06
Bits per pixel: 0.7118
成功
并且前面的错误更改也不需要了。
这里主要是当初在配置tensorflow2.5环境的时候,查找可安装版本没有对应的导致的报错
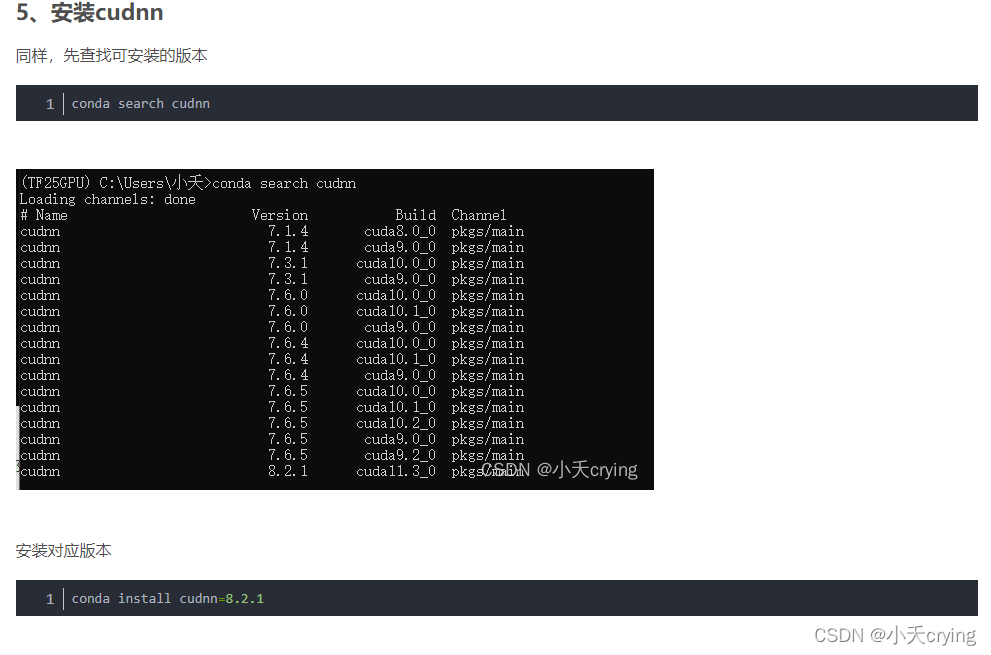

重新安装对应版本的cudnn
cudnn下载
5、整理一下压缩流程
- 加载模型
- 读取图片文件进行解码tf.image.decode_image
- 调用模型的compress方法,更改x、y即原图像与重建后图像的维度,进行非线性分析变换(编码),返回对应的张量
- 获取压缩张量的压缩表示,通过压缩表示和shape信息写一个二进制文件
- 调用模型depress方法(调用熵模型的解压方法,更改对应shape信息,进而通过非线性综合变换进行解码),解压获取重建后的图像tensor
- 对比原图像和重建图像,计算相应性能(mse、psnr、msssim、msssim_db)
- 计算码率bpp(先计算出总的像素值,码率就是每像素所占bit数)
压缩kodak数据集图片,获取当前bpp下所有psnr值求平均值
1、添加新的命令实现新方法求平均
这里只是通过添加新命令进入了新方法,方法内容在后面
(1)添加compressAll子命令

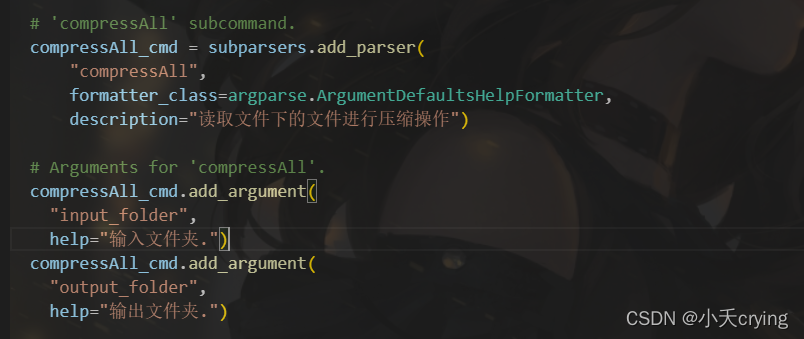
  # 'compressAll' subcommand.
  compressAll_cmd = subparsers.add_parser(
      "compressAll",
      formatter_class=argparse.ArgumentDefaultsHelpFormatter,
      description="读取文件下的文件进行压缩操作")

  # Arguments for 'compressAll'.
  compressAll_cmd.add_argument(
    "input_folder",
    help="输入文件夹.")
  compressAll_cmd.add_argument(
    "output_folder",
    help="输出文件夹.")
这里我们在前面执行的命令其实都是通过在这里进行预先设置的,之后在终端或者launch.json中添加相应的args走到对应的方法中
(2)改变main方法走入不同的分支
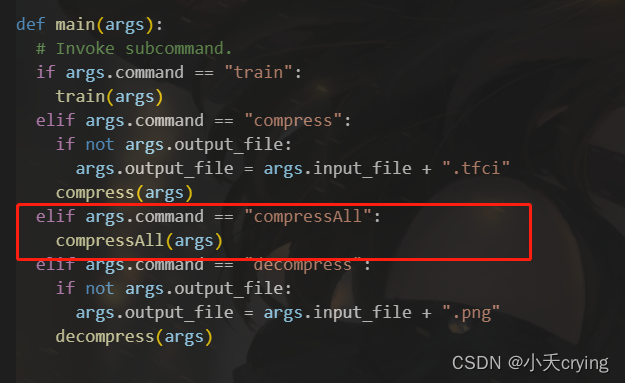
def main(args):
  # Invoke subcommand.
  if args.command == "train":
    train(args)
  elif args.command == "compress":
    if not args.output_file:
      args.output_file = args.input_file + ".tfci"
    compress(args)
      # compressAll(args)
  elif args.command == "compressAll":
    compressAll(args)
  elif args.command == "decompress":
    if not args.output_file:
      args.output_file = args.input_file + ".png"
    decompress(args)
(3)添加compressAll方法
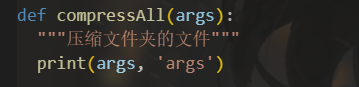
def compressAll(args):
  """压缩文件夹的文件"""
  print(args, 'args')
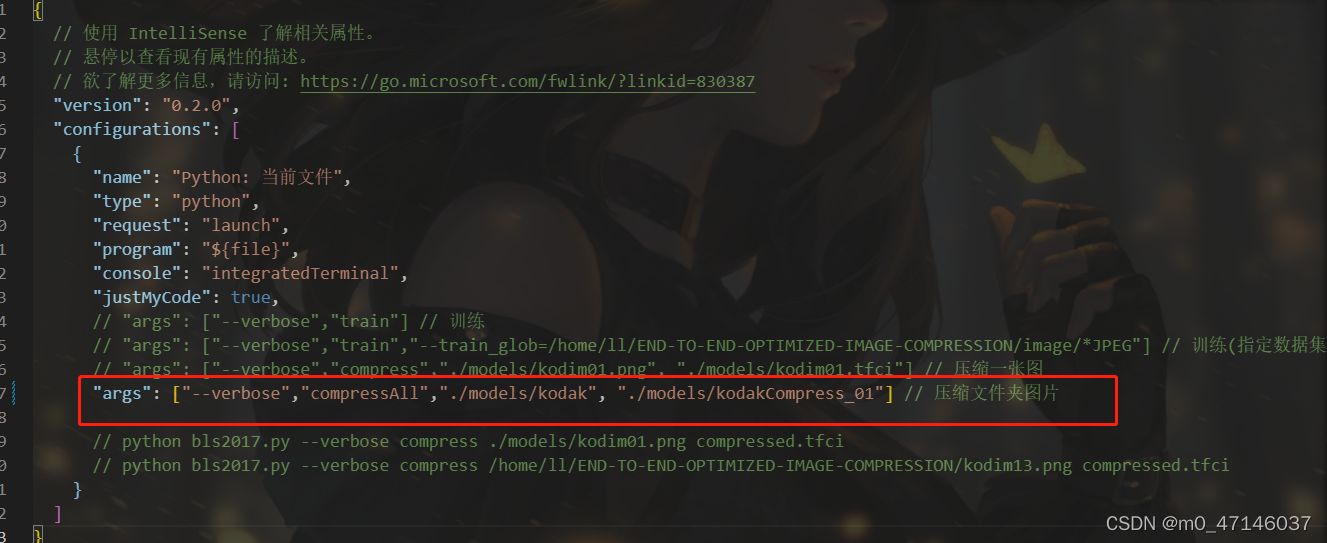
(4)改变launch.json文件
这里也可以直接在终端输入命令行,只是我调试的时候通过改变json文件要方便一点
{
  // 使用 IntelliSense 了解相关属性。
  // 悬停以查看现有属性的描述。
  // 欲了解更多信息,请访问: https://go.microsoft.com/fwlink/?linkid=830387
  "version": "0.2.0",
  "configurations": [
    {
      "name": "Python: 当前文件",
      "type": "python",
      "request": "launch",
      "program": "${file}",
      "console": "integratedTerminal",
      "justMyCode": true,
      // "args": ["--verbose","compress","./models/kodim01.png", "./models/kodim01.tfci"] // 压缩一张图
      "args": ["--verbose","compressAll","./models/kodak", "./models/kodakCompress_01"] // 压缩文件夹图片

    }
  ]
}
这里的命令结合之前说的,其实依次就是1、查看日志;2、compressAll命令;3、输入文件夹地址;4、输出文件夹地址
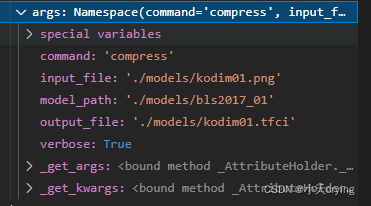
最后我们打印一下args

2、新方法的具体实现
初步想法是通过读取数据集图片地址,传入之前原有的压缩方法,将输出的bpp、mse、psnr值存到数组,最后求平均,所以第一步首先知道原有的compress的args中需要的参数,然后进行拼接传入一张图片的压缩方法
(1)改变原有compress方法,添加返回值
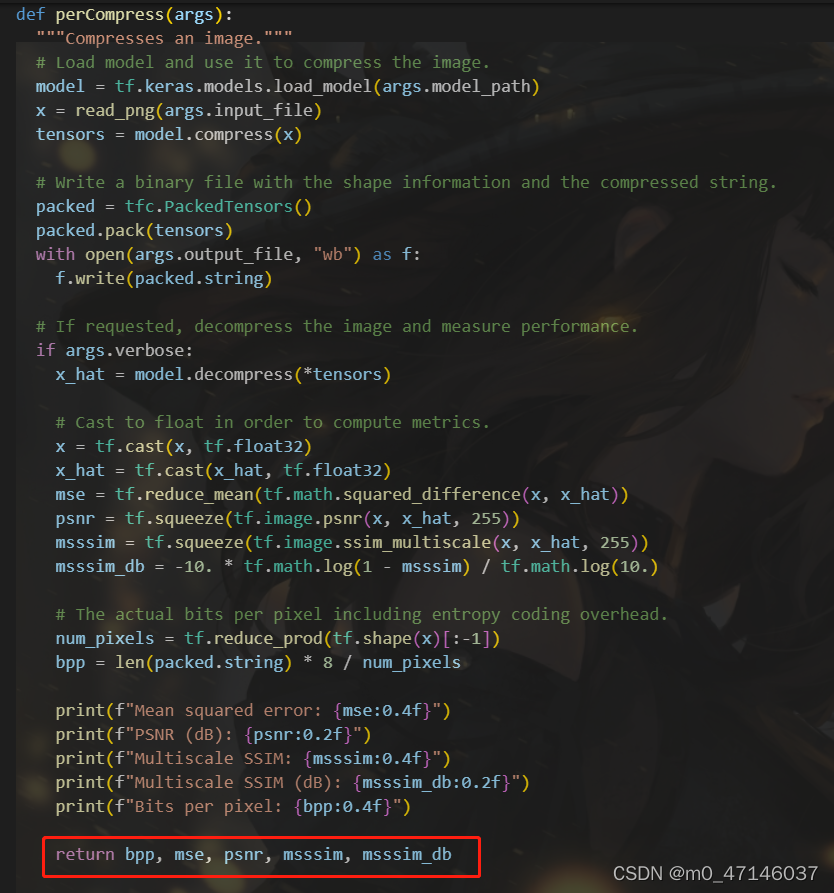
def perCompress(args):
  """Compresses an image."""
  # Load model and use it to compress the image.
  model = tf.keras.models.load_model(args.model_path)
  x = read_png(args.input_file)
  tensors = model.compress(x)

  # Write a binary file with the shape information and the compressed string.
  packed = tfc.PackedTensors()
  packed.pack(tensors)
  with open(args.output_file, "wb") as f:
    f.write(packed.string)

  # If requested, decompress the image and measure performance.
  if args.verbose:
    x_hat = model.decompress(*tensors)

    # Cast to float in order to compute metrics.
    x = tf.cast(x, tf.float32)
    x_hat = tf.cast(x_hat, tf.float32)
    mse = tf.reduce_mean(tf.math.squared_difference(x, x_hat))
    psnr = tf.squeeze(tf.image.psnr(x, x_hat, 255))
    msssim = tf.squeeze(tf.image.ssim_multiscale(x, x_hat, 255))
    msssim_db = -10. * tf.math.log(1 - msssim) / tf.math.log(10.)

    # The actual bits per pixel including entropy coding overhead.
    num_pixels = tf.reduce_prod(tf.shape(x)[:-1])
    bpp = len(packed.string) * 8 / num_pixels

    print(f"Mean squared error: {mse:0.4f}")
    print(f"PSNR (dB): {psnr:0.2f}")
    print(f"Multiscale SSIM: {msssim:0.4f}")
    print(f"Multiscale SSIM (dB): {msssim_db:0.2f}")
    print(f"Bits per pixel: {bpp:0.4f}")

    return bpp, mse, psnr, msssim, msssim_db
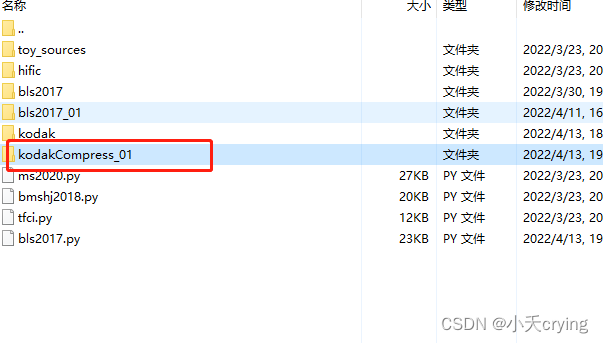
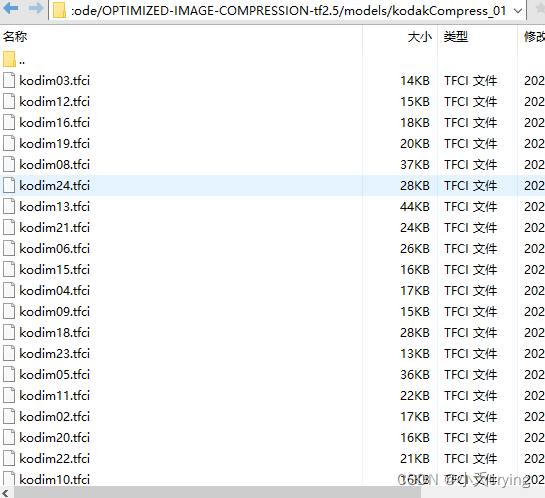
(2)新建kodakCompress_01文件夹,储存第一次模型压缩的.tfci文件
(3)重新写compressAll方法
-
通过args传入的数据集文件夹路径获取所有的文件list

-
通过传入的args值,浅拷贝出新的perArgs

首先这里的拷贝是浅拷贝,防止之前的args发生改变
其次遍历之前的文件list,通过索引与字符串拼接的方式,修改perArgs中的input_file与output_file
最后调用单张图片压缩的方式获取返回的bpp, mse, psnr, msssim, msssim_db -
创建新数组依次推入之前获取的bpp, mse, psnr, msssim, msssim_db,进而求平均值
下面是compressAll的方法
def compressAll(args):
  """压缩文件夹的文件"""
  # print(args, 'args')
  files = glob.glob(args.input_folder + '/*png')
  # print(files, 'files')
  perArgs = copy.copy(args) # 浅拷贝,不改变args的值
  # print(perArgs, 'perArgs')
  bpp_list = []
  mse_list = []
  psnr_list = []
  mssim_list = []
  msssim_db_list = []
  # 循环遍历kodak数据集
  for img in files:
    # print(img, 'img')
    # img为图片完整的相对路径
    imgIndexFirst = img.find('/kodim') # 索引
    imgIndexNext = img.find('.png')
    imgName = img[imgIndexFirst: imgIndexNext] # 单独的图片文件名,如kodim01.png
    # print(imgName, 'imgName') # 单独的图片文件名,如/kodim01
    perArgs.input_file = img
    perArgs.output_file = args.output_folder + imgName + '.tfci'
    # print(perArgs, 'perArgs')
    # print(args, 'args')
    bpp, mse, psnr, msssim, msssim_db = perCompress(perArgs)
    print(bpp, mse, psnr, msssim, msssim_db, 'bpp, mse, psnr, msssim, msssim_db')
    bpp_list.append(bpp)
    mse_list.append(mse)
    psnr_list.append(psnr)
    mssim_list.append(msssim)
    msssim_db_list.append(msssim_db)
  print(bpp_list, 'bpp_list')
  print(mse_list, 'mse_list')

  bpp_average = mean(bpp_list)
  mse_average = mean(mse_list)
  psnr_average = mean(psnr_list)
  mssim_average = mean(mssim_list)
  msssim_db_average = mean(msssim_db_list)

  print(bpp_average, 'bpp_average')
  print(mse_average, 'mse_average')
  print(psnr_average, 'psnr_average')
  print(mssim_average, 'mssim_average')
  print(msssim_db_average, 'msssim_db_average')
最后打印出来的数据
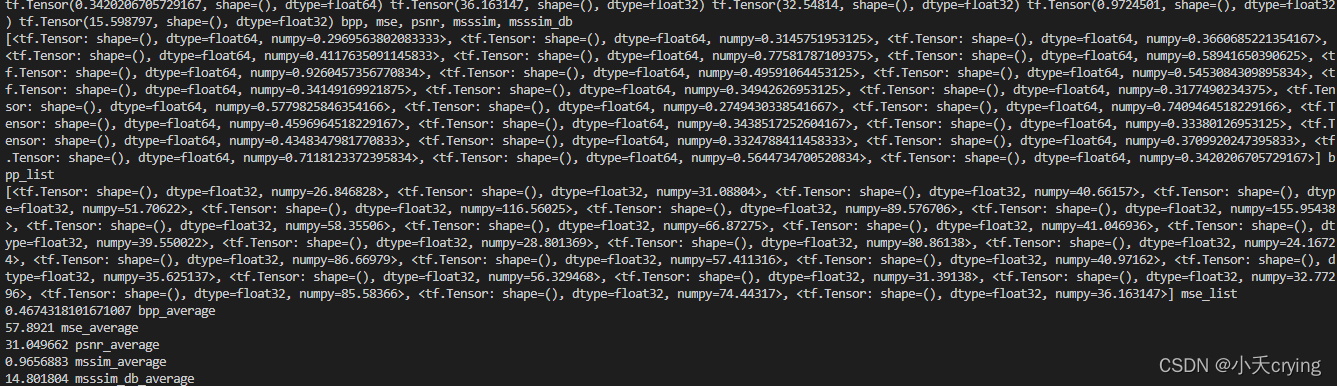
[<tf.Tensor: shape=(), dtype=float64, numpy=0.2969563802083333>, <tf.Tensor: shape=(), dtype=float64, numpy=0.3145751953125>, <tf.Tensor: shape=(), dtype=float64, numpy=0.3660685221354167>, <tf.Tensor: shape=(), dtype=float64, numpy=0.4117635091145833>, <tf.Tensor: shape=(), dtype=float64, numpy=0.77581787109375>, <tf.Tensor: shape=(), dtype=float64, numpy=0.58941650390625>, <tf.Tensor: shape=(), dtype=float64, numpy=0.9260457356770834>, <tf.Tensor: shape=(), dtype=float64, numpy=0.49591064453125>, <tf.Tensor: shape=(), dtype=float64, numpy=0.5453084309895834>, <tf.Tensor: shape=(), dtype=float64, numpy=0.34149169921875>, <tf.Tensor: shape=(), dtype=float64, numpy=0.34942626953125>, <tf.Tensor: shape=(), dtype=float64, numpy=0.3177490234375>, <tf.Tensor: shape=(), dtype=float64, numpy=0.5779825846354166>, <tf.Tensor: shape=(), dtype=float64, numpy=0.2749430338541667>, <tf.Tensor: shape=(), dtype=float64, numpy=0.7409464518229166>, <tf.Tensor: shape=(), dtype=float64, numpy=0.4596964518229167>, <tf.Tensor: shape=(), dtype=float64, numpy=0.3438517252604167>, <tf.Tensor: shape=(), dtype=float64, numpy=0.33380126953125>, <tf.Tensor: shape=(), dtype=float64, numpy=0.4348347981770833>, <tf.Tensor: shape=(), dtype=float64, numpy=0.3324788411458333>, <tf.Tensor: shape=(), dtype=float64, numpy=0.3709920247395833>, <tf.Tensor: shape=(), dtype=float64, numpy=0.7118123372395834>, <tf.Tensor: shape=(), dtype=float64, numpy=0.5644734700520834>, <tf.Tensor: shape=(), dtype=float64, numpy=0.3420206705729167>] bpp_list
[<tf.Tensor: shape=(), dtype=float32, numpy=26.846828>, <tf.Tensor: shape=(), dtype=float32, numpy=31.08804>, <tf.Tensor: shape=(), dtype=float32, numpy=40.66157>, <tf.Tensor: shape=(), dtype=float32, numpy=51.70622>, <tf.Tensor: shape=(), dtype=float32, numpy=116.56025>, <tf.Tensor: shape=(), dtype=float32, numpy=89.576706>, <tf.Tensor: shape=(), dtype=float32, numpy=155.95438>, <tf.Tensor: shape=(), dtype=float32, numpy=58.35506>, <tf.Tensor: shape=(), dtype=float32, numpy=66.87275>, <tf.Tensor: shape=(), dtype=float32, numpy=41.046936>, <tf.Tensor: shape=(), dtype=float32, numpy=39.550022>, <tf.Tensor: shape=(), dtype=float32, numpy=28.801369>, <tf.Tensor: shape=(), dtype=float32, numpy=80.86138>, <tf.Tensor: shape=(), dtype=float32, numpy=24.16724>, <tf.Tensor: shape=(), dtype=float32, numpy=86.66979>, <tf.Tensor: shape=(), dtype=float32, numpy=57.411316>, <tf.Tensor: shape=(), dtype=float32, numpy=40.97162>, <tf.Tensor: shape=(), dtype=float32, numpy=35.625137>, <tf.Tensor: shape=(), dtype=float32, numpy=56.329468>, <tf.Tensor: shape=(), dtype=float32, numpy=31.39138>, <tf.Tensor: shape=(), dtype=float32, numpy=32.77296>, <tf.Tensor: shape=(), dtype=float32, numpy=85.58366>, <tf.Tensor: shape=(), dtype=float32, numpy=74.44317>, <tf.Tensor: shape=(), dtype=float32, numpy=36.163147>] mse_list
0.4674318101671007 bpp_average
57.8921 mse_average
31.049662 psnr_average
0.9656883 mssim_average
14.801804 msssim_db_average
主要是最后求得的平均值
0.4674318101671007 bpp_average
57.8921 mse_average
31.049662 psnr_average
0.9656883 mssim_average
14.801804 msssim_db_average
压缩后的文件
3、最后一步
在源码中有提到不同码率下的psnr值,接下来我们要做的就是训练出6个模型,验证集统一采用kodak数据集,算出基于不同码率下的psnr平均值,绘制图形和原文结果作对比(本博客的模型 lambda是0.01)
| lambda | bpp | mse | psnr | mssim |
|---|---|---|---|---|
| 0.01 | 0.4639 | 57.8921 | 31.049662 | 0.9656883 |
| 0.02 | 0.6282 | 40.958206 | 32.634518 | 0.97844774 |
| 0.04 | 0.8110 | 31.25152 | 33.925323 | 0.9857104 |
| 0.06 | 0.9331 | 28.104935 | 34.46075 | 0.9883335 |
| 0.09 | 1.0590 | 25.8044 | 34.891132 | 0.99006397 |
| 1.1 | 2.0109 | 21.851587 | 35.779408 | 0.99350816 |
ps
这里有个经验问题,不能以一个滤波器个数一直训练会导致性能下降
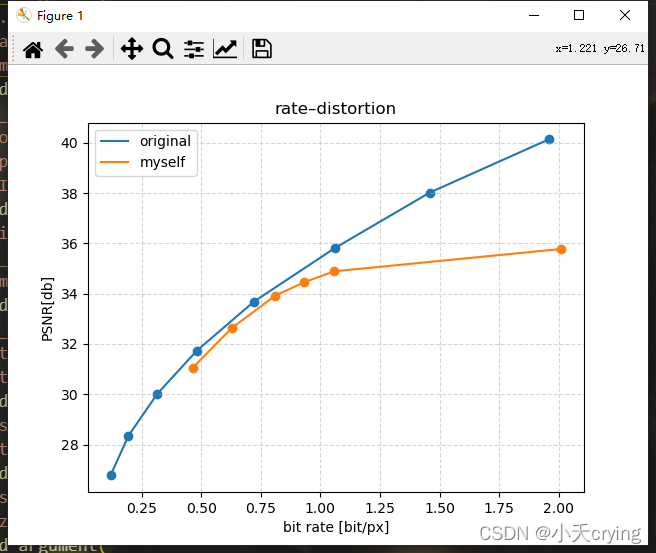
这里一般训练6个模型,前三个模型模型滤波器个数num_filters=128,后三个模型滤波器个数num_filters=192,如果更高则num_filters=256
经验数据
| num_filters | lambda | bpp |
|---|---|---|
| 128 | 0.0016 | 0.1左右 |
| 128 | 0.0032 | |
| 128 | 0.0075 | 0.3左右 |
| 192 | 0.015 | |
| 192 | 0.03 | |
| 192 | 0.045 | |
| 256 | 0.06 |
重新训练
| lambda | num_filters | bpp | mse | psnr | missm |
|---|---|---|---|---|---|
| 0.0016 | 128 | 0.1408 | 166.10385 | 26.523191 | 0.8996394 |
| 0.0032 | 128 | 0.2338 | 117.890594 | 27.964922 | 0.92493457 |
| 0.0075 | 128 | 0.3995 | 69.89697 | 30.22051 | 0.9561076 |
| 0.015 | 192 | 0.6025 | 42.810368 | 32.265305 | 0.97305185 |
| 0.03 | 192 | 0.8245 | 26.716658 | 34.288815 | 0.98393947 |
| 0.045 | 192 | 0.9754 | 20.61658 | 35.438095 | 0.987926 |
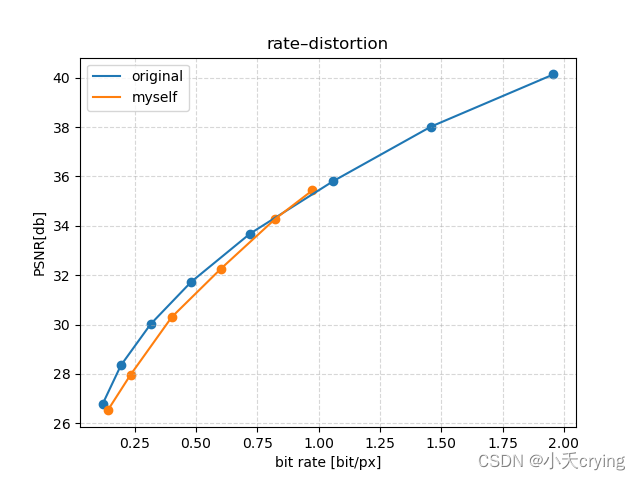
中间三个点的性能还是明显下降了
然后我开始查找参数,但是不知道是哪里的问题,我之前改过preprocess_threads进程数为4,先改回来,改成默认16,再重新训练看看
重新训练
| lambda | num_filters | bpp | mse | psnr | missm |
|---|---|---|---|---|---|
| 0.0016 | 128 | 0.1408 | 166.10385 | 26.523191 | 0.8996394 |
| 0.0032 | 128 | 0.2344 | 115.258026 | 28.078568 | 0.93014747 |
| 0.0075 | 128 | 0.4019 | 68.61319 | 30.30449 | 0.9575408 |
| 0.015 | 192 | 0.6000 | 42.827885 | 32.276566 | 0.97326684 |
| 0.03 | 192 | 0.8245 | 26.716658 | 34.288815 | 0.98393947 |
| 0.045 | 192 | 0.9754 | 20.61658 | 35.438095 | 0.987926 |
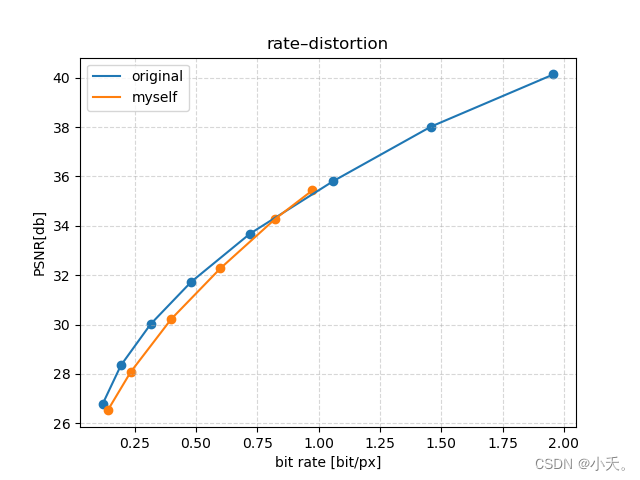
基本没有太大的差别,那么训练和preprocess_threads进程数无关,再次训练也再次证明的确是有性能的下降
改变学习率
(1)learning_rate=1e-4改为learning_rate=1e-5
| lambda | num_filters | bpp | mse | psnr | missm |
|---|---|---|---|---|---|
| 0.0016 | 128 | 0.1408 | 166.10385 | 26.523191 | 0.8996394 |
| 0.0032 | 128 | 0.2344 | 115.258026 | 28.078568 | 0.93014747 |
| 0.0075 | 128 | 0.4273 | 71.872826 | 30.078863 | 0.9593249 |
| 0.015 | 192 | 0.6000 | 42.827885 | 32.276566 | 0.97326684 |
| 0.03 | 192 | 0.8245 | 26.716658 | 34.288815 | 0.98393947 |
| 0.045 | 192 | 0.9754 | 20.61658 | 35.438095 | 0.987926 |
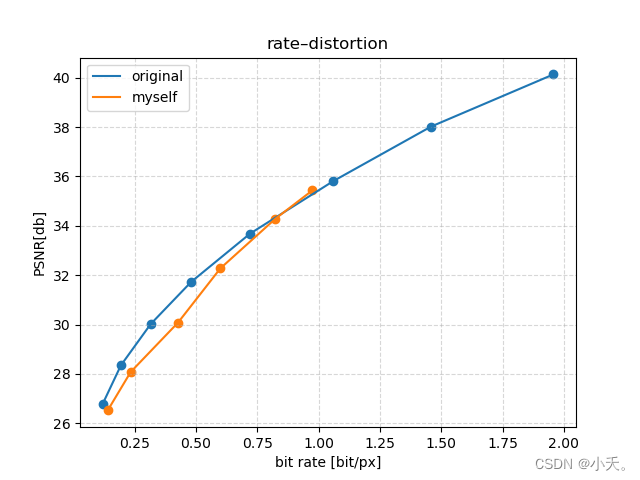
这个结果只改变了第三个点,性能下降了,接下来提高学习率
(2)learning_rate=1e-4改为learning_rate=1e-3
| lambda | num_filters | bpp | mse | psnr | missm | learning_rate |
|---|---|---|---|---|---|---|
| 0.0016 | 128 | 0.1408 | 166.10385 | 26.523191 | 0.8996394 | 1e-4 |
| 0.0032 | 128 | 0.2169 | 118.319 | 28.00917 | 0.9293921 | 1e-3 |
| 0.0075 | 128 | 0.3785 | 71.33112 | 30.19074 | 0.95802593 | 1e-3 |
| 0.015 | 192 | 0.4943 | 54.065155 | 31.508627 | 0.9727008 | 1e-3 |
| 0.03 | 192 | 0.8245 | 26.716658 | 34.288815 | 0.98393947 | 1e-4 |
| 0.045 | 192 | 0.9754 | 20.61658 | 35.438095 | 0.987926 | 1e-4 |
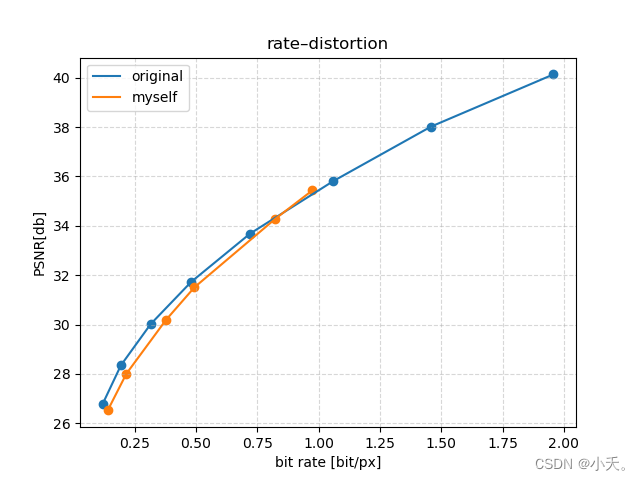
发现性能提高了很多,那么之前应该是学习率低了导致的损失函数不收敛
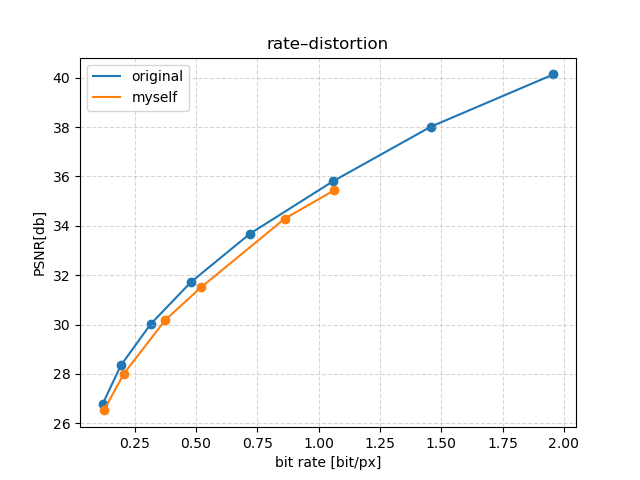
4、基于验证的柯达数据集计算压缩平均码率进行绘图
| lambda | num_filters | bpp | mse | psnr | missm | learning_rate |
|---|---|---|---|---|---|---|
| 0.0016 | 128 | 0.12500847710503474 | 166.10385 | 26.523191 | 0.8996394 | 1e-4 |
| 0.0032 | 128 | 0.2065819634331597 | 118.319 | 28.00917 | 0.9293921 | 1e-3 |
| 0.0075 | 128 | 0.37603505452473956 | 71.33112 | 30.19074 | 0.95802593 | 1e-3 |
| 0.015 | 192 | 0.5213546752929688 | 54.065155 | 31.508627 | 0.9727008 | 1e-3 |
| 0.03 | 192 | 0.8620588514539932 | 26.716658 | 34.288815 | 0.98393947 | 1e-4 |
| 0.045 | 192 | 1.0637342664930556 | 20.61658 | 35.438095 | 0.987926 | 1e-4 |
5、训练结束后重建图片
以一张图片为例
官方给出的命令
python bls2017.py [options] decompress compressed.tfci reconstruction.png
我的命令
"args": ["--verbose","decompress","./models/kodakCompress_01/kodim01.tfci", "./models/kodakCompress_01/kodim01_decompress.png"] // 解压缩图片
模型为bls2017_01
码率0.12500847710503474
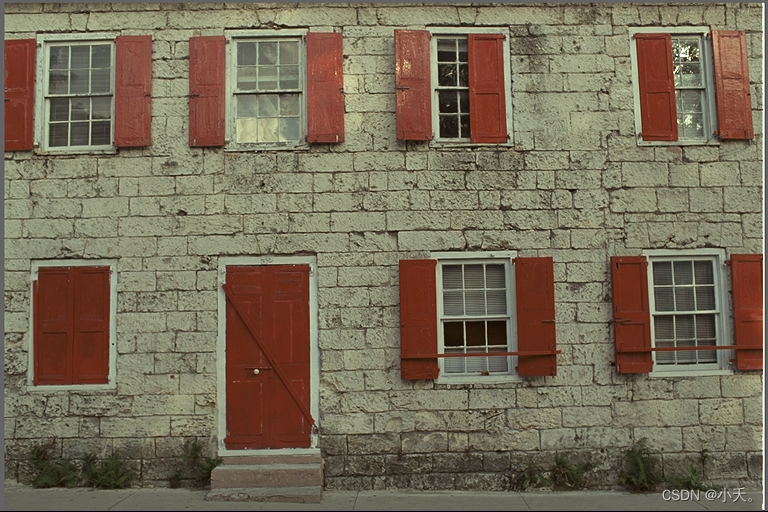
原图
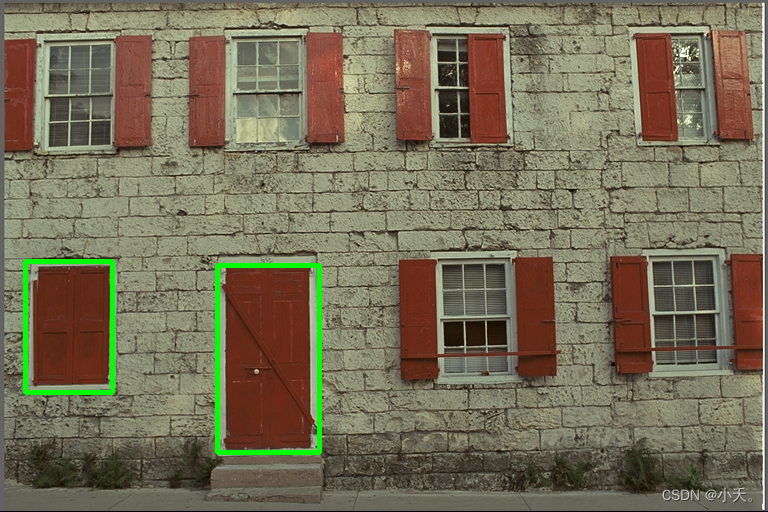
解码后的图片
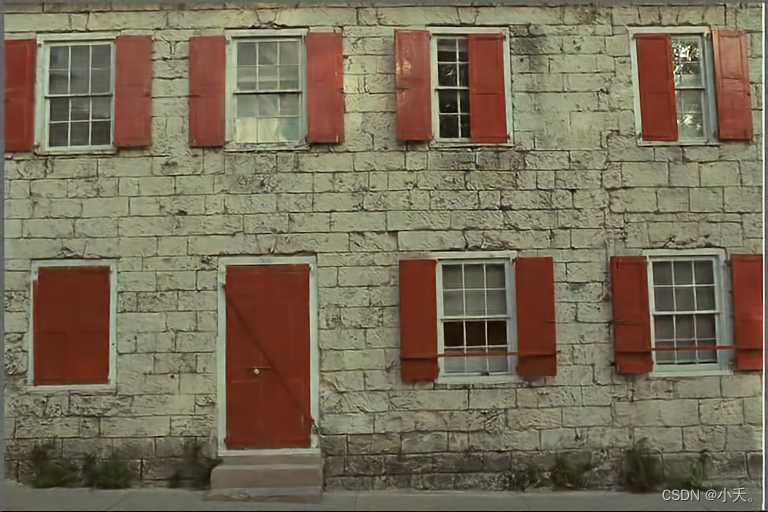
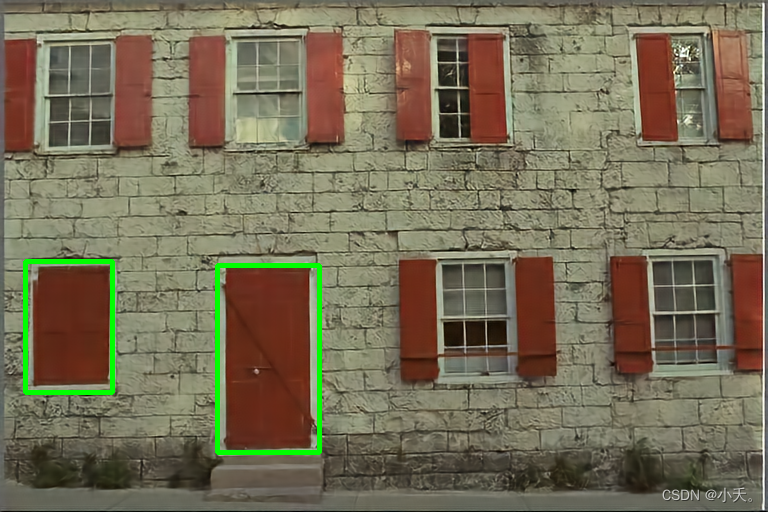
可以看到这个模型压缩图片后进行解码会导致一部分纹路的被弱化
另外
针对训练过程可以通过tensorBoard查看进程
tensorboard --logdir=/tmp/train_bls2017 &
浏览器会指向一个特定端口的web页面
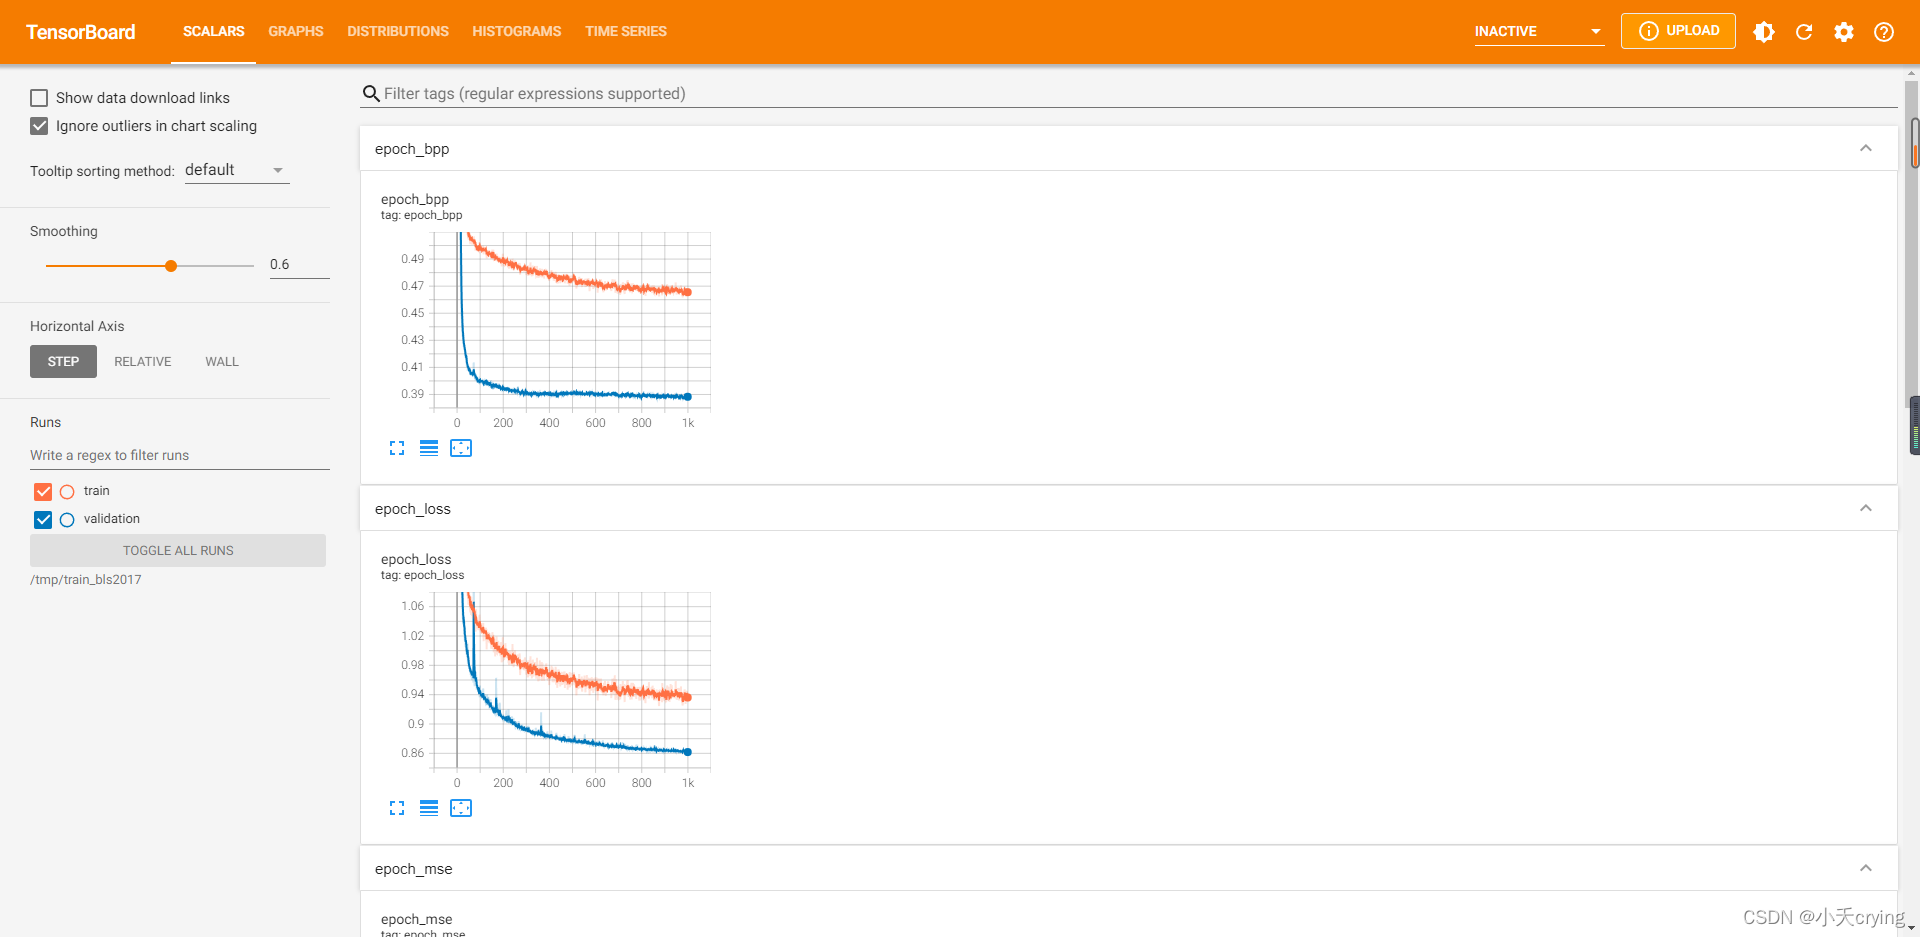
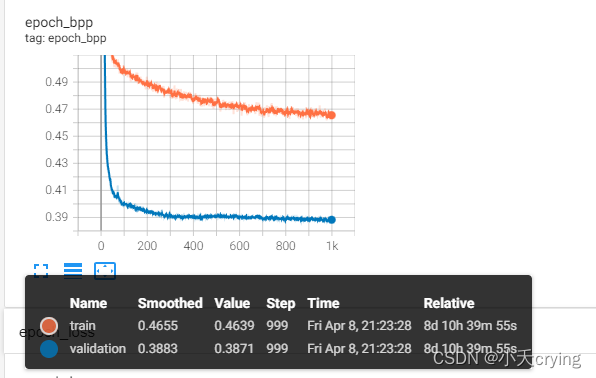
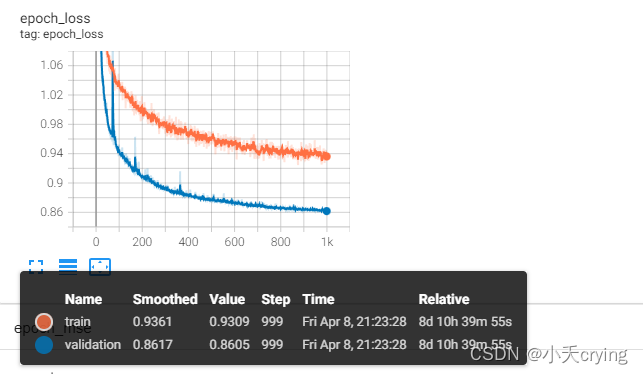
ps:这个模型的码率:0.4639

腾讯云面向开发者汇聚海量精品云计算使用和开发经验,营造开放的云计算技术生态圈。
更多推荐
 2
2 0
0- 0


 已为社区贡献7条内容

所有评论(0)