CAM类激活映射 |神经网络可视化 | 热力图
注意:本篇文章只是教程,不涉及原理,感兴趣可以自行搜索如图,热力图可以很好的反映出网络究竟注意图片的哪一部分github官方教程:https://github.com/jacobgil/pytorch-grad-cam参考博客:https://blog.csdn.net/u014264373/article/details/85415921https://blog.csdn.net/u014264
文章目录
前言:
本篇文章只是教程,不涉及原理,感兴趣可以自行搜索
如图,热力图可以很好的反映出网络究竟注意图片的哪一部分
github官方教程:
https://github.com/jacobgil/pytorch-grad-cam
参考博客:
https://blog.csdn.net/u014264373/article/details/85415921
https://blog.csdn.net/u014264373/article/details/116302678
但还是遇到了很多报错,解决过程记录如下:
安装库:
pip install grad-cam
分类案例–ResNet50
案例图片: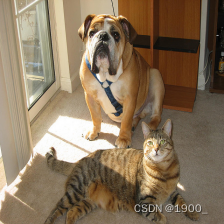
案例代码:
这个代码是可以跑通的,将图片保存到你本地,然后设置好路径即可。
(需要下载ResNet预训练模型)
from pytorch_grad_cam import GradCAM, ScoreCAM, GradCAMPlusPlus, AblationCAM, XGradCAM, EigenCAM, FullGrad
from pytorch_grad_cam.utils.model_targets import ClassifierOutputTarget
from pytorch_grad_cam.utils.image import show_cam_on_image
from torchvision.models import resnet50
import torchvision
import torch
from matplotlib import pyplot as plt
import numpy as np

def myimshows(imgs, titles=False, fname="test.jpg", size=6):
    lens = len(imgs)
    fig = plt.figure(figsize=(size * lens, size))
    if titles == False:
        titles = "0123456789"
    for i in range(1, lens + 1):
        cols = 100 + lens * 10 + i
        plt.xticks(())
        plt.yticks(())
        plt.subplot(cols)
        if len(imgs[i - 1].shape) == 2:
            plt.imshow(imgs[i - 1], cmap='Reds')
        else:
            plt.imshow(imgs[i - 1])
        plt.title(titles[i - 1])
    plt.xticks(())
    plt.yticks(())
    plt.savefig(fname, bbox_inches='tight')
    plt.show()


def tensor2img(tensor, heatmap=False, shape=(224, 224)):
    np_arr = tensor.detach().numpy()  # [0]
    # 对数据进行归一化
    if np_arr.max() > 1 or np_arr.min() < 0:
        np_arr = np_arr - np_arr.min()
        np_arr = np_arr / np_arr.max()
    # np_arr=(np_arr*255).astype(np.uint8)
    if np_arr.shape[0] == 1:
        np_arr = np.concatenate([np_arr, np_arr, np_arr], axis=0)
    np_arr = np_arr.transpose((1, 2, 0))
    return np_arr

path = "../examples/both.png"
bin_data = torchvision.io.read_file(path)  # 加载二进制数据
img = torchvision.io.decode_image(bin_data) / 255  # 解码成CHW的图片
img = img.unsqueeze(0)  # 变成BCHW的数据,B==1; squeeze
input_tensor = torchvision.transforms.functional.resize(img, [224, 224])

model = resnet50(pretrained=True)
target_layers = [model.layer4[-1]]  # 如果传入多个layer,cam输出结果将会取均值

# cam = GradCAM(model=model, target_layers=target_layers, use_cuda=False)
with GradCAM(model=model, target_layers=target_layers, use_cuda=False) as cam:
    # targets = [ClassifierOutputTarget(386), ClassifierOutputTarget(386)]  # 指定查看class_num为386的热力图
    targets = None  # 选定目标类别,如果不设置,则默认为分数最高的那一类
    # aug_smooth=True, eigen_smooth=True 使用图像增强是热力图变得更加平滑
    grayscale_cams = cam(input_tensor=input_tensor, targets=targets)  # targets=None 自动调用概率最大的类别显示
    for grayscale_cam, tensor in zip(grayscale_cams, input_tensor):
        # 将热力图结果与原图进行融合
        rgb_img = tensor2img(tensor)
        visualization = show_cam_on_image(rgb_img, grayscale_cam, use_rgb=True)
        myimshows([rgb_img, grayscale_cam, visualization], ["image", "cam", "image + cam"])
最后出来的结果应该就是这样一张图。
分割案例
如果上面的代码你跑通了
那么如何为自己的网络生成热力图呢?
有几个需要注意的点:(最后会附上完整代码)
首先,切换成你的网络了模型加载就不说了,这个自己搞好。
然后,你的网络是否是在gpu上跑的,如果是
输入数据要放gpu上
path = './test_img/yu.jpg'
bin_data = torchvision.io.read_file(path)  # 加载二进制数据
img = torchvision.io.decode_image(bin_data) / 255  # 解码成CHW的图片
img = img.unsqueeze(0)  # 变成BCHW的数据,B==1 squeeze
img_tensor = torchvision.transforms.functional.resize(img, [352, 352])
img_tensor = img_tensor.cuda()   # 加一句这个
然后按照上面的代码,修改这一句,改成你要查看的层:
target_layers = [model.layer4[-1]] # 如果传入多个layer,cam输出结果将会取均值
把这个改成你要的层,然后运行一下,可能会遇到报错:
AttributeError: ‘tuple‘ object has no attribute ‘cpu‘
如果出现这个报错,可以看下你的网络最终输出是几个特征。因为是自己写的网络,有的因为训练需要,最终返回的是多个结果。
print(model(x))
如果有多个结果,会被变成一个元组。后面需要转cpu,元组tuple没有.cpu的方法,所以报错。
解决方法:
先把你的网络包装一下,你返回了多个值,选择有用的那一个就行
我这里选择了多个输出的第一个,自己视情况而定
class SegmentationModelOutputWrapper(torch.nn.Module):
    def __init__(self, model):
        super(SegmentationModelOutputWrapper, self).__init__()
        self.model = model

    def forward(self, x):
        return self.model(x)[0]  # 我这里选择了多个输出的第一个,自己视情况而定


model = NetWork()
model.load_state_dict(torch.load(opt.snap_path))
# 网络加载后先包装下  修改输出
model = SegmentationModelOutputWrapper(model)
然后再运行,可能会出现报错:
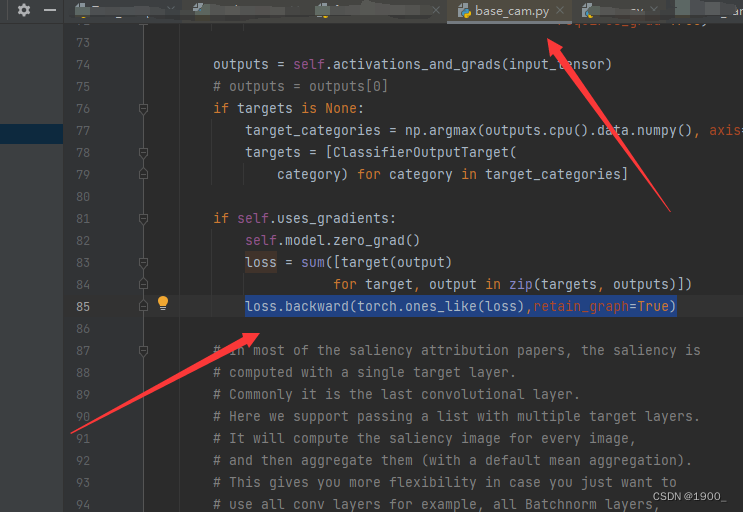
RuntimeError: grad can be implicitly created only for scalar outputs
这个问题的解决办法是:
你需要去到base_cam.py这个库文件里面去
第85行有一句loss.backward(retain_graph = True)
将其修改为loss.backward(torch.ones_like(loss),retain_graph=True)
参考链接:https://blog.csdn.net/weixin_44390884/article/details/127893163
还有一个报错:
TypeError: can’t convert cuda:0 device type tensor to numpy. Use Tensor.cpu() to copy the tensor to host memory first.
如果你的模型最后返回的特征是tensor的特征,那么需要对tensor2img做改动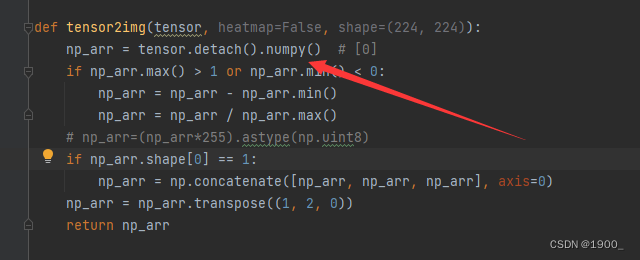
np_arr = tensor.detach().numpy() # [0]
修改为:
np_arr = tensor.cpu().detach().numpy() # [0]
完整代码
import os
import torch
import argparse
import numpy as np
import imageio
import torchvision
import torch.nn.functional as F
import torch.backends.cudnn as cudnn
from pytorch_grad_cam import GradCAM
from pytorch_grad_cam.utils.image import show_cam_on_image
from matplotlib import pyplot as plt

def myimshows(imgs, titles=False, fname="test.jpg", size=6):
    lens = len(imgs)
    fig = plt.figure(figsize=(size * lens, size))
    if titles == False:
        titles = "0123456789"
    for i in range(1, lens + 1):
        cols = 100 + lens * 10 + i
        plt.xticks(())
        plt.yticks(())
        plt.subplot(cols)
        if len(imgs[i - 1].shape) == 2:
            plt.imshow(imgs[i - 1], cmap='Reds')
        else:
            plt.imshow(imgs[i - 1])
        plt.title(titles[i - 1])
    plt.xticks(())
    plt.yticks(())
    plt.savefig(fname, bbox_inches='tight')
    plt.show()


def tensor2img(tensor, heatmap=False, shape=(224, 224)):
    np_arr = tensor.cpu().detach().numpy()  # [0]
    if np_arr.max() > 1 or np_arr.min() < 0:
        np_arr = np_arr - np_arr.min()
        np_arr = np_arr / np_arr.max()
    # np_arr=(np_arr*255).astype(np.uint8)
    if np_arr.shape[0] == 1:
        np_arr = np.concatenate([np_arr, np_arr, np_arr], axis=0)
    np_arr = np_arr.transpose((1, 2, 0))
    return np_arr

if __name__ == '__main__':

	model = NetWork()
    model.load_state_dict(torch.load(opt.snap_path))
    # torchinfo.summary(model=model,input_size=(8, 3, 352, 352))

    # 包装下  修改输出
    model = SegmentationModelOutputWrapper(model)

    model.eval()

    path = './test_img/yu.jpg'
    bin_data = torchvision.io.read_file(path)  # 加载二进制数据
    img = torchvision.io.decode_image(bin_data) / 255  # 解码成CHW的图片
    img = img.unsqueeze(0)  # 变成BCHW的数据,B==1 squeeze
    img_tensor = torchvision.transforms.functional.resize(img, [352, 352])
    img_tensor = img_tensor.cuda()

    target_layers = [model.model.ncd]
    targets = None
    with GradCAM(model=model,target_layers=target_layers,use_cuda=True) as cam:
        grayscale_cams = cam(input_tensor=img_tensor,targets=targets,aug_smooth=True)
        # cam_image = show_cam_on_image(img_rgb, grayscale_cam, use_rgb=True)
        for grayscale_cam, tensor in zip(grayscale_cams, img_tensor):
            # 将热力图结果与原图进行融合
            rgb_img = tensor2img(tensor)
            visualization = show_cam_on_image(rgb_img, grayscale_cam, use_rgb=True)
            myimshows([rgb_img, grayscale_cam, visualization], ["image", "cam", "image + cam"])

腾讯云面向开发者汇聚海量精品云计算使用和开发经验,营造开放的云计算技术生态圈。
更多推荐
 6
6 0
0- 0


 已为社区贡献8条内容

所有评论(0)