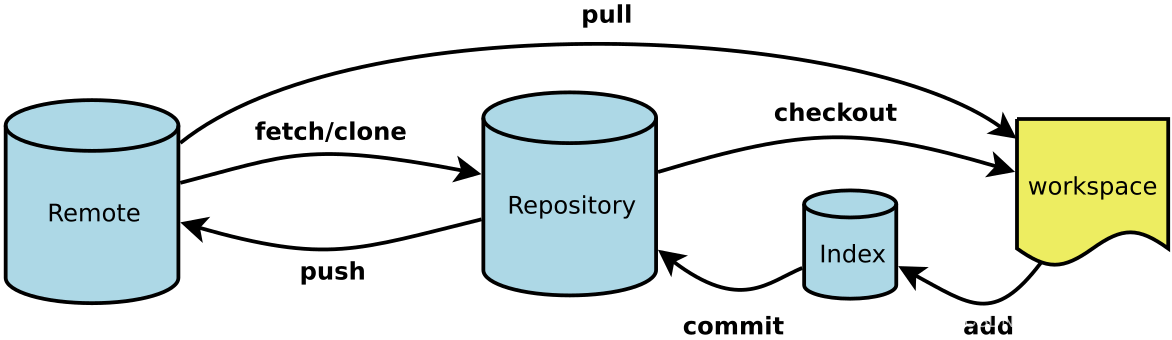
9、git基础
git基础
git基础
注意点:
1、http、ssh
2、token认证、密码认证
3、sll证书
1、连接远程仓库
1.1personal access token 代替密码认证
github 配置使用 personal access token 认证
一. 问题描述
使用如下命令推送代码到 github :
git push origin main
根据提示输入用户名和密码,报如下错误:
remote: Support for password authentication was removed on August 13, 2021. Please use a personal access token instead.
remote: Please see https://github.blog/2020-12-15-token-authentication-requirements-for-git-operations/ for more information.
根据提示信息可以知道,github 在 2021.8.13 移除了密码认证的支持,它建议使用 personal access token 代替密码认证。由于提示中给出的地址无法访问,所以查阅相关文档,下面主要记录一下如何解决这个问题。
二. 解决方法
github docs 文档中描述说,在使用命令行或API的时候,应该创建一个个人访问令牌(personal access token)来代替密码,下面详细介绍如何创建 personal access token。
参考链接:https://blog.csdn.net/qq_39218530/article/details/119809170
3.1 使用个人访问令牌personal access token登录
登录GitHub账户
点击右上角头像
点击Settings
左边选择最下面一栏Developer settings
选择Personal access tokens
选择第二个Tokens(classic),不要选择第一个
点击右边Generate new token
链接:https://blog.csdn.net/qq_51139827/article/details/130557349
1.2重置用户密码
git认证失败Authentication failed怎么办?清除凭证
Git报错fatal:Authentication failed for‘https://git……解决方法
报错就是因为你输入的账号或者密码错误,导致验证失败。
方法一配置全局参数:
git config --global user.name “xxx”
git config --global user.email “xxx”
方法二:
git remote -v
git remote remove origin
git remote add origin xxx
方法三(可以解决):
git config --system --unset credential.helper
执行这个命令之后,你可以重新写入账号密码,这样就可以重新提交代码了。
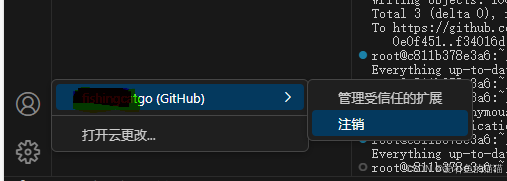
1.3vscode重置用户密码
1、没显示用户头像,右击并将用户账户打勾
2、左击用户头像,选择登录的git账户,并注销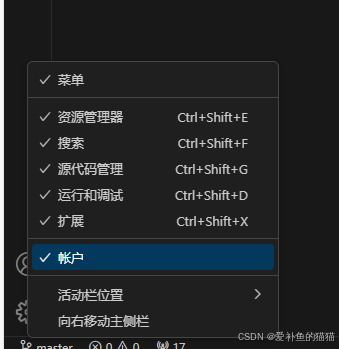
1.4git设置不用每次输入密码
查看git配置信息
git config --list
开启:
git config --global credential.helper store
取消:清除配置中纪录的用户名和密码,下次提交代码时会让重新输入账号密码
git config --system --unset credential.helper
1.5多用户
查看git配置: git config --global --list 和 git config --list
-
- 取消全局配置
如果想在一台电脑上使用多个 GitHub 账号,使用全局配置是不行的。如果使用全局配置的话,那么每次使用 git 命令时都会使用这个全局的用户名和邮箱,就没有办法区分不同的 GitHub 账号了。
在最开始使用GitHub配置ssh时,大部分人都使用过下面这两条语句:
git config --global user.name "你的用户名"
git config --global user.email "你的邮箱"
这两条命令是在进行全局配置,对于想要在一台电脑上使用多个GitHub账号是不行的,需要利用下面的两条语句来取消全局配置。
git config --global --unset user.name git config --global --unset user.email - 取消全局配置
-
- 配置多个git的用户名和邮箱
a、单个配置
git config --global user.name "yourusername"
git config --global user.email "youremail@email.com"
b、多个配置
注意: 这里git config命令没有带—global,表示这是一个局部的设置,也就是这个用户是当前项目的,而不是全局的。git config user.name "1" git config user.email "1@hotmail.com"c、删除配置
git config --unset user.name git config --unset user.email -
3.免密登录
git config credential.helper store
git config --global credential.helper store
git config --global credential.helper store        #全局
git config credential.helper store                 #单个项目
取消:
git config --global --unset credential.helper
git config  --unset credential.helper
来进行清楚掉.gitconfig文件中  [credential]  helper = store信息;
1.6Git连接远程仓库
echo "# clash_Linux" >> README.md
git init
git add README.md
git commit -m "first commit"
git branch -M main
git remote add origin https://github.com/fishingcatgo/clash_Linux.git
git push -u origin main
1.先创建一个文件夹,名字为远程仓库的名称
2.在该文件目录下打开Git Bash
3.输入git init,进行初始化(初次连接时)
4.连接远程仓库(初次连接是下一次进入该文件夹就不用了)
输入下列命令
git remote add origin git@github.com:yourName/repositoryname.git
git remote add origin https://github.com/yourName/repositoryname.git
yourName是用户名,repositoryname是仓库名字
5.从远程仓库拉取文件
git pull origin "分支名"
6.查看工作目录状态
git status
7.提交更改,添加备注信息
git commit -m "备注信息"
注意:若第6步的信息中有以下情况:
1.Untraked Files
使用git add .解决该问题
2.Changes not staged for commit
使用 git commit -am “备注信息” 解决
8.将本地文件push到远程仓库
git push origin "分支名"
链接:https://blog.csdn.net/qq_41234663/article/details/110645327
如果有多个远程仓库,此命令将全部列出
git remote -v
删除远程地址
git remote rm origin
更新为你的新远程仓库地址
git remote add origin 你的新远程仓库地址
1.7打标
创建标签:
创建标签使用 git tag [标签名] -m [备注信息] [提交版本号] 这个命令。其中 -m [备注信息] 可以省略不写
git tag 标签名
例如:git tag v1.0 -m “第一版本”
查看标签:
执行 git tag 命令显示仓库中的全部标签列表,执行 git show [标签名] 查看标签详情
git tag
git show 标签名
删除本地标签:
执行 git tag -d [标签名] 删除本地标签
git tag -d 标签名称
将本地标签推送至远程仓库:
执行 git push origin [标签名] 推送标签到远程仓库
git push origin 标签名称
删除远程仓库标签:
使用 git push origin :refs/tags/[标签名] 删除远程仓库的标签
git push origin :regs/tags/标签名称
or
git push origin --delete 标签名称
签出版本:
首先执行 git checkout [标签名] 切换到之前的某个提交版本,然后执行 git checkout -b [新的分支名] 将此提交版本固定到一个新分支上并切换到此分支。
$ git checkout -b 分支名称 标签名称
标签是 Git 中的概念,而 releases 则是 Github、码云等源码托管商所提供的更高层的概念。Git 本身是没有 releases 这个概念,只有 tag。两者之间的关系则是,release 基于 tag,为 tag 添加更丰富的信息,一般是编译好的文件。
链接:https://juejin.cn/post/7101196005843927071
在推送代码提交时同时推送标签:
git push --follow-tags
推送所有标签:
git push origin --tags
2、基本使用
2.1、常用命令
参考:https://www.ruanyifeng.com/blog/2015/12/git-cheat-sheet.html
# 在当前目录新建一个Git代码库
$ git init

# 显示有变更的文件
$ git status

# 显示当前分支的版本历史
$ git log

# 显示当前分支的最近几次提交
$ git reflog

# 添加当前目录的所有文件到暂存区
$ git add .

# 显示暂存区和工作区的差异
$ git diff

# 提交暂存区到仓库区
$ git commit -m [message]

#使用一条命令进行add和commit操作:
git commit -am "Initial commit"
查看当前分支的文件列表:
git ls-files
查看单个分支的提交记录
要查看单个分支的提交记录,我们可以使用以下命令:
git log <branch_name>
2.2、gitignore
- git使用.gitignore忽略提交文件并没有生效问题解决
idea集成git过滤一些不必要提交到git上的文件以及文件夹的时候发现使用.ignore插件创建.gitignore来忽略提交文件并没有生效,每次commit还是带了一堆不必提交的文件,最后找到了处理办法:
.gitignore只能忽略那些原来没有被track的文件,如果某些文件已经被纳入了版本管理中,则修改.gitignore是无效的。那么解决方法就是先把本地缓存删除(改变成未track状态),然后再提交:
git rm -r --cached .
git add .
git commit -m “update .gitignore file”
链接:https://blog.csdn.net/oDaiLiDong/article/details/88874203
为存储库创建文件。.gitignore
touch .gitignore
- 只选要的
https://zhuanlan.zhihu.com/p/52885189
/*
!.gitignore
!/dir2/

# /*忽略全部,!保留要提交的
- 某个目录下某个文件
如果不是在根目录下,比如 /a/b.java,设置这样一个文件不被忽略,却是没有用:
/*
!/a/b.
那不忽略 /a/b.java 应该这样写:
/*
!/a
/a/*
!/a/b.java
- 参考:
/*
!.gitignore

!utils/
!/config/

# !/test
# /test/*
# !/test/demo.py

# !/a
# /a/*
# !/a/b.java

!/stablediffusionwebui15/
/stablediffusionwebui15/*
!/stablediffusionwebui15/webui2.py
# !/stablediffusionwebui15/webui2.py

!/kohya_ss
/kohya_ss/*
!/kohya_ss/train_network.py
2.3、上传大文件
参考:https://blog.csdn.net/fujian9544/article/details/115112171
https://git-lfs.com/
1、上传报错:
当你的Git仓库中不小心有一个超过100MB的文件,并且你不小心Push后,会出现如下报错:
remote: error: GH001: Large files detected. You may want to try Git Large File Storage - https://git-lfs.github.com.
remote: error: Trace: cc5b9de7356152c0194da63d929b1c66
remote: error: See http://git.io/iEPt8g for more information.
remote: error: File Weka/dataset-bug-classification/mozilla_firefox.csv is 118.64 MB; this exceeds GitHub's file size limit of 100.00 MB
解决:根据报错中提到的文件,删除已追加的大文件(文件传到一半出错,将其删除)
将Weka/dataset-bug-classification/mozilla_firefox.csv换成你报错中的文件
#文件,参考:https://blog.csdn.net/qq_43827595/article/details/105673569
git filter-branch -f --index-filter 'git rm --cached --ignore-unmatch Weka/dataset-bug-classification/mozilla_firefox.csv'
#目录,参考:https://geek-docs.com/git/git-questions/391_git_git_filterbranch_with_indexfilter_does_not_work_and_remove_directories_as_expected.html
git filter-branch --index-filter 'git rm --cached --ignore-unmatch -r dir_to_remove' HEAD

#强制推送仓库,不要大文时,删除大文件再强制推送。或用lsf强制推送
git push --force
git push origin --force --all
或
git push origin master -f
2、清理完上面提交中途异常的文件,再用lfs推送大文件
# 1.安装Git命令行扩展。只需要设置一次Git LFS
$ git lfs install
# 2.选择您希望Git LFS管理的文件类型
$ git lfs track "*.psd"
# 确保跟踪.gitattributes
$ git add .gitattributes
# 3.Just commit and push to GitHub as you normally would.
$ git add file.psd
$ git commit -m "Add design file"
$ git push origin master #或强制推送 git push origin master -f
2.4、git 将当前仓库和远程仓库合并
主要合并两个分支,并解决冲突
https://blog.csdn.net/m0_45463480/article/details/137016787
3、readme使用文档书写
参考(教程很好):https://github.com/merrier/markdown-tutorial
使用 tree 命令生成目录结构:
sudo apt-get install tree
tree -L 2  #L为层的深度
例如:
# 1、项目结构
```plaintext
project-root
|   |-- logs #日志目录
|   |   `-- secure.log
|   |-- main.py  #服务的python脚本
|   |-- start.sh #启动文件
|   |-- utils #工具类
|   |   `-- logconfig.py
```
# 2、安装相关依赖
pip install -r requirements.txt

# 3、运行
相关参数,在start.sh中设置
```
#测试运行
./start.sh
#测试后台运行
nohup bash start.sh >> ./logs/log_scure.log 2>&1 &
#部署,gunicorn设置多个工作进程
nohup gunicorn -w 5 -k uvicorn.workers.UvicornWorker --timeout 600 main:app --bind 0.0.0.0:8888  --log-level debug --access-logfile ../logs/gunicorn_output.log >> ./logs/log_scure.log 2>&1 &

```
# 4、服务请求示例
```
curl --location 'http://127.0.0.1:8888/v1/security' \
--header 'Content-Type: application/json' \
--data '{
"input":["输入1","输入2","输入3,敏感词测试"]
}
'
```
附录
-
直接在线新建文件
-
git全局设置
git config --global user.name “caizhaochuan”
git config --global user.email “caizhaochuan@kingsoft.com” -
用命令行向此代码库提交代码
git clone http://ezone.ksyun.com/ezone/czc/test2.git
cd test2
touch READEME.md
git add READEME.md
git commit -m “add READEME”
git push -u origin master -
将本地文件夹推送到新建库中
#进入工作目录
git init
git remote add origin http://ezone.ksyun.com/ezone/czc/test2.git
git add .
git commit -m “Initial commit”
git push -u origin master -
将已有的Git代码库代码推送到这个新建代码库中
进入工作目录
git remote rename origin old-origin
git remote add origin http://ezone.ksyun.com/ezone/czc/test2.git
git push -u origin --all
git push -u origin --tags

腾讯云面向开发者汇聚海量精品云计算使用和开发经验,营造开放的云计算技术生态圈。
更多推荐
 20
20 0
0- 0


 已为社区贡献3条内容

所有评论(0)