Linux gitLab 本地部署、远程仓库克隆、代码管理和提交
1. 安装git
sudo apt-get install git
2. 全局配置git 用户名和邮箱
可根据需求选择是否全局配置
git config --global user.name "实际用户名"
git config --global user.email "实际邮箱@example.com"
3. ssh免密连接
先通过ssh与git建立免密连接:
test@test-PC321:~$ cd .ssh/ # 进入到ssh文件目录下
test@test-PC321:~/.ssh$ ls
known_hosts
test@test-PC321:~/.ssh$ ssh-keygen
Generating public/private rsa key pair.
Enter file in which to save the key (/home/test/.ssh/id_rsa):
Enter passphrase (empty for no passphrase):
Enter same passphrase again:
Your identification has been saved in /home/test/.ssh/id_rsa.
Your public key has been saved in /home/test/.ssh/id_rsa.pub.
The key fingerprint is:
SHA256:WMbI122UwdS3/8OXpuj3243222zEv543gdssWoGy4Nk test@test-PC321
The key's randomart image is:
+---[RSA 2048]----+
|      o+=..      |
|     .oB + .     |
|      +.* . .    |
|     . +.    .   |
|   . ...S. +  .  |
|  . + +  o+ +  . |
|   o E . +=* .. o|
|      ..+==.+. =o|
|       o+ o. oooo|
+----[SHA256]-----+
test@test-PC321:~/.ssh$ ls
id_rsa  id_rsa.pub  known_hosts
test@test-PC321:~/.ssh$ cat id_rsa.pub
ssh-rsa Axxxxxxxxxxxxxxxxxxxxxxxxxxxxxxxxxxxxxxxxxxxxxxxxxxxxxxxxxxxxxxxxxxxxxxxxxxxxxxxxxxxxxxxxxxxxxxxxxxxxxxxxxxxxxxxxxxxxxxxxxxxxxxxxxxxxxxxxxxxxxxxxxxxxxxxxxxxxxxxxxxxxxxxxxxxassdaaaaddpy7 test@test-PC321   # 生成密钥
将生成的密钥:
ssh-rsa Axxxxxxxxxxxxxxxxxxxxxxxxxxxxxxxxxxxxxxxxxxxxxxxxxxxxxxxxxxxxxxxxxxxxxxxxxxxxxxxxxxxxxxxxxxxxxxxxxxxxxxxxxxxxxxxxxxxxxxxxxxxxxxxxxxxxxxxxxxxxxxxxxxxxxxxxxxxxxxxxxxxxxxxxxxxassdaaaaddpy7 test@test-PC321
需要注意:这里的“test@test-PC321”应对应项目文件的所属管理用户,比如项目文件对应的所属用户是test,这里生成的密钥以“root@root-PC321”结尾,密钥对应的项目ssh免密配置就会不生效。
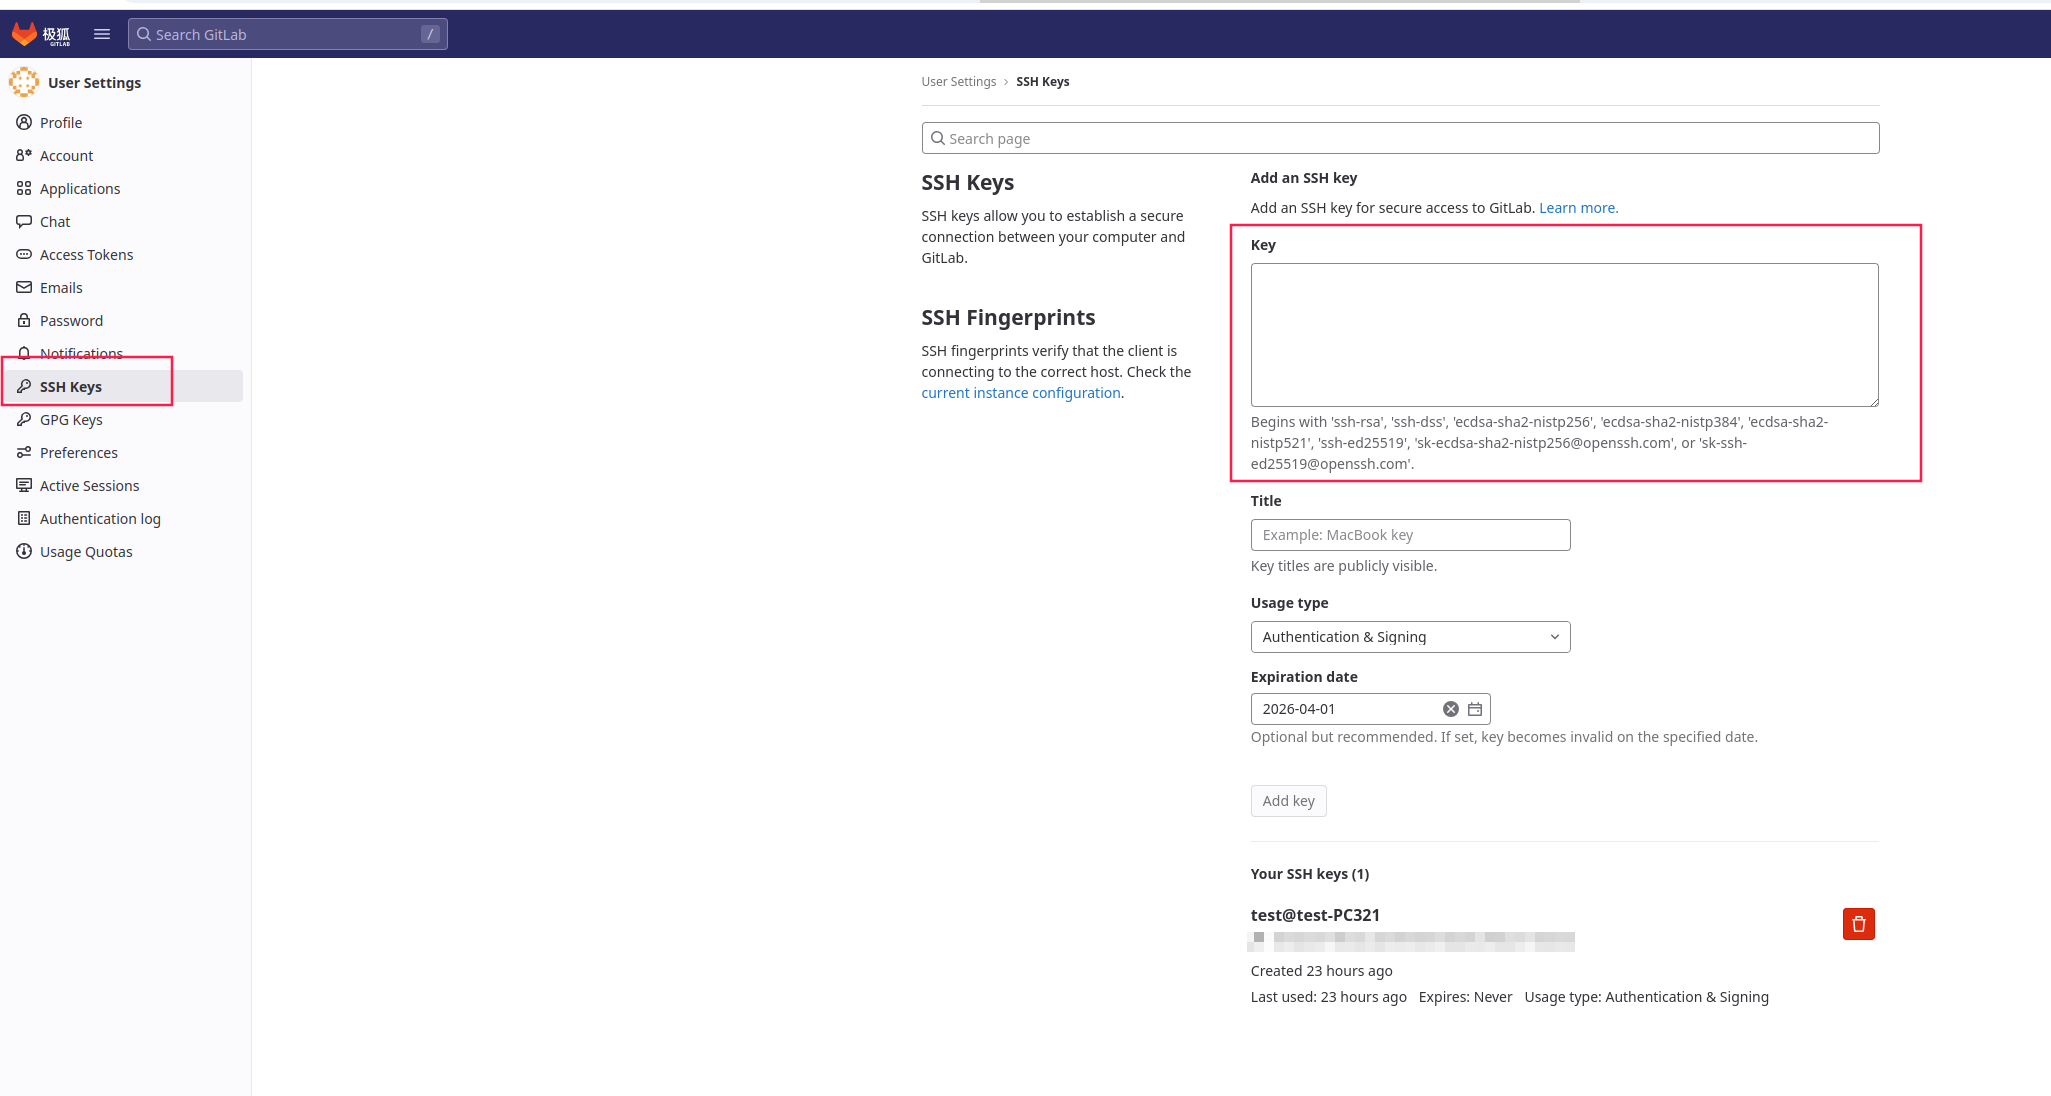
复制到登录账户后的github或其他使用的git平台,比如gitee或gitLab
下面是gitLab中导入密钥的示例:
4. 新建代码仓库
在合适位置,新建用于存放代码的仓库文件夹,比如:test
cd test/  # 进入到文件夹目录下
git clone git@xxxxxxx.git  // 克隆远程仓库地址
需要注意的是,克隆完远程仓库就不需要在git init了
git init会造成仓库重新初始化,容易出问题
5. git 设置代理
当你的网络环境(如公司内网、防火墙)限制了直接访问 Git 服务(如 GitHub、GitLab)时,需要通过代理服务器中转请求。
进入自己的项目目录
git config http.proxy http://192.168.2.5:1080 # 192.168.2.5:1080 仅为示例
git config http.proxy https://192.168.2.6:1080
按项目需求全局配置
http.sslVerify fasle关闭 SSL 验证:当代理服务器或目标 Git 仓库使用自签名 SSL 证书时,Git 会报错(如 SSL certificate problem: self signed certificate)http.autocrlf fasle处理换行符autocrlf:Linux/macOS:false:禁用自动转换(适合统一团队规范或跨平台协作)http.filemode fasle忽略文件权限:忽略文件权限差异(适合跨平台开发)
git config --global http.sslVerify fasle
git config --global http.autocrlf fasle
git config --global http.filemode fasle
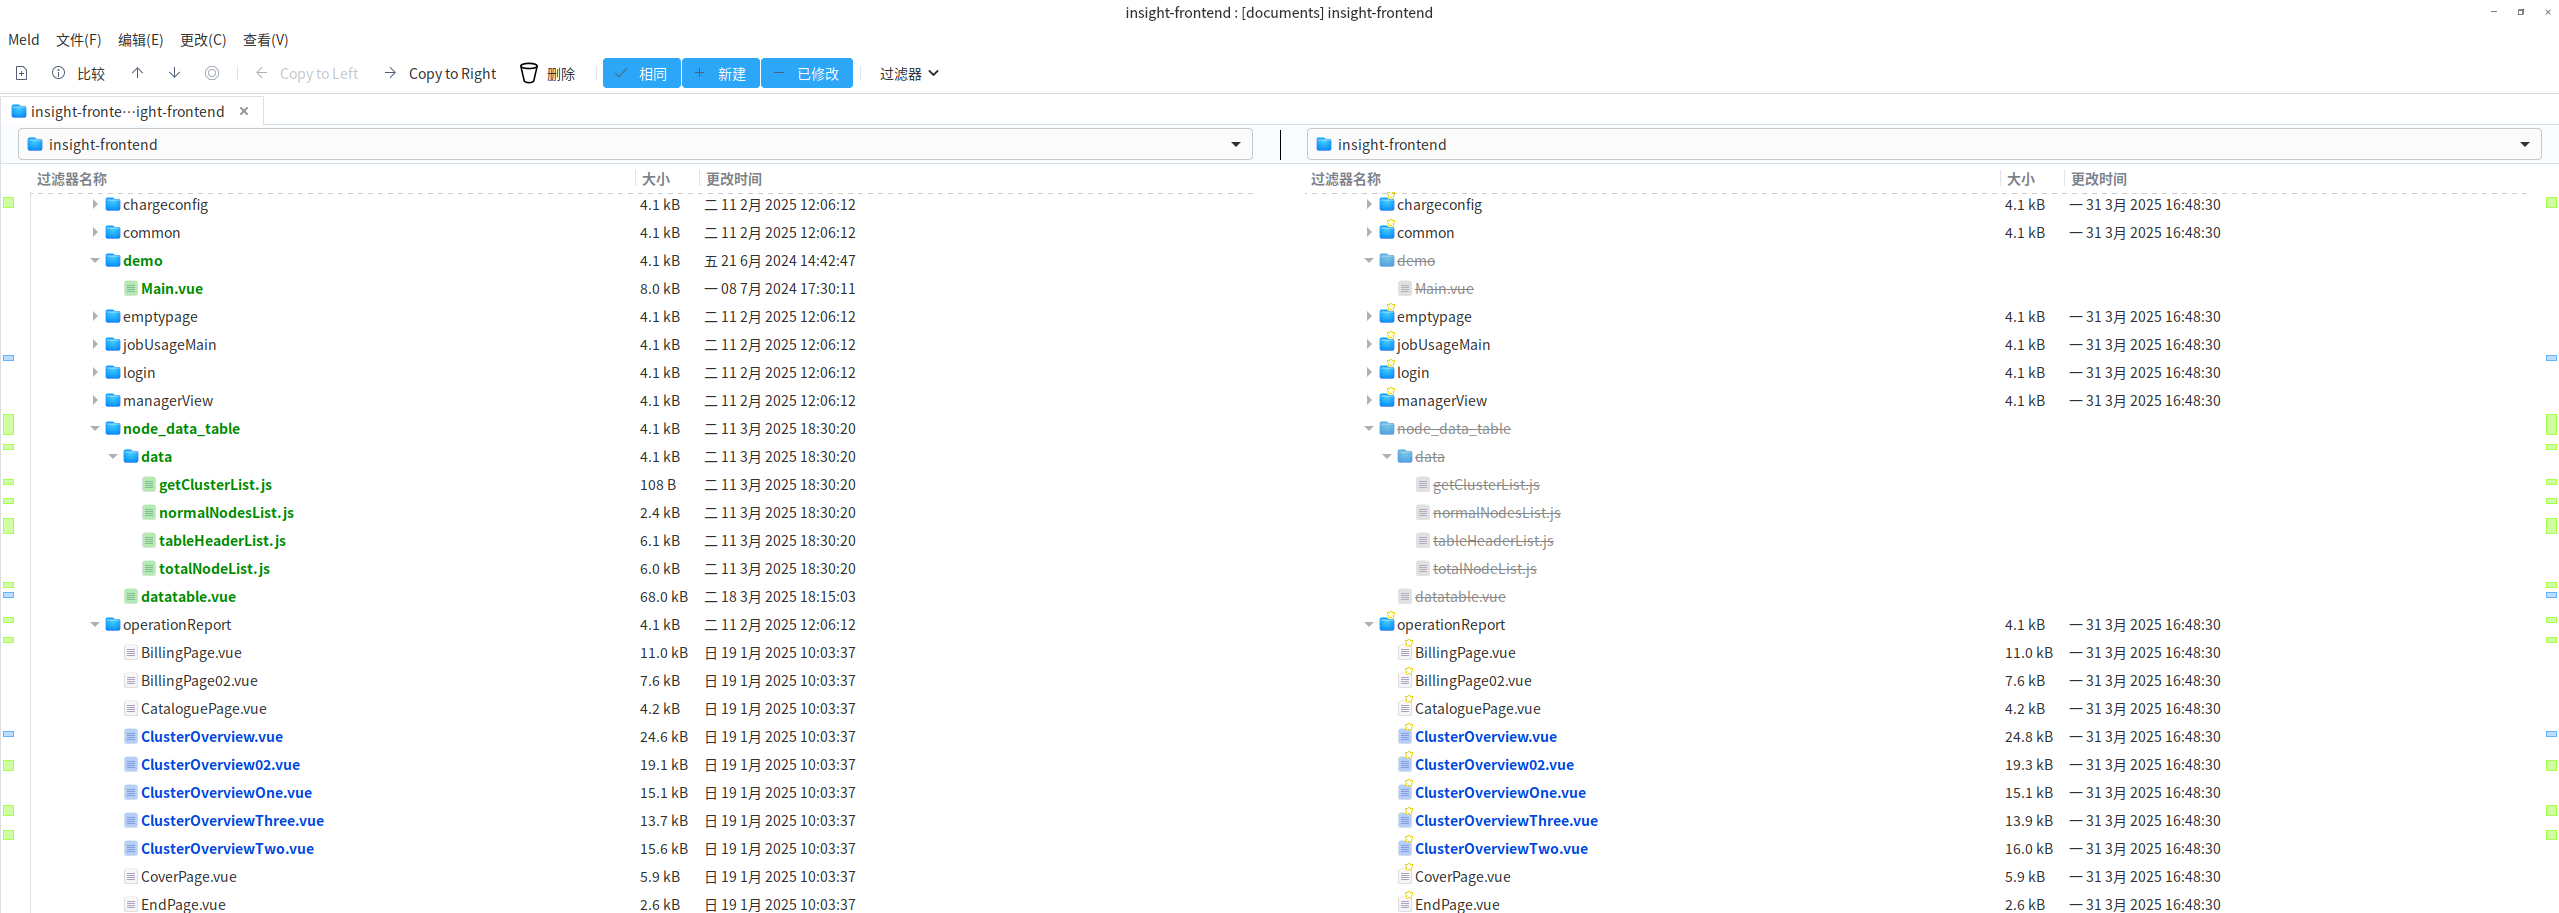
代码对比工具meld
sudo apt install meld # 下载代码对比工具
在指定目录下输入两个代码的目录地址回车就可以
meld /文件1路径 /文件2路径 # 对比两个目录下的代码文件
通过meld可以查看代码的不同,并进行逐步对比,需要的变化可以向左合并或向右合并

可以先在本地代码仓库内新建自己的本地分支,先将代码提交到自己的分支,确定无误再合并在master主分支中,下面是
常用的git指令:
git branch myName  # 新建名为myName的本地分支
git branch -a # 查看所有分支
git checkout myName  # 切换分支到myName上,git checkout 命令可以切换通过 git branch 命令创建的分支
git status: 查看修改的文件
git add 文件: 待提交
git commit -m "xxx"  : 在本地生成提交记录
git push :将本地的提交记录推送到服务器。 (推送到开发分支)
生成合并请求 (对开发分支和master 分支作diff)
合并: 将diff 合并到master
git  pull:  同步远端分支到本地。
记录Git提交遇到的问题
一、git checkout master 切换分支报错
git checkout master 切换到本地主分支,显示当前分支修改未保存,会覆盖因此终止指令 git pull失败
解决方法:
- 检查当前分支状态,暂存工作区修改
git branch  # 查看当前所处分支
git status  # 查看工作区状态,发现有未提交的修改代码
git stash  # 将未提交的修改暂存
- 更新主分支并合并代码
git checkout master  # 切换到主分支
git pull  # 拉取远程最新代码
git checkout lmluo  # 切换回开发分支,这里名为lmluo
git merge master  # 将master分支合并到当前分支
- 恢复暂存修改
git stash pop # 恢复暂存的修改
- 构建检查
make install # 安装环境需要的依赖,这是我这里运行项目必须的
npm run build # 构建检查项目
- git暂存更改
git status # 检查代码状态,选择性添加修改的文件,比如下面示例:
git add src/views/productivity_report/ai_productivity_report.vue  src/views/productivity_report/llm_productivity_report.vue
git status # 再次 git status 验证这两个文件已进入暂存区(显示为 Changes to be committed)
- 恢复剩余修改
git stash pop # 将最近一次暂存的修改应用到当前分支
git status # 恢复后的修改会显示在 git status 的未暂存区域
- 差异检查
对于恢复暂存修改后的代码状态,若status后显示有绿色的其他代码被修改(可能是项目其他成员在此期间修改的),就比较差异,比如:
git diff ../biengine/src/main/webapp/viewports/insight/gpu_cards.html
git diff ../biengine/src/main/webapp/resources/js/hostload/hldatatable.js
git diff 会输出文件的具体修改内容(新增行显示为 +,删除行显示为 -)
- 分阶段提交
将 git merge master 产生的合并提交单独分离
保持提交历史的原子性(后续功能修改不与合并冲突混杂)
git commit -m "merge master"
批量添加剩余文件(可以避免手动输入超过10个的文件路径)
git status | grep 修改  # 过滤出包含“modified”状态的行
git status | grep 修改 | awk '{print $NF}'  # 提取出每行最后一个字段(即文件目录)
git status | grep 修改 | awk '{print $NF}' | xargs -I {} git add {} # 批量执行添加操作

提交代码
git commit -m "提交备注文字内容"
二、撤回提交代码的合并请求
git status 发现代码要提交的变更变绿了,也就是说文件已被修改了但是还没有被提交到版本控制中。
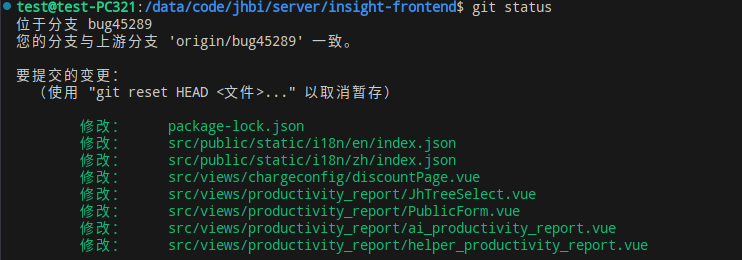 这里没问题,接着我就git add 加上想要提交的代码文件,接着直接git commit:
$ git add src/views/productivity_report/ai_productivity_report.vue src/views/productivity_report/helper_productivity_report.vue
$ git commit -m "update fix retest bug 45289"

在这一步发现 8 files changed,git 自动将8个已修改的文件提交到暂存区了,此时git status,发现没有未暂存的修改
但实际上,我只想推送下面这两个变化的代码文件到远程仓库中:
src/views/productivity_report/ai_productivity_report.vue
src/views/productivity_report/helper_productivity_report.vue
解决方法
此时我需要回退本地分支到上一次提交:
git reset HEAD~1
回退到上一次提交,保留工作区修改,清空暂存区
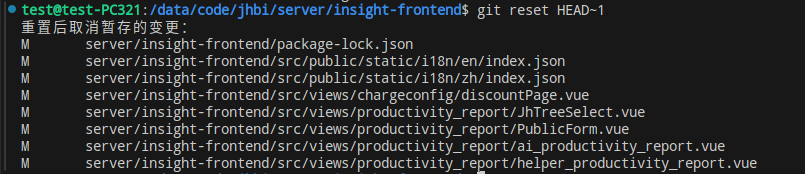
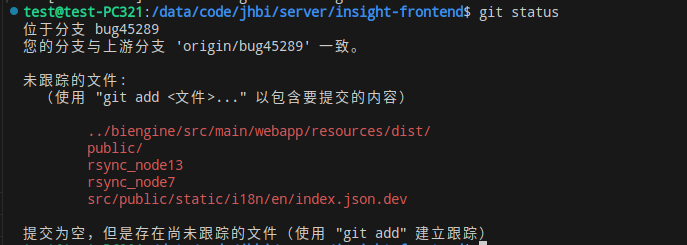
此时,再git status就会发现要提交的变更变红了,表示该文件已被修改但尚未加入到缓存区。
现在,再重新git add 相应的代码文件就可以了。git add … 和 git commit -m …

然后git status 查看代码状态,发现只有刚刚 add的那两个文件不在待暂存的变更中:
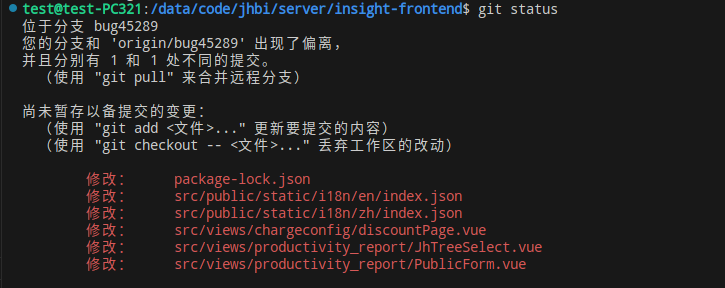
最后再git push
三、由于当前分支的最新提交留后于其对应的远程分支–>git push 失败
由于一些操作导致更新被拒绝

此时 git status查看代码状态
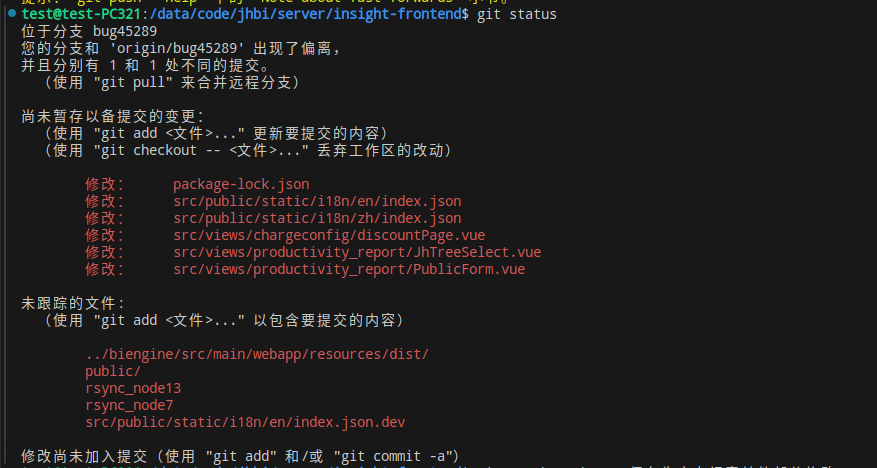
发现当前位于分支 bug45289
您的分支和 ‘origin/bug45289’ 出现了偏离
解决方法:
git stash push -m "保存生产力报表其他部分修改"
git push -f origin bug45289
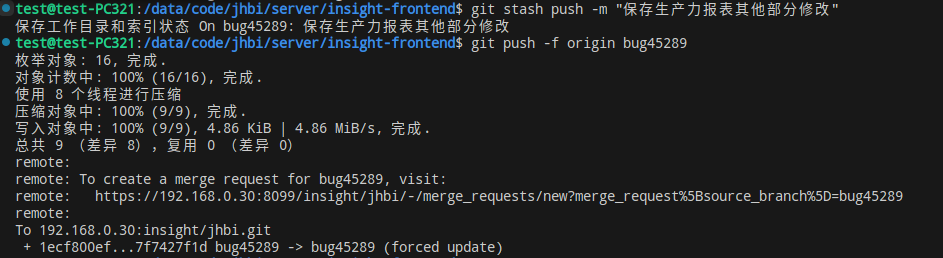
通过git fetch和 git log origin/bug45289查看是否有误:

显示无异常
再git status 显示无异常后,通过git stash apply 将缓存的更改还原:
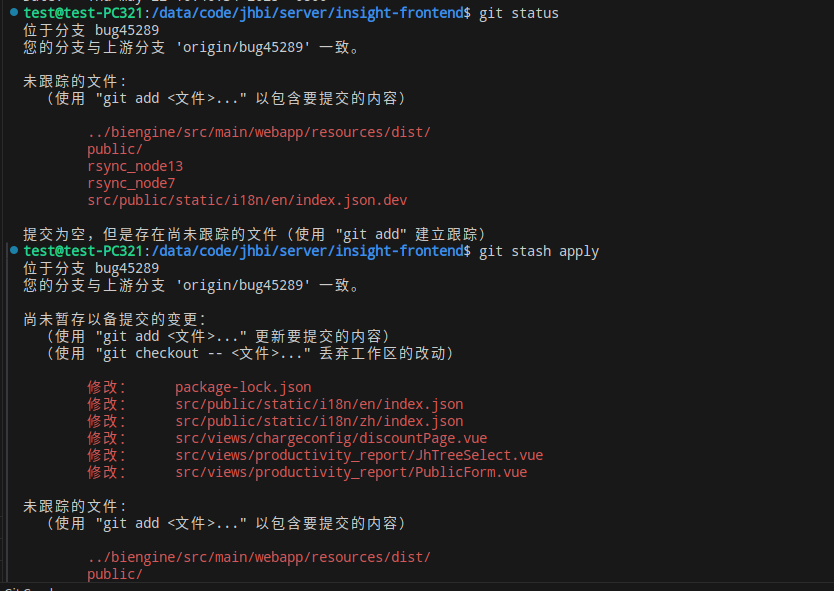
问题解决!

腾讯云面向开发者汇聚海量精品云计算使用和开发经验,营造开放的云计算技术生态圈。
更多推荐
 11
11 0
0- 0


 已为社区贡献2条内容

所有评论(0)