PyQt5进阶篇:自定义控件、多线程、数据库集成、图表和数据可视化进阶功能GUI应用实战开发
·
系列文章
文章目录
前言
本篇是基于上篇的进阶应用,上篇介绍的PyQt5开发中的基础知识和pyqt的常用组件和基本应用,本篇进一步学习一些高级的功能,包括自定义控件、多线程、数据库集成、图表和数据可视化等
一、pyqt入门篇示例整合
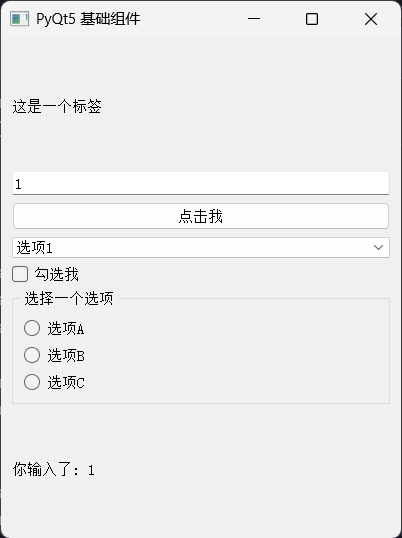
1.1 常用组件
展示常用组件的示例:
import sys
from PyQt5.QtWidgets import (QApplication, QMainWindow, QWidget, QVBoxLayout,
                             QPushButton, QLabel, QLineEdit, QComboBox,
                             QCheckBox, QRadioButton, QGroupBox, QHBoxLayout)

class MainWindow(QMainWindow):
    def __init__(self):
        super().__init__()
        self.setWindowTitle('PyQt5 基础组件')
        self.setGeometry(100, 100, 400, 500)

        # 创建中央部件
        central_widget = QWidget()
        self.setCentralWidget(central_widget)

        # 创建主布局
        main_layout = QVBoxLayout(central_widget)

        # 标签
        label = QLabel('这是一个标签')
        main_layout.addWidget(label)

        # 文本输入框
        self.text_input = QLineEdit()
        self.text_input.setPlaceholderText('请输入文本')
        main_layout.addWidget(self.text_input)

        # 按钮
        button = QPushButton('点击我')
        button.clicked.connect(self.button_clicked)
        main_layout.addWidget(button)

        # 下拉框
        combo = QComboBox()
        combo.addItems(['选项1', '选项2', '选项3'])
        main_layout.addWidget(combo)

        # 复选框
        checkbox = QCheckBox('勾选我')
        main_layout.addWidget(checkbox)

        # 单选按钮组
        radio_group = QGroupBox('选择一个选项')
        radio_layout = QVBoxLayout()

        self.radio1 = QRadioButton('选项A')
        self.radio2 = QRadioButton('选项B')
        self.radio3 = QRadioButton('选项C')

        radio_layout.addWidget(self.radio1)
        radio_layout.addWidget(self.radio2)
        radio_layout.addWidget(self.radio3)

        radio_group.setLayout(radio_layout)
        main_layout.addWidget(radio_group)

        # 状态标签
        self.status_label = QLabel('状态: 等待操作')
        main_layout.addWidget(self.status_label)

    def button_clicked(self):
        text = self.text_input.text()
        if text:
            self.status_label.setText(f'你输入了: {text}')
        else:
            self.status_label.setText('请在文本框中输入内容')

if __name__ == '__main__':
    app = QApplication(sys.argv)
    window = MainWindow()
    window.show()
    sys.exit(app.exec_())
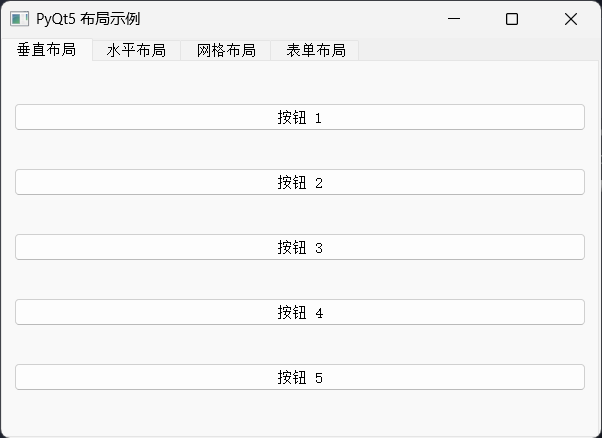
1.2 布局管理
PyQt5 提供了几种布局管理器:
- QVBoxLayout :垂直布局
- QHBoxLayout :水平布局
- QGridLayout :网格布局
- QFormLayout :表单布局
下面是一个布局示例:
import sys
from PyQt5.QtWidgets import (QApplication, QMainWindow, QWidget, QVBoxLayout,
                             QHBoxLayout, QGridLayout, QFormLayout, QPushButton,
                             QLabel, QLineEdit, QTabWidget)

class MainWindow(QMainWindow):
    def __init__(self):
        super().__init__()
        self.setWindowTitle('PyQt5 布局示例')
        self.setGeometry(100, 100, 600, 400)

        # 创建标签页部件
        tab_widget = QTabWidget()
        self.setCentralWidget(tab_widget)

        # 创建不同布局的标签页
        tab_widget.addTab(self.create_vbox_layout(), "垂直布局")
        tab_widget.addTab(self.create_hbox_layout(), "水平布局")
        tab_widget.addTab(self.create_grid_layout(), "网格布局")
        tab_widget.addTab(self.create_form_layout(), "表单布局")

    def create_vbox_layout(self):
        widget = QWidget()
        layout = QVBoxLayout()

        for i in range(1, 6):
            button = QPushButton(f'按钮 {i}')
            layout.addWidget(button)

        widget.setLayout(layout)
        return widget

    def create_hbox_layout(self):
        widget = QWidget()
        layout = QHBoxLayout()

        for i in range(1, 6):
            button = QPushButton(f'按钮 {i}')
            layout.addWidget(button)

        widget.setLayout(layout)
        return widget

    def create_grid_layout(self):
        widget = QWidget()
        layout = QGridLayout()

        positions = [(i, j) for i in range(3) for j in range(3)]

        for position, name in zip(positions, ['1', '2', '3', '4', '5', '6', '7', '8', '9']):
            button = QPushButton(name)
            layout.addWidget(button, *position)

        widget.setLayout(layout)
        return widget

    def create_form_layout(self):
        widget = QWidget()
        layout = QFormLayout()

        layout.addRow('姓名:', QLineEdit())
        layout.addRow('年龄:', QLineEdit())
        layout.addRow('邮箱:', QLineEdit())
        layout.addRow('电话:', QLineEdit())

        widget.setLayout(layout)
        return widget

if __name__ == '__main__':
    app = QApplication(sys.argv)
    window = MainWindow()
    window.show()
    sys.exit(app.exec_())
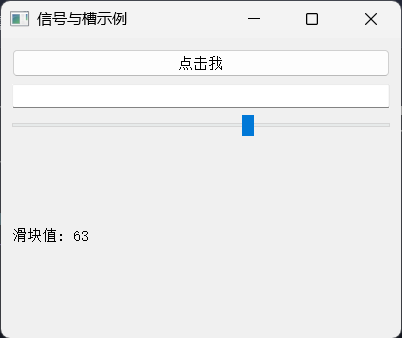
1.3 信号与槽
PyQt5 的信号和槽机制是其最强大的特性之一,它允许组件之间进行通信。
import sys
from PyQt5.QtWidgets import (QApplication, QMainWindow, QWidget, QVBoxLayout,
                             QPushButton, QLabel, QLineEdit, QSlider)
from PyQt5.QtCore import Qt

class MainWindow(QMainWindow):
    def __init__(self):
        super().__init__()
        self.setWindowTitle('信号与槽示例')
        self.setGeometry(100, 100, 400, 300)

        # 创建中央部件
        central_widget = QWidget()
        self.setCentralWidget(central_widget)

        # 创建布局
        layout = QVBoxLayout(central_widget)

        # 按钮示例
        self.button = QPushButton('点击我')
        self.button.clicked.connect(self.button_clicked)
        layout.addWidget(self.button)

        # 文本框示例
        self.text_input = QLineEdit()
        self.text_input.textChanged.connect(self.text_changed)
        layout.addWidget(self.text_input)

        # 滑块示例
        self.slider = QSlider(Qt.Horizontal)
        self.slider.setMinimum(0)
        self.slider.setMaximum(100)
        self.slider.setValue(50)
        self.slider.valueChanged.connect(self.slider_changed)
        layout.addWidget(self.slider)

        # 显示结果的标签
        self.result_label = QLabel('结果将显示在这里')
        layout.addWidget(self.result_label)

    def button_clicked(self):
        self.result_label.setText('按钮被点击了!')

    def text_changed(self, text):
        self.result_label.setText(f'文本已更改: {text}')

    def slider_changed(self, value):
        self.result_label.setText(f'滑块值: {value}')

if __name__ == '__main__':
    app = QApplication(sys.argv)
    window = MainWindow()
    window.show()
    sys.exit(app.exec_())
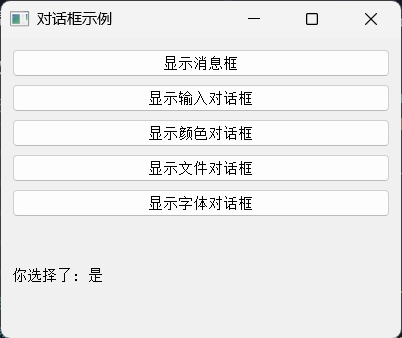
1.4 对话框
PyQt5 提供了多种对话框,如消息框、文件对话框、颜色对话框等。
import sys
from PyQt5.QtWidgets import (QApplication, QMainWindow, QWidget, QVBoxLayout,
                             QPushButton, QMessageBox, QInputDialog, QColorDialog,
                             QFileDialog, QFontDialog, QLabel)
from PyQt5.QtGui import QColor, QFont

class MainWindow(QMainWindow):
    def __init__(self):
        super().__init__()
        self.setWindowTitle('对话框示例')
        self.setGeometry(100, 100, 400, 300)

        # 创建中央部件
        central_widget = QWidget()
        self.setCentralWidget(central_widget)

        # 创建布局
        layout = QVBoxLayout(central_widget)

        # 消息框按钮
        msg_btn = QPushButton('显示消息框')
        msg_btn.clicked.connect(self.show_message_box)
        layout.addWidget(msg_btn)

        # 输入对话框按钮
        input_btn = QPushButton('显示输入对话框')
        input_btn.clicked.connect(self.show_input_dialog)
        layout.addWidget(input_btn)

        # 颜色对话框按钮
        color_btn = QPushButton('显示颜色对话框')
        color_btn.clicked.connect(self.show_color_dialog)
        layout.addWidget(color_btn)

        # 文件对话框按钮
        file_btn = QPushButton('显示文件对话框')
        file_btn.clicked.connect(self.show_file_dialog)
        layout.addWidget(file_btn)

        # 字体对话框按钮
        font_btn = QPushButton('显示字体对话框')
        font_btn.clicked.connect(self.show_font_dialog)
        layout.addWidget(font_btn)

        # 结果标签
        self.result_label = QLabel('对话框结果将显示在这里')
        layout.addWidget(self.result_label)

    def show_message_box(self):
        reply = QMessageBox.question(
            self, '消息框', '这是一个问题对话框。你喜欢 PyQt5 吗?',
            QMessageBox.Yes | QMessageBox.No, QMessageBox.Yes
        )

        if reply == QMessageBox.Yes:
            self.result_label.setText('你选择了: 是')
        else:
            self.result_label.setText('你选择了: 否')

    def show_input_dialog(self):
        text, ok = QInputDialog.getText(
            self, '输入对话框', '请输入你的名字:'
        )

        if ok:
            self.result_label.setText(f'你输入了: {text}')

    def show_color_dialog(self):
        color = QColorDialog.getColor()

        if color.isValid():
            self.result_label.setText(f'你选择的颜色是: {color.name()}')
            self.result_label.setStyleSheet(f'color: {color.name()};')

    def show_file_dialog(self):
        file_name, _ = QFileDialog.getOpenFileName(
            self, '打开文件', '', '所有文件 (*);;文本文件 (*.txt)'
        )

        if file_name:
            self.result_label.setText(f'你选择的文件是: {file_name}')

    def show_font_dialog(self):
        font, ok = QFontDialog.getFont()

        if ok:
            self.result_label.setFont(font)
            self.result_label.setText(f'你选择的字体是: {font.family()}, {font.pointSize()}pt')

if __name__ == '__main__':
    app = QApplication(sys.argv)
    window = MainWindow()
    window.show()
    sys.exit(app.exec_())
二、进阶示例
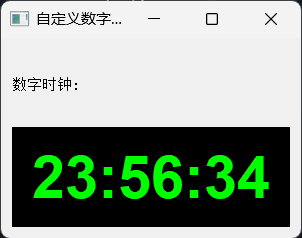
2.1 自定义组件
你可以通过继承现有组件来创建自定义组件:
import sys
from PyQt5.QtWidgets import QApplication, QMainWindow, QWidget, QVBoxLayout, QLabel
from PyQt5.QtCore import Qt, QTimer
from PyQt5.QtGui import QPainter, QColor, QFont

class DigitalClock(QWidget):
    def __init__(self, parent=None):
        super().__init__(parent)
        self.setMinimumSize(200, 100)

        # 设置时间更新定时器
        self.timer = QTimer(self)
        self.timer.timeout.connect(self.update)  # 触发重绘
        self.timer.start(1000)  # 每秒更新一次

    def paintEvent(self, event):
        painter = QPainter(self)
        painter.setRenderHint(QPainter.Antialiasing)

        # 绘制背景
        painter.fillRect(self.rect(), QColor(0, 0, 0))

        # 设置字体
        font = QFont('Arial', 36, QFont.Bold)
        painter.setFont(font)

        # 设置文字颜色
        painter.setPen(QColor(0, 255, 0))

        # 获取当前时间
        import time
        current_time = time.strftime("%H:%M:%S")

        # 绘制文字
        painter.drawText(self.rect(), Qt.AlignCenter, current_time)

class MainWindow(QMainWindow):
    def __init__(self):
        super().__init__()
        self.setWindowTitle('自定义数字时钟')
        self.setGeometry(100, 100, 300, 200)

        # 创建中央部件
        central_widget = QWidget()
        self.setCentralWidget(central_widget)

        # 创建布局
        layout = QVBoxLayout(central_widget)

        # 添加标签
        label = QLabel('数字时钟:')
        layout.addWidget(label)

        # 添加自定义时钟组件
        clock = DigitalClock()
        layout.addWidget(clock)

if __name__ == '__main__':
    app = QApplication(sys.argv)
    window = MainWindow()
    window.show()
    sys.exit(app.exec_())
2.2 多线程
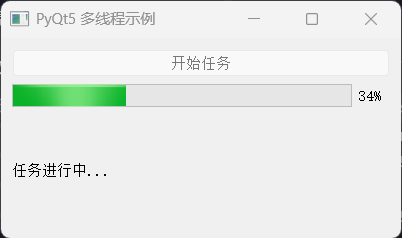
在 PyQt5 中处理耗时操作时,应该使用多线程以避免界面冻结:
import sys
import time
from PyQt5.QtWidgets import (QApplication, QMainWindow, QWidget, QVBoxLayout,
                             QPushButton, QProgressBar, QLabel)
from PyQt5.QtCore import QThread, pyqtSignal

class WorkerThread(QThread):
    # 定义信号
    update_progress = pyqtSignal(int)
    task_complete = pyqtSignal(str)

    def run(self):
        # 模拟耗时任务
        for i in range(101):
            time.sleep(0.1)  # 模拟工作
            self.update_progress.emit(i)  # 发送进度信号

        self.task_complete.emit("任务完成!")  # 发送完成信号

class MainWindow(QMainWindow):
    def __init__(self):
        super().__init__()
        self.setWindowTitle('PyQt5 多线程示例')
        self.setGeometry(100, 100, 400, 200)

        # 创建中央部件
        central_widget = QWidget()
        self.setCentralWidget(central_widget)

        # 创建布局
        layout = QVBoxLayout(central_widget)

        # 添加按钮
        self.start_button = QPushButton('开始任务')
        self.start_button.clicked.connect(self.start_task)
        layout.addWidget(self.start_button)

        # 添加进度条
        self.progress_bar = QProgressBar()
        layout.addWidget(self.progress_bar)

        # 添加状态标签
        self.status_label = QLabel('准备就绪')
        layout.addWidget(self.status_label)

        # 创建工作线程
        self.worker = WorkerThread()
        self.worker.update_progress.connect(self.update_progress)
        self.worker.task_complete.connect(self.task_complete)

    def start_task(self):
        self.start_button.setEnabled(False)
        self.status_label.setText('任务进行中...')
        self.progress_bar.setValue(0)
        self.worker.start()  # 启动线程

    def update_progress(self, value):
        self.progress_bar.setValue(value)

    def task_complete(self, message):
        self.status_label.setText(message)
        self.start_button.setEnabled(True)

if __name__ == '__main__':
    app = QApplication(sys.argv)
    window = MainWindow()
    window.show()
    sys.exit(app.exec_())
2.3 数据库集成
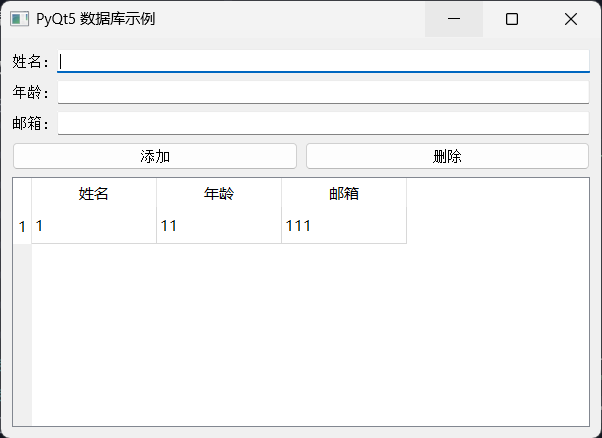
PyQt5 可以轻松集成 SQL 数据库:
import sys
import os
from PyQt5.QtWidgets import (QApplication, QMainWindow, QWidget, QVBoxLayout,
                             QPushButton, QTableView, QLineEdit, QFormLayout,
                             QHBoxLayout, QMessageBox)
from PyQt5.QtSql import QSqlDatabase, QSqlTableModel, QSqlQuery
from PyQt5.QtCore import Qt

class MainWindow(QMainWindow):
    def __init__(self):
        super().__init__()
        self.setWindowTitle('PyQt5 数据库示例')
        self.setGeometry(100, 100, 600, 400)

        # 创建中央部件
        central_widget = QWidget()
        self.setCentralWidget(central_widget)

        # 创建主布局
        main_layout = QVBoxLayout(central_widget)

        # 创建表单布局用于输入
        form_layout = QFormLayout()

        self.name_input = QLineEdit()
        form_layout.addRow('姓名:', self.name_input)

        self.age_input = QLineEdit()
        form_layout.addRow('年龄:', self.age_input)

        self.email_input = QLineEdit()
        form_layout.addRow('邮箱:', self.email_input)

        main_layout.addLayout(form_layout)

        # 创建按钮布局
        button_layout = QHBoxLayout()

        self.add_button = QPushButton('添加')
        self.add_button.clicked.connect(self.add_record)
        button_layout.addWidget(self.add_button)

        self.delete_button = QPushButton('删除')
        self.delete_button.clicked.connect(self.delete_record)
        button_layout.addWidget(self.delete_button)

        main_layout.addLayout(button_layout)

        # 创建表格视图
        self.table_view = QTableView()
        main_layout.addWidget(self.table_view)

        # 设置数据库
        self.setup_database()

    def setup_database(self):
        # 创建SQLite数据库连接
        db_path = os.path.join(os.path.dirname(__file__), "contacts.db")
        self.db = QSqlDatabase.addDatabase("QSQLITE")
        self.db.setDatabaseName(db_path)

        if not self.db.open():
            QMessageBox.critical(self, "数据库错误", "无法建立数据库连接")
            return False

        # 创建表(如果不存在)
        query = QSqlQuery()
        query.exec_("""
            CREATE TABLE IF NOT EXISTS contacts (
                id INTEGER PRIMARY KEY AUTOINCREMENT,
                name TEXT NOT NULL,
                age INTEGER,
                email TEXT
            )
        """)

        # 设置表格模型
        self.model = QSqlTableModel()
        self.model.setTable("contacts")
        self.model.setEditStrategy(QSqlTableModel.OnManualSubmit)
        self.model.select()

        # 设置表头
        self.model.setHeaderData(1, Qt.Horizontal, "姓名")
        self.model.setHeaderData(2, Qt.Horizontal, "年龄")
        self.model.setHeaderData(3, Qt.Horizontal, "邮箱")

        # 将模型应用到表格视图
        self.table_view.setModel(self.model)
        self.table_view.hideColumn(0)  # 隐藏ID列

        return True

    def add_record(self):
        name = self.name_input.text()
        age = self.age_input.text()
        email = self.email_input.text()

        if not name:
            QMessageBox.warning(self, "输入错误", "姓名不能为空")
            return

        # 添加新记录
        record = self.model.record()
        record.setValue("name", name)
        record.setValue("age", int(age) if age.isdigit() else 0)
        record.setValue("email", email)

        if self.model.insertRecord(-1, record):
            self.model.submitAll()
            self.clear_inputs()
        else:
            QMessageBox.warning(self, "添加失败", "无法添加记录")

    def delete_record(self):
        # 获取选中的行
        indexes = self.table_view.selectionModel().selectedRows()
        if not indexes:
            QMessageBox.warning(self, "删除错误", "请先选择要删除的行")
            return

        # 删除选中的行
        for index in sorted(indexes, reverse=True):
            self.model.removeRow(index.row())

        self.model.submitAll()

    def clear_inputs(self):
        self.name_input.clear()
        self.age_input.clear()
        self.email_input.clear()

if __name__ == '__main__':
    app = QApplication(sys.argv)
    window = MainWindow()
    window.show()
    sys.exit(app.exec_())
2.4 图表和数据可视化
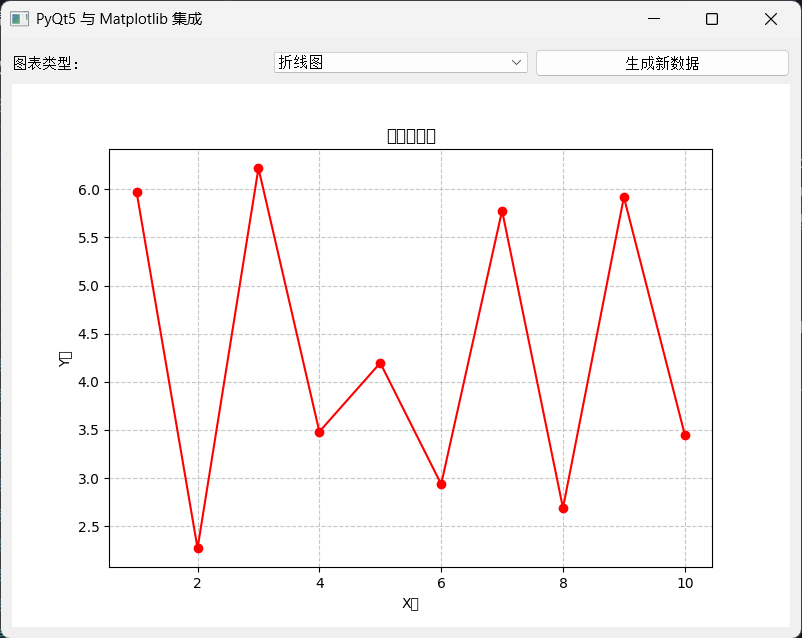
PyQt5 可以与 matplotlib 集成,用于创建强大的数据可视化应用:
先安装numpy库和matplotlib库:
pip install numpy matplotlib
import sys
import numpy as np
from PyQt5.QtWidgets import (QApplication, QMainWindow, QWidget, QVBoxLayout,
                             QPushButton, QComboBox, QLabel, QHBoxLayout)
from matplotlib.backends.backend_qt5agg import FigureCanvasQTAgg as FigureCanvas
from matplotlib.figure import Figure

class MplCanvas(FigureCanvas):
    def __init__(self, parent=None, width=5, height=4, dpi=100):
        # 创建图形
        self.fig = Figure(figsize=(width, height), dpi=dpi)
        self.axes = self.fig.add_subplot(111)

        # 初始化FigureCanvas
        super(MplCanvas, self).__init__(self.fig)

class MainWindow(QMainWindow):
    def __init__(self):
        super().__init__()
        self.setWindowTitle('PyQt5 与 Matplotlib 集成')
        self.setGeometry(100, 100, 800, 600)

        # 创建中央部件
        central_widget = QWidget()
        self.setCentralWidget(central_widget)

        # 创建主布局
        main_layout = QVBoxLayout(central_widget)

        # 创建控制面板
        control_layout = QHBoxLayout()

        # 图表类型选择
        self.chart_type_label = QLabel('图表类型:')
        control_layout.addWidget(self.chart_type_label)

        self.chart_type = QComboBox()
        self.chart_type.addItems(['折线图', '柱状图', '散点图', '饼图'])
        self.chart_type.currentIndexChanged.connect(self.update_chart)
        control_layout.addWidget(self.chart_type)

        # 数据生成按钮
        self.generate_button = QPushButton('生成新数据')
        self.generate_button.clicked.connect(self.generate_data)
        control_layout.addWidget(self.generate_button)

        main_layout.addLayout(control_layout)

        # 创建matplotlib画布
        self.canvas = MplCanvas(self, width=8, height=6, dpi=100)
        main_layout.addWidget(self.canvas)

        # 初始化数据
        self.generate_data()
        self.update_chart()

    def generate_data(self):
        # 生成随机数据
        self.x = np.arange(1, 11)
        self.y = np.random.rand(10) * 10
        self.update_chart()

    def update_chart(self):
        # 清除当前图表
        self.canvas.axes.clear()

        chart_type = self.chart_type.currentText()

        if chart_type == '折线图':
            self.canvas.axes.plot(self.x, self.y, 'r-o')
            self.canvas.axes.set_title('折线图示例')

        elif chart_type == '柱状图':
            self.canvas.axes.bar(self.x, self.y, color='g', alpha=0.7)
            self.canvas.axes.set_title('柱状图示例')

        elif chart_type == '散点图':
            # 生成更多随机点
            x = np.random.rand(50) * 10
            y = np.random.rand(50) * 10
            self.canvas.axes.scatter(x, y, color='b', alpha=0.7)
            self.canvas.axes.set_title('散点图示例')

        elif chart_type == '饼图':
            # 生成饼图数据
            labels = ['A', 'B', 'C', 'D', 'E']
            sizes = np.random.rand(5) * 100
            self.canvas.axes.pie(sizes, labels=labels, autopct='%1.1f%%',
                                shadow=True, startangle=90)
            self.canvas.axes.axis('equal')  # 确保饼图是圆的
            self.canvas.axes.set_title('饼图示例')

        # 添加网格
        if chart_type != '饼图':
            self.canvas.axes.grid(True, linestyle='--', alpha=0.7)
            self.canvas.axes.set_xlabel('X轴')
            self.canvas.axes.set_ylabel('Y轴')

        # 重绘画布
        self.canvas.draw()

if __name__ == '__main__':
    app = QApplication(sys.argv)
    window = MainWindow()
    window.show()
    sys.exit(app.exec_())
2.5 样式和主题
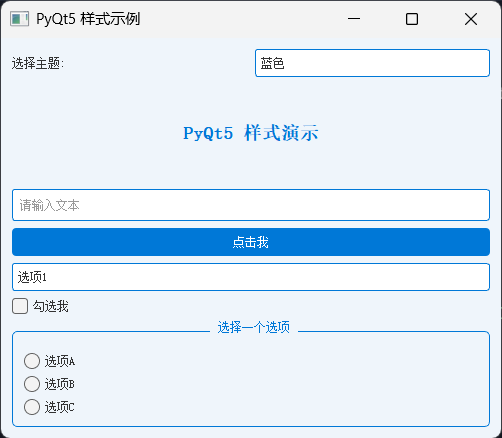
PyQt5 允许你使用 CSS 样式表来自定义应用程序的外观:
import sys
from PyQt5.QtWidgets import (QApplication, QMainWindow, QWidget, QVBoxLayout,
QPushButton, QLabel, QComboBox, QLineEdit,
QCheckBox, QRadioButton, QGroupBox, QHBoxLayout)
from PyQt5.QtCore import Qt
class MainWindow(QMainWindow):
def __init__(self):
super().__init__()
self.setWindowTitle('PyQt5 样式示例')
self.setGeometry(100, 100, 500, 400)
# 创建中央部件
central_widget = QWidget()
self.setCentralWidget(central_widget)
# 创建主布局
main_layout = QVBoxLayout(central_widget)
# 创建主题选择器
theme_layout = QHBoxLayout()
theme_label = QLabel('选择主题:')
theme_layout.addWidget(theme_label)
self.theme_selector = QComboBox()
self.theme_selector.addItems(['默认', '深色', '浅色', '蓝色', '自定义'])
self.theme_selector.currentIndexChanged.connect(self.change_theme)
theme_layout.addWidget(self.theme_selector)
main_layout.addLayout(theme_layout)
# 创建各种组件进行样式展示
# 标签
self.title_label = QLabel('PyQt5 样式演示')
self.title_label.setAlignment(Qt.AlignCenter)
main_layout.addWidget(self.title_label)
# 输入框
self.text_input = QLineEdit()
self.text_input.setPlaceholderText('请输入文本')
main_layout.addWidget(self.text_input)
# 按钮
self.button = QPushButton('点击我')
main_layout.addWidget(self.button)
# 下拉框
self.combo = QComboBox()
self.combo.addItems(['选项1', '选项2', '选项3'])
main_layout.addWidget(self.combo)
# 复选框
self.checkbox = QCheckBox('勾选我')
main_layout.addWidget(self.checkbox)
# 单选按钮组
self.radio_group = QGroupBox('选择一个选项')
radio_layout = QVBoxLayout()
self.radio1 = QRadioButton('选项A')
self.radio2 = QRadioButton('选项B')
self.radio3 = QRadioButton('选项C')
radio_layout.addWidget(self.radio1)
radio_layout.addWidget(self.radio2)
radio_layout.addWidget(self.radio3)
self.radio_group.setLayout(radio_layout)
main_layout.addWidget(self.radio_group)
# 应用默认主题
self.change_theme(0)
def change_theme(self, index):
theme = self.theme_selector.currentText()
if theme == '默认':
self.setStyleSheet("")
elif theme == '深色':
self.setStyleSheet("""
QWidget {
background-color: #2D2D30;
color: #FFFFFF;
font-size: 12px;
}
QLabel {
color: #FFFFFF;
}
QLabel#title_label {
font-size: 18px;
font-weight: bold;
margin: 10px;
}
QPushButton {
background-color: #0078D7;
color: white;
border: none;
padding: 8px;
border-radius: 4px;
}
QPushButton:hover {
background-color: #1C97EA;
}
QPushButton:pressed {
background-color: #00559B;
}
QLineEdit {
background-color: #3E3E42;
color: #FFFFFF;
border: 1px solid #555555;
padding: 5px;
border-radius: 3px;
}
QComboBox {
background-color: #3E3E42;
color: #FFFFFF;
border: 1px solid #555555;
padding: 5px;
border-radius: 3px;
}
QComboBox::drop-down {
border: none;
}
QComboBox QAbstractItemView {
background-color: #2D2D30;
color: #FFFFFF;
selection-background-color: #0078D7;
}
QCheckBox, QRadioButton {
color: #FFFFFF;
spacing: 5px;
}
QGroupBox {
border: 1px solid #555555;
border-radius: 5px;
margin-top: 10px;
padding-top: 10px;
}
QGroupBox::title {
subcontrol-origin: margin;
subcontrol-position: top center;
padding: 0 5px;
}
""")
elif theme == '浅色':
self.setStyleSheet("""
QWidget {
background-color: #F0F0F0;
color: #333333;
font-size: 12px;
}
QLabel {
color: #333333;
}
QLabel#title_label {
font-size: 18px;
font-weight: bold;
margin: 10px;
}
QPushButton {
background-color: #E1E1E1;
color: #333333;
border: 1px solid #BBBBBB;
padding: 8px;
border-radius: 4px;
}
QPushButton:hover {
background-color: #D1D1D1;
}
QPushButton:pressed {
background-color: #C1C1C1;
}
QLineEdit {
background-color: #FFFFFF;
color: #333333;
border: 1px solid #BBBBBB;
padding: 5px;
border-radius: 3px;
}
QComboBox {
background-color: #FFFFFF;
color: #333333;
border: 1px solid #BBBBBB;
padding: 5px;
border-radius: 3px;
}
QComboBox::drop-down {
border: none;
}
QComboBox QAbstractItemView {
background-color: #FFFFFF;
color: #333333;
selection-background-color: #D1D1D1;
}
QCheckBox, QRadioButton {
color: #333333;
spacing: 5px;
}
QGroupBox {
border: 1px solid #BBBBBB;
border-radius: 5px;
margin-top: 10px;
padding-top: 10px;
}
QGroupBox::title {
subcontrol-origin: margin;
subcontrol-position: top center;
padding: 0 5px;
}
""")
elif theme == '蓝色':
self.setStyleSheet("""
QWidget {
background-color: #EFF5FB;
color: #333333;
font-size: 12px;
}
QLabel {
color: #333333;
}
QLabel#title_label {
font-size: 18px;
font-weight: bold;
margin: 10px;
color: #0078D7;
}
QPushButton {
background-color: #0078D7;
color: white;
border: none;
padding: 8px;
border-radius: 4px;
}
QPushButton:hover {
background-color: #1C97EA;
}
QPushButton:pressed {
background-color: #00559B;
}
QLineEdit {
background-color: #FFFFFF;
color: #333333;
border: 1px solid #0078D7;
padding: 5px;
border-radius: 3px;
}
QComboBox {
background-color: #FFFFFF;
color: #333333;
border: 1px solid #0078D7;
padding: 5px;
border-radius: 3px;
}
QComboBox::drop-down {
border: none;
}
QComboBox QAbstractItemView {
background-color: #FFFFFF;
color: #333333;
selection-background-color: #0078D7;
}
QCheckBox, QRadioButton {
color: #333333;
spacing: 5px;
}
QGroupBox {
border: 1px solid #0078D7;
border-radius: 5px;
margin-top: 10px;
padding-top: 10px;
}
QGroupBox::title {
subcontrol-origin: margin;
subcontrol-position: top center;
padding: 0 5px;
color: #0078D7;
}
""")
elif theme == '自定义':
self.setStyleSheet("""
QWidget {
background-color: #2E2E2E;
color: #F0F0F0;
font-size: 12px;
}
QLabel {
color: #F0F0F0;
}
QLabel#title_label {
font-size: 18px;
font-weight: bold;
margin: 10px;
color: #FF5722;
}
QPushButton {
background-color: #FF5722;
color: white;
border: none;
padding: 8px;
border-radius: 4px;
}
QPushButton:hover {
background-color: #FF7043;
}
QPushButton:pressed {
background-color: #E64A19;
}
QLineEdit {
background-color: #424242;
color: #F0F0F0;
border: 1px solid #FF5722;
padding: 5px;
border-radius: 3px;
}
QComboBox {
background-color: #424242;
color: #F0F0F0;
border: 1px solid #FF5722;
padding: 5px;
border-radius: 3px;
}
QComboBox::drop-down {
border: none;
}
QComboBox QAbstractItemView {
background-color: #424242;
color: #F0F0F0;
selection-background-color: #FF5722;
}
QCheckBox, QRadioButton {
color: #F0F0F0;
spacing: 5px;
}
QGroupBox {
border: 1px solid #FF5722;
border-radius: 5px;
margin-top: 10px;
padding-top: 10px;
}
QGroupBox::title {
subcontrol-origin: margin;
subcontrol-position: top center;
padding: 0 5px;
color: #FF5722;
}
""")
# 设置标题标签的对象名,以便在样式表中引用
self.title_label.setObjectName("title_label")
if __name__ == '__main__':
app = QApplication(sys.argv)
window = MainWindow()
window.show()
sys.exit(app.exec_())
这个做出来的界面很好看
三、 实际项目:简单的笔记应用
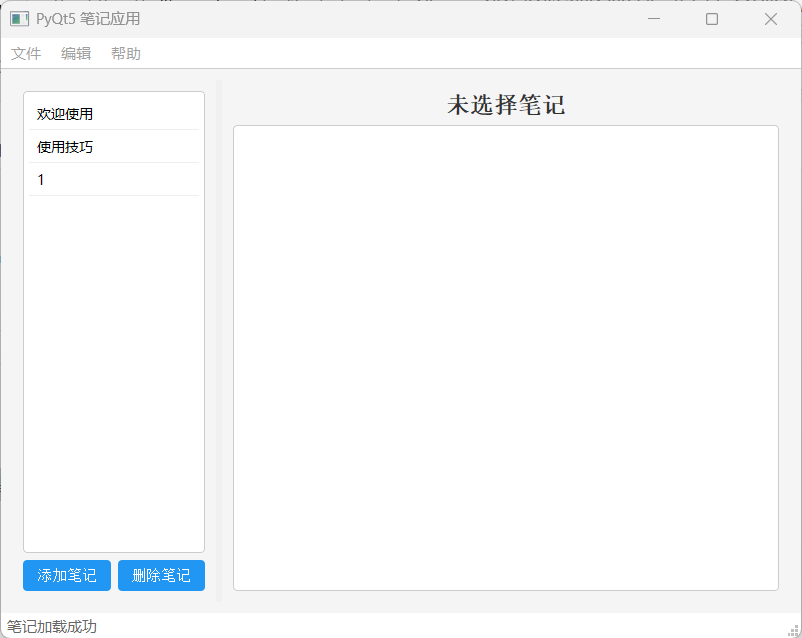
让我们创建一个简单但功能完整的笔记应用,综合运用前面学到的知识
import sys
import os
import json
from PyQt5.QtWidgets import (QApplication, QMainWindow, QWidget, QVBoxLayout,
                             QHBoxLayout, QPushButton, QTextEdit, QListWidget,
                             QInputDialog, QMessageBox, QSplitter, QAction,
                             QFileDialog, QMenu, QLabel, QStatusBar)
from PyQt5.QtCore import Qt, QSize
from PyQt5.QtGui import QIcon, QFont

class NoteApp(QMainWindow):
    def __init__(self):
        super().__init__()
        self.setWindowTitle('PyQt5 笔记应用')
        self.setGeometry(100, 100, 800, 600)

        # 初始化UI
        self.init_ui()

        # 初始化数据
        self.notes = {}
        self.current_note = None

        # 加载笔记
        self.load_notes()

    def init_ui(self):
        # 创建中央部件
        central_widget = QWidget()
        self.setCentralWidget(central_widget)

        # 创建主布局
        main_layout = QHBoxLayout(central_widget)

        # 创建分割器
        splitter = QSplitter(Qt.Horizontal)
        main_layout.addWidget(splitter)

        # 左侧面板 - 笔记列表
        left_panel = QWidget()
        left_layout = QVBoxLayout(left_panel)

        # 笔记列表
        self.note_list = QListWidget()
        self.note_list.itemClicked.connect(self.note_selected)
        left_layout.addWidget(self.note_list)

        # 按钮布局
        button_layout = QHBoxLayout()

        # 添加笔记按钮
        self.add_button = QPushButton('添加笔记')
        self.add_button.clicked.connect(self.add_note)
        button_layout.addWidget(self.add_button)

        # 删除笔记按钮
        self.delete_button = QPushButton('删除笔记')
        self.delete_button.clicked.connect(self.delete_note)
        button_layout.addWidget(self.delete_button)

        left_layout.addLayout(button_layout)

        # 右侧面板 - 笔记编辑器
        right_panel = QWidget()
        right_layout = QVBoxLayout(right_panel)

        # 笔记标题
        self.note_title = QLabel('未选择笔记')
        self.note_title.setAlignment(Qt.AlignCenter)
        self.note_title.setFont(QFont('Arial', 14, QFont.Bold))
        right_layout.addWidget(self.note_title)

        # 笔记编辑器
        self.note_editor = QTextEdit()
        self.note_editor.textChanged.connect(self.note_edited)
        right_layout.addWidget(self.note_editor)

        # 添加面板到分割器
        splitter.addWidget(left_panel)
        splitter.addWidget(right_panel)
        splitter.setSizes([200, 600])  # 设置初始大小

        # 创建菜单栏
        self.create_menu_bar()

        # 创建状态栏
        self.statusBar = QStatusBar()
        self.setStatusBar(self.statusBar)
        self.statusBar.showMessage('就绪')

        # 设置样式
        self.apply_style()

    def create_menu_bar(self):
        # 创建菜单栏
        menu_bar = self.menuBar()

        # 文件菜单
        file_menu = menu_bar.addMenu('文件')

        # 导入笔记
        import_action = QAction('导入笔记', self)
        import_action.triggered.connect(self.import_notes)
        file_menu.addAction(import_action)

        # 导出笔记
        export_action = QAction('导出笔记', self)
        export_action.triggered.connect(self.export_notes)
        file_menu.addAction(export_action)

        file_menu.addSeparator()

        # 退出
        exit_action = QAction('退出', self)
        exit_action.triggered.connect(self.close)
        file_menu.addAction(exit_action)

        # 编辑菜单
        edit_menu = menu_bar.addMenu('编辑')

        # 重命名笔记
        rename_action = QAction('重命名笔记', self)
        rename_action.triggered.connect(self.rename_note)
        edit_menu.addAction(rename_action)

        # 帮助菜单
        help_menu = menu_bar.addMenu('帮助')

        # 关于
        about_action = QAction('关于', self)
        about_action.triggered.connect(self.show_about)
        help_menu.addAction(about_action)

    def apply_style(self):
        # 应用样式表
        self.setStyleSheet("""
            QMainWindow {
                background-color: #F5F5F5;
            }
            QListWidget {
                background-color: #FFFFFF;
                border: 1px solid #CCCCCC;
                border-radius: 4px;
                padding: 5px;
                font-size: 14px;
            }
            QListWidget::item {
                padding: 5px;
                border-bottom: 1px solid #EEEEEE;
            }
            QListWidget::item:selected {
                background-color: #E3F2FD;
                color: #1976D2;
            }
            QTextEdit {
                background-color: #FFFFFF;
                border: 1px solid #CCCCCC;
                border-radius: 4px;
                padding: 5px;
                font-size: 14px;
            }
            QPushButton {
                background-color: #2196F3;
                color: white;
                border: none;
                padding: 8px;
                border-radius: 4px;
            }
            QPushButton:hover {
                background-color: #1976D2;
            }
            QPushButton:pressed {
                background-color: #0D47A1;
            }
            QLabel {
                color: #333333;
            }
            QMenuBar {
                background-color: #FFFFFF;
                border-bottom: 1px solid #CCCCCC;
            }
            QMenuBar::item {
                padding: 5px 10px;
                background-color: transparent;
            }
            QMenuBar::item:selected {
                background-color: #E3F2FD;
                color: #1976D2;
            }
            QMenu {
                background-color: #FFFFFF;
                border: 1px solid #CCCCCC;
            }
            QMenu::item {
                padding: 5px 30px 5px 20px;
            }
            QMenu::item:selected {
                background-color: #E3F2FD;
                color: #1976D2;
            }
            QStatusBar {
                background-color: #FFFFFF;
                color: #666666;
            }
        """)

    def load_notes(self):
        # 加载笔记数据
        notes_file = os.path.join(os.path.dirname(__file__), "notes.json")

        if os.path.exists(notes_file):
            try:
                with open(notes_file, 'r', encoding='utf-8') as f:
                    self.notes = json.load(f)

                # 更新笔记列表
                self.update_note_list()
                self.statusBar.showMessage('笔记加载成功')
            except Exception as e:
                QMessageBox.warning(self, '加载错误', f'无法加载笔记: {str(e)}')
        else:
            # 创建示例笔记
            self.notes = {
                '欢迎使用': '这是一个简单的笔记应用,你可以:\n\n- 添加新笔记\n- 编辑笔记内容\n- 删除笔记\n- 导入/导出笔记',
                '使用技巧': '- 点击左侧列表选择笔记\n- 使用右侧编辑器修改内容\n- 内容会自动保存'
            }
            self.save_notes()
            self.update_note_list()

    def save_notes(self):
        # 保存笔记数据
        notes_file = os.path.join(os.path.dirname(__file__), "notes.json")

        try:
            with open(notes_file, 'w', encoding='utf-8') as f:
                json.dump(self.notes, f, ensure_ascii=False, indent=2)
            self.statusBar.showMessage('笔记已保存')
        except Exception as e:
            QMessageBox.warning(self, '保存错误', f'无法保存笔记: {str(e)}')

    def update_note_list(self):
        # 更新笔记列表
        self.note_list.clear()
        for title in self.notes.keys():
            self.note_list.addItem(title)

    def note_selected(self, item):
        # 选择笔记
        title = item.text()
        self.current_note = title
        self.note_title.setText(title)
        self.note_editor.setText(self.notes[title])
        self.statusBar.showMessage(f'已选择笔记: {title}')

    def note_edited(self):
        # 笔记内容编辑
        if self.current_note:
            self.notes[self.current_note] = self.note_editor.toPlainText()
            self.save_notes()

    def add_note(self):
        # 添加新笔记
        title, ok = QInputDialog.getText(self, '添加笔记', '请输入笔记标题:')

        if ok and title:
            if title in self.notes:
                QMessageBox.warning(self, '添加错误', '笔记标题已存在')
                return

            self.notes[title] = ''
            self.update_note_list()

            # 选择新笔记
            items = self.note_list.findItems(title, Qt.MatchExactly)
            if items:
                self.note_list.setCurrentItem(items[0])
                self.note_selected(items[0])

            self.statusBar.showMessage(f'已添加笔记: {title}')

    def delete_note(self):
        # 删除笔记
        if not self.current_note:
            QMessageBox.warning(self, '删除错误', '请先选择要删除的笔记')
            return

        reply = QMessageBox.question(self, '确认删除',
                                     f'确定要删除笔记 "{self.current_note}" 吗?',
                                     QMessageBox.Yes | QMessageBox.No,
                                     QMessageBox.No)

        if reply == QMessageBox.Yes:
            del self.notes[self.current_note]
            self.update_note_list()
            self.current_note = None
            self.note_title.setText('未选择笔记')
            self.note_editor.clear()
            self.save_notes()
            self.statusBar.showMessage('笔记已删除')

    def rename_note(self):
        # 重命名笔记
        if not self.current_note:
            QMessageBox.warning(self, '重命名错误', '请先选择要重命名的笔记')
            return

        new_title, ok = QInputDialog.getText(self, '重命名笔记',
                                            '请输入新的笔记标题:',
                                            text=self.current_note)

        if ok and new_title and new_title != self.current_note:
            if new_title in self.notes:
                QMessageBox.warning(self, '重命名错误', '笔记标题已存在')
                return

            # 重命名笔记
            self.notes[new_title] = self.notes[self.current_note]
            del self.notes[self.current_note]
            self.update_note_list()

            # 选择重命名后的笔记
            items = self.note_list.findItems(new_title, Qt.MatchExactly)
            if items:
                self.note_list.setCurrentItem(items[0])
                self.current_note = new_title
                self.note_title.setText(new_title)

            self.save_notes()
            self.statusBar.showMessage(f'笔记已重命名为: {new_title}')

    def import_notes(self):
        # 导入笔记
        file_name, _ = QFileDialog.getOpenFileName(
            self, '导入笔记', '', 'JSON 文件 (*.json);;所有文件 (*)'
        )

        if file_name:
            try:
                with open(file_name, 'r', encoding='utf-8') as f:
                    imported_notes = json.load(f)

                # 检查导入的数据格式
                if not isinstance(imported_notes, dict):
                    raise ValueError("导入的文件格式不正确")

                # 合并笔记
                conflict_count = 0
                for title, content in imported_notes.items():
                    if title in self.notes:
                        conflict_count += 1
                    else:
                        self.notes[title] = content

                self.update_note_list()
                self.save_notes()

                message = f'成功导入 {len(imported_notes) - conflict_count} 个笔记'
                if conflict_count > 0:
                    message += f',{conflict_count} 个笔记因标题冲突而跳过'

                QMessageBox.information(self, '导入成功', message)
                self.statusBar.showMessage('笔记导入成功')

            except Exception as e:
                QMessageBox.warning(self, '导入错误', f'无法导入笔记: {str(e)}')

    def export_notes(self):
        # 导出笔记
        file_name, _ = QFileDialog.getSaveFileName(
            self, '导出笔记', '', 'JSON 文件 (*.json);;所有文件 (*)'
        )

        if file_name:
            try:
                with open(file_name, 'w', encoding='utf-8') as f:
                    json.dump(self.notes, f, ensure_ascii=False, indent=2)

                QMessageBox.information(self, '导出成功',
                                       f'成功导出 {len(self.notes)} 个笔记')
                self.statusBar.showMessage('笔记导出成功')

            except Exception as e:
                QMessageBox.warning(self, '导出错误', f'无法导出笔记: {str(e)}')

    def show_about(self):
        # 显示关于对话框
        QMessageBox.about(self, '关于笔记应用',
                         '笔记应用 v1.0\n\n'
                         '这是一个使用 PyQt5 开发的简单笔记应用\n'
                         '可以用于创建、编辑和管理文本笔记')

    def closeEvent(self, event):
        # 关闭窗口时保存笔记
        self.save_notes()
        event.accept()

if __name__ == '__main__':
    app = QApplication(sys.argv)
    note_app = NoteApp()
    note_app.show()
    sys.exit(app.exec_())
总结
PyQt5 学习总结:
- 基础知识 :窗口、布局、组件
- 信号与槽 :组件间通信机制
- 对话框 :消息框、文件对话框等
- 高级组件 :表格、列表、树形视图
- 自定义组件 :创建自己的组件
- 多线程 :处理耗时操作
- 数据库集成 :使用 SQL 数据库
- 图表和数据可视化 :使用 matplotlib
- 样式和主题 :使用 CSS 自定义外观
如果你想进一步提升 PyQt5 技能,可以考虑以下方向:
- 学习 Qt Designer 高级用法 :掌握复杂界面设计
- 深入学习 Model/View 架构 :处理复杂数据展示
- 学习 QML 和 Qt Quick :创建现代化、流畅的用户界面
- 探索 PyQt5 的动画框架 :创建动态效果
- 学习 OpenGL 集成 :进行 3D 渲染
- 研究 Qt 网络模块 :开发网络应用
- 学习 Qt 多媒体模块 :处理音频和视频
- 探索 Qt 传感器模块 :与硬件交互

腾讯云面向开发者汇聚海量精品云计算使用和开发经验,营造开放的云计算技术生态圈。
更多推荐
 36
36 0
0- 0


 已为社区贡献1条内容

所有评论(0)