进一步完善前端框架搭建及vue-konva依赖的使用(Vscode)
前端开发(一)
接续上一篇文章,向下探索
大致项目架构如下图所示:
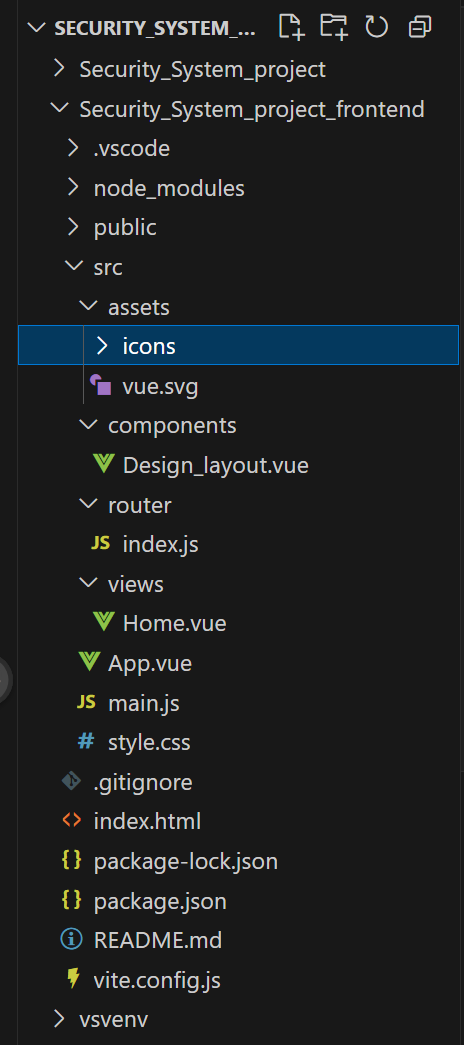
1.完善项目架构
由于我们初始化创建的项目框架是最为基础的所以接下来我们将进行一步步拓展:
-
通过命令:
npm install vue-router@4
安装路由
-
创建路由配置文件:
在
src目录下创建router文件夹,并在其中创建index.js文件:// src/router/index.js import { createRouter, createWebHistory } from 'vue-router' import Home from '../views/Home.vue' // 需创建该组件 const routes = [ { path: '/', name: 'Home', component: Home }, { path: '/about', name: 'About', // 路由懒加载 component: () => import('../views/About.vue') } ] const router = createRouter({ history: createWebHistory(import.meta.env.BASE_URL), routes }) export default router -
创建视图文件夹“views”,并在里面添加视图组件
在
src/views目录下创建组件文件(如Home.vue、About.vue):示例代码: <!-- src/views/Home.vue --> <template> <div class="home"> <h1>首页</h1> </div> </template>
-
在主应用中挂载路由
修改
src/main.js文件:// src/main.js import { createApp } from 'vue' import App from './App.vue' import router from './router' createApp(App) .use(router) .mount('#app')还有一种写法:
// src/main.js import { createApp } from 'vue' import App from './App.vue' import router from './router' const app = createApp(App); app.use(router); app.mount('#app');个人而言,更喜欢第二种写法(hahahah)
-
正如以上第2点创建路由配置文件所示,因为有该界面的路由导航路径所以我们就在Home.vue组件中进行导入功能组件
在<script></script>标签中添加以下代码:
import Design_layout from '../components/Design_layout.vue';
注意:组件路径要根据你项目架构的实际情况来:
有种方法:配置别名:
-
配置 Vite 别名
在
vite.config.js中添加resolve.alias配置:lve.alias配置:// vite.config.js import { defineConfig } from 'vite' import vue from '@vitejs/plugin-vue' import path from 'path' // 需要安装 @types/node:npm i @types/node -D export default defineConfig({ plugins: [vue()], resolve: { alias: { '@': path.resolve(__dirname, 'src') // 将 @ 指向 src 目录 } } }) -
TypeScript 项目配置(可选)
如果使用 TypeScript,需在
tsconfig.json中添加compilerOptions.paths配置:// tsconfig.json { "compilerOptions": { "baseUrl": ".", "paths": { "@/*": ["src/*"] // 与 Vite 配置保持一致 } } } -
使用绝对路径(别名)
配置完成后,可以使用
@作为src目录的别名:// 导入组件(绝对路径) import Home from '@/views/Home.vue' // 导入工具函数 import { formatDate } from '@/utils/date' // 导入样式 import '@/styles/main.css' -
相对路径与绝对路径对比
-
相对路径:基于当前文件位置的路径,如
../components/Button.vue -
绝对路径:基于
src目录的路径,如@/components/Button.vue示例对比:
// 相对路径(复杂) import Button from '../../components/Button.vue' // 绝对路径(简洁) import Button from '@/components/Button.vue'
-
-
CSS / 样式中的路径引用
在 CSS 中使用别名需要添加
~前缀(Vite 支持):/* 使用绝对路径引入图片 */ .logo { background-image: url('~@/assets/logo.png'); }温馨提示:
VScode中的智能提示:可使用以下命令:
npm install @types/node --save-dev
-
2.开始(5.9)
1.目的:使用vue-konva依赖实现网页上的图标拖拽
-
使用命令安装依赖:
npm install vue-konva konva
-
vue-konva:Vue.js 的 Konva 包装器 -
konva:核心绘图库(HTML5 Canvas API 的 JavaScript 实现)
-
-
全局注册组件
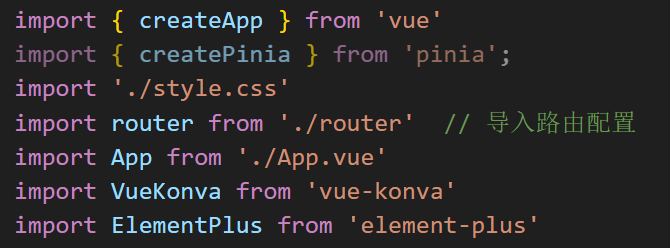
-
在组件中使用(局部注册)
若不想全局注册,可在组件中局部导入:
示例代码: <template> <v-stage :config="configStage"> <v-layer> <v-rect :config="configRect" @click="handleClick" /> </v-layer> </v-stage> </template> <script setup> import { ref } from 'vue' import { Stage, Layer, Rect } from 'vue-konva' // 局部导入组件 const configStage = ref({ width: 500, height: 300 }) const configRect = ref({ x: 20, y: 20, width: 100, height: 100, fill: 'blue', stroke: 'black', strokeWidth: 4 }) const handleClick = () => { configRect.value.fill = 'green' // 点击后变绿色 } </script> -
响应式更新
使用
ref或reactive包装配置对象,确保数据变化时 Canvas 自动更新:// 使用 ref 包装配置 const configRect = ref({ // 配置项... }) // 更新属性时触发重绘 const changeColor = () => { configRect.value.fill = 'red' } -
事件绑定
通过
@事件名绑定 Konva 对象的原生事件:<v-circle :config="circleConfig" @mouseover="handleMouseOver" @mouseout="handleMouseOut" />
-
类型支持(TypeScript)
若使用 TypeScript,需安装类型定义:
npm install @types/konva --save-dev
-
参考示例
<template> <div> <v-stage :config="stageConfig"> <v-layer> <v-circle :config="circleConfig" @click="changeColor" /> <v-text :config="textConfig" /> </v-layer> </v-stage> <button @click="addShape">添加图形</button> </div> </template> <script setup> import { ref, reactive, onMounted } from 'vue' import { Stage, Layer, Circle, Text } from 'vue-konva' const stageConfig = ref({ width: window.innerWidth, height: 400 }) const circleConfig = reactive({ x: 100, y: 100, radius: 70, fill: 'red', stroke: 'black', strokeWidth: 4 }) const textConfig = reactive({ x: 50, y: 200, text: '点击圆形改变颜色', fontSize: 20, fontFamily: 'Calibri', fill: 'black' }) const changeColor = () => { circleConfig.fill = circleConfig.fill === 'red' ? 'blue' : 'red' } const addShape = () => { // 动态添加新图形(需通过 v-for 实现) } // 窗口大小变化时更新舞台尺寸 const handleResize = () => { stageConfig.value.width = window.innerWidth } onMounted(() => { window.addEventListener('resize', handleResize) }) </script>注意事项
安装配置完成后,你可以在项目中使用
vue-konva创建交互式 Canvas 应用,如数据可视化、游戏、绘图工具等。-
性能优化:大量动态图形时,使用
v-memo或v-show避免不必要的重绘 -
生命周期:Canvas 对象在组件卸载时会自动销毁,无需手动处理
-
版本兼容:确保使用
vue-konva@3.x版本以兼容 Vue3
-
2.开发过程中所遇问题:
我想要在页面上拖拽多个图标
问题1:在实际应用过程中,如果图标太多,常规方式坑定就太冗长了哇?
如下所示:
顶部导入图标
import cameraIcon from '@/assets/icons/摄像头.png'
import roomIcon from '@/assets/icons/房间.png'
import areaIcon from '@/assets/icons/监测范围.png'
......(n个图片)
在 icons 中使用这些变量
const icons = ref([
  { type: 'camera', name: '相机', src: cameraIcon, loaded: false },
  { type: 'edit', name: '房间', src: roomIcon, loaded: false },
  { type: 'setting', name: '监测范围', src: areaIcon, loaded: false }
])
小型项目可以直接将所需要的图片放入public文件夹中,中大型项目最好在assets文件夹中进行资源导入
解决方法:
使用 import.meta.glob 动态引入图标
你可以这样做:
🔧 第 1 步:自动导入 icons 目录下的所有图片
const iconModules = import.meta.glob('@/assets/icons/*.png', { eager: true, import: 'default' })
const icons = ref(Object.entries(iconModules).map(([path, src]) => {
const name = path.split('/').pop().replace('.png', '')
return {
type: name,
name: name, // 或自定义中文名映射
src,
loaded: false
}
}))
📦 如果你需要中文名:
你可以做个映射表:
js复制编辑const nameMap = {
'摄像头': '相机',
'房间': '房间',
'监测范围': '监测范围'
}
const icons = ref(Object.entries(iconModules).map(([path, src]) => {
const filename = path.split('/').pop().replace('.png', '')
return {
type: filename,
name: nameMap[filename] || filename,
src,
loaded: false
}
}))
📝 注意:
确保 vite.config.js 中未禁用 glob 功能(默认是启用的),并确保路径是 @/assets/... 这种形式,Vite 支持别名 @ -> src。
3.为实现目的
关键技术点解释:
-
HTML5 拖放 API:
-
draggable属性使元素可拖拽 -
dragstart事件设置拖拽数据 -
dragover和drop事件处理目标区域放置逻辑
-
-
Konva.js 集成:
-
使用
v-image组件渲染图标 -
通过
ref获取 Konva 舞台对象 -
计算鼠标坐标与舞台的相对位置
-
-
数据管理:
-
droppedIcons数组保存所有放置的图标 -
每个图标对象包含位置、尺寸和图像数据
-
响应式更新确保视图同步
-
-
示例代码:
<!DOCTYPE html> <html lang="zh-CN"> <head> <meta charset="UTF-8"> <meta name="viewport" content="width=device-width, initial-scale=1.0"> <title>极简拖拽示例</title> <script src="https://cdn.jsdelivr.net/npm/konva@8.4.2/konva.min.js"></script> <style> body { margin: 0; overflow: hidden; } .container { display: flex; height: 100vh; } .sidebar { width: 100px; background: #f0f0f0; padding: 10px; } .canvas-container { flex: 1; background: #f9f9f9; } .draggable { cursor: move; padding: 10px; margin: 5px; background: white; border: 1px solid #ddd; text-align: center; } .dragging { opacity: 0.5; } .drop-area { border: 2px dashed transparent; } .drop-area.drag-over { border-color: #3B82F6; } </style> </head> <body> <div class="container"> <!-- 左侧图标栏 --> <div class="sidebar"> <div class="draggable" draggable="true" data-type="camera">摄像头</div> <div class="draggable" draggable="true" data-type="room">房间</div> <div class="draggable" draggable="true" data-type="area">监测范围</div> </div> <!-- 右侧画布 --> <div id="canvas-container" class="canvas-container drop-area"></div> </div> <script> // 初始化Konva舞台 const stage = new Konva.Stage({ container: 'canvas-container', width: window.innerWidth - 100, height: window.innerHeight }); const layer = new Konva.Layer(); stage.add(layer); // 当前拖拽的元素类型 let draggedType = null; // 设置拖拽源事件 document.querySelectorAll('.draggable').forEach(item => { item.addEventListener('dragstart', (e) => { draggedType = e.target.dataset.type; e.dataTransfer.setData('text/plain', draggedType); e.target.classList.add('dragging'); }); item.addEventListener('dragend', (e) => { e.target.classList.remove('dragging'); }); }); // 设置目标区域事件 const dropArea = document.getElementById('canvas-container'); dropArea.addEventListener('dragover', (e) => { e.preventDefault(); dropArea.classList.add('drag-over'); }); dropArea.addEventListener('dragleave', (e) => { if (!dropArea.contains(e.relatedTarget)) { dropArea.classList.remove('drag-over'); } }); dropArea.addEventListener('drop', (e) => { e.preventDefault(); dropArea.classList.remove('drag-over'); if (!draggedType) return; // 计算相对于舞台的坐标 const rect = stage.container().getBoundingClientRect(); const x = e.clientX - rect.left; const y = e.clientY - rect.top; // 创建对应的图形 createShape(draggedType, x, y); draggedType = null; }); // 创建图形 function createShape(type, x, y) { let shape; // 根据类型创建不同形状 switch(type) { case 'camera': shape = new Konva.Rect({ x: x - 25, y: y - 25, width: 50, height: 50, fill: '#3B82F6', draggable: true }); break; case 'room': shape = new Konva.Circle({ x: x, y: y, radius: 30, fill: '#10B981', draggable: true }); break; case 'area': shape = new Konva.RegularPolygon({ x: x, y: y, sides: 3, radius: 30, fill: '#F59E0B', draggable: true }); break; } if (shape) { // 添加到图层 layer.add(shape); layer.draw(); // 为形状添加拖拽事件 shape.on('dragend', function() { console.log(`${type} 移动到:`, this.position()); }); } } </script> </body> </html>
运行结果: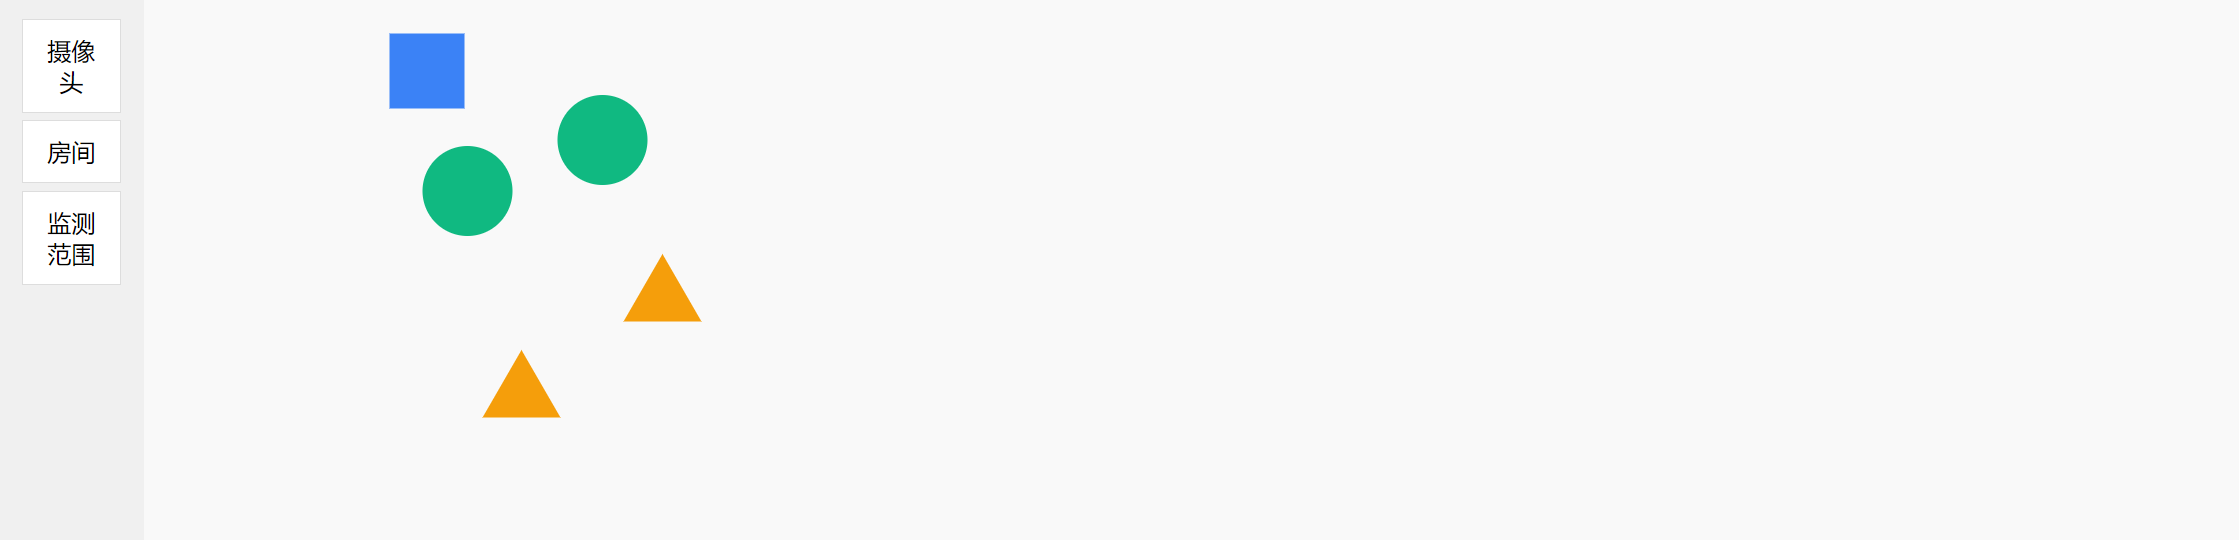

腾讯云面向开发者汇聚海量精品云计算使用和开发经验,营造开放的云计算技术生态圈。
更多推荐
 21
21 0
0- 0


 已为社区贡献1条内容

所有评论(0)