使用神经网络进行鸢尾花分类
前言
提醒:
文章内容为方便作者自己后日复习与查阅而进行的书写与发布,其中引用内容都会使用链接表明出处(如有侵权问题,请及时联系)。
其中内容多为一次书写,缺少检查与订正,如有问题或其他拓展及意见建议,欢迎评论区讨论交流。
神经网络相关资料
基本代码
import numpy as np
from sklearn.datasets import load_iris
from sklearn.model_selection import train_test_split
from keras.models import Sequential
from keras.layers import Dense
from keras.utils import to_categorical

# 加载鸢尾花数据集
iris = load_iris()
X = iris.data
y = iris.target

# 数据预处理,将标签进行独热编码
y = to_categorical(y)

# 划分训练集和测试集
X_train, X_test, y_train, y_test = train_test_split(X, y, test_size=0.2, random_state=42)

# 构建神经网络模型
model = Sequential()
model.add(Dense(10, input_dim=4, activation='relu'))
model.add(Dense(3, activation='softmax'))

# 编译模型
model.compile(loss='categorical_crossentropy', optimizer='adam', metrics=['accuracy'])

# 训练模型
model.fit(X_train, y_train, epochs=50, batch_size=16, verbose=1)

# 评估模型
loss, accuracy = model.evaluate(X_test, y_test)
print(f"测试集损失: {loss}")
print(f"测试集准确率: {accuracy}")
代码分析
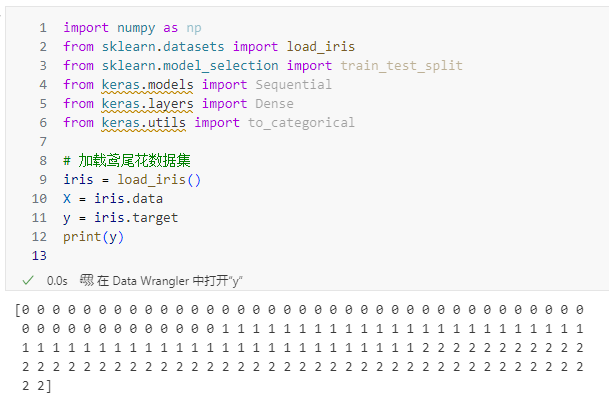
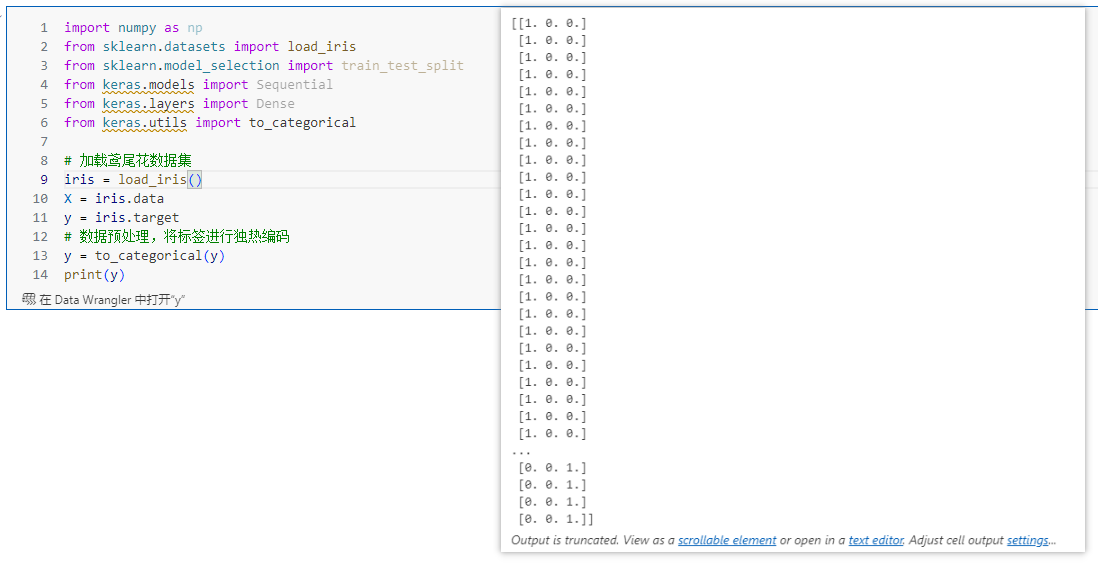
y = to_categorical(y)
y的输出:
将标签进行独热编码,y的输出:
构建神经网络,model = Sequential()
# 划分训练集和测试集
X_train, X_test, y_train, y_test = train_test_split(X, y, test_size=0.2, random_state=42)
# 构建神经网络模型
model = Sequential()
model.add(Dense(10, input_dim=4, activation='relu'))
model.add(Dense(3, activation='softmax'))
# 编译模型
model.compile(loss='categorical_crossentropy', optimizer='adam', metrics=['accuracy'])
# 训练模型
model.fit(X_train, y_train, epochs=50, batch_size=16, verbose=1)
在 Python 的 Keras(TensorFlow/Keras) 中,除了 Sequential() 模型,还有其他多种构建神经网络的方式。以下是完整的分类和列举:
1. Sequential 模型(顺序模型)
- 特点:最简单的线性堆叠模型,逐层添加。
- 适用场景:单输入单输出、简单的全连接网络或 CNN/RNN。
from keras.models import Sequential
model = Sequential()
model.add(Dense(64, activation='relu'))
2. Functional API(函数式 API)
- 特点:支持多输入多输出、共享层、分支结构等复杂模型。
- 适用场景:ResNet、Inception 等复杂架构。
from keras.models import Model
from keras.layers import Input, Dense

inputs = Input(shape=(784,))
x = Dense(64, activation='relu')(inputs)
outputs = Dense(10, activation='softmax')(x)
model = Model(inputs=inputs, outputs=outputs)
3. 子类化模型(Model Subclassing)
- 特点:通过继承
keras.Model类自定义模型,完全灵活。 - 适用场景:需要动态调整前向传播逻辑(如自定义循环、条件分支)。
from keras.models import Model
from keras.layers import Dense

class MyModel(Model):
    def __init__(self):
        super().__init__()
        self.dense1 = Dense(64, activation='relu')
        self.dense2 = Dense(10, activation='softmax')

    def call(self, inputs):
        x = self.dense1(inputs)
        return self.dense2(x)

model = MyModel()
4. 预训练模型(Pre-trained Models)
- 特点:直接加载预训练权重(如 ImageNet 上训练的模型)。
- 适用场景:迁移学习(图像分类、特征提取等)。
from keras.applications import ResNet50

model = ResNet50(weights='imagenet', include_top=False)
5. 自定义层(Custom Layers)
- 特点:通过继承
keras.layers.Layer自定义层逻辑。 - 适用场景:实现特殊操作(如自定义激活函数、注意力机制)。
from keras.layers import Layer

class MyLayer(Layer):
    def __init__(self, units):
        super().__init__()
        self.units = units

    def build(self, input_shape):
        self.w = self.add_weight(shape=(input_shape[-1], self.units))

    def call(self, inputs):
        return tf.matmul(inputs, self.w)

model = Sequential([MyLayer(64)])
6. 混合模型(Hybrid Models)
- 特点:结合 Sequential、Functional API 或子类化模型。
- 适用场景:模块化设计(如共享特征提取器 + 独立分类头)。
# 用 Functional API 构建共享层
shared_layer = Dense(64, activation='relu')
branch1 = shared_layer(inputs1)
branch2 = shared_layer(inputs2)
7. 概率模型(Probabilistic Models)
- 特点:内置概率层(如
tf.keras.layers.GaussianNoise)或使用 TensorFlow Probability。 - 适用场景:贝叶斯神经网络、不确定性估计。
from keras.layers import GaussianNoise

model = Sequential([
    GaussianNoise(0.1),
    Dense(64, activation='relu')
])
8. 图神经网络(Graph Neural Networks, GNN)
- 特点:使用
tf_geometric或spektral等库构建。 - 适用场景:社交网络、分子结构等图数据。
# 需安装 spektral 库
from spektral.layers import GCNConv

class GNNModel(Model):
    def __init__(self):
        super().__init__()
        self.conv1 = GCNConv(64)
总结
| 模型类型 | 关键类/方法 | 灵活性 | 适用场景 |
|---|---|---|---|
| Sequential | keras.models.Sequential | 低 | 简单堆叠网络 |
| Functional API | keras.models.Model | 中 | 多输入输出、复杂架构 |
| Model Subclassing | 继承 keras.Model | 高 | 完全自定义逻辑 |
| Pre-trained Models | keras.applications.* | 低 | 迁移学习 |
| Custom Layers | 继承 keras.layers.Layer | 高 | 自定义层操作 |
| Hybrid Models | 混合使用上述方法 | 高 | 模块化设计 |
| Probabilistic Models | tensorflow_probability | 中 | 不确定性建模 |
| GNN | spektral/tf_geometric | 高 | 图结构数据 |
根据需求选择合适的模型构建方式:
- 简单任务 →
Sequential - 复杂架构 →
Functional API或Model Subclassing - 迁移学习 → 预训练模型
- 研究创新 → 自定义层或子类化模型。
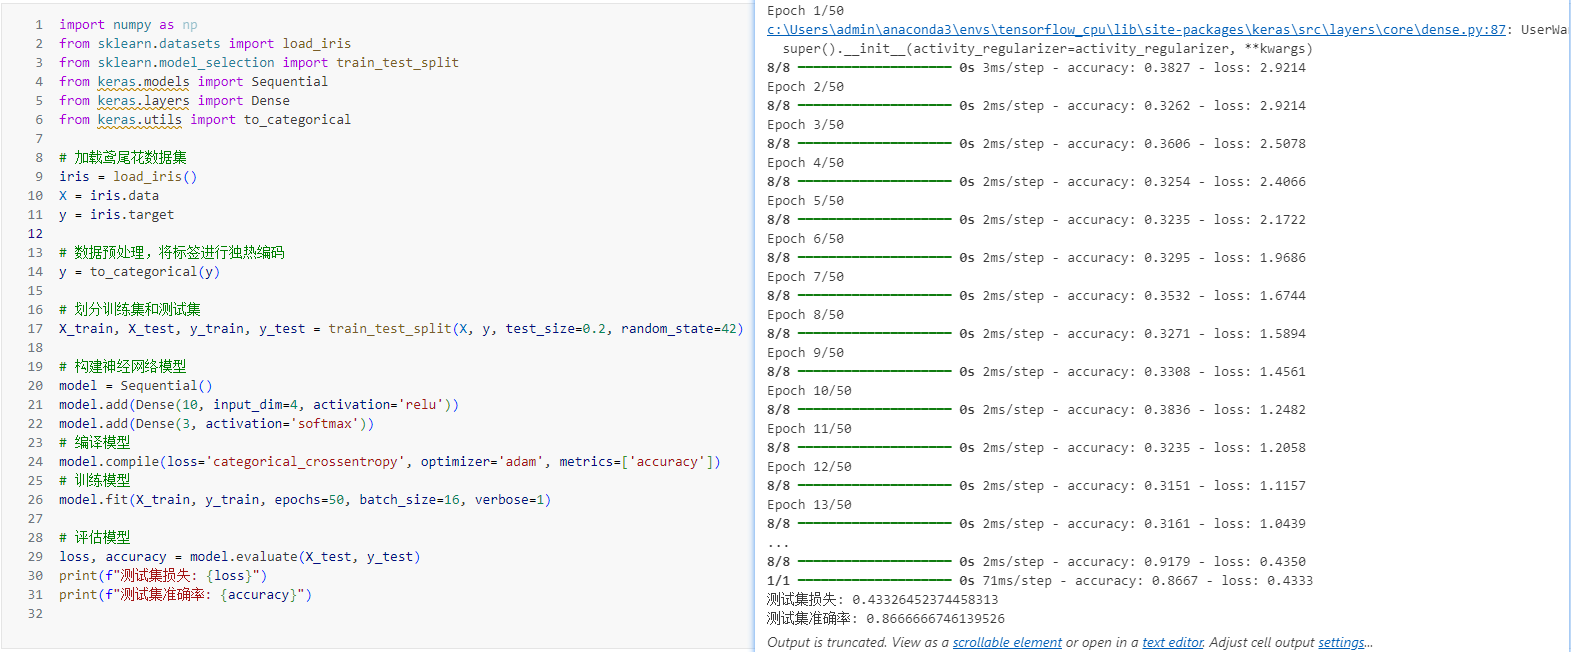
代码运行实例
运行结果:
神经网络结构分析
你提供的代码构建了一个简单的 全连接神经网络(Feedforward Neural Network),用于解决鸢尾花数据集的分类问题(3个类别)。
使用函数model.summary()进行查看
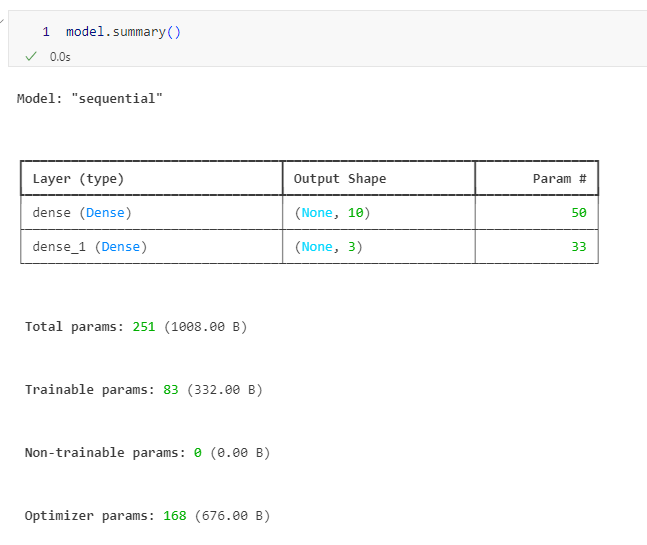
以下是逐层分析:
1. 输入层(Input Layer)
- 隐含定义:通过
input_dim=4指定输入特征维度为 4(对应鸢尾花的 4 个特征:花萼长/宽、花瓣长/宽)。 - 数据流:输入形状为
(batch_size, 4),无需显式定义Input层(Sequential 模型自动处理)。
2. 第一个隐藏层(Hidden Layer 1)
model.add(Dense(10, input_dim=4, activation='relu'))
- 类型:全连接层(
Dense)。 - 神经元数量:10 个。
- 激活函数:ReLU(
relu),解决线性不可分问题。 - 参数计算:
- 权重矩阵
W形状:(4, 10)(输入 4 维 → 输出 10 维)。 - 偏置向量
b形状:(10,)。 - 总参数量:
4*10 + 10 = 50。
- 权重矩阵
3. 输出层(Output Layer)
model.add(Dense(3, activation='softmax'))
- 类型:全连接层(
Dense)。 - 神经元数量:3 个(对应鸢尾花的 3 个类别)。
- 激活函数:Softmax(
softmax),将输出转换为概率分布(多分类任务)。 - 参数计算:
- 权重矩阵
W形状:(10, 3)(前一隐藏层 10 维 → 输出 3 维)。 - 偏置向量
b形状:(3,)。 - 总参数量:
10*3 + 3 = 33。
- 权重矩阵
网络结构总结
| 层类型 | 输出形状 | 激活函数 | 参数量 | 作用 |
|---|---|---|---|---|
| 输入层 | (batch_size, 4) | - | 0 | 接收 4 维特征 |
| 隐藏层(Dense) | (batch_size, 10) | ReLU | 50 | 特征非线性变换 |
| 输出层(Dense) | (batch_size, 3) | Softmax | 33 | 输出类别概率 |
- 总参数量:
50 + 33 = 83。 - 输出意义:每个样本输出 3 个概率值(如
[0.1, 0.7, 0.2]),表示属于 3 个类别的概率。
补充说明
-
为什么使用 ReLU?
- 解决梯度消失问题,加速收敛(相比 Sigmoid/Tanh)。
-
为什么使用 Softmax?
- 多分类任务需要输出概率分布,Softmax 确保所有输出值之和为 1。
网络优化
多层感知机
原代码:
# 划分训练集和测试集
X_train, X_test, y_train, y_test = train_test_split(X, y, test_size=0.2, random_state=42)
#构建神经网络模型
model = Sequential()
model.add(Dense(20, input_dim=4, activation='relu'))
model.add(Dense(3, activation='softmax'))
#编译模型
model.compile(loss='categorical_crossentropy', optimizer='adam', metrics=['accuracy'])
#训练模型
model.fit(X_train, y_train, epochs=50, batch_size=16, verbose=1)
运行结果:
测试集损失: 0.5125355124473572
测试集准确率: 0.8666666746139526
增加隐藏层:
#构建神经网络模型
model = Sequential()
model.add(Dense(16, input_dim=4, activation='relu'))
model.add(Dense(12, activation='relu'))
model.add(Dense(8, activation='relu'))
model.add(Dense(3, activation='softmax'))
网络结构:
以下是你提供的神经网络模型的结构总结,以 Markdown 表格的形式呈现:
| 层类型 | 输出形状 | 激活函数 | 参数量 | 作用 |
|---|---|---|---|---|
| 输入层 | (batch_size, 4) | - | 0 | 接收 4 维特征 |
| 隐藏层 1(Dense) | (batch_size, 16) | ReLU | 80 | 特征非线性变换 |
| 隐藏层 2(Dense) | (batch_size, 12) | ReLU | 204 | 特征非线性变换 |
| 隐藏层 3(Dense) | (batch_size, 8) | ReLU | 104 | 特征非线性变换 |
| 输出层(Dense) | (batch_size, 3) | Softmax | 27 | 输出类别概率 |
- 该网络由 4 个层组成,包含 3 个隐藏层和 1 个输出层,适合用于多分类任务(如鸢尾花分类)。每个隐藏层使用 ReLU 激活函数,输出层使用 Softmax 激活函数以输出类别概率。
运行结果:
测试集损失: 0.18599386513233185
测试集准确率: 1.0
卷积神经网络(CNN)
原代码:
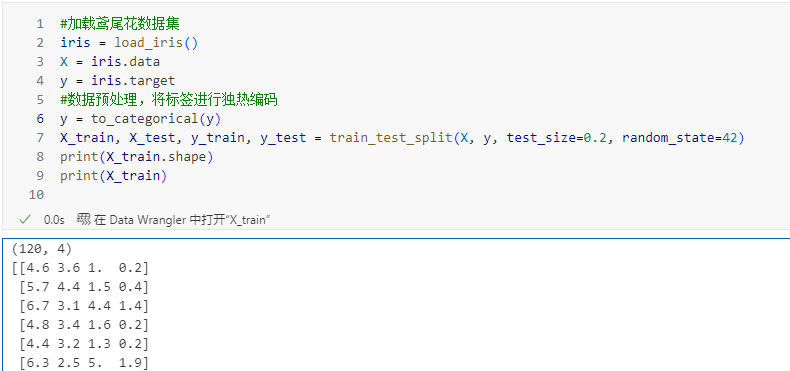
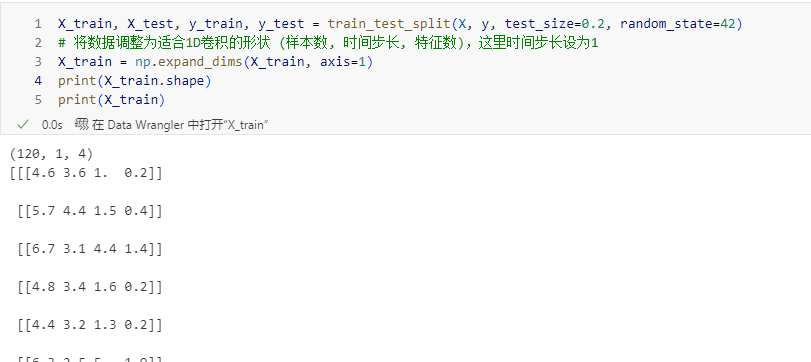
#将数据调整为适合1D卷积的形状 (样本数, 时间步长, 特征数),这里时间步长设为1
X_train = np.expand_dims(X_train, axis=1)
X_test = np.expand_dims(X_test, axis=1)

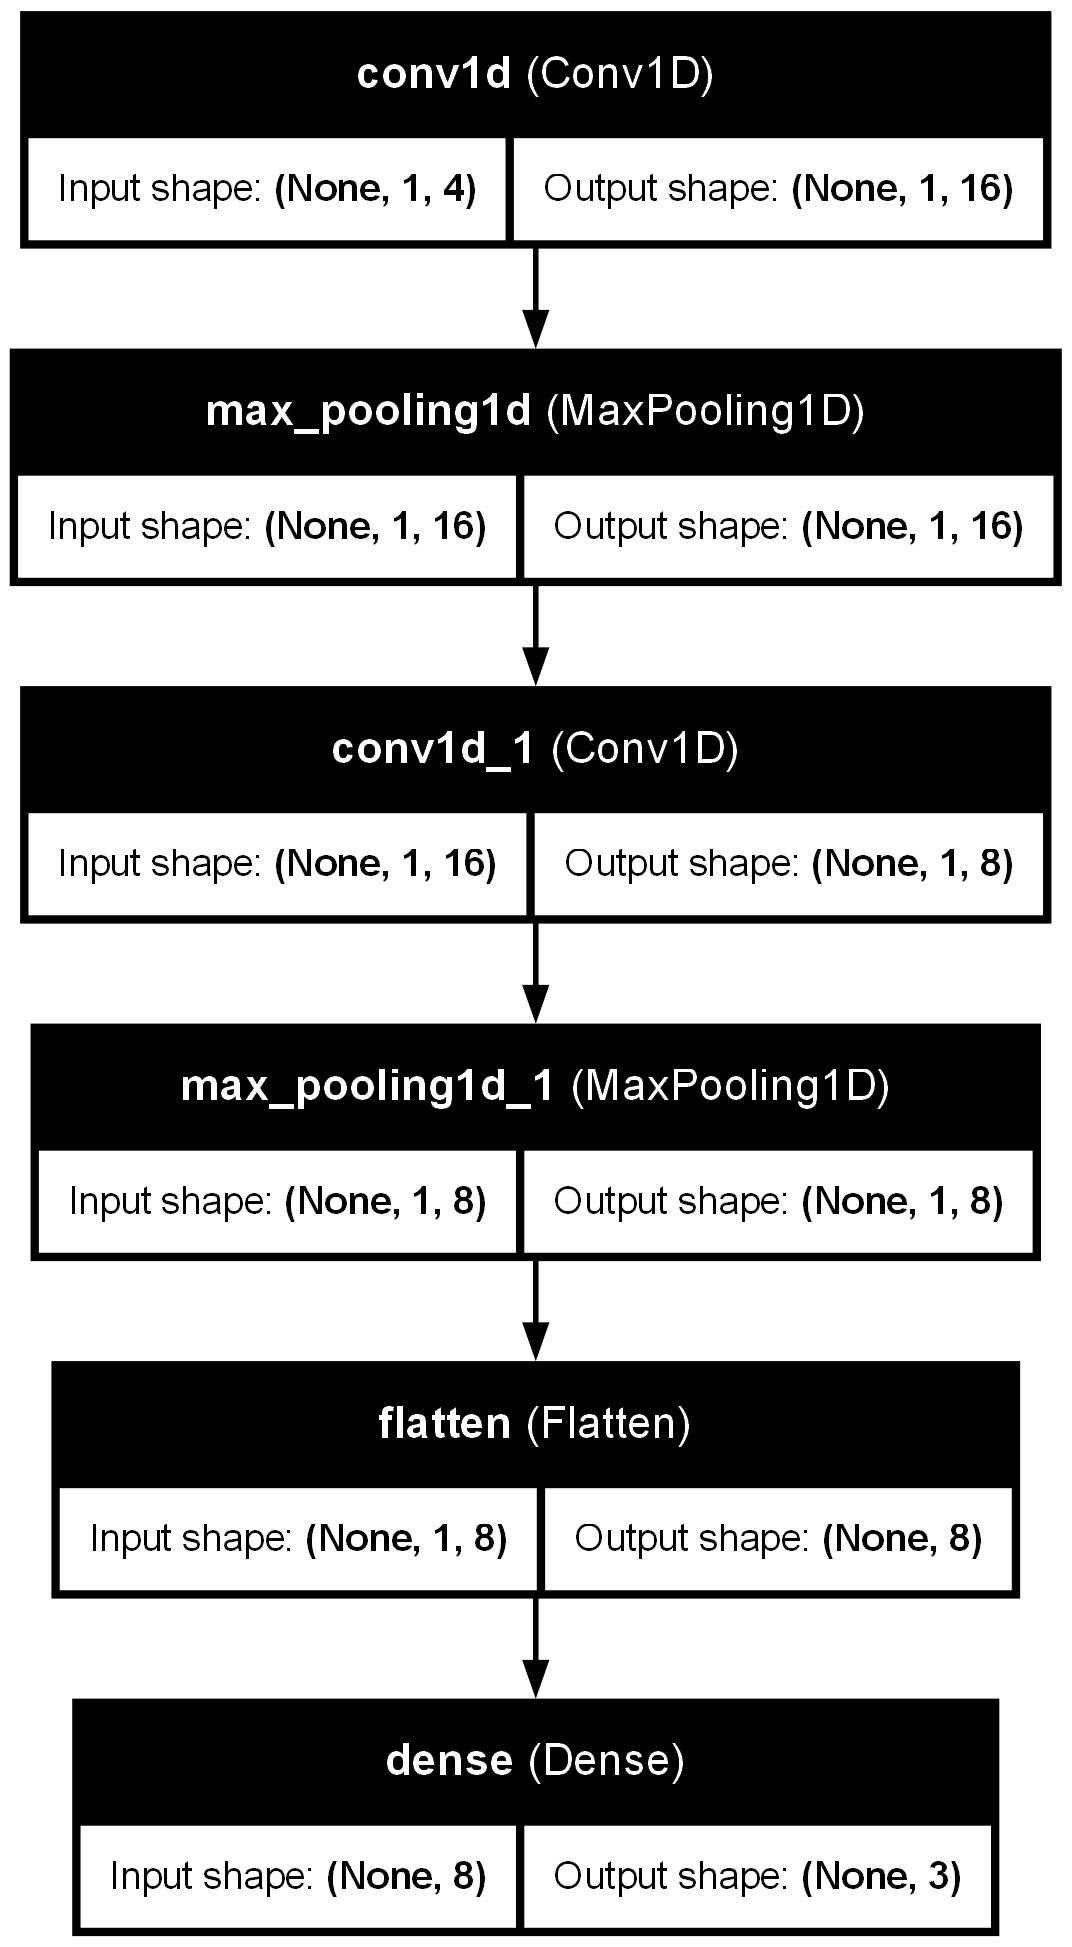
#构建神经网络模型
model = Sequential()
model.add(Conv1D(16, kernel_size=1, activation='relu', input_shape=(1, 4)))
model.add(MaxPooling1D(pool_size=1))
model.add(Conv1D(8, kernel_size=1, activation='relu'))
model.add(MaxPooling1D(pool_size=1))
model.add(Flatten())
model.add(Dense(3, activation='softmax'))
#编译模型
model.compile(loss='categorical_crossentropy', optimizer='adam', metrics=['accuracy'])
np.expand_dims(X_train, axis=1)解析:
- np.expand_dims(arr, axis)
- arr: 要操作的 NumPy 数组
- axis: 指定在哪个位置插入新维度(从 0 开始)
网络结构分析:
推荐几个网络可视化的网站:
几个卷积神经网络(CNN)可视化的网站
运行结果:
测试集损失: 0.5125355124473572
测试集准确率: 0.8666666746139526
多次运行结构准确率不稳定:
使用CNN神经网络分析鸢尾花数据集时,准确率不稳定
循环神经网络(RNN)
原代码:
import numpy as np
from sklearn.datasets import load_iris
from sklearn.model_selection import train_test_split
from tensorflow.keras.models import Sequential
from tensorflow.keras.layers import Dense, SimpleRNN
from tensorflow.keras.utils import to_categorical

#加载鸢尾花数据集
iris = load_iris()
X = iris.data
y = iris.target

#数据预处理,将标签进行独热编码
y = to_categorical(y)

#划分训练集和测试集
X_train, X_test, y_train, y_test = train_test_split(X, y, test_size=0.2, random_state=42)
#将数据调整为适合RNN的形状 (样本数, 时间步长, 特征数),这里时间步长设为1
X_train = np.expand_dims(X_train, axis=1)
X_test = np.expand_dims(X_test, axis=1)

#构建神经网络模型
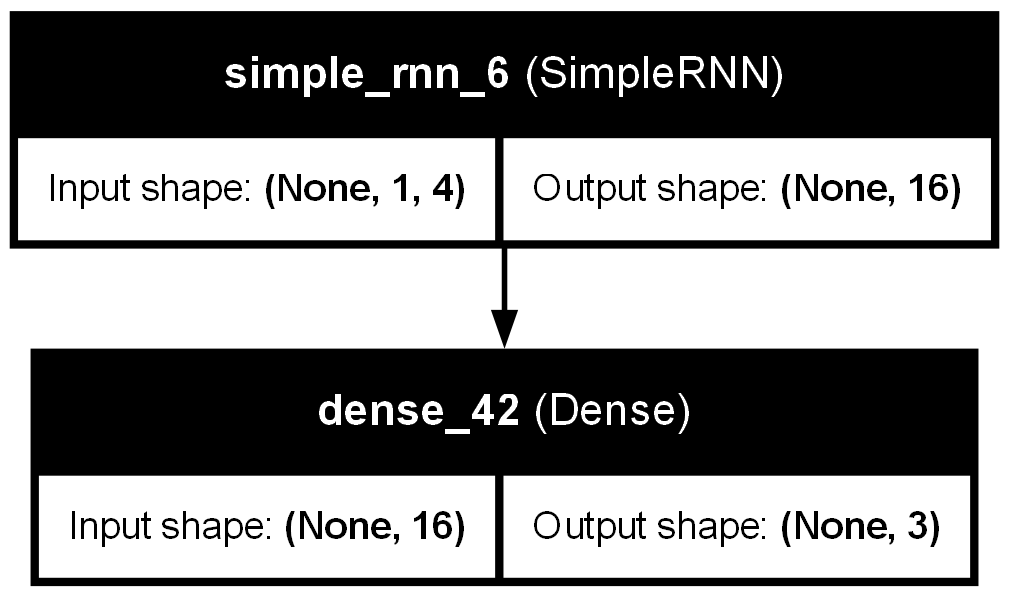
model = Sequential()
model.add(SimpleRNN(16, input_shape=(1, 4), activation='relu'))
model.add(Dense(3, activation='softmax'))

#编译模型
model.compile(loss='categorical_crossentropy', optimizer='adam', metrics=['accuracy'])

#训练模型
model.fit(X_train, y_train, epochs=50, batch_size=16, verbose=1)

#评估模型
loss, accuracy = model.evaluate(X_test, y_test)
print(f"测试集损失: {loss}")
print(f"测试集准确率: {accuracy}")
网络结构分析:
运行结果:
测试集损失: 0.3807409703731537
测试集准确率: 0.9666666388511658

腾讯云面向开发者汇聚海量精品云计算使用和开发经验,营造开放的云计算技术生态圈。
更多推荐
 19
19 0
0- 0


 已为社区贡献3条内容

所有评论(0)