Three.js实现智慧城市效果
·
Three.js实现智慧城市效果
https://threehub.cn/#/codeMirror?navigation=ThreeJS&classify=shader&id=buildGradient
在这里插入图片描述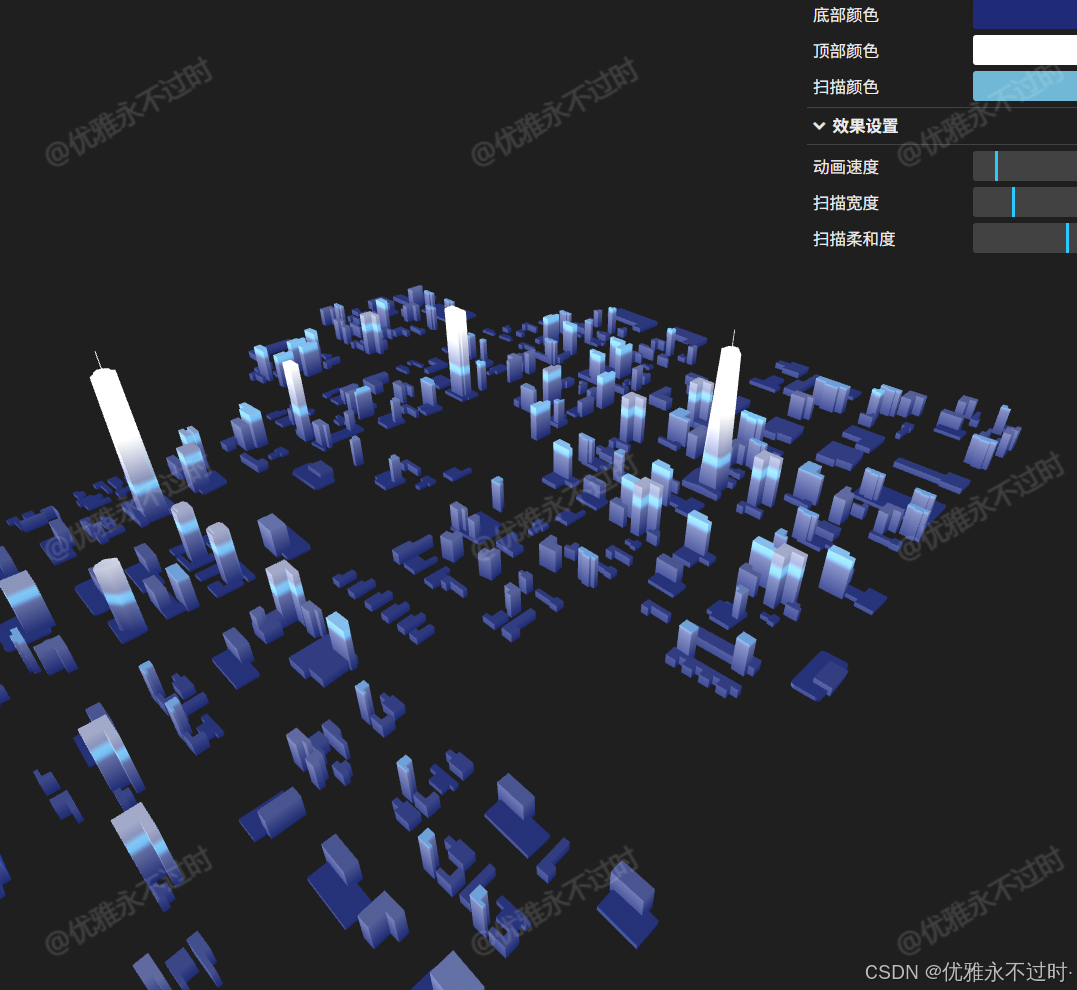
import * as THREE from 'three'
import { OrbitControls } from 'three/examples/jsm/controls/OrbitControls.js'
import { GLTFLoader } from 'three/examples/jsm/loaders/GLTFLoader.js'
import { GUI } from 'three/examples/jsm/libs/lil-gui.module.min.js'
const box = document.getElementById('box')
const scene = new THREE.Scene()
const camera = new THREE.PerspectiveCamera(75, box.clientWidth / box.clientHeight, 0.1, 100000)
camera.position.set(1, 1, 1)
const renderer = new THREE.WebGLRenderer({ antialias: true, alpha: true , logarithmicDepthBuffer: true })
renderer.setSize(box.clientWidth, box.clientHeight)
renderer.setPixelRatio(window.devicePixelRatio)
box.appendChild(renderer.domElement)
new OrbitControls(camera, renderer.domElement)
const shaderMaterial = new THREE.ShaderMaterial({
vertexShader: `
uniform vec3 uColorBottom;
uniform vec3 uColorTop;
uniform float uMinY;
uniform float uMaxY;
uniform float uTime;
varying vec3 vColor;
varying vec2 vUv;
varying vec3 vNormal;
varying vec3 vPosition;
void main() {
// 设置UV坐标,类似原始着色器中的缩放方式
vUv = vec2(position.x / 80.0, position.y / 250.0);
vNormal = normalize(normalMatrix * normal);
vPosition = position;
// 基础渐变效果
float factor = smoothstep(uMinY, uMaxY, position.y);
vColor = mix(uColorBottom, uColorTop, factor);
gl_Position = projectionMatrix * modelViewMatrix * vec4(position, 1.0);
}`,
fragmentShader: `
uniform vec3 uColorBottom;
uniform vec3 uColorTop;
uniform vec3 uSweepColor;
uniform float uTime;
uniform vec3 uLightDir;
uniform float uScanWidth;
uniform float uScanSoftness;
varying vec3 vColor;
varying vec2 vUv;
varying vec3 vNormal;
varying vec3 vPosition;
// 随机函数,与原始着色器相同
float random(vec2 st) {
return fract(sin(dot(st.xy, vec2(12.9898, 78.233))) * 43758.5453123);
}
// 叠加混合函数 - 让扫描颜色与基础渐变叠加
vec3 blendOverlay(vec3 base, vec3 blend) {
vec3 result;
result.r = (base.r < 0.5) ? (2.0 * base.r * blend.r) : (1.0 - 2.0 * (1.0 - base.r) * (1.0 - blend.r));
result.g = (base.g < 0.5) ? (2.0 * base.g * blend.g) : (1.0 - 2.0 * (1.0 - base.g) * (1.0 - blend.g));
result.b = (base.b < 0.5) ? (2.0 * base.b * blend.b) : (1.0 - 2.0 * (1.0 - base.b) * (1.0 - blend.b));
return result;
}
void main() {
// 基础颜色混合,基于Y坐标
vec3 originColor = mix(uColorBottom, uColorTop, vUv.y);
// 平滑的扫描波动效果
float scanPos = fract(uTime * 0.2); // 扫描位置 (0-1循环)
float scanLine = 1.0 - abs(vUv.y - scanPos) / uScanWidth;
scanLine = smoothstep(0.0, uScanSoftness, scanLine);
// 计算扫描颜色 - 简化处理,移除彩虹选项
vec3 finalSweepColor = uSweepColor;
// 添加轻微的噪声获得更自然的效果
float noise = random(vUv * 10.0 + uTime * 0.1) * 0.03 + 0.97;
// 计算最终扫描颜色
vec3 sweepColor = finalSweepColor * noise;
// 简化的光照效果
float diffuse = dot(normalize(uLightDir), vNormal);
diffuse = clamp(-diffuse, 0.0, 0.45);
// 应用最终效果 - 使用叠加混合而非简单混合
vec3 color = originColor;
// 叠加混合扫描效果 - 根据扫描线强度
vec3 overlayColor = blendOverlay(originColor, sweepColor);
color = mix(color, overlayColor, scanLine * 0.8);
// 添加额外的扫描光亮效果
color += sweepColor * scanLine * 0.2;
// 添加轻微边缘发光 - 也使用叠加效果
float edge = 1.0 - max(0.0, dot(vNormal, vec3(0.0, 0.0, 1.0)));
vec3 edgeColor = blendOverlay(originColor, sweepColor * edge);
color = mix(color, edgeColor, edge * 0.3);
// 添加发光效果
vec3 emissive = vec3(diffuse) * 0.5;
color += emissive;
gl_FragColor = vec4(color, 1.0);
}`,
uniforms: {
uColorBottom: { value: new THREE.Color(0x6373b6) },
uColorTop: { value: new THREE.Color(0xffffff) },
uSweepColor: { value: new THREE.Color(0xb1ddec) },
uMinY: { value: 0.0 }, uMaxY: { value: 1.0 }, uTime: { value: 0.0 },
uLightDir: { value: new THREE.Vector3(0.5, 0.5, 0.5).normalize() },
uScanWidth: { value: 0.1 }, uScanSoftness: { value: 0.8 }
},
transparent: true,
})
new GLTFLoader().load(`https://file.threehub.cn/` + 'models/whitebuild.glb', (gltf) => {
const model = gltf.scene;
const bounds = new THREE.Box3().setFromObject(model);
shaderMaterial.uniforms.uMinY.value = bounds.min.y;
shaderMaterial.uniforms.uMaxY.value = bounds.max.y;
model.traverse(child => { if (child.isMesh) child.material = shaderMaterial; });
scene.add(model);
});
function animate() {
requestAnimationFrame(animate);
shaderMaterial.uniforms.uTime.value += 0.01;
renderer.render(scene, camera);
}
animate()
window.onresize = () => {
renderer.setSize(box.clientWidth, box.clientHeight)
camera.aspect = box.clientWidth / box.clientHeight
camera.updateProjectionMatrix()
}
// 扩展GUI控制 - 移除彩虹选项
const gui = new GUI()
const colorFolder = gui.addFolder('颜色设置')
colorFolder.addColor(shaderMaterial.uniforms.uColorBottom, 'value').name('底部颜色')
colorFolder.addColor(shaderMaterial.uniforms.uColorTop, 'value').name('顶部颜色')
colorFolder.addColor(shaderMaterial.uniforms.uSweepColor, 'value').name('扫描颜色')
const effectsFolder = gui.addFolder('效果设置')
effectsFolder.add(shaderMaterial.uniforms.uTime, 'value', 0.001, 0.05).name('动画速度').onChange(value => {
animate = function() {
requestAnimationFrame(animate)
shaderMaterial.uniforms.uTime.value += value;
renderer.render(scene, camera)
}
})
effectsFolder.add(shaderMaterial.uniforms.uScanWidth, 'value', 0.001, 0.3).name('扫描宽度')
effectsFolder.add(shaderMaterial.uniforms.uScanSoftness, 'value', 0.1, 1.0).name('扫描柔和度')
/**
* 名称: 建筑渐变
* 作者: 优雅永不过时 https://z2586300277.github.io/
*/

腾讯云面向开发者汇聚海量精品云计算使用和开发经验,营造开放的云计算技术生态圈。
更多推荐
 2
2 0
0- 0



 已为社区贡献4条内容

所有评论(0)