macbook m芯片,使用buildx插件构建docker镜像
一、背景
当拉取docker镜像的时候,指定机器架构失效时,建议使用buildx解决多平台问题。
> docker pull --platform linux/amd64 node:22.12.0
22.12.0: Pulling from library/node
Digest: sha256:0e910f435308c36ea60b4cfd7b80208044d77a074d16b768a81901ce938a62dc
Status: Image is up to date for node:22.12.0
docker.io/library/node:22.12.0

> docker inspect --format='{{.Architecture}}' node:22.12.0
arm64
这大概率是因为镜像在拉取的时候,有缓存。
虽然后面你指定了–platform linux/amd64,但因为你已拉取镜像node:22.12.0的架构是arm64,所以你后面拉取的镜像即便指定为arm64也枉然。
解决办法:手动删除本地已拉取架构是arm64的镜像。
如果手动删除镜像,仍旧指定架构无效的话,则需要清理镜像数据。
注意:此操作会把本地所有的Image镜像彻底清除了。
再次拉取镜像,此次就符合需求了。

拉取原始镜像的问题解决了,但是构建多平台的镜像,也还是会遇到不同架构的烦恼。
-
错误的做法:
docker build -t node:22.12.0 . -
正确的做法:
docker build --platform linux/amd64 --no-cache -t node:22.12.0 .
二、buildx创建并启动多平台构建器
mac安装的docker desktop桌面版已默认安装了buildx,验证:
> docker buildx version
github.com/docker/buildx v0.22.0-desktop.1 b45d7a53aa26a5e76aae051acdb15775c0e178da
# 创建容器形式的构建器,支持 QEMU 模拟
> docker buildx create --name multi --driver docker-container --use
multi

# 首次会拉取 buildkit 镜像
> docker buildx inspect --bootstrap
[+] Building 64.7s (1/1) FINISHED
 => [internal] booting buildkit                                                                     64.6s
 => => pulling image moby/buildkit:buildx-stable-1                                                  64.3s
 => => creating container buildx_buildkit_multi0                                                     0.3s
Name:          multi
Driver:        docker-container
Last Activity: 2025-10-16 01:03:17 +0000 UTC

Nodes:
Name:     multi0
Endpoint: desktop-linux
Error:    Get "http://%2FUsers%2FZhuanz%2F.docker%2Frun%2Fdocker.sock/v1.48/containers/buildx_buildkit_multi0/json": context deadline exceeded
Zhuanz@zhuwenping xh-nodejs % docker buildx inspect --bootstrap
Name:          multi
Driver:        docker-container
Last Activity: 2025-10-16 01:03:17 +0000 UTC

Nodes:
Name:                  multi0
Endpoint:              desktop-linux
Status:                running
BuildKit daemon flags: --allow-insecure-entitlement=network.host
BuildKit version:      v0.25.1
Platforms:             linux/arm64, linux/amd64, linux/amd64/v2, linux/riscv64, linux/ppc64le, linux/s390x, linux/386, linux/arm/v7, linux/arm/v6
Labels:
 org.mobyproject.buildkit.worker.executor:         oci
 org.mobyproject.buildkit.worker.hostname:         9e3849ff68f8
 org.mobyproject.buildkit.worker.network:          host
 org.mobyproject.buildkit.worker.oci.process-mode: sandbox
 org.mobyproject.buildkit.worker.selinux.enabled:  false
 org.mobyproject.buildkit.worker.snapshotter:      overlayfs
GC Policy rule#0:
 All:            false
 Filters:        type==source.local,type==exec.cachemount,type==source.git.checkout
 Keep Duration:  48h0m0s
 Max Used Space: 488.3MiB
GC Policy rule#1:
 All:            false
 Keep Duration:  1440h0m0s
 Reserved Space: 9.313GiB
 Max Used Space: 93.13GiB
 Min Free Space: 188.1GiB
GC Policy rule#2:
 All:            false
 Reserved Space: 9.313GiB
 Max Used Space: 93.13GiB
 Min Free Space: 188.1GiB
GC Policy rule#3:
 All:            true
 Reserved Space: 9.313GiB
 Max Used Space: 93.13GiB
 Min Free Space: 188.1GiB
如果你在执行docker buildx inspect --bootstrap时报错,请不要怀疑,问题就是出在网络不通。
验证,本地镜像会多出moby/buildkit:
> docker images

REPOSITORY                            TAG               IMAGE ID       CREATED         SIZE
moby/buildkit                         buildx-stable-1   79cc6476ab1a   8 days ago      324MB
1、拉取docker镜像
如果是使用buildx拉取docker镜像,手动拉取 amd64 的 digest:
docker buildx imagetools inspect node:22.12.0
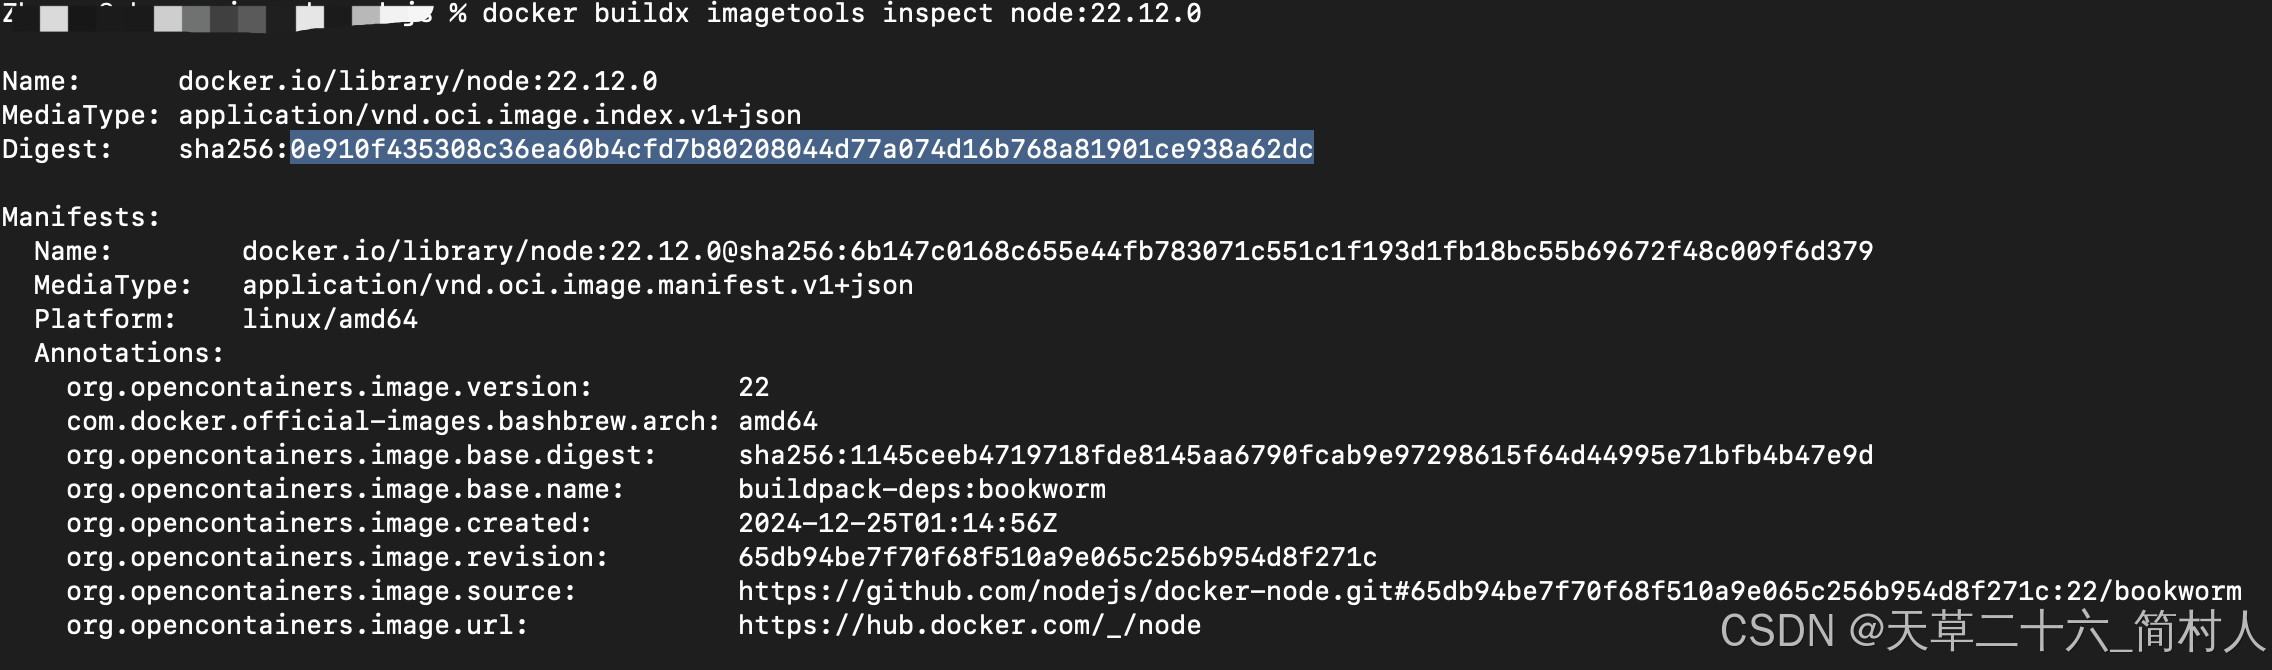
docker pull node:22.12.0@sha256:0e910f435308c36ea60b4cfd7b80208044d77a074d16b768a81901ce938a62dc
2、构建docker镜像
一键构建并推送docker镜像
docker buildx build --platform linux/amd64,linux/arm64 -t 192.168.5.6:8086/library/node:22.12.0 --push .
三、总结
第一、Dockerfile中的FROM原始镜像,如果架构不一致,就会报错。
第二、如果在macbook构建并推送镜像,未指定adm64架构,届时在jenkins的slave pod节点启动则会报错。
这里补充一些jenkins的信息:
jenkins集群是使用k8s搭建,一个slave节点对应一个pod,在模板中配置了容器及其镜像地址。

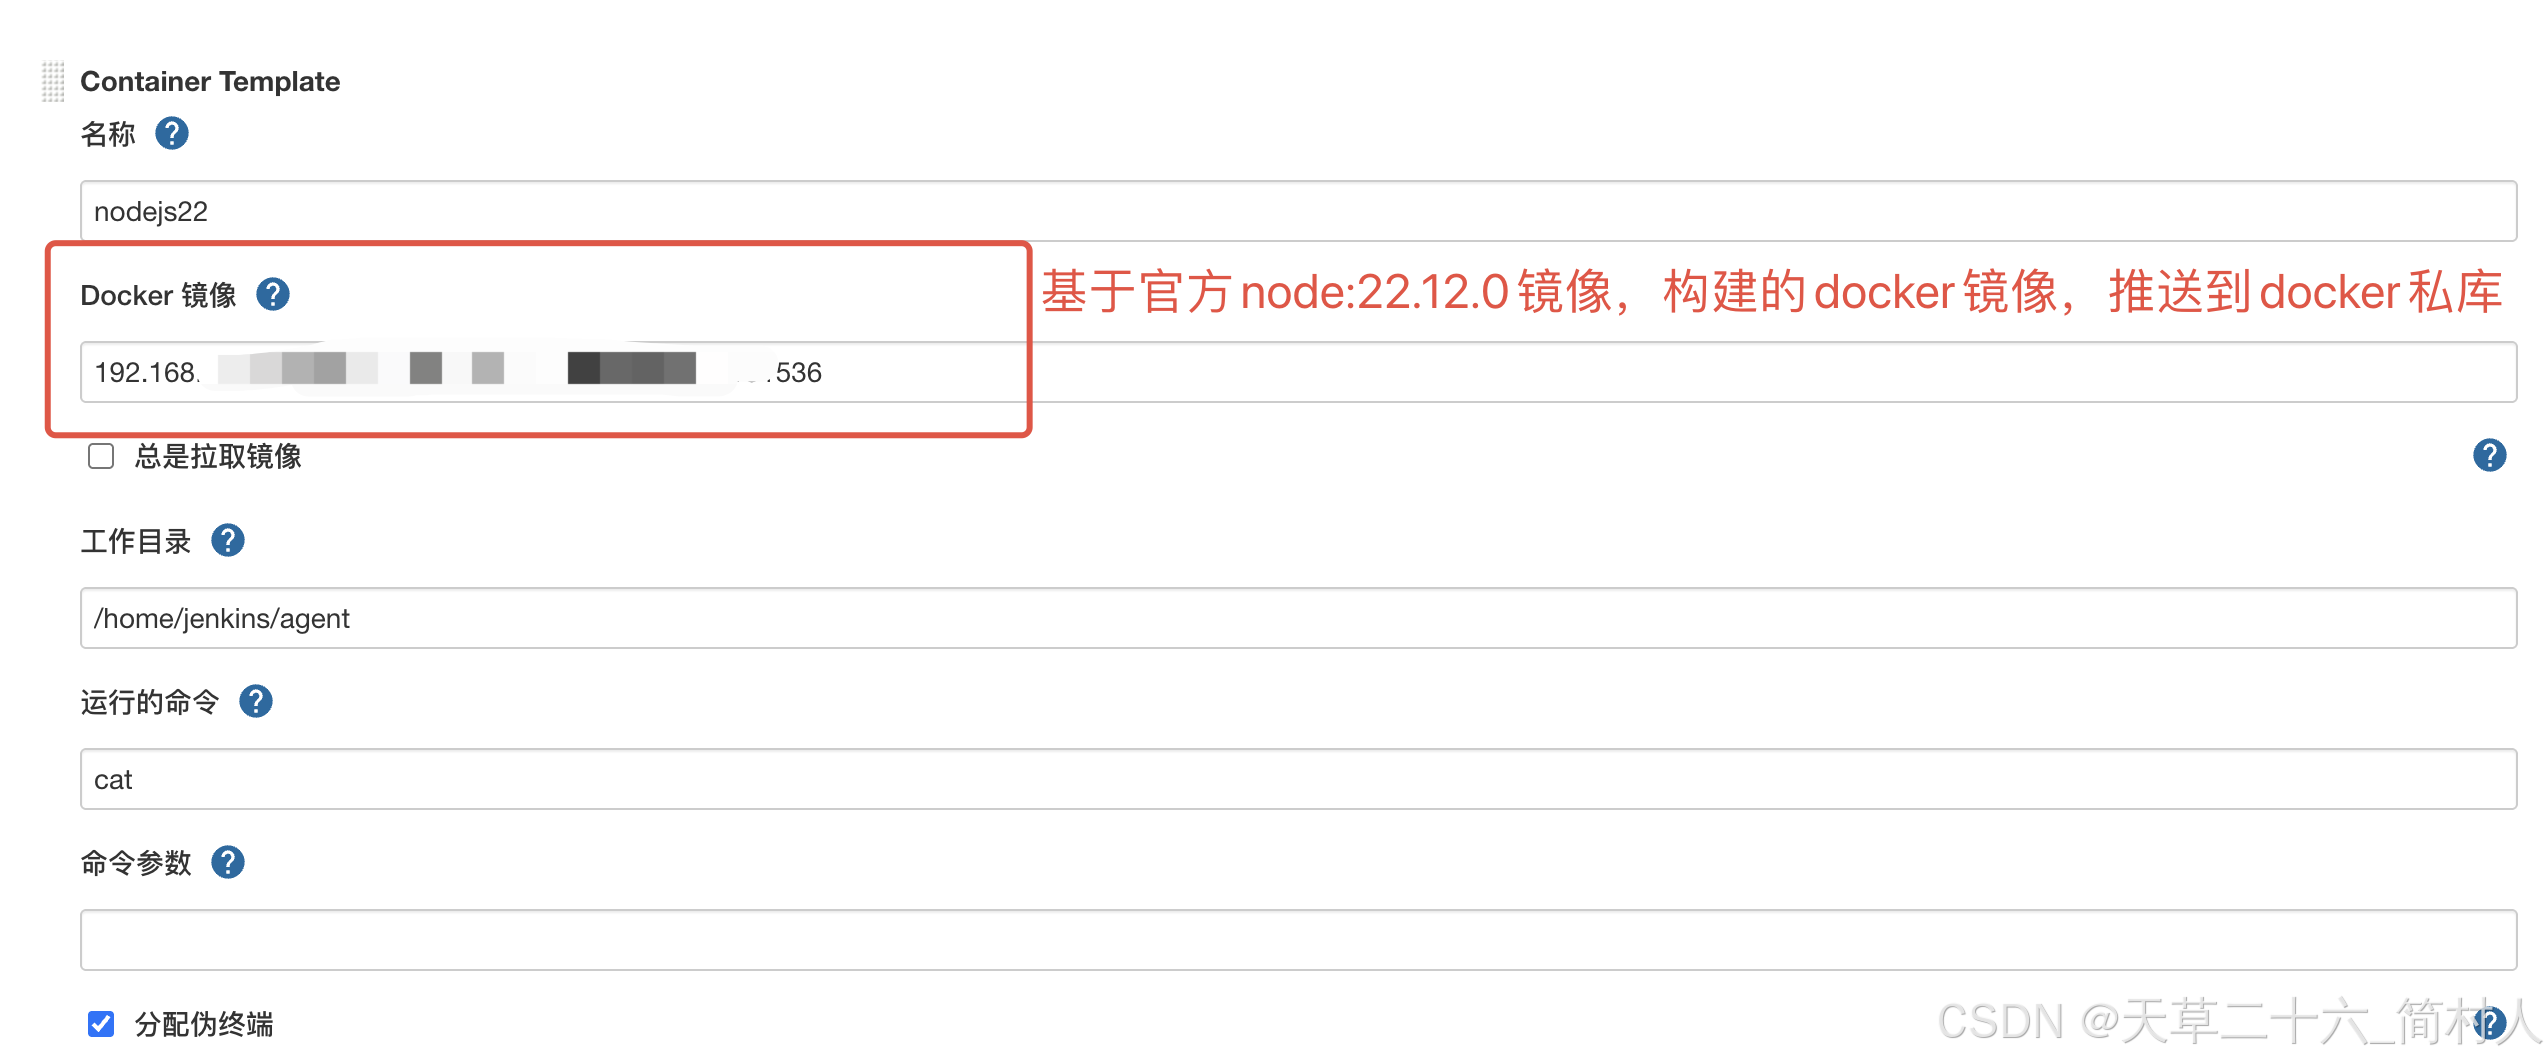
可是在创建pod的时候,报错如下;当更换为其他镜像后,就能正常创建Pod。
我怀疑是镜像地址不对,可是在本地又能成功拉取到该镜像。
Created Pod: kubernetes kubernetes-plugin/test-zty-h5-study-road-web-4-sfbgq-vv3wp-r1xft
kubernetes-plugin/test-zty-h5-study-road-web-4-sfbgq-vv3wp-r1xft Container nodejs22 was terminated (Exit Code: 1, Reason: Error)

- docker -- running
-----Logs-------------


- jnlp -- running
-----Logs-------------
Warning: JnlpProtocol3 is disabled by default, use JNLP_PROTOCOL_OPTS to alter the behavior
十月 15, 2025 3:20:33 下午 hudson.remoting.jnlp.Main createEngine
信息: Setting up agent: test-zty-h5-study-road-web-4-sfbgq-vv3wp-r1xft
十月 15, 2025 3:20:33 下午 hudson.remoting.jnlp.Main$CuiListener <init>
信息: Jenkins agent is running in headless mode.
十月 15, 2025 3:20:33 下午 hudson.remoting.Engine startEngine
信息: Using Remoting version: 3.29
十月 15, 2025 3:20:33 下午 org.jenkinsci.remoting.engine.WorkDirManager initializeWorkDir
信息: Using /home/jenkins/agent/remoting as a remoting work directory
Both error and output logs will be printed to /home/jenkins/agent/remoting
十月 15, 2025 3:20:33 下午 hudson.remoting.jnlp.Main$CuiListener status
信息: Locating server among [http://jenkins:18080/]
十月 15, 2025 3:20:33 下午 org.jenkinsci.remoting.engine.JnlpAgentEndpointResolver resolve
信息: Remoting server accepts the following protocols: [JNLP4-connect, Ping]
十月 15, 2025 3:20:33 下午 org.jenkinsci.remoting.engine.JnlpAgentEndpointResolver resolve
信息: Remoting TCP connection tunneling is enabled. Skipping the TCP Agent Listener Port availability check
十月 15, 2025 3:20:33 下午 hudson.remoting.jnlp.Main$CuiListener status
信息: Agent discovery successful
  Agent address: jenkins
  Agent port:    50000
  Identity:      a8:0e:71:ef:31:c8:dd:6d:8a:d0:ae:5a:ec:03:77:2b
十月 15, 2025 3:20:33 下午 hudson.remoting.jnlp.Main$CuiListener status
信息: Handshaking
十月 15, 2025 3:20:33 下午 hudson.remoting.jnlp.Main$CuiListener status
信息: Connecting to jenkins:50000
十月 15, 2025 3:20:33 下午 hudson.remoting.jnlp.Main$CuiListener status
信息: Trying protocol: JNLP4-connect
十月 15, 2025 3:20:33 下午 hudson.remoting.jnlp.Main$CuiListener status
信息: Remote identity confirmed: a8:0e:71:ef:31:c8:dd:6d:8a:d0:ae:5a:ec:03:77:2b


- nodejs16 -- running
-----Logs-------------


- nodejs22 -- terminated (1)
-----Logs-------------
standard_init_linux.go:211: exec user process caused "exec format error"
问题核心:镜像架构不匹配
尽管本地能拉取并运行该镜像,但 Kubernetes 集群中的节点架构可能与你本地不同,导致镜像在该节点上无法执行。
所以pod创建失败。

腾讯云面向开发者汇聚海量精品云计算使用和开发经验,营造开放的云计算技术生态圈。
更多推荐
 17
17 0
0- 0


 已为社区贡献25条内容

所有评论(0)