zabbix监控进程、日志、mysql主从
·
zabbix监控进程、日志、mysql主从
一、自定义监控进程(监控httpd服务)
1、下载httpd服务,查看其进程
[root@zabbix-agent ~]# yum -y install httpd
[root@zabbix-agent ~]# systemctl restart httpd
[root@zabbix-agent ~]# systemctl enable httpd
Created symlink from /etc/systemd/system/multi-user.target.wants/httpd.service to /usr/lib/systemd/system/httpd.service.
[root@zabbix-agent ~]# ps -ef | grep httpd
root      14627      1  0 18:10 ?        00:00:00 /usr/sbin/httpd -DFOREGROUND
apache    14629  14627  0 18:10 ?        00:00:00 /usr/sbin/httpd -DFOREGROUND
apache    14630  14627  0 18:10 ?        00:00:00 /usr/sbin/httpd -DFOREGROUND
apache    14631  14627  0 18:10 ?        00:00:00 /usr/sbin/httpd -DFOREGROUND
apache    14632  14627  0 18:10 ?        00:00:00 /usr/sbin/httpd -DFOREGROUND
apache    14633  14627  0 18:10 ?        00:00:00 /usr/sbin/httpd -DFOREGROUND
root      14664   9748  0 18:10 pts/0    00:00:00 grep --color=auto httpd
[root@zabbix-agent ~]# ps -ef | grep httpd | grep -v grep
root      14627      1  0 18:10 ?        00:00:00 /usr/sbin/httpd -DFOREGROUND
apache    14629  14627  0 18:10 ?        00:00:00 /usr/sbin/httpd -DFOREGROUND
apache    14630  14627  0 18:10 ?        00:00:00 /usr/sbin/httpd -DFOREGROUND
apache    14631  14627  0 18:10 ?        00:00:00 /usr/sbin/httpd -DFOREGROUND
apache    14632  14627  0 18:10 ?        00:00:00 /usr/sbin/httpd -DFOREGROUND
apache    14633  14627  0 18:10 ?        00:00:00 /usr/sbin/httpd -DFOREGROUND
[root@zabbix-agent ~]# ps -ef | grep httpd | grep -v grep | grep -c httpd
6
2、创建一个脚本判断进程是否启动(0为开启,1为关闭)
[root@zabbix-agent script]# vim check_httpd.sh
[root@zabbix-agent script]# cat check_httpd.sh
#!/bin/bash
count=$(ps -ef | grep -Ev "grep|$0" | grep -c httpd)
if [ $count -eq 0 ];then
	echo 1
else
	echo 0
fi
[root@zabbix-agent script]# chmod +x check_httpd.sh
[root@zabbix-agent script]# chown -R zabbix.zabbix /etc/zabbix/script/
[root@zabbix-agent script]# ./check_httpd.sh
0
3、修改zabbix_agentd.conf文件
[root@zabbix-agent ~]# vim /etc/zabbix/zabbix_agentd.conf

UserParameter=loginusers,who | wc -l
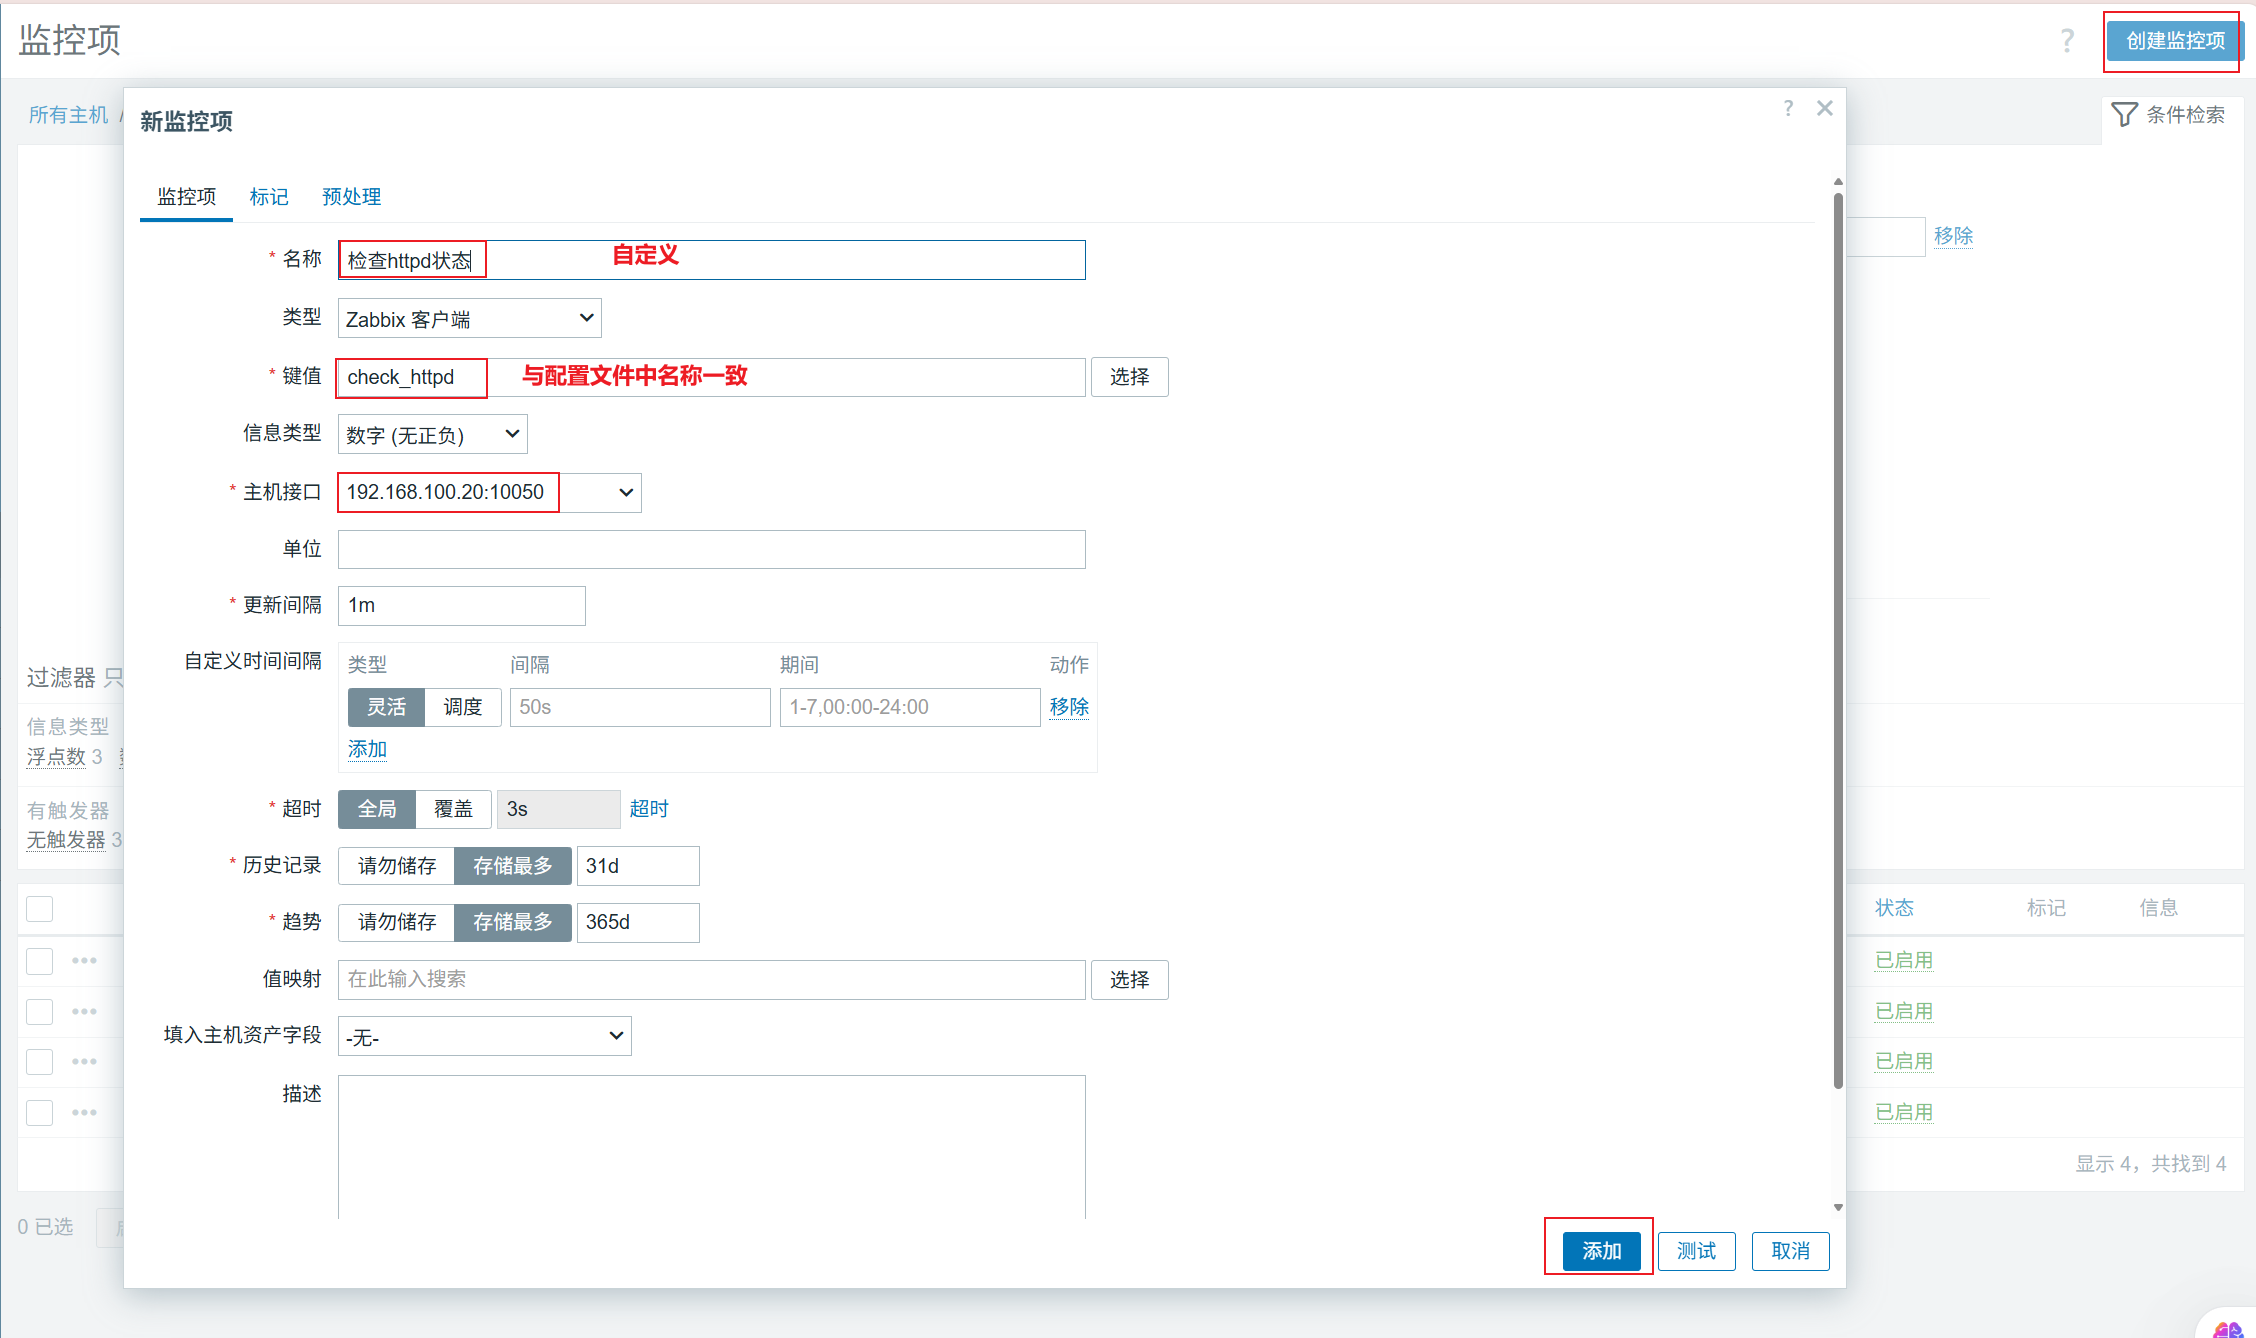
UserParameter=check_httpd,/bin/bash /etc/zabbix/script/check_httpd.sh
[root@zabbix-agent ~]# systemctl restart zabbix-agent.service
server端测试
[root@zabbix-server ~]# zabbix_get -s 192.168.100.20 -k check_httpd
0
将httpd服务关闭
[root@zabbix-agent ~]# systemctl stop httpd
[root@zabbix-agent script]# ./check_httpd.sh
1
server端测试
[root@zabbix-server ~]# zabbix_get -s 192.168.100.20 -k check_httpd
1
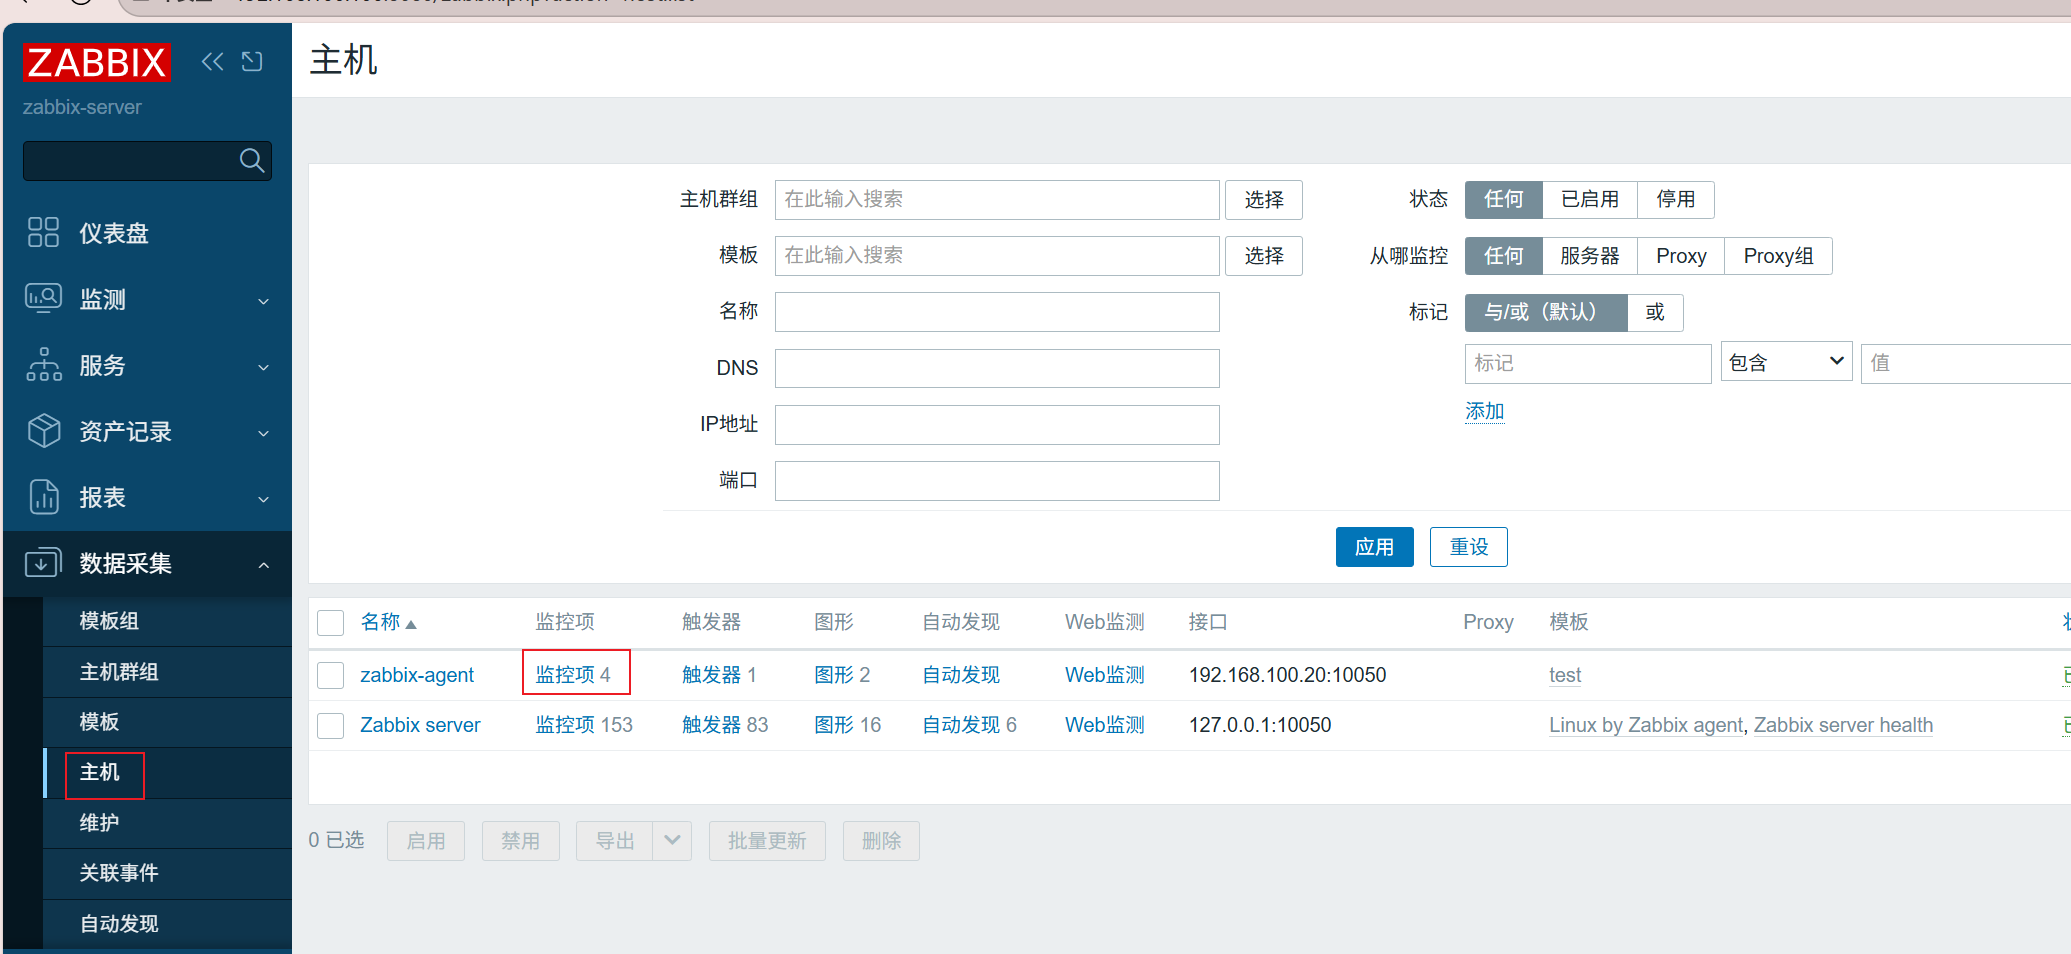
监控项
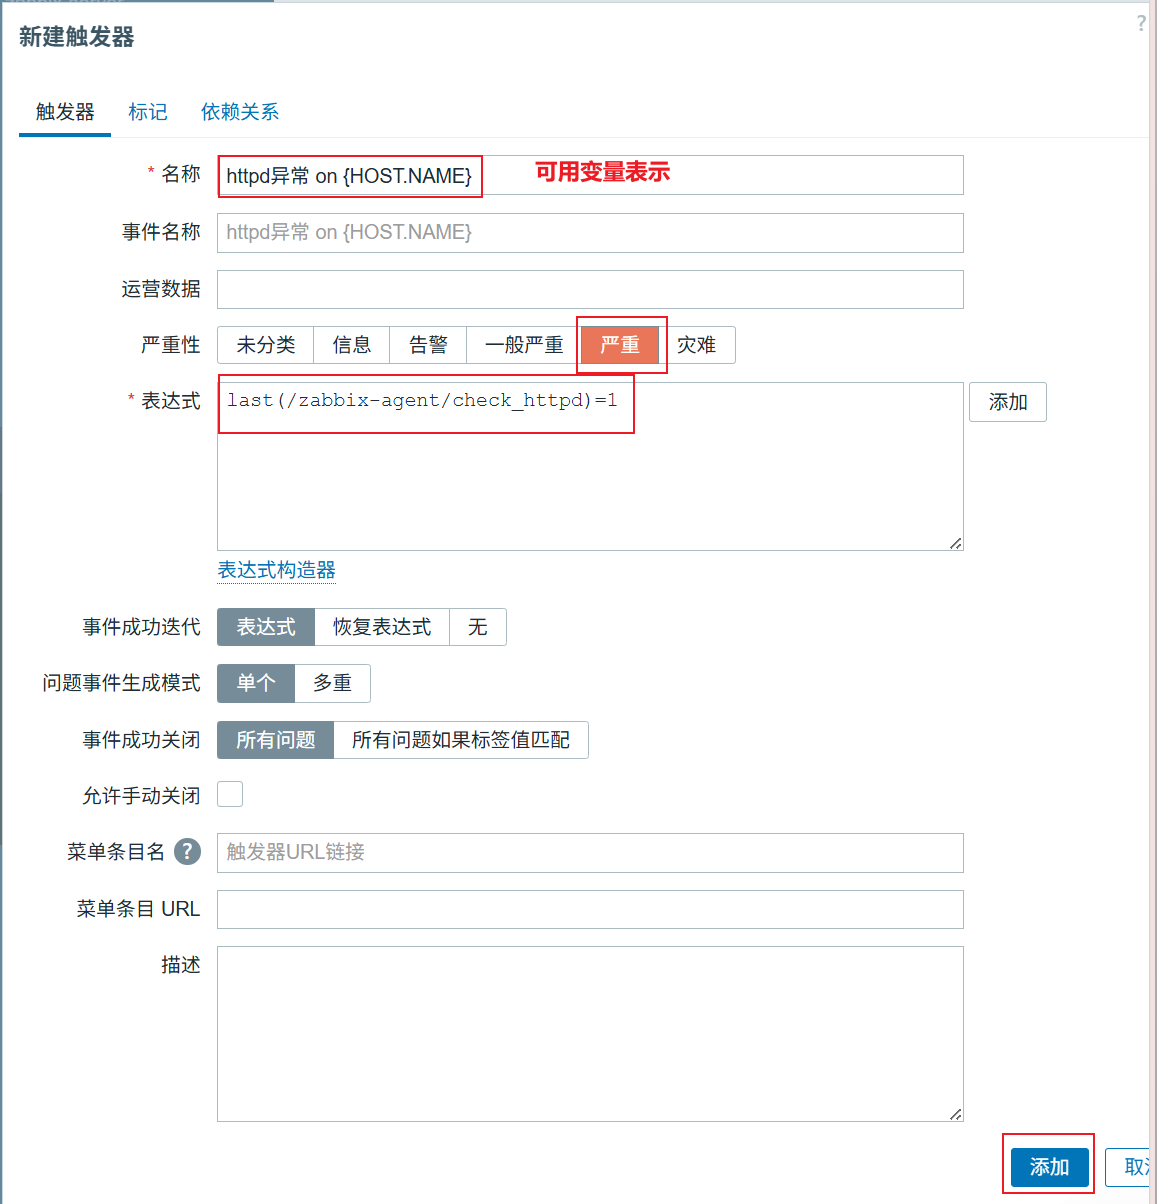
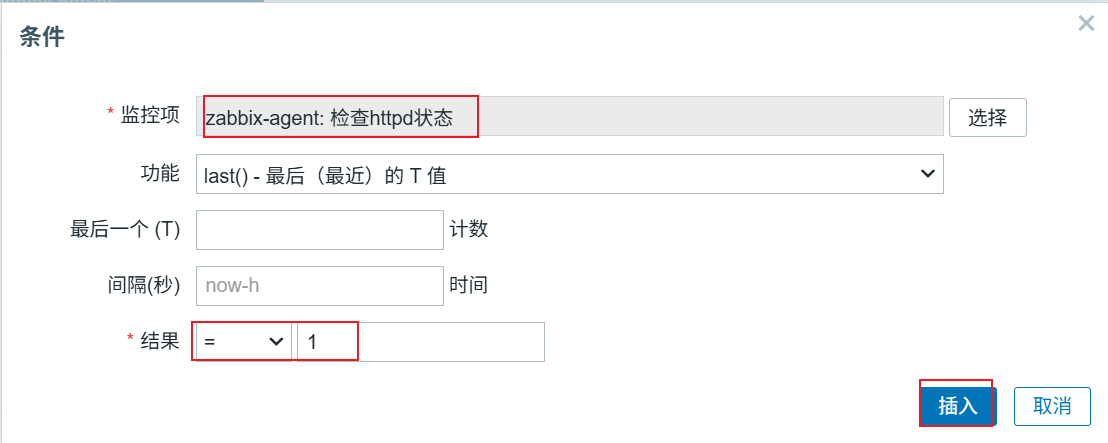
触发器
主机——>zabbix-agent(触发器)——>创建触发器
动作
告警——>动作——>触发器动作——>点击Report problems to Zabbix administrators
操作不用做更改,配置告警邮箱时已经配置过了,最后点击更新
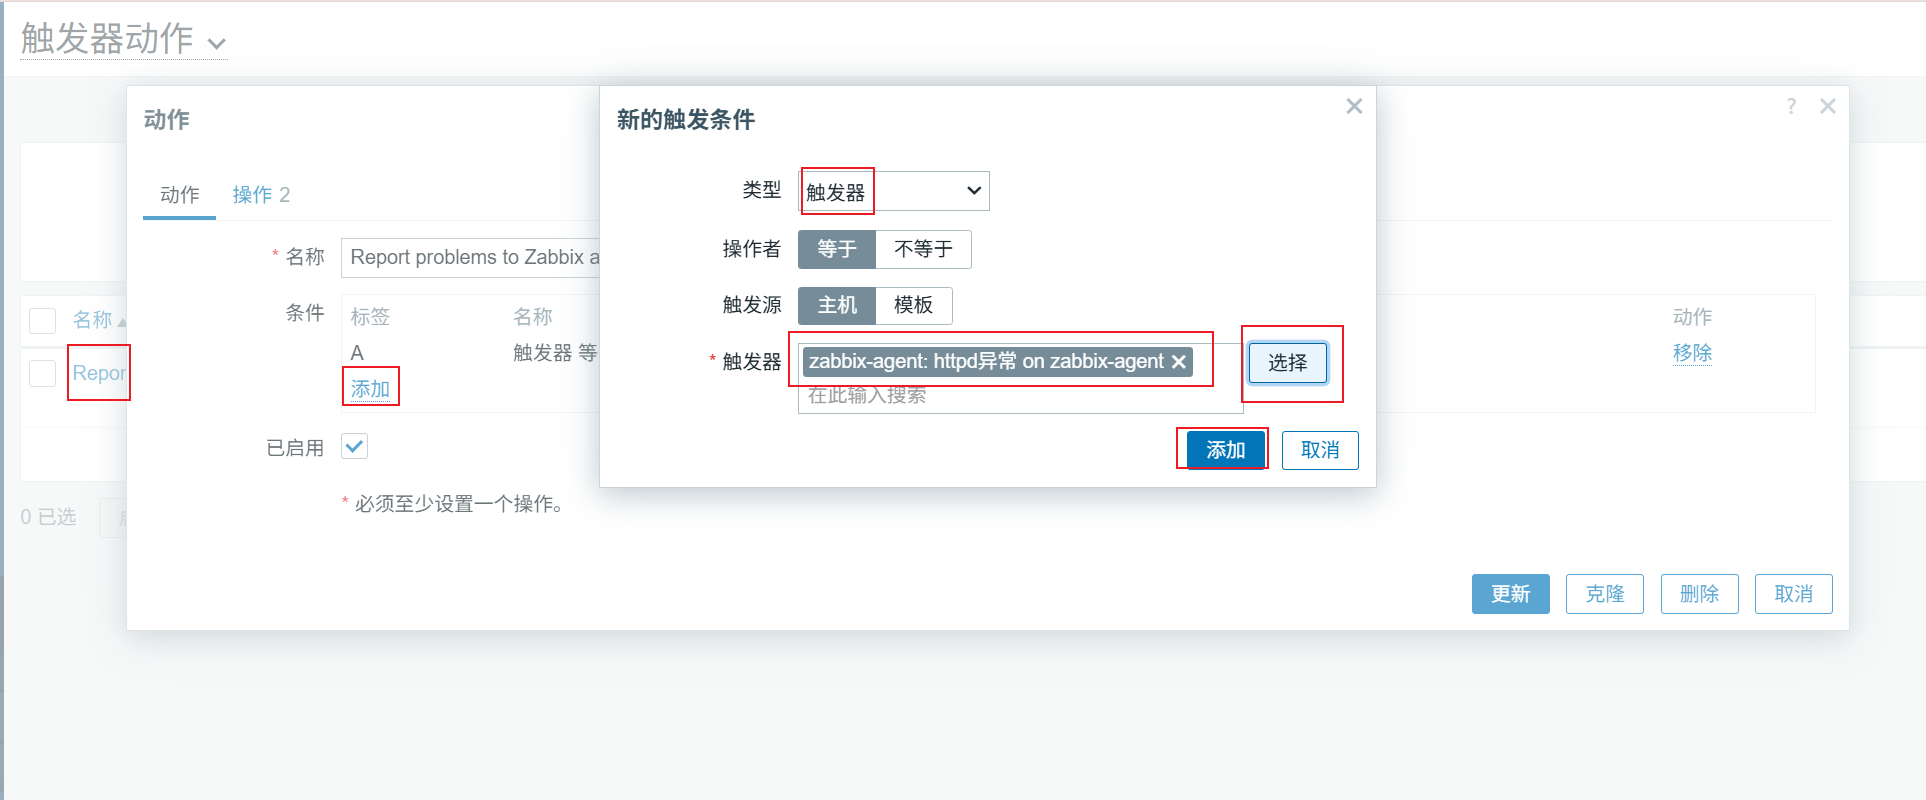
测试
客户端停止httpd服务
[root@zabbix-agent ~]# systemctl stop httpd
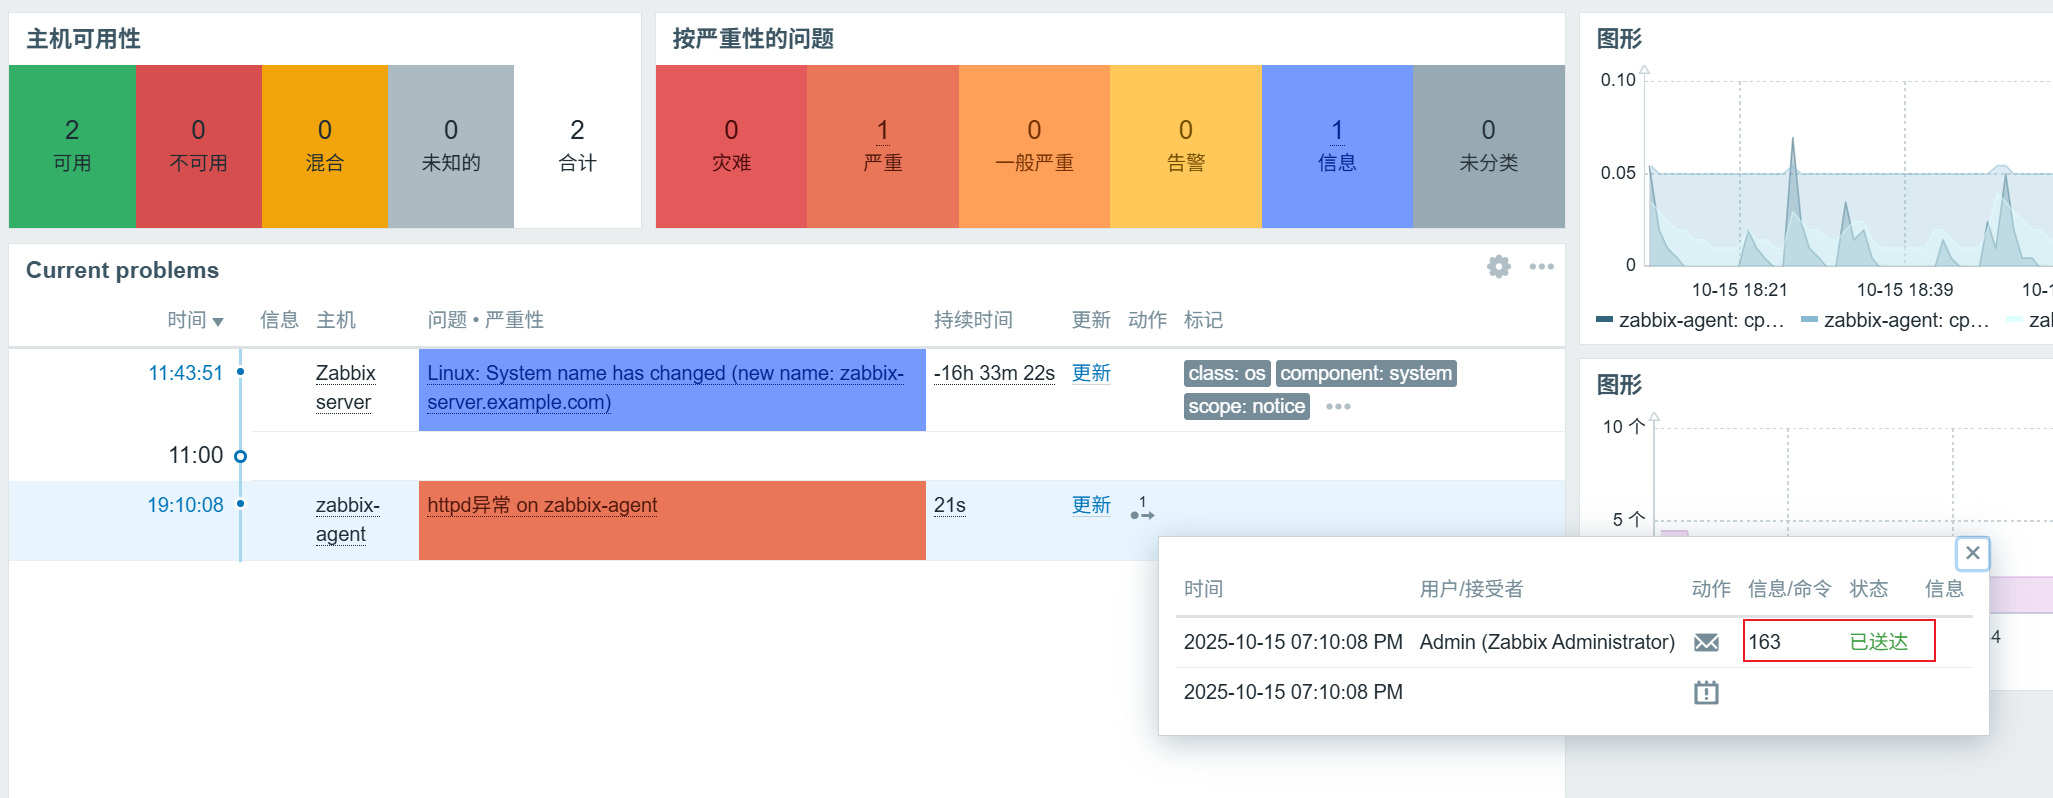
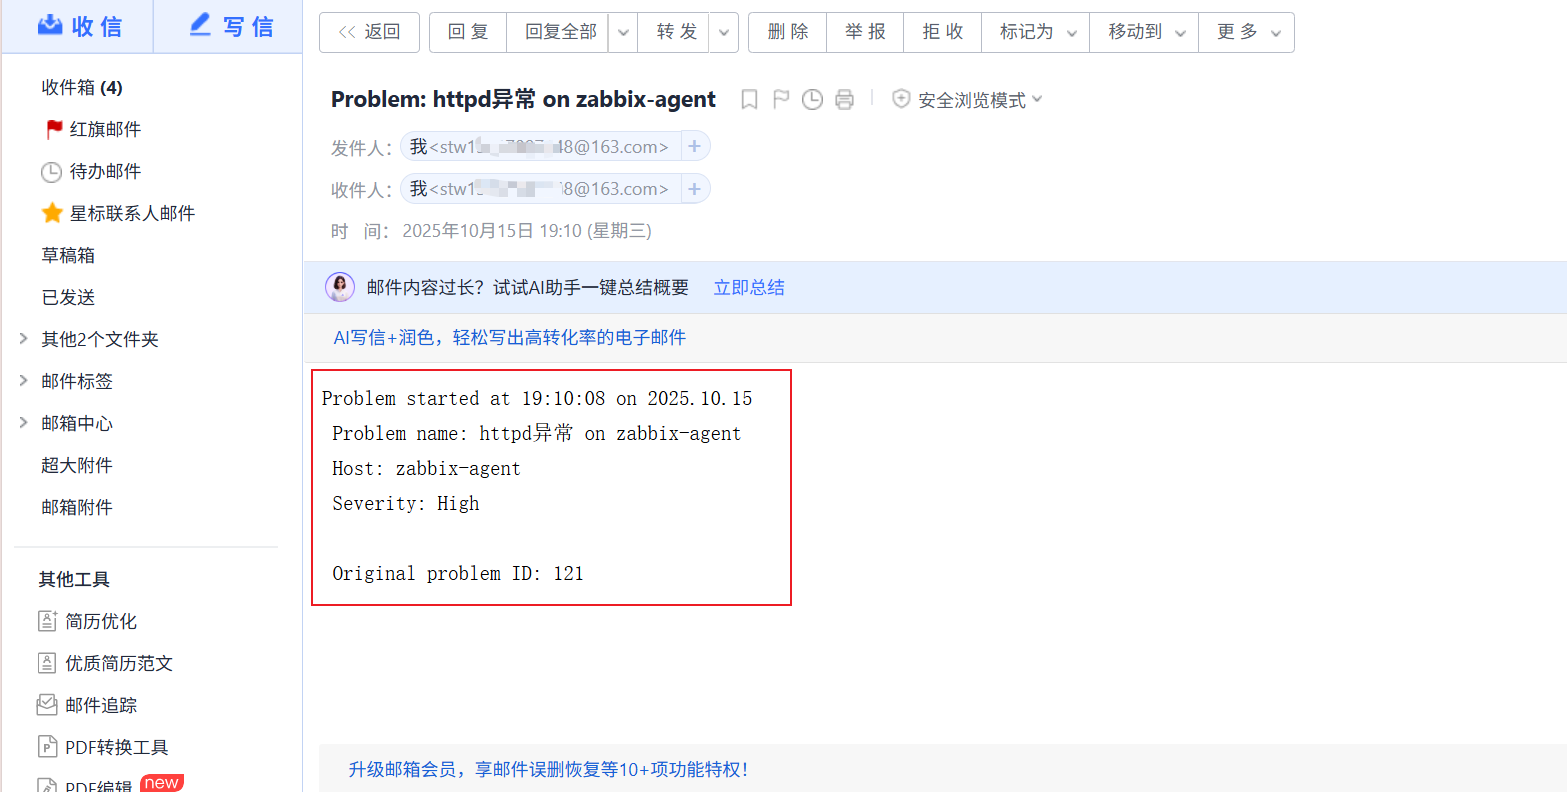
重启服务之后,界面异常消失,也收到恢复的邮件
二、自定义监控日志
下载log.py来协助我们进行测试,以httpd服务为例
1、将log.py上传到/etc/zabbix/script/目录下,然后给执行权限,修改所有者和所属组为zabbix
log.py讲解
作用:检查日志文件中是否有指定的关键字
第一个参数为日志文件名(必须有,相对路径、绝对路径均可)
第二个参数为seek position文件的路径(可选项,若不设置则默认为/tmp/logseek文件。相对路径、绝对路径均可)
第三个参数为搜索关键字,默认为 Error
[root@zabbix-agent ~]# cd /etc/zabbix/script/
[root@zabbix-agent script]# ls
check_httpd.sh
[root@zabbix-agent script]# rz -E
rz waiting to receive.
[root@zabbix-agent script]# ls
check_httpd.sh  log.py
[root@zabbix-agent script]# ll
total 8
-rwxr-xr-x 1 zabbix zabbix  114 Oct 15 18:50 check_httpd.sh
-rw-r--r-- 1 root   root   1854 Oct 17 11:36 log.py
[root@zabbix-agent script]# chown zabbix.zabbix log.py
[root@zabbix-agent script]# chmod +x log.py
2、httpd服务的日志文件在/var/log/httpd/目录下,首先我们需要给这个目录设置一个ACL权限,让zabbix用户有权限去访问该目录
[root@zabbix-agent script]# cd /var/log/httpd
[root@zabbix-agent httpd]# ls
access_log  error_log
[root@zabbix-agent httpd]# setfacl -m u:zabbix:r-x /var/log/httpd/
3、下载python3来执行log.py脚本
[root@zabbix-agent ~]# yum -y install python3
4、修改zabbix_agentd.conf文件,并重启服务
[root@zabbix-agent ~]# vim /etc/zabbix/zabbix_agentd.conf
UserParameter=loginusers,who | wc -l
UserParameter=check_httpd,/bin/bash /etc/zabbix/script/check_httpd.sh
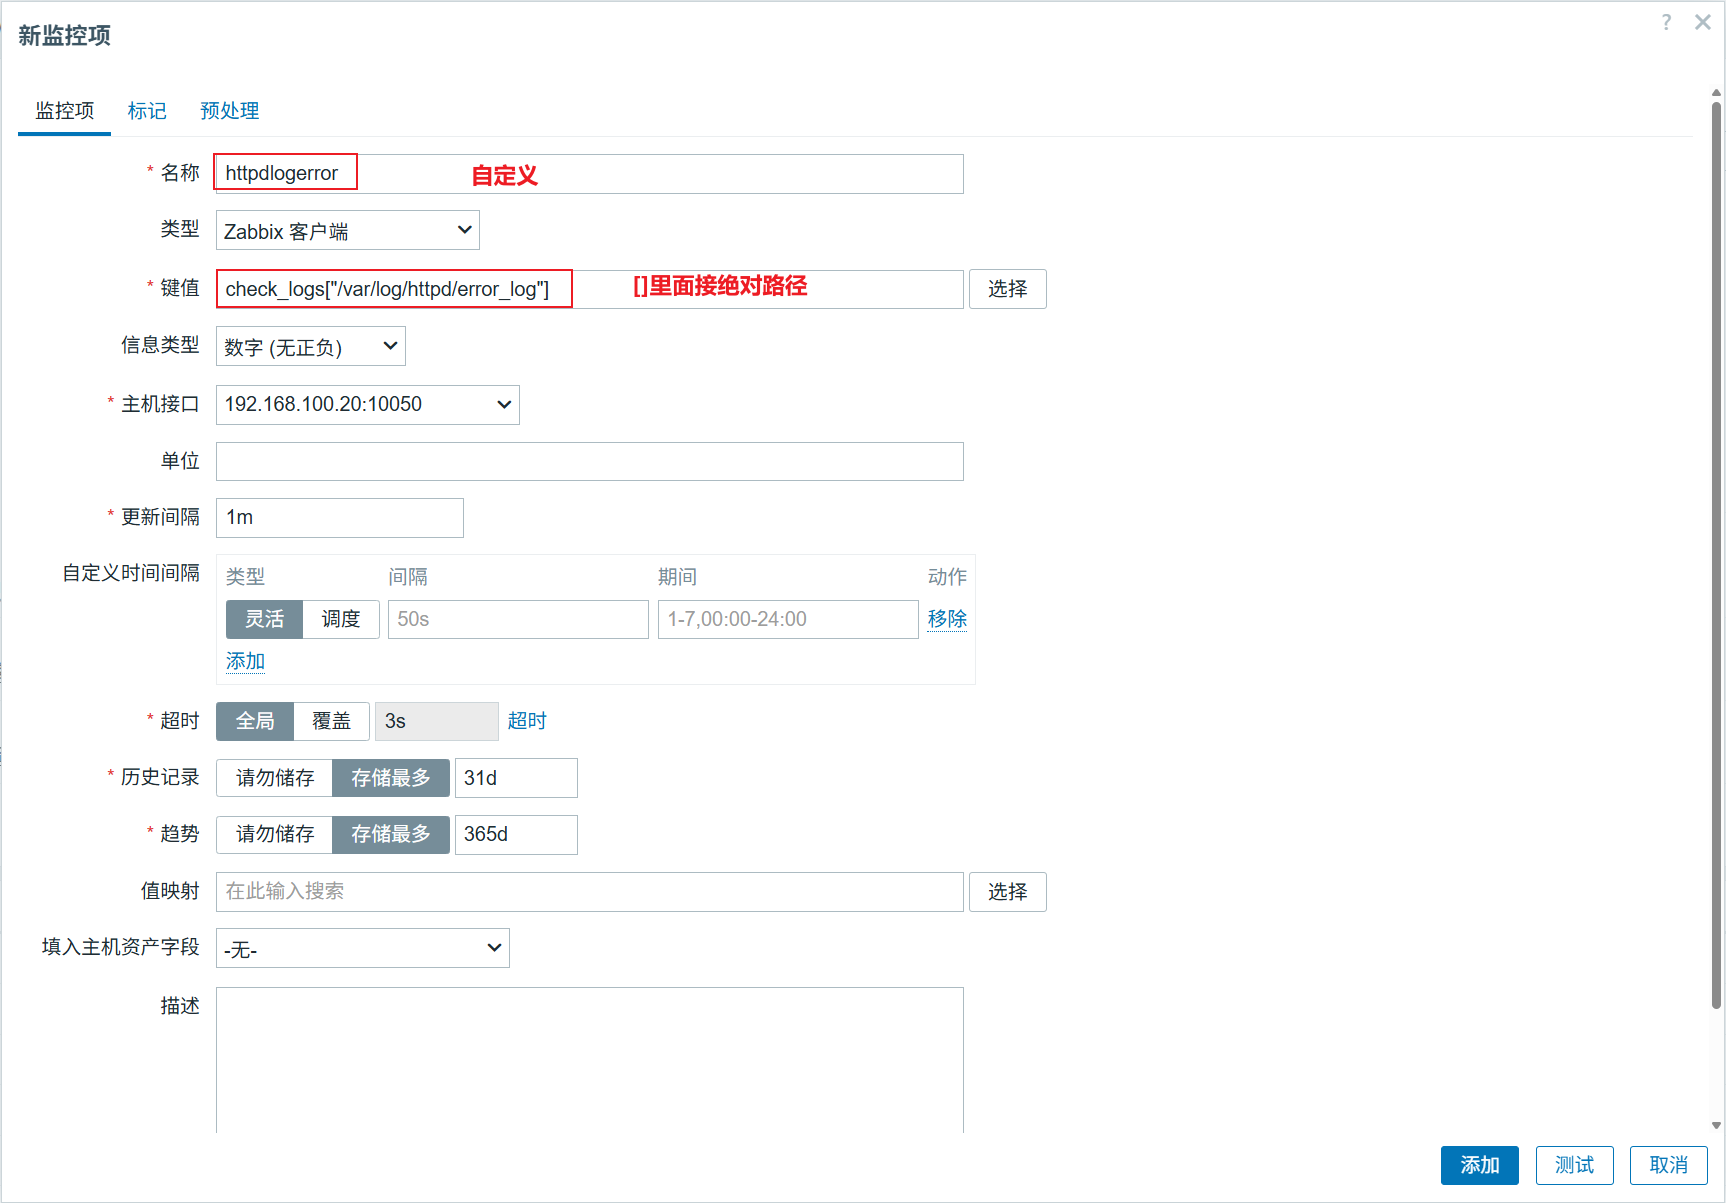
UserParameter=check_logs[*],/usr/bin/python3 /etc/zabbix/script/log.py $1 $2 $3

[root@zabbix-agent ~]# systemctl restart zabbix-agent.service
5、测试脚本(0为没有Error日志信息,1为有Error日志信息)
[root@zabbix-agent ~]# python3 /etc/zabbix/script/log.py /var/log/httpd/error_log
0
[root@zabbix-agent ~]# echo 'Error' >> /var/log/httpd/error_log
[root@zabbix-agent ~]# python3 /etc/zabbix/script/log.py /var/log/httpd/error_log
1
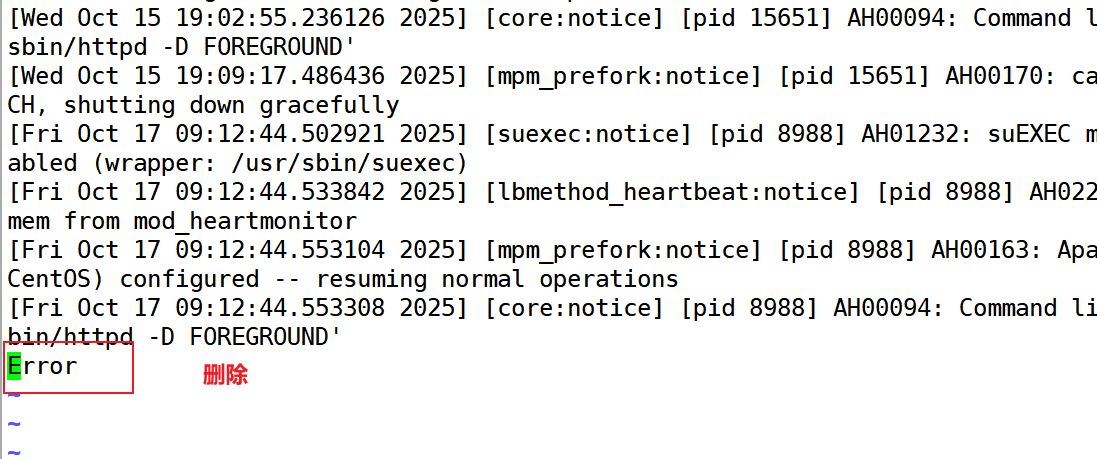
测试完成后将写入的Error内容删除,而且因文件/tmp/logseek属于root账户,在web端写入写不进去,所以删除
[root@zabbix-agent ~]# vim /var/log/httpd/error_log
[root@zabbix-agent ~]# ll /tmp/logseek
-rw-r--r-- 1 root root 4 Oct 17 14:33 /tmp/logseek
[root@zabbix-agent ~]# rm -rf /tmp/logseek
6、配置监控项
主机——>监控项——>创建监控项
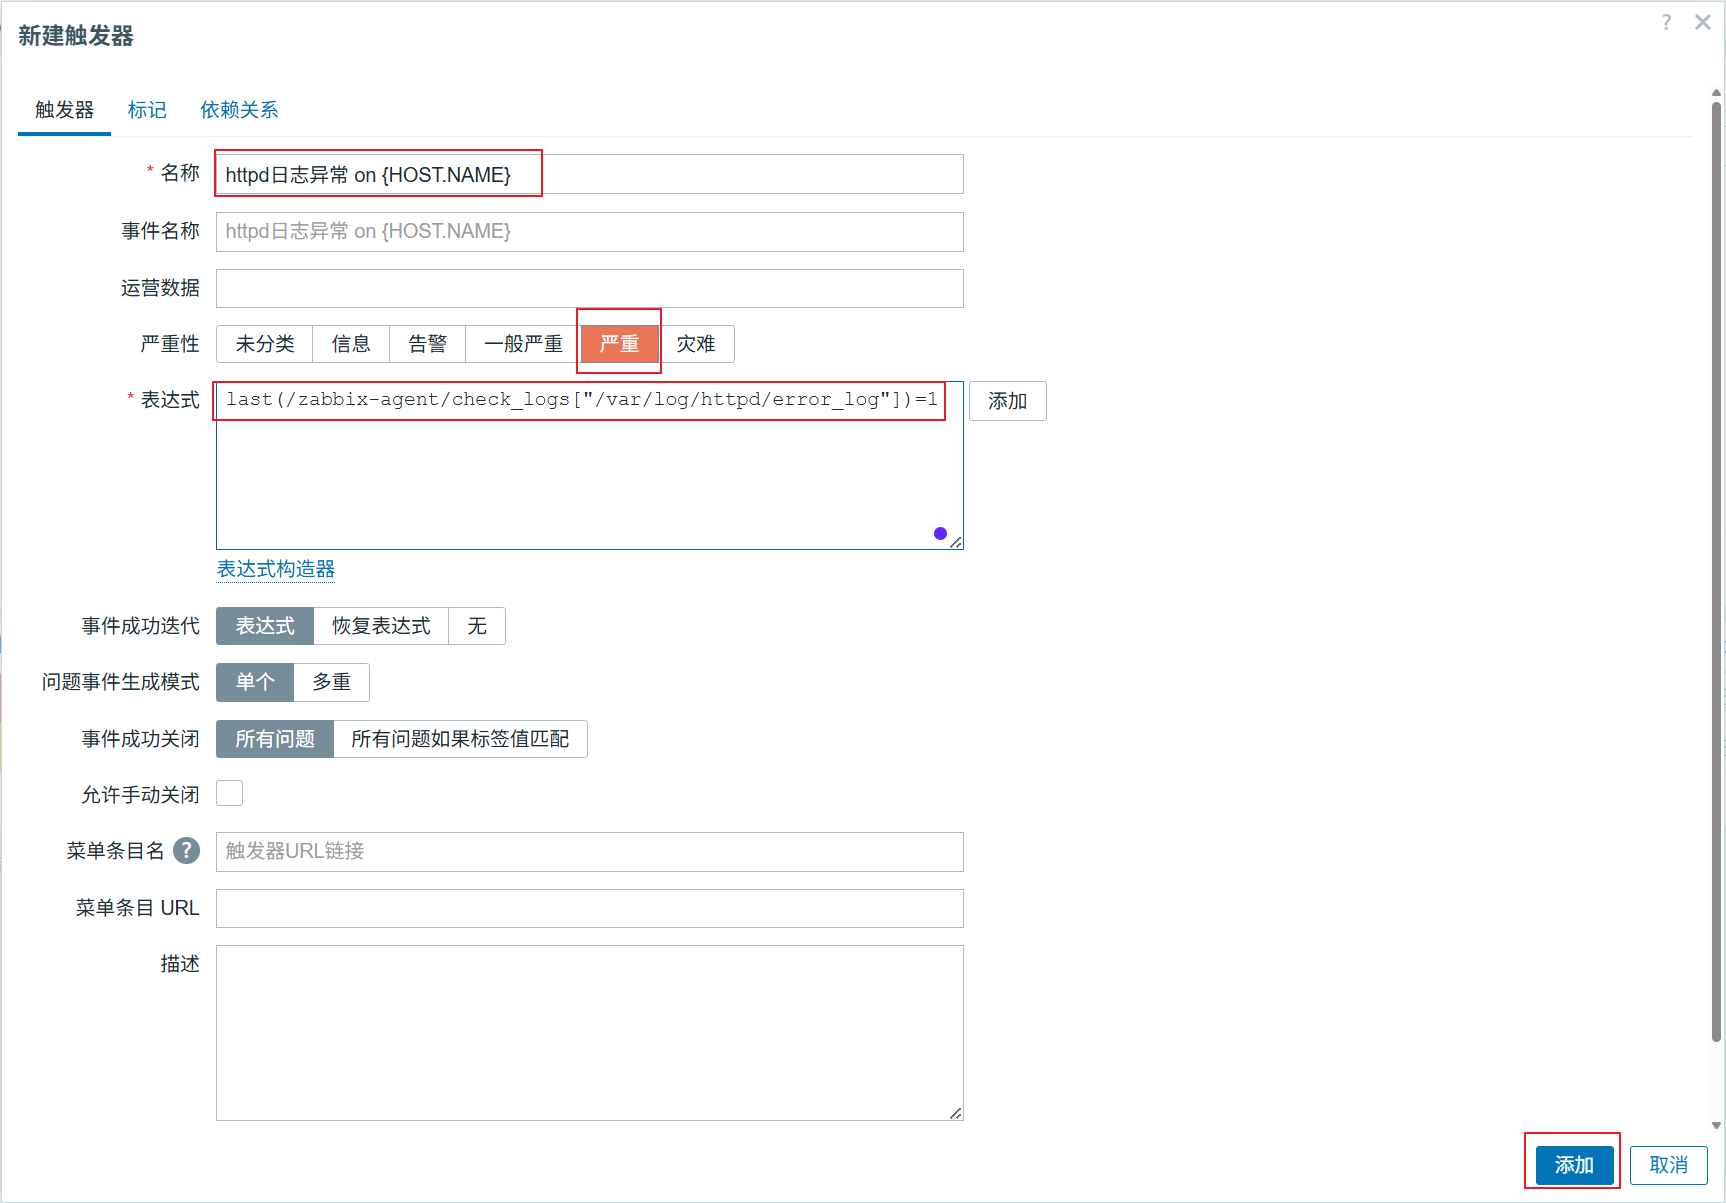
7、创建触发器
主机——>触发器——>创建触发器
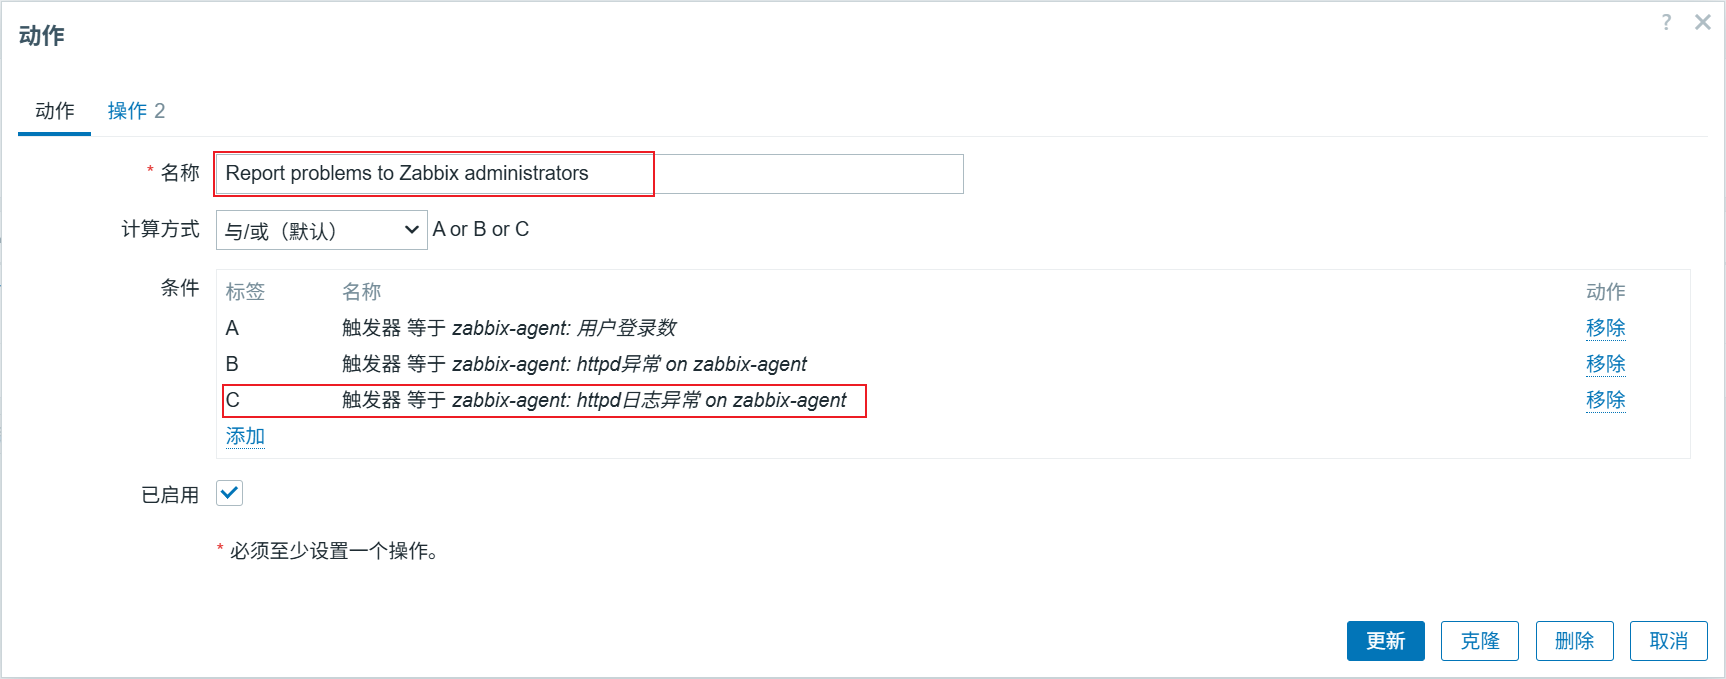
8、添加动作
告警——>动作——>触发器动作——>Report problems to Zabbix administrators
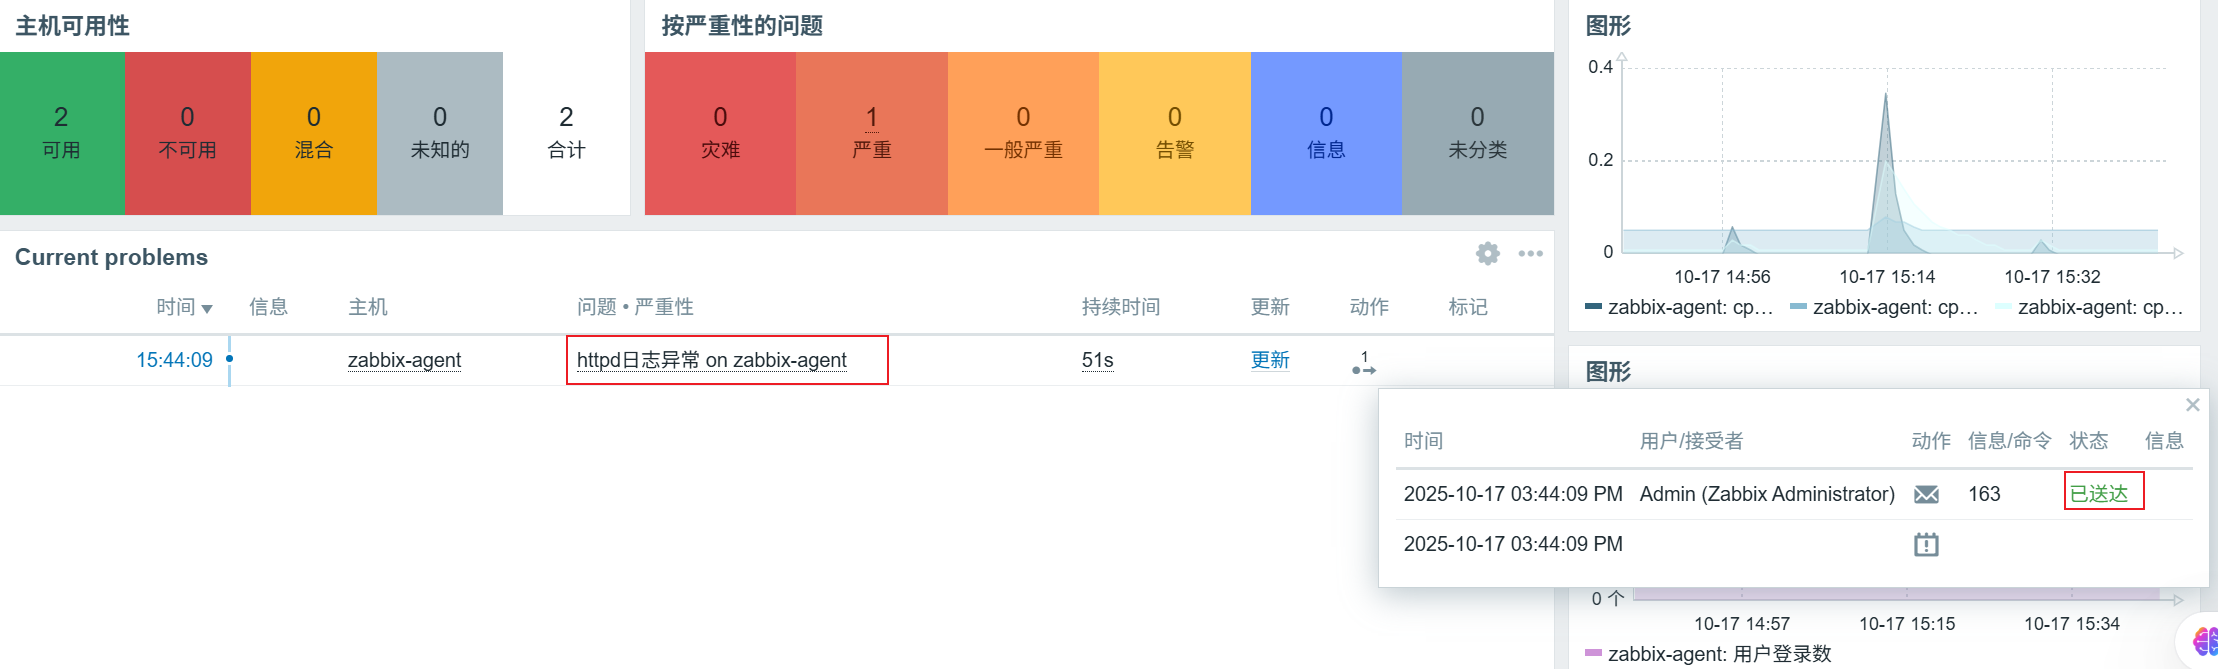
9、测试
[root@zabbix-agent ~]# echo 'Error' >> /var/log/httpd/error_log
[root@zabbix-agent ~]# python3 /etc/zabbix/script/log.py /var/log/httpd/error_log
1

三、Zabbix监控mysql主从
1、再开两台终端,确认IP以及防火墙关闭,设置主机名
192.168.100.30 master.example.com master
192.168.100.40 slave.example.com slave
[root@stw3 ~]# ifconfig ens33
ens33: flags=4163<UP,BROADCAST,RUNNING,MULTICAST>  mtu 1500
        inet 192.168.100.30  netmask 255.255.255.0  broadcast 192.168.100.255
        inet6 fe80::2850:4f7d:bcdd:ccb3  prefixlen 64  scopeid 0x20<link>
        inet6 fe80::9510:d8d7:5d52:d7b3  prefixlen 64  scopeid 0x20<link>
        ether 00:0c:29:d3:d8:82  txqueuelen 1000  (Ethernet)
        RX packets 1083  bytes 166613 (162.7 KiB)
        RX errors 0  dropped 0  overruns 0  frame 0
        TX packets 760  bytes 147147 (143.6 KiB)
        TX errors 0  dropped 0 overruns 0  carrier 0  collisions 0

[root@stw4 ~]# ifconfig ens33
ens33: flags=4163<UP,BROADCAST,RUNNING,MULTICAST>  mtu 1500
        inet 192.168.100.40  netmask 255.255.255.0  broadcast 192.168.100.255
        inet6 fe80::2850:4f7d:bcdd:ccb3  prefixlen 64  scopeid 0x20<link>
        inet6 fe80::9510:d8d7:5d52:d7b3  prefixlen 64  scopeid 0x20<link>
        inet6 fe80::a087:fe31:95a7:535  prefixlen 64  scopeid 0x20<link>
        ether 00:0c:29:85:55:d3  txqueuelen 1000  (Ethernet)
        RX packets 648  bytes 118591 (115.8 KiB)
        RX errors 0  dropped 0  overruns 0  frame 0
        TX packets 338  bytes 74901 (73.1 KiB)
        TX errors 0  dropped 0 overruns 0  carrier 0  collisions 0

[root@stw3 ~]# systemctl status firewalld.service
● firewalld.service - firewalld - dynamic firewall daemon
   Loaded: loaded (/usr/lib/systemd/system/firewalld.service; disabled; vendor preset: enabled)
   Active: inactive (dead)
     Docs: man:firewalld(1)
[root@stw3 ~]# getenforce
Disabled

[root@stw3 ~]# hostnamectl set-hostname master.example.com
[root@stw3 ~]# bash
[root@master ~]#

[root@stw4 ~]# hostnamectl set-hostname slave.example.com
[root@stw4 ~]# bash
[root@slave ~]#
2、修改/etc/hosts(server主机、master主机、slave主机)
[root@master ~]# vim /etc/hosts
[root@master ~]# cat /etc/hosts
127.0.0.1   localhost localhost.localdomain localhost4 localhost4.localdomain4
::1         localhost localhost.localdomain localhost6 localhost6.localdomain6
192.168.100.100 zabbix-server.example.com server
192.168.100.20  zabbix-agent.example.com agent
192.168.100.30  master.example.com  master
192.168.100.40  slaver.example.com  slave

[root@master ~]# scp /etc/hosts root@192.168.100.40:/etc/hosts
The authenticity of host '192.168.100.40 (192.168.100.40)' can't be established.
ECDSA key fingerprint is SHA256:R7/1dpul7cu8SnefsN2wQw5hKDL+xekk0ffasLS6OGI.
ECDSA key fingerprint is MD5:81:88:a1:16:52:83:c0:d5:59:ad:2b:3a:d5:52:02:bc.
Are you sure you want to continue connecting (yes/no)? y
Please type 'yes' or 'no': yes
Warning: Permanently added '192.168.100.40' (ECDSA) to the list of known hosts.
root@192.168.100.40's password:
hosts                                                        100%  339   102.4KB/s   00:00
[root@master ~]# scp /etc/hosts root@192.168.100.100:/etc/hosts
The authenticity of host '192.168.100.100 (192.168.100.100)' can't be established.
ECDSA key fingerprint is SHA256:0p227ESjBsuzXR4AMdzzUZdRvc6lx7ovWjHNITlZseU.
ECDSA key fingerprint is MD5:82:ff:cb:b4:90:17:eb:8e:c6:c7:c5:99:b5:52:af:f2.
Are you sure you want to continue connecting (yes/no)? yes
Warning: Permanently added '192.168.100.100' (ECDSA) to the list of known hosts.
root@192.168.100.100's password:
Permission denied, please try again.
root@192.168.100.100's password:
hosts                                                        100%  339   156.9KB/s   00:00
[root@master ~]#
3、master和slave为centos7的操作系统,将centos7的安装源下载下来,然后两台主机都安装mariadb mariadb-server
[root@master ~]# cd /etc/yum.repos.d/
[root@master yum.repos.d]# ls
CentOS-Base.repo  CentOS-Debuginfo.repo  CentOS-Media.repo    CentOS-Vault.repo
CentOS-CR.repo    CentOS-fasttrack.repo  CentOS-Sources.repo
[root@master yum.repos.d]# rm -rf *
[root@master yum.repos.d]# vim server.repo
[root@master yum.repos.d]# cat server.repo
[aa]
name=aa1
baseurl=file:///mnt
enabled=1
gpgcheck=0
[root@master yum.repos.d]# mount /dev/cdrom /mnt
mount: /dev/sr0 is write-protected, mounting read-only
[root@master yum.repos.d]# yum -y install mariadb mariadb-server
[root@master ~]# systemctl restart mariadb
[root@master ~]# systemctl enable mariadb
Created symlink from /etc/systemd/system/multi-user.target.wants/mariadb.service to /usr/lib/systemd/system/mariadb.service.
4、两台主机都初始化mysql数据库
[root@master ~]# mysql_secure_installation

NOTE: RUNNING ALL PARTS OF THIS SCRIPT IS RECOMMENDED FOR ALL MariaDB
      SERVERS IN PRODUCTION USE!  PLEASE READ EACH STEP CAREFULLY!

In order to log into MariaDB to secure it, we'll need the current
password for the root user.  If you've just installed MariaDB, and
you haven't set the root password yet, the password will be blank,
so you should just press enter here.

Enter current password for root (enter for none):
OK, successfully used password, moving on...

Setting the root password ensures that nobody can log into the MariaDB
root user without the proper authorisation.

Set root password? [Y/n] y
New password:                            //redhat
Re-enter new password:
Password updated successfully!
Reloading privilege tables..
 ... Success!


By default, a MariaDB installation has an anonymous user, allowing anyone
to log into MariaDB without having to have a user account created for
them.  This is intended only for testing, and to make the installation
go a bit smoother.  You should remove them before moving into a
production environment.

Remove anonymous users? [Y/n] y
 ... Success!

Normally, root should only be allowed to connect from 'localhost'.  This
ensures that someone cannot guess at the root password from the network.

Disallow root login remotely? [Y/n] n
 ... skipping.

By default, MariaDB comes with a database named 'test' that anyone can
access.  This is also intended only for testing, and should be removed
before moving into a production environment.

Remove test database and access to it? [Y/n] n
 ... skipping.

Reloading the privilege tables will ensure that all changes made so far
will take effect immediately.

Reload privilege tables now? [Y/n] n
 ... skipping.

Cleaning up...

All done!  If you've completed all of the above steps, your MariaDB
installation should now be secure.

Thanks for using MariaDB!
5、修改数据库配置文件,然后两台主机都重启mariadb服务
master:
[root@master ~]# vim /etc/my.cnf
[mysqld]
#添加两行数据
log_bin=mysql-bin
server_id=20
[root@master ~]# systemctl restart mariadb
slave:
[root@slave ~]# vim /etc/my.cnf
[mysqld]
#添加两行数据
log_bin=mysql-bin
server_id=30
[root@slave ~]# systemctl restart mariadb
6、进入数据库配置主从
master:
[root@master ~]# mysql -uroot -predhat
Welcome to the MariaDB monitor.  Commands end with ; or \g.
Your MariaDB connection id is 2
Server version: 5.5.60-MariaDB MariaDB Server

Copyright (c) 2000, 2018, Oracle, MariaDB Corporation Ab and others.

Type 'help;' or '\h' for help. Type '\c' to clear the current input statement.

MariaDB [(none)]> grant all privileges on *.* to root@'%' identified by "redhat";
Query OK, 0 rows affected (0.00 sec)

MariaDB [(none)]> grant replication slave on *.* to 'user'@'slave' identified by 'redhat';
Query OK, 0 rows affected (0.00 sec)

MariaDB [(none)]> flush privileges;
Query OK, 0 rows affected (0.01 sec)

MariaDB [(none)]>
slave:
Slave_IO_Running: Connecting
Slave_SQL_Running: Yes
[root@slave ~]# mysql -uroot -predhat
Welcome to the MariaDB monitor.  Commands end with ; or \g.
Your MariaDB connection id is 2
Server version: 5.5.60-MariaDB MariaDB Server

Copyright (c) 2000, 2018, Oracle, MariaDB Corporation Ab and others.

Type 'help;' or '\h' for help. Type '\c' to clear the current input statement.

MariaDB [(none)]> grant all privileges on *.* to root@'%' identified by "redhat";
Query OK, 0 rows affected (0.01 sec)

MariaDB [(none)]> change master to master_host='master',master_user='user',master_password='redhat';
Query OK, 0 rows affected (0.01 sec)

MariaDB [(none)]> start slave;
Query OK, 0 rows affected (0.01 sec)

MariaDB [(none)]> show slave status\G;
*************************** 1. row ***************************
               Slave_IO_State: Connecting to master
                  Master_Host: master
                  Master_User: user
                  Master_Port: 3306
                Connect_Retry: 60
              Master_Log_File:
          Read_Master_Log_Pos: 4
               Relay_Log_File: mariadb-relay-bin.000001
                Relay_Log_Pos: 4
        Relay_Master_Log_File:
             Slave_IO_Running: Connecting
            Slave_SQL_Running: Yes
              Replicate_Do_DB:
          Replicate_Ignore_DB:
7、master和slave主机都做好时钟同步
[root@master ~]# systemctl restart chronyd
[root@master ~]# systemctl enable chronyd
Created symlink from /etc/systemd/system/multi-user.target.wants/chronyd.service to /usr/lib/systemd/system/chronyd.service.
[root@master ~]# hwclock -w
8、在slave主机和master主机中安装zabbix-agent软件包,查官方文档
rpm -Uvh https://repo.zabbix.com/zabbix/7.0/rhel/7/x86_64/zabbix-release-latest-7.0.el7.noarch.rpm
[root@slave ~]# rpm -Uvh https://repo.zabbix.com/zabbix/7.0/rhel/7/x86_64/zabbix-release-latest-7.0.el7.noarch.rpm
Retrieving https://repo.zabbix.com/zabbix/7.0/rhel/7/x86_64/zabbix-release-latest-7.0.el7.noarch.rpm
warning: /var/tmp/rpm-tmp.r7YLU7: Header V4 RSA/SHA512 Signature, key ID b5333005: NOKEY
Preparing...                          ################################# [100%]
Updating / installing...
   1:zabbix-release-7.0-5.el7         ################################# [100%]
[root@slave ~]# yum -y install zabbix-agent
9、修改 /etc/zabbix/zabbix_agentd.conf,重启服务(master、slave)
[root@master ~]# vim /etc/zabbix/zabbix_agentd.conf
Server=192.168.100.100
ServerActive=192.168.100.100
Hostname=master
[root@master ~]# systemctl restart zabbix-agent.service
[root@master ~]# systemctl enable zabbix-agent.service
Created symlink from /etc/systemd/system/multi-user.target.wants/zabbix-agent.service to /usr/lib/systemd/system/zabbix-agent.service.
[root@slave ~]# vim /etc/zabbix/zabbix_agentd.conf
Server=192.168.100.100
ServerActive=192.168.100.100
Hostname=slave
[root@slave ~]# systemctl restart zabbix-agent.service
[root@slave ~]# systemctl enable zabbix-agent.service
Created symlink from /etc/systemd/system/multi-user.target.wants/zabbix-agent.service to /usr/lib/systemd/system/zabbix-agent.service.
10、进入zabbix web监控平台,添加主机
数据采集——>主机——>创建主机
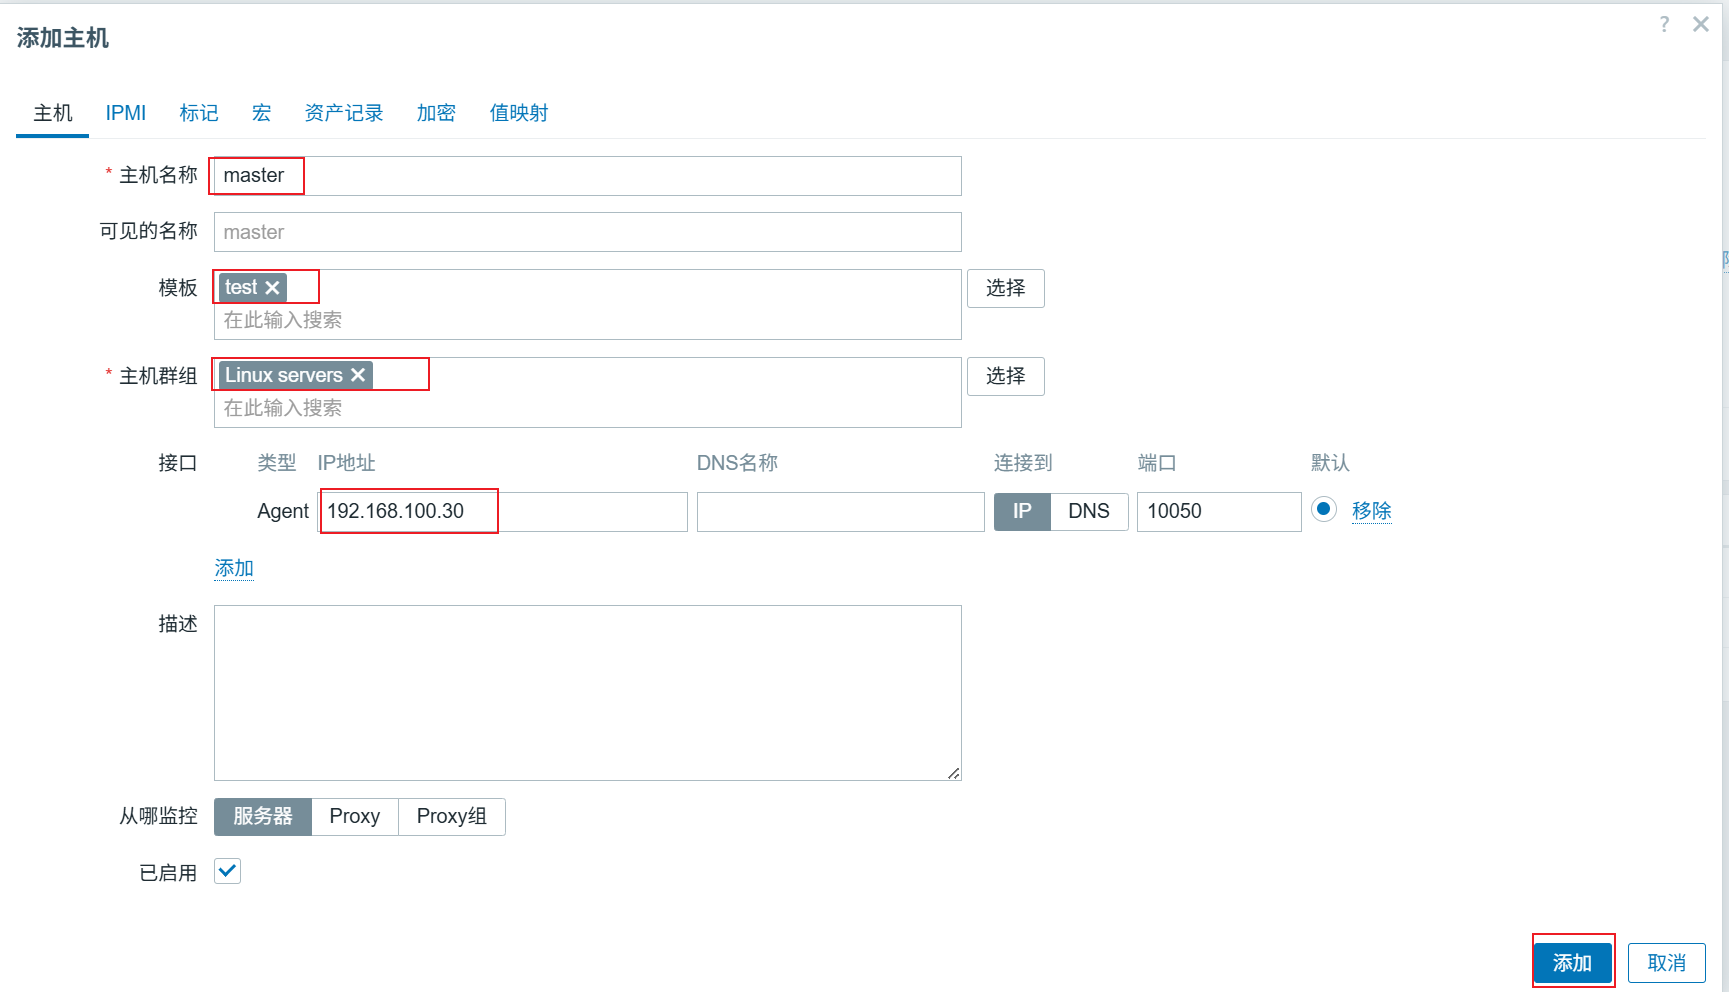
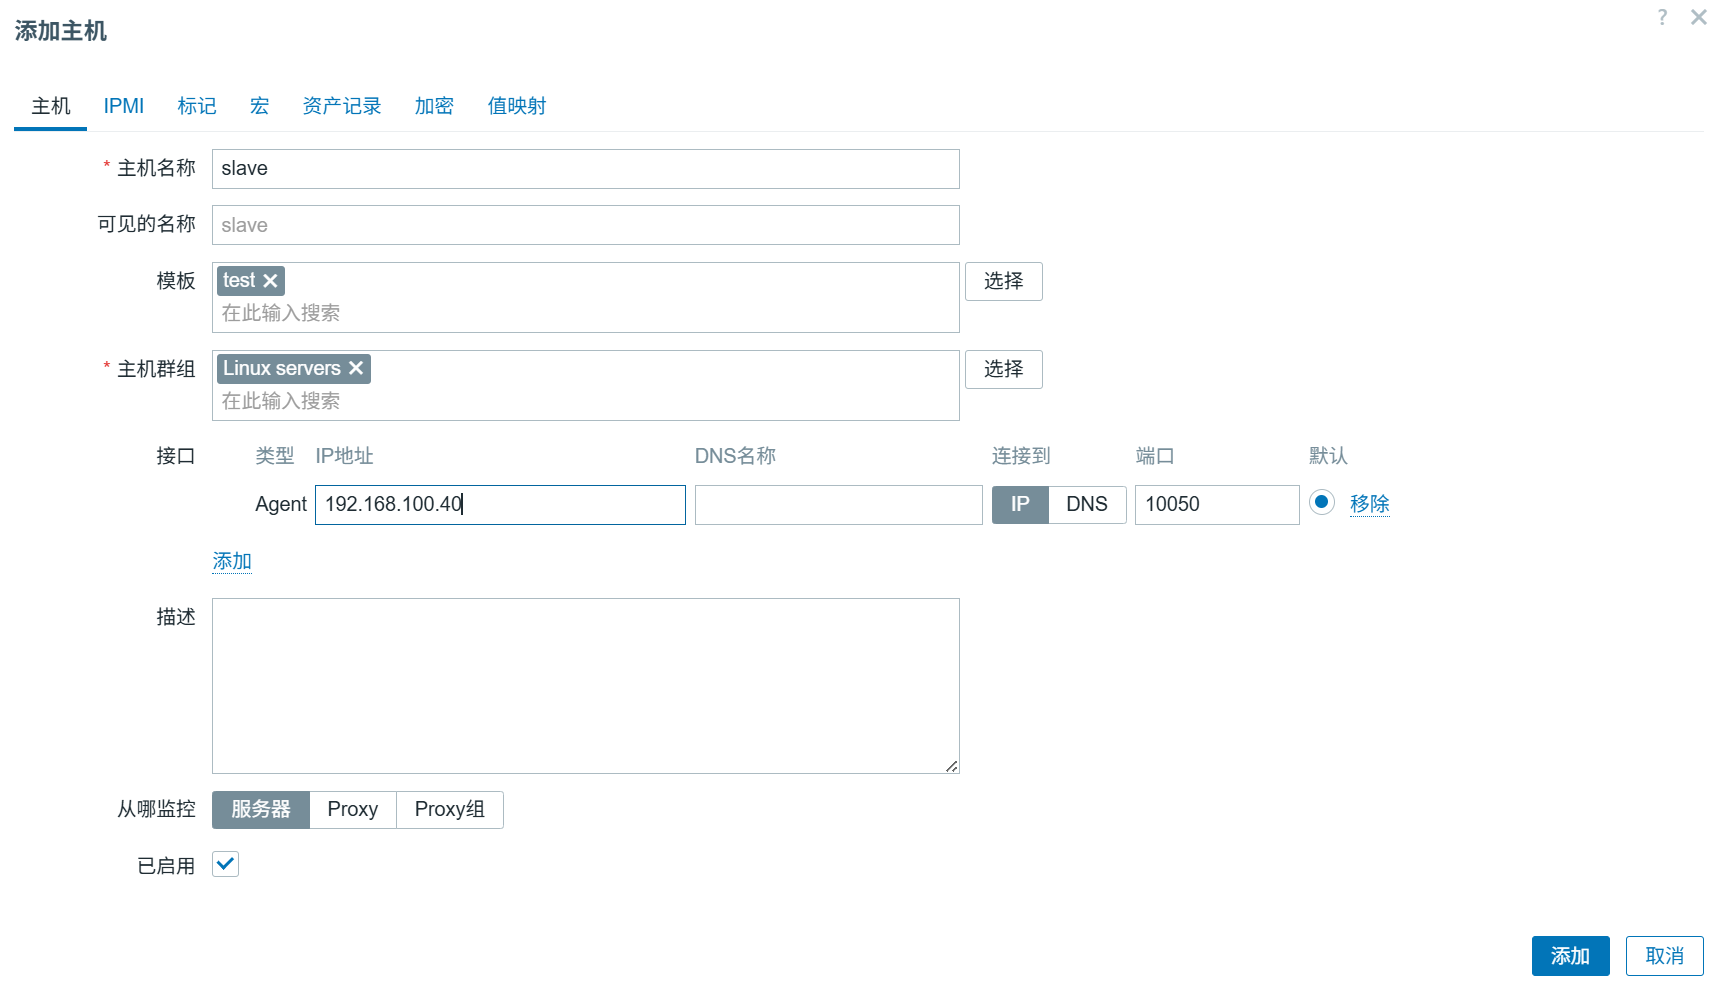

11、在slave主机上配置脚本
[root@slave ~]# mkdir /etc/zabbix/script
[root@slave ~]# cd /etc/zabbix/script
[root@slave script]# ls
[root@slave script]# vim mysql_slave_status.sh
[root@slave script]# cat mysql_slave_status.sh
#!/bin/bash
USER="root"
PASSWD="redhat"
NAME=$1

function IO {
    Slave_IO_Running=`mysql -u $USER -p$PASSWD -e "show slave status\G;" 2> /dev/null |grep Slave_IO_Running |awk '{print $2}'`
    if [ "$Slave_IO_Running" == "Connecting" ];then
        echo 0
    else
        echo 1
    fi
}

function SQL {
    Slave_SQL_Running=`mysql -u $USER -p$PASSWD -e "show slave status\G;" 2> /dev/null |grep Slave_SQL_Running: |awk '{print $2}'`
if [ "$Slave_SQL_Running" == "Yes" ];then
echo 0
    else
        echo 1
    fi

}

case $NAME in
   io)
       IO
   ;;
   sql)
       SQL
   ;;
   *)
        echo -e "Usage: $0 [io | sql]"
esac

[root@slave script]# chown -R zabbix.zabbix /etc/zabbix/script
[root@slave script]# chmod +x mysql_slave_status.sh
12、修改配置文件
[root@slave script]# vim /etc/zabbix/zabbix_agentd.conf
UserParameter=mysql.slave[*],/bin/bash /etc/zabbix/script/mysql_slave_status.sh $1
[root@slave script]# systemctl restart zabbix-agent.service
13、去zabbix server验证状态,使用zabbix_get命令验证,需要先下载zabbix-get软件包(这里已下载)
[root@zabbix-server ~]# zabbix_get -s 192.168.100.40 -k mysql.slave[io]
0
[root@zabbix-server ~]# zabbix_get -s 192.168.100.40 -k mysql.slave[sql]
0
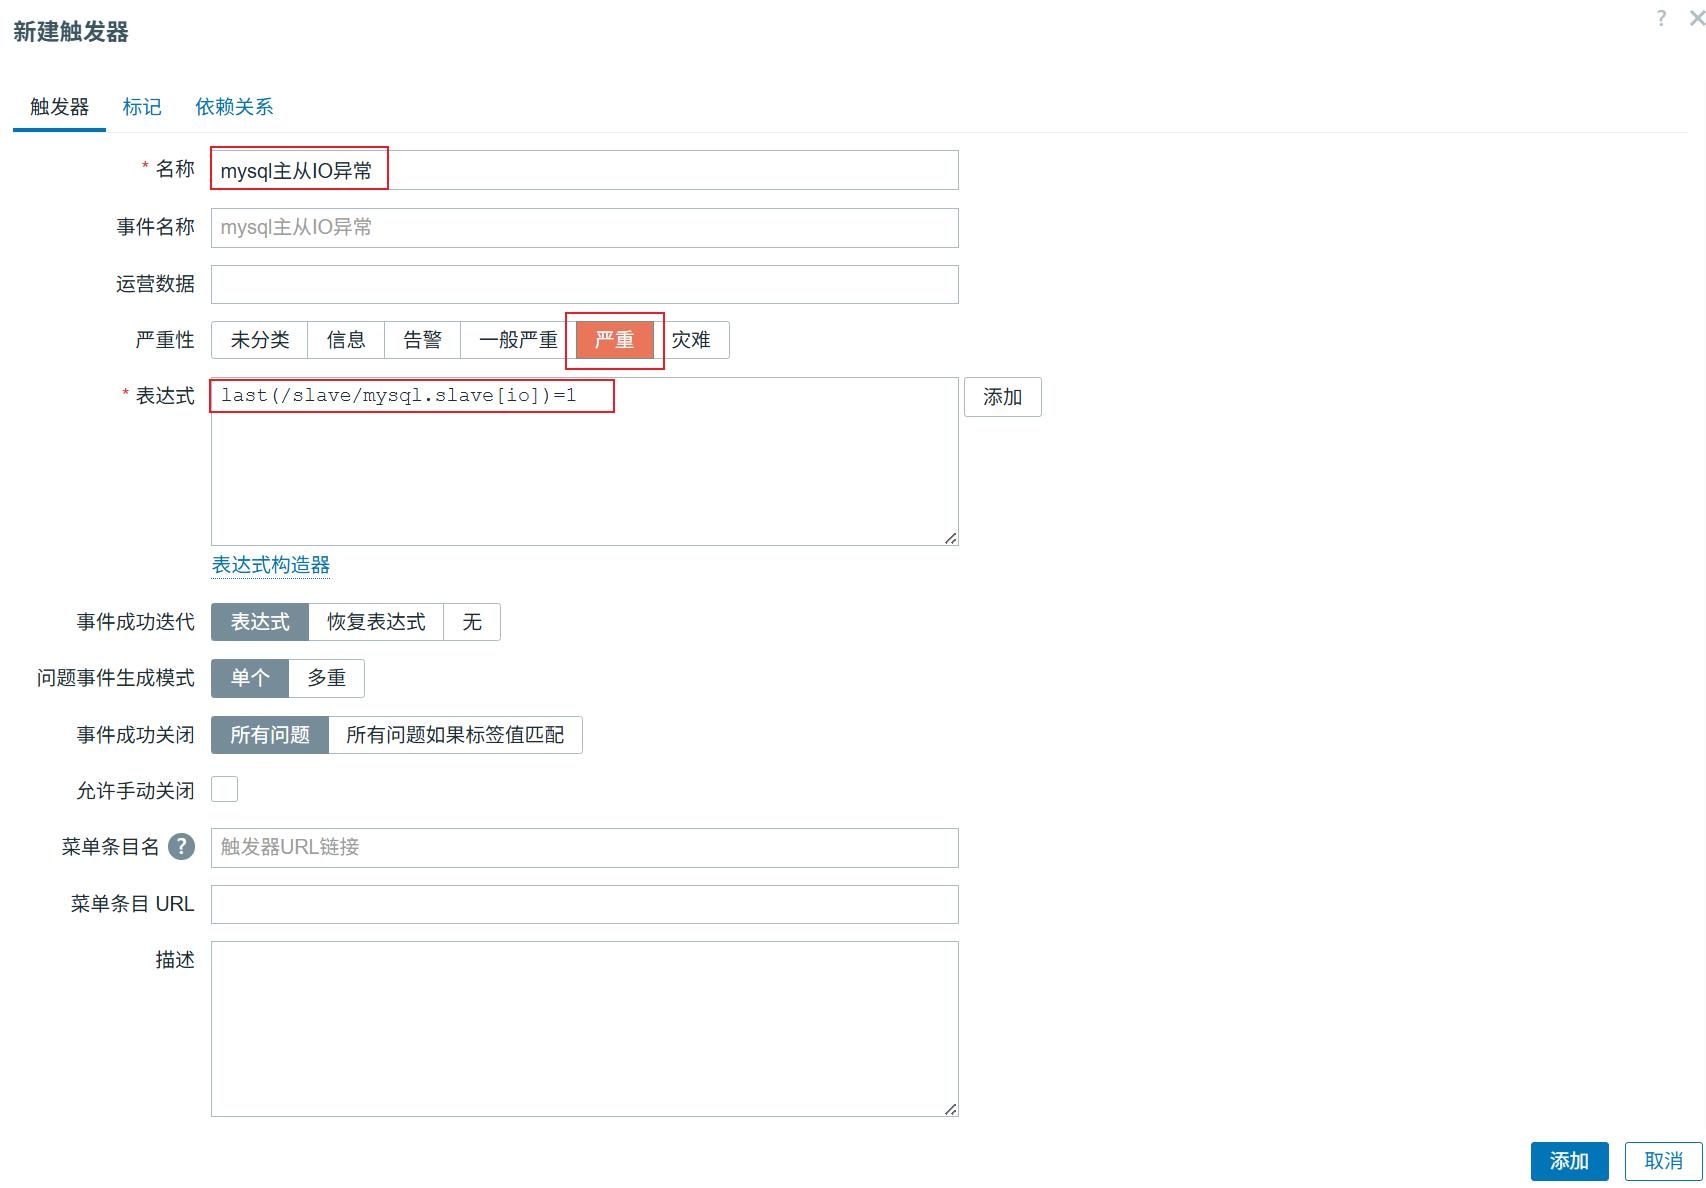
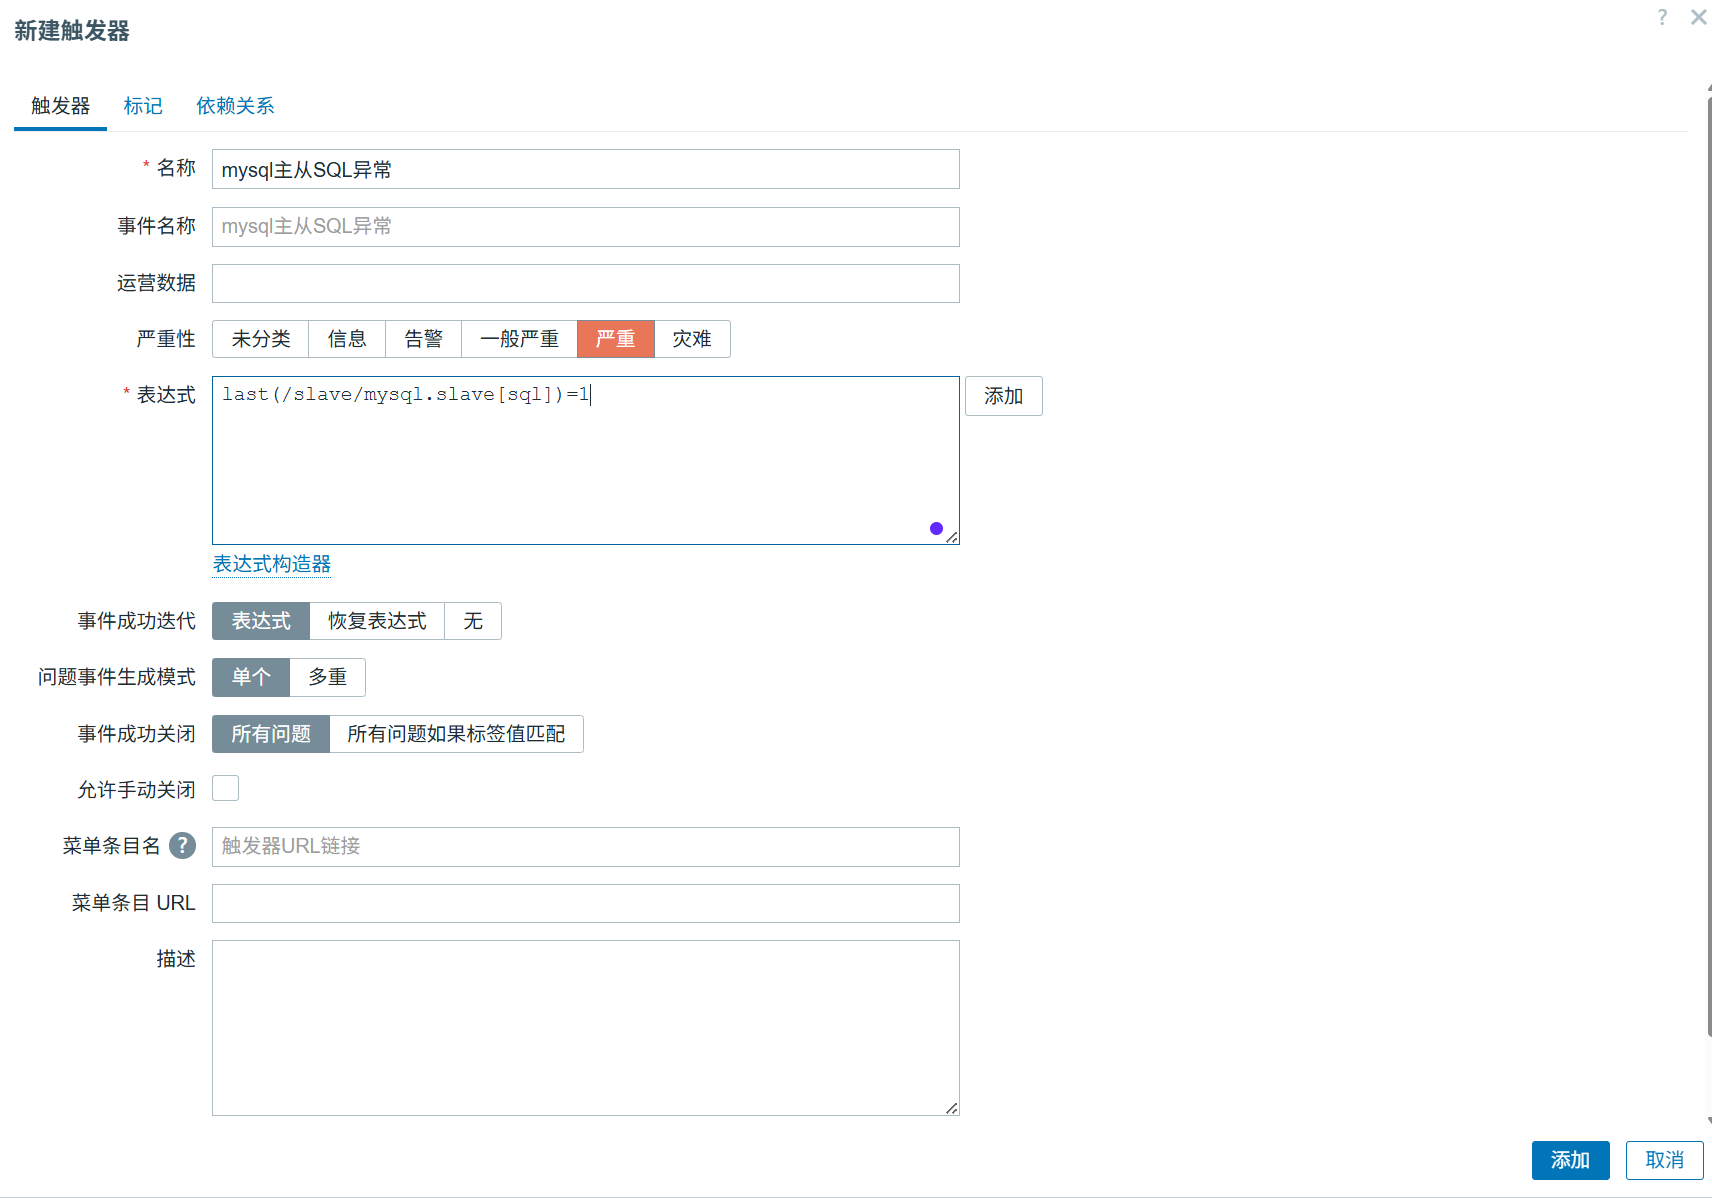
14、在zabbix web平台配置
数据采集——>主机——>slave——>监控项——>创建监控项
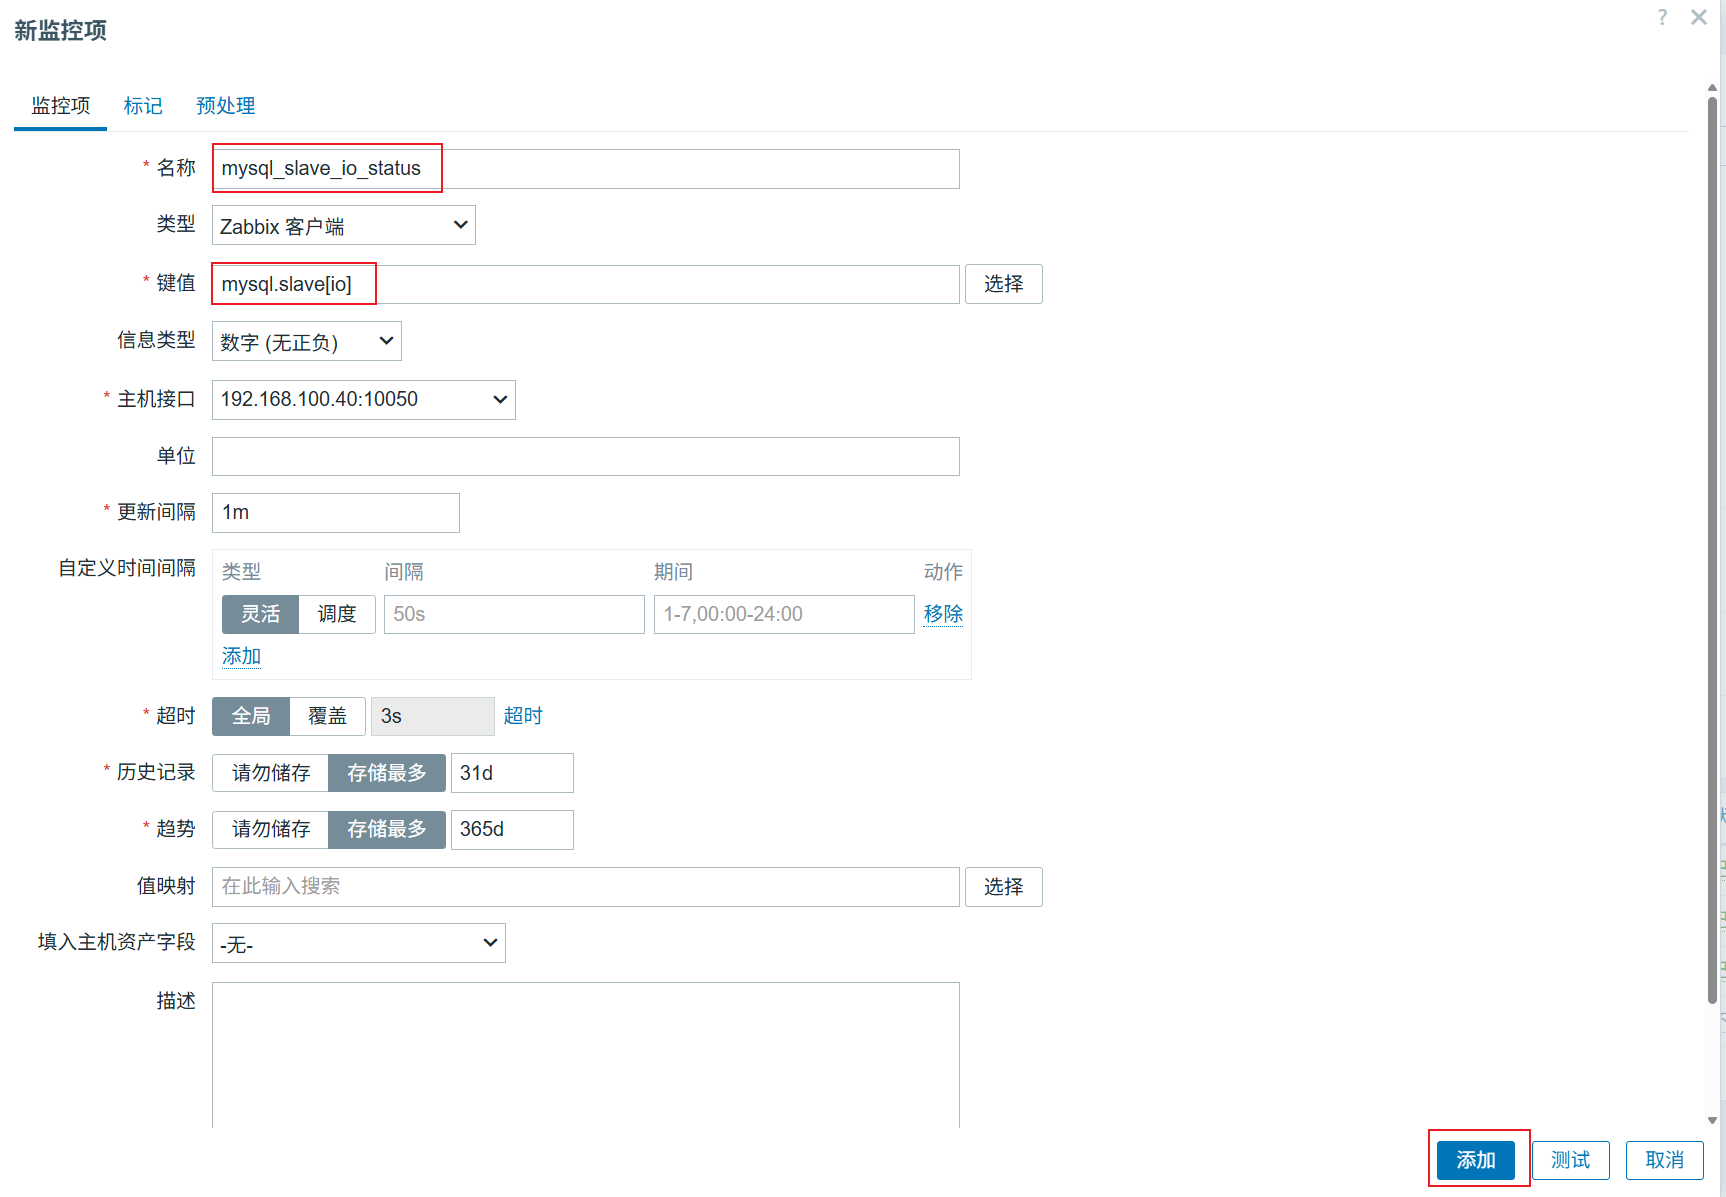
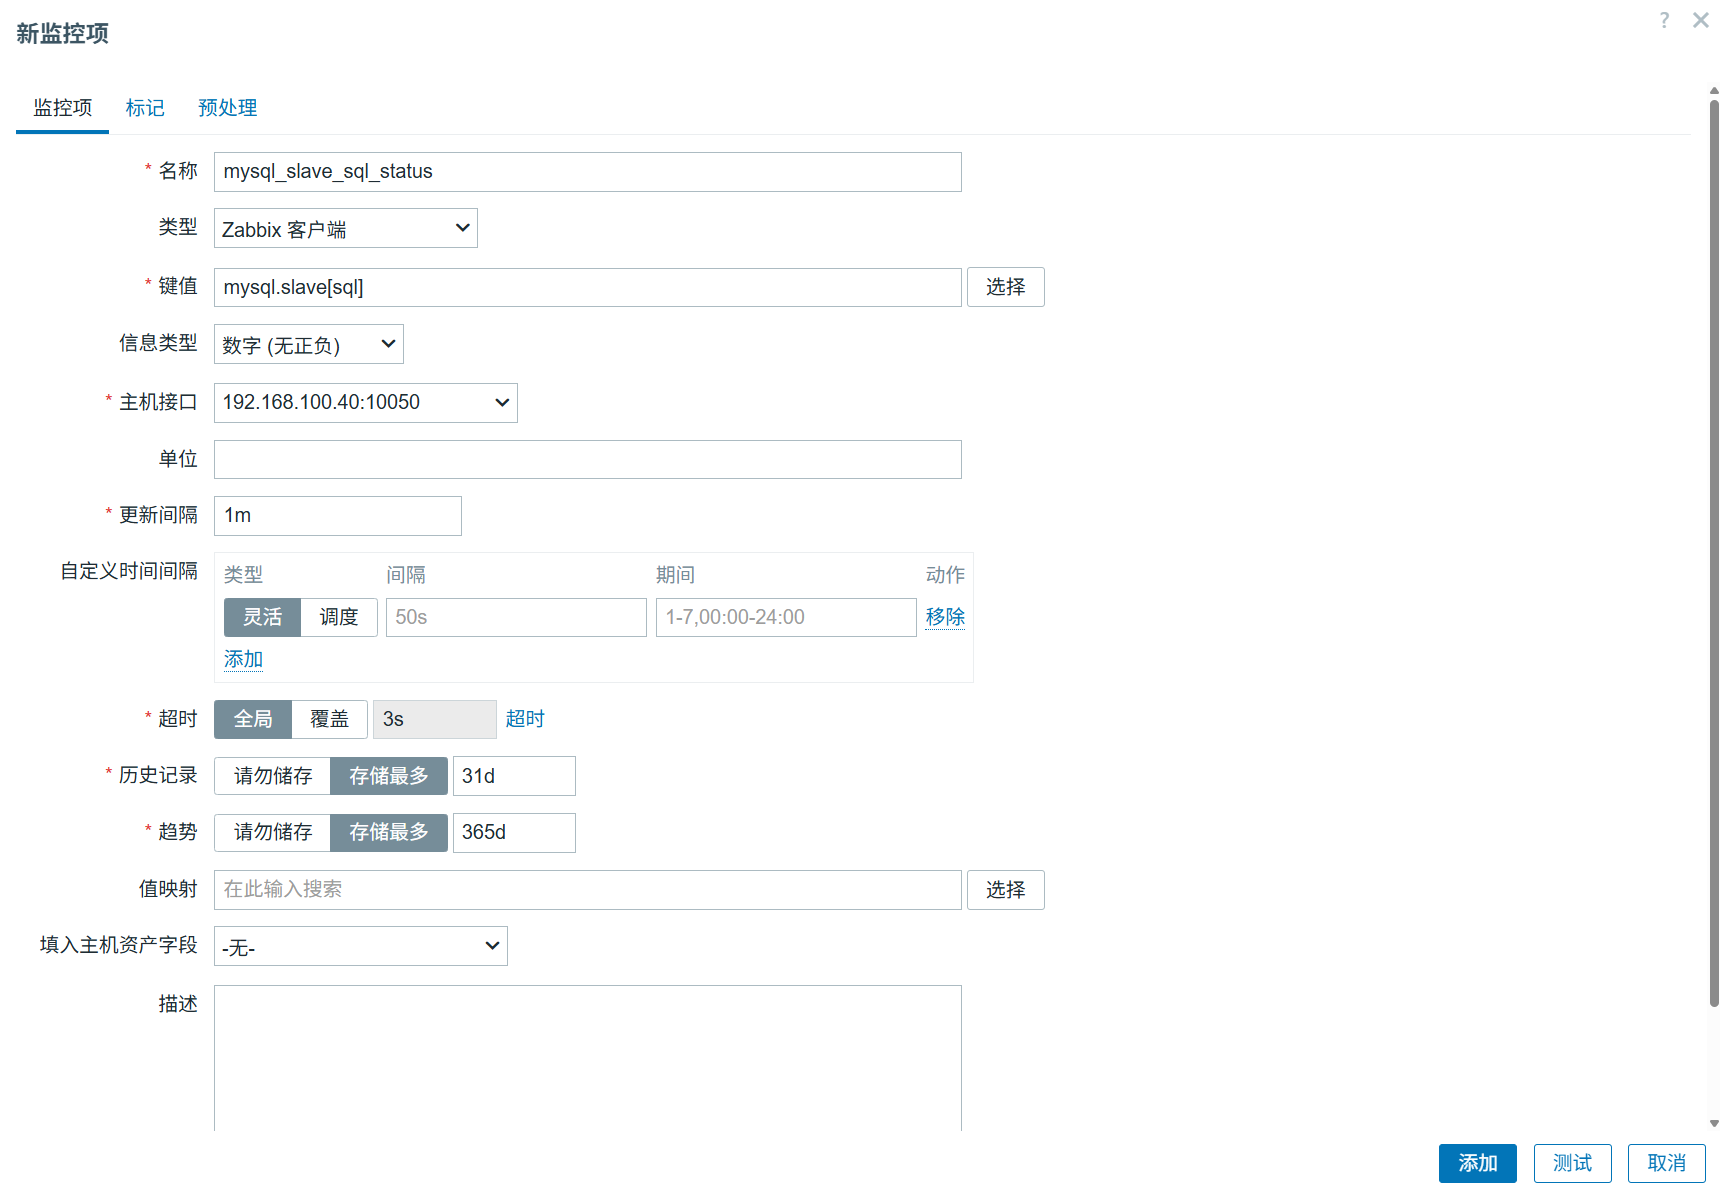
新建触发器
主机——>slave——>触发器——创建触发器
动作——>触发器动作——>Report problems to Zabbix administrators
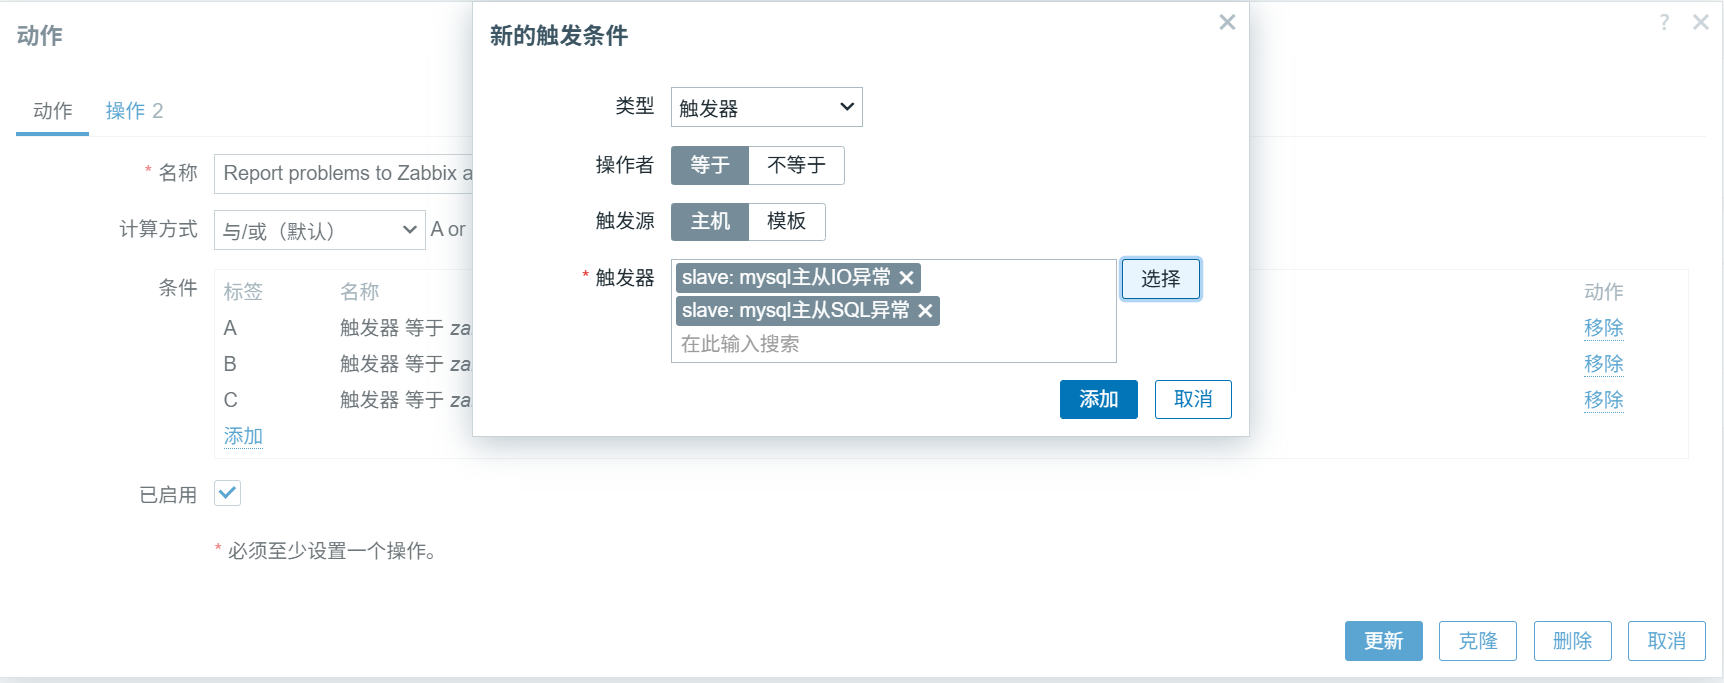
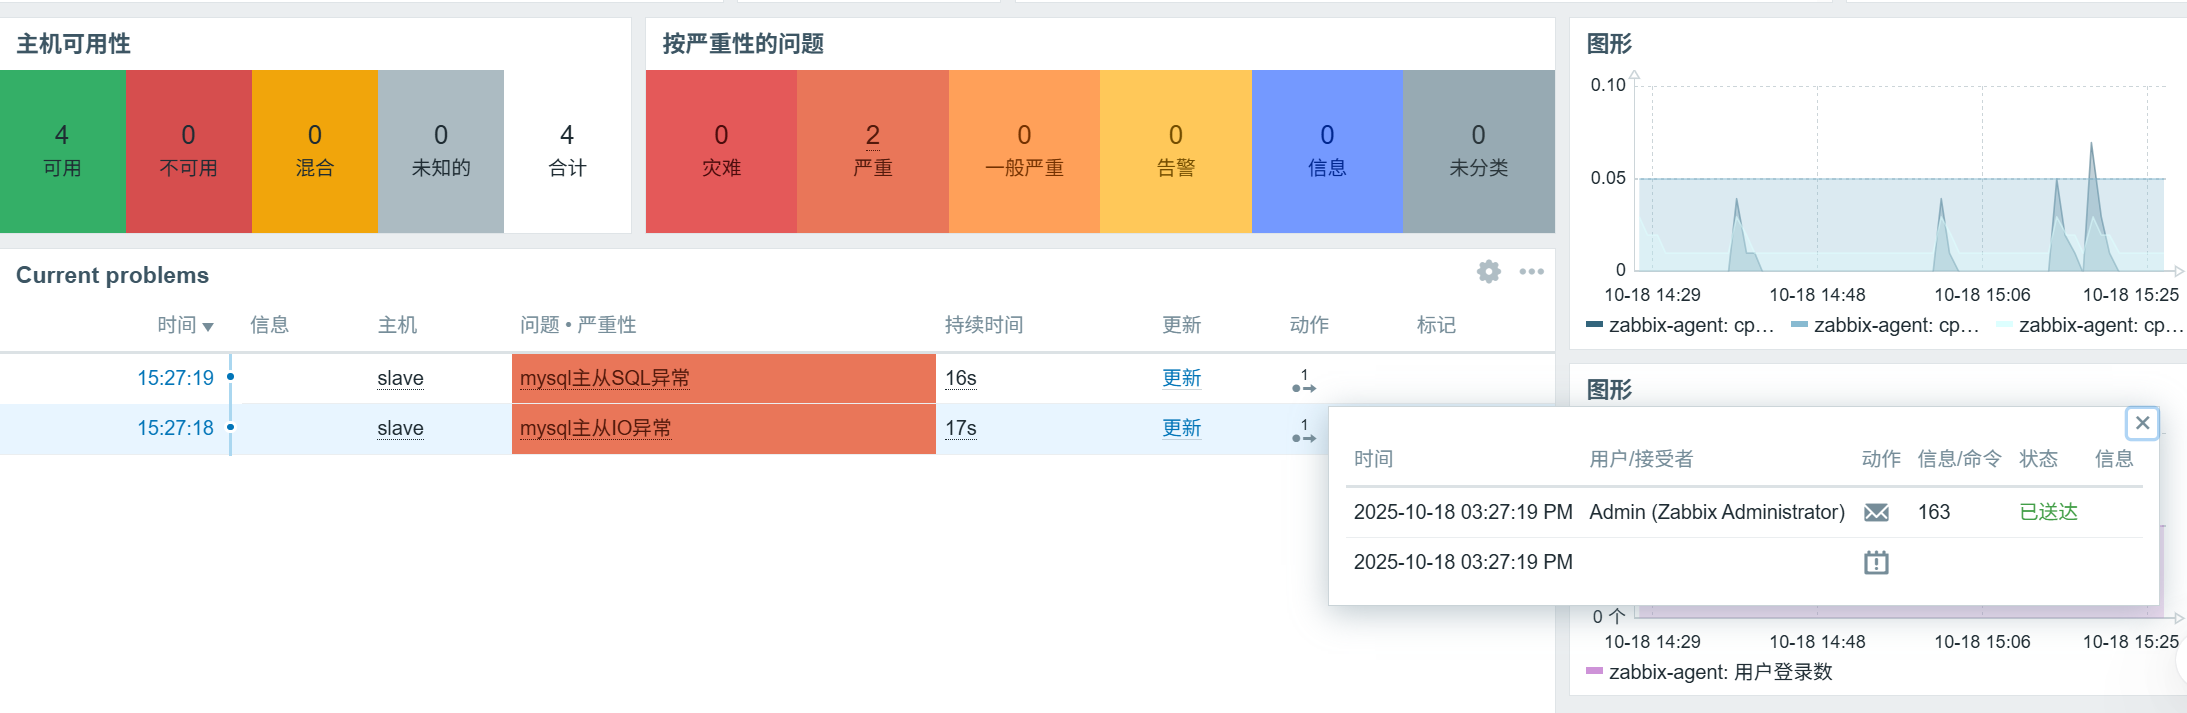
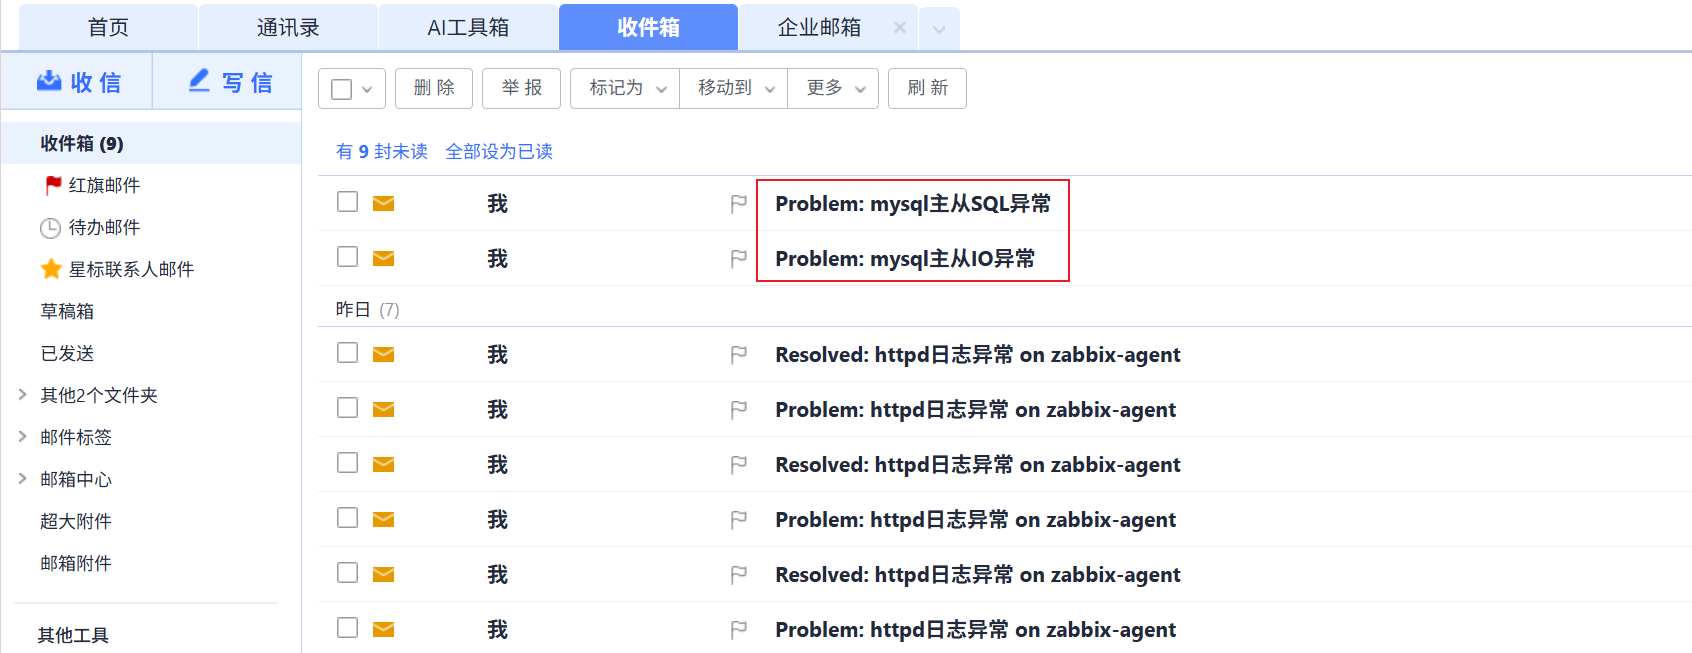
15、测试验证,将mysql主从关闭,查看zabbix告警信息,验证邮箱是否能接收到邮件
[root@slave ~]# mysql -uroot -predhat
Welcome to the MariaDB monitor.  Commands end with ; or \g.
Your MariaDB connection id is 22
Server version: 5.5.60-MariaDB MariaDB Server

Copyright (c) 2000, 2018, Oracle, MariaDB Corporation Ab and others.

Type 'help;' or '\h' for help. Type '\c' to clear the current input statement.

MariaDB [(none)]> stop slave;
Query OK, 0 rows affected (0.02 sec)

MariaDB [(none)]> show slave status\G;
*************************** 1. row ***************************
               Slave_IO_State:
                  Master_Host: master
                  Master_User: user
                  Master_Port: 3306
                Connect_Retry: 60
              Master_Log_File:
          Read_Master_Log_Pos: 4
               Relay_Log_File: mariadb-relay-bin.000001
                Relay_Log_Pos: 4
        Relay_Master_Log_File:
             Slave_IO_Running: No
            Slave_SQL_Running: No
              Replicate_Do_DB:

腾讯云面向开发者汇聚海量精品云计算使用和开发经验,营造开放的云计算技术生态圈。
更多推荐
 37
37 0
0- 0


 已为社区贡献2条内容

所有评论(0)