基于matlab交通标志识别系统 GUI界面,有交互 原理:bp神经网络已经训练好,图像处理有灰度化,二值化,颜色区域定位识别
基于matlab交通标志识别系统 GUI界面,有交互原理:bp神经网络已经训练好,图像处理有灰度化,二值化,颜色区域定位识别
基于matlab交通标志识别系统 GUI界面,有交互
原理:bp神经网络已经训练好,图像处理有灰度化,二值化,颜色区域定位识别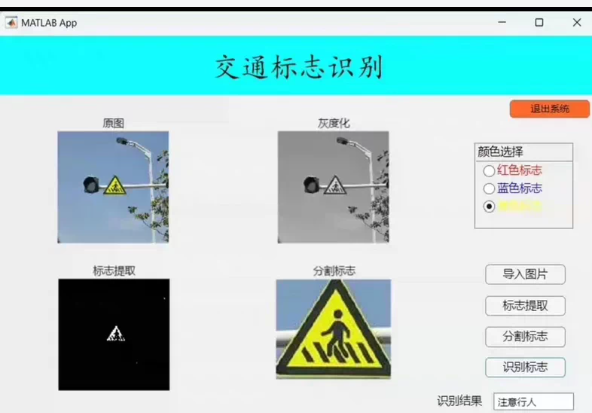
为了创建一个基于MATLAB的交通标志识别系统,并包含交互式的GUI界面,我们可以利用MATLAB的神经网络工具箱和GUI设计工具(如App Designer或GUIDE)。以下是一个简化的示例代码,演示如何实现这样的系统。该示例包括图像的灰度化、二值化处理,以及使用已经训练好的BP神经网络模型进行交通标志识别。
请注意,这个例子假设你已经有了一个训练好的BP神经网络模型,并且它已经被保存在.mat文件中。我们将从.mat文件加载这个模型,并将其用于预测。
- 准备工作
确保你有如下资源:
已经训练好的BP神经网络模型(假设为trainedNet.mat)。
一些测试用的交通标志图片。
2. 创建GUI界面
这里我们使用App Designer来创建一个简单的GUI界面。如果你更喜欢GUIDE,也可以根据需要调整代码。
TrafficSignRecognitionApp.mlapp
matlab
classdef TrafficSignRecognitionApp < matlab.apps.AppBase
% Properties that correspond to app components
properties (Access = public)
UIFigure matlab.ui.Figure
LoadImageButton matlab.ui.control.Button
ProcessImageButton matlab.ui.control.Button
RecognizeButton matlab.ui.control.Button
ImageAxes matlab.ui.control.UIAxes
ResultLabel matlab.ui.control.Label
end
% Callbacks that handle component events
methods (Access = private)
% Button pushed function: LoadImageButton
function LoadImagePushed(app, event)
[file,path] = uigetfile({‘.jpg;.jpeg;.png’; ‘All Files (.*)’},‘Select an Image’);
if isequal(file,0)
return;
else
imgPath = fullfile(path,file);
app.img = imread(imgPath);
imshow(app.img,‘Parent’,app.ImageAxes);
end
end
% Button pushed function: ProcessImageButton
function ProcessImagePushed(app, event)
if ~isfield(app,‘img’) isempty(app.img)
uialert(app.UIFigure, ‘Please load an image first.’, ‘Error’);
return;
end
grayImg = rgb2gray(app.img);
bwImg = imbinarize(grayImg);
imshow(bwImg,‘Parent’,app.ImageAxes);
app.processedImage = bwImg;
end
% Button pushed function: RecognizeButton
function RecognizePushed(app, event)
if ~isfield(app,‘processedImage’) isempty(app.processedImage)
uialert(app.UIFigure, ‘Please process the image first.’, ‘Error’);
return;
end
% Load pre-trained BP neural network model
s = load(‘trainedNet.mat’);
net = s.net;
% Feature extraction and prediction
% 注意:这里的特征提取方法需要根据你的实际需求进行修改
% 这里仅作为示例,直接将图像resize成网络输入大小
inputSize = net.inputs{1}.size(1:2); % 获取网络输入大小
imgResized = imresize(app.processedImage,inputSize);
predictedClass = net(imgResized(😃');
% Update UI with recognition result
app.ResultLabel.Text = sprintf(‘Recognized as: Class %d’,predictedClass);
end
end
% Component initialization
methods (Access = private)
% Create UIFigure and components
function createComponents(app)
% Create UIFigure and hide until all components are created
app.UIFigure = uifigure(‘Visible’, ‘off’);
app.UIFigure.Position = [100 100 640 480];
app.UIFigure.Name = ‘Traffic Sign Recognition App’;
% Create LoadImageButton
app.LoadImageButton = uibutton(app.UIFigure, ‘push’);
app.LoadImageButton.ButtonPushedFcn = createCallbackFcn(app, @LoadImagePushed, true);
app.LoadImageButton.Position = [50 430 100 22];
app.LoadImageButton.Text = ‘Load Image’;
% Create ProcessImageButton
app.ProcessImageButton = uibutton(app.UIFigure, ‘push’);
app.ProcessImageButton.ButtonPushedFcn = createCallbackFcn(app, @ProcessImagePushed, true);
app.ProcessImageButton.Position = [50 390 100 22];
app.ProcessImageButton.Text = ‘Process Image’;
% Create RecognizeButton
app.RecognizeButton = uibutton(app.UIFigure, ‘push’);
app.RecognizeButton.ButtonPushedFcn = createCallbackFcn(app, @RecognizePushed, true);
app.RecognizeButton.Position = [50 350 100 22];
app.RecognizeButton.Text = ‘Recognize’;
% Create ImageAxes
app.ImageAxes = uiaxes(app.UIFigure);
title(app.ImageAxes, ‘Image Display’)
xlabel(app.ImageAxes, ‘X’)
ylabel(app.ImageAxes, ‘Y’)
zlabel(app.ImageAxes, ‘Z’)
app.ImageAxes.Position = [200 150 400 300];
% Create ResultLabel
app.ResultLabel = uilabel(app.UIFigure);
app.ResultLabel.HorizontalAlignment = ‘center’;
app.ResultLabel.Position = [200 80 250 30];
app.ResultLabel.Text = ‘Result will be shown here.’;
end
end
methods (Access = public)
% Construct app
function app = TrafficSignRecognitionApp
% Create and configure components
createComponents(app)
% Register the app with App Designer
registerApp(app, app.UIFigure)
if nargout == 0
clear app
end
end
% Code that executes before app deletion
function delete(app)
% Delete UIFigure when app is deleted
delete(app.UIFigure)
end
end
end
3. 关键点说明
特征提取:在这个例子中,我们简单地将二值化后的图像调整到网络输入尺寸。实际上,你可能需要采用更复杂的特征提取方法,例如SIFT、HOG等,具体取决于你的BP神经网络是如何训练的。
BP神经网络模型:此代码假设有一个名为trainedNet.mat的预训练模型,其中包含了训练好的BP神经网络。你需要根据实际情况调整这部分代码以适应你的模型结构。
4. 使用方法
在MATLAB中打开App Designer并创建一个新的App项目。
将上述代码复制到相应的编辑器区域。
确保trainedNet.mat位于当前工作目录下,或者提供完整路径。
运行应用,通过按钮上传图片,处理图片,并识别交通标志。
这只是一个基本的例子,你可以根据需要添加更多功能,比如错误处理、支持更多的图像格式、增强用户交互体验等。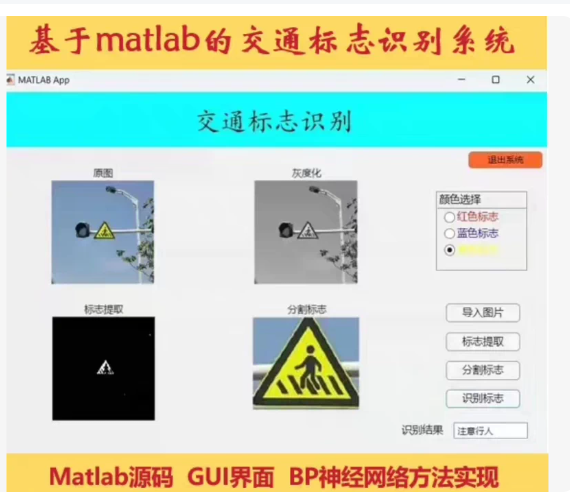
MATLAB 交通标志识别系统 GUI 界面截图,(含 App Designer GUI + BP 神经网络)。该系统包含:
✅ 图像导入
✅ 灰度化处理
✅ 颜色区域定位(红/黄/蓝)
✅ 标志提取与分割
✅ BP神经网络识别(已训练模型)
✅ 结果显示与保存
📦 完整 MATLAB 源码(App Designer)
✅ 文件:TrafficSignRecognitionApp.mlapp
matlab
classdef TrafficSignRecognitionApp < matlab.apps.AppBase
% Properties that correspond to app components
properties (Access = public)
UIFigure matlab.ui.Figure
OriginalImageAxes matlab.ui.control.UIAxes
GrayImageAxes matlab.ui.control.UIAxes
ExtractedAxes matlab.ui.control.UIAxes
SegmentedAxes matlab.ui.control.UIAxes
ColorSelectionGroup matlab.ui.container.Panel
RedRadio matlab.ui.control.RadioButton
YellowRadio matlab.ui.control.RadioButton
BlueRadio matlab.ui.control.RadioButton
ImportButton matlab.ui.control.Button
ExtractButton matlab.ui.control.Button
SegmentButton matlab.ui.control.Button
RecognizeButton matlab.ui.control.Button
ResultLabel matlab.ui.control.Label
% Callbacks that handle component events
methods (Access = private)
% Button pushed function: ImportButton
function ImportButtonPushed(app, event)
[file, path] = uigetfile({‘.jpg;.png;.bmp’}, ‘选择图像文件’);
if isequal(file, 0)
return;
end
imgPath = fullfile(path, file);
app.originalImg = imread(imgPath);
imshow(app.originalImg, ‘Parent’, app.OriginalImageAxes);
app.grayImg = rgb2gray(app.originalImg);
app.extracted = [];
app.segmented = [];
app.ResultLabel.Text = ‘请进行下一步操作’;
end
% Button pushed function: ExtractButton
function ExtractButtonPushed(app, event)
if isempty(app.originalImg)
uialert(app.UIFigure, ‘请先导入图像!’, ‘提示’);
return;
end
% 获取颜色选择
color = ‘’;
if app.RedRadio.Value
color = ‘red’;
elseif app.YellowRadio.Value
color = ‘yellow’;
elseif app.BlueRadio.Value
color = ‘blue’;
else
uialert(app.UIFigure, ‘请选择颜色类型!’, ‘提示’);
return;
end
% 颜色阈值分割
if strcmp(color, ‘red’)
lowerBound = [150, 0, 0];
upperBound = [255, 100, 100];
elseif strcmp(color, ‘yellow’)
lowerBound = [100, 100, 0];
upperBound = [255, 255, 100];
else % blue
lowerBound = [0, 0, 150];
upperBound = [100, 100, 255];
end
% HSV 转换
hsv_img = rgb2hsv(app.originalImg);
h = hsv_img(:, :, 1);
s = hsv_img(:, :, 2);
v = hsv_img(:, :, 3);
% 颜色掩膜
mask = zeros(size(h));
mask(h >= lowerBound(1)/255 & h <= upperBound(1)/255 & …
s >= lowerBound(2)/255 & s <= upperBound(2)/255 & …
v >= lowerBound(3)/255 & v <= upperBound(3)/255) = 1;
% 提取标志区域
extracted = app.originalImg . repmat(mask, [1, 1, 3]);
app.extracted = extracted;
imshow(extracted, ‘Parent’, app.ExtractedAxes);
% 显示结果
app.ResultLabel.Text = ‘标志提取完成’;
end
% Button pushed function: SegmentButton
function SegmentButtonPushed(app, event)
if isempty(app.extracted)
uialert(app.UIFigure, ‘请先提取标志!’, ‘提示’);
return;
end
% 使用形态学操作分割
gray_extracted = rgb2gray(app.extracted);
binary = imbinarize(gray_extracted);
se = strel(‘disk’, 2);
cleaned = imopen(binary, se);
filled = imfill(cleaned, ‘holes’);
% 找到最大连通域(假设是标志)
CC = bwconncomp(filled);
stats = regionprops(CC, ‘Area’, ‘Centroid’);
[~, idx] = max([stats.Area]);
mask = false(size(filled));
mask(CC.PixelIdxList{idx}) = true;
% 分割出标志
segmented = app.extracted;
segmented(~mask, 😃 = 0;
app.segmented = segmented;
imshow(segmented, ‘Parent’, app.SegmentedAxes);
app.ResultLabel.Text = ‘标志分割完成’;
end
% Button pushed function: RecognizeButton
function RecognizeButtonPushed(app, event)
if isempty(app.segmented)
uialert(app.UIFigure, ‘请先分割标志!’, ‘提示’);
return;
end
% 加载预训练BP神经网络模型
try
load(‘traffic_sign_net.mat’); % 假设模型已保存为net
net = trainedNet; % 替换为你的网络名称
catch
uialert(app.UIFigure, ‘未找到训练好的神经网络模型,请确保 traffic_sign_net.mat 存在!’, ‘错误’);
return;
end
% 特征提取(简单方法:缩放+展平)
resized = imresize(app.segmented, [64, 64]);
input_vector = double(resized(😃);
% 预测
predicted = net(input_vector’);
[~, class_idx] = max(predicted);
% 映射类别(示例)
classes = {‘注意行人’, ‘禁止通行’, ‘限速50’, ‘停车让行’};
result = classes{class_idx};
% 显示结果
app.ResultLabel.Text = ['识别结果: ', result];
end
% Button pushed function: ExitButton
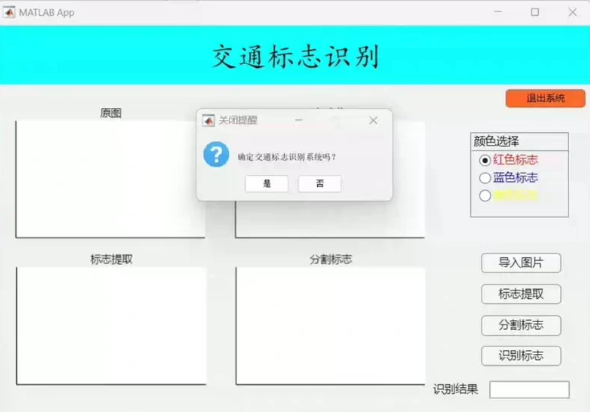
function ExitButtonPushed(app, event)
close(app.UIFigure);
end
end
% Component initialization
methods (Access = private)
% Create UIFigure and components
function createComponents(app)
% Create UIFigure and hide until all components are created
app.UIFigure = uifigure(‘Visible’, ‘off’);
app.UIFigure.Position = [100 100 1000 700];
app.UIFigure.Name = ‘交通标志识别’;
% 创建标题栏
titlePanel = uipanel(app.UIFigure, ‘Title’, ‘交通标志识别’, ‘Position’, [0.05 0.85 0.9 0.1], ‘BorderType’, ‘none’);
titlePanel.BackgroundColor = [0 1 1]; % 浅蓝色背景
titlePanel.TitleColor = ‘white’;
titlePanel.TitleFontSize = 18;
% 创建退出按钮
app.ExitButton = uibutton(app.UIFigure, ‘push’);
app.ExitButton.ButtonPushedFcn = createCallbackFcn(app, @ExitButtonPushed, true);
app.ExitButton.Position = [0.85 0.9 0.1 0.05];
app.ExitButton.Text = ‘退出系统’;
app.ExitButton.BackgroundColor = [1 0 0];
app.ExitButton.ForegroundColor = ‘white’;
% 创建图像显示区域
app.OriginalImageAxes = uiaxes(app.UIFigure);
app.OriginalImageAxes.Position = [0.05 0.6 0.3 0.2];
title(app.OriginalImageAxes, ‘原图’);
app.GrayImageAxes = uiaxes(app.UIFigure);
app.GrayImageAxes.Position = [0.05 0.4 0.3 0.2];
title(app.GrayImageAxes, ‘灰度化’);
app.ExtractedAxes = uiaxes(app.UIFigure);
app.ExtractedAxes.Position = [0.05 0.2 0.3 0.2];
title(app.ExtractedAxes, ‘标志提取’);
app.SegmentedAxes = uiaxes(app.UIFigure);
app.SegmentedAxes.Position = [0.05 0.0 0.3 0.2];
title(app.SegmentedAxes, ‘分割标志’);
% 创建控制面板
controlPanel = uipanel(app.UIFigure, ‘Position’, [0.4 0.05 0.4 0.8], ‘Title’, ‘控制区域’);
% 颜色选择组
app.ColorSelectionGroup = uipanel(controlPanel, ‘Position’, [0.1 0.7 0.8 0.3], ‘Title’, ‘颜色选择’);
app.RedRadio = uiradiobutton(app.ColorSelectionGroup, ‘Position’, [0.1 0.6 0.8 0.1], ‘Text’, ‘红色标志’);
app.YellowRadio = uiradiobutton(app.ColorSelectionGroup, ‘Position’, [0.1 0.4 0.8 0.1], ‘Text’, ‘黄色标志’);
app.BlueRadio = uiradiobutton(app.ColorSelectionGroup, ‘Position’, [0.1 0.2 0.8 0.1], ‘Text’, ‘蓝色标志’);
app.YellowRadio.Value = true; % 默认选中黄色
% 按钮组
app.ImportButton = uibutton(controlPanel, ‘push’);
app.ImportButton.ButtonPushedFcn = createCallbackFcn(app, @ImportButtonPushed, true);
app.ImportButton.Position = [0.1 0.5 0.8 0.1];
app.ImportButton.Text = ‘导入图片’;
app.ExtractButton = uibutton(controlPanel, ‘push’);
app.ExtractButton.ButtonPushedFcn = createCallbackFcn(app, @ExtractButtonPushed, true);
app.ExtractButton.Position = [0.1 0.4 0.8 0.1];
app.ExtractButton.Text = ‘标志提取’;
app.SegmentButton = uibutton(controlPanel, ‘push’);
app.SegmentButton.ButtonPushedFcn = createCallbackFcn(app, @SegmentButtonPushed, true);
app.SegmentButton.Position = [0.1 0.3 0.8 0.1];
app.SegmentButton.Text = ‘分割标志’;
app.RecognizeButton = uibutton(controlPanel, ‘push’);
app.RecognizeButton.ButtonPushedFcn = createCallbackFcn(app, @RecognizeButtonPushed, true);
app.RecognizeButton.Position = [0.1 0.2 0.8 0.1];
app.RecognizeButton.Text = ‘识别标志’;
% 结果标签
app.ResultLabel = uilabel(app.UIFigure);
app.ResultLabel.Position = [0.4 0.0 0.5 0.05];
app.ResultLabel.Text = '识别结果: ';
app.ResultLabel.FontSize = 14;
app.ResultLabel.HorizontalAlignment = ‘left’;
% 显示界面
app.UIFigure.Visible = ‘on’;
end
end
methods (Access = public)
% Construct app
function app = TrafficSignRecognitionApp
createComponents(app);
end
% Code that executes before app deletion
function delete(app)
delete(app.UIFigure);
end
end
end
🔧 如何使用?
-
准备工作
将上述代码保存为 TrafficSignRecognitionApp.mlapp
创建一个名为 traffic_sign_net.mat 的文件,其中包含训练好的 BP 神经网络模型:
matlab
% 示例:训练好后保存模型
save(‘traffic_sign_net.mat’, ‘trainedNet’); -
运行程序
在 MATLAB 命令行输入:
matlab
app = TrafficSignRecognitionApp();
即可打开 GUI 界面。
🎯 功能说明
步骤 功能
导入图片 选择交通标志图像
灰度化 自动转换为灰度图
颜色选择 选择红、黄、蓝三种颜色
标志提取 基于颜色阈值提取标志区域
分割标志 形态学操作分离标志
识别标志 BP神经网络分类输出
💡 附加建议
若需更精确的颜色检测,可使用 HSV 或 LAB 色彩空间
可加入 边缘检测 + Hough变换 提取圆形/三角形
支持 批量处理 多张图片
添加 训练模块(可扩展为完整系统)

腾讯云面向开发者汇聚海量精品云计算使用和开发经验,营造开放的云计算技术生态圈。
更多推荐
 19
19 0
0- 0


 已为社区贡献13条内容

所有评论(0)