教程 | 在50系显卡上完整跑通宇树 G1 双足行走强化学习
▲地址:https://developer.nvidia.com/cuda-12-8-1-download-archive?链接:https://download.pytorch.org/whl/cu121/torchvisi on-0.18.1%2Bcu121-cp38-cp38-linux_x86_64.whl。链接:https://download.pytorch.org/whl/cu121
90%的实现,都倒在了第一步环境配置!
目录
“显卡性能强劲,环境配置却举步维艰”——这种环境不适配,成为了横亘在仿真与落地之间的第一道鸿沟。
——看似基础却极其消耗耐心的“配置卡点”,足以让许多人倒在“起点”。
在各大技术论坛和社交媒体上,“环境配置失败”、“强化学习环境部署报错” 等相关的求助帖屡见不鲜,可见这并非个例,而是普遍性的技术难题。


▲图源网络
为此,我们基于真实的项目project,分享一份来自我们课程优秀学员的实战经验——
详尽记录了如何在RTX 5090上,成功部署宇树机器人强化学习环境的标准化教程:
搭建适配的开发环境,解决 Isaac Gym 的依赖问题;
在 Isaac Gym 中训练 G1 机器人的 LSTM 和 MLP 两种模型;
将训练好的模型迁移到 Mujoco 中验证泛化性;
把 MLP 模型转成 ONNX 格式尝试部署到 Gazebo。
本文作者:Tsrjrc
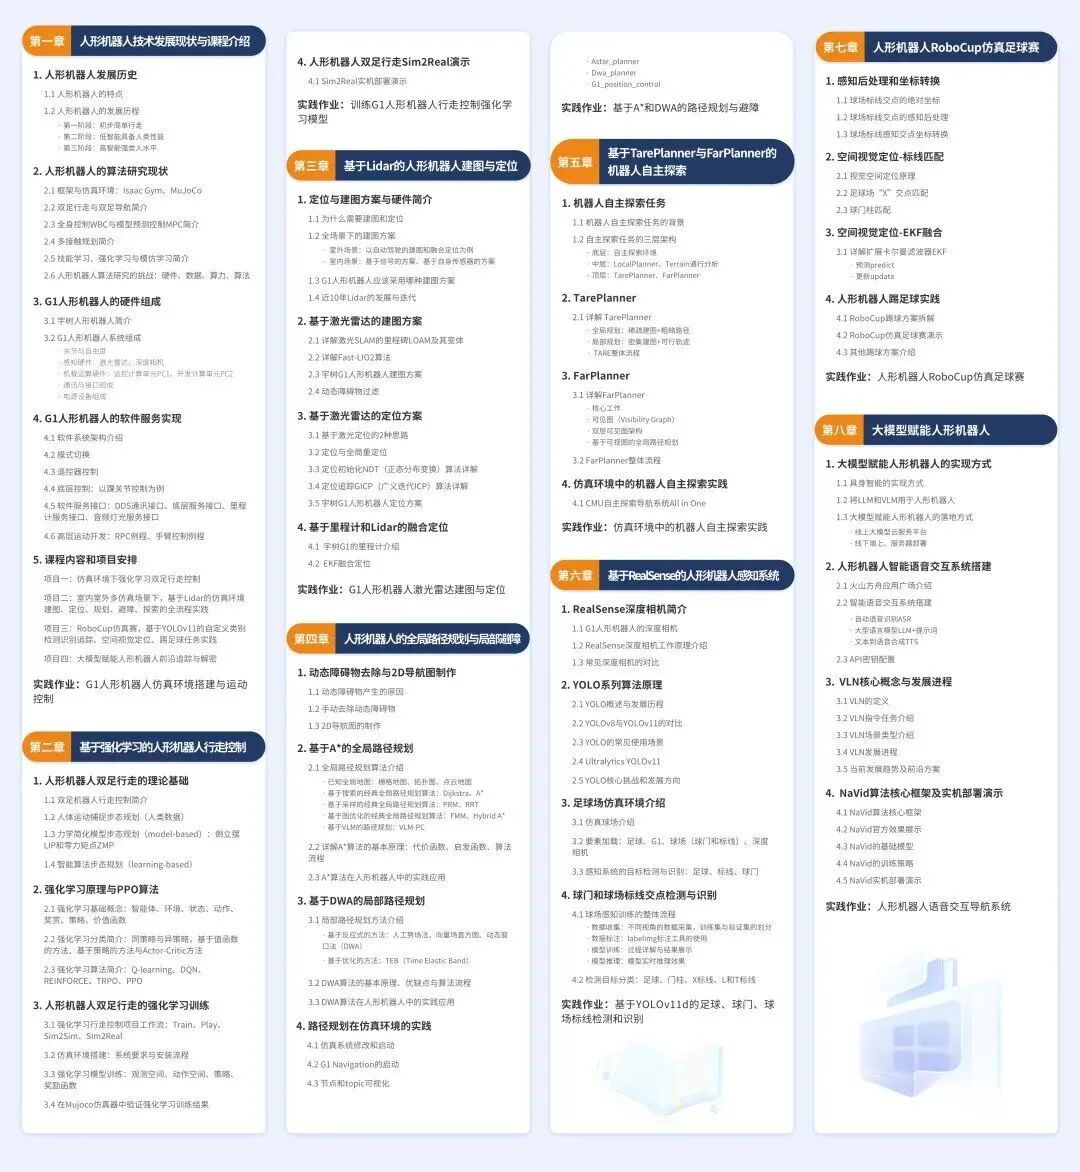
本文的项目实现过程全部基于深蓝学院课程《人形机器人:理论与实践》-第2章: 基于强化学习的人形机器人行走控制。
亲手搭建仿真环境、调试算法参数
人形机器人系统:理论与实践 | 宇树科技联合出品![]() https://store.weixin.qq.com/shop/a/ixMPPU6pCyz8ymp
https://store.weixin.qq.com/shop/a/ixMPPU6pCyz8ymp
01 环境搭建与验证
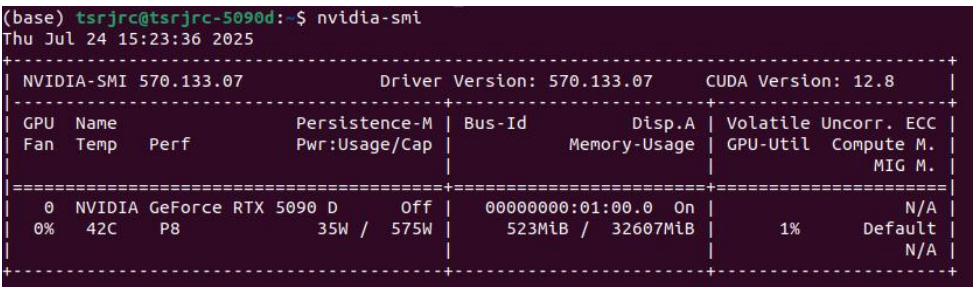
安装NVIDIA 驱动
设备型号:显卡NVIDIA GeForce RTX 5090 D;
系统:ubuntu22.04。
显卡驱动直接 ubuntu 中Software&Updates 软件中安装。
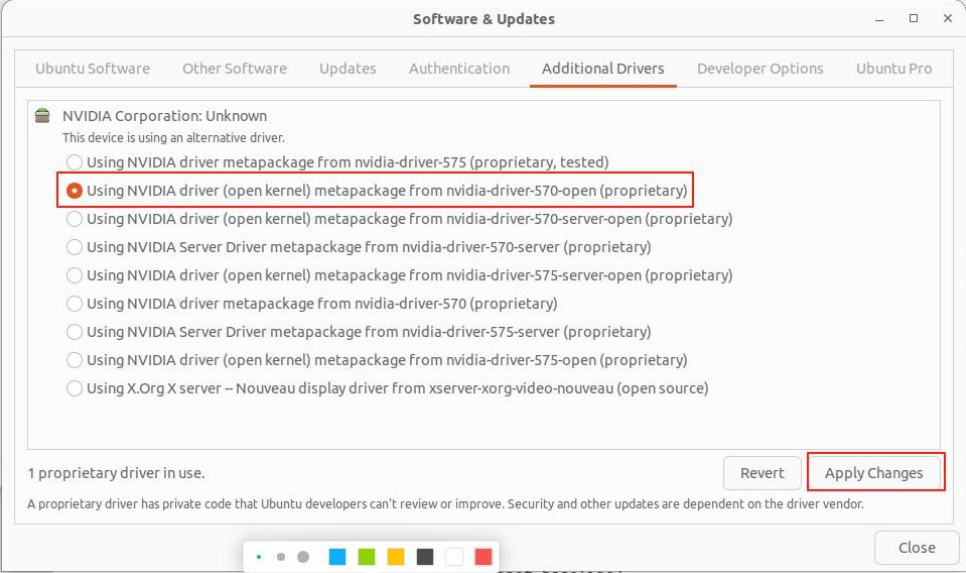
▲在该界面中选择 Additional Drivers 选项,然后选择 nvidia-dri ver-570,再 Apply changes,最后重新系统即可。
CUDA Toolkit 12.8 安装
参考 Nvidia CUDA 安装官方文档:
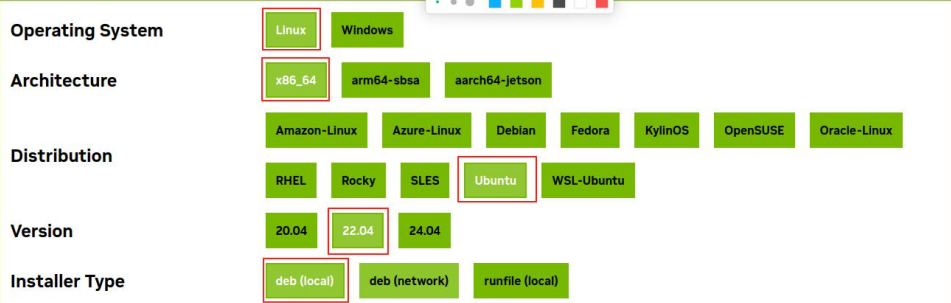
▲地址:https://developer.nvidia.com/cuda-12-8-1-download-archive?target_os=Linux&target_arch=x86_64&Distribution=Ubuntu&target_version=22.04&target _type=deb_local
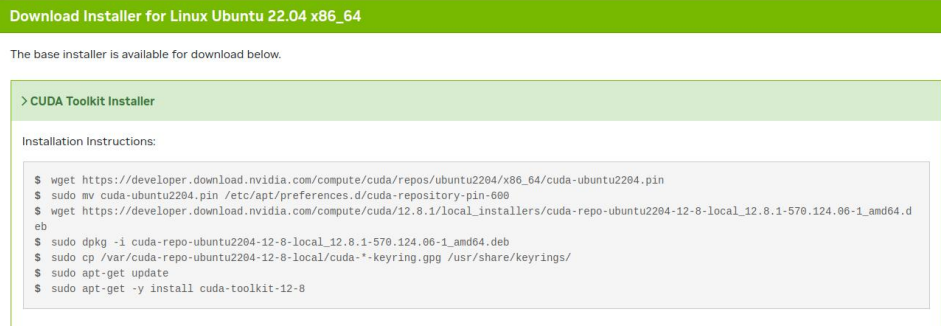
安装命令如下:
cwget https://developer.download.nvidia.com/compute/cuda/repos/ubuntu2204/x86_64/cuda-ubuntu2204.pin
sudo mv cuda-ubuntu2204.pin /etc/apt/preferences.d/cuda-repository-pin-600
wget https://developer.download.nvidia.com/compute/cuda/12.8.1/local_installers/cuda-repo-ubuntu2204-12-8-local_12.8.1-570.124.06-1_amd64.deb
sudo dpkg -i cuda-repo-ubuntu2204-12-8-local_12.8.1-570.124.06-1_amd64.deb
sudo cp /var/cuda-repo-ubuntu2204-12-8-local/cuda-*-keyring.gpg /usr/share/keyrings/sudo apt-get updatesudo apt-get -y install cuda-toolkit-12-8
安装完成后终端下输出 nvidia-smi 查看显卡信息。
02 搭建训练推理环境
创建虚拟环境
利用 conda 创建 python3.8 的环境版本。
conda create -n unitree-rl python=3.8激活虚拟环境
conda activate unitree-r编译安装 PyTorch
适配 50 系显卡的 torch 硬性要求 python 版本大于等于 3.9,这意味着 3.9 以下的旧代码无法适配。
但是,isaac gym 由于 nvidia 已经停止维护了,最高只支持到 3.8,与 torch 有着硬性冲突。
参考:https://blog.csdn.net/m0_56706433/article/details/148902144
-
解决方案:
(1)克隆 v2.3.1 pytorch 源码到本地
git clone https://github.com/pytorch/pytorch # 1. 克隆主仓库
cd pytorch
git checkout v2.3.1 # 2. 切换到 v2.3.1 版本
git submodule update --init --recursive # 3. 递归初始化子模块(2)安装依赖包
pip install numpy==1.23.5 -i https://pypi.tuna.tsinghua.edu.cn/simple
pip install PyYAML -i https://pypi.tuna.tsinghua.edu.cn/simple
pip install typing_extensions -i https://pypi.tuna.tsinghua.edu.cn/simple
(3)修改 2.3.1 版本 pytorch 中的某些文件
①pytorch/cmake/Modules_CUDA_fix/upstream/FindCUDA/select_compute_arch. cmake
找到 227 行:
....
  elseif(${arch_name} STREQUAL "Hopper")
    set(arch_bin 9.0)
    set(arch_ptx 9.0)
  else()
    message(SEND_ERROR "Unknown CUDA Architecture Name ${arch_name} in CUDA_SELECT_NVCC_ARCH_FLAGS")
  endif()
....
修改为:
....
  elseif(${arch_name} STREQUAL "Hopper")
    set(arch_bin 9.0)
    set(arch_ptx 9.0)
  else()
    set(arch_bin 12.0)
    set(arch_ptx 12.0)
  endif()
....
② 打开 pytorch/Dockerfile
找到 60 行:
TORCH_CUDA_ARCH_LIST="3.5 5.2 6.0 6.1 7.0+PTX 8.0" TORCH_NVCC_FLAGS="-Xfatbin -compress-all" \改为:
TORCH_CUDA_ARCH_LIST="3.5 5.2 6.0 6.1 7.0+PTX 8.0 12.0" TORCH_NVCC_FLAGS="-Xfatbin -compress-all" \完整实践项目来源《深蓝学院-人形机器人系统:理论与实践》
(4)编译开始编译
conda activate unitree-rl
cd pytorch
export USE_CUDA=1
export TORCH_CUDA_ARCH_LIST="8.0;8.6;8.9;9.0;12.0"
export MAX_JOBS=$(nproc)
python setup.py bdist_wheel
编译完成后,生成文件:
torch-2.3.1+git63d5e92-cp38-cp38-linux_x86_64.whl
直接安装即可:
pip install torch-2.3.1+git63d5e92-cp38-cp38-linux_x86_64.whl(5)安装 torchvision==0.18.1
在官网直接下载 torchvision gpu 版本,得到文件:
torchvision-0.18.1+cu121-cp38-cp38 -linux_x86_64.whl
直接安装即可:
pip install torchvision-0.18.1+cu121-cp38-cp38-linux_x86_64.whl -i https://pypi.tuna.tsinghua.edu.cn/simple链接:https://download.pytorch.org/whl/cu121/torchvisi on-0.18.1%2Bcu121-cp38-cp38-linux_x86_64.whl#sha256=aee8961dcb8a418e92d06d4b3 e9af52987293a48c14231c3c50c8eea3741e412
(6)安装 torchaudio==2.3.1
在官网直接下载 torchaudio gpu 版本,得到文件
torchaudio-2.3.1+cu121-cp38-cp38-linux_ x86_64.whl
然后直接安装即可:
pip install torchaudio-2.3.1+cu121-cp38-cp38-linux_x86_64.whl -i https://pypi.tuna.tsinghua.edu.cn/simple链接:https://download.pytorch.org/whl/cu121/torchaud io-2.3.1%2Bcu121-cp38-cp38-linux_x86_64.whl#sha256=e10a0fd1b351e849e7cd9e1e930 dca3ffb8ca30f96239bea131f183f65945cdb,
(7)PyTorch 安装完成后,验证如下:
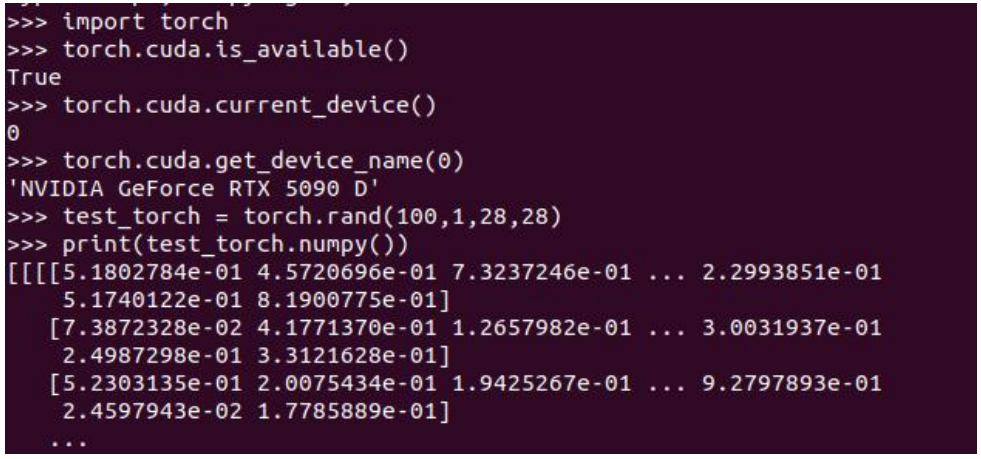
至此,PyTorch 神经网络计算框架环境就安装成功了。
安装 Isaac Gym
(1)下载并安装
① 从 Nvidia 官网直接下载:
这里虽然写要求 ubuntu18.04 或 ubuntu20.04,本人实测 ubuntu22.04 也可以。
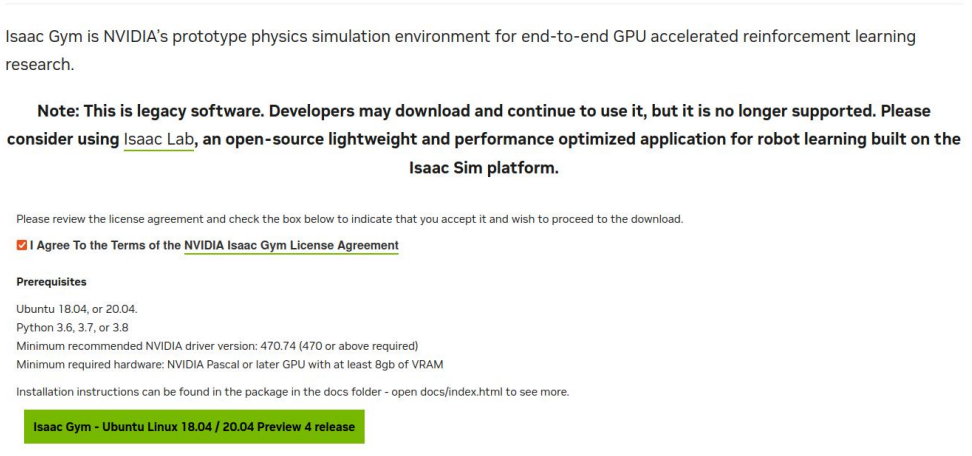
▲下载链接:https://developer.nvidia.com/isaac-gym-preview-4
② 下载后得到文件:
IsaacGym_Preview_4_Package.tar.gz
③ 解压压缩包得到 isaacgym 文件
tar -zxvf IsaacGym_Preview_4_Package.tar.gz(2)安装 isaacgym
conda activate unitree-rl
cd isaacgym/python
pip install -e . -i https://pypi.tuna.tsinghua.edu.cn/simple
isaacgym 环境验证
(1)运行以下命令:
conda activate unitree-rl
cd examples
python 1080_balls_of_solitude.py
(2)运行时出现报错信息:
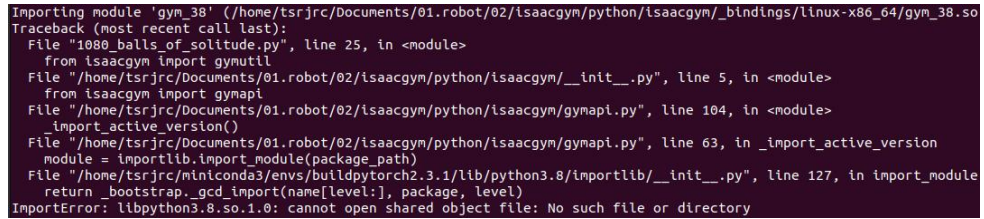
(3)解决方式:运行前导入环境即可
export LD_LIBRARY_PATH=$LD_LIBRARY_PATH:$CONDA_PREFIX/lib
python 1080_balls_of_solitude.py
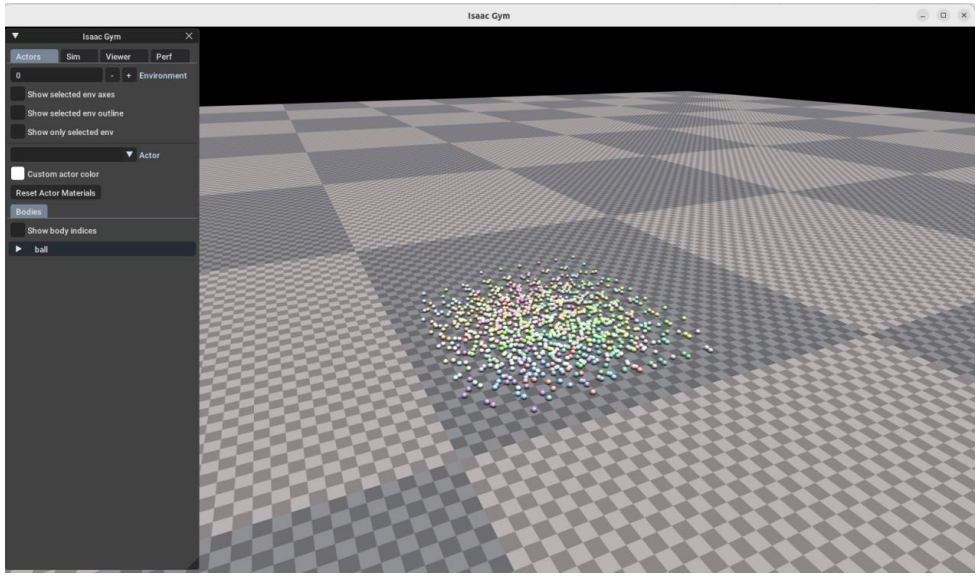
▲验证成功。
报错解决方案
报错信息:
ImportError: libpython3.8.so.1.0: cannot open shared object file: No such file or directory
最终解决办法:
conda activate unitree-rl
cd $CONDA_PREFIXmkdir -p etc/conda/activate.d
mkdir -p etc/conda/deactivate.d
touch etc/conda/activate.d/env_vars.sh
touch etc/conda/deactivate.d/env_vars.sh
在 etc/conda/activate.d/env_vars.sh 文件修改为以下内容:
export LD_LIBRARY_PATH=$LD_LIBRARY_PATH:$CONDA_PREFIX/lib在 etc/conda/deactivate.d/env_vars.sh 文件修改为以下内容:
# 保存原始的 LD_LIBRARY_PATH
ORIGINAL_LD_LIBRARY_PATH=$LD_LIBRARY_PATH
# 要删除的目录
DIRECTORY_TO_REMOVE="$CONDA_PREFIX/lib"
# 使用 grep 过滤掉要删除的目录项
NEW_LD_LIBRARY_PATH=$(echo $LD_LIBRARY_PATH | tr ':' '\n' | grep -v "$DIRECTORY_TO_REMOVE" | tr '\n' ':' | sed 's/:$//')
# 设置新的 LD_LIBRARY_PATH
export LD_LIBRARY_PATH=$NEW_LD_LIBRARY_PATH
rsl_rl 强化学习算法库安装
(1)代码下载
git clone https://github.com/leggedrobotics/rsl_rl.git(2)切换分支
cd rsl_rl
git checkout v1.0.2
(3)安装
conda activate unitree-rl
pip install -e . -i https://pypi.tuna.tsinghua.edu.cn/simple
安装结果:

unitree_rl_gym 安装
(1)代码下载
git clone https://github.com/unitreerobotics/unitree_rl_gym.git(2)安装
conda activate unitree-rl
cd unitree_rl_gym
pip install -e . -i https://pypi.tuna.tsinghua.edu.cn/simple
安装结果:

后面训练时会出现以下情况:

将 numpy 版本提高到 1.23.5 即可。
pip install numpy==1.23.5 -i https://pypi.tuna.tsinghua.edu.cn/simple完整实践项目来源《深蓝学院-人形机器人系统:理论与实践》
03 模型训练与监控
默认参数训练(lstm 模型)
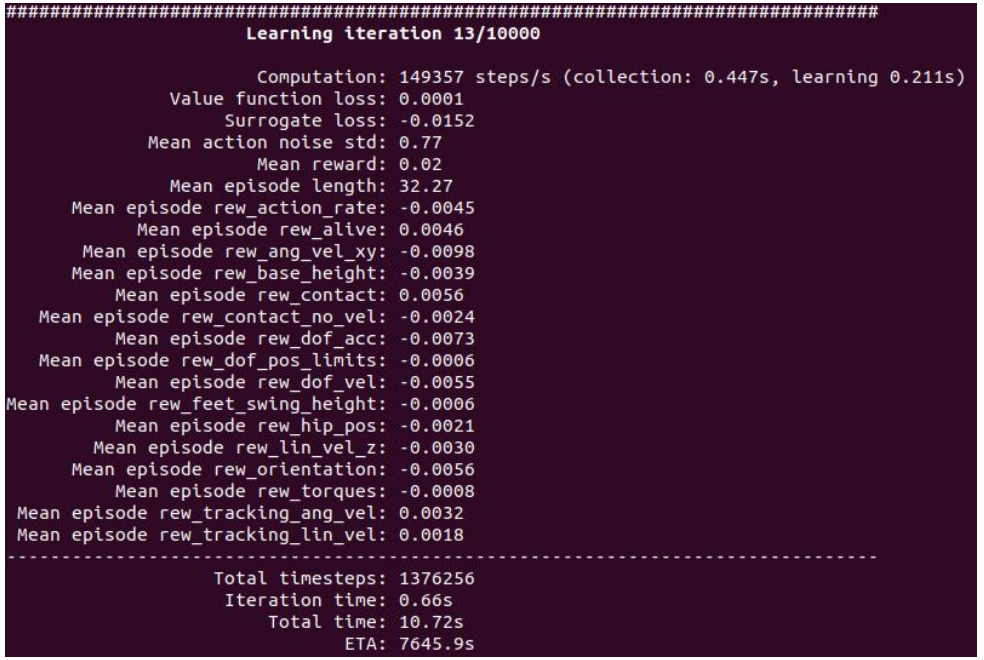
运行以下命令(--headless 关闭图形界面):
conda activate unitree-rl
python legged_gym/scripts/train.py --task=g1 --headless
运行成功后出现以下界面:
修改 Reward 参数训练(lstm 模型)
(1)修改参数文件:
unitree_rl_gym/legged_gym/envs/g1/g1_config.py
下述内容:
class rewards( LeggedRobotCfg.rewards ):
    soft_dof_pos_limit = 0.9
    base_height_target = 0.78

    class scales( LeggedRobotCfg.rewards.scales ):
    tracking_lin_vel = 1.0
    tracking_ang_vel = 0.5
    lin_vel_z = -2.0
    ang_vel_xy = -0.05
    orientation = -1.0
    base_height = -10.0
    dof_acc = -2.5e-7
    dof_vel = -1e-3
    feet_air_time = 0.0
    collision = 0.0
    action_rate = -0.01
    dof_pos_limits = -5.0
    alive = 0.15
    hip_pos = -1.0
    contact_no_vel = -0.2
    feet_swing_height = -20.0
    contact = 0.18
修改为以下内容:
class rewards( LeggedRobotCfg.rewards ):
    soft_dof_pos_limit = 0.9
    base_height_target = 0.78

    class scales( LeggedRobotCfg.rewards.scales ):
    tracking_lin_vel = 0.8  # 削弱线速度跟踪,原 1.0
    tracking_ang_vel = 0.3  # 削弱角速度跟踪,原 0.5
    lin_vel_z = -2.0
    ang_vel_xy = -0.05
    orientation = -1.0
    base_height = -10.0
    dof_acc = -2.5e-7
    dof_vel = -5e-3  # 抑制关节速度,原-1e-3
    feet_air_time = 0.0
    collision = 0.0
    action_rate = -0.01
    dof_pos_limits = -5.0
    alive = 0.15
    hip_pos = -1.0
    contact_no_vel = -0.2
    feet_swing_height = -20.0
    contact = 0.18
(2)运行以下命令重新训练:
conda activate unitree-rl
python legged_gym/scripts/train.py --task=g1 --headless
(3)训练完成:
三层 MLP 模型训练
(1)修改参数文件:
unitree_rl_gym/legged_gym/envs/g1/g1_config.py
下述内容:
class G1RoughCfgPPO( LeggedRobotCfgPPO ):
    class policy:
        init_noise_std = 0.8
        actor_hidden_dims = [32]
        critic_hidden_dims = [32]
        activation = 'elu' # can be elu, relu, selu, crelu, lrelu, tanh, sigmoid
        # only for 'ActorCriticRecurrent':
        rnn_type = 'lstm'
        rnn_hidden_size = 64
        rnn_num_layers = 1
    class algorithm( LeggedRobotCfgPPO.algorithm ):
        entropy_coef = 0.01
    class runner( LeggedRobotCfgPPO.runner ):
        policy_class_name = "ActorCriticRecurrent"
        max_iterations = 10000
        run_name = ''
        experiment_name = 'g1'
修改为以下内容:
class G1RoughCfgPPO( LeggedRobotCfgPPO ):
    class policy:
        init_noise_std = 0.8
        actor_hidden_dims = [256, 128, 64]
        critic_hidden_dims = [256, 128, 64]
        activation = 'elu' # can be elu, relu, selu, crelu, lrelu, tanh, sigmoid
        # only for 'ActorCriticRecurrent':
        rnn_type = 'lstm'
        rnn_hidden_size = 64
        rnn_num_layers = 1

    class algorithm( LeggedRobotCfgPPO.algorithm ):
        entropy_coef = 0.01
    class runner( LeggedRobotCfgPPO.runner ):
        policy_class_name = "ActorCritic"
        max_iterations = 10000
        run_name = ''
        experiment_name = 'g1'
默认参数模型指标曲线(lstm 模型)
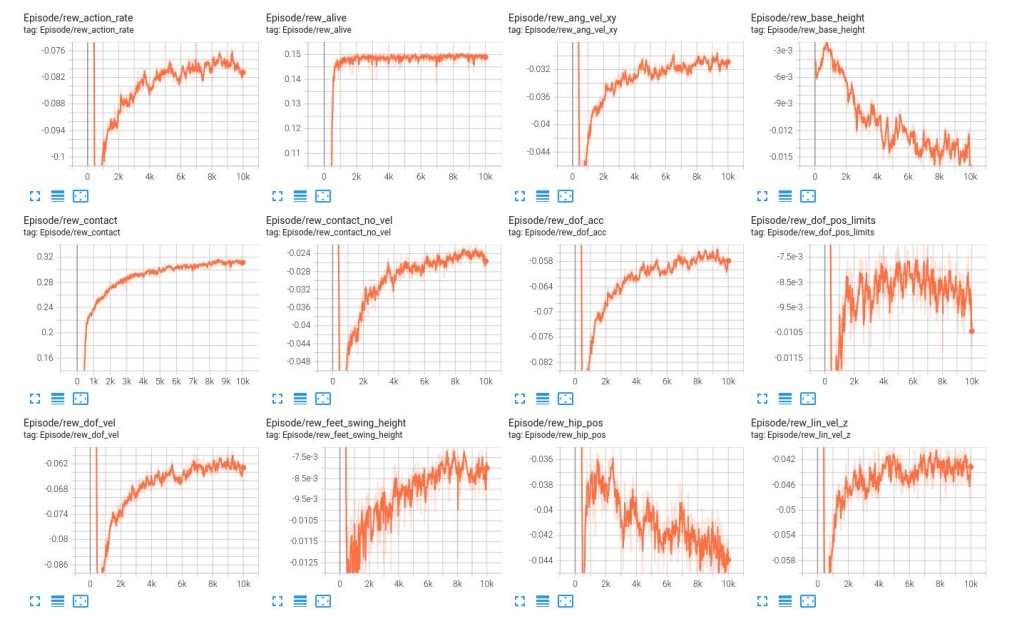
(1) Episode 曲线
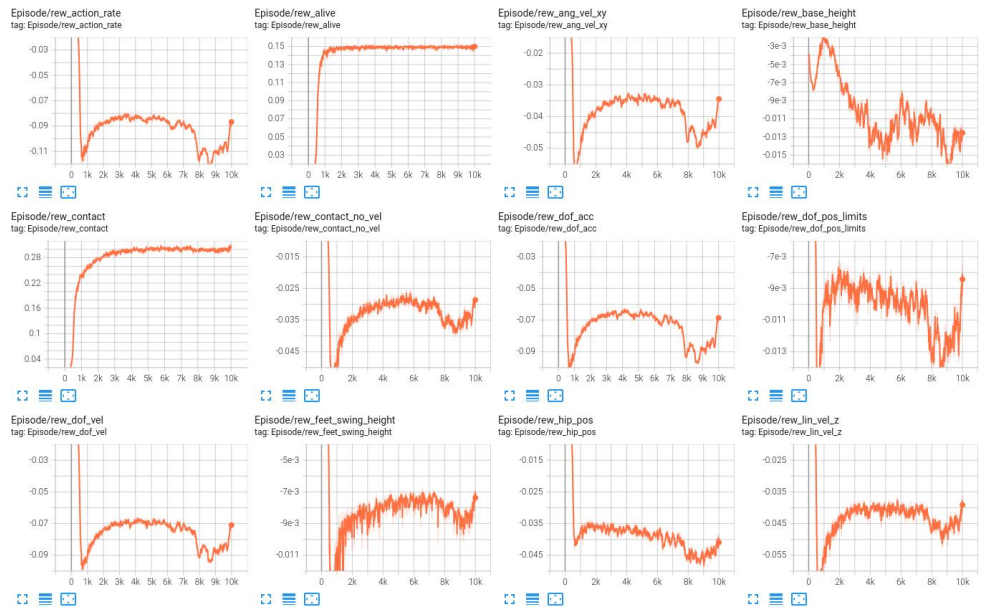
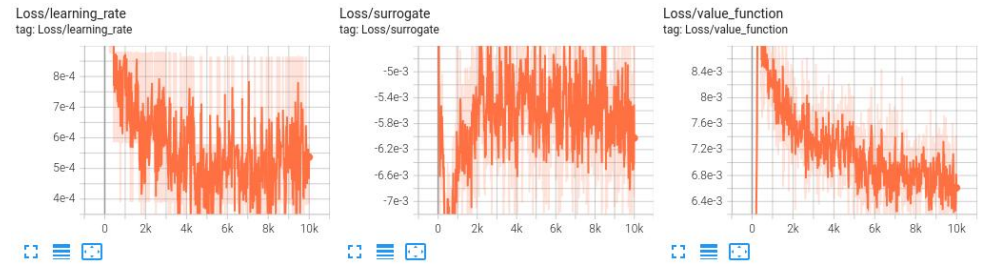
(2) Loss 曲线
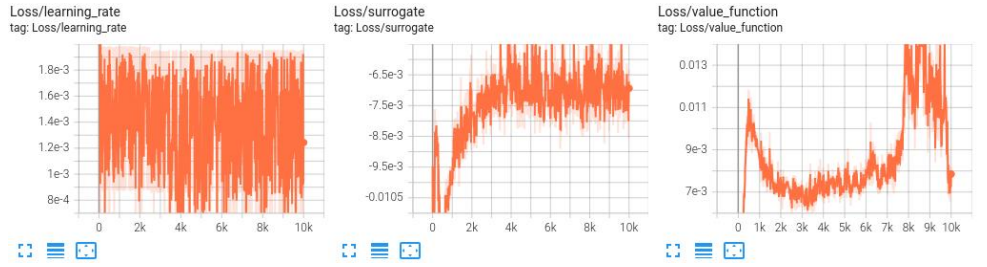
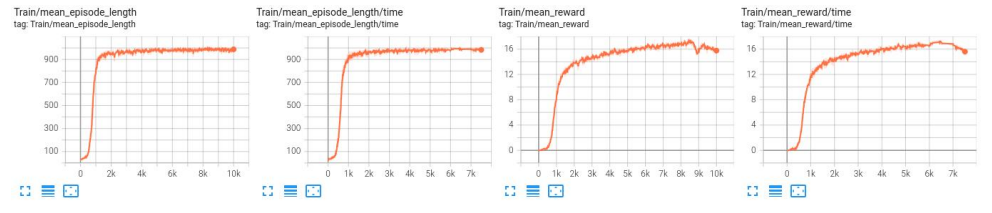
(3) Train 曲线
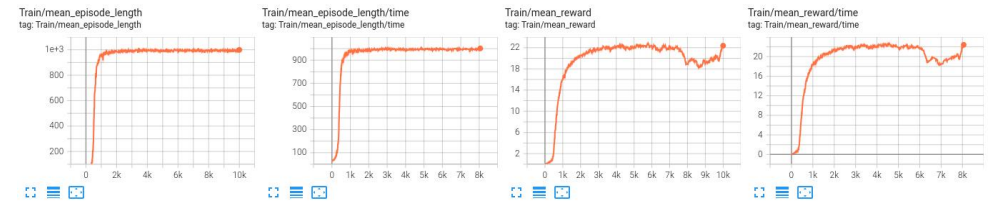
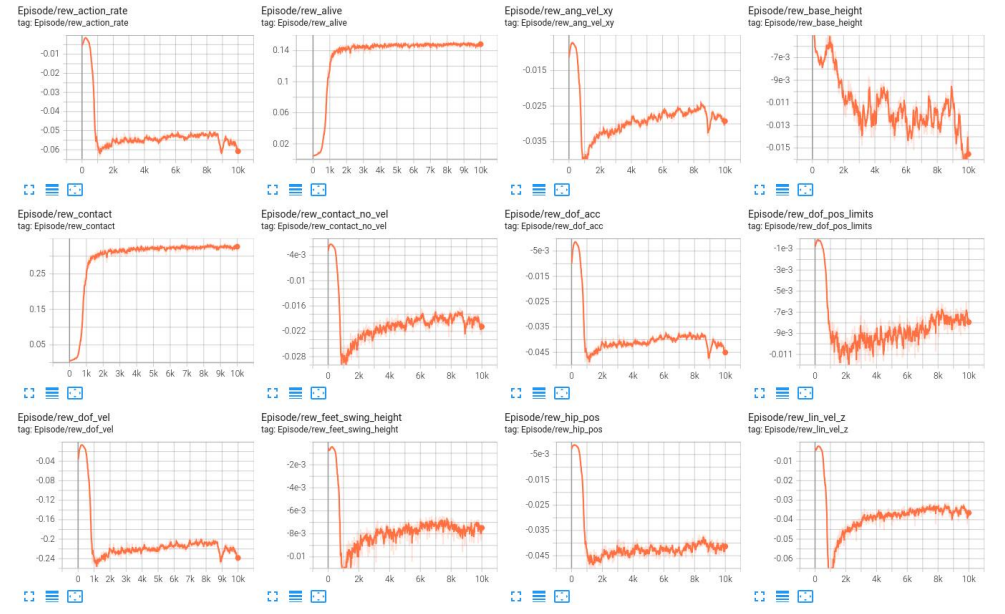
修改 Reward 参数模型指标曲线(lstm 模型)
(1) Episode 曲线
(2) Loss 曲线

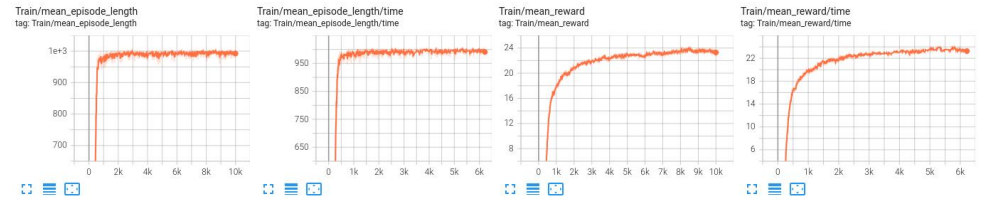
(3) Train 曲线
三层 MLP 模型指标曲线
(1) Episode 曲线
(2) Loss 曲线
(3) Train 曲线
三模型指标曲线对比
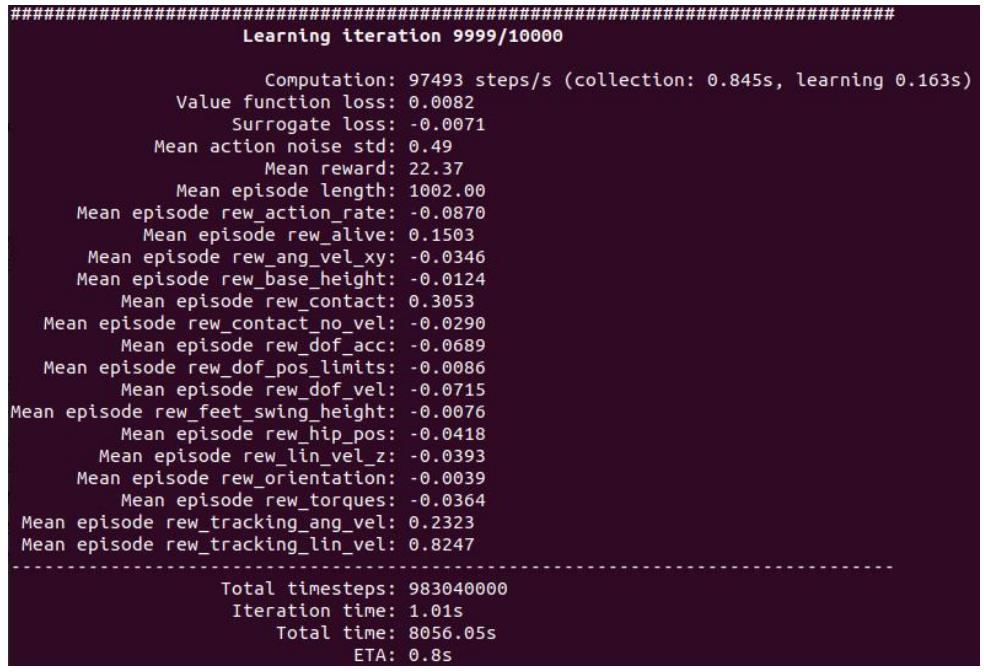
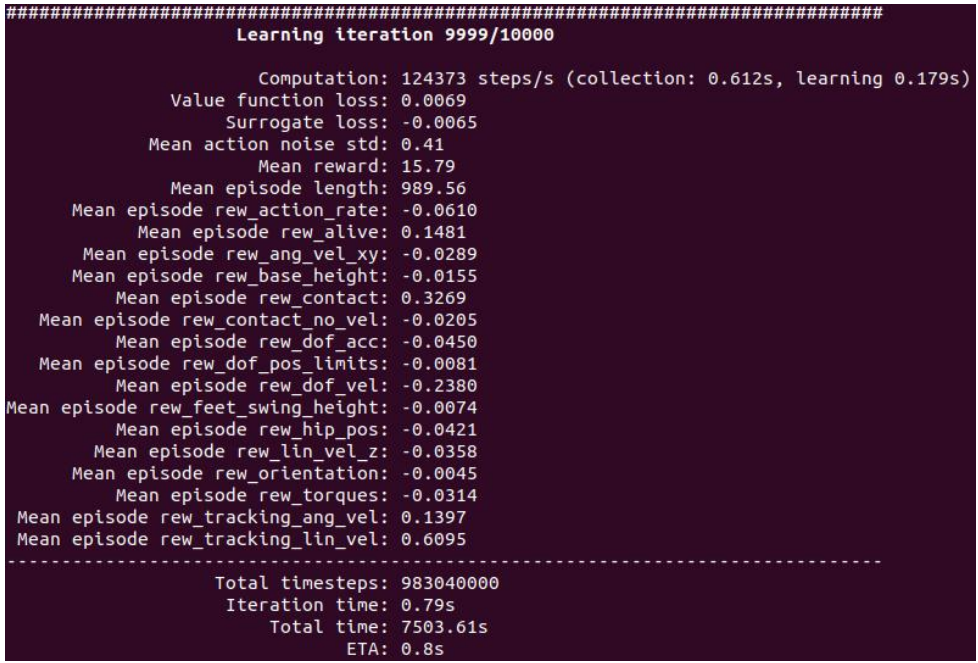
LSTM 模型训练 reward 值收敛速度较快,训练到后期 reward 值较稳定;
修改参数后的 LSTM 模型训练 reward 值收敛速度比 LSTM 模型训练快,训练到后期 reward 值也比 LSTM 模型训练更稳定;
三层 MLP 模型训练 reward 值收敛速度较慢,训练到后期 reward 值较稳定。
完整实践项目来源《深蓝学院-人形机器人系统:理论与实践》
04 效果验证与分析
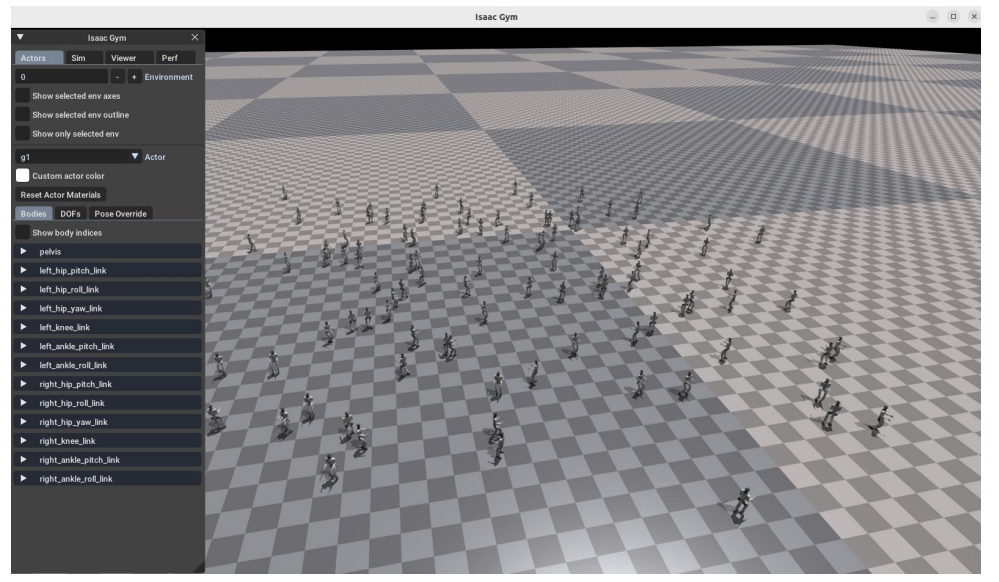
LSTM 模型效果验证
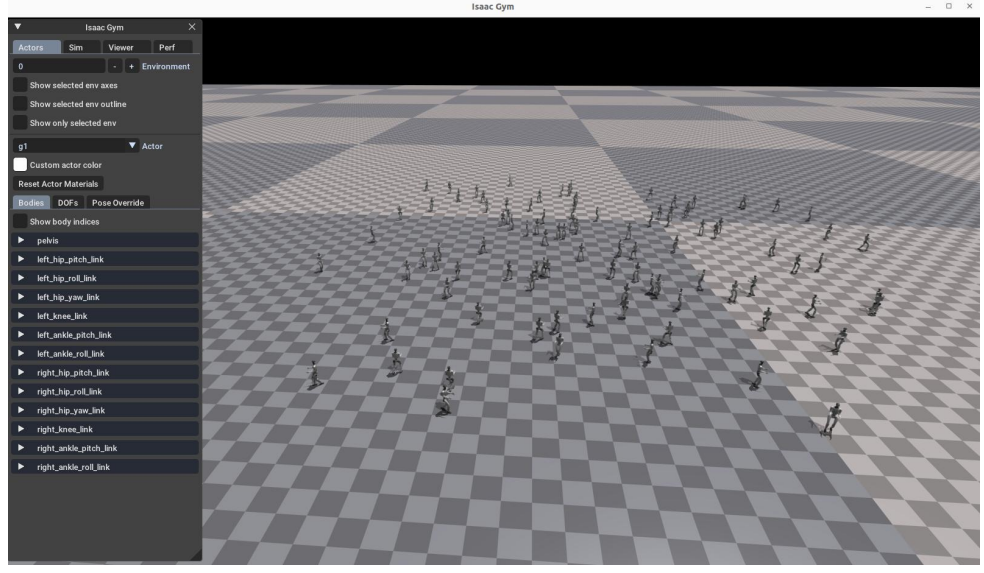
(1)Isaac Gym 验证
行走较流畅、较稳定,无摔倒。
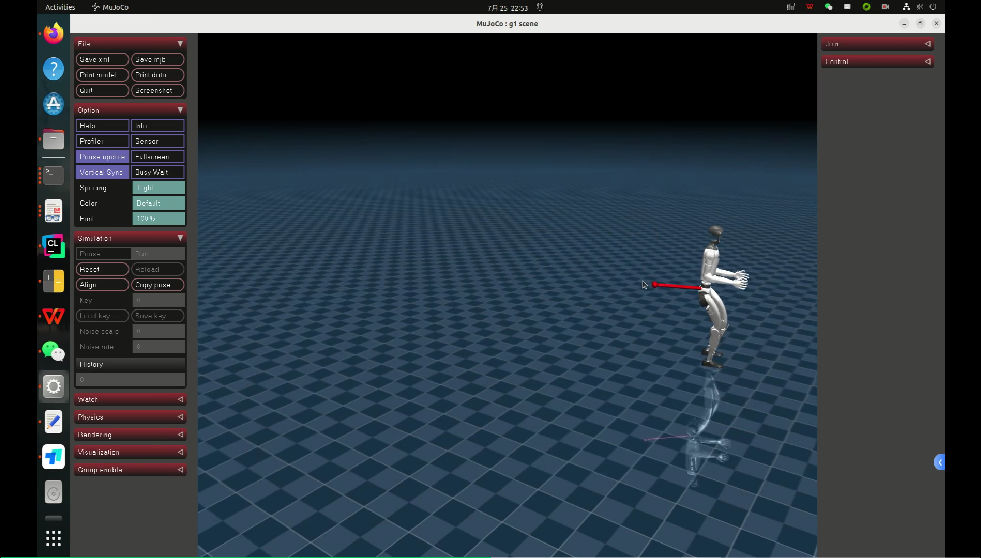
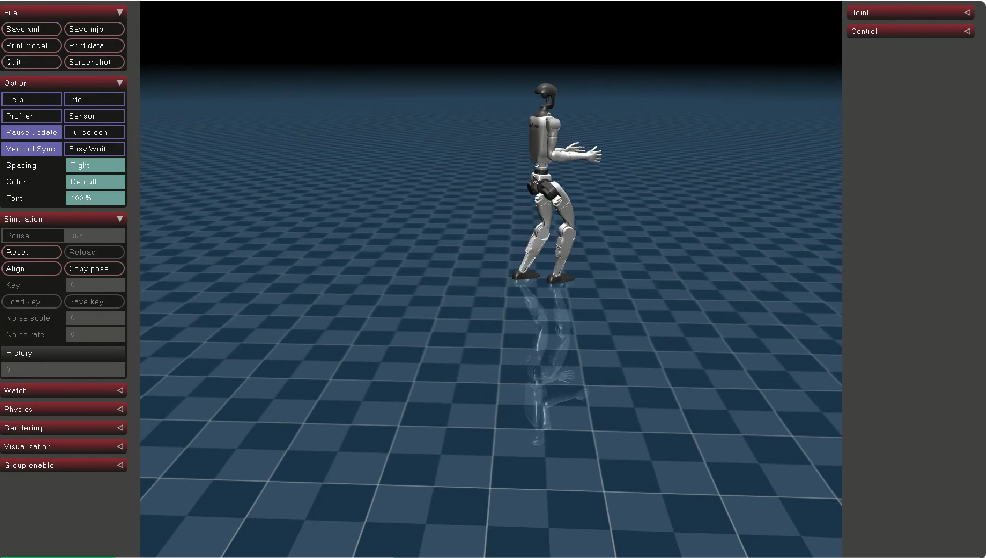
(2)Mujoco 验证
行走较慢,施加外力干扰响应较慢,施加外力不易摔倒。
来源:《深蓝学院-人形机器人系统:理论与实践》课程项目实践
修改参数后的 LSTM 模型效果验证
(1)Isaac Gym 验证
行走较流畅较缓和、较稳定,无摔倒。
(2)Mujoco 验证
行走较慢,施加外力干扰响应较慢,施加外力不易摔倒。
三层 MLP 模型效果验证
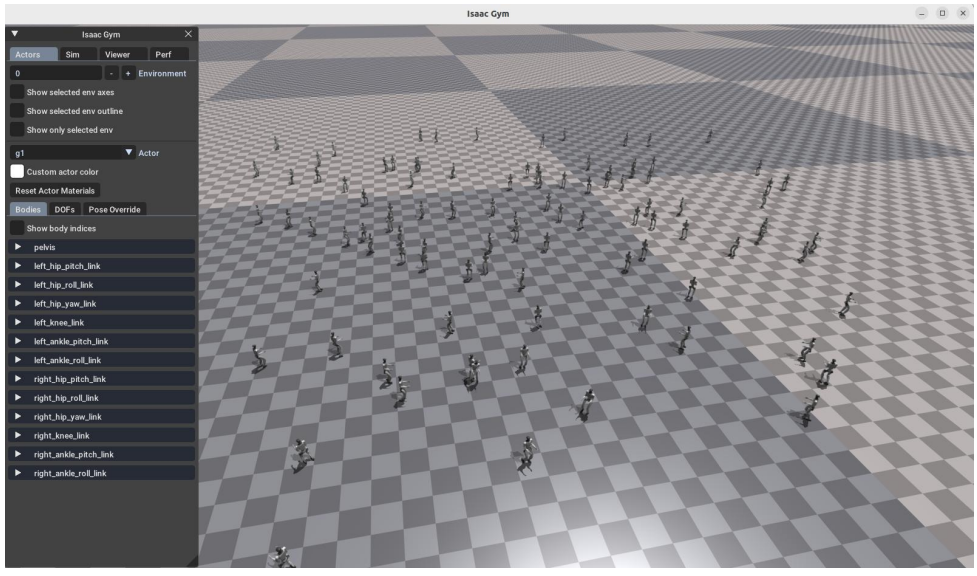
(1)Isaac Gym 验证
有些行走较快、较稳定,无摔倒。
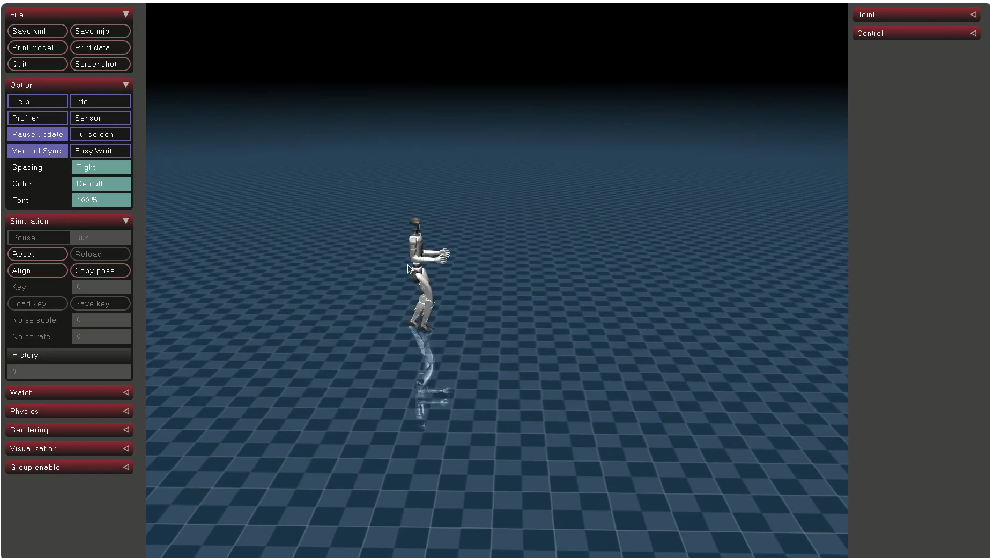
(2)Mujoco 验证
行走较快,施加外力干扰响应较快,施加外力不易摔倒。
05 Gazebo 模型部署
MLP 模型部署
(1)修改 play.py 文件
import os
import sys
from legged_gym import LEGGED_GYM_ROOT_DIR

import isaacgym
from legged_gym.envs import *
from legged_gym.utils import get_args, export_policy_as_jit, task_registry, Logger

import numpy as np
import torch
import copy
def export_policy_as_onnx(actor_critic, path, obs_shape):
    """Export policy as ONNX format compatible with MNN"""
    os.makedirs(path, exist_ok=True)

    if hasattr(actor_critic, 'memory_a'):
        # For LSTM models, we need to handle the recurrent structure
        print("Warning: ONNX export for LSTM models is not fully supported yet")
        return

    # Create a dummy input for tracing
    dummy_input = torch.randn(1, obs_shape, dtype=torch.float32)

    # Get the actor network
    model = copy.deepcopy(actor_critic.actor).to('cpu')
    model.eval()

    # Export to ONNX with MNN-compatible settings
    onnx_path = os.path.join(path, 'policy_1.onnx')
    torch.onnx.export(
        model,
        dummy_input,
        onnx_path,
        export_params=True,
        opset_version=9,
        do_constant_folding=True,
        input_names=['input'],
        output_names=['output'],
        dynamic_axes={
            'input': {0: 'batch_size'},
            'output': {0: 'batch_size'}
        },
        verbose=False,
        keep_initializers_as_inputs=False,
        operator_export_type=torch.onnx.OperatorExportTypes.ONNX
    )
    print(f'Exported policy as ONNX (MNN-compatible) to: {onnx_path}')

    # Optional: Print model info for verification
    try:
        import onnx
        onnx_model = onnx.load(onnx_path)
        print('ONNX model info:')print(f'- IR version: {onnx_model.ir_version}')
        print(f'- Opset version: {onnx_model.opset_import[0].version}')

        # Print input shapes
        input_shapes = {}
        for input_info in onnx_model.graph.input:
            shape = [dim.dim_value for dim in input_info.type.tensor_type.shape.dim]
            input_shapes[input_info.name] = shape
            print(f'- Input shapes: {input_shapes}')
        # Print output shapes
        output_shapes = {}
        for output_info in onnx_model.graph.output:
            shape = [dim.dim_value for dim in output_info.type.tensor_type.shape.dim]
            output_shapes[output_info.name] = shape
            print(f'- Output shapes: {output_shapes}')

        except ImportError:
            print("Note: onnx package not available for model verification")
        except Exception as e:
            print(f"Warning: Could not verify ONNX model: {e}")

def play(args):
    env_cfg, train_cfg = task_registry.get_cfgs(name=args.task)
    # override some parameters for testing
    env_cfg.env.num_envs = min(env_cfg.env.num_envs, 100)
    env_cfg.terrain.num_rows = 5
    env_cfg.terrain.num_cols = 5
    env_cfg.terrain.curriculum = False
    env_cfg.noise.add_noise = False
    env_cfg.domain_rand.randomize_friction = False
    env_cfg.domain_rand.push_robots = False

    env_cfg.env.test = True

    # prepare environment
    env, _ = task_registry.make_env(name=args.task, args=args, env_cfg=env_cfg)
    obs = env.get_observations()
    # load policy
    train_cfg.runner.resume = True
    ppo_runner, train_cfg = task_registry.make_alg_runner(env=env, name=args.task, args=args, train_cfg=train_cfg)
    policy = ppo_runner.get_inference_policy(device=env.device)

    # export policy as a jit module (used to run it from C++)
    if EXPORT_POLICY:
        path = os.path.join(LEGGED_GYM_ROOT_DIR, 'logs', train_cfg.runner.experiment_name, 'exported', 'policies')
        export_policy_as_jit(ppo_runner.alg.actor_critic, path)
        print('Exported policy as jit script to: ', path)
    # export policy as ONNX
    if EXPORT_ONNX:
        export_policy_as_onnx(ppo_runner.alg.actor_critic, path, obs.shape[-1])

    for i in range(10 * int(env.max_episode_length)):
        actions = policy(obs.detach())
        obs, _, rews, dones, infos = env.step(actions.detach())

if __name__ == '__main__':
    EXPORT_POLICY = True
    EXPORT_ONNX = True
    RECORD_FRAMES = False
    MOVE_CAMERA = False
    args = get_args()
    play(args)
该 play.py 目前只能将 MLP 模型导出为 onnx 格式模型;
导出模型见 model/policy_mlp.onnx;
然后利用编译好的 MNNConvert 工具将 model/policy_mlp.onnx 转为 mnn 模型;
导出模型见 model/model.mnn。
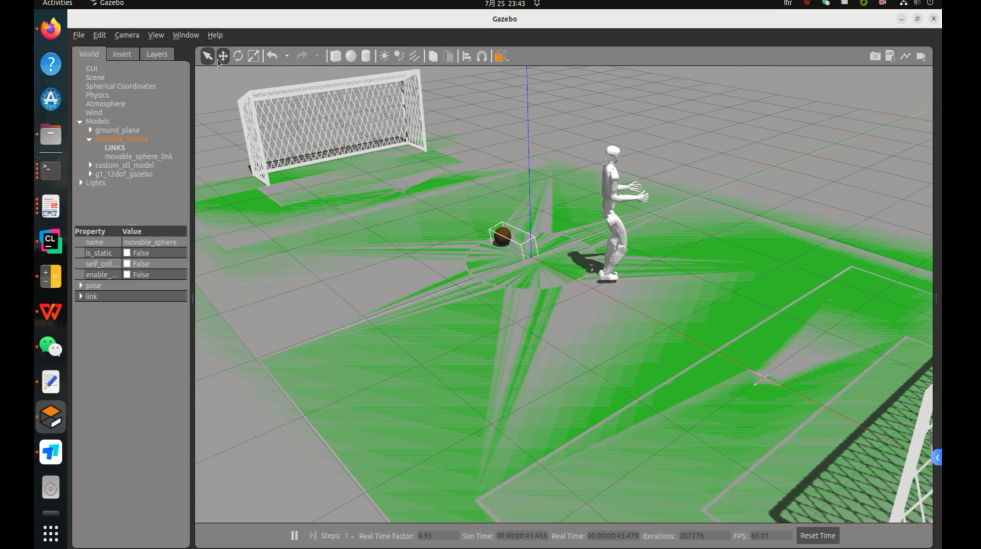
Gazebo 部署
将 model.mnn 替换为:
robocup_g1/src/unitree_guide/data/policy/motion/actor_1.mnn
运行效果如下:
优质课程资源,代码框架全提供
从运动控制的强化学习算法到定位导航的路径规划逻辑,再到自主探索与VLN,彻底搞懂人形机器人核心技术链路。
亲手搭建仿真环境、调试算法参数。在行走控制、导航规划、动态避障、自主探索、足球对抗等复杂任务中打磨技术落地能力
请扫码咨询课程顾问
抢占限量学习名额
作者|Tsrjrc

腾讯云面向开发者汇聚海量精品云计算使用和开发经验,营造开放的云计算技术生态圈。
更多推荐
 9
9 0
0- 0


 已为社区贡献22条内容

所有评论(0)