ubuntu安装openclaw-docker安装openclaw
·
ubuntu安装openclaw-docker安装openclaw
说明
- 安装环境:
- 操作系统:Ubuntu Server 24.04.4 LTS
- 下载地址:https://mirrors.qlu.edu.cn/ubuntu-releases/24.04.4/ubuntu-24.04.4-live-server-amd64.iso
- docker版本:Docker version 29.3.0, build 5927d80
- 该版本中,
docker compose会自动作为插件被安装,使用时命令为:docker compose
- 该版本中,
- 操作系统:Ubuntu Server 24.04.4 LTS
- 为什么使用Docker安装
- 环境隔离:Docker 将 OpenClaw 及其所有依赖(如 Node.js 运行时、系统库等)打包在一个独立的容器中运行。这确保了 OpenClaw 的环境与你的宿主机系统完全隔离。无需在宿主机上手动安装和配置 Node.js、npm 等复杂依赖
- 增强的安全性:容器的隔离性也为安全提供了额外的保障。OpenClaw 在容器内运行,其对宿主机文件系统的访问是受限的(除非你明确挂载目录)。这在一定程度上限制了潜在的安全风险,特别是当你授权 AI 执行一些高风险操作时。
docker安装openclaw
-
创建部署目录
mkdir -p ~/openclaw-server1 cd ~/openclaw-server1 -
编写Docker Compose配置文件
有几点说明:
- OpenClaw 官方镜像地址通常为
ghcr.io/openclaw/openclaw,下载会比较慢 - 镜像版本为
ghcr.io/openclaw/openclaw:latest,拉取镜像时,实际的版本是2026.3.23-2,sha256:dda9f4b94761e87864c901cf34ee858daf89fa1deed9dcb671e8845a6b24062e - 文件夹映射
./data:/home/node/.openclaw - OpenClaw的默认行为是安全地绑定到
127.0.0.1,也就是说,在docker容器外部无法访问,目前似乎没有直接的环境变量(如HOST)来强制修改监听地址为0.0.0.0。所以不要考虑使用HOST=0.0.0.0等环境变量 - 采用了**共享网络栈 (Network Mode)**的方式, Nginx 容器 直接加入 Gateway 容器 的网络命名空间,Nginx 接收外部请求 (
0.0.0.0:80),并通过内部的127.0.0.1:18789转发给 Gateway。(可能有更好的方式没有找到) - nginx镜像选择了
registry.openanolis.cn/openanolis/nginx:1.14.1-8.6,在阿里云容器镜像制品中心找的,龙蜥社区的容器镜像,官网的nginx下载不下来
创建
nginx.confvim nginx.conf粘贴以下内容
user  nginx;
worker_processes  auto;

error_log  /var/log/nginx/error.log warn;
pid        /var/run/nginx.pid;

events {
    worker_connections  1024;
}

http {
    include       /etc/nginx/mime.types;
    default_type  application/octet-stream;

    log_format  main  '$remote_addr - $remote_user [$time_local] "$request" '
                      '$status $body_bytes_sent "$http_referer" '
                      '"$http_user_agent" "$http_x_forwarded_for"';

    access_log  /var/log/nginx/access.log  main;

    sendfile        on;
    keepalive_timeout  65;

    server {
        listen       80; # 监听容器内的 80 端口 (对应宿主机的 18789)
        server_name  localhost;

        location / {
            # ✅ 关键:改为 127.0.0.1,因为它们在同一个网络栈里
            proxy_pass http://127.0.0.1:18789;

            proxy_http_version 1.1;
            proxy_set_header Upgrade $http_upgrade;
            proxy_set_header Connection "upgrade";
            proxy_set_header Host $host;
            proxy_set_header X-Real-IP $remote_addr;
            proxy_set_header X-Forwarded-For $proxy_add_x_forwarded_for;
            proxy_set_header X-Forwarded-Proto $scheme;
        }
    }
}
创建
docker-compose.ymlvim docker-compose.yml粘贴以下内容
version: '3.8' services: # 1. OpenClaw Gateway (主网络拥有者) openclaw-gateway: image: ghcr.io/openclaw/openclaw:2026.3.23-2 container_name: openclaw-gateway restart: always # ✅ 关键:在这里映射端口! # 因为 Nginx 共享了本服务的网络,所以这里映射的端口实际上是 Nginx 监听的端口。 # 我们希望宿主机访问 18789 -> 进入容器 -> 被 Nginx 的 80 端口接收。 ports: - "18789:80" environment: - TZ=Asia/Shanghai - OPENCLAW_PORT=18789 volumes: - ./data:/home/node/.openclaw networks: - openclaw-net mem_limit: 4g cpus: 2.0 # 2. Nginx 反向代理 (共享网络) openclaw-nginx: image: registry.openanolis.cn/openanolis/nginx:1.14.1-8.6 container_name: openclaw-nginx restart: always # ✅ 核心:共享 openclaw-gateway 的网络栈 network_mode: "service:openclaw-gateway" # 注意:使用 network_mode 后,ports, networks, hostname 等指令在此处无效 # 端口映射已在上面的 openclaw-gateway 中定义 (18789:80) volumes: - ./nginx.conf:/etc/nginx/nginx.conf:ro depends_on: - openclaw-gateway networks: openclaw-net: driver: bridge - OpenClaw 官方镜像地址通常为
-
启动服务
docker compose up -d -
openclaw-gateway容器可能会一直重启查看日志:
docker logs --tail=10 -f openclaw-gateway如果是报权限不足
Gateway failed to start: Error: EACCES: permission denied, open '/home/node/.openclaw/openclaw.json.15.aaaaaa.tmp'需要修改当前路径下的
data文件夹的所有者,将该目录所有者修改当前用户sudo chown -R 1000:1000 ./data此时容器
openclaw-gateway启动成功,需重启openclaw-nginx,否则http://ip:18789访问不成功docker restart openclaw-nginx -
此时访问:
http://ip:18789,可以请求成功,出现UI页面,但会有如下提示origin not allowed (open the Control UI from the gateway host or allow it in gateway.controlUi.allowedOrigins)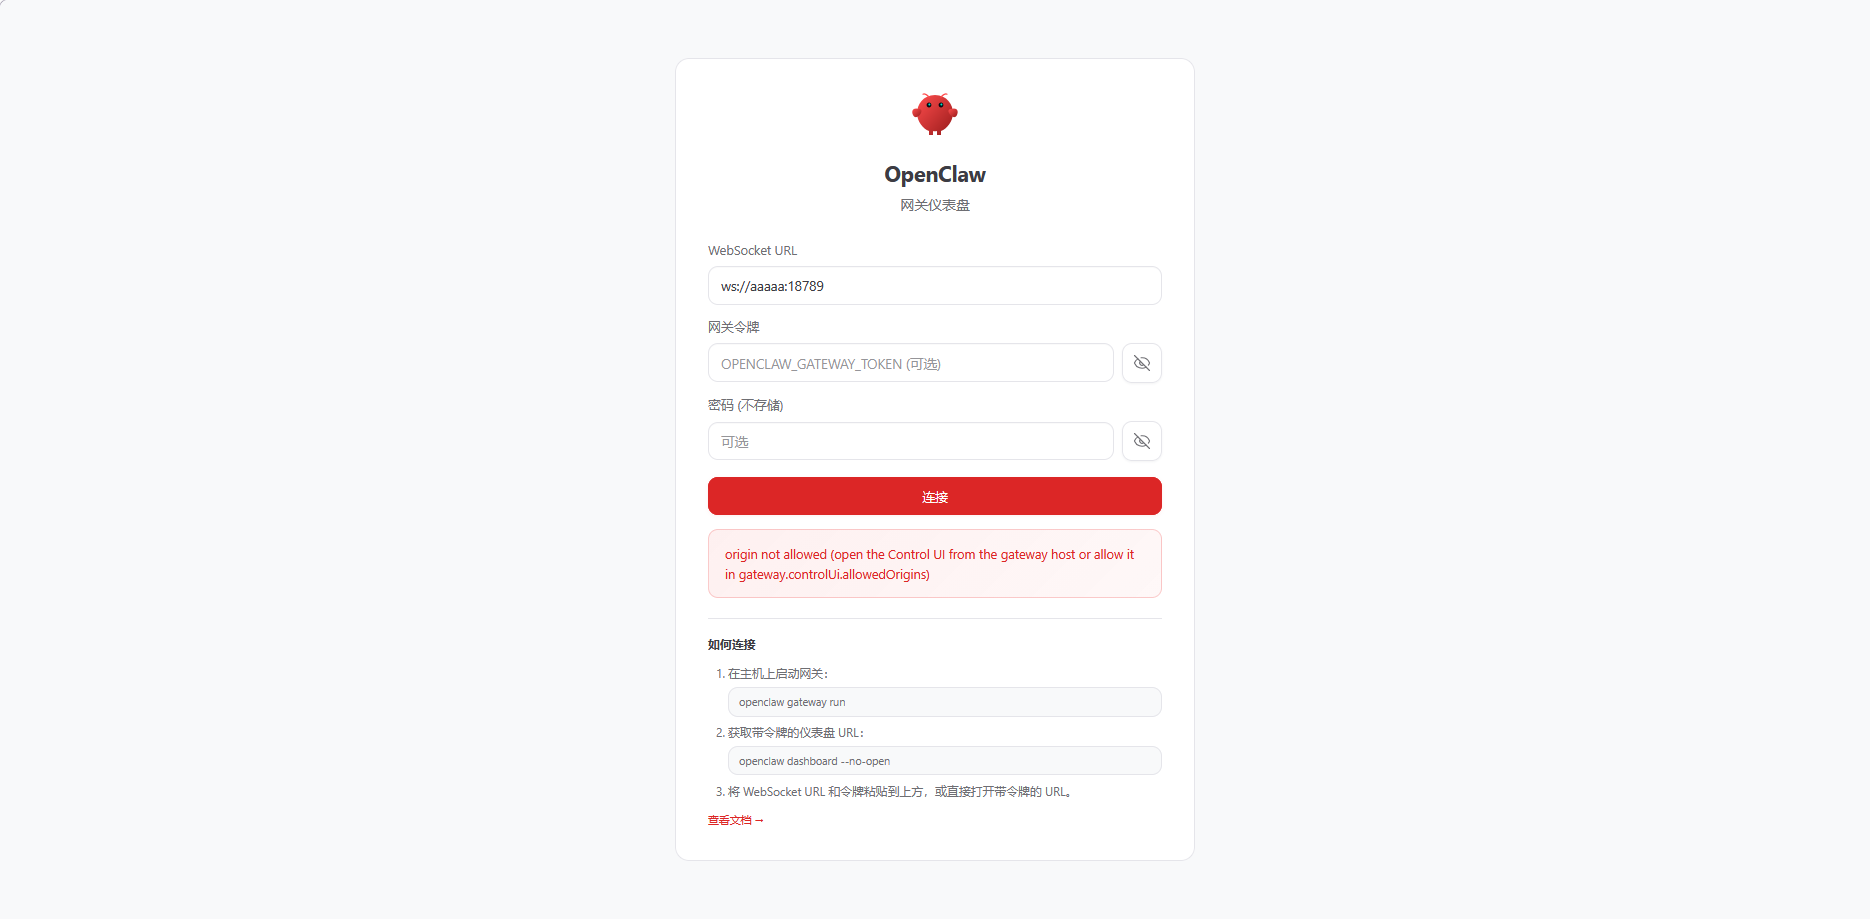
-
出现上面异常,需要改配置文件
./data/openclaw.json以下是当前的内容
{
  "agents": {
    "defaults": {
      "compaction": {
        "mode": "safeguard"
      },
      "maxConcurrent": 4,
      "subagents": {
        "maxConcurrent": 8
      }
    }
  },
  "messages": {
    "ackReactionScope": "group-mentions"
  },
  "commands": {
    "native": "auto",
    "nativeSkills": "auto",
    "restart": true,
    "ownerDisplay": "raw"
  },
  "gateway": {
    "auth": {
      "mode": "token",
      "token": "aaaaaabbbbbbccccccdddddd"
    }
  },
  "meta": {
    "lastTouchedVersion": "2026.3.23",
    "lastTouchedAt": "2026-03-29T07:37:21.817Z"
  }
}
需要增加权限配置,扩充
gateway节点的内容"gateway": { "auth": { "mode": "token", "token": "aaaaaabbbbbbccccccdddddd" }, "bind": "lan", "mode": "local", "trustedProxies": [ "192.168.0.0/16", "172.16.0.0/12", "10.0.0.0/8" ], "controlUi": { "allowedOrigins": [ "http://127.0.0.1:18789", "http://192.168.1.50:18789" ], "allowInsecureAuth": true, "dangerouslyDisableDeviceAuth": true } }(⚠️ 再次提醒:将
http://192.168.1.50:18789替换为实际请求服务的地址) -
重启
openclaw-gateway、openclaw-nginxdocker restart openclaw-gateway docker restart openclaw-nginx此时浏览器再次访问:
http://ip:18789,填写配置文件中的token,即可登录成功 -
没有配置大模型,不能进行对话。
注意事项
- 部分内容由AI生成
- 如有不对,欢迎指正!!!

腾讯云面向开发者汇聚海量精品云计算使用和开发经验,营造开放的云计算技术生态圈。
更多推荐
 10
10 0
0- 0


 已为社区贡献3条内容

所有评论(0)