使用Ansible自动化部署Kubeadm 1.28.2多主集群(Containerd)
kubernetes集群规划:
| IP地址 | 主机名称 | 主机角色 | 操作系统 | 主机配置 |
|---|---|---|---|---|
| 192.168.109.137 | master-ha01 | 管理节点/主负载均衡 | 龙蜥8.10 | 2C4G |
| 192.168.109.138 | master-ha02 | 管理节点/主负载均衡 | 龙蜥8.10 | 2C4G |
| 192.168.109.139 | master03 | 管理节点 | 龙蜥8.10 | 2C4G |
| 192.168.109.140 | node01 | 工作节点 | 龙蜥8.10 | 2C4G |
| 192.168.109.141 | node02 | 工作节点 | 龙蜥8.10 | 2C4G |
master-ha01 安装ansible及配置等~
1.集群前期环境准备:
修改主机名/配置本地dns解析
2.开启 bridge 网桥过滤功能:
3.安装IPVS代理模块:
4.关闭SWAP分区:
1-4:相关理论可参考:https://blog.csdn.net/NG_cheng119/article/details/159749869?spm=1001.2014.3001.5501
5.Containerd环境准备:
添加阿里云dokcer仓库(containerd的包在docker仓库)
dnf install -y yum-utils
yum-config-manager --add-repo https://mirrors.aliyun.com/docker-ce/linux/centos/docker-ce.repo
安装containerd软件包
yum list | grep containerd
###yum install -y containerd.io-1.6.20-3.1.el9.x86
yum install -y containerd
生成containerd配置文件
containerd config default | tee /etc/containerd/config.toml
启用containerd Cgroup用于限制容器使用资源,如CPU、内存资源
sed -i 's#SystemdCgroup = false#SystemdCgroup = true#' /etc/containerd/config.toml
替换文件中的pause镜像下载地址
sed -i 's#sandbox_image = "registry.k8s.io/pause:3.6"#sandbox_image = "registry.aliyuncs.com/google_containers/pause:3.9"#' /etc/containerd/config.toml
配置镜像加速器
在配置文件中找到中定义[plugins.“io.containerd.grpc.v1.cri”.registry]在config_path 中定义一个目录,目录可用于存放SSL/TLS证书(私有仓库证书)和其他认证文件
vim /etc/containerd/config.toml
  [plugins."io.containerd.grpc.v1.cri".registry]
    config_path = "/etc/containerd/certs.d"
创建目录
mkdir -p /etc/containerd/certs.d/docker.io
在该目录下创建 hosts.toml 文件,在文件中定义镜像加速器
vim /etc/containerd/certs.d/docker.io/hosts.toml
[host."https://docker.1ms.run"]
  capabilities = ["pull","resolve","push"]
    skip_verify = true
在k8s环境中,kubelet通过containerd.sock 文件与containerd 进行通信,对容器进行管理,指定contaienrd套接字文件地址
cat <<EOF| tee /etc/crictl.yaml
runtime-endpoint: unix:///var/run/containerd/containerd.sock
image-endpoint: unix:///var/run/containerd/containerd.sock
timeout: 10
debug:false
EOF
启动containerd
systemctl enable containerd --now
下载 nerdctl 工具(containerd容器及镜像管理工具)
https://github.com/containerd/nerdctl
wget https://github.com/containerd/nerdctl/releases/download/v2.2.0/nerdctl-2.2.0-linux-amd64.tar.gz
解压到 /usr/local/bin 目录
tar xf nerdctl-2.2.0-linux-amd64.tar.gz -C /usr/local/bin/
查看 nerdctl 版本
nerdctl -v
2-5 ansible实操【master-ha01】
mkdir -pv /root/deploy-k8s && cd /root/deploy-k8s
vim /root/deploy-k8s/deploy-k8s.sh

cat > /etc/sysctl.d/k8s.conf << EOF
net.bridge.bridge-nf-call-ip6tables = 1
net.bridge.bridge-nf-call-iptables = 1
net.ipv4.ip_forward = 1
EOF
modprobe br_netfilter && lsmod | grep br_netfilter
sysctl -p /etc/sysctl.d/k8s.conf


dnf install -y ipset ipvsadm
cat > /etc/modules-load.d/ip_vs.conf << EOF
ip_vs
ip_vs_rr
ip_vs_wrr
ip_vs_sh
nf_conntrack
EOF
systemctl restart systemd-modules-load.service
lsmod | grep ip_vs


swapoff -a && sed -ri 's/.*swap.*/#&/' /etc/fstab


dnf install -y yum-utils
yum-config-manager --add-repo https://mirrors.aliyun.com/docker-ce/linux/centos/docker-ce.repo
yum install -y containerd
containerd config default | tee /etc/containerd/config.toml

sed -i 's#SystemdCgroup = false#SystemdCgroup = true#' /etc/containerd/config.toml
sed -i 's#sandbox_image = "registry.k8s.io/pause:3.6"#sandbox_image = "registry.aliyuncs.com/google_containers/pause:3.9"#' /etc/containerd/config.toml
sed -i 's#config_path = ""#config_path = "/etc/containerd/certs.d"#' /etc/containerd/config.toml


mkdir -p /etc/containerd/certs.d/docker.io
cat <<EOF| tee /etc/containerd/certs.d/docker.io/hosts.toml
[host."https://docker.1ms.run"]
  capabilities = ["pull","resolve","push"]
    skip_verify = true
EOF

cat <<EOF| tee /etc/crictl.yaml
runtime-endpoint: unix:///run/containerd/containerd.sock
image-endpoint: unix:///run/containerd/containerd.sock
timeout: 10
debug: false
EOF
systemctl enable containerd --now
[root@master-ha01 deploy-k8s]# ansible k8s -m script -a "deploy-k8s.sh"
各节点 下载 nerdctl 工具(containerd容器及镜像管理工具)安装
wget https://github.com/containerd/nerdctl/releases/download/v2.2.0/nerdctl-2.2.0-linux-amd64.tar.gz
tar xf nerdctl-2.2.0-linux-amd64.tar.gz -C /usr/local/bin/
nerdctl -v
6.负载均衡环境准备:
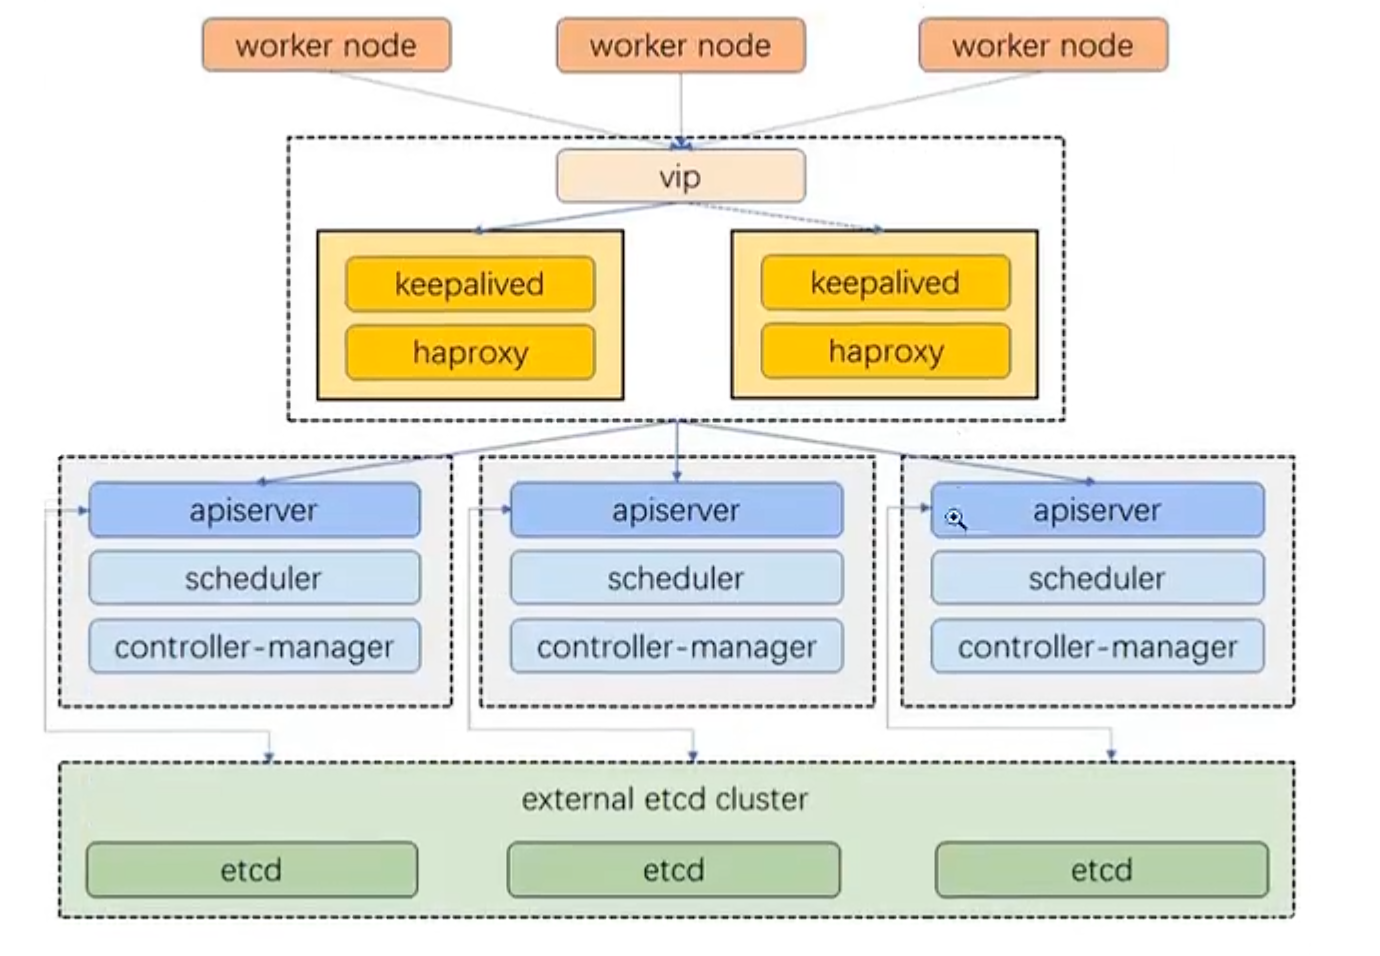
操作参考:https://blog.csdn.net/NG_cheng119/article/details/159749869?spm=1001.2014.3001.5501
7.配置kubernetes仓库:
8.安装集群相关软件:
7-8:ansible实操【master-ha01】
cd /root/deploy-k8s/ && vim /root/deploy-k8s/init-k8s.sh
cat >  /etc/yum.repos.d/kubernetes.repo << EOF
[kubernetes]
name=Kubernetes
baseurl=https://mirrors.aliyun.com/kubernetes/yum/repos/kubernetes-el7-x86_64/
enabled=1
gpgcheck=1
repo_gpgcheck=1
gpgkey=https://mirrors.aliyun.com/kubernetes/yum/doc/yum-key.gpg https://mirrors.aliyun.com/kubernetes/yum/doc/rpm-package-key.gpg
EOF

dnf install -y kubeadm-1.28.2 kubelet-1.28.2 kubectl-1.28.2

cat > /etc/sysconfig/kubelet << EOF
KUBELET_EXTRA_ARGS="--cgroup-driver=systemd"
EOF

systemctl enable kubelet
[root@master-ha01 deploy-k8s]# ansible k8s -m script -a "init-k8s.sh"
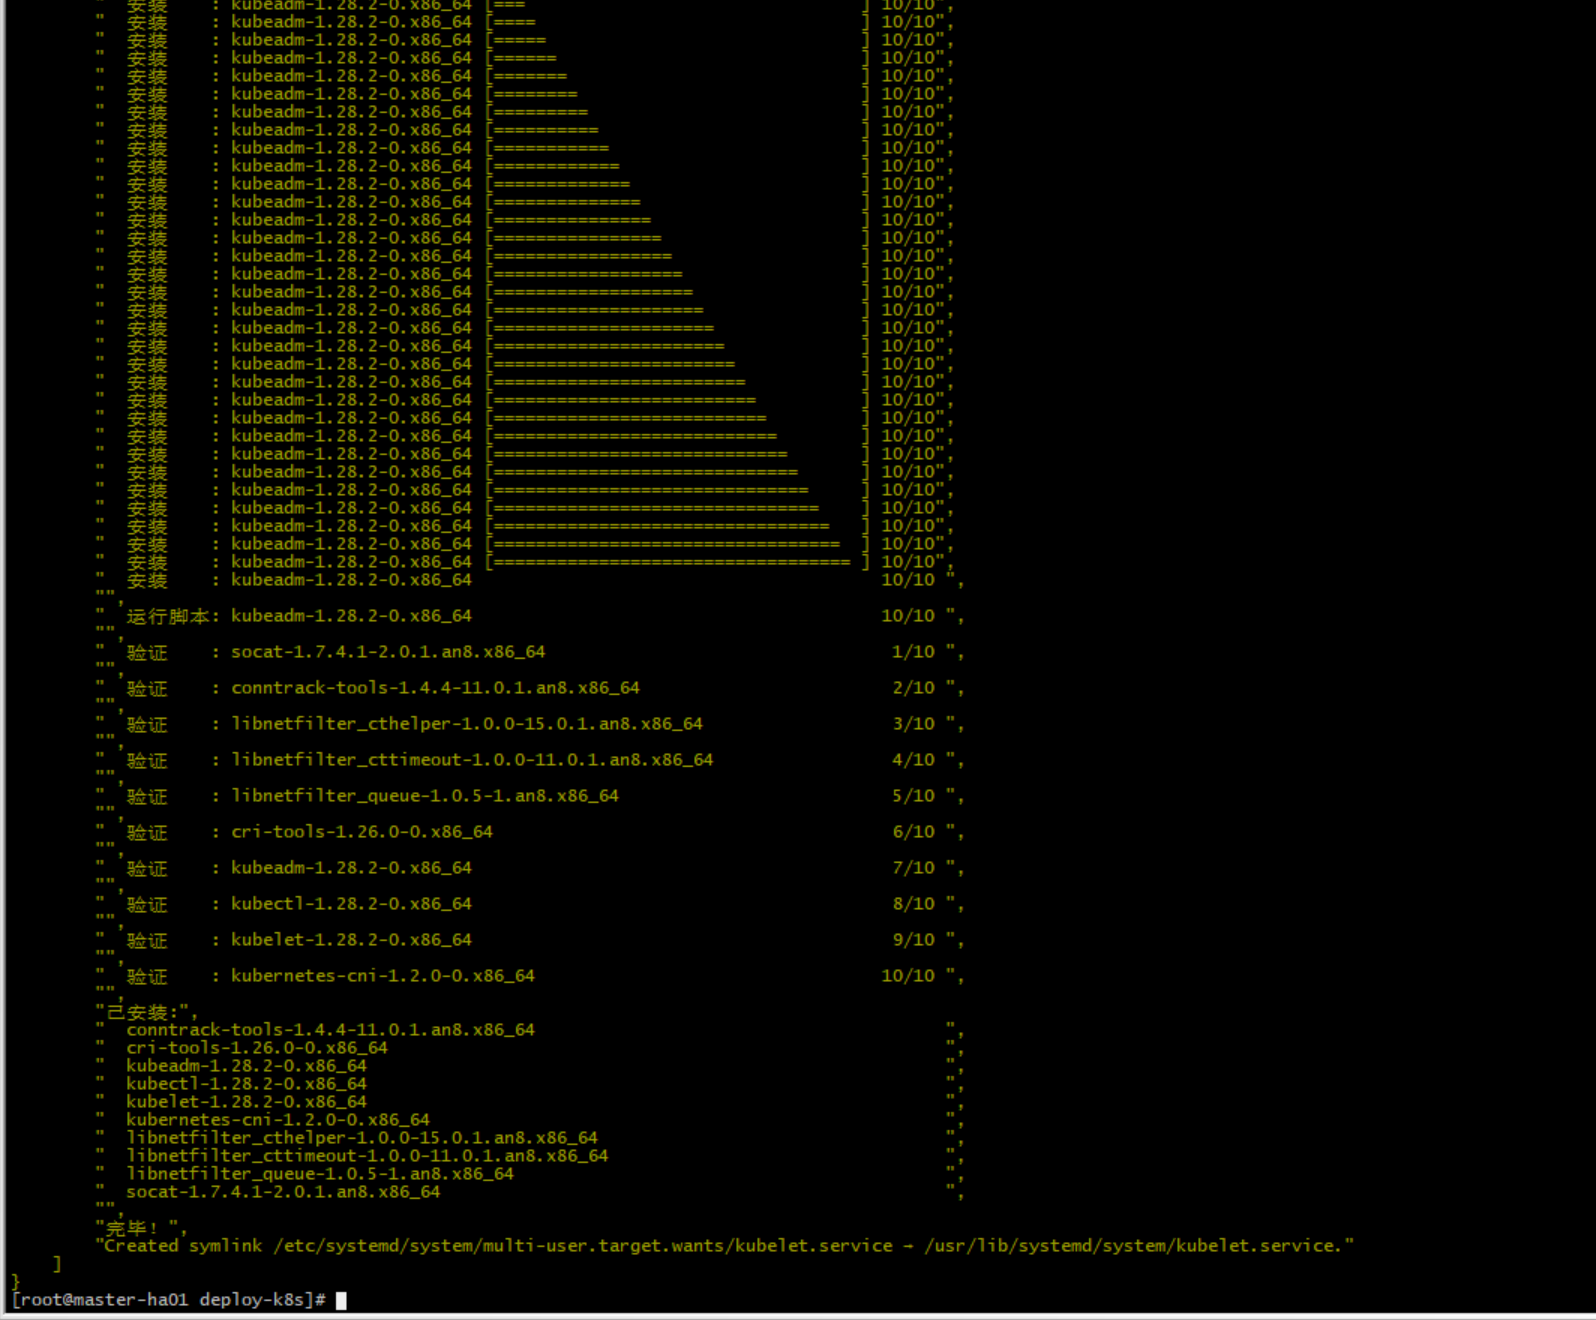
9.k8s集群初始化:
k8s集群初始化
在master-ha01节点生成初始化集群的配置文件
[root@master-ha01 ~]# cd /root/deploy-k8s/
kubeadm config print init-defaults > kube-init.yaml
配置文件需要修改如下内容
apiVersion: kubeadm.k8s.io/v1beta3
bootstrapTokens:
- groups:
  - system:bootstrappers:kubeadm:default-node-token
  token: abcdef.0123456789abcdef
  ttl: 24h0m0s
  usages:
  - signing
  - authentication
kind: InitConfiguration
localAPIEndpoint:
  advertiseAddress: 192.168.109.137
  bindPort: 6443
nodeRegistration:
  criSocket: unix:///var/run/containerd/containerd.sock
  imagePullPolicy: IfNotPresent
  name: master-ha01
  taints: null
---
apiServer:
  certSANs:
  - 192.168.109.150
  timeoutForControlPlane: 4m0s
apiVersion: kubeadm.k8s.io/v1beta3
certificatesDir: /etc/kubernetes/pki
clusterName: kubernetes
controlPlaneEndpoint: 192.168.109.150:16443
controllerManager: {}
dns: {}
etcd:
  local:
    dataDir: /var/lib/etcd
imageRepository: registry.cn-hangzhou.aliyuncs.com/google_containers
kind: ClusterConfiguration
kubernetesVersion: 1.28.0
networking:
  dnsDomain: cluster.local
  serviceSubnet: 10.96.0.0/12
scheduler: {}
通过配置文件初始化集群:
kubeadm init --config kube-init.yaml --upload-certs
结果:
[root@master-ha01 deploy-k8s]#
[root@master-ha01 deploy-k8s]# kubeadm init --config kube-init.yaml --upload-certs
[init] Using Kubernetes version: v1.28.0
[preflight] Running pre-flight checks
        [WARNING FileExisting-tc]: tc not found in system path
[preflight] Pulling images required for setting up a Kubernetes cluster
[preflight] This might take a minute or two, depending on the speed of your internet connection
[preflight] You can also perform this action in beforehand using 'kubeadm config images pull'
W0410 10:52:54.534660    7359 checks.go:835] detected that the sandbox image "registry.aliyuncs.com/google_containers/pause:3.9" of the container runtime is inconsistent with that used by kubeadm. It is recommended that using "registry.cn-hangzhou.aliyuncs.com/google_containers/pause:3.9" as the CRI sandbox image.
[certs] Using certificateDir folder "/etc/kubernetes/pki"
[certs] Generating "ca" certificate and key
[certs] Generating "apiserver" certificate and key
[certs] apiserver serving cert is signed for DNS names [kubernetes kubernetes.default kubernetes.default.svc kubernetes.default.svc.cluster.local master-ha01] and IPs [10.96.0.1 192.168.109.137 192.168.109.150]
[certs] Generating "apiserver-kubelet-client" certificate and key
[certs] Generating "front-proxy-ca" certificate and key
[certs] Generating "front-proxy-client" certificate and key
[certs] Generating "etcd/ca" certificate and key
[certs] Generating "etcd/server" certificate and key
[certs] etcd/server serving cert is signed for DNS names [localhost master-ha01] and IPs [192.168.109.137 127.0.0.1 ::1]
[certs] Generating "etcd/peer" certificate and key
[certs] etcd/peer serving cert is signed for DNS names [localhost master-ha01] and IPs [192.168.109.137 127.0.0.1 ::1]
[certs] Generating "etcd/healthcheck-client" certificate and key
[certs] Generating "apiserver-etcd-client" certificate and key
[certs] Generating "sa" key and public key
[kubeconfig] Using kubeconfig folder "/etc/kubernetes"
W0410 10:53:30.915270    7359 endpoint.go:57] [endpoint] WARNING: port specified in controlPlaneEndpoint overrides bindPort in the controlplane address
[kubeconfig] Writing "admin.conf" kubeconfig file
W0410 10:53:33.866073    7359 endpoint.go:57] [endpoint] WARNING: port specified in controlPlaneEndpoint overrides bindPort in the controlplane address
[kubeconfig] Writing "kubelet.conf" kubeconfig file
W0410 10:53:34.283428    7359 endpoint.go:57] [endpoint] WARNING: port specified in controlPlaneEndpoint overrides bindPort in the controlplane address
[kubeconfig] Writing "controller-manager.conf" kubeconfig file
W0410 10:53:34.492936    7359 endpoint.go:57] [endpoint] WARNING: port specified in controlPlaneEndpoint overrides bindPort in the controlplane address
[kubeconfig] Writing "scheduler.conf" kubeconfig file
[etcd] Creating static Pod manifest for local etcd in "/etc/kubernetes/manifests"
[control-plane] Using manifest folder "/etc/kubernetes/manifests"
[control-plane] Creating static Pod manifest for "kube-apiserver"
[control-plane] Creating static Pod manifest for "kube-controller-manager"
[control-plane] Creating static Pod manifest for "kube-scheduler"
[kubelet-start] Writing kubelet environment file with flags to file "/var/lib/kubelet/kubeadm-flags.env"
[kubelet-start] Writing kubelet configuration to file "/var/lib/kubelet/config.yaml"
[kubelet-start] Starting the kubelet
[wait-control-plane] Waiting for the kubelet to boot up the control plane as static Pods from directory "/etc/kubernetes/manifests". This can take up to 4m0s
[apiclient] All control plane components are healthy after 26.616466 seconds
[upload-config] Storing the configuration used in ConfigMap "kubeadm-config" in the "kube-system" Namespace
[kubelet] Creating a ConfigMap "kubelet-config" in namespace kube-system with the configuration for the kubelets in the cluster
[upload-certs] Storing the certificates in Secret "kubeadm-certs" in the "kube-system" Namespace
[upload-certs] Using certificate key:
459f59f42e01e3daaa97eefd3d7dfc224bfd2d20b52c5924c182122f048faad2
[mark-control-plane] Marking the node master-ha01 as control-plane by adding the labels: [node-role.kubernetes.io/control-plane node.kubernetes.io/exclude-from-external-load-balancers]
[mark-control-plane] Marking the node master-ha01 as control-plane by adding the taints [node-role.kubernetes.io/control-plane:NoSchedule]
[bootstrap-token] Using token: abcdef.0123456789abcdef
[bootstrap-token] Configuring bootstrap tokens, cluster-info ConfigMap, RBAC Roles
[bootstrap-token] Configured RBAC rules to allow Node Bootstrap tokens to get nodes
[bootstrap-token] Configured RBAC rules to allow Node Bootstrap tokens to post CSRs in order for nodes to get long term certificate credentials
[bootstrap-token] Configured RBAC rules to allow the csrapprover controller automatically approve CSRs from a Node Bootstrap Token
[bootstrap-token] Configured RBAC rules to allow certificate rotation for all node client certificates in the cluster
[bootstrap-token] Creating the "cluster-info" ConfigMap in the "kube-public" namespace
[kubelet-finalize] Updating "/etc/kubernetes/kubelet.conf" to point to a rotatable kubelet client certificate and key
[addons] Applied essential addon: CoreDNS
W0410 10:54:08.468048    7359 endpoint.go:57] [endpoint] WARNING: port specified in controlPlaneEndpoint overrides bindPort in the controlplane address
[addons] Applied essential addon: kube-proxy

Your Kubernetes control-plane has initialized successfully!

To start using your cluster, you need to run the following as a regular user:

  mkdir -p $HOME/.kube
  sudo cp -i /etc/kubernetes/admin.conf $HOME/.kube/config
  sudo chown $(id -u):$(id -g) $HOME/.kube/config

Alternatively, if you are the root user, you can run:

  export KUBECONFIG=/etc/kubernetes/admin.conf

You should now deploy a pod network to the cluster.
Run "kubectl apply -f [podnetwork].yaml" with one of the options listed at:
  https://kubernetes.io/docs/concepts/cluster-administration/addons/

You can now join any number of the control-plane node running the following command on each as root:

  kubeadm join 192.168.109.150:16443 --token abcdef.0123456789abcdef \
        --discovery-token-ca-cert-hash sha256:7ee4319abd7afb4c5205f1d251f52983bd4dc602dbde95f144172b73b0c0b484 \
        --control-plane --certificate-key 459f59f42e01e3daaa97eefd3d7dfc224bfd2d20b52c5924c182122f048faad2

Please note that the certificate-key gives access to cluster sensitive data, keep it secret!
As a safeguard, uploaded-certs will be deleted in two hours; If necessary, you can use
"kubeadm init phase upload-certs --upload-certs" to reload certs afterward.

Then you can join any number of worker nodes by running the following on each as root:

kubeadm join 192.168.109.150:16443 --token abcdef.0123456789abcdef \
        --discovery-token-ca-cert-hash sha256:7ee4319abd7afb4c5205f1d251f52983bd4dc602dbde95f144172b73b0c0b484
[root@master-ha01 deploy-k8s]#
10.部署pod网络Calico:
11.验证集群节点状态:
12.部署Nginx测试集群:
9-12:操作参考:https://blog.csdn.net/NG_cheng119/article/details/159749869?spm=1001.2014.3001.5501
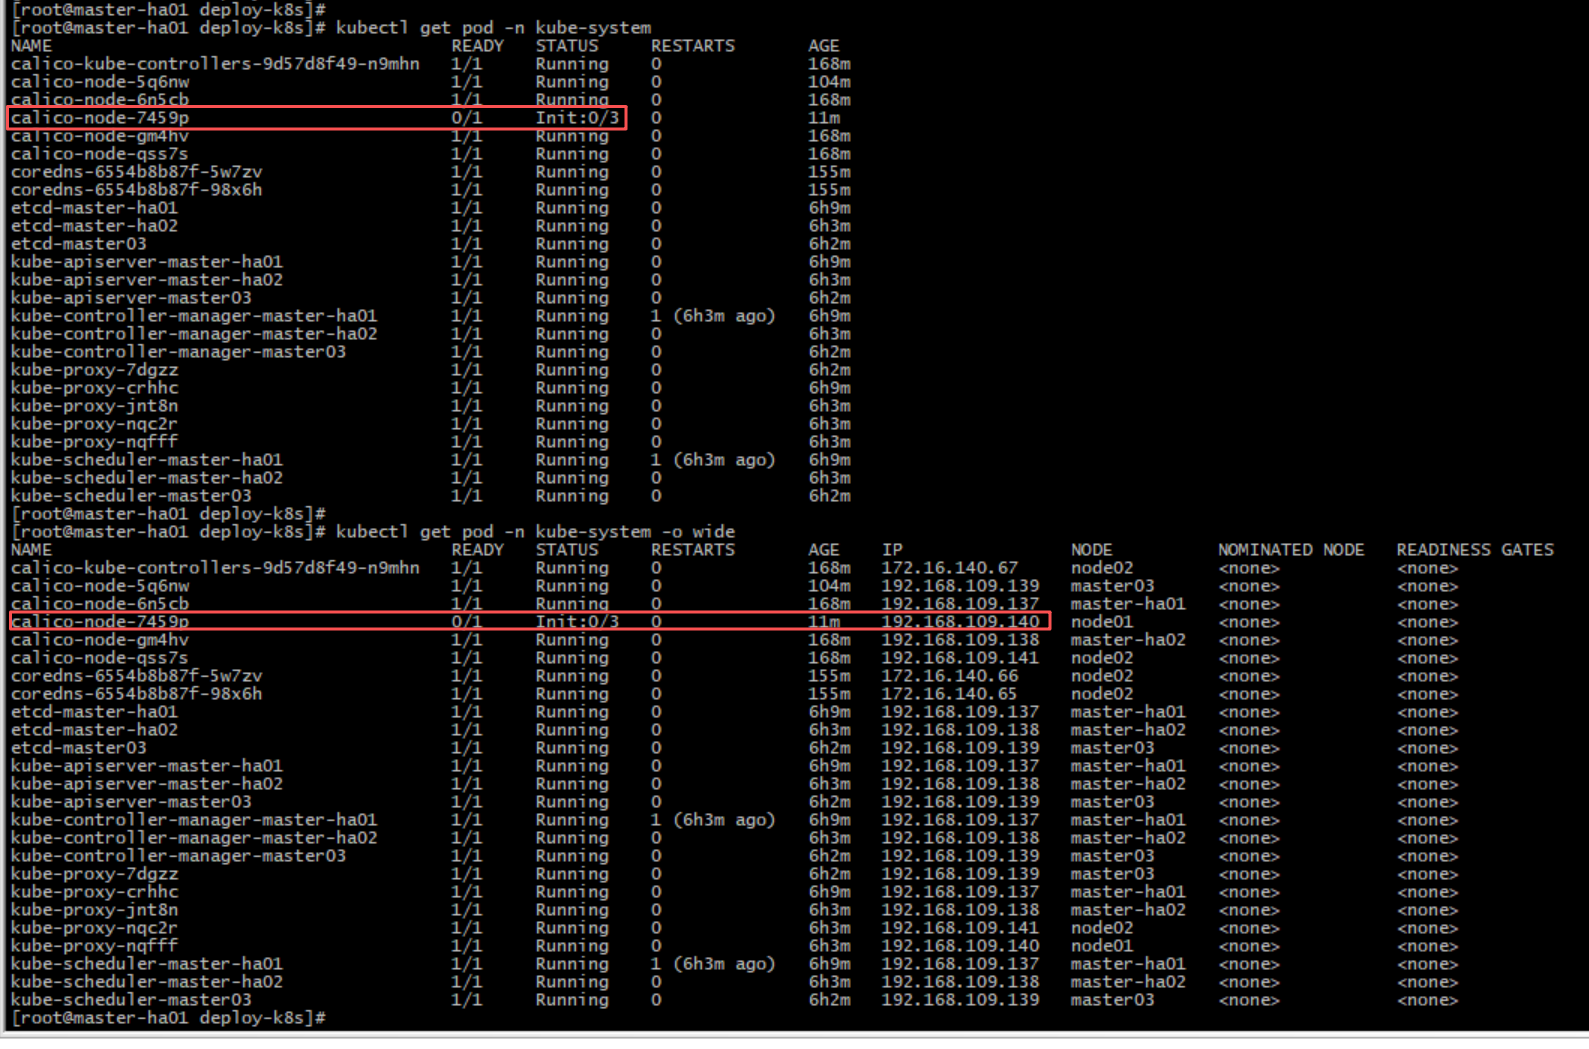
删了重建还是没启出来
[root@master-ha01 deploy-k8s]# kubectl logs calico-node-7459p -n kube-system
[root@master-ha01 deploy-k8s]# kubectl describe pod calico-node-7459p -n kube-system
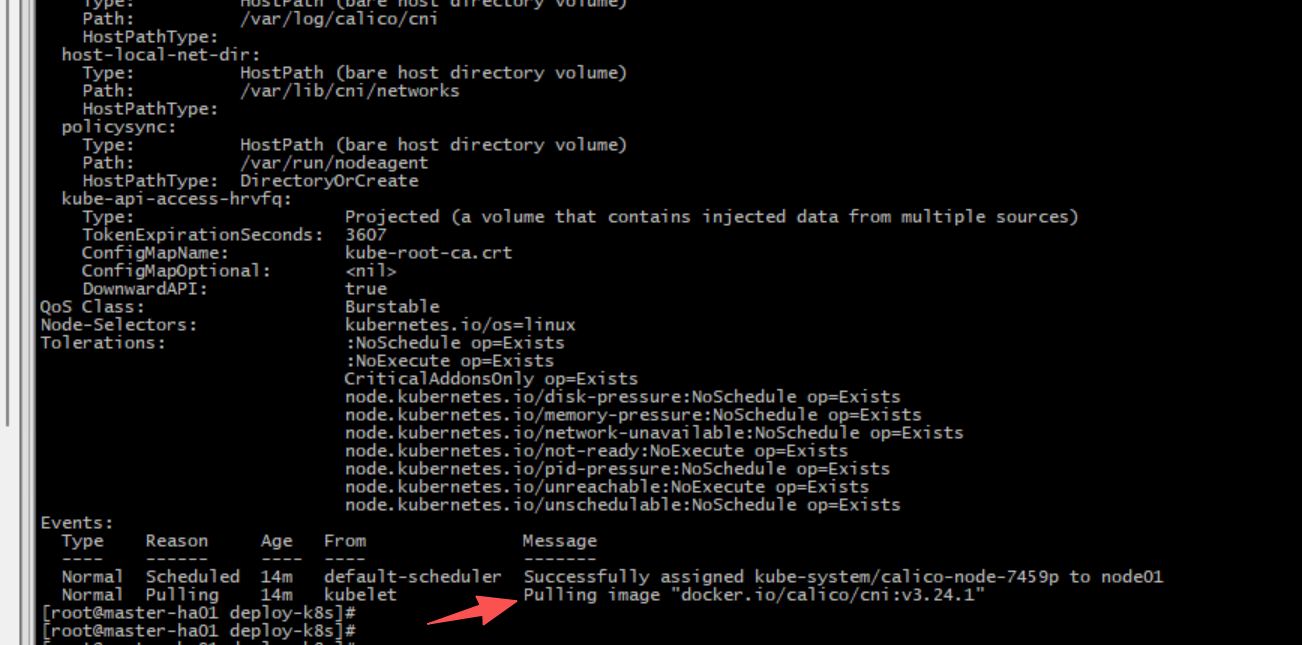
手动拉取尝试:七牛云加速镜像
[root@node01 ~]# ctr -n k8s.io images pull --platform linux/amd64 docker.1ms.run/calico/cni:v3.24.1


腾讯云面向开发者汇聚海量精品云计算使用和开发经验,营造开放的云计算技术生态圈。
更多推荐
 6
6 0
0- 0


 已为社区贡献1条内容

所有评论(0)