23.Ansible使用
Ansible基本使用
Ansible 清单
Ansible 软件包中的文件
[root@controller ~]# rpm -ql ansible
- 配置文件
/etc/ansible - 执行文件目录
/usr/bin - lib依赖库目录
usr/lib/python2.7/site-packages/ansible - 插件
/usr/share/ansible/plugins - Help文档目录
/usr/share/doc/ansible - Man文档目录
usr/share/man/man1/
主机清单
Inventory 定义Ansible将要管理的一批主机。这些主机也可以分配到组中,以进行集中管理 组可以包含子组,主机也可以是多个组的成员。 清单还可以设置应用到它所定义的主机和组的变量。
定义清单方式:
- 静态主机清单:以文本文件来定义
- 动态主机清单:使用外部信息提供程序通过脚本或其他程序来自动生成。目的是从启动环境中获取主机清单,例如openstack、 kubernetes、zabbix等。
静态主机清单
主机清单支持多种格式,如ini、yaml、脚本等
本次我们来学习使用ini 格式
最简单的静态清单
受管节点的主机名或IP地址列表,每行一个
比如:
[hxl@controller ~]$ vim inventory
[hxl@controller ~]$ cat inventory
node1
node2
node3
node4
192.0.2.42
验证主机是否在inventory中
[hxl@controller ~]$ ansible --list-hosts -i inventory node1
  hosts (1):
    node1
[hxl@controller ~]$ ansible --list-hosts -i inventory 192.0.2.42
  hosts (1):
    192.0.2.42
ansible命令通过--inventory PATHNAME或-i PATHNAME选项在命令行中指定清单文件的位置,其中PATHNAME是所需清单文件的路径
主机组
还可以将受管节点组织为主机组。通过主机组,更加有效地对一系列系统运行Ansible
比如:
[hxl@controller ~]$ vim inventory
192.168.1.1

[webservers]
node1
node2

[dbservers]
node3
node4

192.0.2.42

# 验证
[hxl@controller ~]$ ansible --list-hosts -i inventory webservers
  hosts (2):
    node1
    node2
[hxl@controller ~]$ ansible --list-hosts -i inventory dbservers
  hosts (3):
    node3
    node4
    192.0.2.42
注意,192.0.2.42是属于dbservers组的,所以并不是在中间换行就移出组
有两个组总是存在的:
- all:包含inventory 中所有主机
- ungrouped:inventory中列出的,但不属于任何组的主机
比如:
[hxl@controller ~]$ ansible --list-hosts -i inventory all
  hosts (6):
    192.168.1.1
    node1
    node2
    node3
    node4
    192.0.2.42
[hxl@controller ~]$ ansible --list-hosts -i inventory ungrouped
  hosts (1):
    192.168.1.1
主机嵌套组
一个主机组还可以属于另外一个主机组。
比如:
[hxl@controller ~]$ vim inventory
[webservers]
node1
node2

[dbservers]
node3
node4

[wd:children]
webservers
dbservers

# 验证
[hxl@controller ~]$ ansible --list-hosts -i inventory wd
  hosts (4):
    node1
    node2
    node3
    node4
子组的主机组必须定义,否则会出现语法上的报错
[hxl@controller ~]$ vim inventory
[webservers]
node1
node2

[dbservers]
node3
node4

[wd:children]
webservers
dbservers
web

# 验证
[hxl@controller ~]$ ansible --list-hosts -i inventory wd
[WARNING]:  * Failed to parse /home/hxl/inventory with yaml plugin: We were unable to read either as JSON nor YAML, these are the
errors we got from each: JSON: No JSON object could be decoded  Syntax Error while loading YAML.   did not find expected <document
start>  The error appears to be in '/home/hxl/inventory': line 2, column 1, but may be elsewhere in the file depending on the exact
syntax problem.  The offending line appears to be:  [webservers] node1 ^ here
[WARNING]:  * Failed to parse /home/hxl/inventory with ini plugin: /home/hxl/inventory:12: Section [wd:children] includes undefined
group: web
[WARNING]: Unable to parse /home/hxl/inventory as an inventory source
[WARNING]: No inventory was parsed, only implicit localhost is available
[WARNING]: provided hosts list is empty, only localhost is available. Note that the implicit localhost does not match 'all'
  hosts (4):
    node1
    node2
    node3
    node4
范围简写
通过指定主机名称或IP地址的范围来简化Ansible主机清单。您可以指定数字或字母范围。
语法:[start:end]
比如:
[hxl@controller ~]$ cat inventory
[hosts]
node[1:4]

[IP]
192.168.[1:3].[0:2]

[servers]
server[a:e]

# 验证
[hxl@controller ~]$ ansible --list-hosts -i inventory hosts
  hosts (4):
    node1
    node2
    node3
    node4
[hxl@controller ~]$ ansible --list-hosts -i inventory IP
  hosts (9):
    192.168.1.0
    192.168.1.1
    192.168.1.2
    192.168.2.0
    192.168.2.1
    192.168.2.2
    192.168.3.0
    192.168.3.1
    192.168.3.2
[hxl@controller ~]$ ansible --list-hosts -i inventory servers
  hosts (5):
    servera
    serverb
    serverc
    serverd
    servere
范围必须是同一类的,不能出现数字字母混合搭配的情况,比如
server[0a:2c].com,会报错
动态主机清单
使用外部数据提供的信息动态生成Ansible清单信息。
ansible-inventory 命令
通过不同的格式查看清单文件。
# 查看帮助文档
[hxl@controller ~]$ ansible-inventory --help
usage: ansible-inventory [-h] [--version] [-v] [-i INVENTORY]
                         [--vault-id VAULT_IDS]
                         [--ask-vault-pass | --vault-password-file VAULT_PASSWORD_FILES]
                         [--playbook-dir BASEDIR] [--list] [--host HOST]
                         [--graph] [-y] [--toml] [--vars] [--export]
                         [--output OUTPUT_FILE]
                         [host|group]

positional arguments:
  host|group

optional arguments:
  --ask-vault-pass      ask for vault password
  --export              When doing an --list, represent in a way that is
                        optimized for export,not as an accurate representation
                        of how Ansible has processed it
  --output OUTPUT_FILE  When doing --list, send the inventory to a file
                        instead of to the screen
  --playbook-dir BASEDIR
                        Since this tool does not use playbooks, use this as a
                        substitute playbook directory.This sets the relative
                        path for many features including roles/ group_vars/
                        etc.
  --toml                Use TOML format instead of default JSON, ignored for
                        --graph
  --vars                Add vars to graph display, ignored unless used with
                        --graph
  --vault-id VAULT_IDS  the vault identity to use
  --vault-password-file VAULT_PASSWORD_FILES
                        vault password file
  --version             show program's version number, config file location,
                        configured module search path, module location,
                        executable location and exit
  -h, --help            show this help message and exit
  -i INVENTORY, --inventory INVENTORY, --inventory-file INVENTORY
                        specify inventory host path or comma separated host
                        list. --inventory-file is deprecated
  -v, --verbose         verbose mode (-vvv for more, -vvvv to enable
                        connection debugging)
  -y, --yaml            Use YAML format instead of default JSON, ignored for
                        --graph

Actions:
  One of following must be used on invocation, ONLY ONE!

  --graph               create inventory graph, if supplying pattern it must
                        be a valid group name
  --host HOST           Output specific host info, works as inventory script
  --list                Output all hosts info, works as inventory script

Show Ansible inventory information, by default it uses the inventory script
JSON format
常用选项解释:
-i:指定清单位置--list:使用脚本格式显示--list -y:使用yaml格式显示--graph:使用树形结构显示
比如:
# 主机清单
[hxl@controller ~]$ cat inventory
[hosts]
node[1:4]

[IP]
192.168.[1:3].[0:2]

[servers]
server[a:e]

# 树形结构
[hxl@controller ~]$ ansible-inventory -i inventory --graph
@all:
  |--@IP:
  |  |--192.168.1.0
  |  |--192.168.1.1
  |  |--192.168.1.2
  |  |--192.168.2.0
  |  |--192.168.2.1
  |  |--192.168.2.2
  |  |--192.168.3.0
  |  |--192.168.3.1
  |  |--192.168.3.2
  |--@hosts:
  |  |--node1
  |  |--node2
  |  |--node3
  |  |--node4
  |--@servers:
  |  |--servera
  |  |--serverb
  |  |--serverc
  |  |--serverd
  |  |--servere
  |--@ungrouped:

# yaml格式
[hxl@controller ~]$ ansible-inventory -i inventory --list -y
all:
  children:
    IP:
      hosts:
        192.168.1.0: {}
        192.168.1.1: {}
        192.168.1.2: {}
        192.168.2.0: {}
        192.168.2.1: {}
        192.168.2.2: {}
        192.168.3.0: {}
        192.168.3.1: {}
        192.168.3.2: {}
    hosts:
      hosts:
        node1: {}
        node2: {}
        node3: {}
        node4: {}
    servers:
      hosts:
        servera: {}
        serverb: {}
        serverc: {}
        serverd: {}
        servere: {}
    ungrouped: {}
管理 ANSIBLE 配置文件
配置文件位置和优先级
- 环境变量 ANSIBLE_CONFIG
./ansible.cfg,当前位置中的ansible.cfg,当前位置一般是项目目录~/.ansible.cfg/etc/ansible/ansible.cfg
从上到下,优先级越来越低。
建议:在当前目录下定义ansible.cfg文件。
需要使用不同优先级的配置文件,可以从
/etc/ansible/ansible.cfg这里复制到项目目录下,进行需求修改从而配合生产环境的使用“#”,“;” 开头的行,作为注释
配置文件示例
对于基本操作, 使用 [defaults] 和 [privilege_escalation] 即可。
[hxl@controller ~]$ mkdir web
[hxl@controller ~]$ cd web
[hxl@controller web]$ pwd
/home/hxl/web
[hxl@controller web]$ vim ansible.cfg
[defaults]
remote_user = hxl			# 连接登录到受管主机时使用的用户身份
inventory = ./inventory		# inventory 指定清单文件路径

[privilege_escalation]
become = True				# 连接到受管主机后是否需要进行权限提升或切换用户
become_user = root			# 用户切换或提权后的对应用户
become_method = sudo		# 使用何种方式进行用户切换或提权
become_ask_pass = False		# 进行用户切换或提权时是否提示输入密码
编辑inventory
[hxl@controller web]$ vim inventory
node[1:4]
最终效果
[hxl@controller web]$ ansible all -a hostname
node4 | CHANGED | rc=0 >>
node4
node3 | CHANGED | rc=0 >>
node3
node1 | CHANGED | rc=0 >>
node1
node2 | CHANGED | rc=0 >>
node2
ansible-config 命令
用于分析ansible命令的配置
[hxl@controller web]$ ansible-config -h
usage: ansible-config [-h] [--version] [-v] {list,dump,view} ...

View ansible configuration.

positional arguments:
  {list,dump,view}
    list            Print all config options
    dump            Dump configuration
    view            View configuration file

optional arguments:
  --version         show program's version number, config file location,
                    configured module search path, module location, executable
                    location and exit
  -h, --help        show this help message and exit
  -v, --verbose     verbose mode (-vvv for more, -vvvv to enable connection
                    debugging)
ansible-config view
查看当前ansible配合文件内容
[hxl@controller web]$ ansible --version|grep file
  config file = /home/hxl/web/ansible.cfg

[hxl@controller web]$ ansible-config view
[defaults]
remote_user = hxl
inventory = ./inventory

[privilege_escalation]
become = True
become_user = root
become_method = sudo
become_ask_pass = False
ansible-config dump
当前ansible生效的所有配置,包括所有默认值
[hxl@controller web]$ ansible-config dump
ACTION_WARNINGS(default) = True
AGNOSTIC_BECOME_PROMPT(default) = True
ALLOW_WORLD_READABLE_TMPFILES(default) = False
... ...
ansible-config list
查看所有配置参数用途,配置位置等
[hxl@controller web]$ ansible-config list
... ...
DEFAULT_HOST_LIST:
  default: /etc/ansible/hosts
  description: Comma separated list of Ansible inventory sources
  env:
  - {name: ANSIBLE_INVENTORY}
  expand_relative_paths: true
  ini:
  - {key: inventory, section: defaults}
  name: Inventory Source
  type: pathlist
  yaml: {key: defaults.inventory}
... ...
localhost 连接
默认Ansible连接到受管主机的协议为 smart (通常采用最有效的方式 - SSH)。如本地清单中并未指定localhost,Ansible会隐式设置 localhost,并使用local连接类型连接localhost
- local连接类型会忽略remote_user的设置,并且直接在本地系统上运行命令
- 如果使用了特权提升,此时ansible将会在运行sudo时使用运行Ansible命令的账户的身份进行提权,而非remote_user所指定的账户
更改 localhost 连接方式:清单中包涵 localhost
AD HOC命令
命令作用:
- 快速执行单个Ansible任务,而不需要将它保存下来供以后再次运行。它们是简单的在线操作,无需编写playbook即可运行
- 快速测试和更改
语法:
ansible host-pattern -m module [-a 'module arguments'] [-i inventory]
host-pattern,必选项,是inventory中定义的主机或主机组,可以为ip、hostname、inventory中的group组名、具有“,”或“*”或“:”等特殊字符的 匹配型字符串-m module,module是一个小程序,用于实现具体任务-a 'module arguments',是模块的参数-i inventory,指定inventory文件
命令执行结果颜色说明:
Ansible的返回结果都非常友好,用3种颜色来表示执行结果:
- 红色:表示执行过程有异常,一般会中止剩余所有的任务
- 绿色:表示目标主机已经是预期状态,不需要更改
- 黄色:表示命令执行结束后目标有状态变化,并设置为预期状态,所有任务均正常执行
Ansible 部分模块
Ansible 模块存放位置:/usr/lib/python*/site-packages/ansible
官网:模块清单
- 文件模块
- copy: 将控制主机上的文件复制到受管节点,类似于scp
- file: 设置文件的权限和其他属性
- lineinfile: 确保特定行是否在文件中
- synchronize: 使用 rsync 将控制主机上的文件同步到受管节点
- 软件包模块
- package: 自动检测操作系统软件包管理器
- yum: 使用 YUM 软件包管理器管理软件包
- apt: 使用 APT 软件包管理器管理软件包
- gem: 管理 Rubygem
- pip: 从 PyPI 管理 Python 软件包
- 系统模块
- ansible.posix.firewalld : 使用firewalld管理任意端口和服务
- reboot: 重新启动计算机
- service: 管理服务
- user、group: 管理用户和组帐户
- NetTools模块
- get_url: 通过HTTP、HTTPS或FTP下载文件
- nmcli: 管理网络
- uri: 与 Web 服务交互
基础执行
command模块
command 是默认模块(无需显式指定-m),适用于执行无 shell 特性(管道、重定向、环境变量) 的简单命令
查看远程主机主机名
[hxl@controller web]$ ansible all -m command -a "hostname"
# 可以简化为 ansible all -a "hostname"
node4 | CHANGED | rc=0 >>
node4
node2 | CHANGED | rc=0 >>
node2
node3 | CHANGED | rc=0 >>
node3
node1 | CHANGED | rc=0 >>
node1
检查远程主机操作系统版本
[hxl@controller web]$ ansible all -m command -a "cat /etc/os-release"
shell模块
shell模块允许您将要执行的命令作为参数传递给该模块,Ansible随后对受管节点远程执行该命令
与command模块不同的是, 这些命令 将通过受管节点上的shell进行处理。因此,可以访问shell环境变量,也可使用重定向和管道等shell操作
查看远程主机的环境变量
[hxl@controller web]$ ansible node1 -m command -a set
node1 | FAILED | rc=2 >>
[Errno 2] No such file or directory
[hxl@controller web]$ ansible node1 -m shell -a set
node1 | CHANGED | rc=0 >>
BASH=/bin/sh
BASHOPTS=cmdhist:extquote:force_fignore:hostcomplete:interactive_comments:progcomp:promptvars:sourcepath
BASH_ALIASES=()
BASH_ARGC=()
BASH_ARGV=()
... ...
注意:command和shell模块要求被管理主机安装Python
raw模块
可以直接在远端主机shell中执行命令,远端主机不需要安装Python(特别是针对网络设备)
在大部分场景中,不推荐使用 command、shell、raw模块执行命令,因为这些模块不具有幂等性
[hxl@controller web]$ ansible node1 -m raw -a 'echo "hello ansible" > /tmp/hello.txt'
node1 | CHANGED | rc=0 >>
Shared connection to node1 closed.
# 此处多了一个现实:断开连接,相当于通过ssh连接到受管节点执行命令

# 对比shell模块
[hxl@controller web]$ ansible node1 -m shell -a 'echo "hello ansible" > /tmp/hello.txt'
node1 | CHANGED | rc=0 >>
总结
- 普通命令是默认使用command
- 需要使用参数传递,比如管道,数据流,使用shell模块
- 目标主机如果没有python的,使用raw模块
ansible-doc 命令
[hxl@controller web]$ ansible-doc -h
usage: ansible-doc [-h] [--version] [-v] [-M MODULE_PATH]
                   [--playbook-dir BASEDIR]
                   [-t {become,cache,callback,cliconf,connection,httpapi,inventory,lookup,netconf,shell,module,strategy,vars}]
                   [-j] [-F | -l | -s | --metadata-dump]
                   [plugin [plugin ...]]

plugin documentation tool

positional arguments:
  plugin                Plugin

optional arguments:
  --metadata-dump       **For internal testing only** Dump json metadata for
                        all plugins.
  --playbook-dir BASEDIR
                        Since this tool does not use playbooks, use this as a
                        substitute playbook directory.This sets the relative
                        path for many features including roles/ group_vars/
                        etc.
  --version             show program's version number, config file location,
                        configured module search path, module location,
                        executable location and exit
  -F, --list_files      Show plugin names and their source files without
                        summaries (implies --list)
  -M MODULE_PATH, --module-path MODULE_PATH
                        prepend colon-separated path(s) to module library (def
                        ault=~/.ansible/plugins/modules:/usr/share/ansible/plu
                        gins/modules)
  -h, --help            show this help message and exit
  -j, --json            Change output into json format.
  -l, --list            List available plugins
  -s, --snippet         Show playbook snippet for specified plugin(s)
  -t {become,cache,callback,cliconf,connection,httpapi,inventory,lookup,netconf,shell,module,strategy,vars}, --type {become,cache,callback,cliconf,connection,httpapi,inventory,lookup,netconf,shell,module,strategy,vars}
                        Choose which plugin type (defaults to "module").
                        Available plugin types are : ('become', 'cache',
                        'callback', 'cliconf', 'connection', 'httpapi',
                        'inventory', 'lookup', 'netconf', 'shell', 'module',
                        'strategy', 'vars')
  -v, --verbose         verbose mode (-vvv for more, -vvvv to enable
                        connection debugging)

See man pages for Ansible CLI options or website for tutorials
https://docs.ansible.com
查看模块清单及说明
[hxl@controller web]$ ansible-doc -l
fortios_router_community_list                                 Configure community lists in Fortinet's FortiOS and FortiGate
azure_rm_devtestlab_info                                      Get Azure DevTest Lab facts
... ...
查看模块清单及文档
[hxl@controller web]$ ansible-doc -F
fortios_router_community_list                                 /usr/lib/python2.7/site-packages/ansible/modules/network/fortios/forti
azure_rm_devtestlab_info                                      /usr/lib/python2.7/site-packages/ansible/modules/cloud/azure/azure_rm_
ecs_taskdefinition                                            /usr/lib/python2.7/site-packages/ansible/modules/cloud/amazon/ecs_task
... ...
查看特定模块说明文档
[hxl@controller web]$ ansible-doc user
> USER    (/usr/lib/python2.7/site-packages/ansible/modules/system/user.py)

        Manage user accounts and user attributes. For Windows targets, use the [win_user] module instead.

  * This module is maintained by The Ansible Core Team
# 模块选项,=开头是必选选项
OPTIONS (= is mandatory):

- append
        If `yes', add the user to the groups specified in `groups'.
        If `no', user will only be added to the groups specified in `groups', removing them from all
        other groups.
        Mutually exclusive with `local'
        [Default: False]
        type: bool
... ...
# 提示信息
NOTES:
      * There are specific requirements per platform on user management utilities. However they
        generally come pre-installed with the system and Ansible will require they are present at
        runtime. If they are not, a descriptive error message will be shown.
如果现有的模块无法实现现有需求,用户也可以自行编写模块:
- Ansible会从变量ANSIBLE_LIBRARY中查找模块
- 如果该变量未设置,将会从ansible.cfg配置文件library设置的位置查找模块
ansible AD HOC 命令选项
临时命令选项优先级高于配置文件中配置
| 配置文件指令 | 命令行选项 |
|---|---|
| inventory | -i |
| remote_user | -u |
| ask_pass | -k, --ask-pass |
| become | –become, -b |
| become_method | –become_method |
| become_user | –become-user |
| become_ask_pass | –ask-become-pass, -K |
编写和运行Playbook
Playbook 简介
Playbook 是 Ansible 的核心,用于描述一系列自动化任务。它使用 YAML 格式编写,易于阅读和维护。一个 Playbook 可以包含多个 Play,每个 Play 在一组主机上按顺序执行一系列任务。
基本结构示例
---
- name: 配置 Web 服务器
  hosts: webservers
  become: yes
  tasks:
    - name: 安装 httpd
      yum:
        name: httpd
        state: latest

    - name: 启动 httpd 服务
      service:
        name: httpd
        state: started
        enabled: yes
YAML 语法要点
- 使用空格缩进,禁止使用 Tab
- 键值对用
:分隔,后面跟一个空格 - 列表以
---开头 - 支持多行字符串(使用
|或>) - 最后一行
...可以省略
实验环境
主机清单以及配置文件
[hxl@controller web]$ pwd
/home/hxl/web

[hxl@controller web]$ cat ansible.cfg
[defaults]
remote_user = hxl
inventory = ./inventory

[privilege_escalation]
become = True
become_user = root
become_method = sudo
become_ask_pass = False

[hxl@controller web]$ vim inventory
node[1:4]
controller
vim 编辑器设置
如果使用vim编辑器,设置vim环境便于编辑Playbooks,设置tab为两格缩进
在$HOME/.vimrc文件中添加以下内容:
[hxl@controller web]$ vim ~/.vimrc
set ai ts=2
# 或者
autocmd FileType yaml set ai ts=2
效果:
- “ai”,即 “autoindex”,表示自动缩进
- “ts”,即 “tabstop”,表示tab键使用2个空格代替
- autocmd FileType yam,代表文件类型是yaml时,自动执行“set ai ts=2”
Playbook 编写
YAML 注释
在 YAML中, 编号或井号符号(#)右侧的所有内容都是注释。如果注释的左侧有内容, 请在该编号符号的 前面加一个空格。注释可用于提高可读性
YAML 单行字符串
YAML中的字符串通常不需要放在引号里,即使字符串中包含空格
字符串也可以用双引号或单引号括起
this is a string
'this is another string'
"this is yet another a string"
YAML 多行字符串
可以使用竖线(I)字符表示,保留字符串中的换行字符
比如:
[hxl@controller web]$ vim playbook.yaml
---
- name: test string
  hosts: node1
  tasks:
    - name: test string
      debug:
        msg: |
          Example Company
          123 Main Street
          Atlanta, GA 30303
也可以使用大于号(>)字符表示换行字符。执行时换行符使用空格代替,并且行内的引导空白将被删除
比如:
---
- name: test string
  hosts: node1
  tasks:
    - name: test string
      debug:
        msg: >
          This is an example
          of a long string,
          that will become
          a single sentence once folded.
这种方法通常用于将很长的字符串在空格字符处断行,使它们跨占多行来提高可读性
YAML 字典
一组键值对的集合,又称为映射(mapping)和哈希(hashes)
以缩进块的形式编写键值对集合,如下方所示:user属性是字典格式,是多个键值对集合
user:
  name: laowang
  uid: 1088
  state: absent
YAML 列表
一组按次序排列的值,又称为序列(sequence)和数组(array)
以缩进块的形式编写的键值对集合,如下方所示:
- name: latest version of httpd and firewalld installed
  yum:
    name:
      - httpd
      - firewalld
    state: latest
- name: test html page is installed
  copy:
    content: "Welcome to the example.com intranet!\n"
    dest: /var/www/html/index.html
以上有两个任务,每个任务都是多个键值对描述。其中yum模块操作的软件包是一个简单的名称列表
Playbook 运行
启动httpd服务并关闭防火墙
---
- name: enable httpd
  hosts: node1
  tasks:
    - name: install httpd
      yum:
        name:
          - httpd
        state: latest
    - name: disable firewalld
      service:
        name: firewalld
        enabled: no
        state: stopped
...
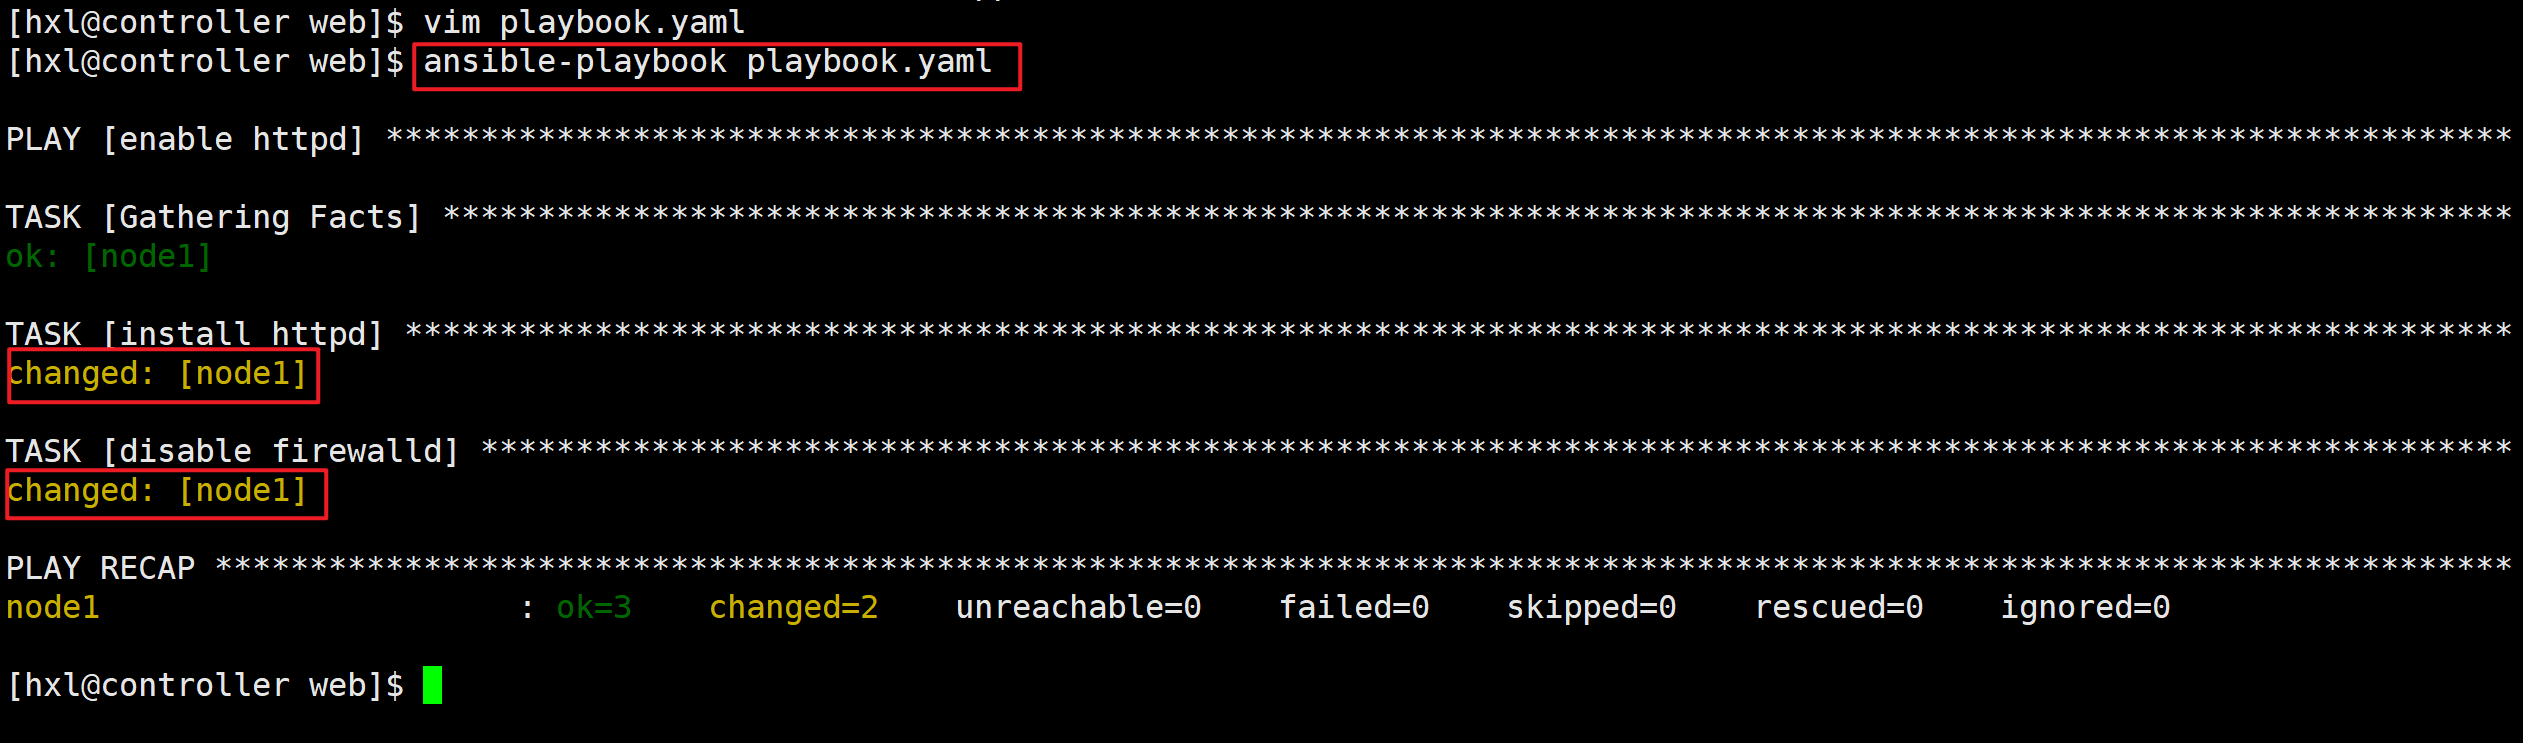
[hxl@controller web]$ ansible-playbook playbook.yaml
第一次执行
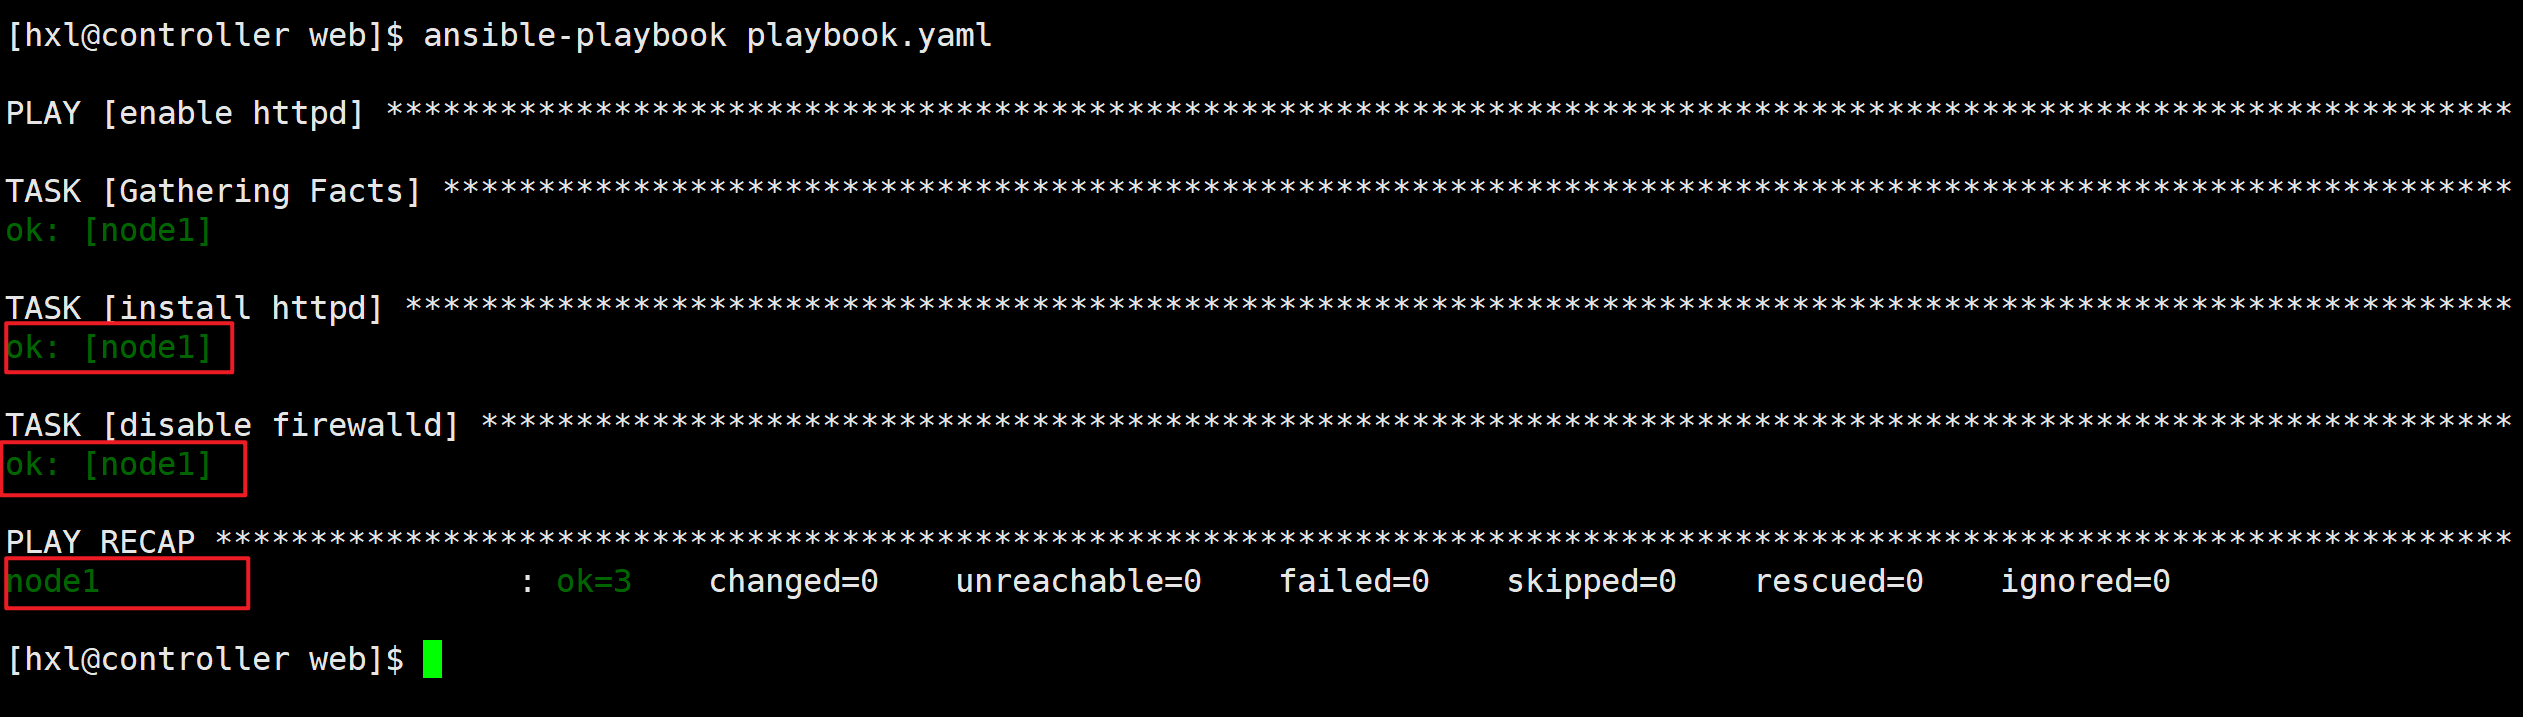
第二次执行,任务状态全是绿色
语法检查
选项--syntax-check,只检查剧本语法,不执行剧本
[hxl@controller web]$ ansible-playbook --syntax-check playbook.yaml

playbook: playbook.yaml
空运行
空运行,是指模拟运行,并不是真正执行
[hxl@controller web]$ ansible-playbook playbook.yaml -C
提高输出详细程度
-v,显示任务结果。一般情况使用 -v 即可-vv,任务结果和任务配置都会显示-vvv,包含关于与受管主机连接的信息-vvvv,增加了连接插件相关的额外详细程度选项,包括受管主机上用于执行脚本的用户,以及所执 行的脚本
Playbook 提权
在playbook中指定此关键字将覆盖/etc/ansible/ansible.cfg文件中的设置特权升级属性
remote_user,指定ssh用户become,启用或禁用特权升级become_method,启用特权升级的方法become_user,特殊升级的帐户
实验环境:
注释ansible.cfg相关的配置
[defaults]
#remote_user = hxl
inventory = ./inventory

[privilege_escalation]
#become = True
#become_user = root
#become_method = sudo
#become_ask_pass = False
安装httpd
[hxl@controller web]$ vim playbook.yaml
---
- name: enable httpd
  hosts: node2
  tasks:
    - name: install httpd
      yum:
        name:
          - httpd
        state: latest
...
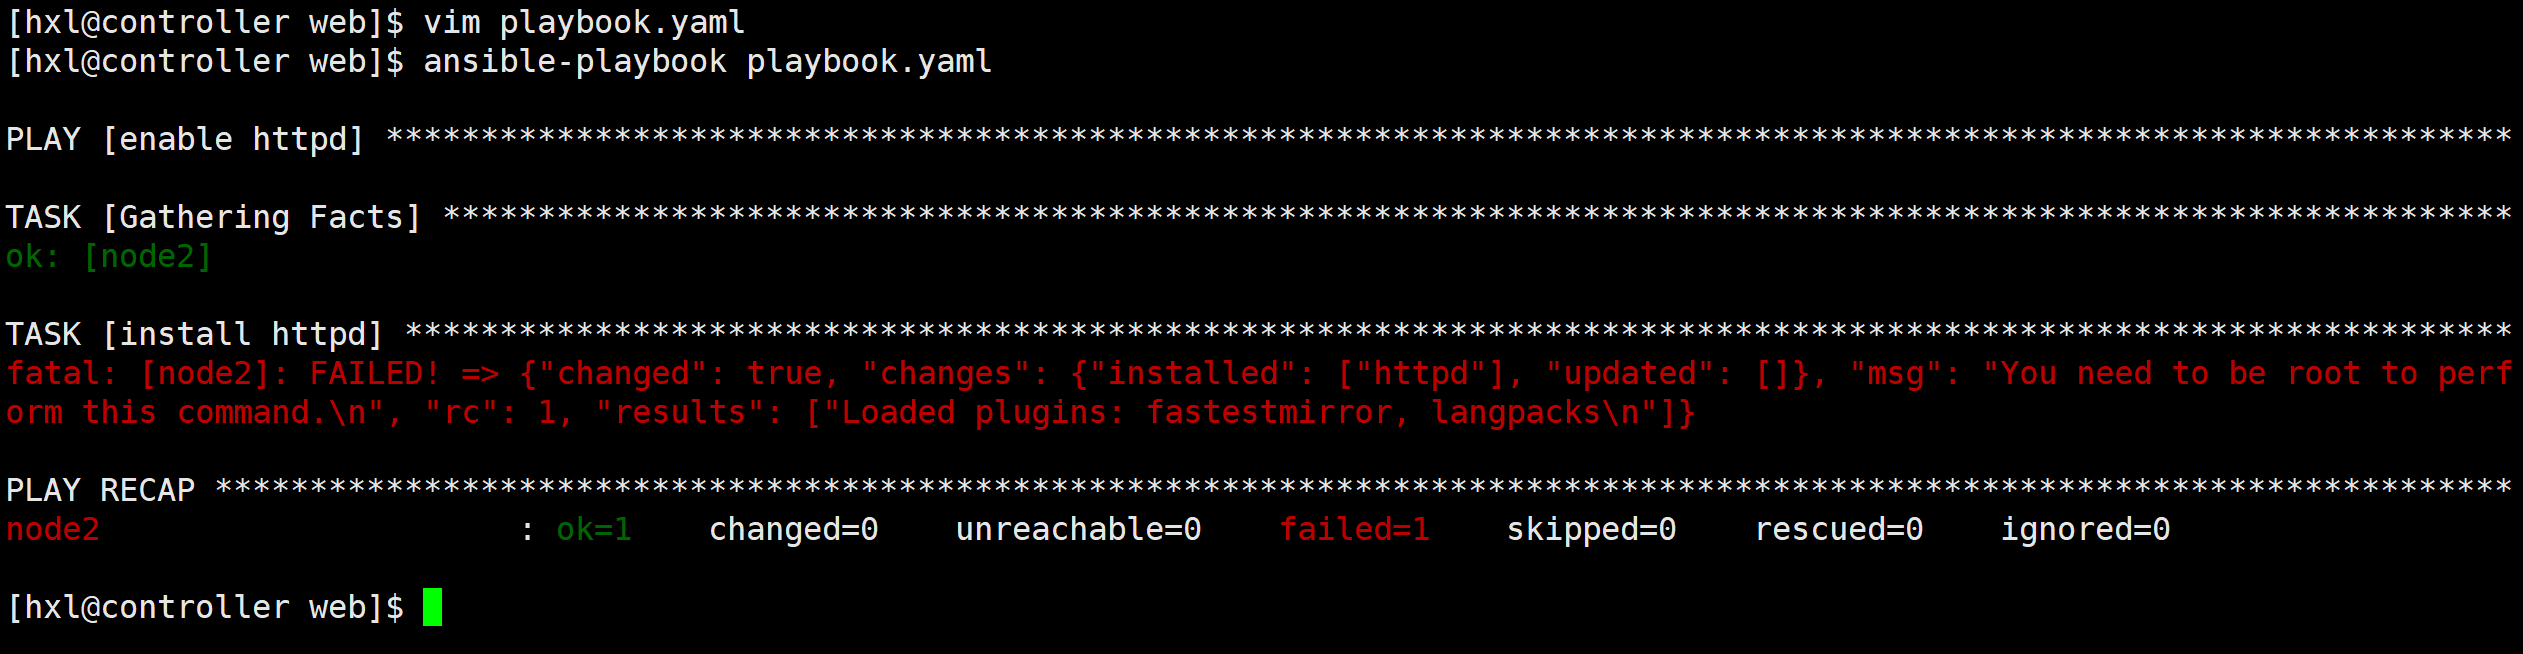
提示需要root权限
在playbook中也可以设置提权属性
[hxl@controller web]$ vim playbook.yaml
---
- name: enable httpd
  hosts: node2

  remote_user: hxl
  become: true
  become_user: root
  become_method: sudo

  tasks:
    - name: install httpd
      yum:
        name:
          - httpd
        state: latest
...
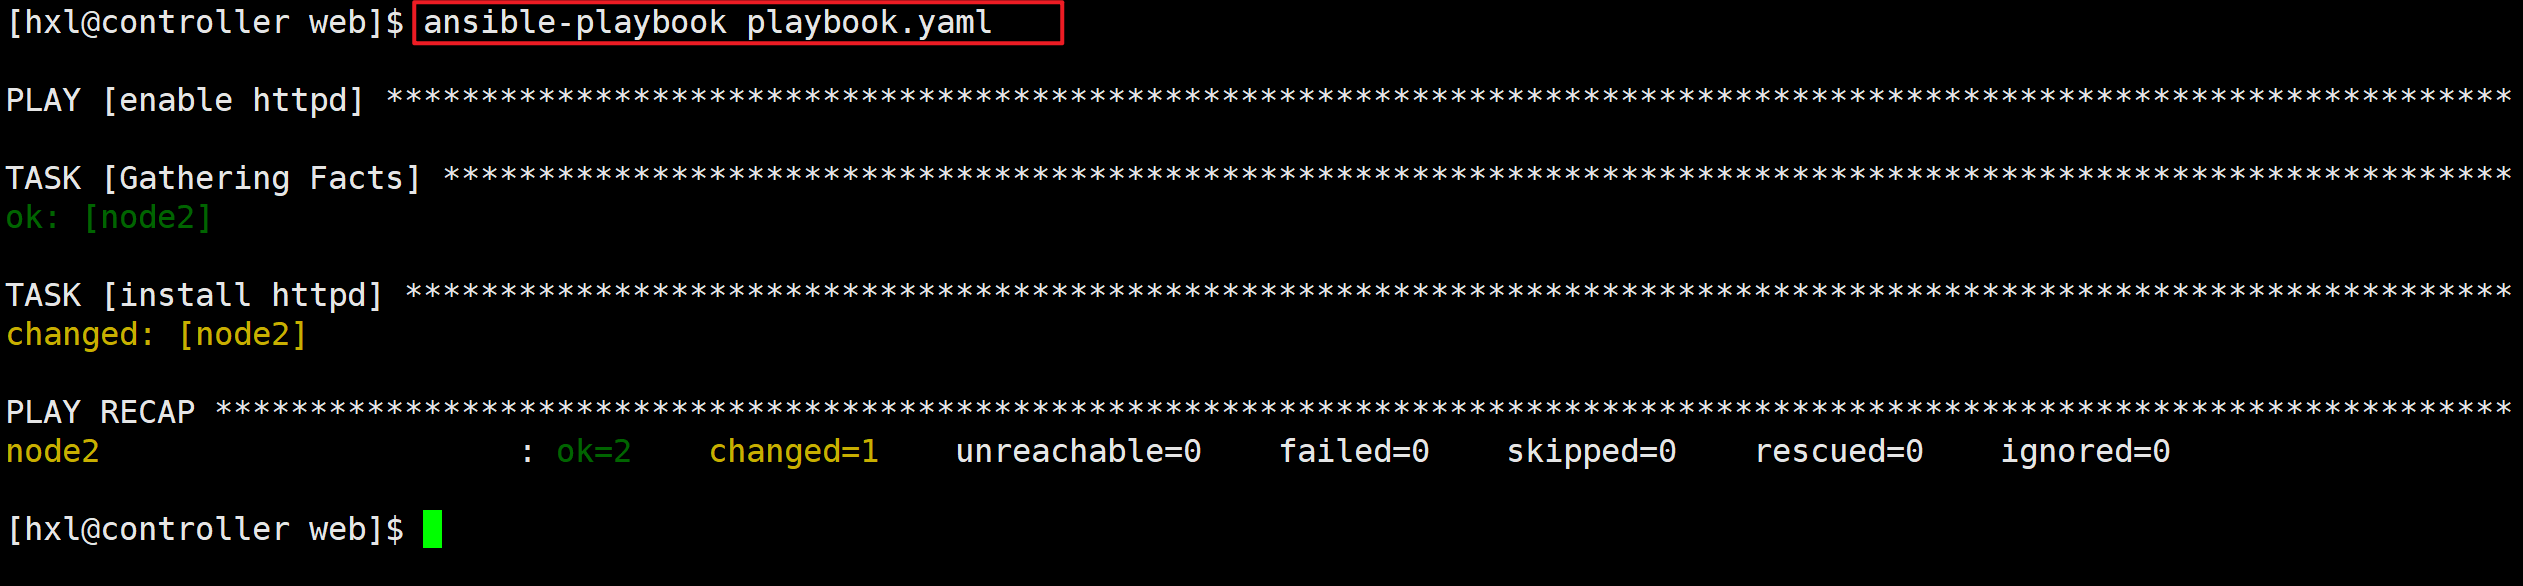
实验完成后,请将ansible.cfg文件中的注释去掉,方便之后的实验
变量管理
变量可以在 Playbook、清单文件、外部文件中定义,支持层级覆盖。
变量范围和优先级
ansible项目文件中多个位置支持定义变量,优先级由高到低,主要包含三个基本范围:
- Global scope:从命令行或 Ansible 配置设置的变量
- Play scope:在play和相关结构中设置的变量
- Host scope:由清单、事实(fact)收集或注册的任务,在主机组和个别主机上设置的变量
变量引用
可将变量名称放在双花括号{{}}内引用变量。在任务执行时, Ansible会将变量替换为其值
当变量用作值的第一元素时,变量引用必须使用引号(单引号或者双引号),否则会报错
比如:
---
- name: test vars statement in play
  hosts: node1
  vars:
    user: joe
    home: /home/joe
  tasks:
    - name: adduser user
      user:
        name: {{ user }}
        state: present
验证:
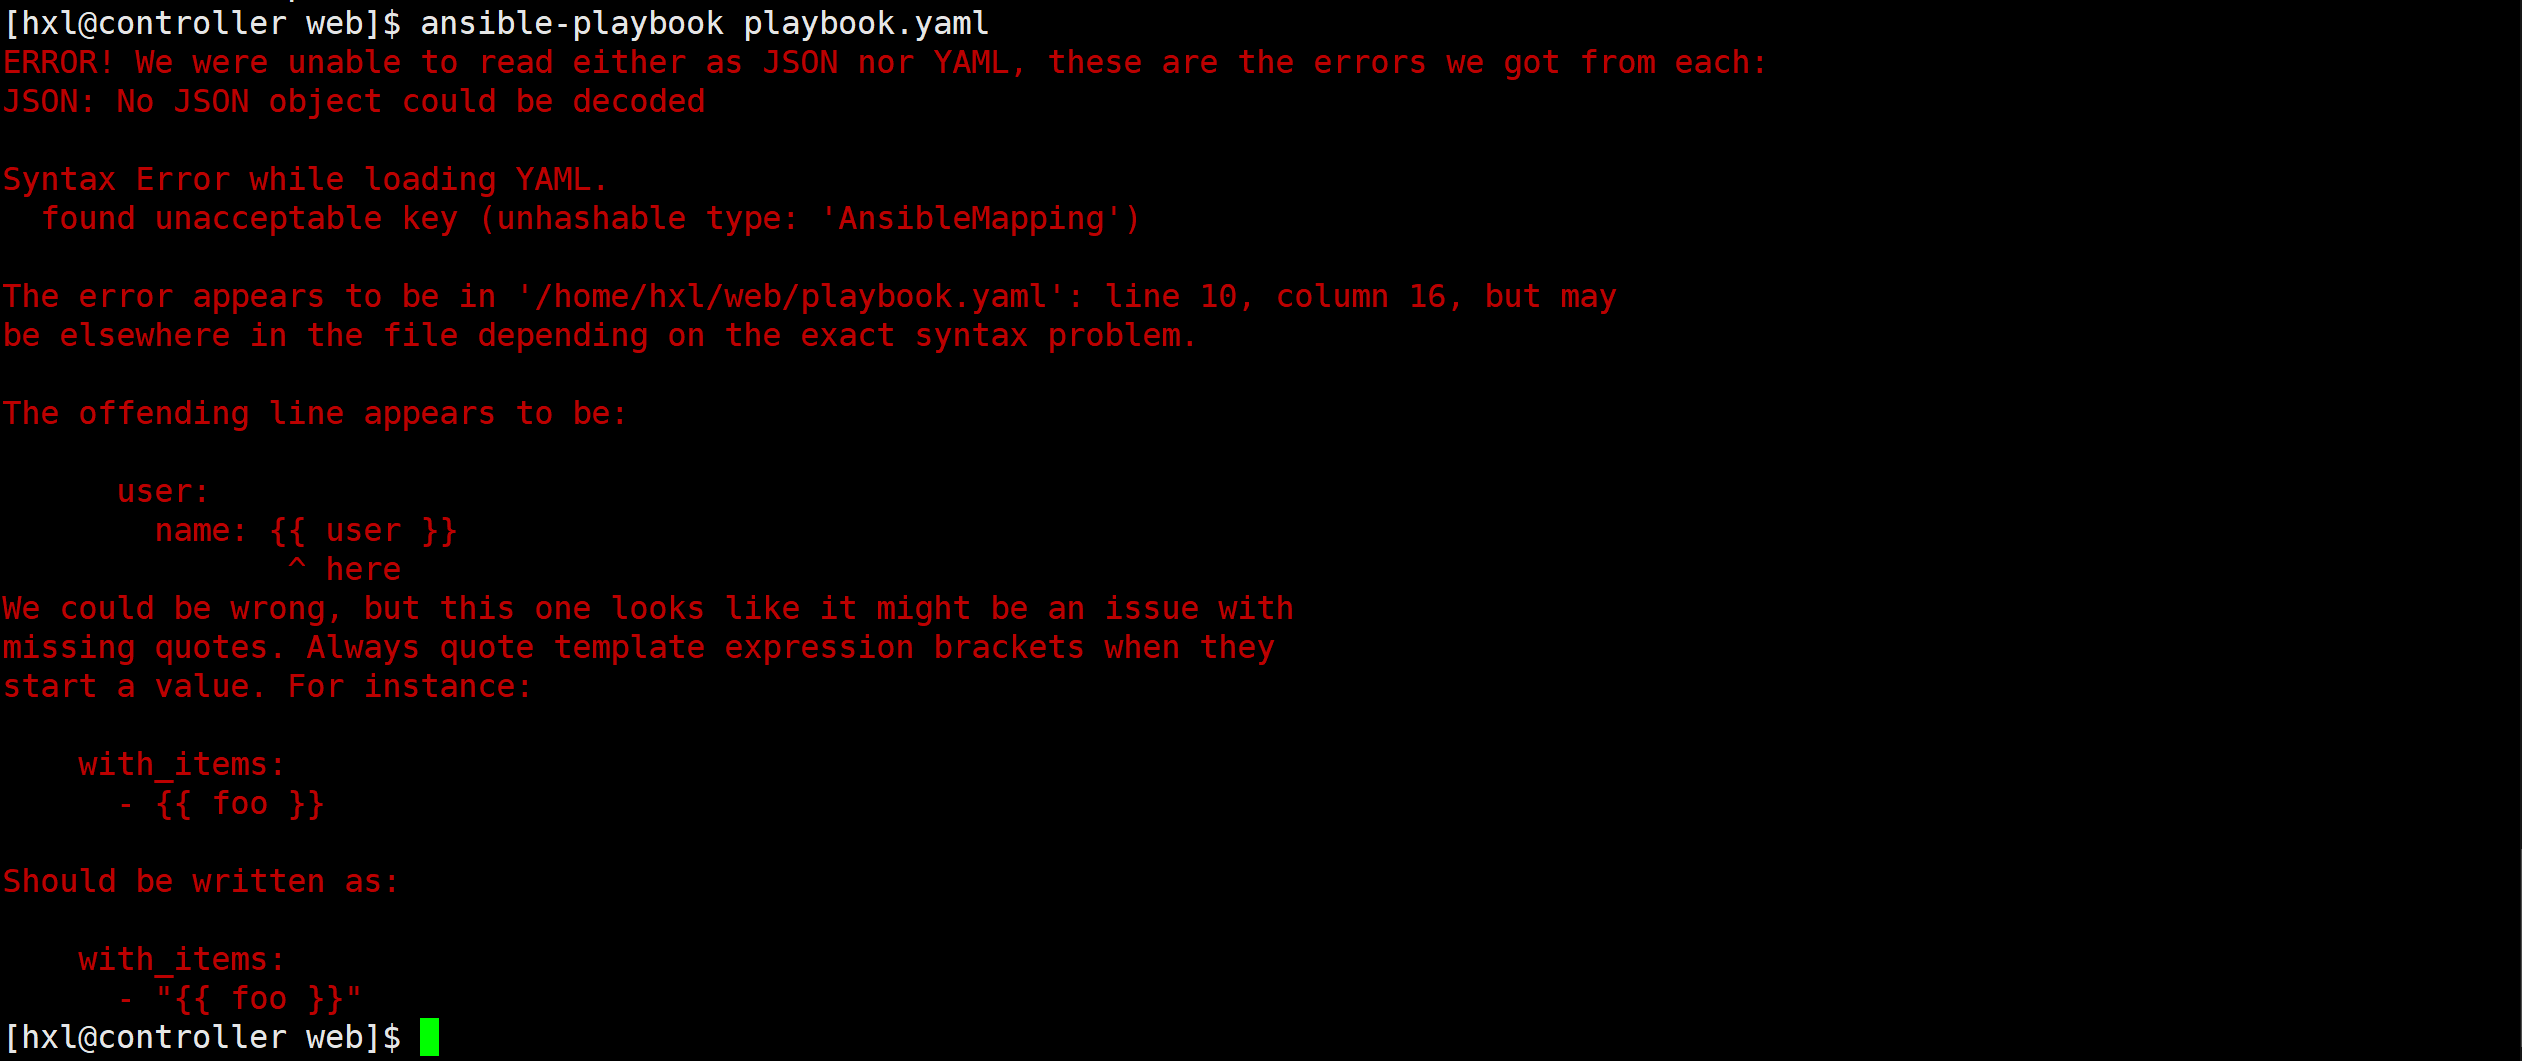
定义变量
命名规则
- 只能包含字母、数字和下划线(如包含空格、点、$符号都为非法变量名)
- 只能以字母开头
- 区分大小写
Global scope
通过选项-e传递给ansible或者ansible-playbook命令
[hxl@controller web]$ ansible node1 -e "package=httpd" -m debug -a "msg={{ package }}"
node1 | SUCCESS => {
    "msg": "httpd"
}
Play scope
vars 声明
格式一:
[hxl@controller web]$ vim playbook.yaml
---
- name: test vars statement in play
  host: node1
  vars:
    user: joe
    home: /home/joe
  tasks:
    - name: adduser {{ user }}
      user:
        name: "{{ user }}"
        home: "{{ home }}"
        state: present

    - name: debug user
      debug:
        msg: |
          username is {{ user }}
          home is {{ home }}
[hxl@controller web]$ ansible-playbook playbook.yaml
格式二:
---
- name: test vars statement in play
  host: node1
  vars:
    - user: joe
    - home: /home/joe
  tasks:
    - name: adduser {{ user }}
      user:
        name: "{{ user }}"
        home: "{{ home }}"
        state: present

    - name: debug user
      debug:
        msg: |
          username is {{ user }}
          home is {{ home }}
vars_files 声明
如果变量比较多,我们可以使用变量文件进行分类,然后分列别应用到playbook中
---
- name: test vars statement in play
  host: node1
  vars_files:
    - vars/user1.yaml
  tasks:
    - name: adduser {{ user }}
      user:
        name: "{{ user }}"
        home: "{{ home }}"
        state: present

    - name: debug user
      debug:
        msg: |
          username is {{ user }}
          home is {{ home }}
# 创建变量文件
[hxl@controller web]$ mkdir vars
[hxl@controller web]$ vim vars/user1.yaml
[hxl@controller web]$ cat vars/user1.yaml
# yaml格式
user: user1
home: /home/user1

# 测试
[hxl@controller web]$ ansible-playbook playbook.yaml
Host scope
主机变量应用于主机和主机组。主机变量优先级高于主机组变量
主机清单中定义
较旧的做法是直接在清单文件中定义。不建议采用,但仍可能会遇到
[hxl@controller web]$ vim inventory
[servers]
node1 user=laowang
node2

[servers:vars]
user=laoli

# 验证
[hxl@controller web]$ ansible servers -m debug -a 'var=user'

node1 | SUCCESS => {
    "user": "laowang"
}
node2 | SUCCESS => {
    "user": "laoli"
}
缺点:使得清单文件更复杂,在同一文件中混合提供了主机和变量信息
目录分层结构定义
在项目目录中创建如下目录:
- group_vars,定义主机组变量。目录中文件名可以直接使用
主机组名或者主机组名.yaml - host_vars,定义主机变量。目录中文件名可以直接使用
主机名或者主机名.yaml
示例:
[hxl@controller web]$ cat inventory
[servers]
node1
node2

[hxl@controller web]$ mkdir group_vars
[hxl@controller web]$ vim group_vars/servers.yaml
user: laowang
[hxl@controller web]$ mkdir host_vars
[hxl@controller web]$ vim host_vars/node1.yaml
user: laoli

# 验证
[hxl@controller web]$ ansible servers -m debug -a 'var=user'
node1 | SUCCESS => {
    "user": "laoli"
}
node2 | SUCCESS => {
    "user": "laowang"
}
目录结构定义主机和主机组的变量是首选做法
主机连接特殊变量
详情参考:主机连接特殊变量
数组变量
示例:
users:
  bjones:
    first_name: Bob
    last_name: Jones
    home_dir: /users/bjones
  acook:
    first_name: Anne
    last_name: Cook
    home_dir: /users/acook
引用方式一:
users.bjones.first_name
users.acook.home_dir
引用方式二:
users['bjones']['first_name']
users['acook']['home_dir']
小总结:
- 如果使用方法一
.分隔符引用的关键字与python的功能函数同名,例如discard、copy、add,那么 就会出现问题。方法二['']引用方式可以避免这种错误 - 尽管两种方法都可以使用,为了减少排故难度,Ansible中统一使用其中一种方法
register 语句
register 语句捕获任务输出。
输出保存在一个临时变量中,稍后在playbook中可用于调试用途或者达成其他目的
---
- name: Installs a package and prints the result
  host: node1
  tasks:
    - name: Install the package
      yum:
        name: httpd
        home: installed
      register: install_result

    - debug:
        var: install_result
MAGIC 变量
magic 变量由 Ansible 自动设置,可用于获取与特定受管主机相关的信息
最常用的四个 Magic 变量
- inventory_hostname,包含清单中配置的当前受管主机的主机名称
- group_names,列出当前受管主机所属的所有主机组
- groups,列出清单中所有组,以及组中含有的主机
- hostvars,包含所有受管主机的变量,可用于获取另一台受管主机的变量的值
SECRETS 管理
ansible-vault 命令
Ansible可能需要访问密码或API密钥等敏感数据,此信息可能以纯文本形式存储在清单变量或其他 Ansible文件中,任何有权访问Ansible文件的用户或存储这些Ansible文件的版本控制系统都能够访问此敏感数据。
这样就显得很不安全,所以Ansible随附的 Ansible Vault 可以加密任何由Ansible使用的结构化数据文件,包 括清单变量、playbook中含有的变量文件、在执行playbook时作为参数传递的变量文件,以及Ansible 角色中定义的变量。
文件管理
[hxl@controller web]$ ansible-vault -h
usage: ansible-vault [-h] [--version] [-v]
                     {create,decrypt,edit,view,encrypt,encrypt_string,rekey}
                     ...

encryption/decryption utility for Ansible data files

positional arguments:
  {create,decrypt,edit,view,encrypt,encrypt_string,rekey}
    create              Create new vault encrypted file
    decrypt             Decrypt vault encrypted file
    edit                Edit vault encrypted file
    view                View vault encrypted file
    encrypt             Encrypt YAML file
    encrypt_string      Encrypt a string
    rekey               Re-key a vault encrypted file

optional arguments:
  --version             show program's version number, config file location,
                        configured module search path, module location,
                        executable location and exit
  -h, --help            show this help message and exit
  -v, --verbose         verbose mode (-vvv for more, -vvvv to enable
                        connection debugging)

See 'ansible-vault <command> --help' for more information on a specific
command.
ansible-vault create和edit命令使用默认编辑器vi打开文件。
可以设置和导出EDITOR环境变量指定其他默认编辑器
比如:设置默认编辑器为vim
# 设置环境变量
[hxl@controller web]$ export EDITOR=vim

# 或者添加到bash配置文件中
[hxl@controller web]$ echo 'export EDITOR=vim' >> ~/.bashrc
[hxl@controller web]$ source ~/.bashrc

# 创建加密文件,内容是yaml格式,例如 password: redhat
[hxl@controller web]$ ansible-vault create secret.yaml
New Vault password: `redhat`
Confirm New Vault password:`redhat`
# 普通情况下查看内容如下
[hxl@controller web]$ cat secret.yaml
$ANSIBLE_VAULT;1.1;AES256
35323639326634393365376265363539383539326530626262383565643139353934656164346631
6164643364376435373137363966653730656561363832370a346539323263353034303764373361
33393131313736636364636235303736306530346133643162336464653936376437333634336566
3563316562303961380a613632336230326462633261313330313161323265376665346231313532
39663766313737323361366133343766613138633735626163343163656339383338

# 查看加密文件
[hxl@controller web]$ ansible-vault view secret.yaml
Vault password: `redhat`
password: redhat

# 使用 --vault-password-file 选项从文件中读取加密和解密密码
[hxl@controller web]$ echo redhat > pass
[hxl@controller web]$ ansible-vault view secret.yaml --vault-password-file=pass
password: redhat

# 或者在ansible.cfg的配置文件中defaults设置vault_password_file
[hxl@controller web]$ vim ansible.cfg
[defaults]
... ...
vault_password_file = ./pass

# 编辑加密文件
[hxl@controller web]$ ansible-vault edit secret.yaml --vault-password-file=pass
password: redhat123

# 解密文件
[hxl@controller web]$ ansible-vault decrypt secret.yaml --vault-password-file=pass
Decryption successful
# 解密后可使用cat进行普通查看
[hxl@controller web]$ cat secret.yaml
password: redhat123

# 加密文件
[hxl@controller web]$ ansible-vault encrypt secret.yaml --vault-password-file=pass
Encryption successful

# 更改加密文件密码
[hxl@controller web]$ ansible-vault rekey secret.yaml --vault-password-file=pass
New Vault password: `redhat`
Confirm New Vault password: `redhat`
Rekey successful

# 或者使用 --new-vault-password-file 指定新密码所在文件位置
[hxl@controller web]$ echo huawei > pass_new
[hxl@controller web]$ ansible-vault rekey secret.yaml --vault-password-file=pass --new-vault-password-file=pass_new
Rekey successful
变量管理
推荐操作:
- 包含敏感变量的文件可通过 ansible-vault 命令进行保护
- 敏感变量和所有其他变量保存在相互独立的文件中
- 管理组变量和主机变量的首选方式是在项目目录中创建子目录
可为每个主机组或受管主机使用独立的目录。这些目录可包含多个变量文件,它们都由该主机组或受管 主机使用。
FACTS 管理
FACTS 介绍
FACTS 是 Ansible 在受管主机上自动检测到的变量,默认保存在内容中,只存在于本次playbook执行期 间
FACTS含有主机相关的信息,可以像play中的常规变量一样使用。
受管主机的 facts 包括:
• 主机名称 • 内核版本 • 网络接口 • IP地址
• 操作系统版本 • 各种环境变量
• CPU数量 • 提供的或可用的内存 • 可用磁盘空间
借助 facts,可以方便地检索受管主机的状态,并根据该状态确定要执行的操作。
例如:
- 可以根据当前内核版本的FACTS运行条件任务,以此来重新启动服务器
- 可以根据通过FACTS报告的可用内存来自定义 MySQL 配置文件
- 可以根据FACTS的值设置配置文件中使用的 IPv4 地址
通常,每个play在执行第一个任务之前会先自动收集FACTS
查看FACTS内容
示例一:查看所有变量
---
- name: Dump facts
  hosts: node1

  tasks:
    - name: Print all facts
      debug:
        var: ansible_facts
输出会超多!!
示例二:查看单个变量
---
- hosts: node1
  tasks:
    - name: Print all facts
      debug:
        msg: >
          The default IPv4 address of {{ ansible_fqdn }}
          is {{ ansible_default_ipv4.address }}
部分FACTS
| FACT | VARIABLE |
|---|---|
| 短主机名 | ansible_facts[‘hostname’] |
| 完全限定的域名 | ansible_facts[‘fqdn’] |
| 主要IPv4地址(基于路由) | ansible_facts[‘default_ipv4’][‘address’] |
| 所有网络接口的名称列表 | ansible_facts[‘interfaces’] |
| /dev/vdal磁盘分区的大小 | ansible_facts[‘devices’][‘vda’][‘partitions’][‘vda1’][‘size’] |
| DNS服务器列表 | ansible_facts[‘dns’][‘nameservers’] |
| 当前运行的内核的版本 | ansible_facts[‘kernel’] |
部署文件模块
环境
[hxl@controller ~]$ mkdir web && cd web

[hxl@controller web]$ cat > ansible.cfg <<'EOF'
[defaults]
remote_user = hxl
inventory = ./inventory

[privilege_escalation]
become = True
become_user = root
become_method = sudo
become_ask_pass = False
EOF

[hxl@controller web]$ cat > inventory <<'EOF'
controller
node1
node2
node3
node4
EOF
file模块
设置权限、所有权、SELinux上下文以及常规文件、符号链接、硬链接和目录的时间戳等属 性。此模块还可以创建或删除常规文件、符号链接、硬链接和目录
创建文件或修改文件属性
---
- hosts: node1
  gather_facts: no
  tasks:
    - name: Touch a file and set permissions
      file:
        path: /tmp/testfile
        owner: hxl
        group: wheel
        mode: 0640
        state: touch
mode选项: 必须使用前导0 (‘0644’ or ‘01777’) 或者引起来 (‘‘644’’ or ‘‘1777’’) 。如果直接写640,则会 640当做10进制,并转换成二进制1 010 000 000,最终文件权限是-w- — --T
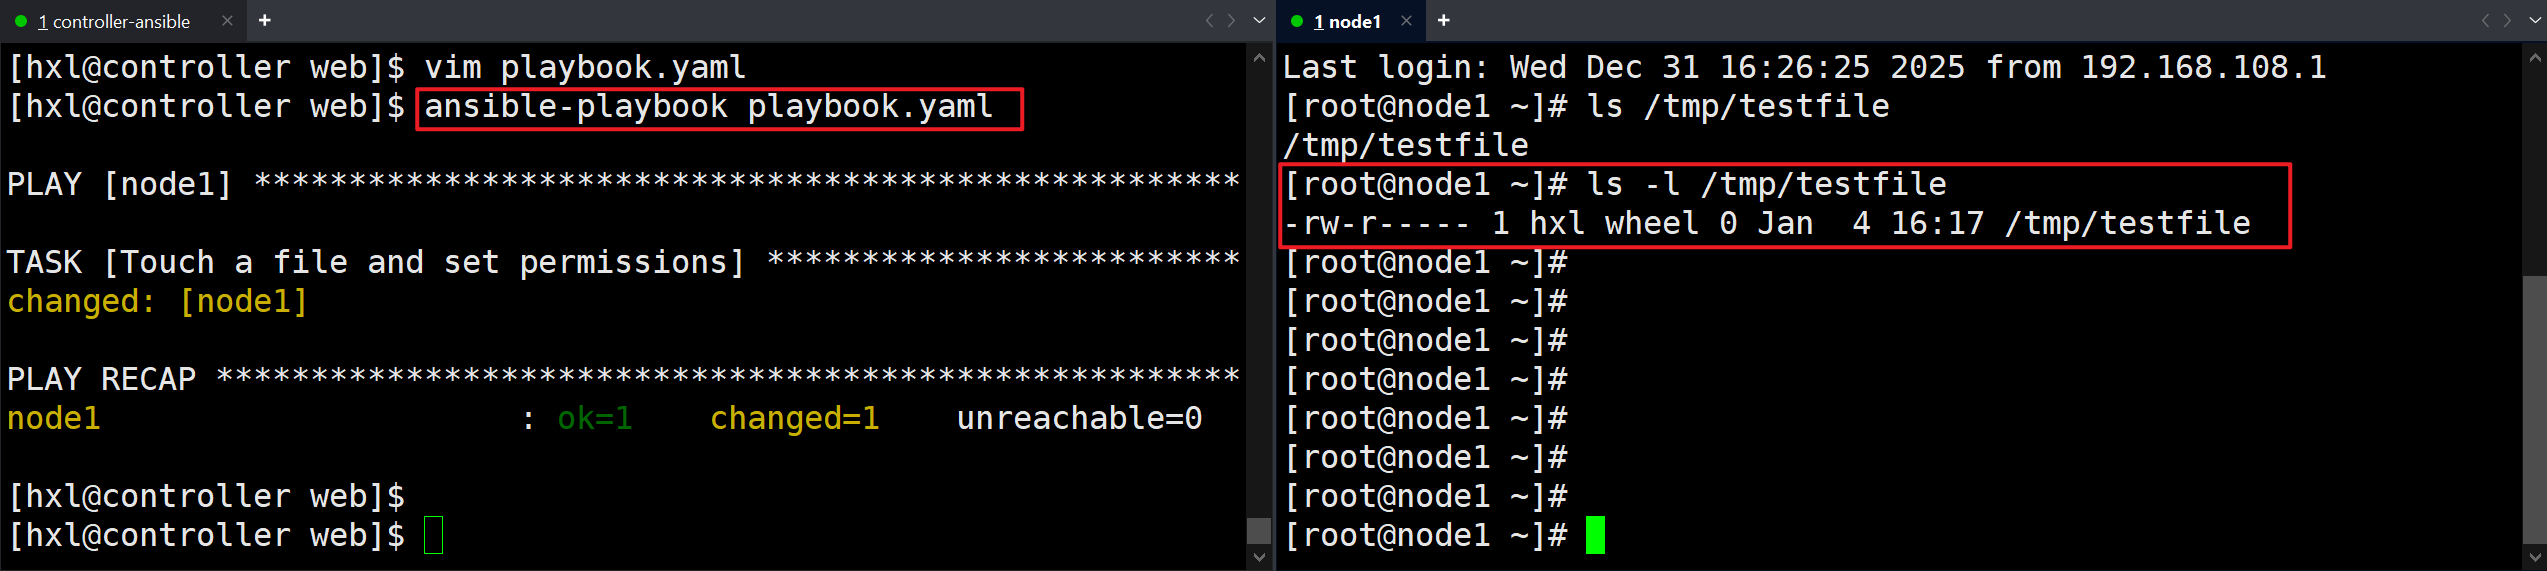
创建目录
---
- hosts: node1
  gather_facts: no
  tasks:
    - name: create directory
      file:
        path: /webdev
        owner: apache
        group: apache
        mode: 0755
        state: directory
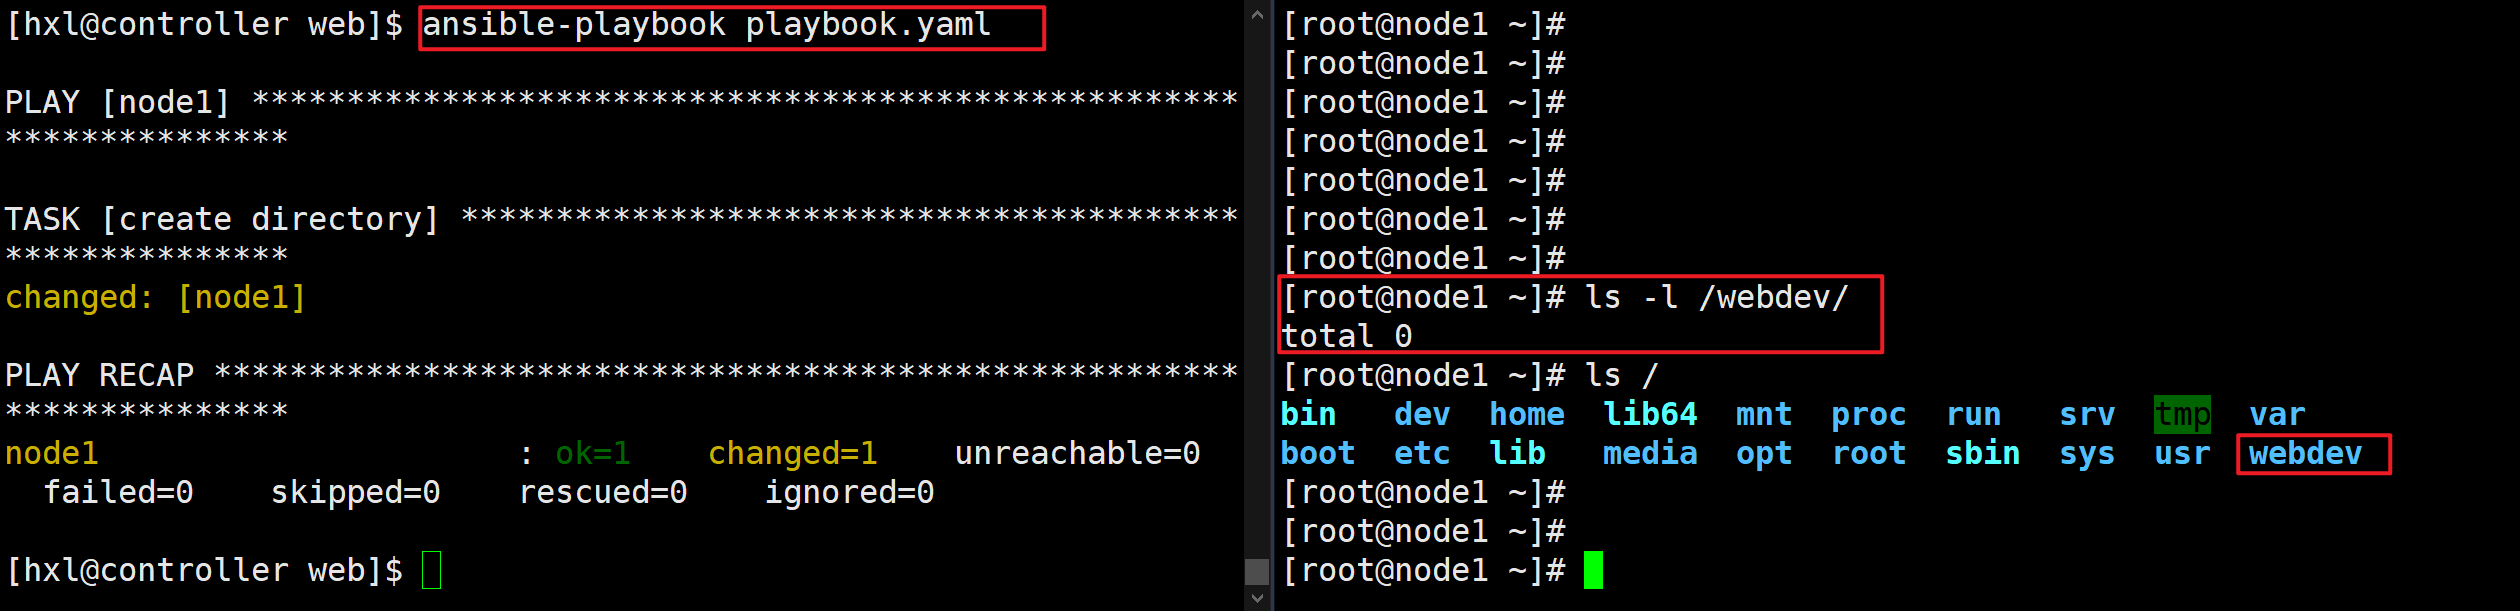
删除文件
---
- hosts: node1
  gather_facts: no
  tasks:
    - name: delete file
      file:
        path: /tmp/testfile
        state: absent
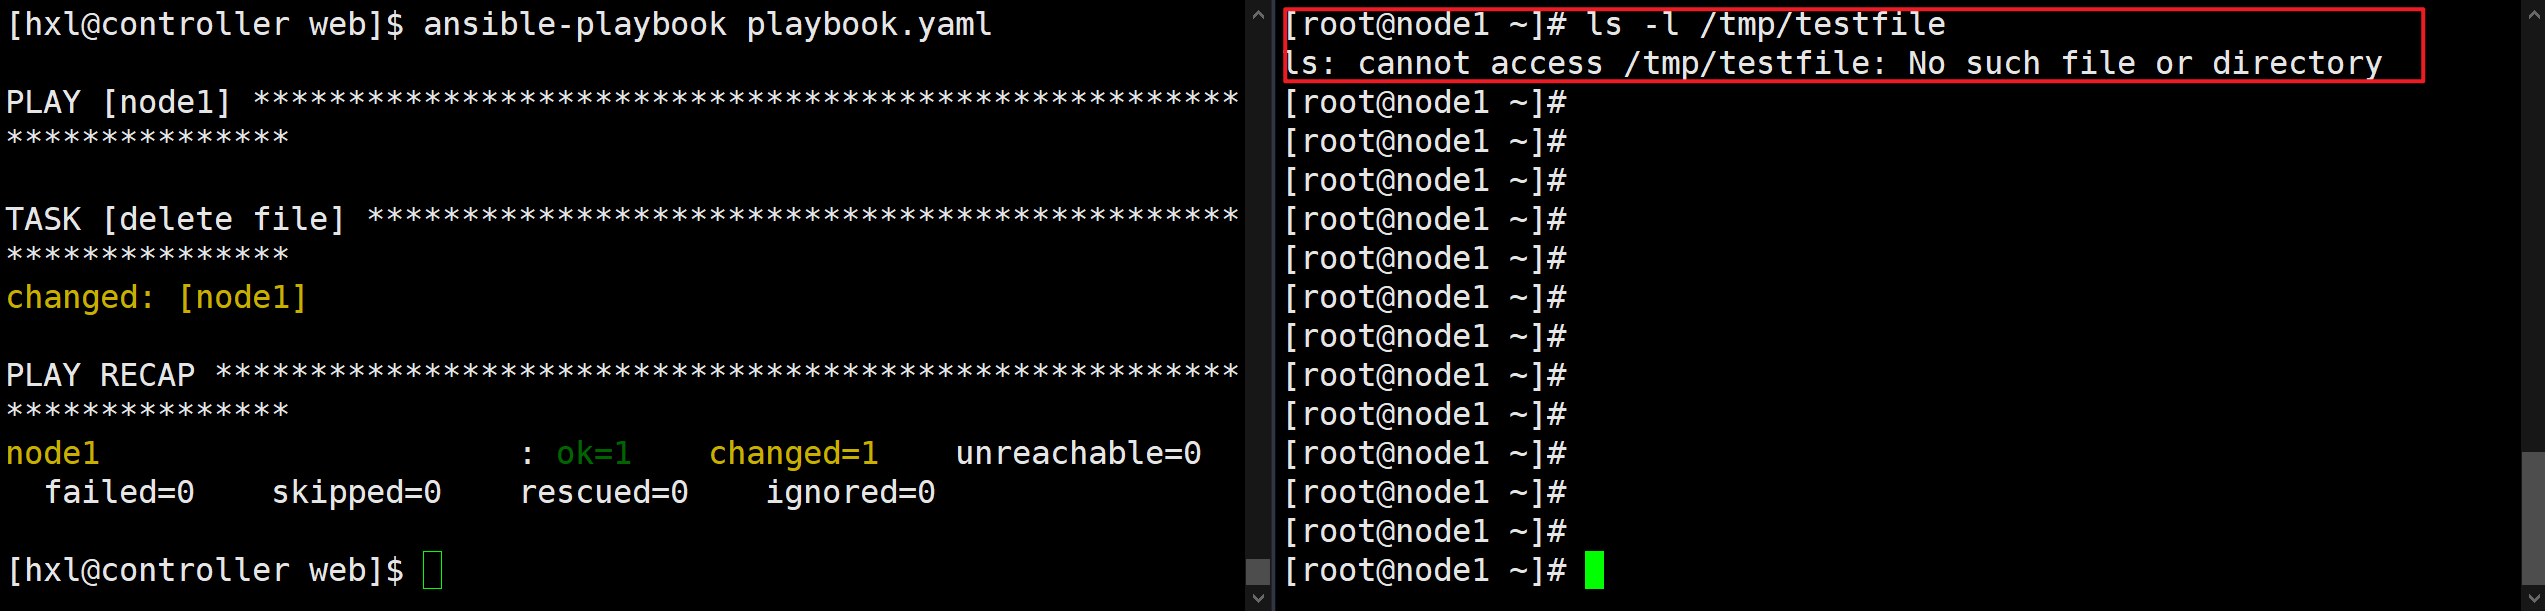
lineinfile模块
确保特定行位于某个文件中,或使用反向引用正则表达式来替换现有行
确保文件中存在特定行
如果不存在加在最后一行
# node1
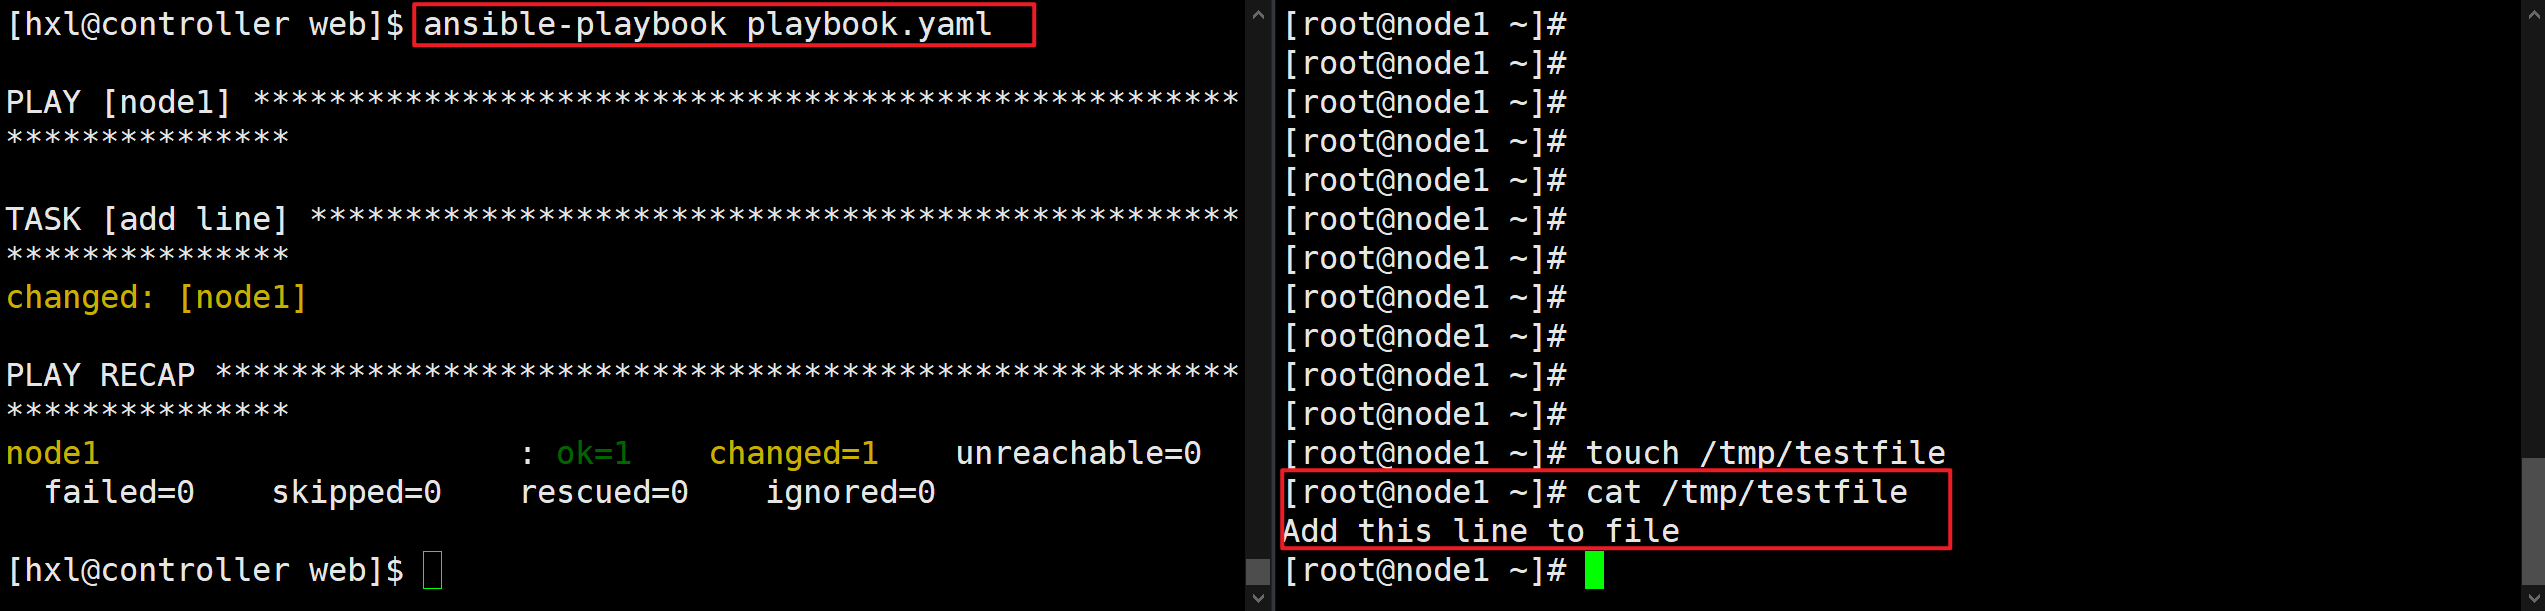
[root@node1 ~]# touch /tmp/testfile
---
- hosts: node1
  gather_facts: no
  tasks:
    - name: add line
      lineinfile:
        path: /tmp/testfile
        line: 'Add this line to file'
        state: present
# controller
[hxl@controller web]$ ansible-playbook playbook.yaml

# node1
[root@node1 ~]# cat /tmp/testfile
Add this line to file
特定位置插入
-
insertbefore,最后一个匹配到前插入
--- - hosts: node1 gather_facts: no tasks: - name: add line lineinfile: path: /etc/httpd/conf/httpd.conf line: 'Listen 79' insertbefore: 'Listen 80' state: present -
insertafter,最后一个匹配到后插入
---
- hosts: node1
  gather_facts: no
  tasks:
    - name: add line
      lineinfile:
        path: /etc/httpd/conf/httpd.conf
        line: 'Listen 81'
        insertafter: 'Listen 80'
        state: present
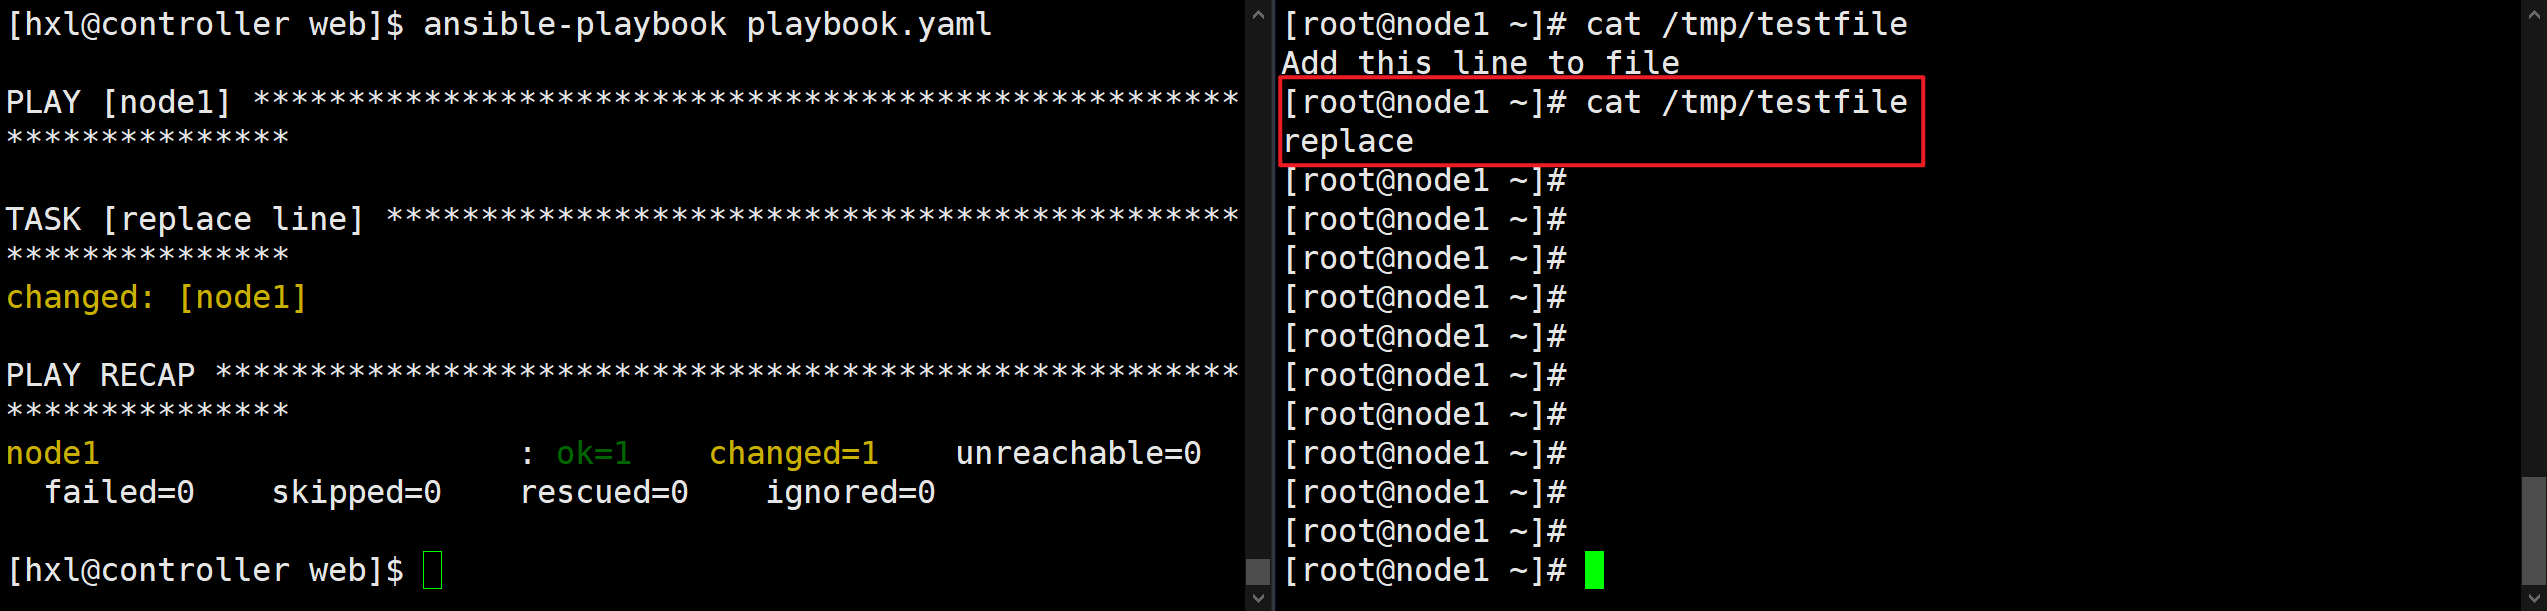
替换文本行
# node1
[root@node1 ~]# cat /tmp/testfile
Add this line to file

# controller
---
- hosts: node1
  gather_facts: no
  tasks:
    - name: replace line
      lineinfile:
        path: /tmp/testfile
        regexp: 'Add'
        line: 'replace'
        state: present

# node1
[root@node1 ~]# cat /tmp/testfile
replace
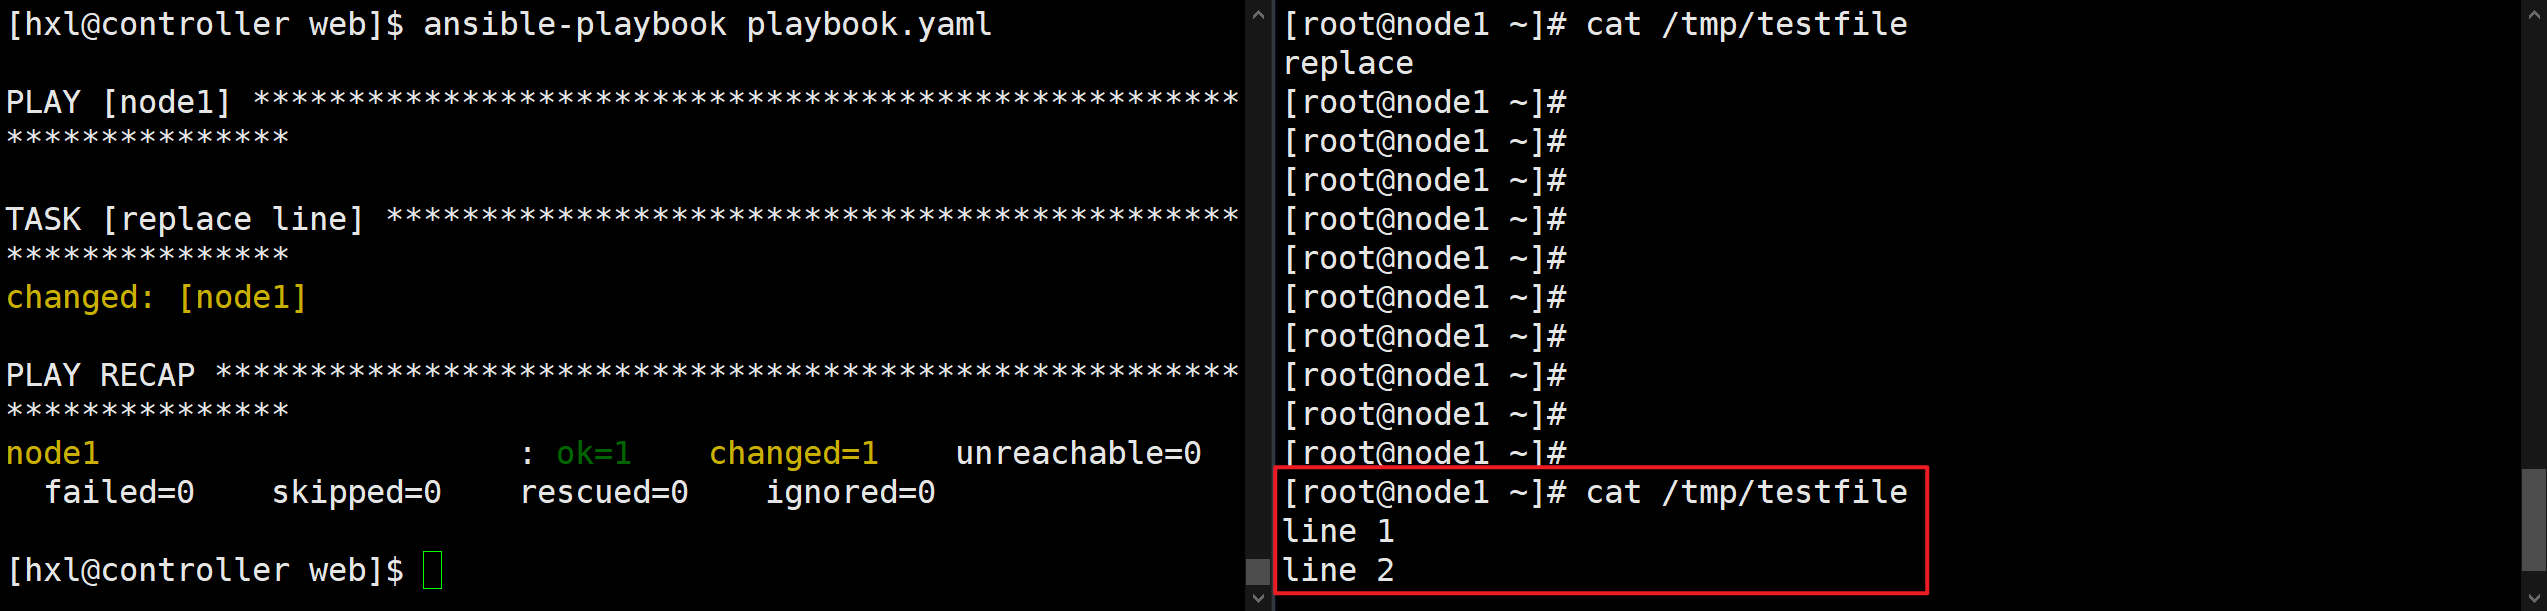
也可以多行文本替换
---
- hosts: node1
  gather_facts: no
  tasks:
    - name: replace line
      lineinfile:
        path: /tmp/testfile
        regexp: 'replace'
        line: |
          line 1
          line 2
        state: present
replace模块
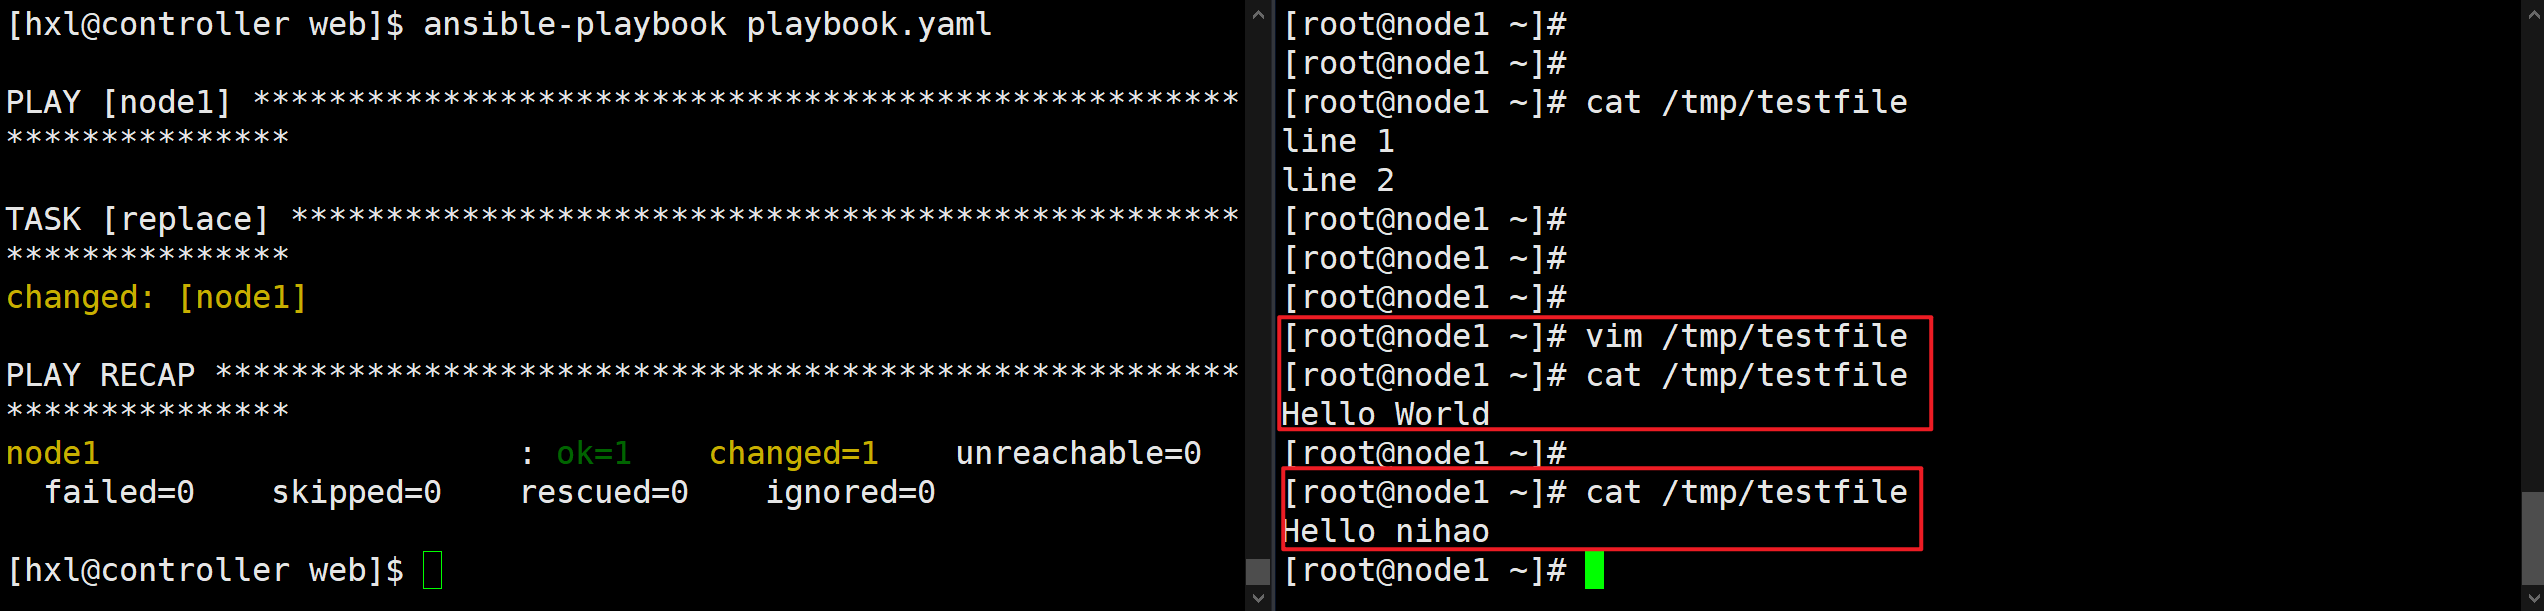
查找文件中行,一次性替换成对应内容
该模块使用正则表达式匹配内容,将匹配的内容替换成指定的内容。匹配的多个地方都会被替换掉
[root@node1 ~]# vim /tmp/testfile
[root@node1 ~]# cat /tmp/testfile
Hello World
---
- hosts: node1
  gather_facts: no
  tasks:
    - name: replace
      replace:
        path: /tmp/testfile
        regexp: '^Hello World.*'
        replace: 'Hello nihao'
blockinfile模块
插入、更新或删除多行文本块
将文本块添加到现有文件
---
- hosts: node1
  gather_facts: no
  tasks:
    - name: add block lines to file
      blockinfile:
        path: /tmp/testfile
        block: |
          line 1 in file
          line 2 in fileaa
          line 3 in file sss
        state: present
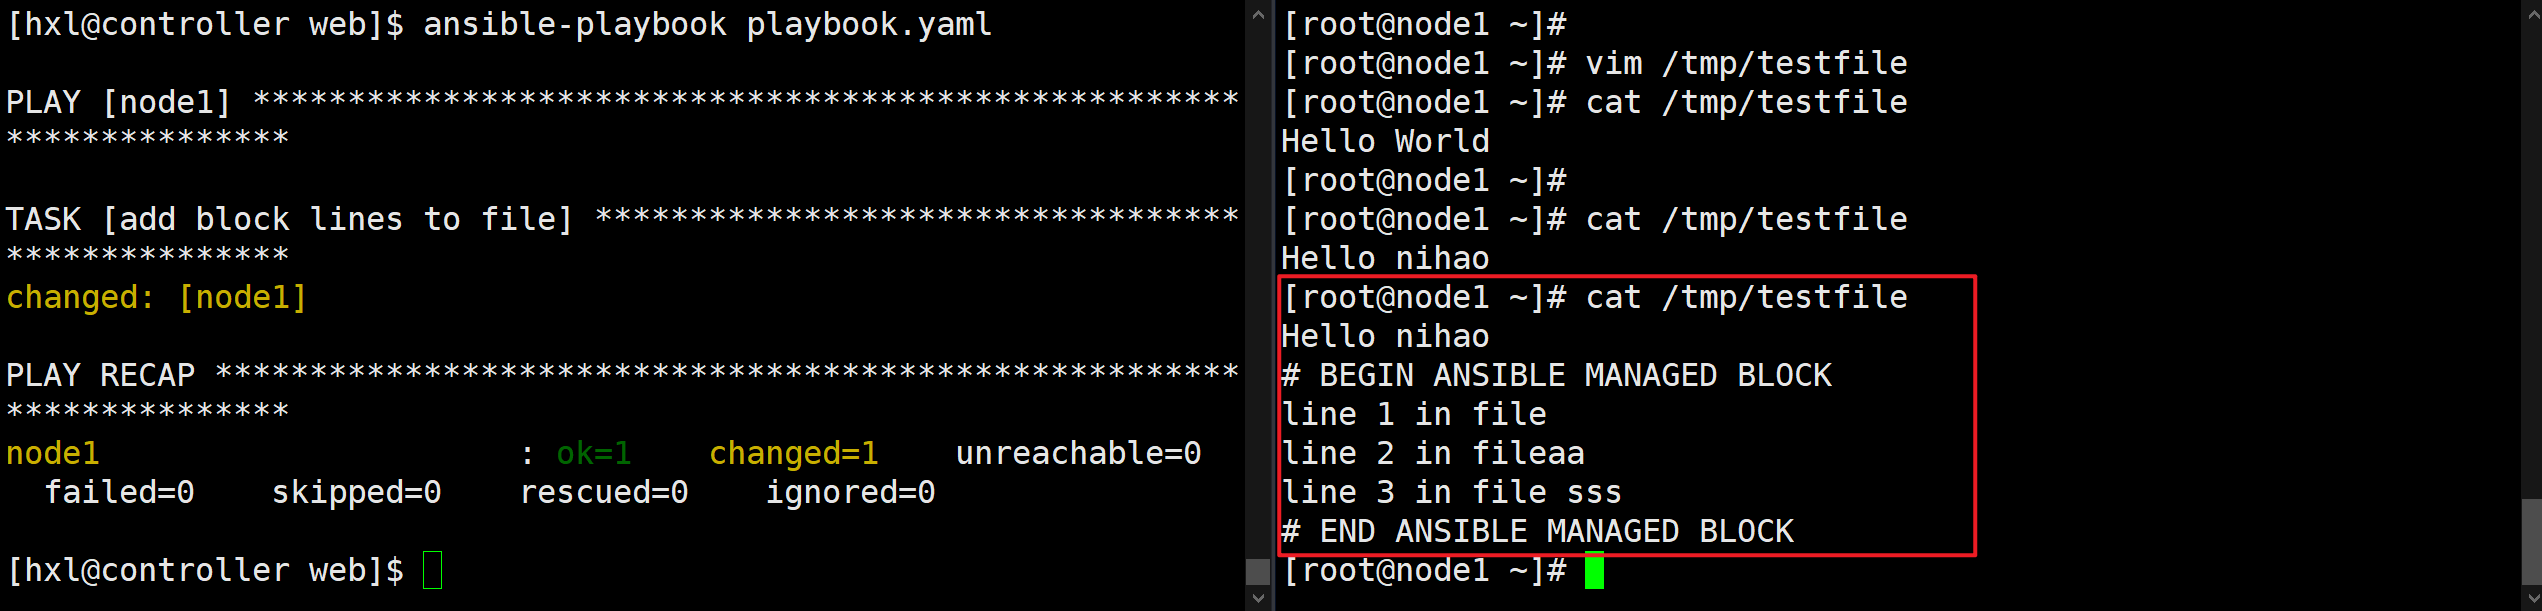
添加的内容如下,会在第一行和最后一行额外添加注释
# BEGIN ANSIBLE MANAGED BLOCK
line 1 in file
line 2 in fileaa
line 3 in file sss
# END ANSIBLE MANAGED BLOCK
stat模块
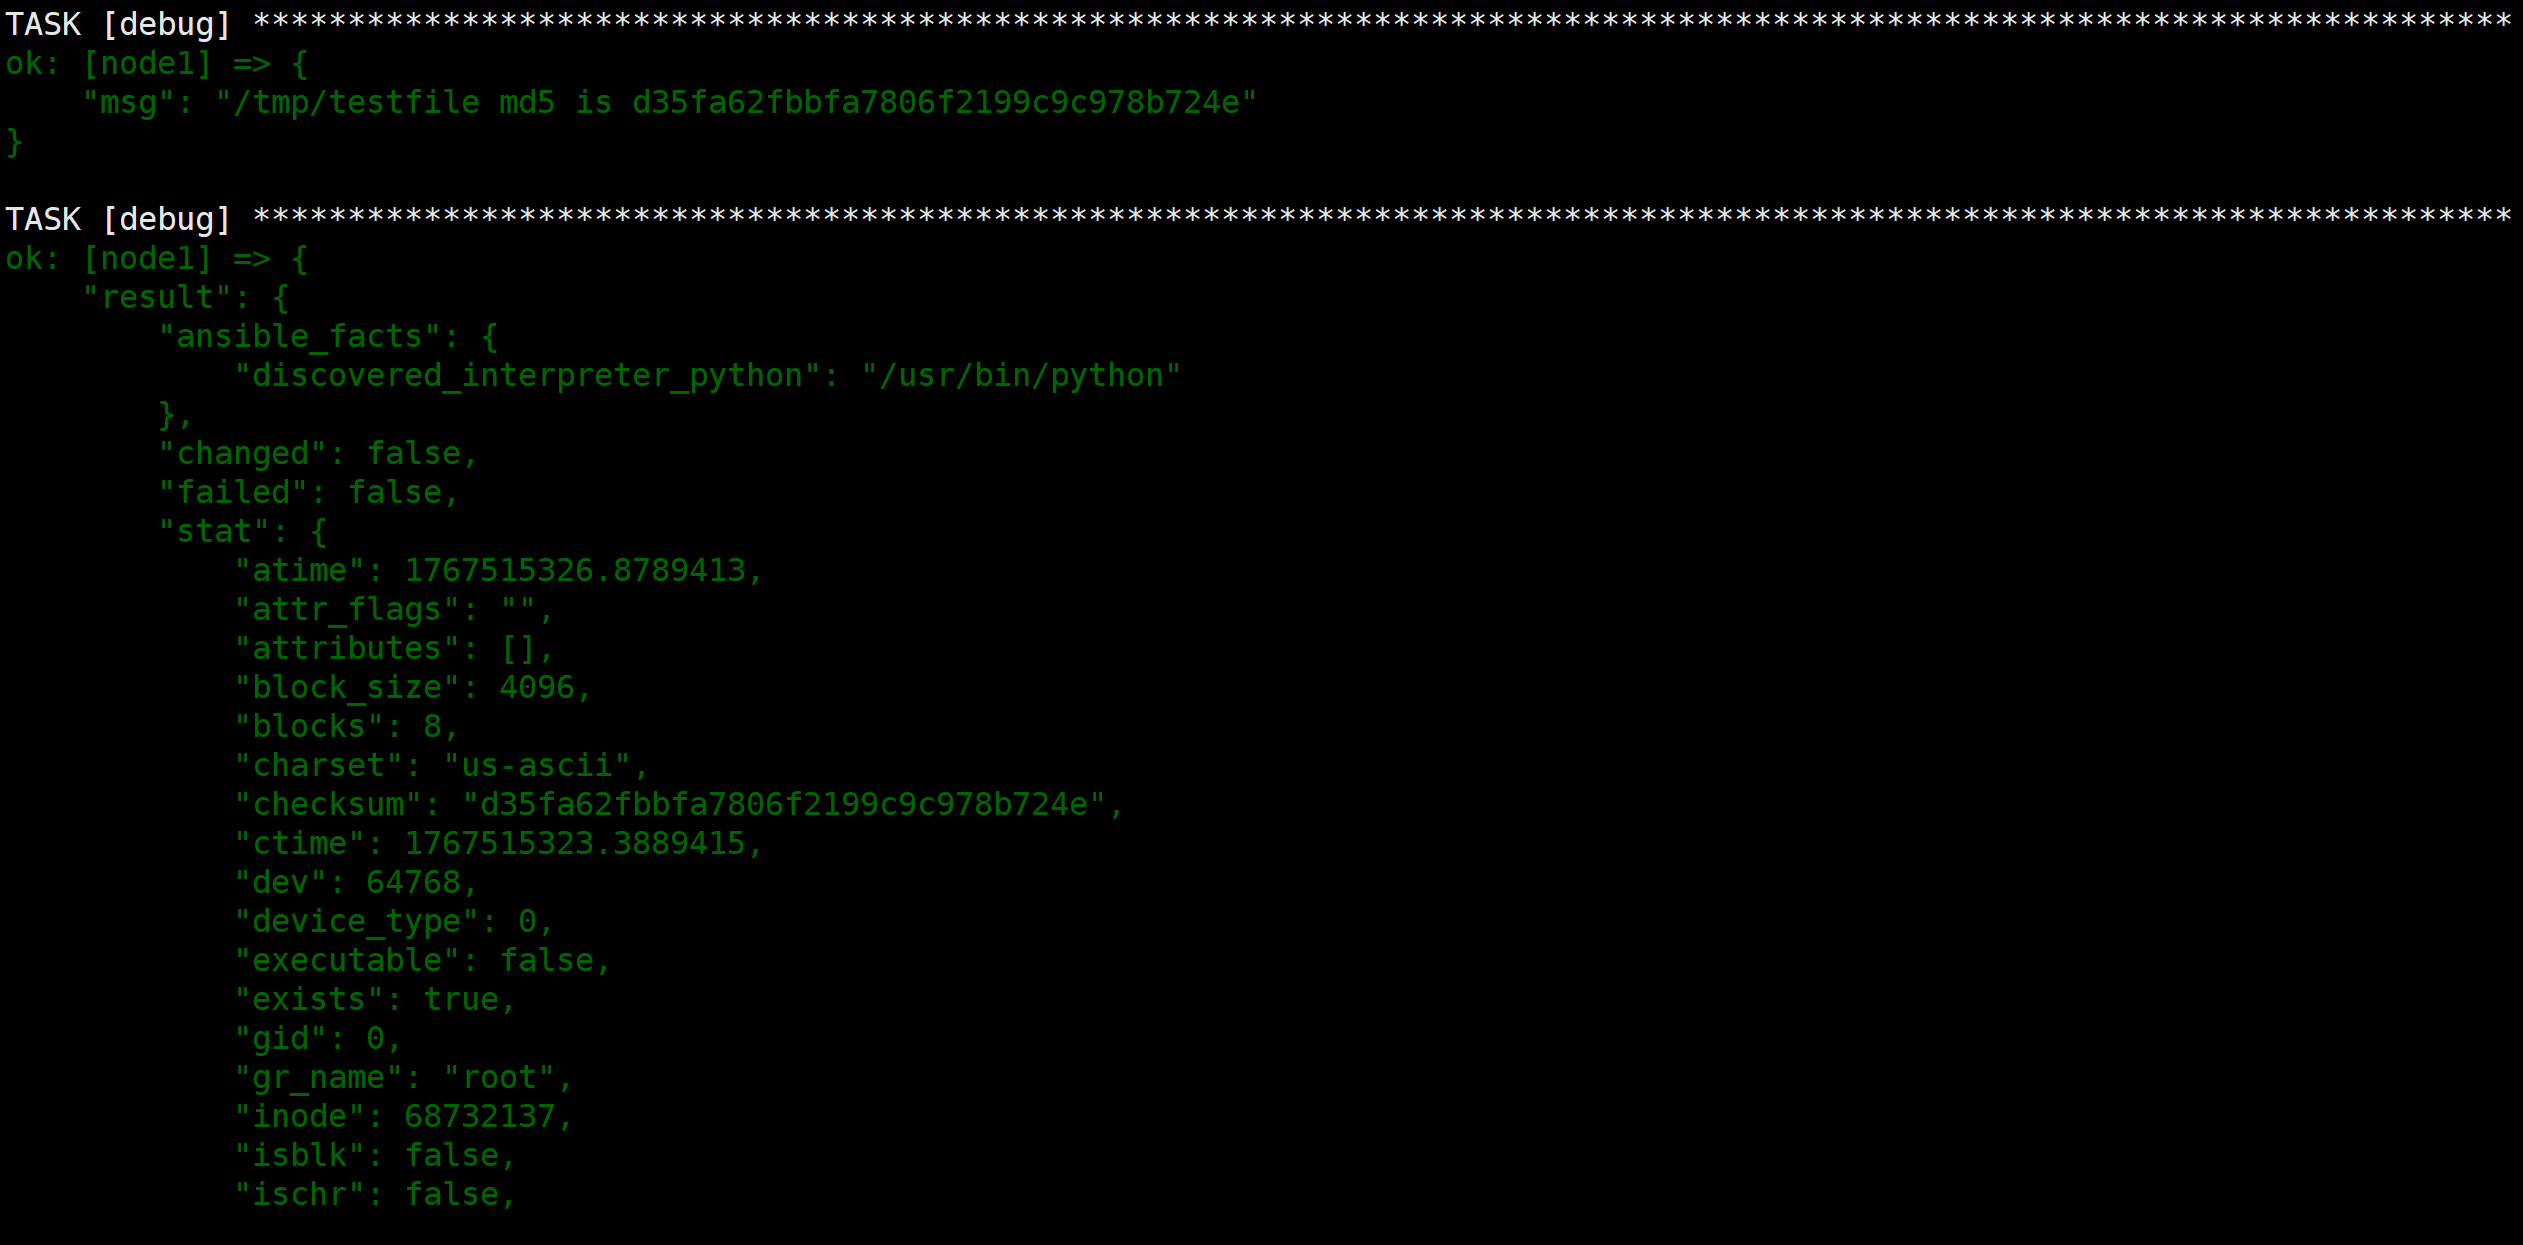
检索文件的状态信息,类似于Linux stat命令
参数提供检索文件属性、确定文件校验和等功能
stat 模块返回一个包含文件状态数据的值的散列字典,允许您使用单独的变量引用各条信息
示例:
---
- hosts: node1
  gather_facts: no
  tasks:
    - stat:
        path: /tmp/testfile
        checksum_algorithm: md5
      register: result
    - debug:
        msg: "/tmp/testfile md5 is {{ result.stat.checksum }}"
    - debug:
        var: result
copy模块
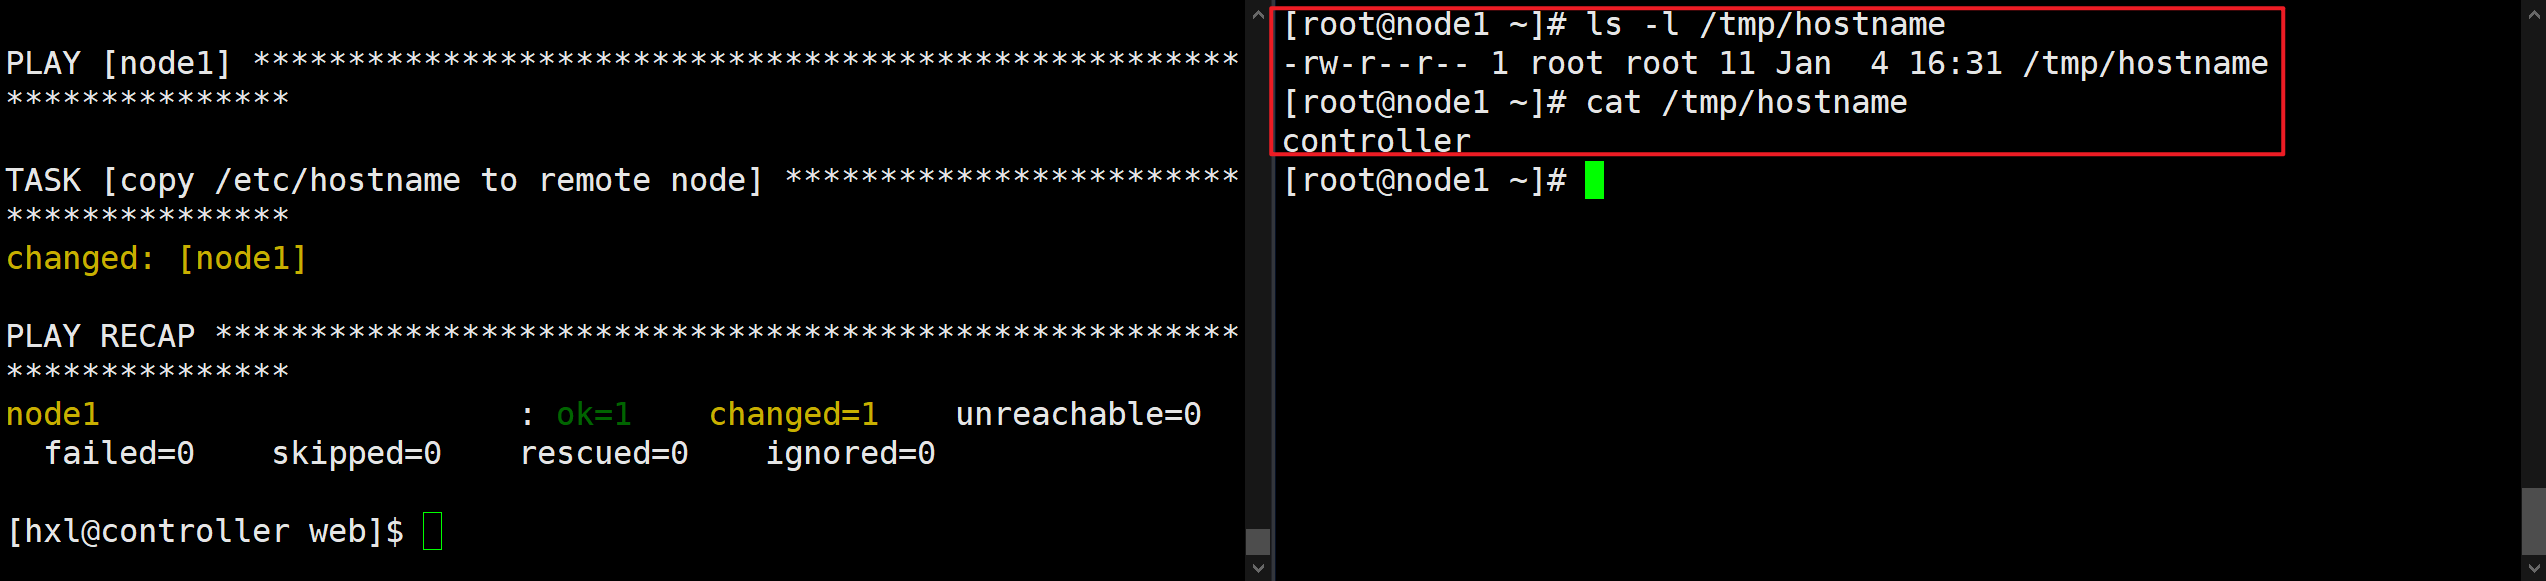
将文件从本地或远程计算机复制到受管节点上的某个位置
将控制节点上文件拷贝到受管节点
类似Linux中scp命令
---
- hosts: node1
  gather_facts: no
  tasks:
    - name: copy /etc/hostname to remote node
      copy:
        src: /etc/hostname
        dest: /tmp
此模块假定设置了force: yes,强制覆盖远程文件,类似scp命令。如果设置force: no, 则不会出现覆盖。
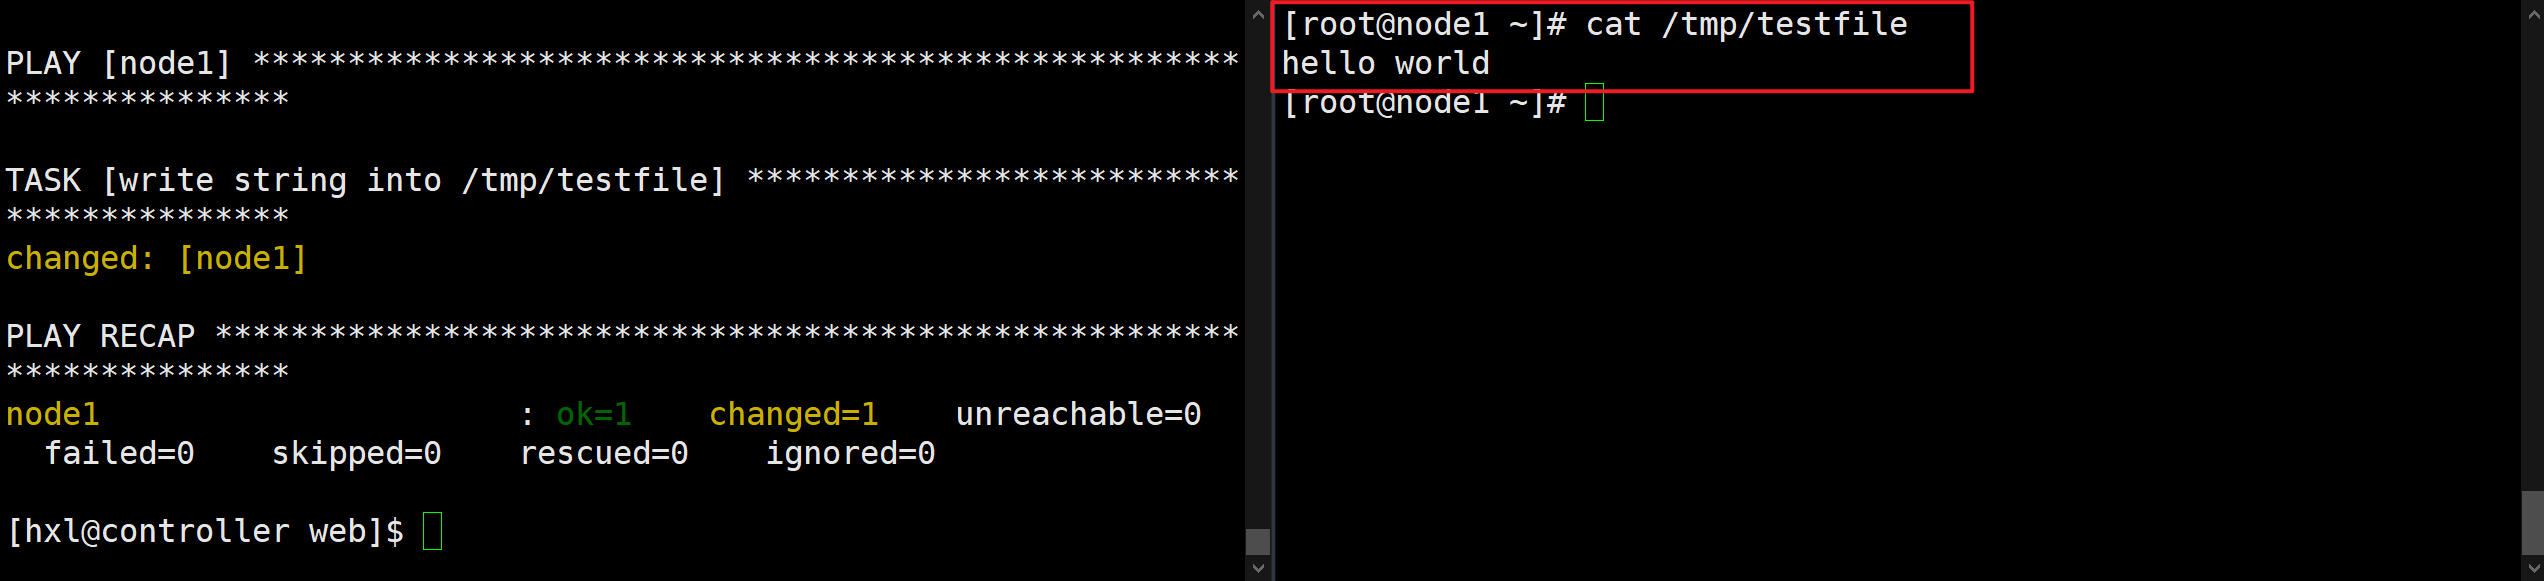
写入字符串到文件
---
- hosts: node1
  gather_facts: no
  tasks:
    - name:  write string into /tmp/testfile
      copy:
        content: "hello world\n"
        dest: /tmp/testfile
synchronize模块
围绕rsync命令的一个程序,可加快和简化常见任务
rsync工具必须同时安装在本地和远程主机上
默认情况下,在使用synchronize模块时, “本地主机”是同步任务的源主机, 而 “目标主机”是synchronize连接到的主机
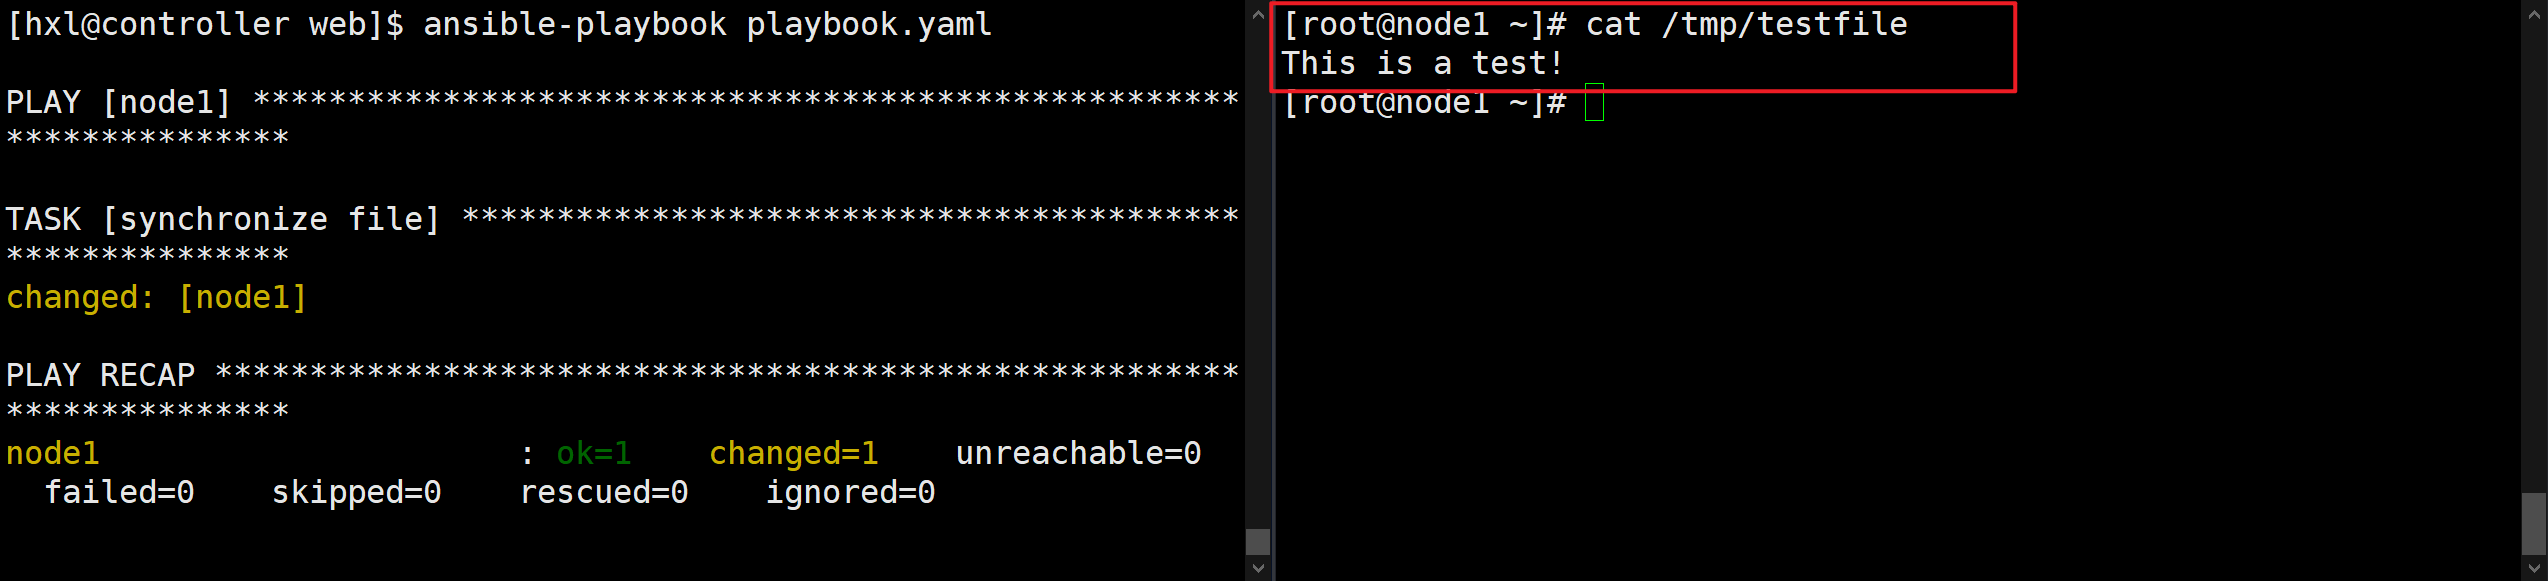
同步文件
# controller
[hxl@controller web]$ touch /tmp/testfile
[hxl@controller web]$ vim /tmp/testfile
[hxl@controller web]$ cat /tmp/testfile
This is a test!

# node1
[root@node1 ~]# rm -f /tmp/testfile
---
- hosts: node1
  gather_facts: no
  tasks:
    - name: synchronize file
      synchronize:
        src: /tmp/testfile
        dest: /tmp/
同步目录
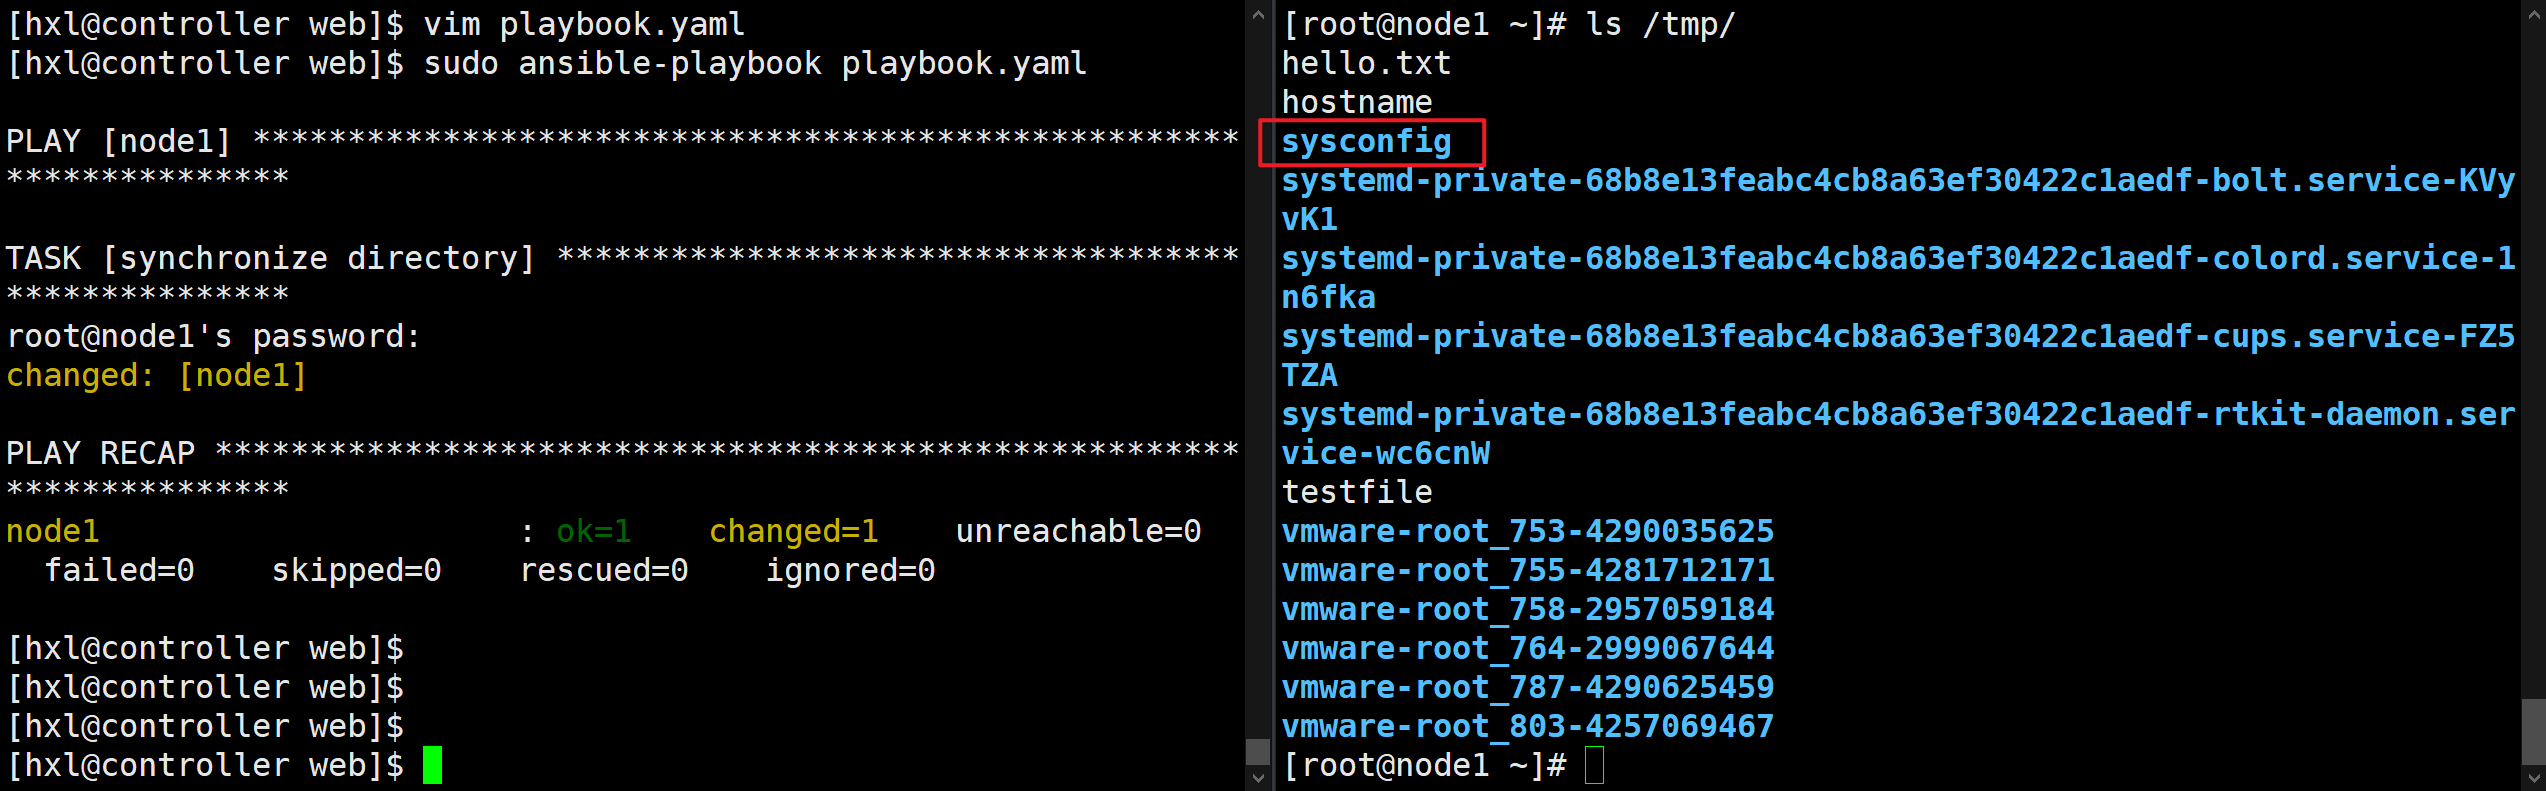
---
- hosts: node1
  gather_facts: no
  remote_user: root
  tasks:
    - name: synchronize directory
      synchronize:
        src: /etc/sysconfig
        dest: /tmp/
[hxl@controller web]$ sudo ansible-playbook playbook.yaml
fetch模块
用于从远程计算机获取文件到控制节点
从受管节点检索文件,例如将被管理节点文件先取到控制节点,然后用于分发到其他节点。诸如SSH公钥之类的文件
示例:
---
- hosts: node1
  gather_facts: no
  tasks:
    - name: fetch file from remote node
      fetch:
        src: /tmp/testfile
        dest: /tmp
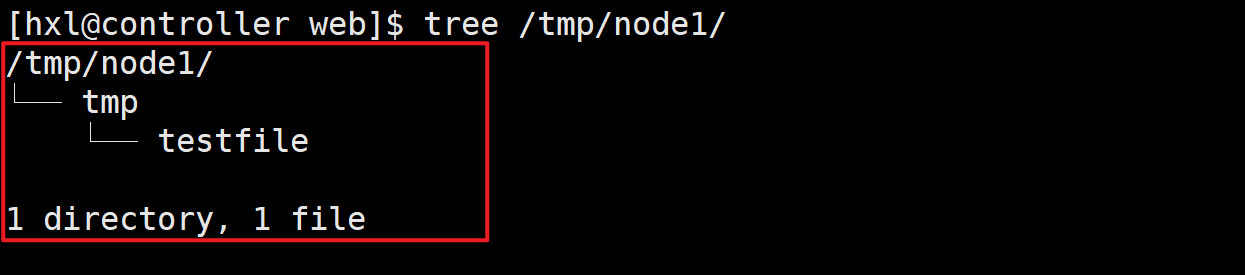
文件保存在:/tmp/node1/tmp/testfile
[hxl@controller web]$ tree /tmp/node1
/tmp/node1
└── tmp
    └── testfile
1 directory, 1 file

腾讯云面向开发者汇聚海量精品云计算使用和开发经验,营造开放的云计算技术生态圈。
更多推荐
 29
29 0
0- 0


 已为社区贡献4条内容

所有评论(0)