zabbix通过Graph API发送邮件
在Zabbix 7.0中,并没有自带的集成Microsoft Graph API邮件发送功能。需要在媒体类型中新建webhook来调用并发送邮件。
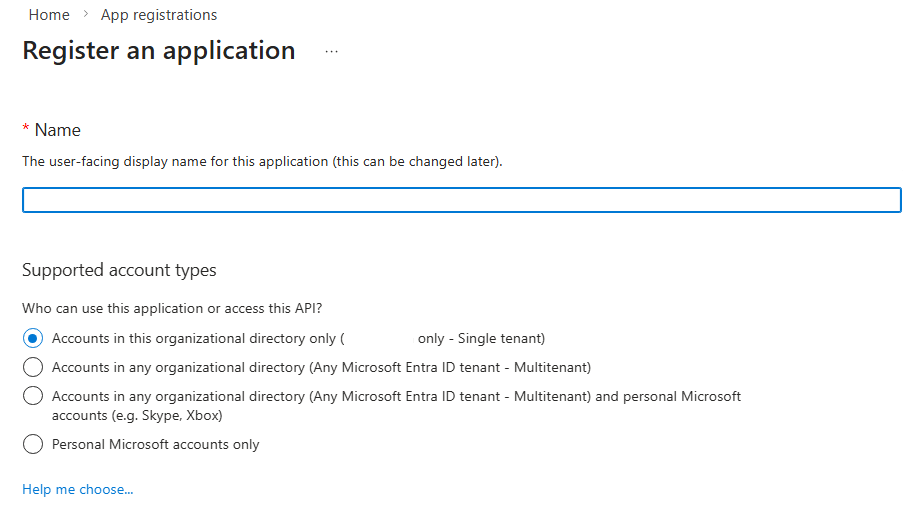
首先,需要在Entra管理中的App registrations中注册一个程序用于发送邮件。这里选择Accounts in this organizational directory only。
为当前App分配Application权限,并选择Microsoft Graph中的Mail.Send权限。

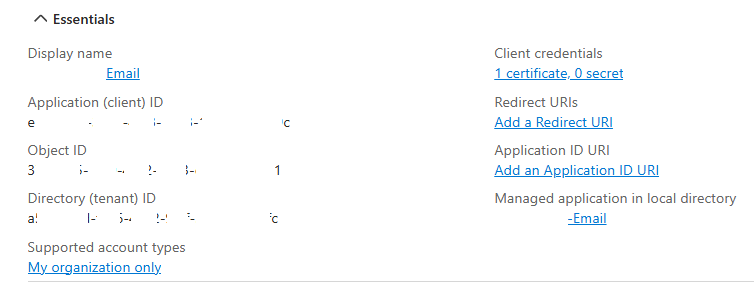
在客户端生成证书,并导出公钥后,上传到程序中。这里记录下来Application ID和Tenant ID,后续程序调用时需要配置。
zabbix网页配置的Media Type中,需要新建一个Webhook类型的媒体。参数中仅保留最基本的{ALERT.MESSAGE},{ALERT.SUBJECT},{ALERT.SENDTO}。并在模板中添加需要消息模板,比如最基本的Problem和Problem recovery。

Script部分,内容如下:
/*
 * Zabbix Webhook -> Local token-broker
 * Expect broker:
 *   POST http://127.0.0.1:8088/zabbix/sendmail
 *   Authorization: Bearer <token>
 *   JSON: { "to": "...", "subject": "...", "message": "..." }
 */

// 注意:URL 必须加引号,否则会被解析成正则导致 "invalid regexp flags"
var BROKER_URL  = 'http://127.0.0.1:8088/zabbix/sendmail';
var BROKER_AUTH = '4f9b3e8c6c1e5a2b8d74d0c0f0e9a9e72bcd7e5a6a8f1d2c3b4e5f6a7b8c9d0'; // 改成你 app.py 的 BROKER_AUTH_TOKEN

function requireParam(params, name) {
  if (typeof params[name] === 'undefined' || params[name] === null || String(params[name]).trim() === '') {
    throw 'Missing parameter: ' + name;
  }
  return String(params[name]).trim();
}

try {
  // 先做最关键的健全性检查,避免语法歧义
  if (typeof BROKER_URL !== 'string' || BROKER_URL.indexOf('http') !== 0) {
    throw 'BROKER_URL must be a quoted string like: \'http://127.0.0.1:8088/zabbix/sendmail\'';
  }
  if (BROKER_AUTH === 'REPLACE_WITH_LONG_RANDOM_STRING') {
    throw 'BROKER_AUTH not set: replace BROKER_AUTH with your BROKER_AUTH_TOKEN from app.py';
  }

  var params = JSON.parse(value);
  var req = new HttpRequest();

  if (params.HTTPProxy) {
    req.setProxy(params.HTTPProxy);
  }

  var to = requireParam(params, 'To');
  var subject = requireParam(params, 'Subject');
  var message = requireParam(params, 'Message');

  req.addHeader('Content-Type: application/json');
  req.addHeader('Authorization: Bearer ' + BROKER_AUTH);

  var payload = {
    to: to,
    subject: subject,
    message: message
  };

  Zabbix.log(4, '[TokenBroker] POST ' + BROKER_URL);
  var resp = req.post(BROKER_URL, JSON.stringify(payload));
  var code = req.getStatus();
  Zabbix.log(4, '[TokenBroker] HTTP ' + code + ' resp=' + resp);

  if (code < 200 || code >= 300) {
    throw 'Broker call failed, HTTP ' + code + ': ' + resp;
  }

  return 'OK';
}
catch (error) {
  Zabbix.log(3, '[TokenBroker] Sending failed: ' + error);
  throw 'Sending failed: ' + error;
}
脚本中调用zabbix本机的token borker稍后会讲到如何配置。token broker会给zabbix提供一个HTTP接口,用证书获取token并完成邮件发送。
这里需要记录BROKER_AUTH中的共享密钥,它用于zabbix和token-broker之间的相互认证。可以用任何工具随意生成一个随机字符串,只需保证它和token borker中的配置一样。
zabbix网页端完成Media Type新增之后,不要忘记更新用户当前的Media Type和Trigger Actions中的Operations,否则会造成邮件无法发送。
接下去登录zabbix系统,这里以Ubuntu 24为操作系统为例。
mkdir -p /opt/token-broker
chown -R root:root /opt/token-broker
cd /opt/token-broker
apt update
apt install python3.12-venv
python3 -m venv venv
pip install fastapi uvicorn pyjwt cryptography requests
pip install "pydantic[email]"
vi app.py
app.py文件内容如下:
import base64
import hashlib
import json
import logging
import re
import threading
import time
import uuid
from typing import Optional, Tuple

import jwt  # PyJWT
import requests
from cryptography import x509
from cryptography.hazmat.primitives import serialization
from cryptography.hazmat.primitives.serialization import load_pem_private_key
from fastapi import FastAPI, Header, HTTPException
from pydantic import BaseModel, EmailStr


# =========================
# 固定配置:按你的环境填写
# =========================

TENANT_ID = "axxxxxxx-xxxx-xxxx-xxxx-xxxxxxxxxxxc"
CLIENT_ID = "exxxxxxx-xxxx-xxxx-xxxx-xxxxxxxxxxxc"  # 你报错里出现的 appId
SENDER_UPN = "NOC@xxxxxxx.com"          # 作为发件人的邮箱(必须在 EXO 中存在)

# broker 鉴权(Zabbix Webhook 里也要一致)
BROKER_AUTH_TOKEN = "4f9b3e8c6c1e5a2b8d74d0c0f0e9a9e72bcd7e5a6a8f1d2c3b4e5f6a7b8c9d0"

# 证书 PEM 路径(需要包含:私钥 + 证书)
# 你可以用 openssl pkcs12 -in app.pfx -out cert.pem -nodes 生成
CERT_PEM_PATH = "/opt/token-broker/NOC-Email.pem"

# 可选:如果你在内网走代理
HTTP_PROXY = None   # 例如 "http://proxy:8080"
HTTPS_PROXY = None  # 例如 "http://proxy:8080"

# =========================
# 日志
# =========================
logger = logging.getLogger("token-broker")
logger.setLevel(logging.INFO)
handler = logging.StreamHandler()
handler.setFormatter(logging.Formatter("%(asctime)s %(levelname)s %(message)s"))
logger.addHandler(handler)

# =========================
# 常量
# =========================
TOKEN_ENDPOINT = f"https://login.microsoftonline.com/{TENANT_ID}/oauth2/v2.0/token"
GRAPH_SENDMAIL = f"https://graph.microsoft.com/v1.0/users/{SENDER_UPN}/sendMail"

# Graph sendMail 成功返回 202 Accepted [4](https://www.getorchestra.io/guides/fastapi-mastering-error-handling-with-examples)
GRAPH_SUCCESS_CODES = {202}

# 证书凭据(client assertion)Header 推荐:
# alg=PS256, typ=JWT, x5t#S256=Base64url-encoded SHA-256 thumbprint of cert DER [1](https://learn.microsoft.com/en-us/entra/identity-platform/certificate-credentials)[2](https://learn.microsoft.com/zh-cn/entra/identity-platform/certificate-credentials)
CLIENT_ASSERTION_ALG = "PS256"
ASSERTION_LIFETIME_SECONDS = 300  # 5分钟足够短(推荐 5~10 分钟内)

# =========================
# FastAPI
# =========================
app = FastAPI(title="Zabbix Token Broker", docs_url=None, redoc_url=None)


class MailRequest(BaseModel):
    to: EmailStr
    subject: str
    message: str  # 建议 Zabbix 传 HTML(你 webhook 里就是 {ALERT.MESSAGE})


# =========================
# 工具函数:Base64url
# =========================
def b64url(data: bytes) -> str:
    return base64.urlsafe_b64encode(data).decode("utf-8").rstrip("=")


# =========================
# 从 PEM 提取私钥与证书(允许一个文件里同时存在)
# =========================
_PEM_CERT_RE = re.compile(
    rb"-----BEGIN CERTIFICATE-----.*?-----END CERTIFICATE-----",
    re.DOTALL
)
_PEM_KEY_RE = re.compile(
    rb"-----BEGIN (?:RSA )?PRIVATE KEY-----.*?-----END (?:RSA )?PRIVATE KEY-----",
    re.DOTALL
)


def load_key_and_cert_from_pem(path: str) -> Tuple[bytes, bytes]:
    with open(path, "rb") as f:
        pem = f.read()

    cert_match = _PEM_CERT_RE.search(pem)
    key_match = _PEM_KEY_RE.search(pem)

    if not cert_match:
        raise RuntimeError(f"No CERTIFICATE block found in {path}")
    if not key_match:
        raise RuntimeError(f"No PRIVATE KEY block found in {path}")

    return key_match.group(0), cert_match.group(0)


def calc_x5t_s256(cert_pem_bytes: bytes) -> str:
    """
    x5t#S256 = Base64url-encoded SHA-256 thumbprint of the X.509 certificate's DER encoding [1](https://learn.microsoft.com/en-us/entra/identity-platform/certificate-credentials)[2](https://learn.microsoft.com/zh-cn/entra/identity-platform/certificate-credentials)
    """
    cert = x509.load_pem_x509_certificate(cert_pem_bytes)
    der = cert.public_bytes(serialization.Encoding.DER)
    digest = hashlib.sha256(der).digest()
    return b64url(digest)


# =========================
# Token Cache(避免每次都请求 Entra)
# =========================
_token_lock = threading.Lock()
_cached_token: Optional[str] = None
_cached_token_exp: int = 0  # epoch seconds


def _requests_session() -> requests.Session:
    s = requests.Session()
    if HTTP_PROXY or HTTPS_PROXY:
        s.proxies.update({k: v for k, v in {
            "http": HTTP_PROXY,
            "https": HTTPS_PROXY
        }.items() if v})
    return s


SESSION = _requests_session()


def build_client_assertion() -> str:
    """
    构造并用证书私钥签名 client_assertion(JWT)。
    Header 按微软证书凭据规范使用 x5t#S256 + PS256 [1](https://learn.microsoft.com/en-us/entra/identity-platform/certificate-credentials)[2](https://learn.microsoft.com/zh-cn/entra/identity-platform/certificate-credentials)
    """
    key_pem, cert_pem = load_key_and_cert_from_pem(CERT_PEM_PATH)

    private_key = load_pem_private_key(key_pem, password=None)

    now = int(time.time())
    payload = {
        "aud": TOKEN_ENDPOINT,       # audience 是 token endpoint [1](https://learn.microsoft.com/en-us/entra/identity-platform/certificate-credentials)[2](https://learn.microsoft.com/zh-cn/entra/identity-platform/certificate-credentials)
        "iss": CLIENT_ID,
        "sub": CLIENT_ID,
        "jti": str(uuid.uuid4()),
        "nbf": now,
        "exp": now + ASSERTION_LIFETIME_SECONDS,
    }

    header = {
        "typ": "JWT",
        "x5t#S256": calc_x5t_s256(cert_pem),
        "alg": CLIENT_ASSERTION_ALG
    }

    assertion = jwt.encode(
        payload,
        private_key,
        algorithm=CLIENT_ASSERTION_ALG,
        headers=header
    )
    return assertion


def get_access_token() -> str:
    """
    client_credentials + certificate client_assertion
    如果证书未在 App Registration 中登记,会得到 AADSTS700027 (key was not found) [3](https://learn.microsoft.com/en-us/answers/questions/915775/aadsts700027-the-certificate-with-identifier-used)
    """
    global _cached_token, _cached_token_exp

    now = int(time.time())
    with _token_lock:
        # 预留 60 秒提前刷新
        if _cached_token and now < (_cached_token_exp - 60):
            return _cached_token

        assertion = build_client_assertion()

        data = {
            "client_id": CLIENT_ID,
            "scope": "https://graph.microsoft.com/.default",
            "grant_type": "client_credentials",
            "client_assertion_type": "urn:ietf:params:oauth:client-assertion-type:jwt-bearer",
            "client_assertion": assertion,
        }

        resp = SESSION.post(
            TOKEN_ENDPOINT,
            data=data,
            timeout=15
        )

        if resp.status_code != 200:
            # 把 Entra 返回原样带回(便于排障)
            raise RuntimeError(f"Token error: {resp.text}")

        token_json = resp.json()
        access_token = token_json.get("access_token")
        expires_in = int(token_json.get("expires_in", 0))

        if not access_token or not expires_in:
            raise RuntimeError(f"Token response missing fields: {resp.text}")

        _cached_token = access_token
        _cached_token_exp = now + expires_in
        return _cached_token


# =========================
# API
# =========================
@app.get("/health")
def health():
    return {"status": "OK"}


@app.post("/zabbix/sendmail")
def sendmail(req: MailRequest, authorization: str = Header(None)):
    # broker 鉴权
    if authorization != f"Bearer {BROKER_AUTH_TOKEN}":
        raise HTTPException(status_code=401, detail="Unauthorized")

    try:
        token = get_access_token()
    except Exception as e:
        # 这里返回 500,detail 带 Entra 原始报错(便于直接定位 AADSTS700027 等)
        raise HTTPException(status_code=500, detail=str(e))

    headers = {
        "Authorization": f"Bearer {token}",
        "Content-Type": "application/json"
    }


    lines = req.message.splitlines()
    html_lines = []

    for line in lines:
        if ":" in line:
            k, v = line.split(":", 1)
            html_lines.append(
                f"<span style='font-weight:normal;color:#555'>{k}:</span>{v}"
         )
        else:
            html_lines.append(line)

    content = "<br/>".join(html_lines)


    payload = {
        "message": {
            "subject": req.subject,
            "body": {
                "contentType": "HTML",
                #"content": req.message
                #"content": req.message.replace("\r\n", "\n").replace("\n", "<br/>")
                "content": content
            },
            "toRecipients": [
                {"emailAddress": {"address": str(req.to)}}
            ]
        },
        "saveToSentItems": True
    }

    r = SESSION.post(GRAPH_SENDMAIL, headers=headers, json=payload, timeout=15)

    if r.status_code not in GRAPH_SUCCESS_CODES:
        # Graph sendMail 成功应为 202,否则返回错误内容 [4](https://www.getorchestra.io/guides/fastapi-mastering-error-handling-with-examples)
        raise HTTPException(status_code=500, detail=f"Graph sendMail failed ({r.status_code}): {r.text}")

    return {"status": "OK"}
接下去用systemd来托管这个服务,并设为自动启动。
vi /etc/systemd/system/token-broker.service
内容如下:
[Unit]
Description=Zabbix Token Broker
After=network.target

[Service]
Type=simple
WorkingDirectory=/opt/token-broker
ExecStart=/opt/token-broker/venv/bin/uvicorn app:app --host 127.0.0.1 --port 8088
Restart=always
RestartSec=5
User=root

[Install]
WantedBy=multi-user.target
启动token-broker并将它设置开机自动启动
systemctl daemon-reload
systemctl start token-broker
systemctl enable token-broker
至此,已完成全部配置,无需再通过传统SMTP方式,zabbix只需要访问
https://graph.microsoft.com/
https://login.microsoftonline.com/
就可以调用Microsoft Graph API发送邮件。

腾讯云面向开发者汇聚海量精品云计算使用和开发经验,营造开放的云计算技术生态圈。
更多推荐
 10
10 0
0- 0


 已为社区贡献2条内容

所有评论(0)