yolov8n结构化剪枝
接上一篇:yolov8n训练
一、导论
rk3399 运行yolov8n 运行的效率太低了,所以想到了剪枝,裁剪了试试能否达到我们目前的标准。
没有裁剪前的模型参数如下:
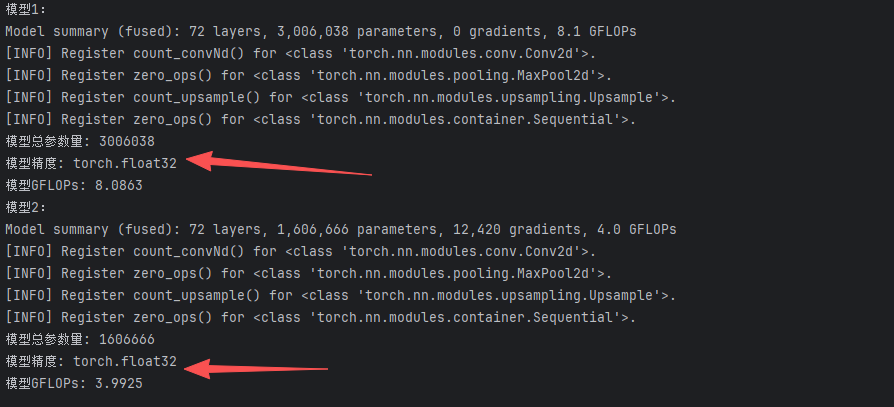
模型总参数量: 3006038
模型GFLOPs: 8.0863
RK3399的FP32(单精度浮点)理论峰值算力约为14.3 GFLOPS
之前模型每秒耗时计算:
大概 8.08G/ 14.3G =0.565秒,约为600ms,理论值,没有算上加速啥的,之前用ncnn部署大概300ms以上。
需要实现目标:(大约100ms内)
如果100ms算力大概要求:14.3G x 0.01秒 = 1.43G
按理论值大约要1.4G,估计很难,那大约裁剪到4G左右,加上加速量化试试能否到100ms内吧。
下面就记录下裁剪过程吧
二、准备
2.1 数据准备
跟之前的训练过程一样,准备一些数据大概2000张左右各种图片,数据集准备这里不再描述。
images/
└── train/
├── 0001.jpg
├── 0002.jpg
└── ...
labels/
└── train/
├── 0001.txt
├── 0002.txt
└── ...
配置文件也准备好
2.2 约束训练(Constrained Training)
这里使用的L1正则化进行稀疏化训练,使模型参数变得稀疏,剪枝的论文大家可以看看https://openaccess.thecvf.com/content_ICCV_2017/papers/Liu_Learning_Efficient_Convolutional_ICCV_2017_paper.pdf
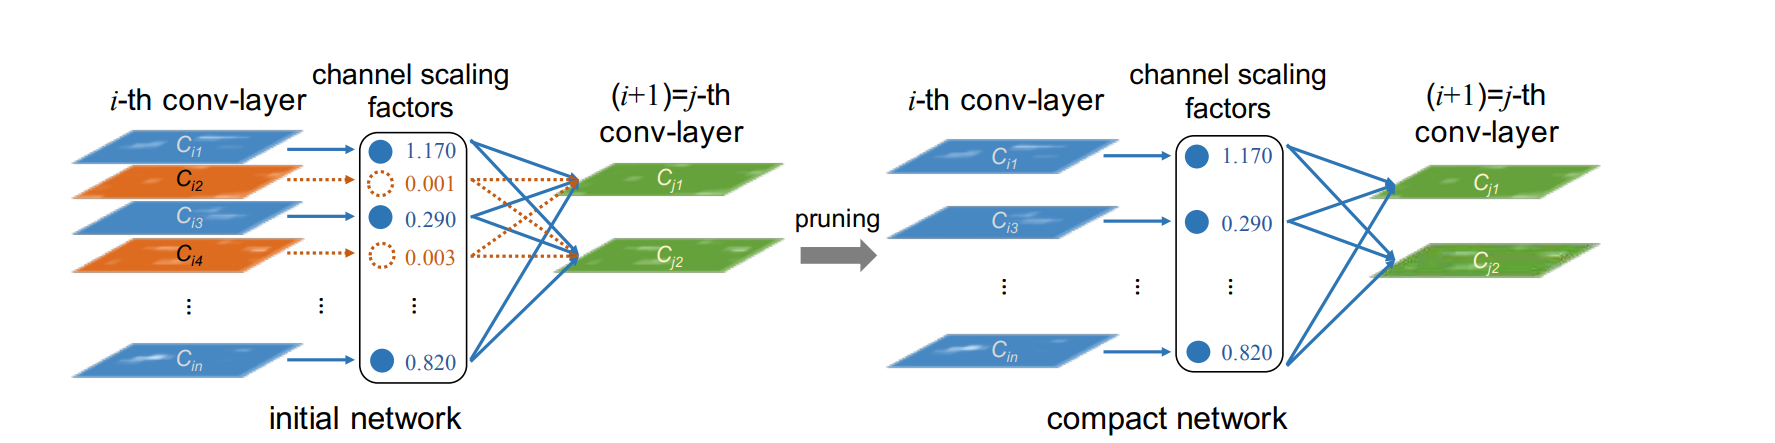
就是CNN模型中很多通道是冗余的,大概率用不上,这就占率了内存和计算,发现把这些通道删除不会影响最终的结果,这就是剪枝的由来了。
我们这里采用结构化剪枝,非结构化剪枝这里不涉及。
那如何剪枝了,比如我们的yolov8 的结构,里面最多的就是Conv卷积,而且剪枝基本针对也是Conv,那如何计算Conv哪些可以裁剪了,就是通过他后面的BN层,BN层记录了conv层的权重,通过他可以比较直接的计算哪些容易丢弃,下面看yolov8的结构
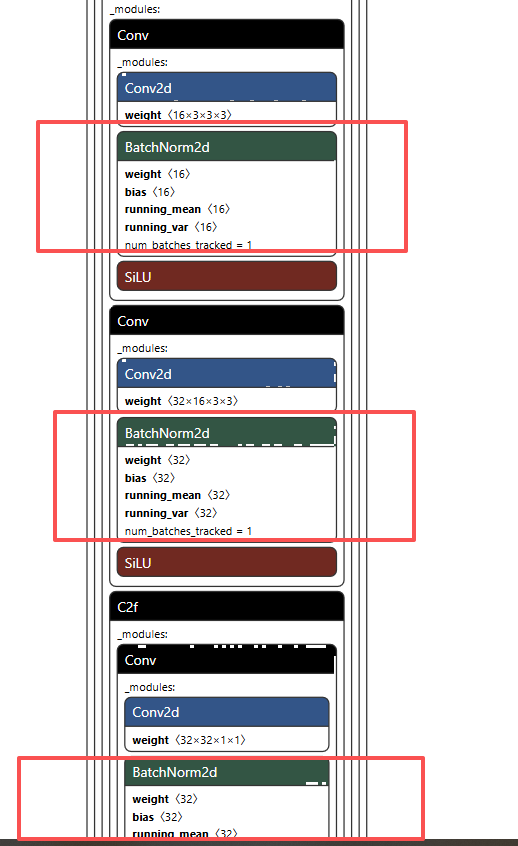
基本每个CONV后面都带BN层,那么方便我们裁剪了。
有两种裁剪方式,一种是先进行约束训练,就是在训练过程中对BN层进行L1正则化,使其接部分低权重的数值近于0,这样方便后续裁剪。
另外一种就是直接裁剪,直接裁剪20%,30%,通过权重排序,找到对应的概率值,低于此值的全部裁剪掉。
好了,这里先进行稀疏化训练
2.2.1 设置约束条件L1正则化
需要下载源码,在源码里面修改训练值。
在代码目录ultralytics\engine\trainer.py
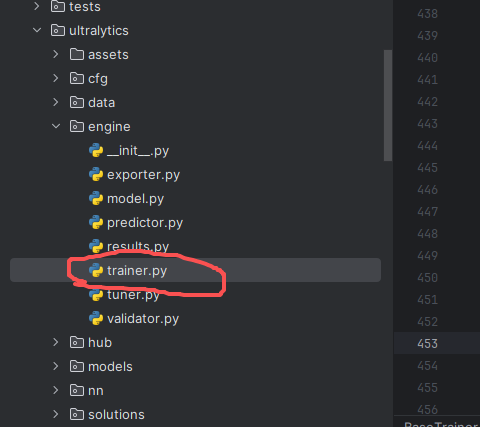
在代码 self.scaler.scale(self.loss).backward() 后面添加如下代码:
        # 对BN层进行L1正则化,约束训练时启用,正常训练时注释掉
        #初始L1正则化强度(10⁻²)如果不收缩可以加大值具体看模型,衰减系数(随训练轮次增加而增大)初期强约束促进稀疏化,后期减弱避免过度稀疏影响精度
                l1_lambda = 1e-2 * (1 - 0.9 * epoch / self.epochs)
                for k, m in self.model.named_modules():
                    if isinstance(m, nn.BatchNorm2d):#确保只对BN层进行操作,避免影响其他层
                        m.weight.grad.data.add_(l1_lambda * torch.sign(m.weight.data))
                        m.bias.grad.data.add_(1e-2 * torch.sign(m.bias.data))
添加后如下
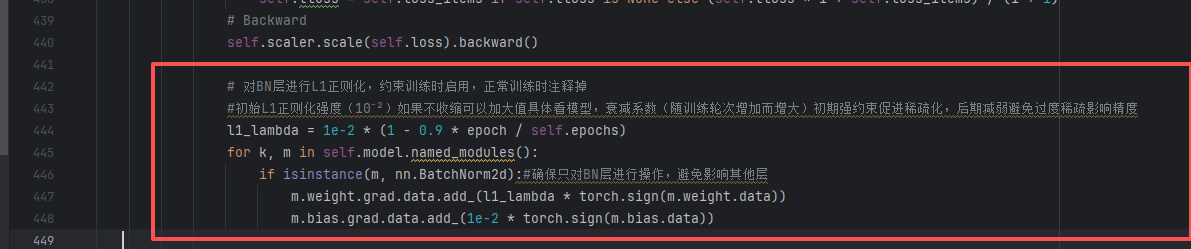
记得一定要在这边加上,刚好反向传播完成,后面step梯度没有清理执行。
2.3 训练代码
上述约束条件和数据准备完成后,开始添加训练代码
创建train_prune_pretrain.py 代码,具体如下:
import math
import os
import platform
import time
import cv2
import torch
import numpy as np
import matplotlib.pyplot as plt
from PIL import Image, UnidentifiedImageError
from torch import nn
from typing import Optional, Tuple
from ultralytics.utils import LOGGER
from pathlib import Path
from ultralytics.data import YOLODataset
from ultralytics import YOLO


# ===================== 1. 重写图片读取(解决Corrupt JPEG退出) =====================
def custom_load_image(self, i: int, rect_mode: bool = True) -> Tuple[np.ndarray, Tuple[int, int], Tuple[int, int]]:
    """完全对齐原生load_image逻辑,兼容Python<3.8"""
    # 1. 优先读取缓存(原生逻辑)
    im, f, fn = self.ims[i], self.im_files[i], self.npy_files[i]
    if im is not None:
        return self.ims[i], self.im_hw0[i], self.im_hw[i]

    # 2. 缓存不存在:尝试读取npy或图片
    if fn.exists():
        try:
            im = np.load(fn)
        except Exception as e:
            LOGGER.warning(f"{self.prefix}Removing corrupt *.npy image file {fn} due to: {e}")
            Path(fn).unlink(missing_ok=True)
            im = self._safe_imread(f)
    else:
        im = self._safe_imread(f)

    # 3. 图片读取失败:抛出异常
    if im is None:
        raise FileNotFoundError(f"Image Not Found {f}")

    # 4. 原生resize逻辑
    h0, w0 = im.shape[:2]
    if rect_mode:
        r = self.imgsz / max(h0, w0)
        if r != 1:
            w, h = (min(math.ceil(w0 * r), self.imgsz), min(math.ceil(h0 * r), self.imgsz))
            im = cv2.resize(im, (w, h), interpolation=cv2.INTER_LINEAR)
    elif not (h0 == w0 == self.imgsz):
        im = cv2.resize(im, (self.imgsz, self.imgsz), interpolation=cv2.INTER_LINEAR)

    # 5. 灰度图转3通道
    if im.ndim == 2:
        im = im[..., None]

    # 6. 缓存处理
    if self.augment:
        self.ims[i], self.im_hw0[i], self.im_hw[i] = im, (h0, w0), im.shape[:2]
        self.buffer.append(i)
        if 1 < len(self.buffer) >= self.max_buffer_length:
            j = self.buffer.pop(0)
            if self.cache != "ram":
                self.ims[j], self.im_hw0[j], self.im_hw[j] = None, None, None

    return im, (h0, w0), im.shape[:2]


def _safe_imread(self, f: str) -> Optional[np.ndarray]:
    """安全读取图片,兼容Python<3.10"""
    try:
        with Image.open(f) as img:
            img = img.convert("RGB")
            im = np.array(img)[:, :, ::-1]  # RGB→BGR
        return im
    except (UnidentifiedImageError, IOError, OSError):
        LOGGER.warning(f"{self.prefix}Corrupt JPEG file {f}, skip reading")
        return None


# 绑定图片读取方法
YOLODataset._safe_imread = _safe_imread
YOLODataset.load_image = custom_load_image


# ===================== 2. 自定义钩子(修复trainer.save和metrics.get问题) =====================
class PruneTrainHook:
    """整合L1正则化+BN分析+提前停止+模型保存的钩子类(修复版)"""

    def __init__(self, total_epochs: int, check_interval: int = 5,
                 stop_threshold: float = 90.0, save_dir: str = "runs/prune_train"):
        self.total_epochs = total_epochs
        self.check_interval = check_interval
        self.stop_threshold = stop_threshold
        self.save_dir = save_dir
        self.stop_training = False
        self.current_epoch = 0
        self.best_mAP50 = 0.0
        self.best_epoch = 0
        self.model = None  # 保存模型引用

        # 创建保存目录
        os.makedirs(save_dir, exist_ok=True)
        os.makedirs("bn_weight_analysis", exist_ok=True)
        LOGGER.info(f"📁 保存目录已创建: {save_dir}")

    def save_model(self, trainer, filename):
        """安全保存模型(修复版)"""
        try:
            # 方法1:使用trainer的ckpt_path属性
            if hasattr(trainer, 'save_model'):
                save_path = os.path.join(self.save_dir, filename)
                trainer.save_model(save_path)
                return save_path

            # 方法2:直接保存模型权重
            elif hasattr(trainer, 'model'):
                save_path = os.path.join(self.save_dir, filename)
                ckpt = {
                    'model': trainer.model.state_dict(),
                    'epoch': trainer.epoch,
                    'best_fitness': getattr(trainer, 'best_fitness', 0.0),
                }
                torch.save(ckpt, save_path)
                return save_path

            else:
                LOGGER.warning(f"⚠️ 无法找到保存方法,跳过保存: {filename}")
                return None

        except Exception as e:
            LOGGER.error(f"❌ 保存模型失败 ({filename}): {e}")
            return None

    def showConstrained_train(self, trainer):
        """显示BN层gamma分布统计"""
        # 获取真实训练模型
        model = trainer.model
        real_model = model.module if hasattr(model, 'module') else model

        # 收集所有 BN gamma (weight)
        all_gammas = []
        for name, m in real_model.named_modules():
            if isinstance(m, nn.BatchNorm2d):
                all_gammas.append(m.weight.data.abs().detach().cpu())

        if not all_gammas:
            print("[Pruning Analysis] No BN layers found.")
            return

        all_gammas = torch.cat(all_gammas)
        total_channels = all_gammas.numel()
        ratio_lt_1e4 = (all_gammas < 1e-4).float().mean().item() * 100
        ratio_lt_1e3 = (all_gammas < 1e-3).float().mean().item() * 100
        avg_gamma = all_gammas.mean().item()

        print(f"\n[Pruning Analysis - TRAIN MODEL] Epoch {trainer.epoch + 1}:")
        print(f"  Total BN channels: {total_channels}")
        print(f"  |γ| < 1e-4: {ratio_lt_1e4:.2f}%")
        print(f"  |γ| < 1e-3: {ratio_lt_1e3:.2f}%")
        print(f"  Avg |γ|: {avg_gamma:.5f}\n")

    def on_train_batch_end(self, trainer):
        """每个批次结束后执行:监控BN层"""
        if self.current_epoch != trainer.epoch:
            self.showConstrained_train(trainer)
            self.current_epoch = trainer.epoch

    def analyze_bn_weight(self, model, epoch):
        """分析BN层weight分布,返回是否满足停止条件"""
        real_model = model.module if hasattr(model, 'module') else model

        # 收集所有BN层weight绝对值
        bn_weights = []
        for _, m in real_model.named_modules():
            if isinstance(m, nn.BatchNorm2d):
                weight_abs = m.weight.data.abs().cpu().numpy()
                bn_weights.extend(weight_abs.flatten().tolist())

        if not bn_weights:
            LOGGER.warning("⚠️ 未找到BN层,跳过分析")
            return False

        # 统计各区间比例
        bn_weights = np.array(bn_weights)
        total_num = len(bn_weights)
        prunable_ratio = np.sum(bn_weights < 1e-4) / total_num * 100
        core_ratio = np.sum(bn_weights > 0.1) / total_num * 100
        total_valid_ratio = prunable_ratio + core_ratio

        # 打印统计结果
        print(f"📊 BN层Weight分布统计(Epoch {epoch}):")
        print(f"   总数量: {total_num}")
        print(f"   可剪枝通道(|w|<1e-4): {prunable_ratio:.2f}%")
        print(f"   核心通道(|w|>0.1): {core_ratio:.2f}%")
        print(f"   有效通道占比: {total_valid_ratio:.2f}% (阈值: {self.stop_threshold}%)")

        # 可视化分布
        try:
            plt.figure(figsize=(10, 6))
            plt.hist(bn_weights, bins=50, color='skyblue', edgecolor='black', alpha=0.7)
            plt.axvline(x=1e-4, color='red', linestyle='--', linewidth=2, label='剪枝阈值(1e-4)')
            plt.axvline(x=0.1, color='orange', linestyle='--', linewidth=2, label='核心通道阈值(0.1)')
            plt.xlabel("BN层|weight|值", fontsize=12)
            plt.ylabel("数量", fontsize=12)
            plt.title(f"Epoch {epoch} BN层Weight绝对值分布", fontsize=14, fontweight='bold')
            plt.legend(fontsize=10)
            plt.grid(True, alpha=0.3)

            save_path = os.path.join("bn_weight_analysis", f"bn_dist_epoch_{epoch}.png")
            plt.savefig(save_path, dpi=150, bbox_inches='tight')
            plt.close()
            LOGGER.info(f"📈 BN分布图已保存: {save_path}")
        except Exception as e:
            LOGGER.warning(f"⚠️ 保存BN分布图失败: {e}")

        # 返回是否满足停止条件
        return total_valid_ratio >= self.stop_threshold

    def on_train_epoch_end(self, trainer):
        """每个epoch结束后执行:BN层分析+提前停止判断+模型保存"""
        current_epoch = trainer.epoch + 1

        LOGGER.info(f"\n{'=' * 60}")
        LOGGER.info(f"Epoch {current_epoch}/{self.total_epochs} 训练结束")
        LOGGER.info(f"{'=' * 60}")

        # 每隔check_interval个epoch分析BN层
        if current_epoch % self.check_interval == 0:
            LOGGER.info(f"\n🔍 开始BN层分析...")
            stop_condition = self.analyze_bn_weight(trainer.model, current_epoch)

            if stop_condition:
                self.stop_training = True
                LOGGER.info(f"\n🛑 满足停止条件(有效通道占比≥{self.stop_threshold}%),将在本轮结束后停止训练!")

                # ⭐ 立即保存当前模型(提前停止保存)
                save_path = self.save_model(trainer, f"model_epoch{current_epoch}_early_stop.pt")
                if save_path:
                    LOGGER.info(f"✅ 提前停止模型已保存至: {save_path}")
                    file_size = os.path.getsize(save_path) / (1024 * 1024)
                    LOGGER.info(f"📦 文件大小: {file_size:.2f} MB")

        # 每个epoch都保存一次(定期保存)
        epoch_save_path = self.save_model(trainer, f"model_epoch{current_epoch}.pt")
        if epoch_save_path:
            LOGGER.info(f"💾 Epoch {current_epoch} 模型已保存: {epoch_save_path}")

    def on_val_end(self, trainer):
        """验证结束后执行:保存最佳模型(修复metrics.get问题)"""
        try:
            # 修复:直接访问metrics属性,而不是使用get()
            metrics = trainer.metrics

            # 方法1:尝试访问属性
            if hasattr(metrics, 'box'):
                box_metrics = metrics.box
                if hasattr(box_metrics, 'mp'):
                    current_mAP50 = box_metrics.mp  # mAP50
                    current_mAP50_95 = box_metrics.map  # mAP50-95
                else:
                    # 备用方法
                    current_mAP50 = getattr(box_metrics, 'mAP50', 0)
                    current_mAP50_95 = getattr(box_metrics, 'mAP', 0)
            else:
                # 方法2:直接从metrics获取
                current_mAP50 = getattr(metrics, 'mAP50', 0)
                current_mAP50_95 = getattr(metrics, 'mAP', 0)

            # 保存最佳模型
            if current_mAP50 > self.best_mAP50:
                self.best_mAP50 = current_mAP50
                self.best_epoch = trainer.epoch + 1

                best_path = self.save_model(trainer, "best_model.pt")
                if best_path:
                    LOGGER.info(
                        f"\n🏆 新的最佳模型 (Epoch {self.best_epoch}, mAP50={current_mAP50:.4f}, mAP50-95={current_mAP50_95:.4f}) 已保存至: {best_path}")

                # 同时保存为best.pt(方便后续使用)
                best_pt_path = self.save_model(trainer, "best.pt")
                if best_pt_path:
                    LOGGER.info(f"🏆 已复制为 best.pt: {best_pt_path}")

        except Exception as e:
            LOGGER.warning(f"⚠️ 获取验证指标失败: {e}")
            import traceback
            LOGGER.debug(f"详细错误:\n{traceback.format_exc()}")

    def on_train_end(self, trainer):
        """训练结束后执行:保存最终模型"""
        LOGGER.info(f"\n{'=' * 60}")
        LOGGER.info(f"🎉 训练完成!")
        LOGGER.info(f"{'=' * 60}")

        # 保存最终模型
        final_path = self.save_model(trainer, "final_model.pt")
        if final_path:
            LOGGER.info(f"\n✅ 训练完成,最终模型已保存至: {final_path}")
            file_size = os.path.getsize(final_path) / (1024 * 1024)
            LOGGER.info(f"📦 文件大小: {file_size:.2f} MB")

        # 保存为last.pt(标准命名)
        last_path = self.save_model(trainer, "last.pt")
        if last_path:
            LOGGER.info(f"✅ 已保存为 last.pt: {last_path}")

        # 显示最佳模型信息
        LOGGER.info(f"\n📊 训练统计:")
        LOGGER.info(f"   最佳mAP50: {self.best_mAP50:.4f} (Epoch {self.best_epoch})")
        LOGGER.info(f"   保存目录: {self.save_dir}")

        # 列出所有保存的模型
        try:
            saved_files = []
            for file in os.listdir(self.save_dir):
                if file.endswith('.pt'):
                    file_path = os.path.join(self.save_dir, file)
                    file_size = os.path.getsize(file_path) / (1024 * 1024)
                    saved_files.append((file, file_size))

            if saved_files:
                LOGGER.info(f"\n📦 已保存的模型文件:")
                for file, size in sorted(saved_files):
                    LOGGER.info(f"   - {file}: {size:.2f} MB")
        except Exception as e:
            LOGGER.warning(f"⚠️ 列出模型文件失败: {e}")


# ===================== 3. 紧急保存函数 =====================
def emergency_save(model, save_dir, reason):
    """紧急保存模型(独立于trainer)"""
    try:
        timestamp = time.strftime("%Y%m%d_%H%M%S")
        save_path = os.path.join(save_dir, f"emergency_{reason}_{timestamp}.pt")

        # 直接保存模型
        ckpt = {
            'model': model.model.state_dict() if hasattr(model, 'model') else model.state_dict(),
            'date': timestamp,
        }
        torch.save(ckpt, save_path)

        LOGGER.info(f"🚨 紧急保存成功: {save_path}")
        return True
    except Exception as e:
        LOGGER.error(f"❌ 紧急保存失败: {e}")
        return False


# ===================== 4. 主训练函数 =====================
def train_prune_pretrain():
    """剪枝预训练主函数(修复模型保存问题)"""

    # ========== 1. 配置参数 ==========
    model_path = "yolov8n_prune_160.pt"
    total_epochs = 20
    check_interval = 5
    stop_threshold = 90.0

    # 数据集路径
    Base_Path = r"F:\work\code\python\yolov8\ultralytics-train\ultralytics"
    datayaml = os.path.join(Base_Path, "data", "prune.yaml")

    # 保存目录
    save_dir = "runs/prune_train"
    os.makedirs(save_dir, exist_ok=True)
    os.makedirs("bn_weight_analysis", exist_ok=True)

    # ========== 2. 打印配置信息 ==========
    LOGGER.info(f"\n{'=' * 60}")
    LOGGER.info(f"🚀 剪枝预训练开始")
    LOGGER.info(f"{'=' * 60}")
    LOGGER.info(f"📌 模型路径: {model_path}")
    LOGGER.info(f"📌 数据集: {datayaml}")
    LOGGER.info(f"📌 保存目录: {save_dir}")
    LOGGER.info(f"📌 总轮数: {total_epochs}")
    LOGGER.info(f"📌 BN分析间隔: {check_interval} epochs")
    LOGGER.info(f"📌 停止阈值: {stop_threshold}%")
    LOGGER.info(f"📌 Python版本: {platform.python_version()}")
    LOGGER.info(f"📌 PyTorch版本: {torch.__version__}")
    LOGGER.info(f"📌 CUDA可用: {torch.cuda.is_available()}")
    if torch.cuda.is_available():
        LOGGER.info(f"📌 GPU: {torch.cuda.get_device_name(0)}")
    LOGGER.info(f"{'=' * 60}\n")

    # ========== 3. 初始化模型 ==========
    try:
        model = YOLO(model_path)
        LOGGER.info(f"✅ 模型加载成功: {model_path}")
    except Exception as e:
        LOGGER.error(f"❌ 模型加载失败: {e}")
        raise e

    # 补充overrides
    model.overrides.update({
        "model": os.path.abspath(model_path),
        "data": os.path.abspath(datayaml)
    })

    # ========== 4. 初始化自定义钩子 ==========
    prune_hook = PruneTrainHook(
        total_epochs=total_epochs,
        check_interval=check_interval,
        stop_threshold=stop_threshold,
        save_dir=save_dir
    )

    # ========== 5. 绑定钩子事件 ==========
    LOGGER.info("📌 注册钩子事件...")
    model.add_callback("on_train_batch_end", prune_hook.on_train_batch_end)
    model.add_callback("on_train_epoch_end", prune_hook.on_train_epoch_end)
    model.add_callback("on_val_end", prune_hook.on_val_end)
    model.add_callback("on_train_end", prune_hook.on_train_end)
    LOGGER.info("✅ 钩子事件注册完成")

    # ========== 6. 训练配置 ==========
    workers = 0 if platform.system() == "Windows" else 8

    train_config = {
        "data": datayaml,
        "epochs": total_epochs,
        "batch": 16,
        "imgsz": 160,
        "workers": workers,
        "lr0": 0.01,
        "weight_decay": 0.0005,
        "device": "cuda" if torch.cuda.is_available() else "cpu",
        "verbose": True,
        # ⭐⭐⭐ 关键保存参数
        "save": True,
        "save_period": 1,
        "project": "runs",
        "name": "prune_training",
        "exist_ok": True,
        "patience": 100,  # 防止早停
    }

    LOGGER.info(f"\n📋 训练配置:")
    for key, value in train_config.items():
        LOGGER.info(f"   {key}: {value}")
    LOGGER.info(f"{'=' * 60}\n")

    # ========== 7. 启动训练 ==========
    start_time = time.time()
    LOGGER.info(f"🕐 训练开始时间: {time.strftime('%Y-%m-%d %H:%M:%S')}")
    LOGGER.info(f"🚀 开始训练...\n")

    try:
        results = model.train(**train_config)

        # 训练完成后记录
        end_time = time.time()
        elapsed = end_time - start_time
        elapsed_min = elapsed / 60
        elapsed_hours = elapsed_min / 60

        LOGGER.info(f"\n{'=' * 60}")
        LOGGER.info(f"🕐 训练结束时间: {time.strftime('%Y-%m-%d %H:%M:%S')}")
        if elapsed_hours >= 1:
            LOGGER.info(f"🕐 总耗时: {elapsed_hours:.2f} 小时 ({elapsed_min:.2f} 分钟)")
        else:
            LOGGER.info(f"🕐 总耗时: {elapsed_min:.2f} 分钟")
        LOGGER.info(f"{'=' * 60}")

        # ========== 8. 训练完成后再次保存(双重保险) ==========
        try:
            final_save_path = os.path.join(save_dir, "model_final_complete.pt")
            model.save(final_save_path)
            LOGGER.info(f"\n✅ 训练完成!最终完整模型已保存至: {final_save_path}")
            file_size = os.path.getsize(final_save_path) / (1024 * 1024)
            LOGGER.info(f"📦 文件大小: {file_size:.2f} MB")
        except Exception as e:
            LOGGER.error(f"❌ 保存最终完整模型失败: {e}")

        # 同时保存为标准命名
        try:
            standard_save_path = os.path.join(save_dir, "best.pt")
            model.save(standard_save_path)
            LOGGER.info(f"✅ 模型已保存为标准命名 best.pt: {standard_save_path}")
        except Exception as e:
            LOGGER.error(f"❌ 保存标准命名模型失败: {e}")

        LOGGER.info(f"\n🎉 训练流程全部完成!")
        LOGGER.info(f"📁 所有模型保存在: {os.path.abspath(save_dir)}")

    except KeyboardInterrupt:
        LOGGER.warning("\n⚠️ 训练被用户中断 (Ctrl+C)")
        LOGGER.warning("🔄 尝试紧急保存当前模型...")
        emergency_save(model, save_dir, "interrupted")
        LOGGER.info("⚠️ 训练中断,但模型已紧急保存")

    except Exception as e:
        LOGGER.error(f"\n❌ 训练异常: {e}")
        import traceback
        LOGGER.error(f"📋 详细错误信息:\n{traceback.format_exc()}")

        # ⭐ 即使出错也尝试保存当前模型
        LOGGER.warning("🔄 尝试紧急保存当前模型...")
        if emergency_save(model, save_dir, "error"):
            LOGGER.info("✅ 紧急保存成功,模型未丢失")
        else:
            LOGGER.error("❌ 紧急保存失败,模型可能丢失")

        raise e

    finally:
        # 最后的清理工作
        LOGGER.info(f"\n{'=' * 60}")
        LOGGER.info(f"📊 训练结束统计")
        LOGGER.info(f"{'=' * 60}")

        # 列出保存目录中的所有.pt文件
        try:
            pt_files = [f for f in os.listdir(save_dir) if f.endswith('.pt')]
            if pt_files:
                LOGGER.info(f"\n📦 保存目录中的模型文件 ({len(pt_files)}个):")
                for f in sorted(pt_files):
                    file_path = os.path.join(save_dir, f)
                    size_mb = os.path.getsize(file_path) / (1024 * 1024)
                    LOGGER.info(f"   ✓ {f} ({size_mb:.2f} MB)")
            else:
                LOGGER.warning("⚠️ 保存目录中未找到.pt文件")
        except Exception as e:
            LOGGER.warning(f"⚠️ 列出文件失败: {e}")

        LOGGER.info(f"\n📁 保存目录: {os.path.abspath(save_dir)}")
        LOGGER.info(f"📁 BN分析目录: {os.path.abspath('bn_weight_analysis')}")
        LOGGER.info(f"{'=' * 60}\n")


# ===================== 5. 执行训练 =====================
if __name__ == "__main__":
    try:
        # 切换工作目录到脚本所在路径
        script_dir = os.path.dirname(os.path.abspath(__file__))
        os.chdir(script_dir)
        LOGGER.info(f"📁 工作目录: {script_dir}")

        # 打印环境信息
        LOGGER.info(f"\n{'=' * 60}")
        LOGGER.info(f"🖥️  环境信息")
        LOGGER.info(f"{'=' * 60}")
        LOGGER.info(f"Python版本: {platform.python_version()}")
        LOGGER.info(f"系统: {platform.system()} {platform.release()}")
        LOGGER.info(f"PyTorch版本: {torch.__version__}")
        LOGGER.info(f"CUDA可用: {torch.cuda.is_available()}")
        if torch.cuda.is_available():
            LOGGER.info(f"GPU数量: {torch.cuda.device_count()}")
            LOGGER.info(f"当前GPU: {torch.cuda.get_device_name(0)}")
            LOGGER.info(f"CUDA版本: {torch.version.cuda}")
        LOGGER.info(f"{'=' * 60}\n")

        # 执行训练
        train_prune_pretrain()

    except Exception as e:
        LOGGER.error(f"\n❌ 主程序异常: {e}")
        import traceback

        LOGGER.error(f"📋 详细错误信息:\n{traceback.format_exc()}")
        raise e
把如下参数修改成自己的参数,基于哪个模型训练,配置文件的路径和配置名称
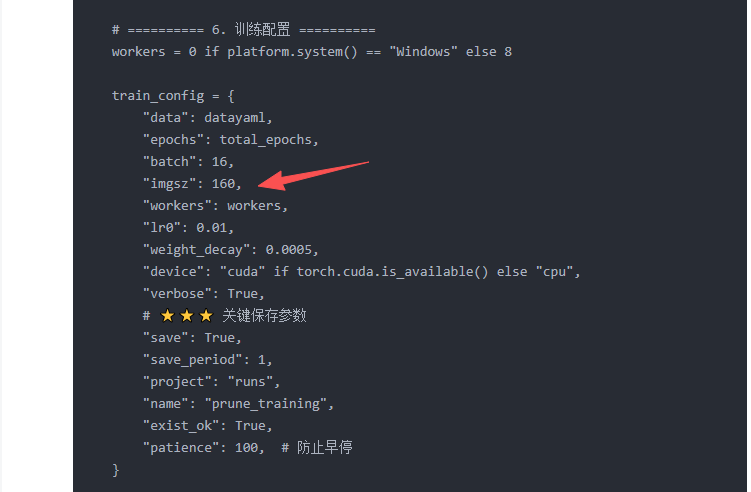
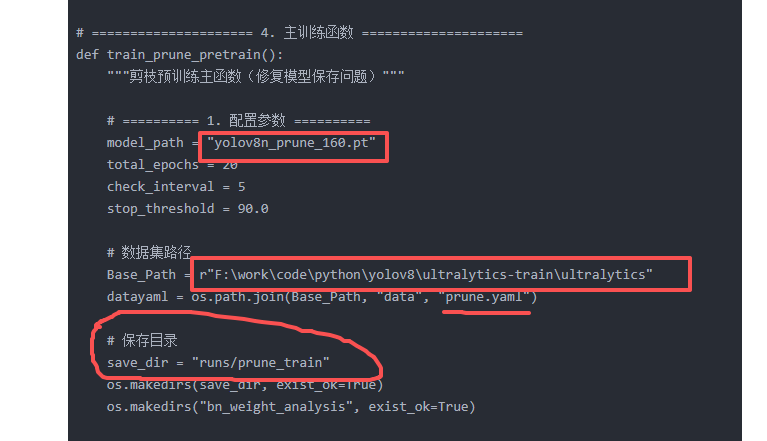
训练大概10多轮就可以了,如果一直不为0,那么就把 l1_lambda = 1e-2 * (1 - 0.9 * epoch / self.epochs)里面的1e-2 增加。
修改好后就可以开始训练了。
2.4 、开始训练
执行train_prune_pretrain.py,在runs/prune_train下,会得到一个模型best.onnx 、 best.pt 、 model_final_complete.pt 模型。
这里选取 best.pt
可以用这个模型用来裁剪。
三、开始剪枝
上面已经得到了稀疏化的模型,那么就需要编写剪枝代码,通过BN层的权重,把对应的CONv的对应层删除,那么需要修改对应的输入和输出。参考博客(https://zhuanlan.zhihu.com/p/13362757767)大家可以直接去看
创建剪枝代码如下:analyze_pruning_new.py
#!/usr/bin/env python3
# -*- coding: utf-8 -*-
"""
YOLOv8 模型通道剪枝脚本(基于BN层权重)
核心流程:
1. 加载稀疏训练后的YOLOv8模型
2. 统计所有BN层权重,计算全局剪枝阈值(保留指定比例的通道)
3. 核心剪枝逻辑:
   - 剪枝Bottleneck模块内的卷积层
   - 剪枝模型主干模块间的卷积层
   - 剪枝检测头(Detect)的卷积层
   - 同步更新前后连接层的通道数,保证模型结构一致性
4. 保存剪枝后模型并导出ONNX格式
注意事项:
- 稀疏训练阶段需为BN层添加L1正则约束(lambda≈1e-2)
- 剪枝后微调时需移除L1约束,避免过度稀疏
- 剪枝时保证至少保留8个通道,避免Nvidia GPU利用率过低
"""

# ============================== 导入依赖库 ==============================
import sys
import torch
from ultralytics import YOLO
from ultralytics.nn.modules import Bottleneck, Conv, C2f, SPPF, Detect
from thop import profile  # 预留计算量接口,当前未使用

# ============================== 全局配置 ==============================
# 模型路径
MODEL_PATH = "yolov8n_prune_pretrain1best.pt"
# 通道保持率(保留权重最大的80%通道)
KEEP_FACTOR = 0.8
# 颜色输出配置(用于终端高亮显示最小值)
RED = "\033[91m"
RESET = "\033[0m"

# ============================== 加载模型 ==============================
# 加载稀疏训练后的YOLOv8模型
yolo = YOLO(MODEL_PATH)
model = yolo.model

# ============================== 计算剪枝阈值 ==============================
# 收集所有BN层的权重和偏置绝对值(用于计算全局阈值)
bn_weights = []  # 存储所有BN层权重绝对值
bn_biases = []  # 存储所有BN层偏置绝对值

print("=" * 80)
print("BN层权重/偏置极值统计(最小值高亮显示):")
print("=" * 80)

for module_name, module in model.named_modules():
    if isinstance(module, torch.nn.BatchNorm2d):
        # 提取BN层权重/偏置(detach避免影响计算图)
        weight_abs = module.weight.abs().detach()
        bias_abs = module.bias.abs().detach()

        bn_weights.append(weight_abs)
        bn_biases.append(bias_abs)

        # 打印当前BN层的权重/偏置极值
        print(
            f"BN层名称: {module_name: <50} "
            f"权重最大值: {weight_abs.max().item():.10f} "
            f"权重最小值: {RED}{weight_abs.min().item():.10f}{RESET} "
            f"偏置最大值: {bias_abs.max().item():.10f} "
            f"偏置最小值: {RED}{bias_abs.min().item():.10f}{RESET}"
        )

# 拼接所有BN权重,计算全局剪枝阈值(保留KEEP_FACTOR比例的通道)
all_bn_weights = torch.cat(bn_weights)
sorted_weights = torch.sort(all_bn_weights, descending=True)[0]
prune_threshold = sorted_weights[int(len(sorted_weights) * KEEP_FACTOR)]

print("=" * 80)
print(f"全局剪枝阈值(保留{KEEP_FACTOR * 100}%通道): {prune_threshold:.10f}")
print("=" * 80)


# ============================== 核心剪枝函数 ==============================
def prune_conv(conv1: Conv, conv2: Conv or list):
    """
    核心卷积层剪枝函数:剪枝前层conv1的输出通道,同步更新后层conv2的输入通道
    保证前后层通道数匹配,避免结构不一致

    Args:
        conv1: 待剪枝的卷积层(前层,剪枝其输出通道)
        conv2: 与conv1连接的后续卷积层(后层,需同步更新输入通道),支持单个或列表
    """
    # 提取conv1的BN层权重和偏置(用于判断保留哪些通道)
    gamma = conv1.bn.weight.data.detach()
    beta = conv1.bn.bias.data.detach()

    keep_indices = []
    local_threshold = prune_threshold.clone()

    # 逐步降低阈值,确保至少保留8个通道(避免GPU利用率过低)
    while len(keep_indices) < 8:
        # 筛选出权重绝对值≥当前阈值的通道索引
        keep_indices = torch.where(gamma.abs() >= local_threshold)[0]
        local_threshold *= 0.5  # 阈值减半,扩大保留范围

    # 保留的通道数
    keep_channel_num = len(keep_indices)
    print(f"保留通道数/原始通道数: {keep_channel_num}/{len(gamma)} ({keep_channel_num / len(gamma) * 100:.2f}%)")

    # -------------------------- 更新前层conv1(输出通道剪枝) --------------------------
    # 更新BN层参数
    conv1.bn.weight.data = gamma[keep_indices]
    conv1.bn.bias.data = beta[keep_indices]
    conv1.bn.running_var.data = conv1.bn.running_var.data[keep_indices]
    conv1.bn.running_mean.data = conv1.bn.running_mean.data[keep_indices]
    conv1.bn.num_features = keep_channel_num  # 更新BN层通道数

    # 更新卷积层参数
    conv1.conv.weight.data = conv1.conv.weight.data[keep_indices]
    conv1.conv.out_channels = keep_channel_num  # 更新输出通道数
    if conv1.conv.bias is not None:  # 若存在偏置,同步更新
        conv1.conv.bias.data = conv1.conv.bias.data[keep_indices]

    # -------------------------- 更新后层conv2(输入通道同步) --------------------------
    # 统一格式为列表,方便批量处理
    if not isinstance(conv2, list):
        conv2 = [conv2]

    for item in conv2:
        if item is not None:
            # 兼容C2f/SPPF等复合模块的卷积层提取
            conv = item.conv if isinstance(item, Conv) else item

            # 更新输入通道数(与conv1输出通道一致)
            conv.in_channels = keep_channel_num
            # 剪枝卷积核的输入通道维度
            conv.weight.data = conv.weight.data[:, keep_indices]


def prune(prev_module, next_module):
    """
    复合模块剪枝适配函数:处理C2f/SPPF等复合模块的卷积层提取,调用核心剪枝函数

    Args:
        prev_module: 前序模块(C2f/Bottleneck/Conv等)
        next_module: 后续模块(C2f/SPPF/Conv等),支持单个或列表
    """
    # 提取C2f模块的输出卷积层(cv2)
    if isinstance(prev_module, C2f):
        prev_module = prev_module.cv2

    # 统一格式为列表,方便批量处理
    if not isinstance(next_module, list):
        next_module = [next_module]

    # 提取复合模块的输入卷积层(cv1)
    for idx, item in enumerate(next_module):
        if isinstance(item, C2f) or isinstance(item, SPPF):
            next_module[idx] = item.cv1

    # 调用核心剪枝函数
    prune_conv(prev_module, next_module)


# ============================== 分模块执行剪枝 ==============================
print("\n" + "=" * 80)
print("开始执行模型剪枝:")
print("=" * 80)

# 1. 剪枝C2f模块中Bottleneck的卷积层
print("\n[Step 1/3] 剪枝Bottleneck模块内卷积层:")
for module_name, module in model.named_modules():
    if isinstance(module, Bottleneck):
        prune_conv(module.cv1, module.cv2)

# 2. 剪枝模型主干序列中指定模块间的卷积层
print("\n[Step 2/3] 剪枝模型主干模块间卷积层:")
model_backbone = model.model  # 获取模型主干序列
for idx in range(3, 9):
    if idx in [6, 4, 9]:  # 跳过指定层(避免破坏模型结构)
        continue
    prune(model_backbone[idx], model_backbone[idx + 1])

# 3. 剪枝检测头(Detect)相关卷积层
print("\n[Step 3/3] 剪枝检测头卷积层:")
detect_head: Detect = model_backbone[-1]  # 获取检测头模块
# 检测头输入层配置
detect_inputs = [model_backbone[15], model_backbone[18], model_backbone[21]]
detect_secondary = [model_backbone[16], model_backbone[19], None]

# 遍历检测头的cv2/cv3分支,逐层剪枝
for input_module, secondary_module, cv2_branch, cv3_branch in zip(
        detect_inputs, detect_secondary, detect_head.cv2, detect_head.cv3
):
    # 剪枝输入层到检测头分支的连接
    prune(input_module, [secondary_module, cv2_branch[0], cv3_branch[0]])
    # 剪枝cv2分支内部
    prune(cv2_branch[0], cv2_branch[1])
    prune(cv2_branch[1], cv2_branch[2])
    # 剪枝cv3分支内部
    prune(cv3_branch[0], cv3_branch[1])
    prune(cv3_branch[1], cv3_branch[2])

# ============================== 模型后处理 ==============================
print("\n" + "=" * 80)
print("剪枝完成,重置参数梯度状态并保存模型:")
print("=" * 80)

# 重置所有参数为可训练状态(加载模型后部分参数可能被设为不可训练)
for param_name, param in yolo.model.named_parameters():
    param.requires_grad = True

# 保存剪枝后的模型权重
torch.save(yolo.ckpt, "prune.pt")
print("✅ 剪枝后模型已保存为: prune.pt")

# 导出ONNX格式(简化版)
yolo.export(format="onnx", simplify=True)
print("✅ 剪枝后模型已导出为ONNX格式(简化版)")

print("\n🎉 剪枝流程全部完成!")
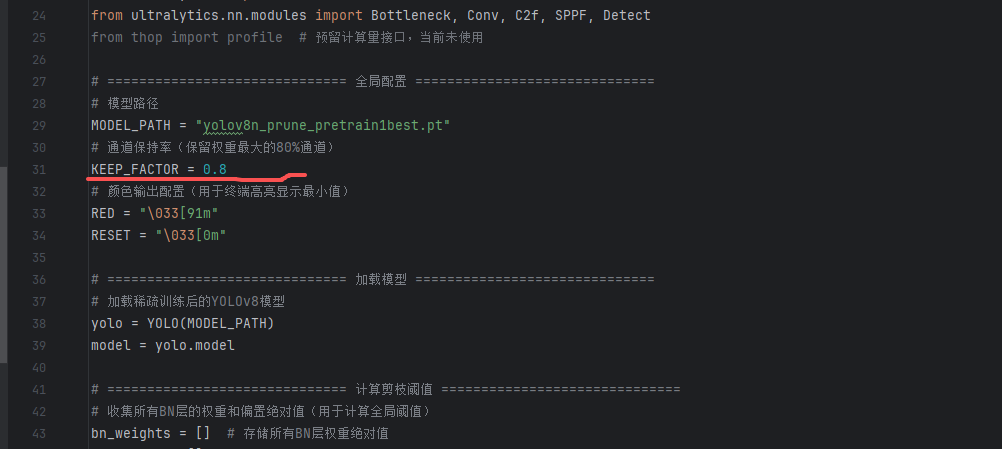
此剪枝代码,支持两种剪枝方式,一种是直接剪枝百分之多少,如0.2百分之20,还有一种就是自己设置阈值比如低于多少的阈值全部剪掉。
这里是设置保留百分比阈值,保留80%
阈值修改,可以直接设置值,不需要获取出来,那么就是低于此阈值的全部裁剪
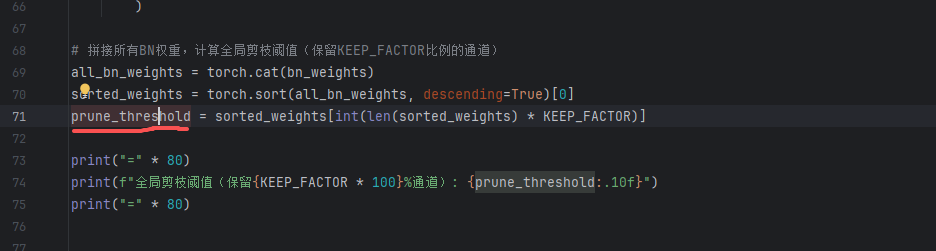
两种方式都行,一种精细化裁剪,一种粗略裁剪。
裁剪过后,会输出 prune.pt 裁剪后的模型,注意哈,裁剪后的模型,需要微调才会恢复,不然直接使用,可能没有结果。
四、微调
微调就是直接可以在之前的训练集上面,跑40~50轮,恢复精度。
记住不能直接训练,由于剪枝了,那么结构变化了,yolov8 默认代码会通过配置文件恢复结构,所以直接这么训练那么白剪枝了,还是会恢复成老样子。所以需要修改一下代码
4.1 修改结构
具体如下:
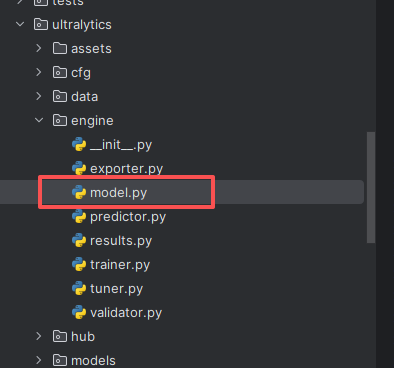
在代码ultralytics\engine下面model.py 文件里面修改,把加载的模型结构赋值回去,禁止修改
具体如下:
在如下代码后
self.trainer.model = self.trainer.get_model(weights=self.model if self.ckpt else None, cfg=self.model.yaml)
添加
self.trainer.model.model = self.model.model  # 新增 prune need
self.model = self.trainer.model
具体如下:

对了还有记得把之前约束代码也要禁用掉,就是2.2.1节添加的代码,如下

4.2 微调
然后开始执行训练,可以用https://blog.csdn.net/p731heminyang/article/details/156423483
这一节的内容执行训练,把训练轮数降低就行。
比如自己发现精度已经达标了,或者开始降低了就可以停止掉了,模型跟上节一样

4.3 查询模型信息
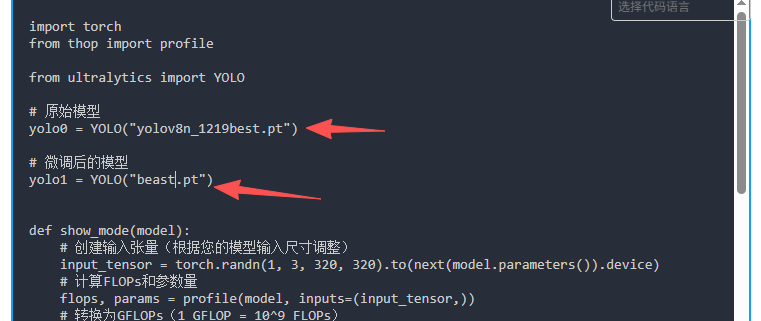
获取到了最好的模型,那么就查询下模型的参数是否变化了
查询代码:show_model_info.py
import torch
from thop import profile

from ultralytics import YOLO

# 原始模型
yolo0 = YOLO("yolov8n_1219best.pt")

# 微调后的模型
yolo1 = YOLO("beast.pt")


def show_mode(model):
    # 创建输入张量(根据您的模型输入尺寸调整)
    input_tensor = torch.randn(1, 3, 320, 320).to(next(model.parameters()).device)
    # 计算FLOPs和参数量
    flops, params = profile(model, inputs=(input_tensor,))
    # 转换为GFLOPs(1 GFLOP = 10^9 FLOPs)
    gflops = flops / 1e9
    print(f"模型FLOPs: {flops}")
    print(f"模型GFLOPs: {gflops:.4f}")
    print(f"模型参数量: {params}")


def get_model_info(model):
    """获取模型的总参数量、精度和GFLOPs(正确计算FLOPs)"""
    # 1. 确保模型已融合(YOLOv8默认融合,但显式操作更安全)
    model = model.fuse()

    # 2. 获取总参数量
    total_params = sum(p.numel() for p in model.parameters())

    # 3. 获取精度
    dtype = next(model.parameters()).dtype

    # 4. 获取GFLOPs(关键:thop返回的是MACs,需乘以2得到FLOPs)
    input_size = (1, 3, 640, 640)  # YOLOv8标准输入尺寸
    input = torch.randn(input_size).to(next(model.parameters()).device)

    flops, _ = profile(model, inputs=(input,))
    # 重要修正:FLOPs = 2 × MACs
    gflops = (flops * 2) / 1e9  # 转换为GFLOPs    # 打印结果
    print(f"模型总参数量: {total_params}")
    print(f"模型精度: {dtype}")
    print(f"模型GFLOPs: {gflops:.4f}")
    return {
        'total_params': total_params,
        'precision': dtype,
        'gflops': gflops
    }


def get_model_layer_info(model):
    """
    获取模型各层的详细信息(名称、类型、参数量、精度等)

    :param model: PyTorch模型
    :return: 各层信息列表
    """
    layers_info = []
    for name, module in model.named_modules():
        # 只关注有参数的层
        if len(list(module.parameters())) > 0:
            # 获取层的参数量
            params = sum(p.numel() for p in module.parameters())
            # 获取层的精度
            dtype = next(module.parameters()).dtype

            layers_info.append({
                'layer_name': name,
                'layer_type': module.__class__.__name__,
                'params': params,
                'precision': dtype
            })
    # 打印各层信息
    print("\n各层详细信息:")
    for layer in layers_info:
        print(
            f"层: {layer['layer_name']}, 类型: {layer['layer_type']}, 参数量: {layer['params']}, 精度: {layer['precision']}")


print("模型1:")
# get_model_layer_info(yolo0.model)
model_info=get_model_info(yolo0.model)


print("模型2:")
# get_model_layer_info(yolo1.model)
model_info=get_model_info(yolo1.model)
修改两个模型的名称
执行后发现,参数量和算力都降低了很多,如果精度也达标那么我们的模型已经ok。
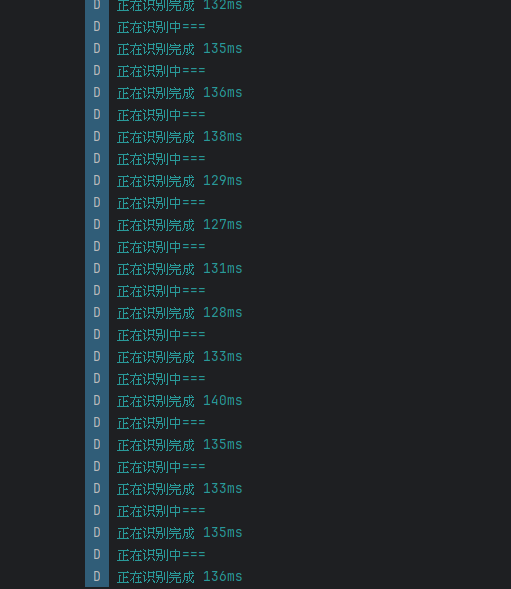
后续就是放入到rk3399 试试效果了,转换为ncnn模型和之前一样,这里不讲了。
最终效果:从300ms最终降低到100多ms,还可以继续裁剪,下面试试量化了
裁剪总结:
我这边裁剪是进行稀疏化之后再进行剪枝,我采用的是多次剪枝这样达到的精确度会比较好。
1、每次剪枝10%,保留90%的通道
2、微调模型后,然后再执行第一步剪枝
3、直到精度下降厉害或者算力达到标准,停止执行
参考文档:https://blog.csdn.net/p731heminyang/article/details/156423483

腾讯云面向开发者汇聚海量精品云计算使用和开发经验,营造开放的云计算技术生态圈。
更多推荐
 16
16 0
0- 0


 已为社区贡献7条内容

所有评论(0)