Elasticsearch
这是一篇基于黑马学习后的笔记Elasticsearch是一个高性能分布式搜索引擎elasticsearch结合kibana、Logstash、Beats,是一整套技术栈,被叫做ELK。被广泛应用在日志数据分析、实时监控等领域。安装:安装操作这里就不演示了,在黑马springcloud课程第115集有具体讲解。进入elactic(虚拟机ip:5601)的Dev Tools后访问GET /,出现:即安
Elasticsearch
这是一篇基于黑马学习后的笔记
Elasticsearch是一个高性能分布式搜索引擎
一、认识和安装
elasticsearch结合kibana、Logstash、Beats,是一整套技术栈,被叫做ELK。被广泛应用在日志数据分析、实时监控等领域。
安装:
- elasticsearch:存储、搜索和运算
- kibana:图形化展示
安装操作这里就不演示了,在黑马springcloud课程第115集有具体讲解。
进入elactic(虚拟机ip:5601)的Dev Tools后访问GET /,出现:
{
  "name" : "2590057c3e8a",
  "cluster_name" : "docker-cluster",
  "cluster_uuid" : "iitPi53aS96subF1qiWC-A",
  "version" : {
    "number" : "7.12.1",
    "build_flavor" : "default",
    "build_type" : "docker",
    "build_hash" : "3186837139b9c6b6d23c3200870651f10d3343b7",
    "build_date" : "2021-04-20T20:56:39.040728659Z",
    "build_snapshot" : false,
    "lucene_version" : "8.8.0",
    "minimum_wire_compatibility_version" : "6.8.0",
    "minimum_index_compatibility_version" : "6.0.0-beta1"
  },
  "tagline" : "You Know, for Search"
}
即安装成功。
二、倒排索引
elasticsearch采用倒排索引:
- 文档:每条数据就是一个文档
- 词条:文档按照语义分成的词语
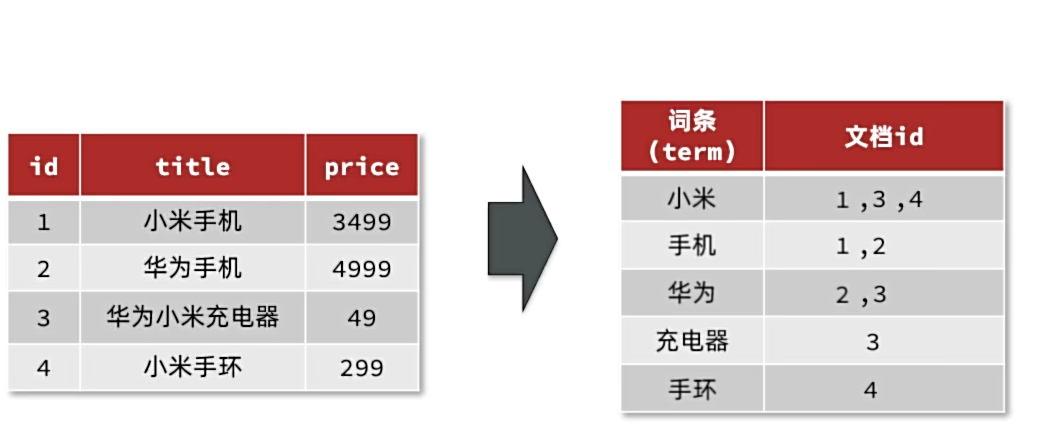
正向索引:
基于文档id创建索引。根据id查询快,但是查询词条时必须先找到文档,而后判断是否包含词条
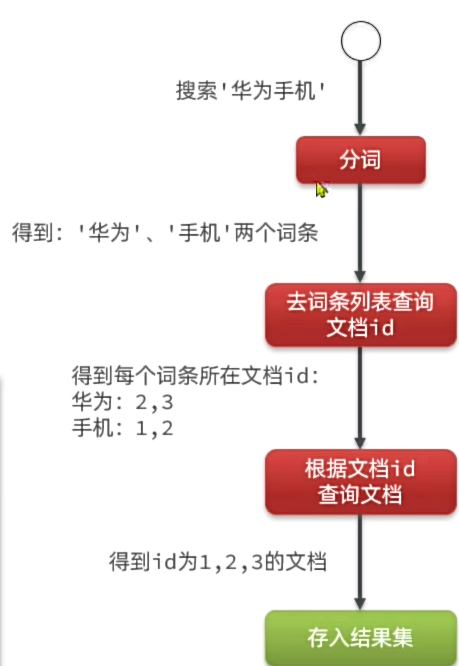
*倒排索引:
对文档内容分词,对词条创建索引,并记录词条所在文档的id,
查询时先根据词条查询到文档id,而后根据文档id查询文档。
三、IK分词器
1.安装插件
首先,进入虚拟机,然后进入elasticsearch数据卷挂载的位置,将老师提供的目录拖拽放入。
随后,重启elasticsearch
sudo docker restart es
2.调试
在kibana的DevTools中可以使用下面的语法来调试IK分词器
POST /_analyze
{
  "analyzer": "ik_smart",
  "text": "黑马程序员学习java太棒了"
}
语法说明;
-
post:请求方式
-
/_analyze:请求路径,这里9省略了http://虚拟机ip:9200,有kibana帮我们补充
-
请求参数,json风格:
- analyzer:分词器类型,这里是默认的standard分词器
- text:分词的内容
{
  "tokens" : [
    {
      "token" : "黑马",
      "start_offset" : 0,
      "end_offset" : 2,
      "type" : "CN_WORD",
      "position" : 0
    },
    {
      "token" : "程序员",
      "start_offset" : 2,
      "end_offset" : 5,
      "type" : "CN_WORD",
      "position" : 1
    },
    {
      "token" : "学习",
      "start_offset" : 5,
      "end_offset" : 7,
      "type" : "CN_WORD",
      "position" : 2
    },
    {
      "token" : "java",
      "start_offset" : 7,
      "end_offset" : 11,
      "type" : "ENGLISH",
      "position" : 3
    },
    {
      "token" : "太棒了",
      "start_offset" : 11,
      "end_offset" : 14,
      "type" : "CN_WORD",
      "position" : 4
    }
  ]
}
另外:ik分词器也可以自定义词典
在ik文件夹的conf文件夹里打开IKAnalyzer.cfg.xml即可设置自定义词典的文件名。
随后,定义字典(后缀为.dic)在config中即可。
最后,重启elasticsearch,使用 “analyzer”: "ik_max_word"即可使用你的自定义词典。
四、基础概念
索引(index):相同类型的文档的集合
映射(mapping):索引中文档的字段约束信息,类似表的结构约束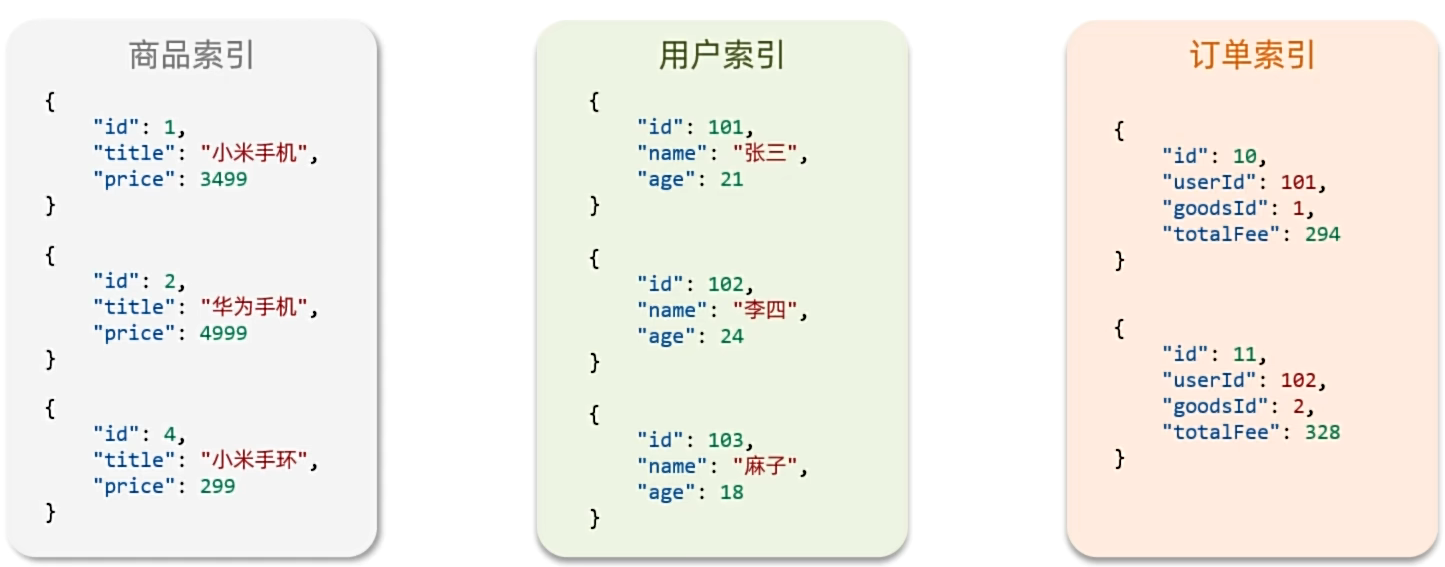
1.Mapping映射属性
mapping是对索引库中文档的约束,常见的mapping属性包括:
-
type:字段数据类型,常见的简单类型有:
- 字符串:text(可分词的文本)、keyword(精确值,例如:品牌、国家、ip地址)
- 数值:long、integer、short、byte、double、float
- 布尔:boolean
- 日期:date
- 对象:object
-
index:是否创建索引,默认为 true
-
analyzer:使用哪种分词器
-
properties:该字段的子字段
2.索引库操作
创建索引库和mapping的请求语法: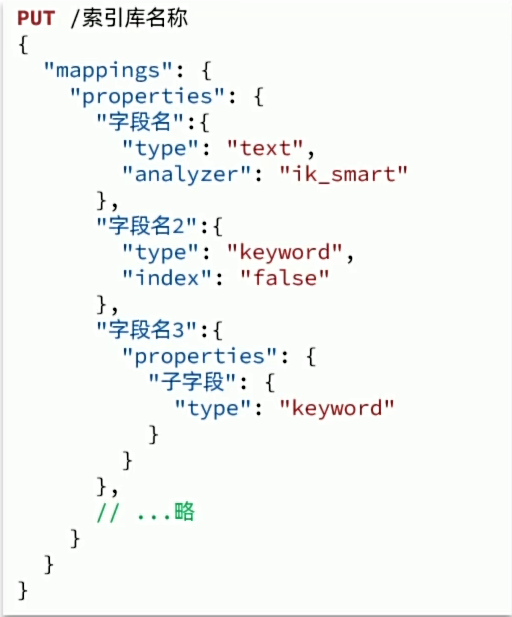
示范:
# 创建索引库并设置mapping映射
PUT /heima
{
  "mappings": {
    "properties": {
      "info": {
        "type": "text",
        "analyzer": "ik_smart"
      },
      "age" :{
        "type": "byte"
      },
      "email":{
        "type": "keyword",
        "index": false
      },
      "name":{
        "type": "object"
        , "properties": {
          "firstName":{
            "type":"keyword"
          },
          "lastName":{
            "type":"keyword"
          }
        }
      }
    }
  }
}
查询索引库:
# 查询索引库
GET /heima
删除索引库:
# 删除索引库
DELETE /heima
更新索引库:
注意:这里的更新操作只能在原有索引库没有的基础上进行添加,如果原有索引库已经有该字段则无法进行修改
# 修改索引库(只能增加原索引库没有的,不能修改原来有的字段)
PUT /heima/_mapping
{
  "properties": {
    "age":{
      "type": "byte"
    }
  }
}
总结:
- 创建索引库:PUT/索引库名
- 查询索引库:GET/索引库名
- 删除索引库:DELETE/索引库名
- 添加字段:PUT/索引库名/_mapping
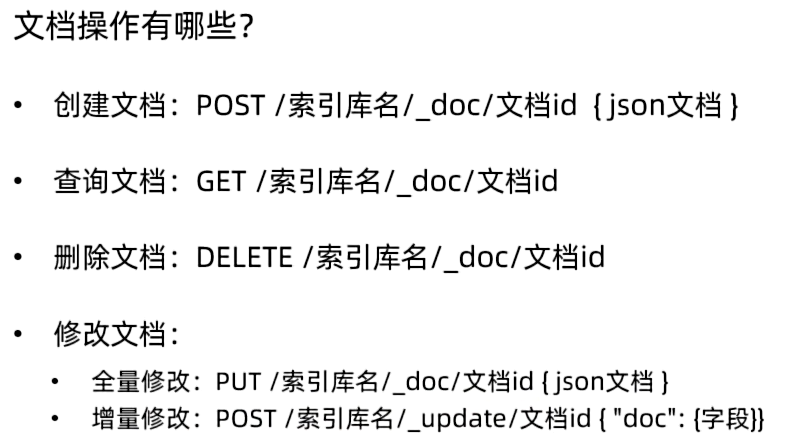
3.文档CRUD
新增文档
#新增文档
PUT /heima/_doc/1
{
  "info":"黑马程序员Java讲师",
  "email":"zy@itcast.cn",
  "name":{
    "firstName":"云",
    "lastName":"赵"
  }
}
查询文档
GET /heima/_doc/1
删除文档
DELETE /heima/_doc/1
全量修改
#全量修改(即直接覆盖原有id的文档)
PUT /heima/_doc/1
{
  "info":"黑马程序员Java讲师",
  "email":"ZY@itcast.cn",
  "name":{
    "firstName":"云",
    "lastName":"赵"
  }
}
增量修改
#增量修改(修改局部字段)
POST /heima/_update/1
{
  "doc":{
    "name":{
       "firstName":"四",
    "lastName":"赵"
    }
  }
}
4.批量处理
Elasticsearch中允许通过一次请求中携带多次文档操作,也就是批量处理,语法格式如下: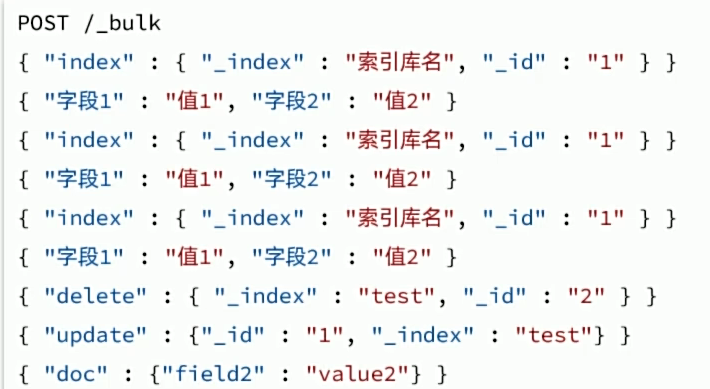
批量新增
#批量新增
POST /_bulk
{"index":{"_index":"heima","_id":2}}
{"info":"黑马程序员c++讲师","email":"ww@itcast.con","name":{"firstName":"五","lastName":"王"}}
{"index":{"_index":"heima","_id":3}}
{"info": "黑马程序员前端讲师", "email": "zhangsan@itcast.cn", "name":{"firstName": "三", "lastName":"张"}}
批量删除
#批量删除
POST /_bulk
{"delete":{"_index":"heima","_id":2}}
{"delete":{"_index":"heima","_id":3}}
批量更新
#批量更新
POST /_bulk
{"update":{"_index":"heima","_id":2}}
{"doc":{"email":"aa@itheima.cn"}}
{"update":{"_index":"heima","_id":3}}
{"doc":{"info":"黑马程序员java讲师"}}
五、JavaRestClient
1.客户端初始化
首先,引入依赖
<dependency>
    <groupId>org.elasticsearch.client</groupId>
    <artifactId>elasticsearch-rest-high-level-client</artifactId>
</dependency>
然后,更新springboot默认elasticsearch的版本(默认是7.1710)
  <properties>
      <maven.compiler.source>11</maven.compiler.source>
      <maven.compiler.target>11</maven.compiler.target>
      <elasticsearch.version>7.12.1</elasticsearch.version>
  </properties>
最后,初始化RestHighLevelClient
RestHighLevelClient client = new RestHighLevelClient(RestClient.builder(
        HttpHost.create("http://192.168.150.101:9200")
));
为了测试方便,将初始化代码写进测试类的@BeforeEach中
public class ElasticTest {
    private RestHighLevelClient client;

    @Test
    void testElastic() {
        System.out.println("client = " + client);
    }

    @BeforeEach
    void setUp() {
        client = new RestHighLevelClient(RestClient.builder(
                HttpHost.create("http://192.168.86.128:9200")
        ));
    }

    @AfterEach
    void tearDown() throws IOException {
        if(client!=null){
            client.close();
        }
    }
2.商品表映射
由于要实现对商品搜索,所以我们需要将商品添加到Elasticsearch中,不过需要根据搜索业务的需求来设定索引库结构,而不是一股脑的把MySQL数据写入Elasticsearch.
搜索页面的效果如图所示: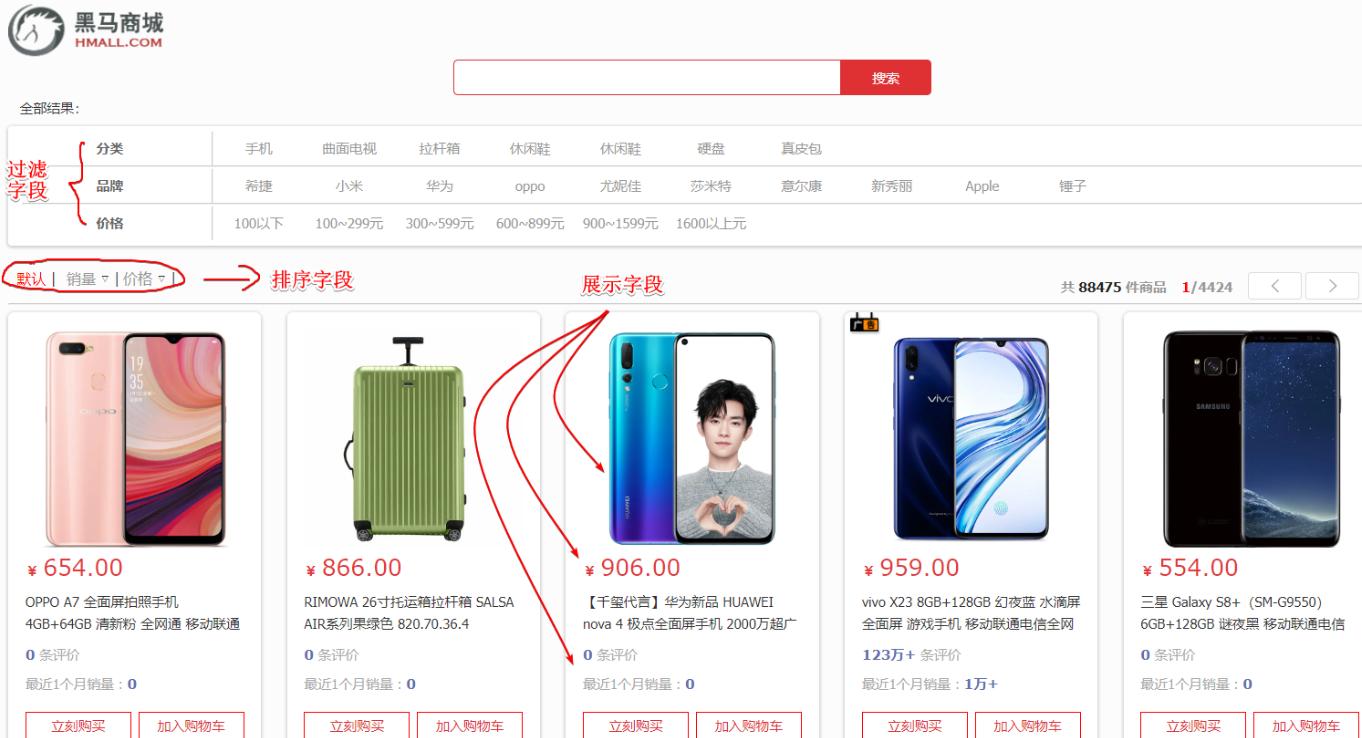
#商品索引库
PUT /items
{
  "mappings": {
    "properties": {
      "id": {
        "type": "keyword"
      },
      "name":{
        "type": "text",
        "analyzer": "ik_max_word"
      },
      "price":{
        "type": "integer"
      },
      "stock":{
        "type": "integer"
      },
      "image":{
        "type": "keyword",
        "index": false
      },
      "category":{
        "type": "keyword"
      },
      "brand":{
        "type": "keyword"
      },
      "sold":{
        "type": "integer"
      },
      "commentCount":{
        "type": "integer",
        "index": false
      },
      "isAD":{
        "type": "boolean"
      },
      "updateTime":{
        "type": "date"
      }
    }
  }
}
3.索引库操作
1.创建索引
代码分为三步:
-
- 创建Request对象。
- 因为是创建索引库的操作,因此Request是CreateIndexRequest。
-
- 添加请求参数
- 其实就是Json格式的Mapping映射参数。因为json字符串很长,这里是定义了静态字符串常量MAPPING_TEMPLATE,让代码看起来更加优雅。
-
- 发送请求
- client.indices()方法的返回值是IndicesClient类型,封装了所有与索引库操作有关的方法。例如创建索引、删除索引、判断索引是否存在等
@Test
void testCreateIndex() throws IOException {
    // 1.创建Request对象
    CreateIndexRequest request = new CreateIndexRequest("items");
    // 2.准备请求参数
    request.source(MAPPING_TEMPLATE, XContentType.JSON);
    // 3.发送请求
    client.indices().create(request, RequestOptions.DEFAULT);
}

static final String MAPPING_TEMPLATE = "{\n" +
            "  \"mappings\": {\n" +
            "    \"properties\": {\n" +
            "      \"id\": {\n" +
            "        \"type\": \"keyword\"\n" +
            "      },\n" +
            "      \"name\":{\n" +
            "        \"type\": \"text\",\n" +
            "        \"analyzer\": \"ik_max_word\"\n" +
            "      },\n" +
            "      \"price\":{\n" +
            "        \"type\": \"integer\"\n" +
            "      },\n" +
            "      \"stock\":{\n" +
            "        \"type\": \"integer\"\n" +
            "      },\n" +
            "      \"image\":{\n" +
            "        \"type\": \"keyword\",\n" +
            "        \"index\": false\n" +
            "      },\n" +
            "      \"category\":{\n" +
            "        \"type\": \"keyword\"\n" +
            "      },\n" +
            "      \"brand\":{\n" +
            "        \"type\": \"keyword\"\n" +
            "      },\n" +
            "      \"sold\":{\n" +
            "        \"type\": \"integer\"\n" +
            "      },\n" +
            "      \"commentCount\":{\n" +
            "        \"type\": \"integer\"\n" +
            "      },\n" +
            "      \"isAD\":{\n" +
            "        \"type\": \"boolean\"\n" +
            "      },\n" +
            "      \"updateTime\":{\n" +
            "        \"type\": \"date\"\n" +
            "      }\n" +
            "    }\n" +
            "  }\n" +
            "}";
2.查询索引库
    @Test
    void testGetIndex() throws IOException {
        //准备request对象
        GetIndexRequest request = new GetIndexRequest("items");
        //发送请求
        //这里用的是exists查询是否存在,get则是查询索引库
        boolean exists = client.indices().exists(request, RequestOptions.DEFAULT);
        System.out.println("exists = " + exists);
    }
3.删除索引库
    @Test
    void testDeleteIndex() throws IOException {
        //准备request对象
        DeleteIndexRequest request = new DeleteIndexRequest("items");
        //发送请求
        client.indices().delete(request, RequestOptions.DEFAULT);
    }
4.文档操作(CRUD)
添加文档
1.定义实体类
索引库结构和数据库结构还存在一些差异,所以需要定义一个与索引库结构对应的实体。
package com.hmall.item.domain.po;

import io.swagger.annotations.ApiModel;
import io.swagger.annotations.ApiModelProperty;
import lombok.Data;

import java.time.LocalDateTime;

@Data
@ApiModel(description = "索引库实体")
public class ItemDoc{

    @ApiModelProperty("商品id")
    private String id;

    @ApiModelProperty("商品名称")
    private String name;

    @ApiModelProperty("价格(分)")
    private Integer price;

    @ApiModelProperty("商品图片")
    private String image;

    @ApiModelProperty("类目名称")
    private String category;

    @ApiModelProperty("品牌名称")
    private String brand;

    @ApiModelProperty("销量")
    private Integer sold;

    @ApiModelProperty("评论数")
    private Integer commentCount;

    @ApiModelProperty("是否是推广广告,true/false")
    private Boolean isAD;

    @ApiModelProperty("更新时间")
    private LocalDateTime updateTime;
}
2.实现
package com.hmall.itemservice.es;

@SpringBootTest(properties = "spring.profiles.active=local")
public class ElasticDocument {
    @Autowired
    private IItemService itemService;

    private RestHighLevelClient client;

    @Test
    public void testAddDocument() throws IOException {
        //1.准备文档数据
        Item item = itemService.getById(100000011127L);

        //2.把数据转换成文档数据
        ItemDoc itemDoc= BeanUtil.copyProperties(item, ItemDoc.class);

        //3.准备request对象
        IndexRequest request = new IndexRequest("items").id(itemDoc.getId());
        //4.准备json文档
        request.source(JSONUtil.toJsonStr(itemDoc), XContentType.JSON);
        //5.发送请求
        client.index(request, RequestOptions.DEFAULT);
    }

    @BeforeEach
    void setUp() {
        client=new RestHighLevelClient(RestClient.builder(
                HttpHost.create("http://192.168.86.128:9200")
        ));
    }

    @AfterEach
    void tearDown() throws IOException {
        if(client!=null){
            client.close();
        }
    }
}
全量修改
这个与添加文档一致,如果id一致则实行全覆盖
局部修改
@Test
    public void testUpdateDocument() throws IOException {
        UpdateRequest request = new UpdateRequest("items", "100000011127");
        request.doc(
                "price",29999
        );
        client.update(request, RequestOptions.DEFAULT);
    }
5.批处理
批量新增
将所有数据库中的商品数据全部存入索引库中,这里采用的是分页操作将数据分批次存入
 @Test
    public void testCreateAllDocument() throws IOException {
        int pageNo = 1, pageSize = 500;
        while (true){
            //准备文档数据
            Page<Item> page = itemService.lambdaQuery()
                    .eq(Item::getStatus, 1)
                    .page(Page.of(pageNo, pageSize));
            List<Item> records = page.getRecords();
            if(records==null || records.isEmpty()){
                return;
            }

            //1.准备Request对象
            BulkRequest request = new BulkRequest();
            for (Item record : records) {
                request.add(new IndexRequest("items").id(record.getId().toString()).
                        source(JSONUtil.toJsonStr(BeanUtil.copyProperties(record, ItemDoc.class)), XContentType.JSON));
            }
            //request.add(new IndexRequest("items").id("1").source("json source",XContentType.JSON));
            client.bulk(request, RequestOptions.DEFAULT);
            pageNo++;
        }
    }
六、DSL查询
概念
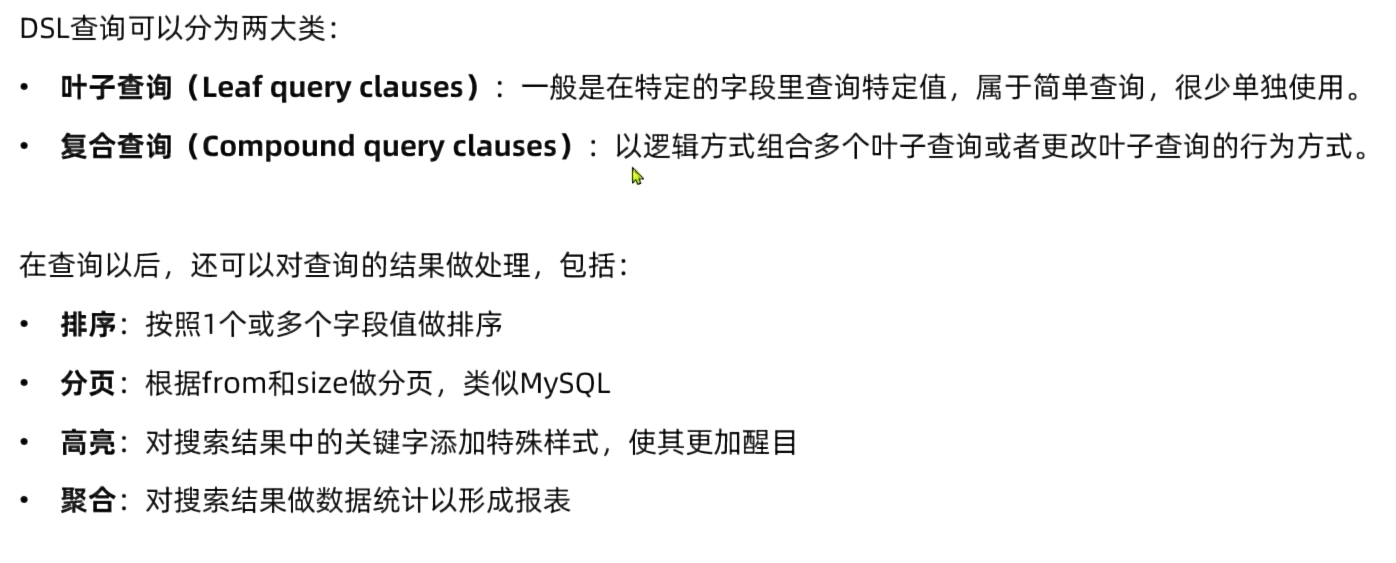
基础语法
查询全部
GET /items/_search
{
  "query": {
    "match_all": {}
  }
}
1.叶子查询
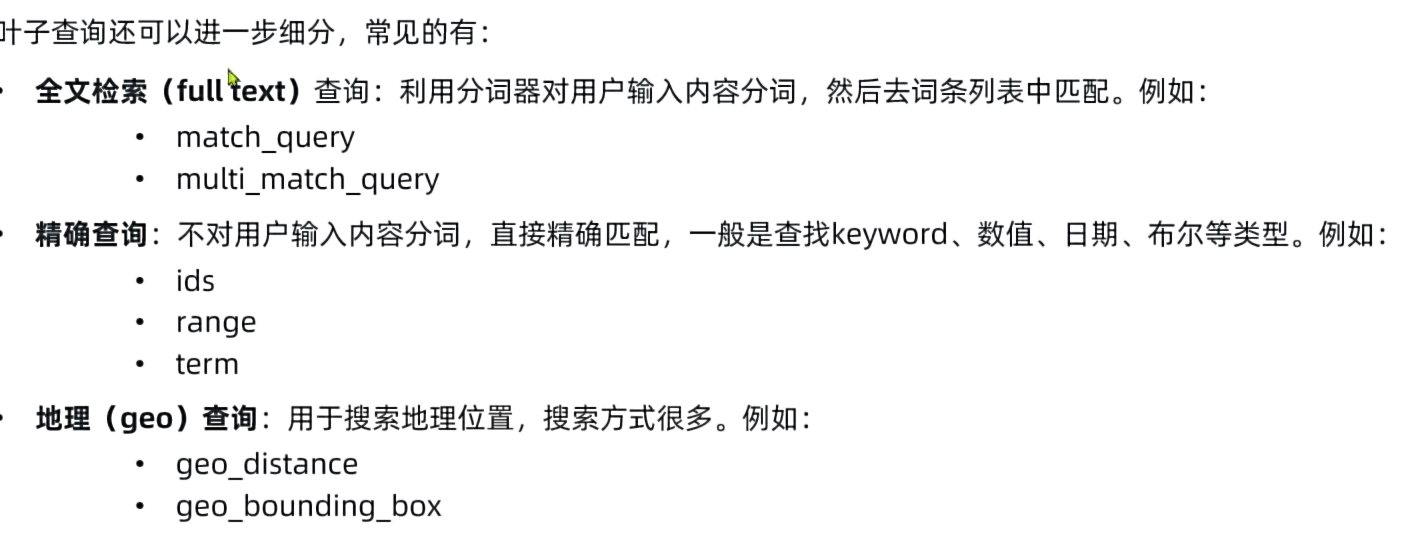
1.全文检索
#match
GET /items/_search
{
  "query": {
    "match": {
      "name": "脱脂牛奶"
    }
  }
}

#multi_match
GET /items/_search
{
  "query": {
    "multi_match": {
      "query": "脱脂牛奶",
      "fields": ["name"]
    }
  }
}
精确查询
#term 所有
GET /items/_search
{
  "query": {
    "term": {
      "brand": {
        "value": "德亚"
      }
    }
  }
}

#range 所有
GET /items/_search
{
  "query": {
    "range": {
      "price": {
        "gte": 500000,
        "lte": 2000000
      }
    }
  }
}

#id 所有
GET /items/_search
{
  "query": {
    "ids": {
      "values": ["1861102","1861103"]
    }
  }
}
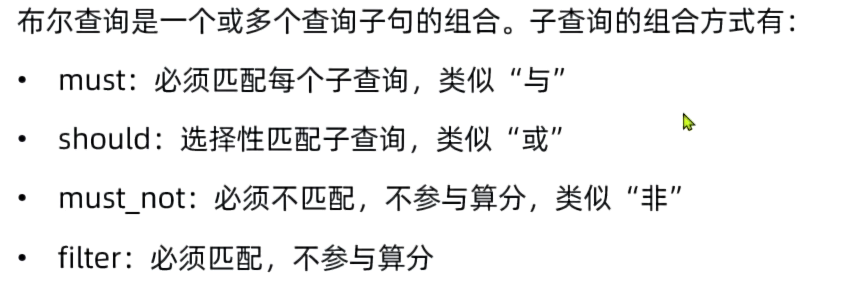
2.复杂查询
复杂查询可以分为两类:
-
第一类:基于逻辑运算组合叶子查询,实现组合条件,例如:
- bool
-
第二类:基于某种算法修改查询时的文档相关性算分,从而改变文档排名。例如:
- function_score
- dis_max
- 案例:搜索“智能手机”,但品牌必须是华为,价格必须是900-1599
# 复合查询(查询智能手机,品牌为华为,价格为900-1599)
GET /items/_search
{
  "query": {
    "bool": {
      "must": [
        {
          "match": {
            "name": "智能手机"
          }
        }
      ]
      , "filter": [
        {
          "term": {
            "brand.keyword": "华为"
          }
        },
        {
          "range": {
            "price": {
              "gte": 90000,
              "lte": 159900
            }
          }
        }
      ]
    }
  }
}
3.排序和页
排序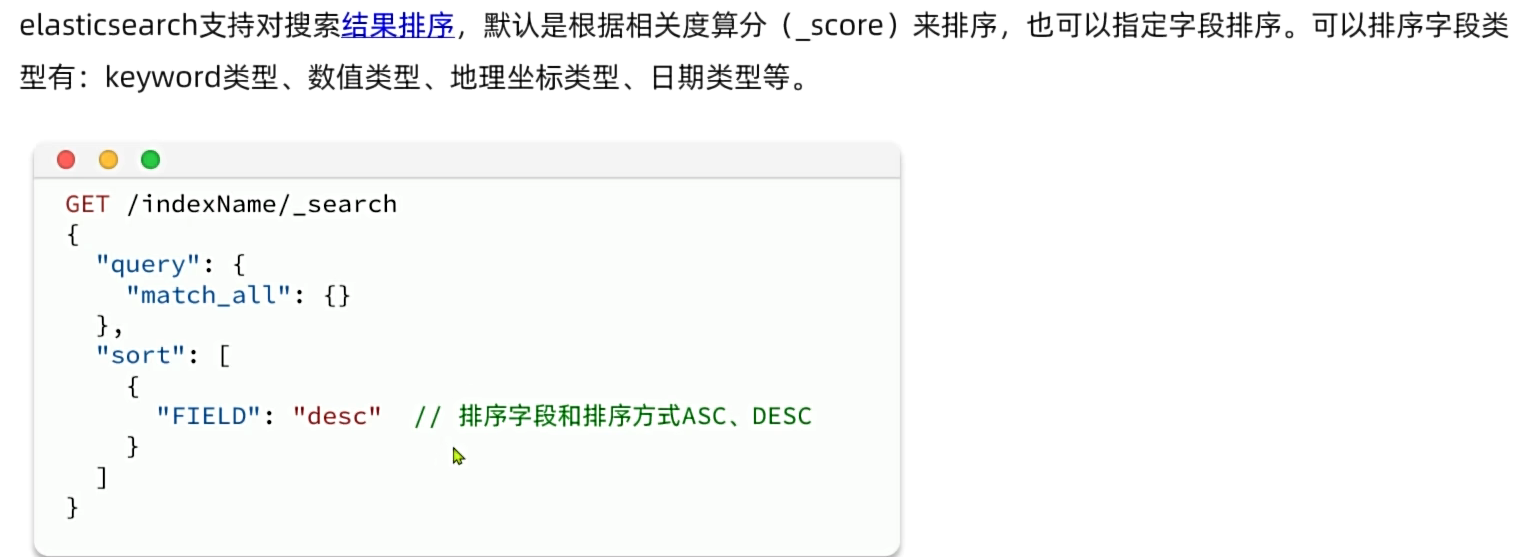
分页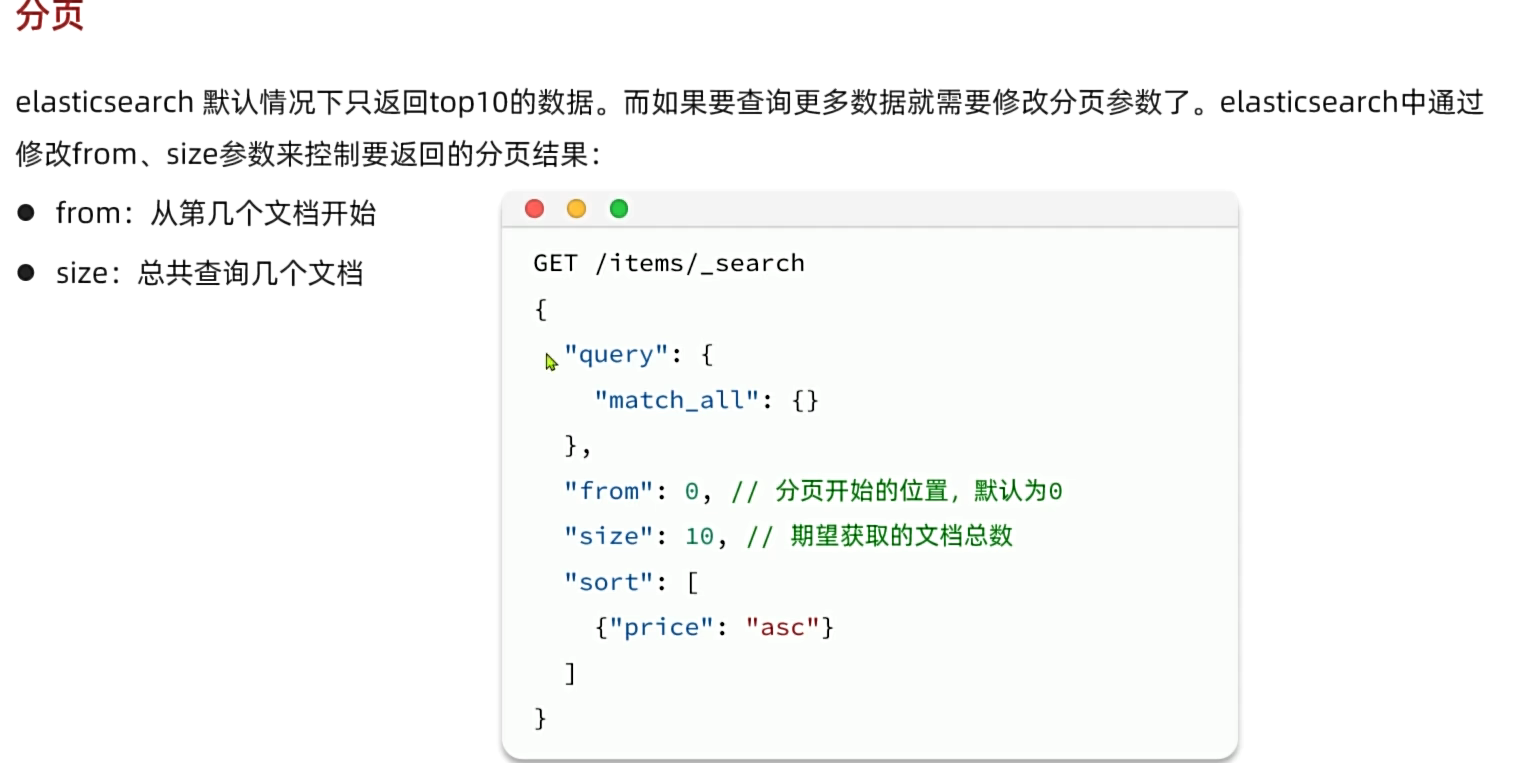
#排序分页查询
GET /items/_search
{
  "query": {
    "match_all": {}
  }
  , "sort": [
    {
      "sold": "desc"
    },
    {
      "price": "asc"
    }
  ],
  "from": 0,
  "size": 10
}
4. 高亮显示
#高亮显示
GET /items/_search
{
  "query": {
    "match": {
      "name": "脱脂牛奶"
    }
  }
  , "highlight": {
    "fields": {
      "name": {
        "pre_tags": "<em>"
        , "post_tags": "</em>"
      }
    }
  }
}
七、JavaRestClient查询
1.快速入门
数据搜索的代码主要分为两部分
- 构建并发起请求
@Test
    public void testSearch() throws IOException {
        //1.准备Request对象
        SearchRequest request = new SearchRequest("items");
        //2.配置Request参数
        request.source()
                .query(QueryBuilders.matchAllQuery());
        //3.发送请求
        SearchResponse response = client.search(request, RequestOptions.DEFAULT);

        parseResponseResult(response);

    }
- 解析查询结果
//解析结果
    private void parseResponseResult(SearchResponse response) {
        //4.解析结果
        SearchHits hits = response.getHits();
        //4.1.获取总条数
        TotalHits totalHits = hits.getTotalHits();
        //4.2.获取数据
        SearchHit[] hitsHits = hits.getHits();
        for (SearchHit hitsHit : hitsHits) {
            //4.2.1获取sourse结果
            String json = hitsHit.getSourceAsString();
            //4.2.2将json转为对象
            ItemDoc itemDoc = JSONUtil.toBean(json, ItemDoc.class);

            System.out.println("itemDoc ="+itemDoc);
        }
    }
2.构建查询条件
构建关键字为脱脂牛奶,品牌必须为德亚,价格必须低于300
 @Test
    public  void testBoolSearch() throws IOException {
        //1.准备Request对象
        SearchRequest request = new SearchRequest("items");
        //2.组织DSL参数
        request.source().query(
                QueryBuilders.boolQuery().must(QueryBuilders.matchQuery("name","脱脂牛奶"))
                        .filter(QueryBuilders.termQuery("brand.keyword","德亚"))
                .filter(QueryBuilders.rangeQuery("price").lt(30000))
        );
        //3.发送请求
        SearchResponse response = client.search(request, RequestOptions.DEFAULT);
        //4.解析结果
        parseResponseResult(response);

    }
3.排序和分页
 @Test
    public void testSoldAndPage() throws IOException {
    	//前端传递的分页参数
        int pageNo=1,pageSize=10;

        SearchRequest request = new SearchRequest("items");
        request.source().query(QueryBuilders.matchAllQuery());
        //分页
        request.source().from((pageNo-1)*pageSize).size(pageSize);
        //排序
        request.source().sort("sold", SortOrder.DESC)
                        .sort("price", SortOrder.ASC);

        SearchResponse response = client.search(request, RequestOptions.DEFAULT);

        parseResponseResult(response);
    }
4.高亮显示
    @Test
    public void testHeight() throws IOException {
        SearchRequest request = new SearchRequest("items");
        request.source().query(QueryBuilders.matchQuery("name","脱脂牛奶"));
        //指定高亮字段
        request.source().highlighter(SearchSourceBuilder.highlight().field("name"));

        SearchResponse response = client.search(request, RequestOptions.DEFAULT);

        parseResponseResult(response);
    }
解析高亮字段
 //解析结果
    private void parseResponseResult(SearchResponse response) {
        //4.解析结果
        SearchHits hits = response.getHits();
        //4.1.获取总条数
        TotalHits totalHits = hits.getTotalHits();
        //4.2.获取数据
        SearchHit[] hitsHits = hits.getHits();
        for (SearchHit hitsHit : hitsHits) {
            //4.2.1获取sourse结果
            String json = hitsHit.getSourceAsString();
            //4.2.2将json转为对象
            ItemDoc itemDoc = JSONUtil.toBean(json, ItemDoc.class);
            //4.3处理高亮结果
            Map<String, HighlightField> highlightFields = hitsHit.getHighlightFields();
            //4.3.1根据字段高亮名获取高亮结果
            if(highlightFields!=null && !highlightFields.isEmpty()){
                //4.3.2获取高亮结果,覆盖原有结果
                HighlightField name = highlightFields.get("name");
                itemDoc.setName(name.getFragments()[0].string());
            }

            System.out.println("itemDoc ="+itemDoc);
        }
    }
八、数据聚合
DSL实现聚合
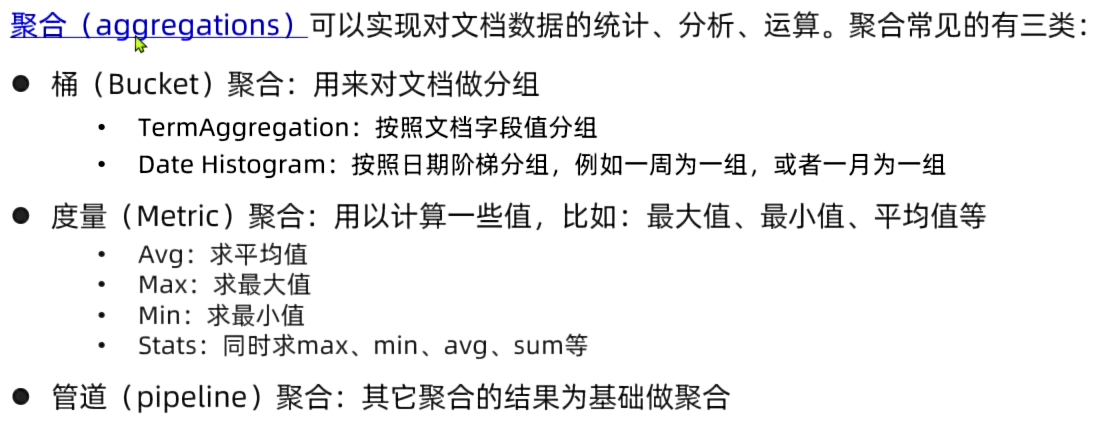
DSL聚合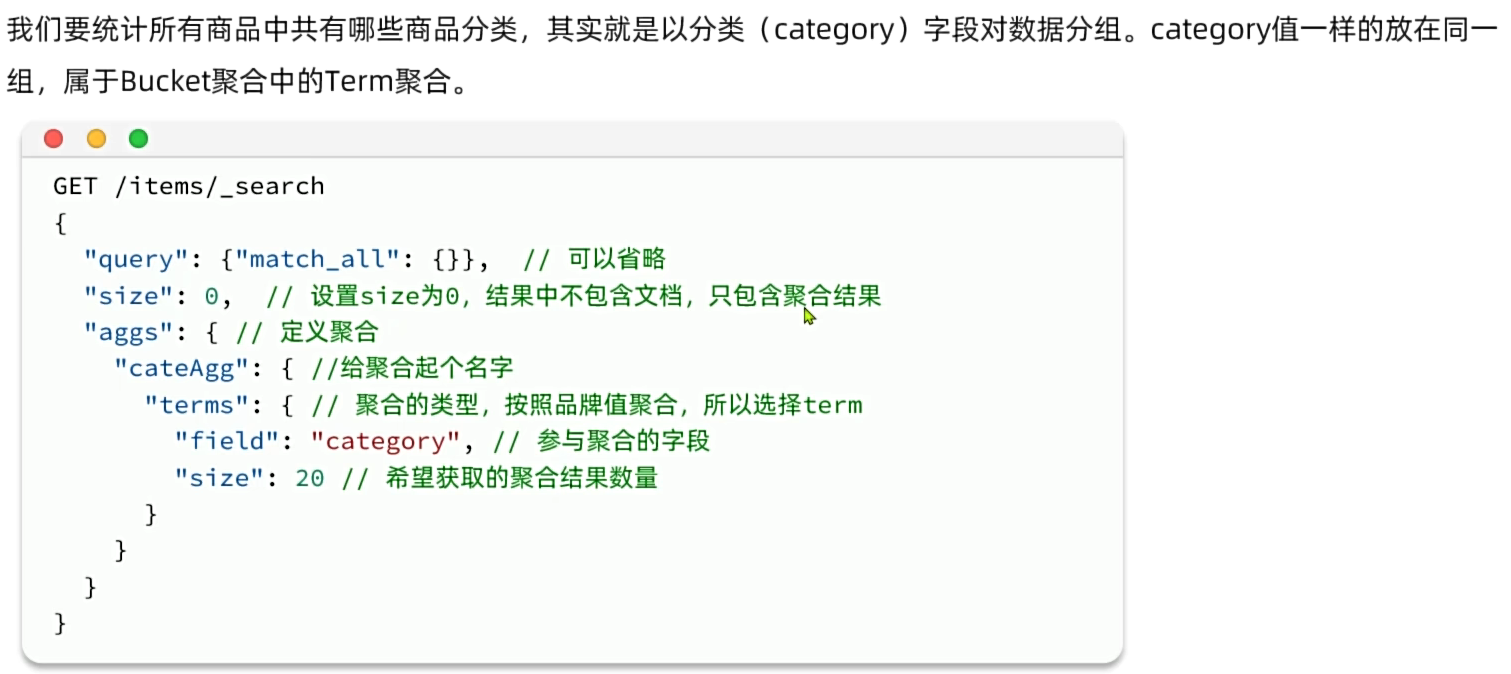
#聚合分组
GET /items/_search
{
  "query": {
    "bool": {
      "filter": [
        {
          "term": {
            "category.keyword": "手机"
          }
        },
        {
          "range": {
            "price": {
              "gte": 300000
            }
          }
        }
      ]
    }
  },
  "size": 0,
  "aggs": {
    "goods_category": {
      "terms": {
        "field": "brand.keyword",
        "size": 10
      }
    }
  }
}
# 聚合分组求平均值
GET /items/_search
{
  "query": {
    "bool": {
      "filter": [
        {
          "term": {
            "category.keyword": "手机"
          }
        },
        {
          "range": {
            "price": {
              "gte": 300000
            }
          }
        }
      ]
    }
  },
  "size": 0,
  "aggs": {
    "goods_": {
      "terms": {
        "field": "brand.keyword",
        "size": 10
      },
        "aggs": {
    "avg": {
      "stats": {
        "field": "price"
      }
    }
  }
    }
  }
}
java客户端实现聚合
@Test
    public void testAggs() throws IOException {
        //准备Request对象
        SearchRequest request = new SearchRequest("items");
        //分页
        request.source().size(0);
        //聚合条件
        request.source().aggregation(
                AggregationBuilders.terms("goods_category").field("brand.keyword").size(10)
        );
        //发送请求
        SearchResponse response = client.search(request, RequestOptions.DEFAULT);

        //解析结果
        Aggregations aggregations = response.getAggregations();
        //根据聚合名称获取对应的聚合
        Terms terms = aggregations.get("goods_category");
        //获取bucket
        List<? extends Terms.Bucket> buckets = terms.getBuckets();
        //根据bucket获取数据,并输出打印
        for (Terms.Bucket bucket : buckets) {
            System.out.println(bucket.getKeyAsString());
            System.out.println(bucket.getDocCount());
        }

    }

腾讯云面向开发者汇聚海量精品云计算使用和开发经验,营造开放的云计算技术生态圈。
更多推荐
 36
36 0
0- 0


 已为社区贡献1条内容

所有评论(0)