Jenkins 的高级功能
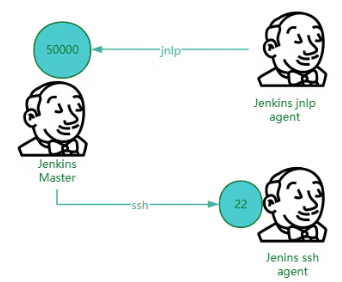
一、Jenkins 分布式
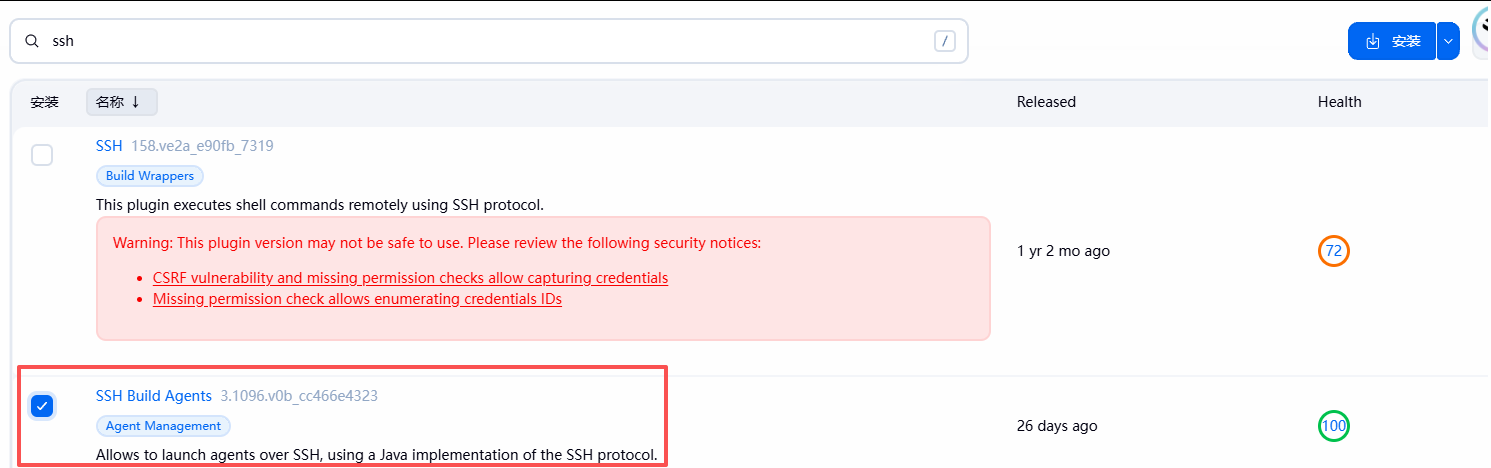
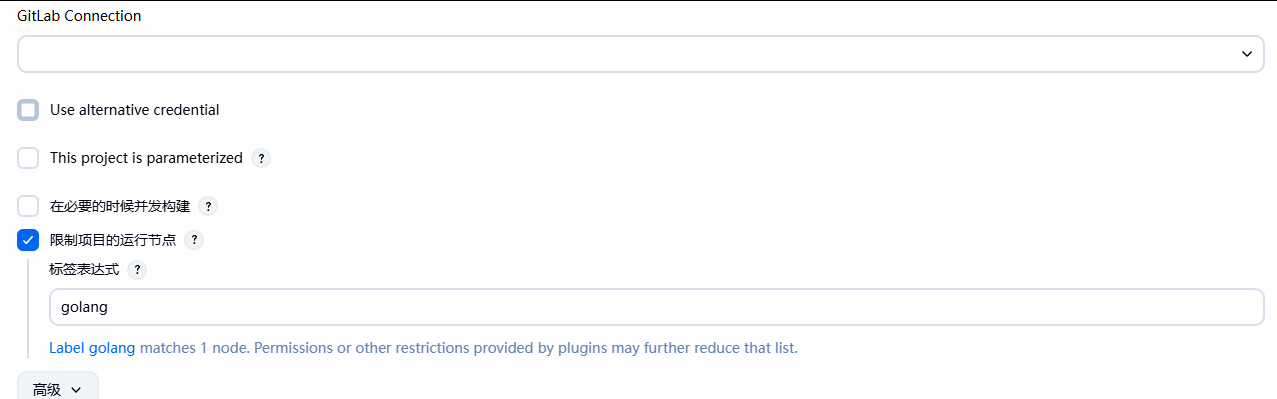
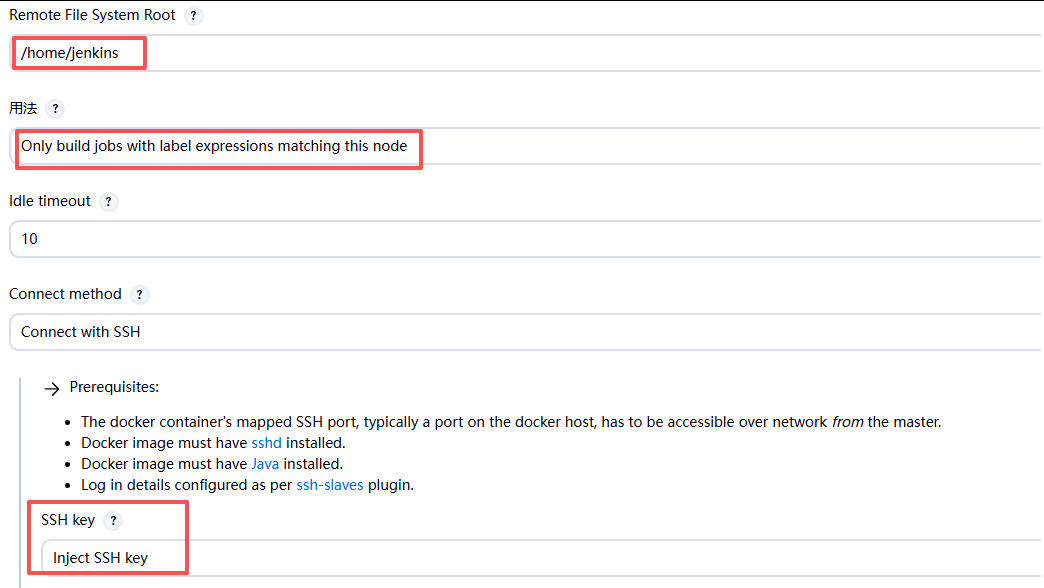
(一)基于 SSH 协议实现 Jenkins 分布式
在 10.0.0.18 和 10.0.0.19 主机上面安装 JAVA 程序,安装的版本和 jenkins 主机一致
apt update && apt install openjdk-21-jdk -y安装插件
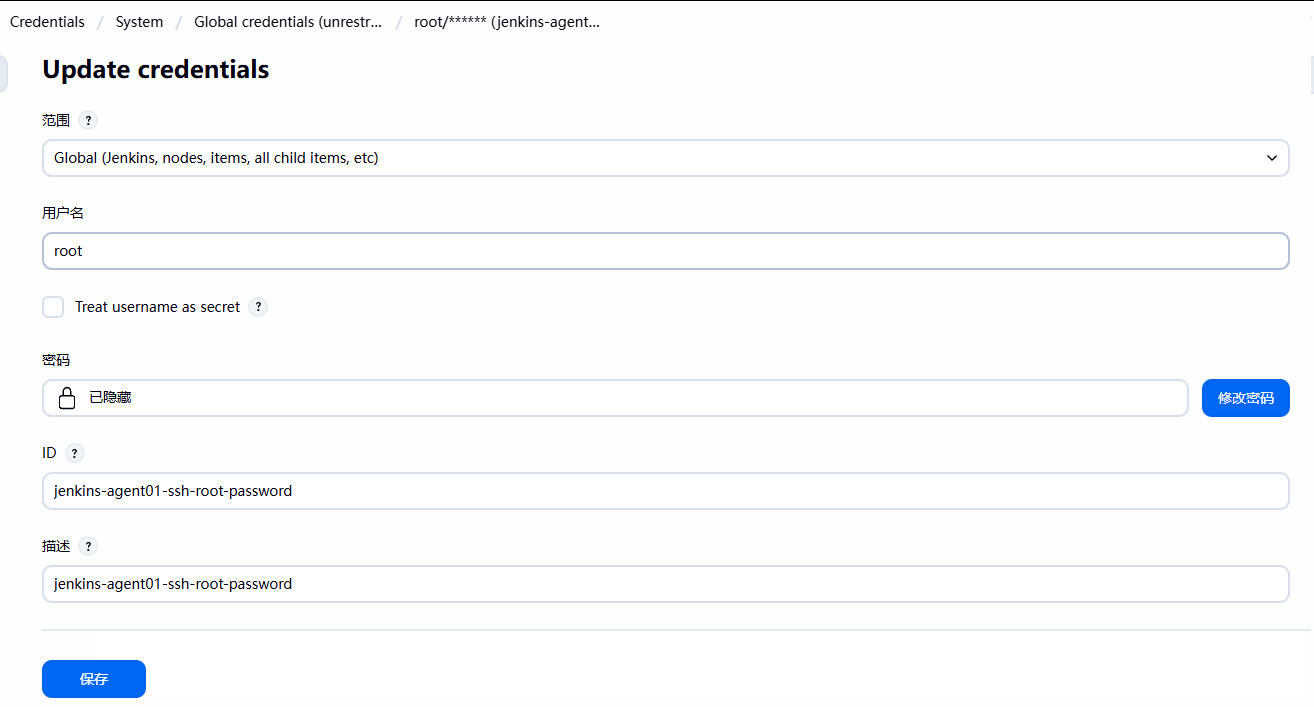
配置凭据
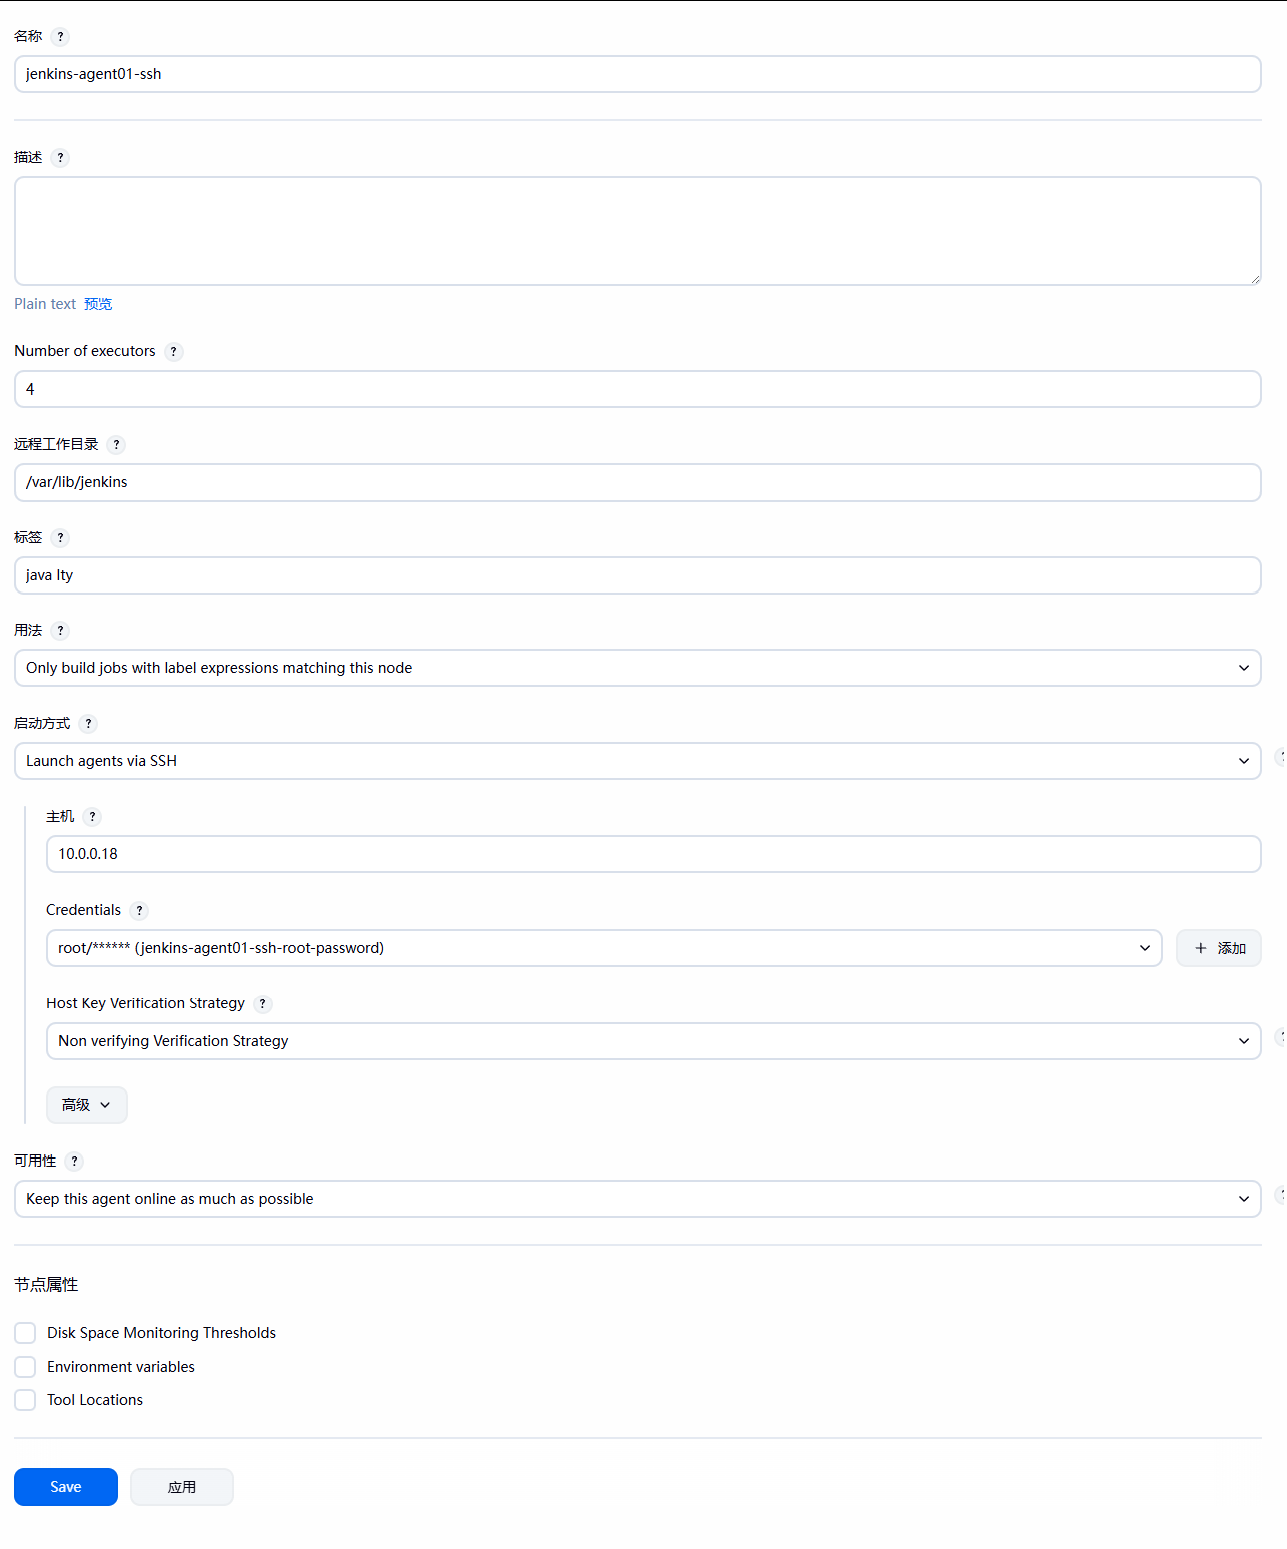
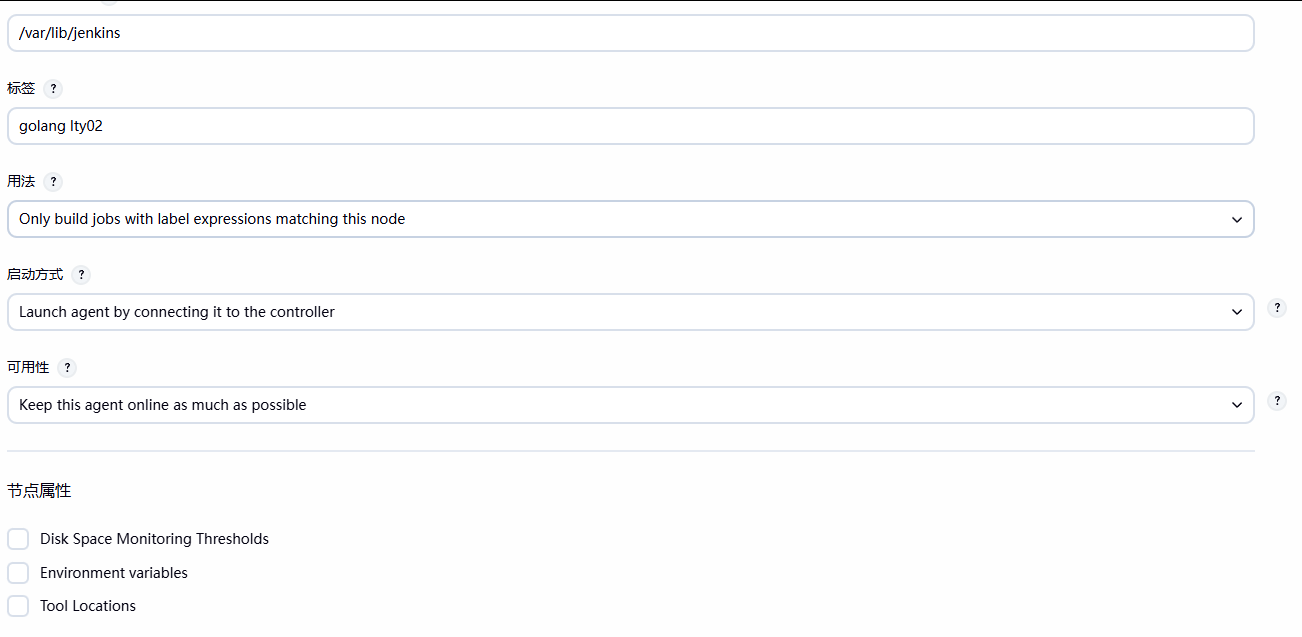
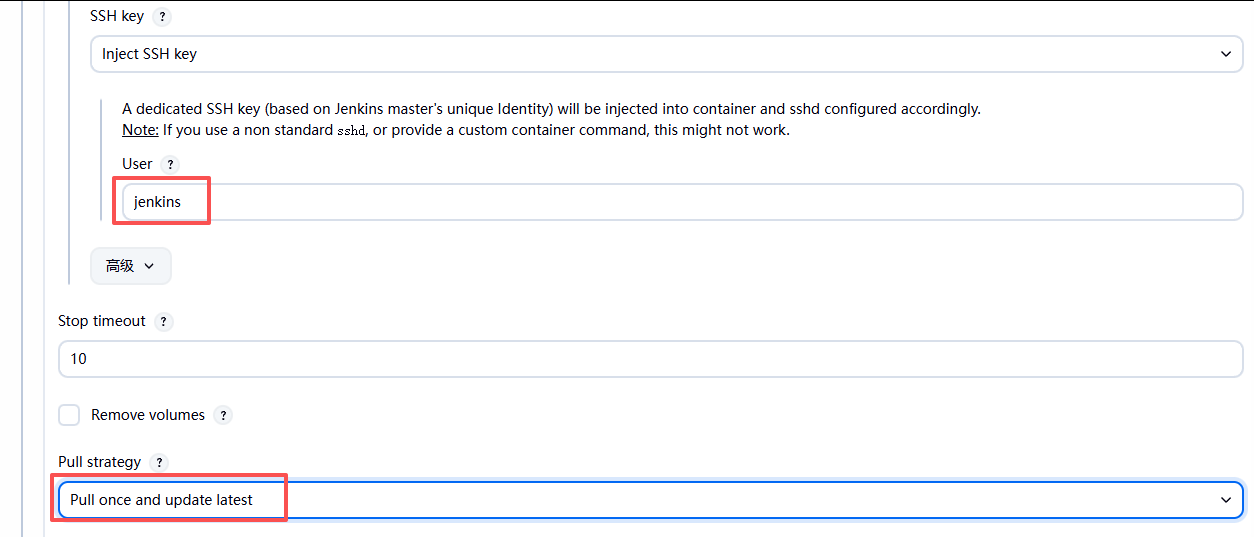
配置从节点

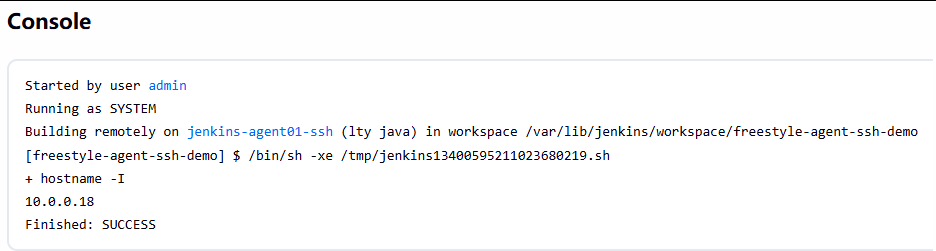
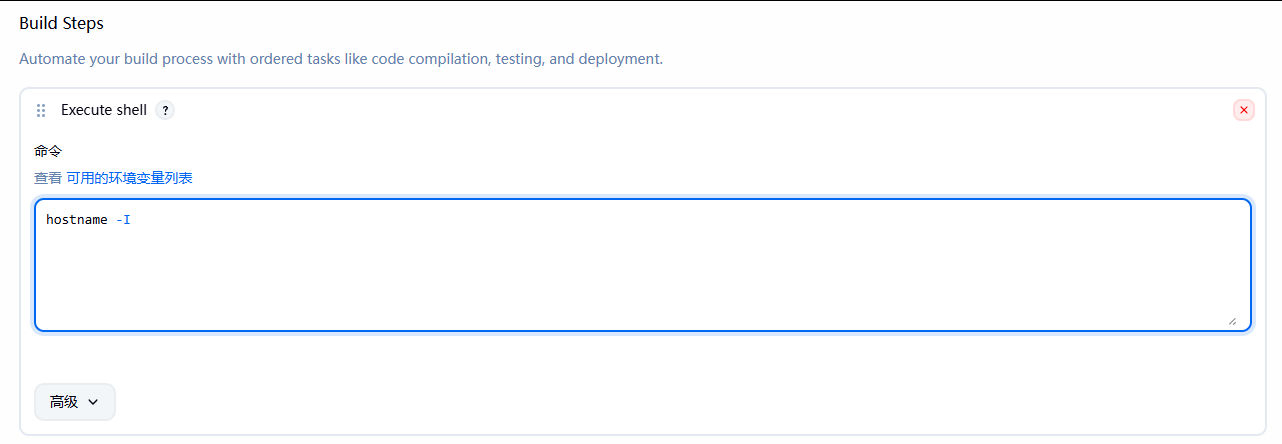
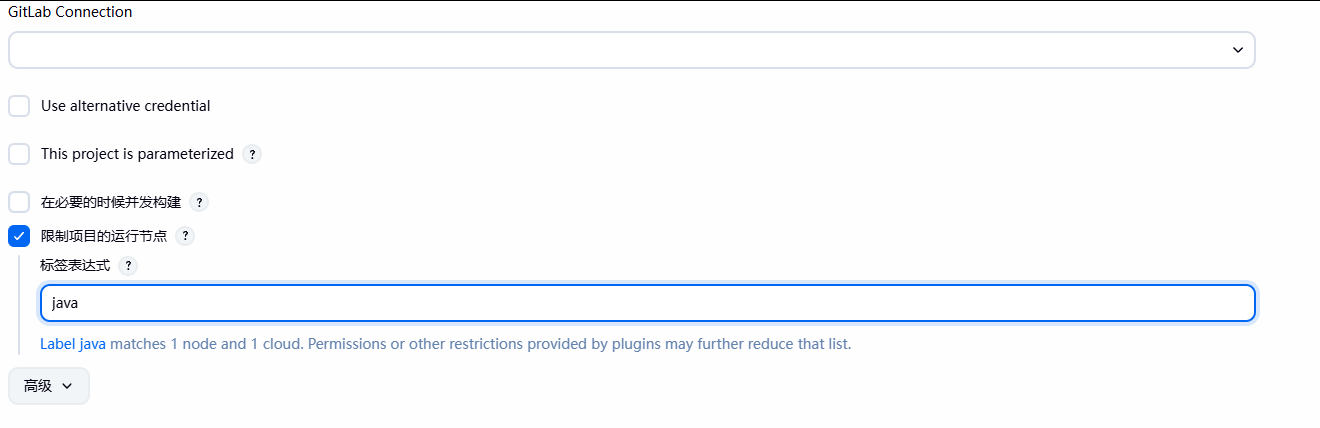
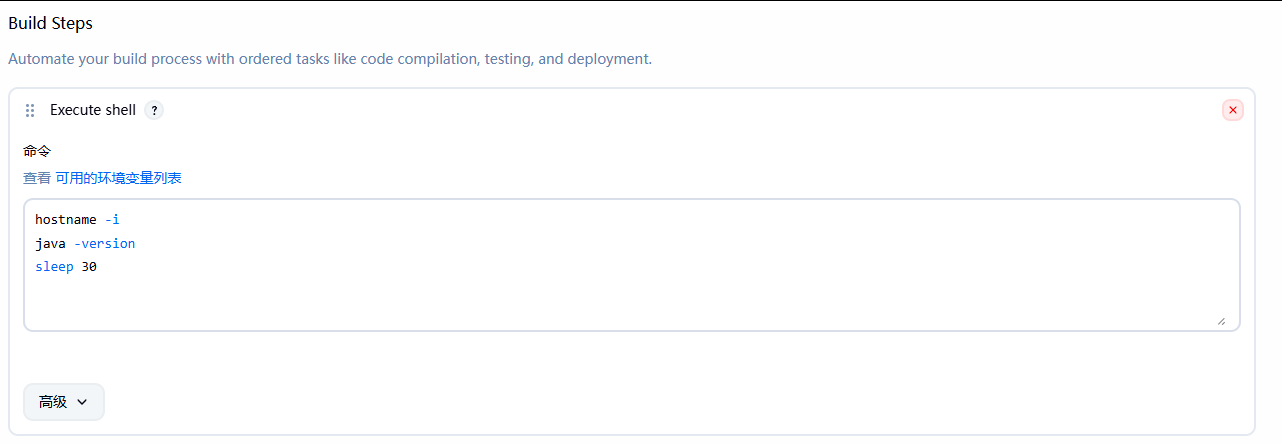
创建一个新的item测试一下
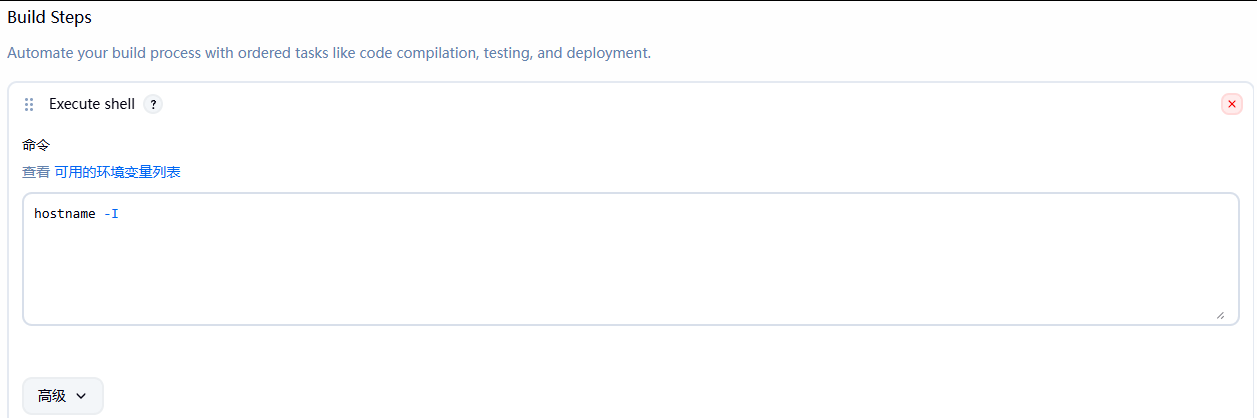
执行构建测试
(二)基于 JNLP协议的 Java Web 启动代理
在JNLP模式下由于是jenkins jnlp agent 去找jenkins master 所以不需要输入详细IP
保存之后根据提示到 agent02 主机上进行相关操作
root@jenkins-agent02:~  curl -sO http://10.0.0.10:8080/jnlpJars/agent.jar
root@jenkins-agent02:~  ls
agent.jar  snap
root@jenkins-agent02:~  java -jar agent.jar -url http://10.0.0.10:8080/ -secret dd2f805da5173914559ca649d81ccc3c88e3e1943eaf11a4a8c46e31ff88105d -name "jenkins-agent02-jnlp" -webSocket -workDir "/var/lib/jenkins"
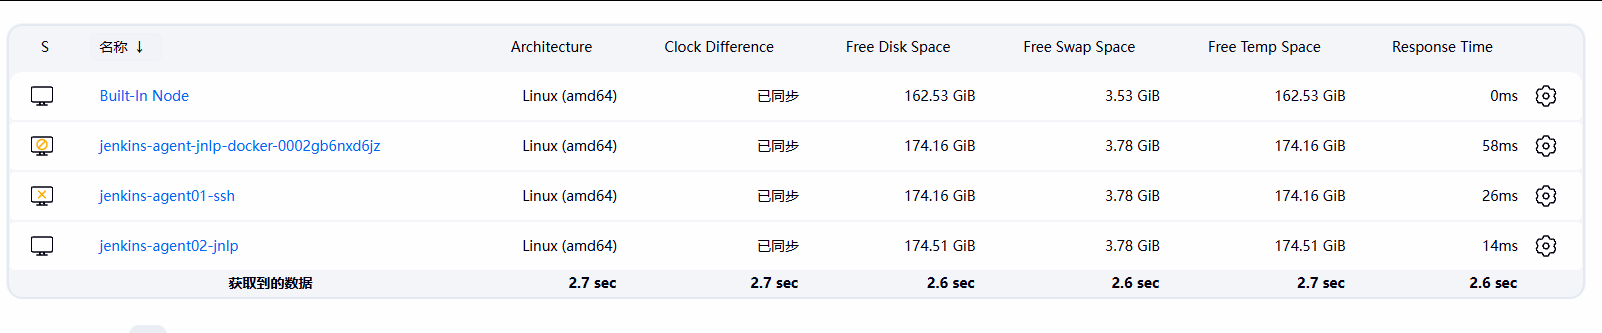
在jenkins主机上查看,连接成功


构建一个新的item测试
构建成功
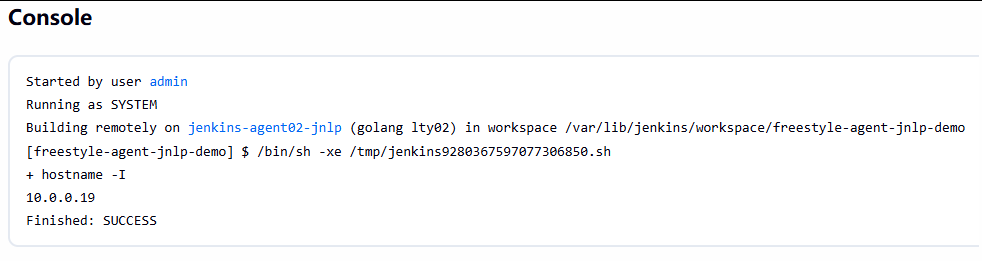
注意:尽量保证 jenkins 主机和其他 agent 的环境要一致
(三)基于Docker的动态Agent
1.http协议
安装docker
apt update && apt -y install docker.io远程 Docker 连接,需要修配下面配置
vim /lib/systemd/system/docker.service
……
ExecStart=/usr/bin/dockerd -H fd:// -H tcp://0.0.0.0:2375 --containerd=/run/containerd/containerd.sock        #加入-H tcp://0.0.0.0:2375 让远程也能连接本机的2375端口
……

重新加载配置并重启
root@jenkins-agent01:~  systemctl daemon-reload
root@jenkins-agent01:~  systemctl restart docker.service

jenkins主机上测试
root@ubuntu10:~  docker -H 10.0.0.18  images
REPOSITORY   TAG       IMAGE ID   CREATED   SIZE
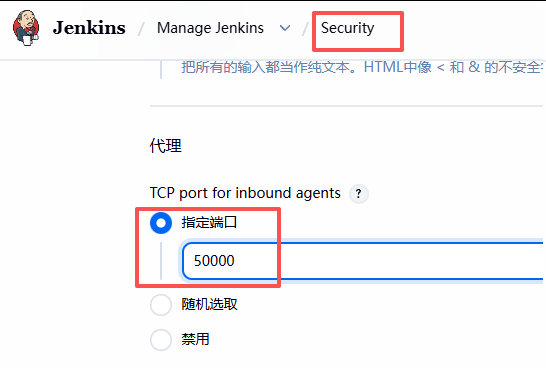
在jenkins中打开50000端口
安装docker插件

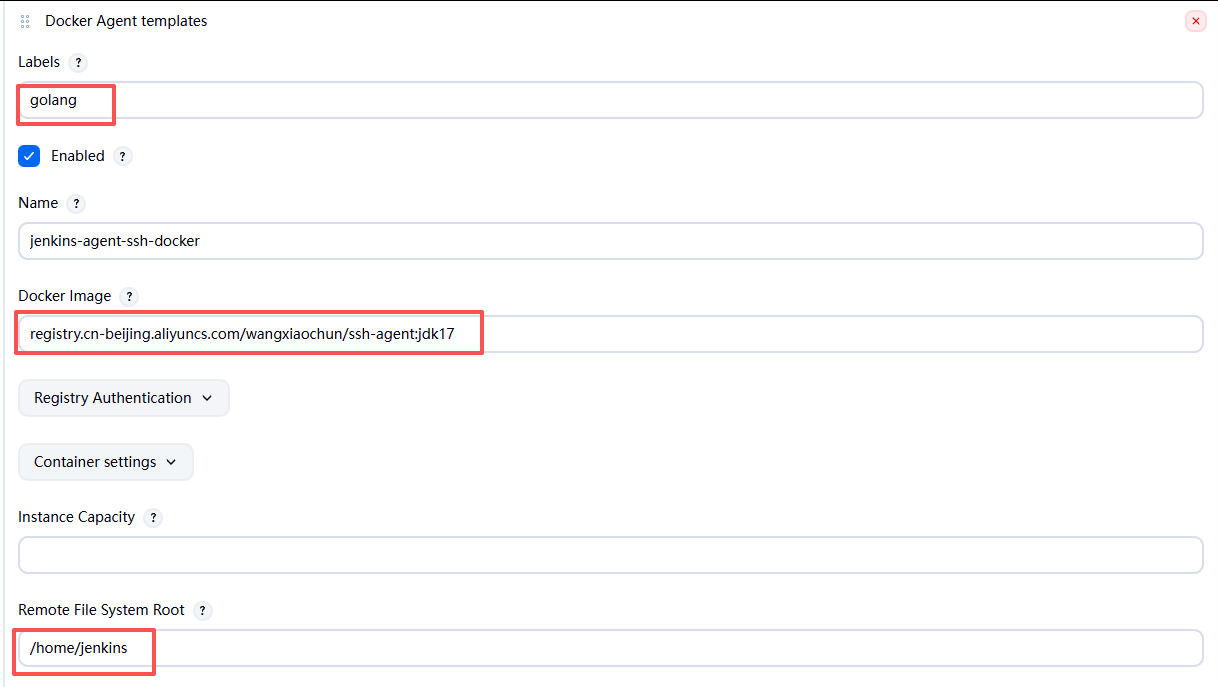
创建clouds
2.配置名称解析(JNLP协议才需要配置)

容器和宿主机的hosts文件不互通,所以在这个地方配置一下;但如果配置了DNS是可以做到域名解析的
新建item测试
构建
临时创建了一个
3.ssh协议
在原有的cloud上面增加
测试


二、 Jenkins Pipeline
Pipeline 是帮助 Jenkins 实现CI到CD转变的重要角色,是运行在 jenkins 2.X 版本的核心插件,简单来说Pipeline就是一套运行于 Jenkins上的工作流框架,将原本独立运行于单个或者多个节点的任务连接起来,实现单个任务难以完成的复杂发布流程,从而实现单个任务很难实现的复杂流程编排和任务可视化
官方帮助:
https://www.jenkins.io/zh/doc/book/pipeline/
https://www.jenkins.io/doc/book/pipeline/
https://www.jenkins.io/2.0/
(一)pipeline语法
官方文档
https://www.jenkins.io/zh/doc/book/pipeline/syntax/
http://www.jenkins.io/doc/book/pipeline/syntax/
http://www.jenkins.io/doc/pipeline/steps/
#支持docker
https://www.jenkins.io/doc/book/pipeline/docker/
分为脚本式和声明式,现在推荐使用声明式
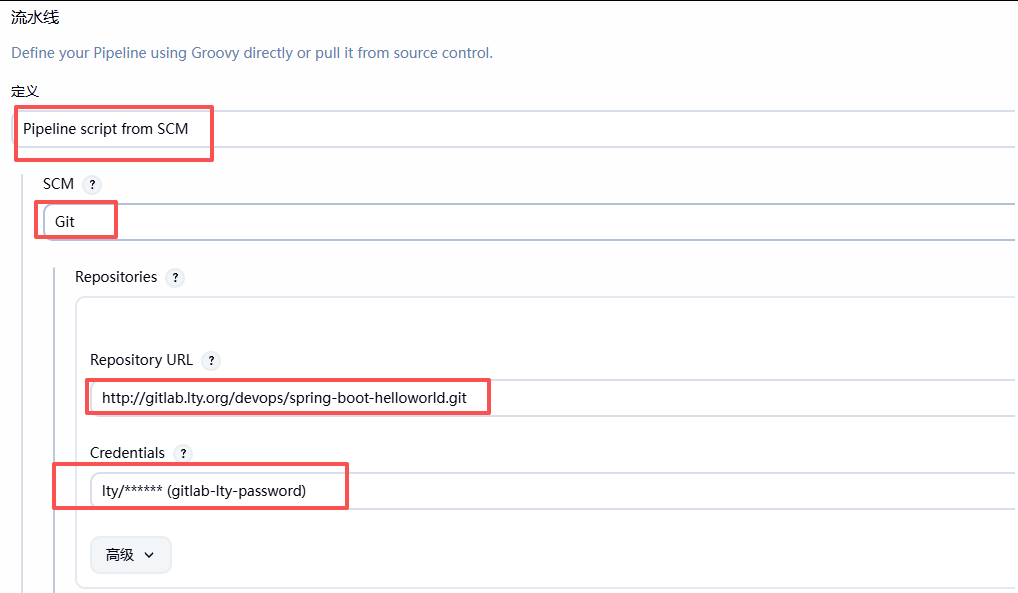
(二)实现一个简单 Pipeline Job
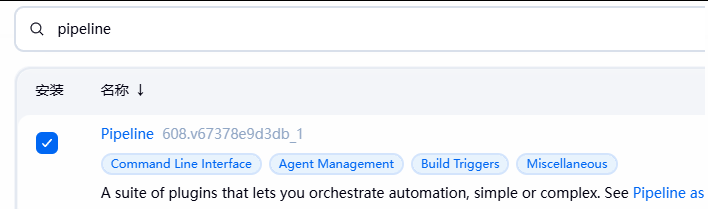
1.安装 Pipeline 插件

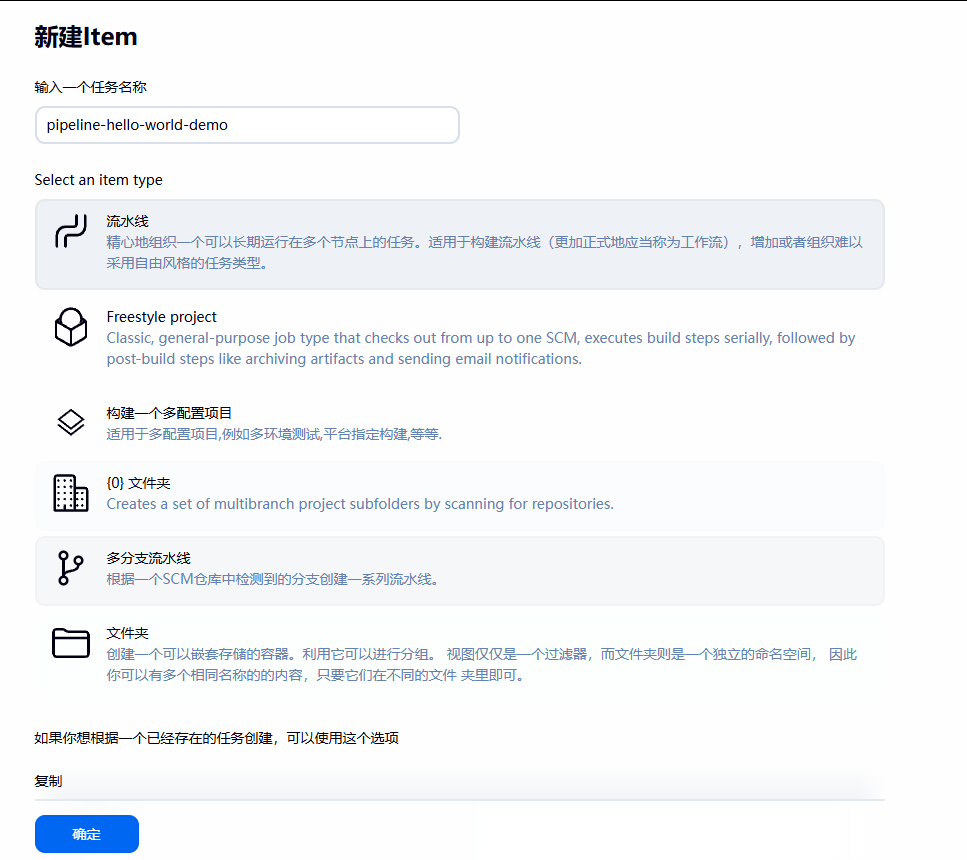
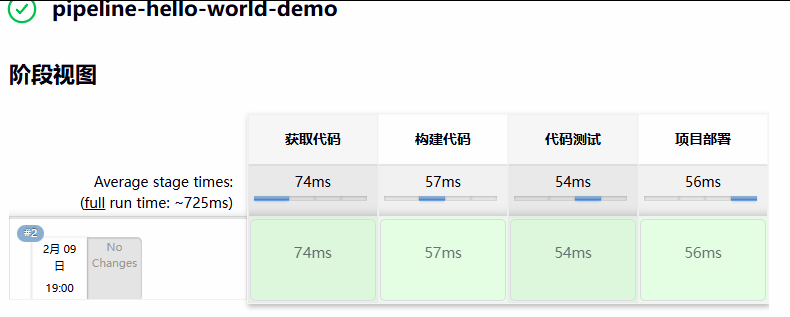
新建一个item
测试一下
pipeline {
    agent any

    environment {
        PROJECT_NAME = 'demo-project'
    }
    stages {
        stage('获取代码') {
            steps {
                echo "【${PROJECT_NAME}】开始拉取代码"
            }
        }
        stage('构建代码') {
            steps {
                echo "【${PROJECT_NAME}】开始构建项目代码"
            }
        }
        stage('代码测试') {
            steps {
                echo "【${PROJECT_NAME}】开始测试项目功能"
            }
        }
        stage('项目部署') {
            steps {
                echo "【${PROJECT_NAME}】开始部署项目"
            }
        }
    }
}
还可以从指定节点开始执行
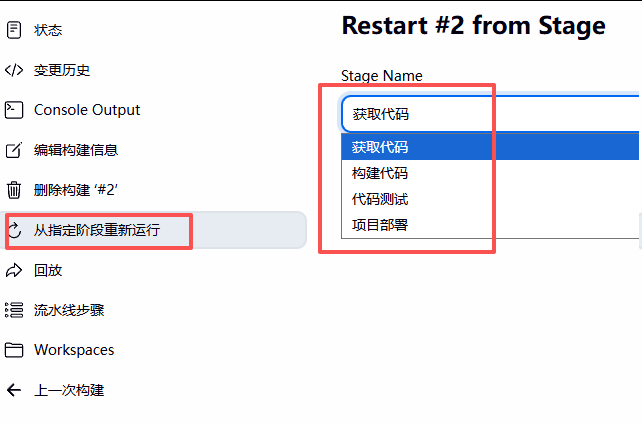
有辅助功能
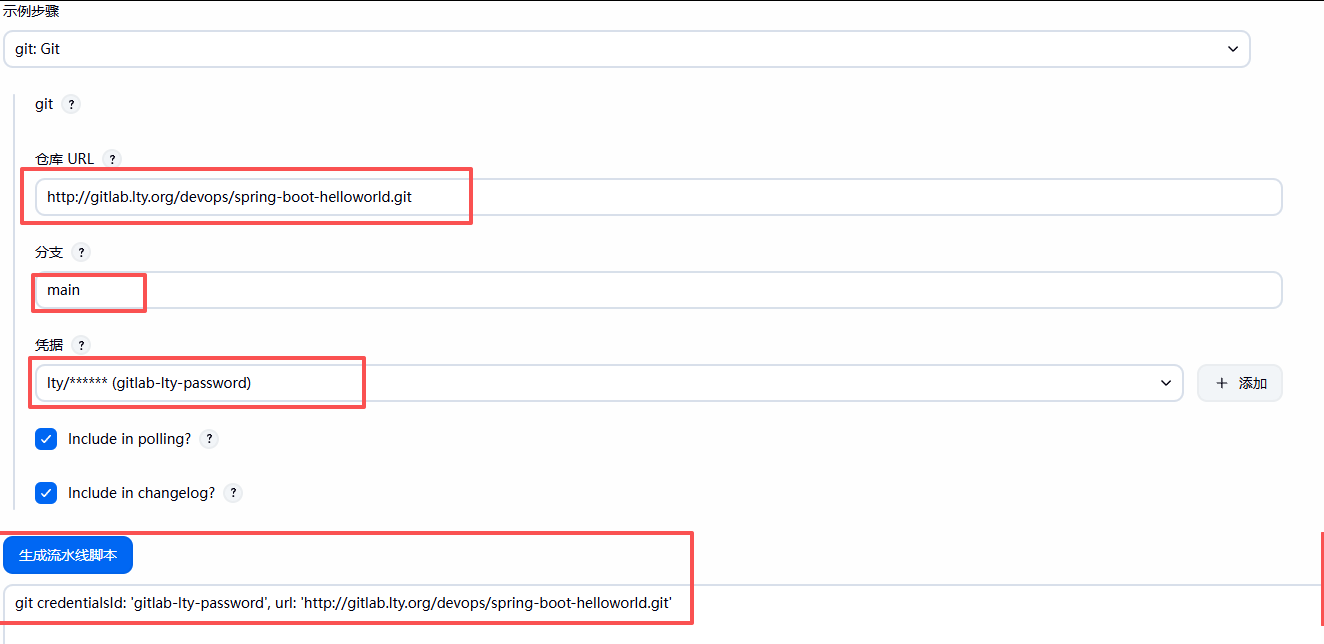
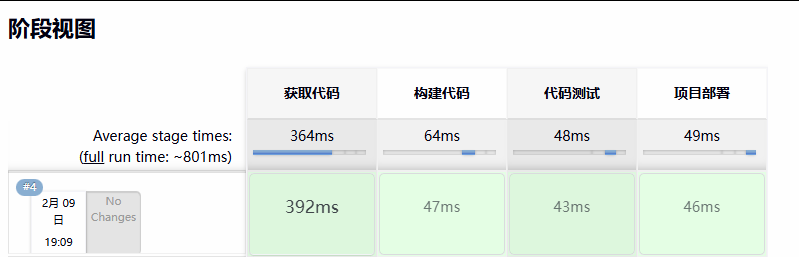
测试一下
pipeline {
    agent any

    environment {
        PROJECT_NAME = 'demo-project'
    }
    stages {
        stage('获取代码') {
            steps {
                echo "【${PROJECT_NAME}】开始拉取代码"
                git branch: 'main', credentialsId: 'gitlab-lty-password', url: 'http://gitlab.lty.org/devops/spring-boot-helloworld.git'
            }
        }
        stage('构建代码') {
            steps {
                echo "【${PROJECT_NAME}】开始构建项目代码"
            }
        }
        stage('代码测试') {
            steps {
                echo "【${PROJECT_NAME}】开始测试项目功能"
            }
        }
        stage('项目部署') {
            steps {
                echo "【${PROJECT_NAME}】开始部署项目"
            }
        }
    }
}
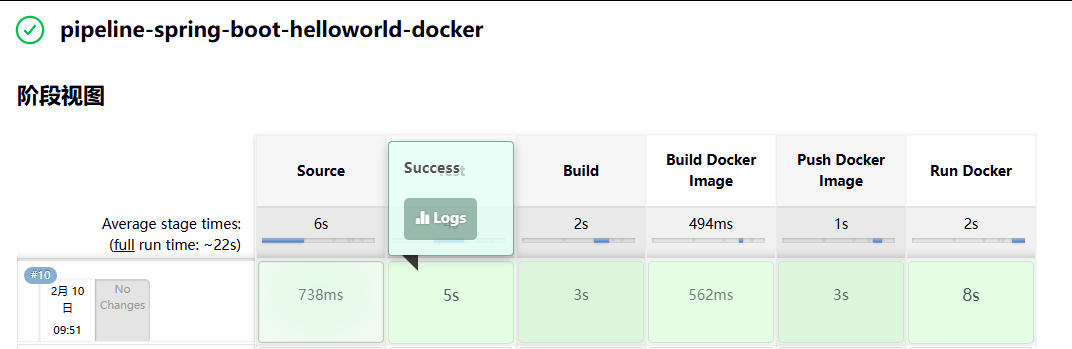
(三)声明式 Pipeline语法
1.变量
引用全局环境变量格式有四种:
${env.ENV_VAR_NAME}
$env.ENV_VAR_NAME
$ENV_VAR_NAME
${ENV_VAR_NAME}
pipeline {
    agent any
    //tools {
    // maven 'maven-3.6.3'
    //}
    environment {
        codeRepo="git@gitlab.lty.org:devops/spring-boot-helloworld.git"
        credential="gitlab-lty-sshkey"
        harborServer='harbor.lty.org'
        projectName='spring-boot-helloworld'
        imageUrl="${harborServer}/example/${projectName}"
        imageTag="${BUILD_ID}"
        harborUserName="admin"
        harborPassword="123456"
    }
    stages {
        stage('Source') {
            steps {
                git branch: 'main', credentialsId: "${credential}", url: "${codeRepo}"
            }
        }
        stage('Test') {
            steps {
                //注意:不要修改hello()函数,否则会导致下面失败
                sh 'mvn test'
            }
        }
        stage('Build') {
            steps {
                //sh 'mvn -B -DskipTests clean package'
                sh 'mvn clean package -Dmaven.test.skip=true'
            }
        }
        stage('Build Docker Image') {
            steps {
                sh 'docker build . -t "${imageUrl}:${imageTag}"'
            }
        }
        stage('Push Docker Image') {
            steps {
                sh "echo ${harborPassword} | docker login -u ${harborUserName} --password-stdin ${harborServer}"
                //sh "docker login -u ${harborUserName} -p ${harborPassword} ${harborServer}"
                sh "docker push ${imageUrl}:${imageTag}"
            }
        }
        stage('Run Docker ') {
            steps {
                sh 'ssh root@10.0.0.11 "docker rm -f ${projectName} ; docker run --name ${projectName} --restart always -p 80:8888 -d ${imageUrl}:${imageTag}"'
                sh 'ssh root@10.0.0.12 "docker rm -f ${projectName} ; docker run --name ${projectName} --restart always -p 80:8888 -d ${imageUrl}:${imageTag}"'
                //sh "docker -H 10.0.0.101 rm -f ${projectName} ; docker -H 10.0.0.101 run --name ${projectName} --restart always -p 80:8888 -d ${imageUrl}:${imageTag}"
                //sh "docker -H 10.0.0.102 rm -f ${projectName} ; docker -H 10.0.0.102 run --name ${projectName} --restart always -p 80:8888 -d ${imageUrl}:${imageTag}"
            }
        }
    }
}
2.使用凭据 Credential
Pipeline 可以将凭据的用户名和密码,分别赋值给各自的变量,方便后续使用
创建一个凭据
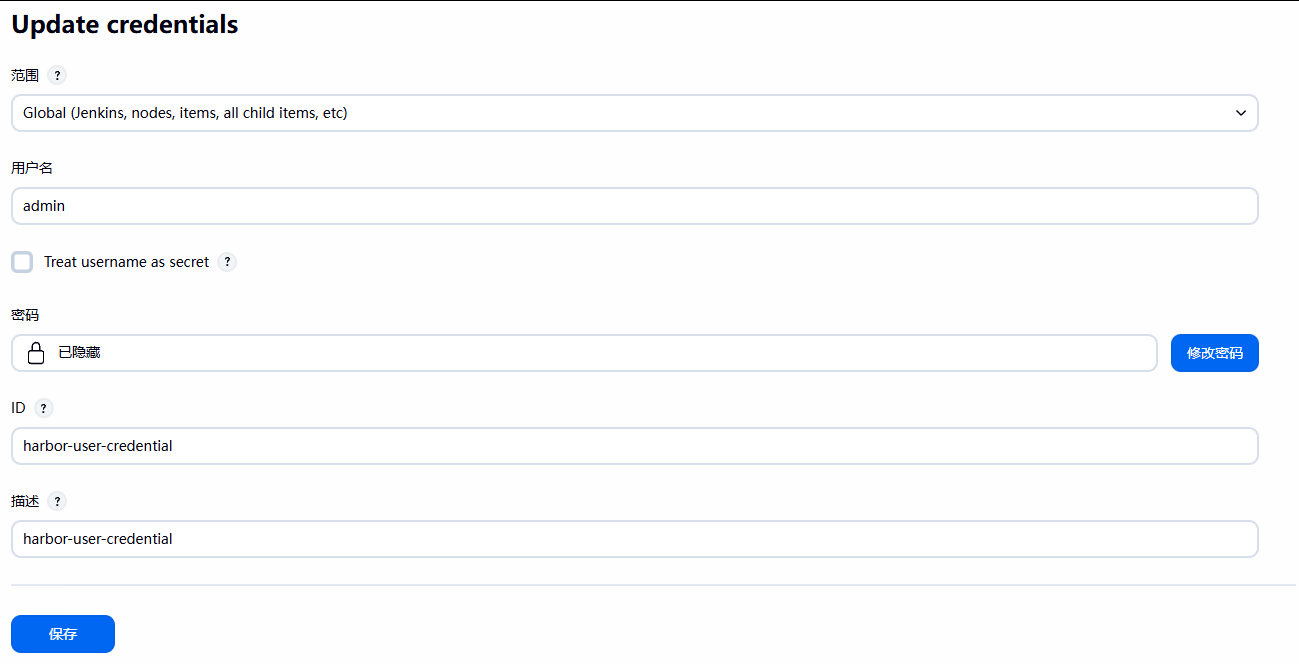
在上方的代码中替换push docker image部分,把开头的账号密码可以删除掉

		withCredentials([usernamePassword(credentialsId: 'harbor-user-credential', \        #指定使用的凭据名
			passwordVariable: 'harborPassword', usernameVariable:'harborUserName')]) {        #这里会从凭据中提取对应的变量
		sh "echo ${harborPassword} | docker login -u ${env.harborUserName} --password-stdin ${harborServer}"    #使用上面的变量进行登录
		//sh "docker login -u ${env.harborUserName} -p
		${harborPassword} ${harborServer}"
		sh "docker push ${imageUrl}:${imageTag}"
		echo "username=${env.harborUserName}"    #尝试一下看不看的到账号密码,生产中不加
		echo "password=${harborPassword}"        #尝试一下看不看的到账号密码,生产中不加
stage('Push Docker Image') {
steps {
//sh "echo ${harborPassword} | docker login -u ${harborUserName} --password-stdin ${harborServer}"
//sh "docker login -u ${harborUserName} -p ${harborPassword} ${harborServer}"
//sh "docker push ${imageUrl}:${imageTag}"
withCredentials([usernamePassword(credentialsId: 'harbor-user-credential', \
passwordVariable: 'harborPassword', usernameVariable:'harborUserName')]) {
sh "echo ${harborPassword} | docker login -u ${env.harborUserName} --password-stdin ${harborServer}"
//sh "docker login -u ${env.harborUserName} -p ${harborPassword} ${harborServer}"
sh "docker push ${imageUrl}:${imageTag}"
echo "username=${env.harborUserName}"
echo "password=${harborPassword}"
}
}
}可以从控制台看到是不会显示账户密码的

3.参数选项和密码
(1)string(字符串类型参数)
字符串类型的参数
parameters {
  string(
    name: 'DEPLOY_ENV',
    defaultValue: 'staging',
    description: 'description demo'
  )
}
(2)text(文本类型参数)
文本类型的参数,支持多行文本(通过\n实现换行)
parameters {
  text(
    name: 'DEPLOY_TEXT',
    defaultValue: 'One\nTwo\nThree\n',
    description: 'description demo'
  )
}
(3)booleanParam(布尔型参数)
布尔型参数,注意:其传递的值实际为 string 类型
parameters {
  booleanParam(
    name: 'DEBUG_BUILD',
    defaultValue: true,
    description: 'description demo'
  )
}
(4)choice(选项型参数)
选项型参数,支持预定义多个可选值
parameters {
  choice(
    name: 'CHOICES',
    choices: ['one', 'two', 'three'],
    description: 'description demo'
  )
}
(5)password(密码参数)
密码类型参数,输入时会自动隐藏明文
parameters {
  password(
    name: 'PASSWORD',
    defaultValue: '123456',
    description: 'Ai secret password'
  )
}
4.交互输入实现确认和取消
input {
    message "should we continue?"
    ok "Yes,we should."
    submitter "user1,user2"
    parameters {string(参数格式)}
}
5.条件判断
node {
    stage('Example ') {
        if(条件值=='匹配内容'){
            echo 'true'
        } else {
            echo 'false'
        }
    }
}
6.并行
pipeline {
    agent any
    stages {
        stage('deploy') {
            parallel {
                stage('deploy_proxy') {
                    steps {
                        echo "部署反向代理服务"
                    }
                }

                stage('deploy_app1') {
                    steps {
                        echo "部署deploy_app1应用"
                    }
                }

                stage('deploy_app') {
                    stages {
                        stage('delete container') {
                            steps {
                                echo "删除旧容器"
                            }
                        }

                        stage('start container') {
                            steps {
                                echo "启动新容器"
                            }
                        }
                    }
                }
            }
        }
    }
}
下载一个blue ocean插件可以看到并行创造
7.触发器
注意:第一次需要手动执行,后续才能生效
pipeline {
agent any
// 触发器配置块
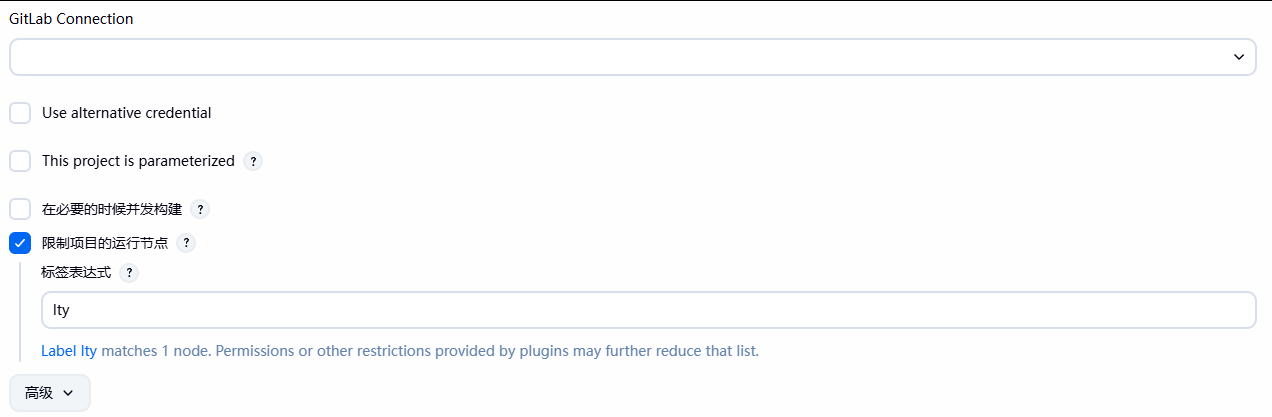
triggers {
gitlab(
triggerOnPush: false,
triggerOnMergeRequest: true,
triggerOnMergeRequestPush: "never",
triggerOnNoteRequest: true,
noteRegex: "jenkins please retry a build",
skipWorkInProgressMergeRequest: true,
ciSkip: false,
setBuildDescription: true,
addNoteOnMergeRequest: true,
addCiMessage: true,
addVoteOnMergeRequest: true,
acceptMergeRequestOnSuccess: false,
branchFilterType: "NameBasedFilter",
includeBranchesSpec: "release/qa/*",
excludeBranchesSpec: "",
pendingBuildName: "Jenkins",
cancelPendingBuildOnUpdate: false,
secretToken: "62dad2c1d9ae62686daadc4cdoae66"
)
}
stages {
// 此处可添加你的流水线阶段(如之前的deploy等)
stage('Example') {
steps {
echo "Pipeline triggered by GitLab events"
}
}
}
}(四)jenkinsfile
代码放在交互页面容易被破坏,可以通过上传到仓库进行备份
新建一个item
在客户机上建立一个jenkinsfile文件,把自己的代码放进去,提交到仓库;执行之后会自动从仓库中调用其中的jenkinsfile文件去构建项目
三、Jenkins 权限管理
默认情况下的选项安全度几乎没有

安装角色权限相关的插件
Role-based Authorization Strategy 安装这个插件;安装完成后会多出一个基于角色的安全选项
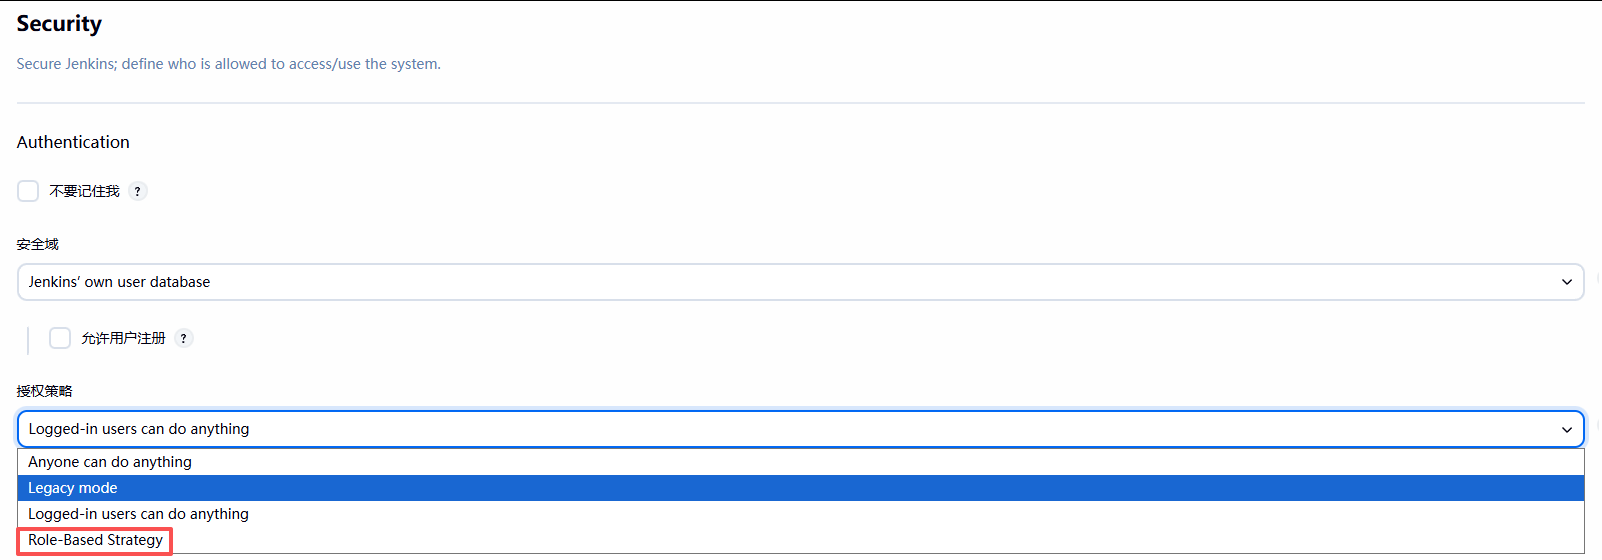
登录 liao 账号

可以配置这个角色可以拥有那些权限
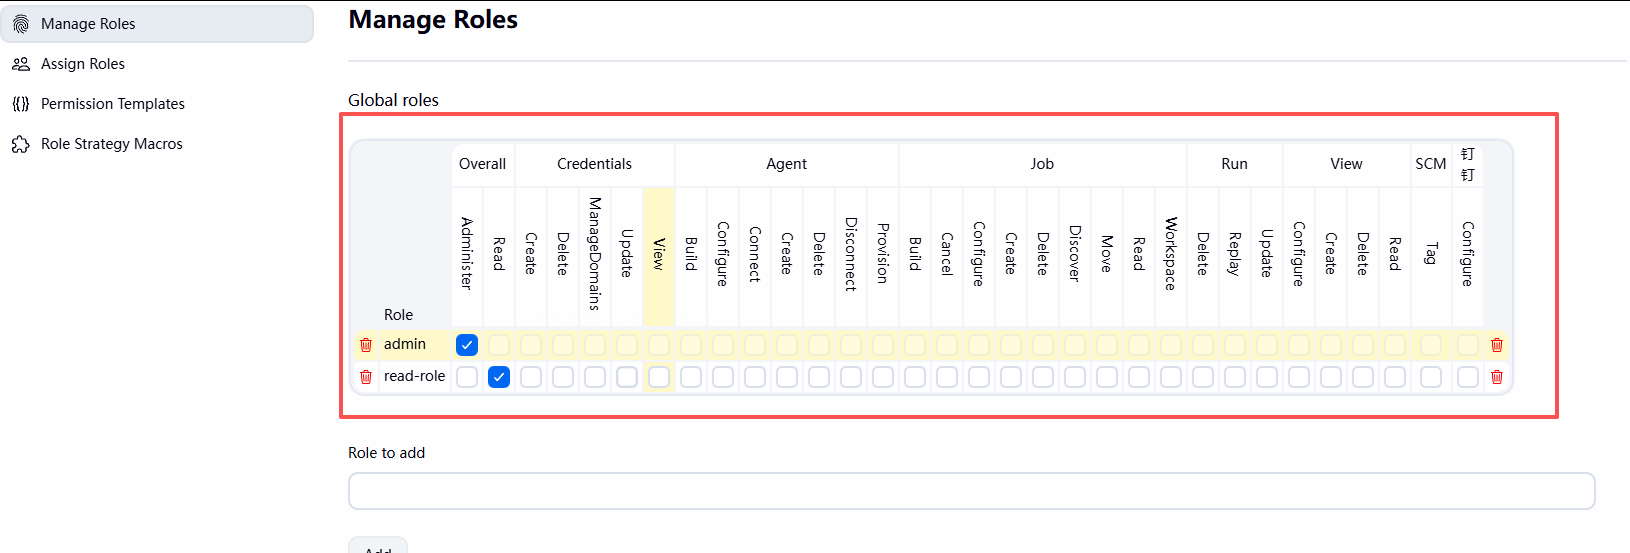
1.全局角色
基于jenkins的权限

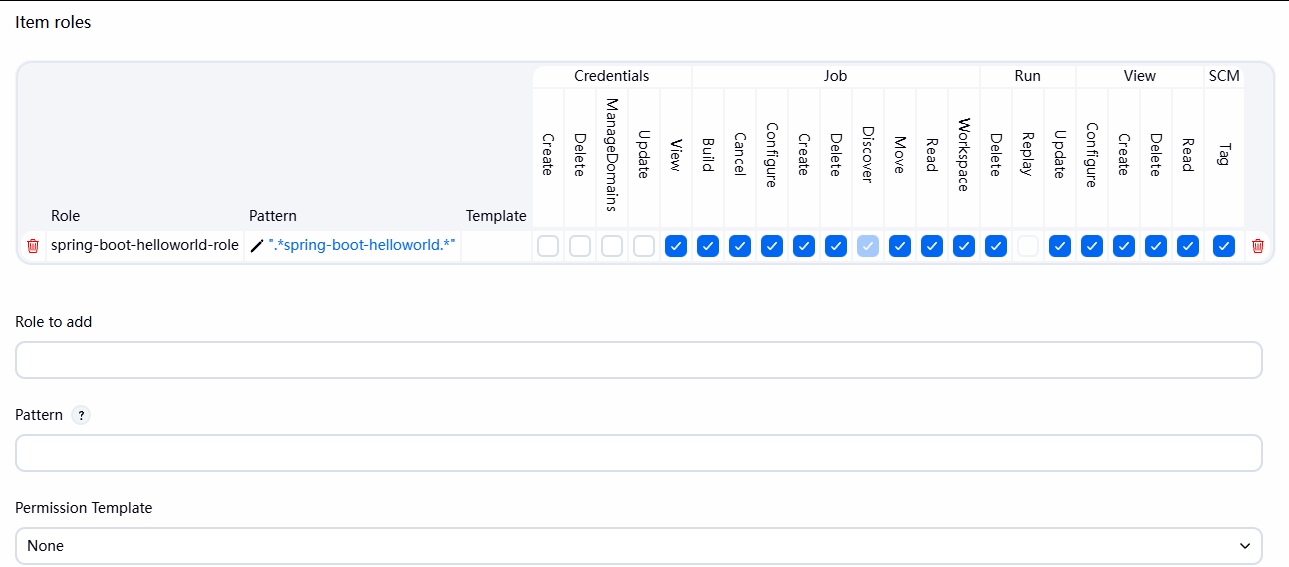
2.项目角色
给这个角色查看某些任务的权限,使用正则表达式
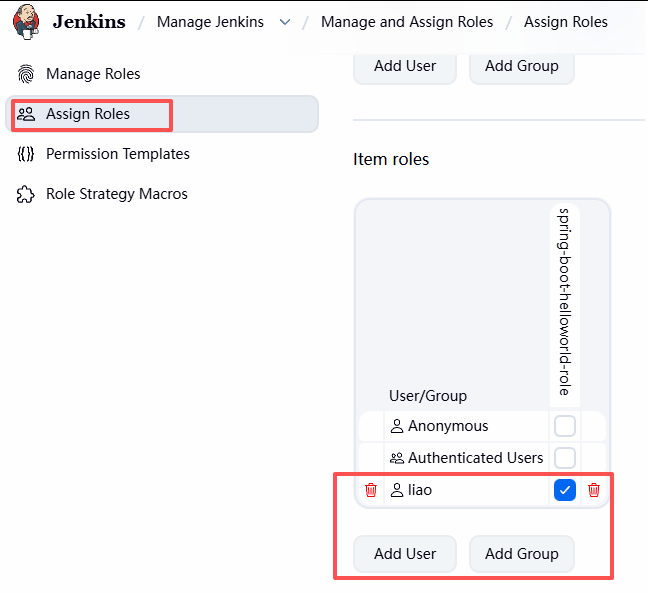
登录liao账号
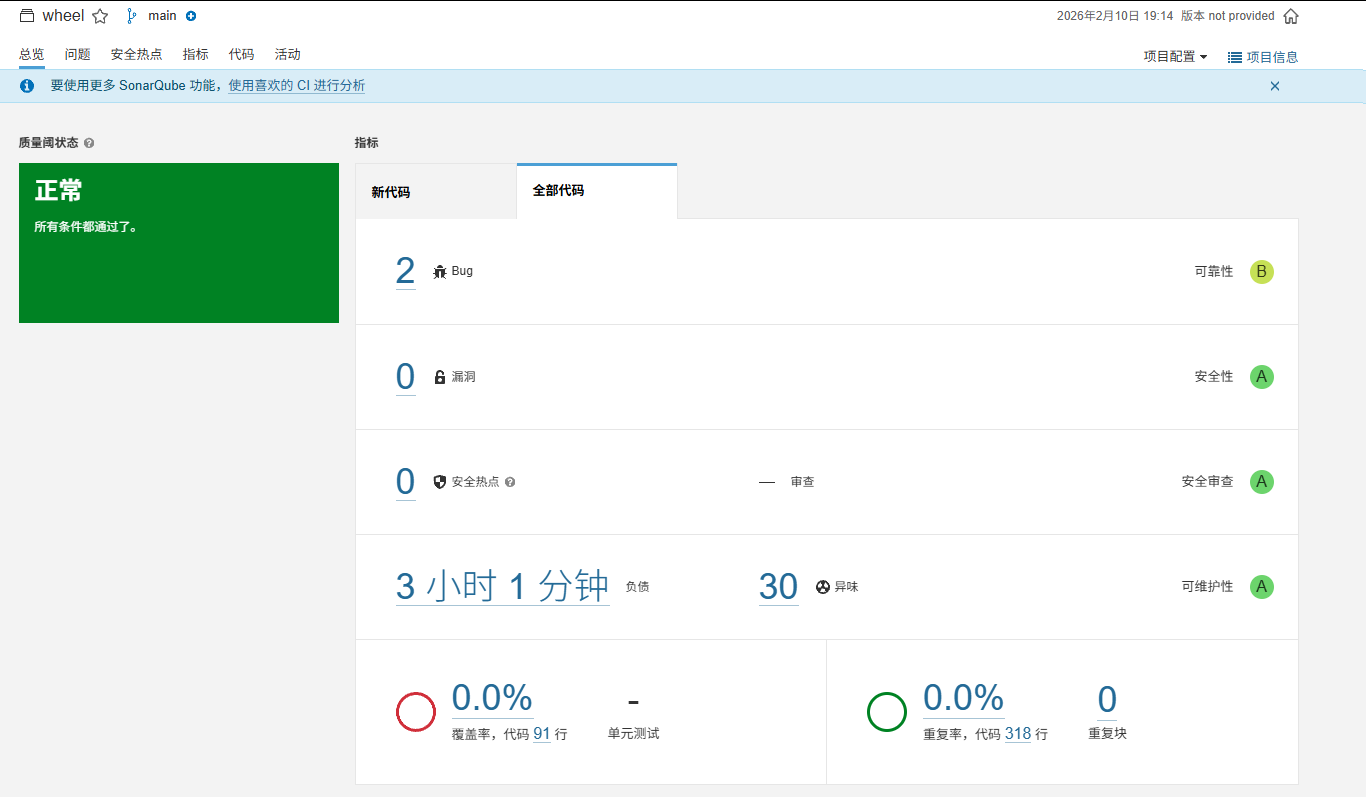
四、代码质量检测 SonarQube
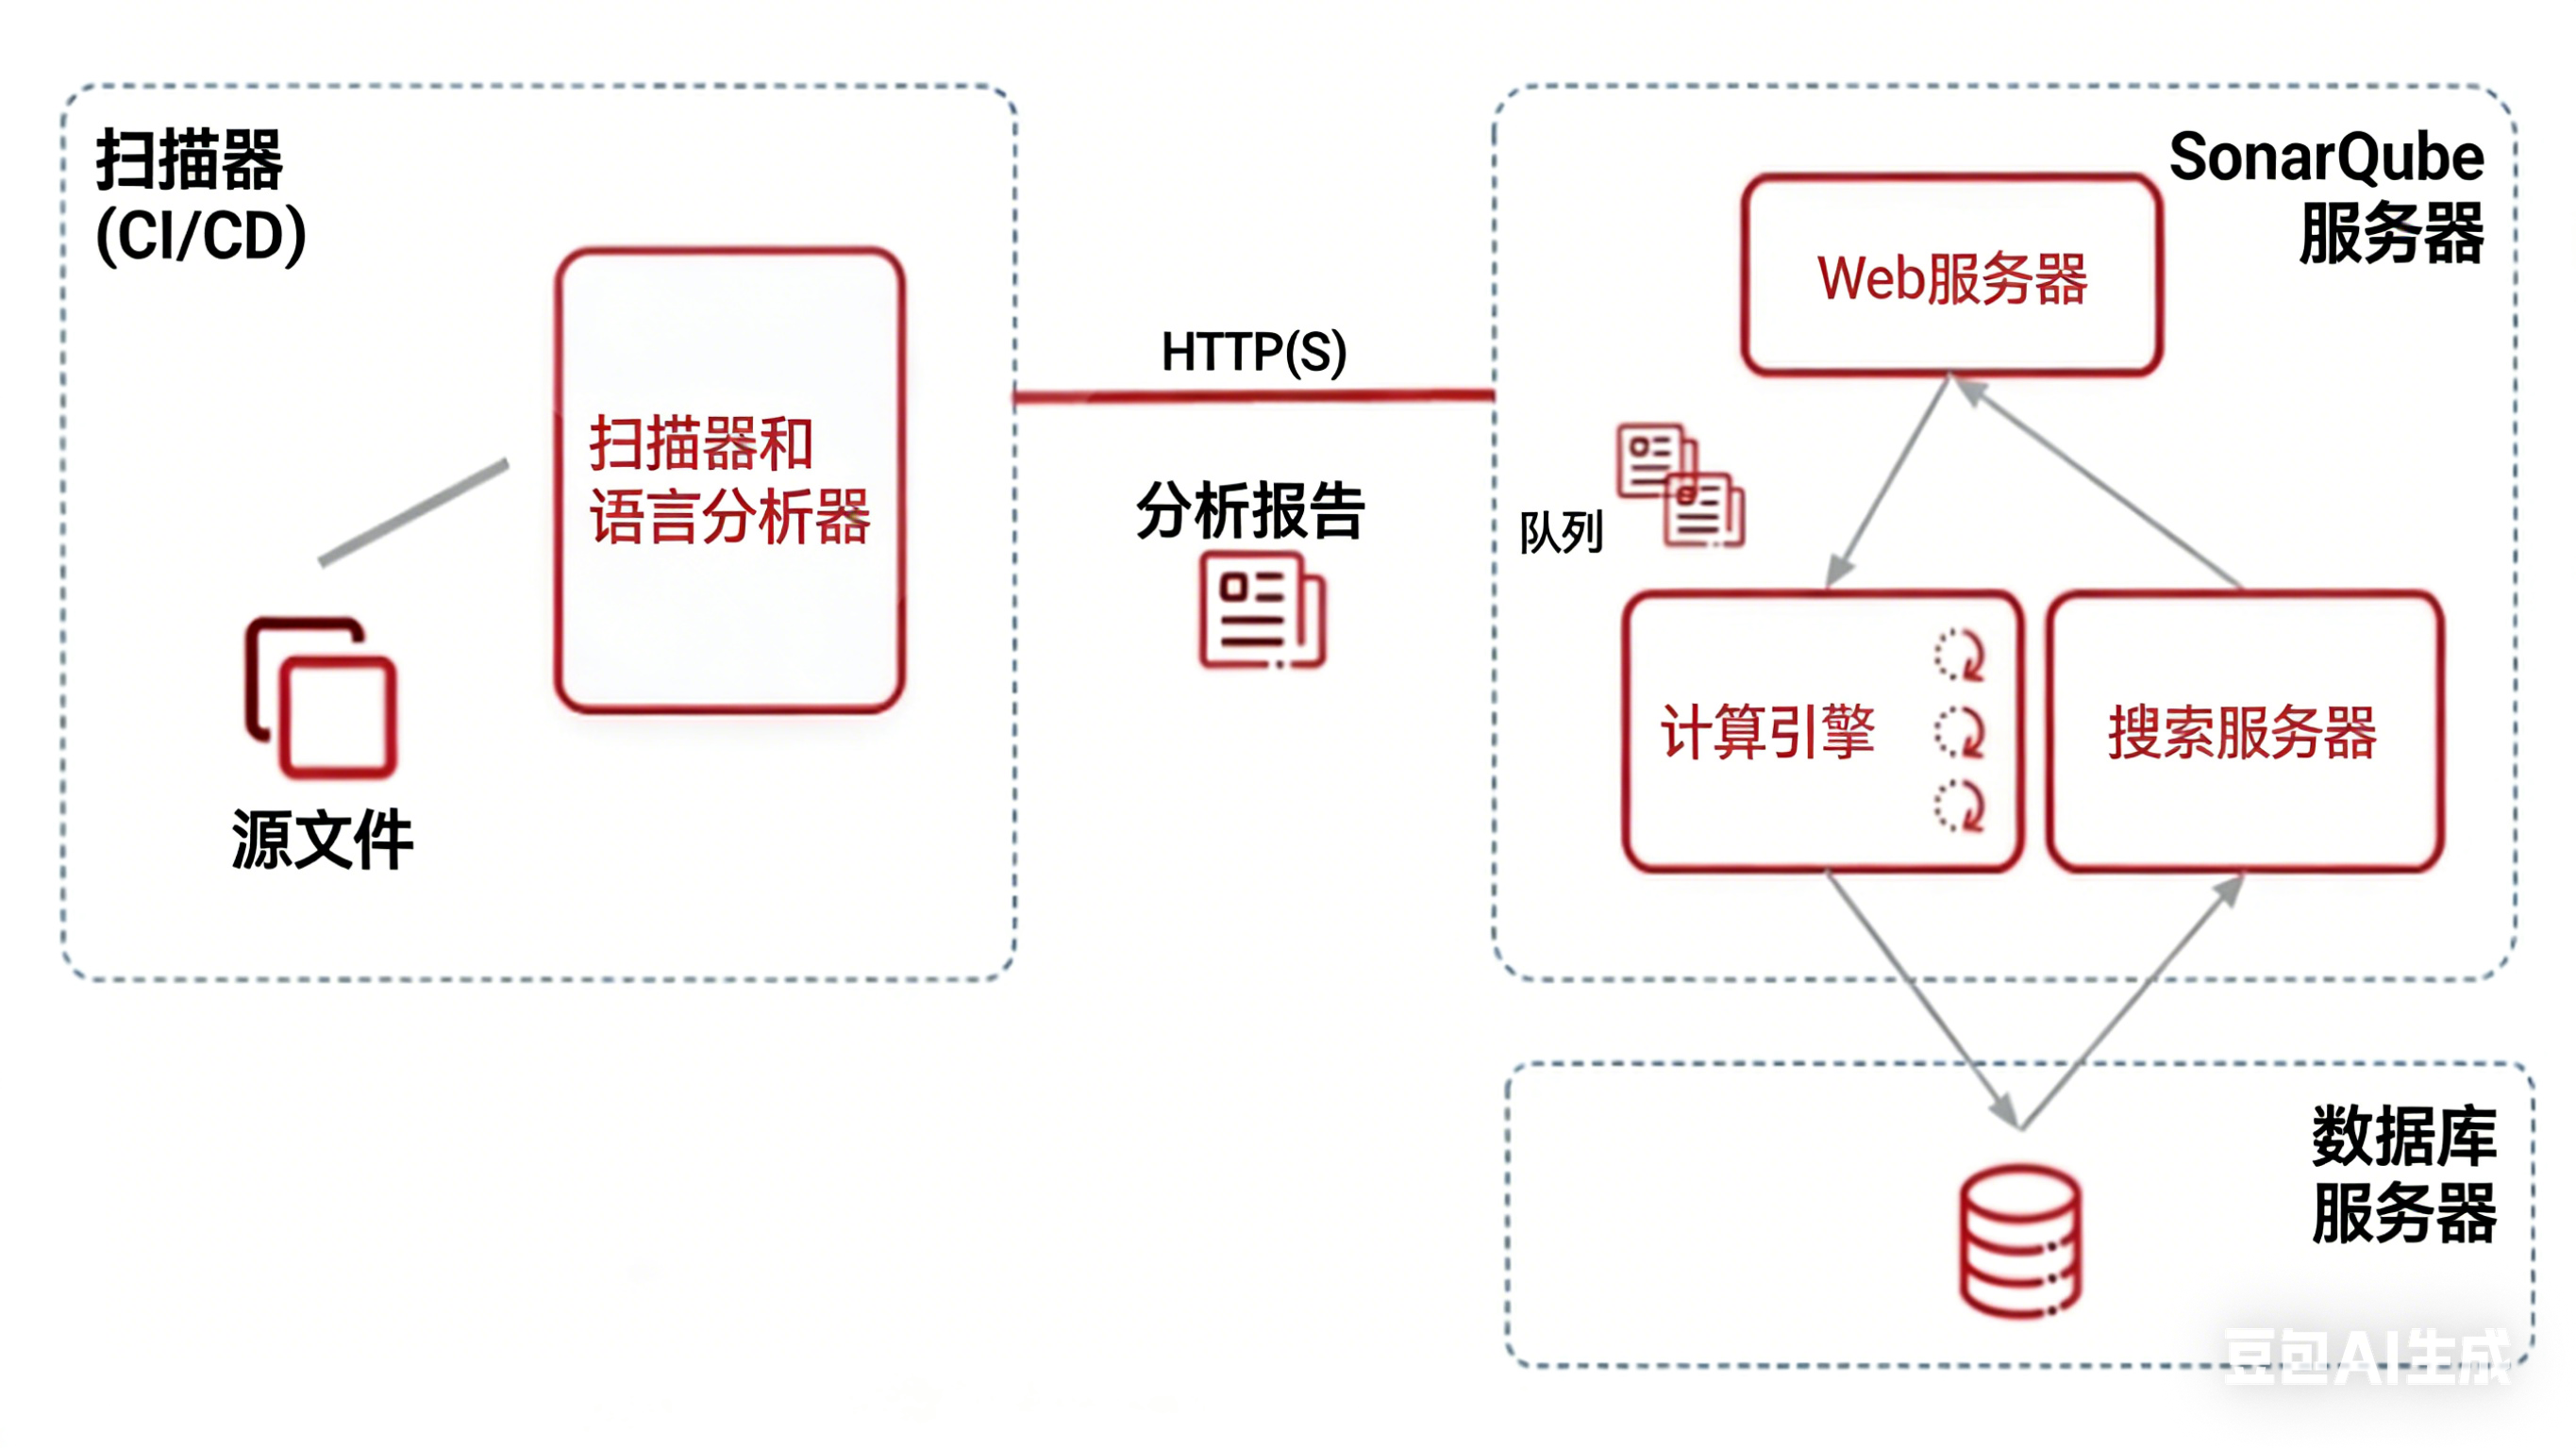
(一) SonarQube 架构
(二)安装环境准备
官网下载长期支持版,社区版下载最新的9.9:https://binaries.sonarsource.com/Distribution/sonarqube/sonarqube-9.9.8.100196.zip
1.硬件要求
官方文档:
https://docs.sonarsource.com/sonarqube-server/9.9/requirements/prerequisites-and-overview/
https://docs.sonarqube.org/8.9/requirements/requirements/
https://docs.sonarqube.org/7.9/requirements/requirements/
2.系统内核优化
官方文档:
https://docs.sonarsource.com/sonarqube/latest/setup-and-upgrade/pre-installation/linux/
https://docs.sonarsource.com/sonarqube/9.9/requirements/prerequisites-and-overview/
https://docs.sonarqube.org/latest/requirements/prerequisites-and-overview/
3.创建用户和修改内核配置
#Ubuntu24.04,此文件可不改,默认已满足要求
[root@ubuntu2404 ~]#sysctl vm.max_map_countvm.max_map_count = 1048576
[root@ubuntu2404 ~]#sysctl fs.file-maxfs.file-max = 9223372036854775807
#Ubuntu22.04 需要修改
[root@sonarqube-server ~]#vim /etc/sysctl.conf
vm.max_map_count=262144 #此项必须修改,否则无法启动,ubuntu22.04 默认值为 65530,需要修改
fs.file-max=65536 #此项可不改,默认值满足要求,ubuntu22.04 默认值为 9223372036854775807
#Ubuntu22.04,此文件需要修改,可选
[root@sonarqube-server ~]# vim /etc/security/limits.conf
sonarqube - nofile 131072
sonarqube - nproc 8192
注意:当前Sonarqube-9.9.8.100196不支持Ubuntu24.04内置的PostGreSQL-16
(三)安装JAVA并创建sonarqube用户
apt update && apt -y install openjdk-17-jdk创建sonarqube用户
#使用普通账户启动sonarqube,因为sonarqube内置了ES,所以不允许 root 启动
#Ubuntu使用useradd创建用户时默认使用/bin/sh,并且不创建家目录root@ubuntu20:/home/tpc/soft/postgresql-15.10 useradd -s /bin/bash -m sonarqube root@ubuntu20:/home/tpc/soft/postgresql-15.10 getent passwd sonarqube sonarqube:x:1001:1001::/home/sonarqube:/bin/bash
(四)安装PostgreSQL
1.在ubuntu10.0.0.20上面安装PostgreSQL
用源码安装15版:PostgreSQL: File Browser
官方安装手册:PostgreSQL:文档:15:17.4。安装程序
我们下载包,放在/home/tpc/soft目录下,进行解压:
root@ubuntu20:~  mkdir /home/tpc/soft -p
root@ubuntu20:~  cd /home/tpc/soft
root@ubuntu20:/home/tpc/soft  ls
postgresql-15.10.tar.gz
root@ubuntu20:/home/tpc/soft  tar -zxvf postgresql-15.10.tar.gz
2.编译安装
我们把需要的组件包进行安装
root@ubuntu20:/home/tpc/soft  apt update && sudo apt install -y \
gcc \
make \
libreadline-dev \
zlib1g-dev \
libssl-dev \
libpam0g-dev \
libxml2-dev \
libxslt1-dev \
libperl-dev \
python3-dev \
tcl-dev \
libicu-dev
执行 configure 脚本
#默认安装到/usr/local/pgsql
./configure CC=gcc

# 可选:自定义安装路径(比如/opt/pgsql-15.10)
# ./configure CC=gcc --prefix=/opt/pgsql-15.10
编译:进入源码目录执行make或者make all
最后执行 make install 安装
安装完成后,执行以下命令验证:
# 默认安装路径下查看PostgreSQL版本
root@ubuntu20:/home/tpc/soft/postgresql-15.10  /usr/local/pgsql/bin/postgres --version
postgres (PostgreSQL) 15.10
3.建立service文件
root@ubuntu20:/usr/local/pgsql  vim /etc/systemd/system/postgresql.service
[Unit]
Description=PostgreSQL Database Server
After=network.target

[Service]
Type=simple
User=postgres
Group=postgres
ExecStart=/usr/local/pgsql/bin/postgres -D /usr/local/pgsql/data
ExecReload=/bin/kill -HUP $MAINPID
TimeoutSec=300

[Install]
WantedBy=multi-user.target
创建需要的文件
root@ubuntu20:/usr/local/pgsql  mkdir -p /var/lib/postgresql/15/data
root@ubuntu20:/usr/local/pgsql  chown postgres:postgres /var/lib/postgresql/15/data
root@ubuntu20:/usr/local/pgsql  chmod 700 /var/lib/postgresql/15/data
root@ubuntu20:/usr/local/pgsql  /usr/local/pgsql/bin/initdb -D /var/lib/postgresql/15/data
4.创建postgresql用户初始化数据库
root@ubuntu20:/usr/local/pgsql  groupadd -r postgres
root@ubuntu20:/usr/local/pgsql  useradd -r -g postgres -s /bin/bash -d /var/lib/postgres -m -c "PostgreSQL Server" postgres
root@ubuntu20:/usr/local/pgsql  id postgres
uid=997(postgres) gid=984(postgres) 组=984(postgres)

进入postgres用户中去执行初始化,root身份不允许
root@ubuntu20:/usr/local/pgsql  su postgres
postgres@ubuntu20:/usr/local/pgsql$ /usr/local/pgsql/bin/initdb -D /usr/local/pgsql/data
5.启动
root@ubuntu20:/usr/local/pgsql  systemctl daemon-reload
root@ubuntu20:/usr/local/pgsql  systemctl enable postgresql
Created symlink /etc/systemd/system/multi-user.target.wants/postgresql.service → /etc/systemd/system/postgresql.service.
root@ubuntu20:/usr/local/pgsql  systemctl start postgresql
root@ubuntu20:/usr/local/pgsql  systemctl status postgresql
● postgresql.service - PostgreSQL Database Server
     Loaded: loaded (/etc/systemd/system/postgresql.service; enabled; preset: enabled)
     Active: active (running) since Tue 2026-02-10 16:49:41 CST; 4s ago
……
6.配置
修改监听地址支持远程连接,我这里的sonarqube和PostgreSQL在同一台主机,可不做修改
包安装的路径
vim /etc/postgresql/16/main/postgresql.conf

根据上面定义的路径
vim /usr/local/pgsql/data/postgresql.conf

# - Connection Settings -

listen_addresses = '*'                  #改成 *
#listen_addresses = 'localhost'         # what IP address(es) to listen on;
                                        # comma-separated list of addresses;

root@ubuntu20:/usr/local/pgsql/data  systemctl restart postgresql.service
root@ubuntu20:/usr/local/pgsql/data  ss -tnulp
Netid      State       Recv-Q      Send-Q           Local Address:Port              Peer Address:Port      Process
……
tcp        LISTEN      0           244                       [::]:5432                      [::]:*          users:(("postgres",pid=44514,fd=6))
……
开启远程访问
包安装的路径
vim /etc/postgresql/16/main/postgresql.conf

根据上面定义的路径
vim /usr/local/pgsql/data/pg_hba.conf
……
# Allow replication connections from localhost, by a user with the
# replication privilege.
local   replication     all                                     trust
host    replication     all             127.0.0.1/32            trust
host    replication     all             ::1/128                 trust
host    replication     all             0.0.0.0/0               trust


root@ubuntu20:/usr/local/pgsql/data  systemctl restart postgresql
root@ubuntu20:/usr/local/pgsql/data  ss -ntl|grep 5432
LISTEN 0      244          0.0.0.0:5432      0.0.0.0:*
LISTEN 0      244             [::]:5432         [::]:*
7.创建数据库和用户授权
root@ubuntu20:/usr/local/pgsql/data  su - postgres
postgres@ubuntu20:~$ alias psql='/usr/local/pgsql/bin/psql'            #我是编译安装的需要设置一下路径,包安装不用
postgres@ubuntu20:~$ psql -U postgres
psql (15.10)
Type "help" for help.

#创建用户和数据库并授权
postgres=# CREATE USER sonarqube WITH ENCRYPTED PASSWORD '123456';
CREATE ROLE
# OWNER sonarqube可选
postgres=# CREATE DATABASE sonarqube OWNER sonarqube;
CREATE DATABASE
# 授权
postgres=# GRANT ALL PRIVILEGES ON DATABASE sonarqube TO sonarqube;
GRANT
#前面如果已经指定数据库的OWNER,则可以不执行下面命令,可选
postgres=# ALTER DATABASE sonarqube OWNER TO sonarqube;
ALTER DATABASE
#查看数据库是否创建,相当于MySQL中 show databases;
postgres=# \l
                                                   List of databases
   Name    |   Owner   | Encoding |   Collate   |    Ctype    | ICU Locale | Locale Provider |    Access privileges
-----------+-----------+----------+-------------+-------------+------------+-----------------+-------------------------
 postgres  | postgres  | UTF8     | zh_CN.UTF-8 | zh_CN.UTF-8 |            | libc            |
 sonarqube | sonarqube | UTF8     | zh_CN.UTF-8 | zh_CN.UTF-8 |            | libc            | =Tc/sonarqube          +
           |           |          |             |             |            |                 | sonarqube=CTc/sonarqube
 template0 | postgres  | UTF8     | zh_CN.UTF-8 | zh_CN.UTF-8 |            | libc            | =c/postgres            +
           |           |          |             |             |            |                 | postgres=CTc/postgres
 template1 | postgres  | UTF8     | zh_CN.UTF-8 | zh_CN.UTF-8 |            | libc            | =c/postgres            +
           |           |          |             |             |            |                 | postgres=CTc/postgres
(4 rows)
(五)下载 SonarQube 和修改配置文件
1.下载的压缩包拉到主机解压
root@ubuntu20:~  unzip sonarqube-9.9.8.100196.zip

创建一个软连接
root@ubuntu20:/usr/local  ln -s sonarqube-9.9.8.100196/ sonarqube
root@ubuntu20:/usr/local  ls sonarqube
bin  conf  COPYING  data  dependency-license.json  elasticsearch  extensions  lib  logs  temp  web
2.设置 SonarQube 连接数据库
#修改SonarQube配置用于连接postgresql数据库
[root@SonarQube-Server ~] vim /usr/local/sonarqube/conf/sonar.properties

#修改连接postgresql数据库的账号和密码,和前面的配置必须匹配
sonar.jdbc.username=sonarqube
sonar.jdbc.password=123456

#修改数据库相关的信息,这里必须和此前配置的postgresql内容相匹配,其中localhost为DB服务器的地址,而sonarqube为数据库名称
sonar.jdbc.url=jdbc:postgresql://localhost/sonarqube
#默认配置如下,必须删除?currentSchema=my_schema
##sonar.jdbc.url=jdbc:postgresql://localhost/sonarqube?currentSchema=my_schema

#设置 SonarQube 的提供的 Web Server监听的地址和端口,可选
sonar.web.host=0.0.0.0 #此为默认值,可不做修改
sonar.web.port=9000 #此为默认值,可不做修改
#按需要修改SonarQube存储数据的目录位置,以下两个目录为相对路径,相对于sonarqube的安装目录,也可以使用绝对路径
sonar.path.data=data #默认值,可不做修改
sonar.path.temp=temp #默认值,可不做修改
把文件属性的所有人所有组修改成sonarqube
root@ubuntu20:/usr/local  chown -R sonarqube: /usr/local/sonarqube/
root@ubuntu20:/usr/local  ll /usr/local/sonarqube/
总计 128
drwxr-xr-x 11 sonarqube sonarqube  4096 12月  2  2024 ./
drwxr-xr-x 12 root      root       4096  2月 10 17:33 ../
drwxr-xr-x  6 sonarqube sonarqube  4096 12月  2  2024 bin/
drwxr-xr-x  2 sonarqube sonarqube  4096  2月 10 17:40 conf/
-rw-r--r--  1 sonarqube sonarqube  7651 12月  2  2024 COPYING
drwxr-xr-x  2 sonarqube sonarqube  4096 12月  2  2024 data/
-rw-r--r--  1 sonarqube sonarqube 77629 12月  2  2024 dependency-license.json
drwxr-xr-x  7 sonarqube sonarqube  4096 12月  2  2024 elasticsearch/
drwxr-xr-x  4 sonarqube sonarqube  4096 12月  2  2024 extensions/
drwxr-xr-x  5 sonarqube sonarqube  4096 12月  2  2024 lib/
drwxr-xr-x  2 sonarqube sonarqube  4096 12月  2  2024 logs/
drwxr-xr-x  2 sonarqube sonarqube  4096 12月  2  2024 temp/
drwxr-xr-x  5 sonarqube sonarqube  4096 12月  2  2024 web/
3.启动 SonarQube
root@ubuntu20:/usr/local  su - sonarqube
sonarqube@ubuntu20:~$  /usr/local/sonarqube/bin/linux-x86-64/sonar.sh start
/usr/bin/java
Starting SonarQube...
Started SonarQube.
sonarqube@ubuntu20:~$  /usr/local/sonarqube/bin/linux-x86-64/sonar.sh status
/usr/bin/java
SonarQube is running (45107).
4.建立service文件
root@ubuntu20:  vim /lib/systemd/system/sonarqube.service
[Unit]
Description=SonarQube service
After=syslog.target network.target
[Service]
Type=simple
User=sonarqube
Group=sonarqube
PermissionsStartOnly=true
ExecStart=/usr/bin/nohup /usr/bin/java -Xms32m -Xmx32m -Djava.net.preferIPv4Stack=true -jar /usr/local/sonarqube/lib/sonar-application-9.9.8.100196.jar
StandardOutput=syslog
LimitNOFILE=131072
LimitNPROC=8192
TimeoutStartSec=5
Restart=always

[Install]
WantedBy=multi-user.target


root@ubuntu20:/usr/local  systemctl daemon-reload
root@ubuntu20:/usr/local  systemctl restart sonarqube.service
root@ubuntu20:/usr/local  systemctl status sonarqube.service
● sonarqube.service - SonarQube service
     Loaded: loaded (/usr/lib/systemd/system/sonarqube.service; disabled; preset: enabled)
     Active: active (running) since Tue 2026-02-10 17:57:38 CST; 7s ago
……
(六)应用使用
1.登录到 Web 界面

默认用户名和密码都是 admin
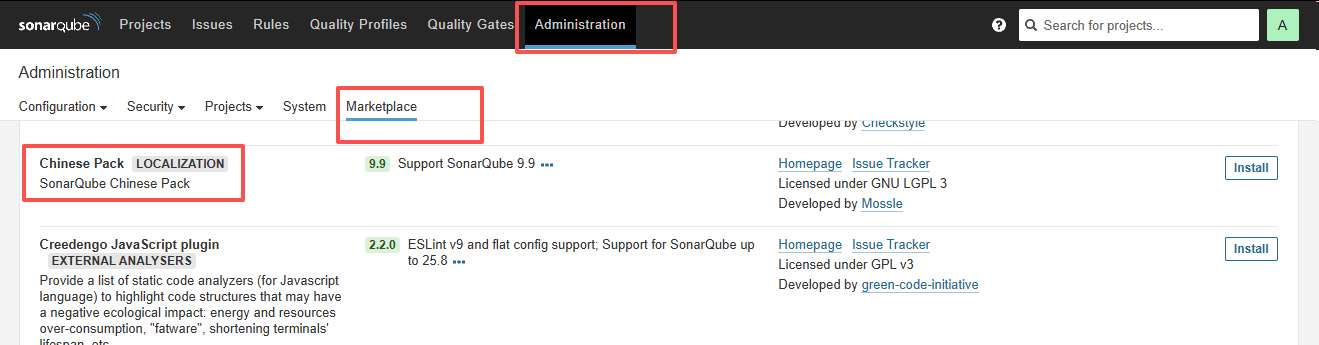
市场中安装中文包;可能需要魔法
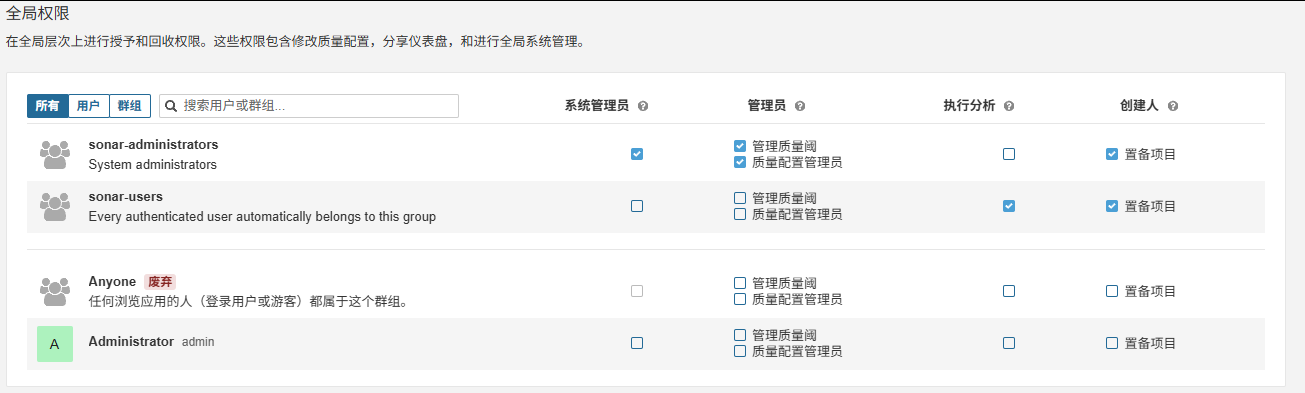
2.权限管理
创建用户,所有新建的用户都属于 sonar-users 组中

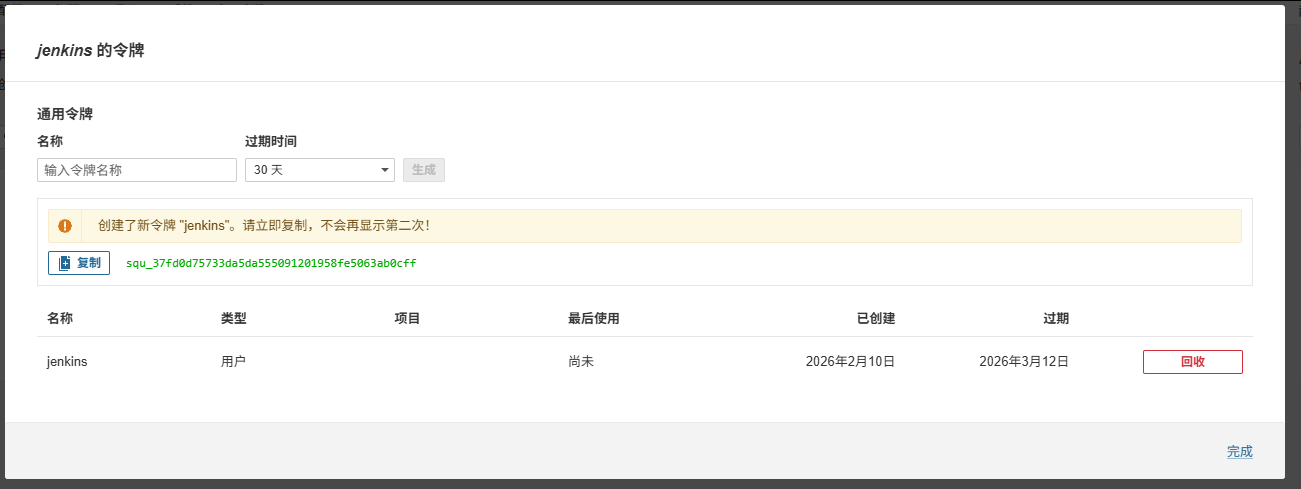
创建令牌给开发人员,不让他们进入管理界面
squ_37fd0d75733da5da555091201958fe5063ab0cff
3.部署代码扫描器 sonar-scanner
官方文档:https://docs.sonarqube.org/latest/analysis/scan/sonarscanner/
下载地址:
https://docs.sonarqube.org/latest/analyzing-source-code/scanners/sonarscanner/
https://binaries.sonarsource.com/?prefix=Distribution/sonar-scanner-cli/
https://binaries.sonarsource.com/Distribution/sonar-scanner-cli/
新版下载链接
https://docs.sonarqube.org/latest/analyzing-source-code/scanners/sonarscanner/
在 jenkins 主机上面安装
root@ubuntu10:~  unzip sonar-scanner-cli-7.3.0.5189-linux-x64.zip  -d /usr/local/
root@ubuntu10:/usr/local  ln -s sonar-scanner-7.3.0.5189-linux-x64/ sonar-scanner
root@ubuntu10:/usr/local  ls sonar-scanner
bin  conf  jre  lib
配置域名解析,传到所有主机上
root@ubuntu10:/usr/local/sonar-scanner# cat /etc/hosts
127.0.0.1 localhost
127.0.1.1 ubuntu10

# The following lines are desirable for IPv6 capable hosts
::1     ip6-localhost ip6-loopback
fe00::0 ip6-localnet
ff00::0 ip6-mcastprefix
ff02::1 ip6-allnodes
ff02::2 ip6-allrouters


10.0.0.16 gitlab.lty.org
10.0.0.10 jenkins.lty.org redis.lty.org harbor.lty.org
10.0.0.11  mysql.lty.org
10.0.0.20 sonarqube.lty.org
配置sonar-scanner连接sonarqube服务器
vim /usr/local/sonar-scanner/conf/sonar-scanner.properties
# Configure here general information about the environment, such as the server connection details for example
# No information about specific project should appear here

#----- SonarQube server URL (default to SonarCloud)
#sonar.host.url=https://mycompany.com/sonarqube
sonar.host.url=http://sonarqube.lty.org:9000/        #sonarqube服务器的地址

#sonar.scanner.proxyHost=myproxy.mycompany.com
#sonar.scanner.proxyPort=8002
sonar.login=squ_37fd0d75733da5da555091201958fe5063ab0cff    #上面的token,也可以用账号和密码的形式但是不推荐
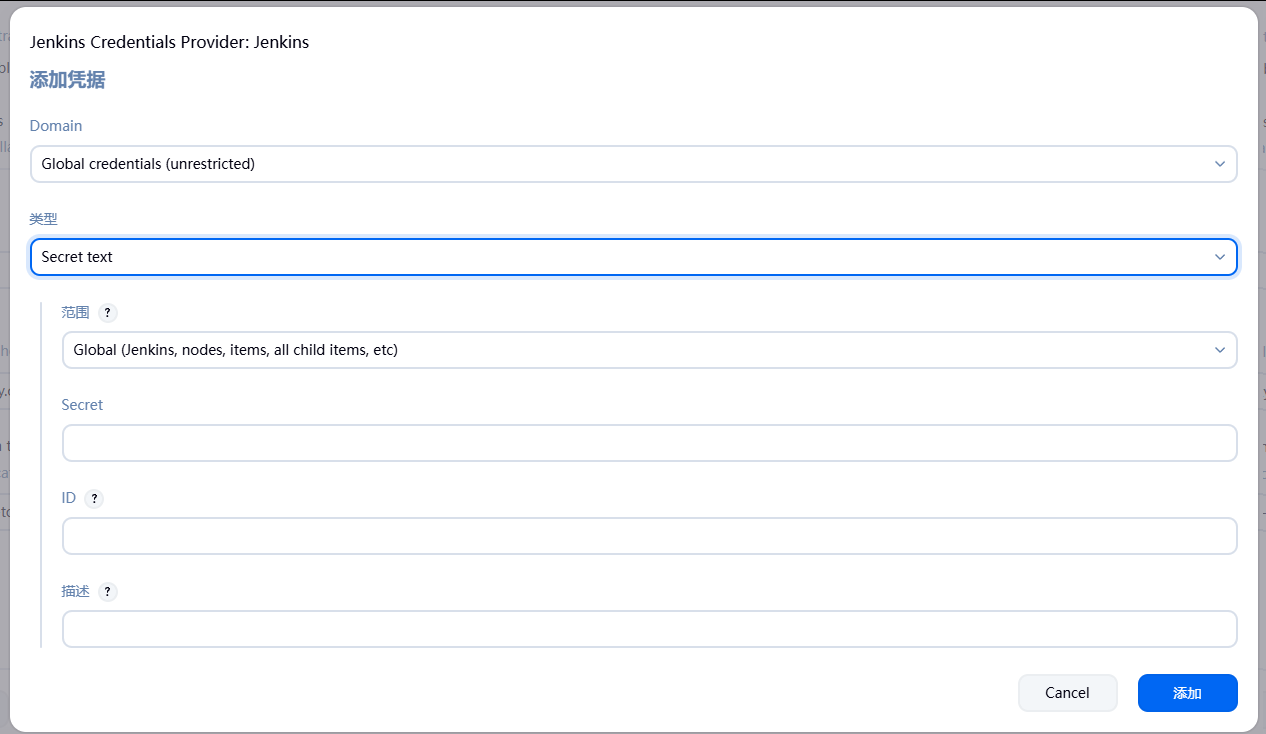
4.Jenkins 全局tools中自动安装
安装插件 SonarQube Scanner后

系统配置中也需要配置
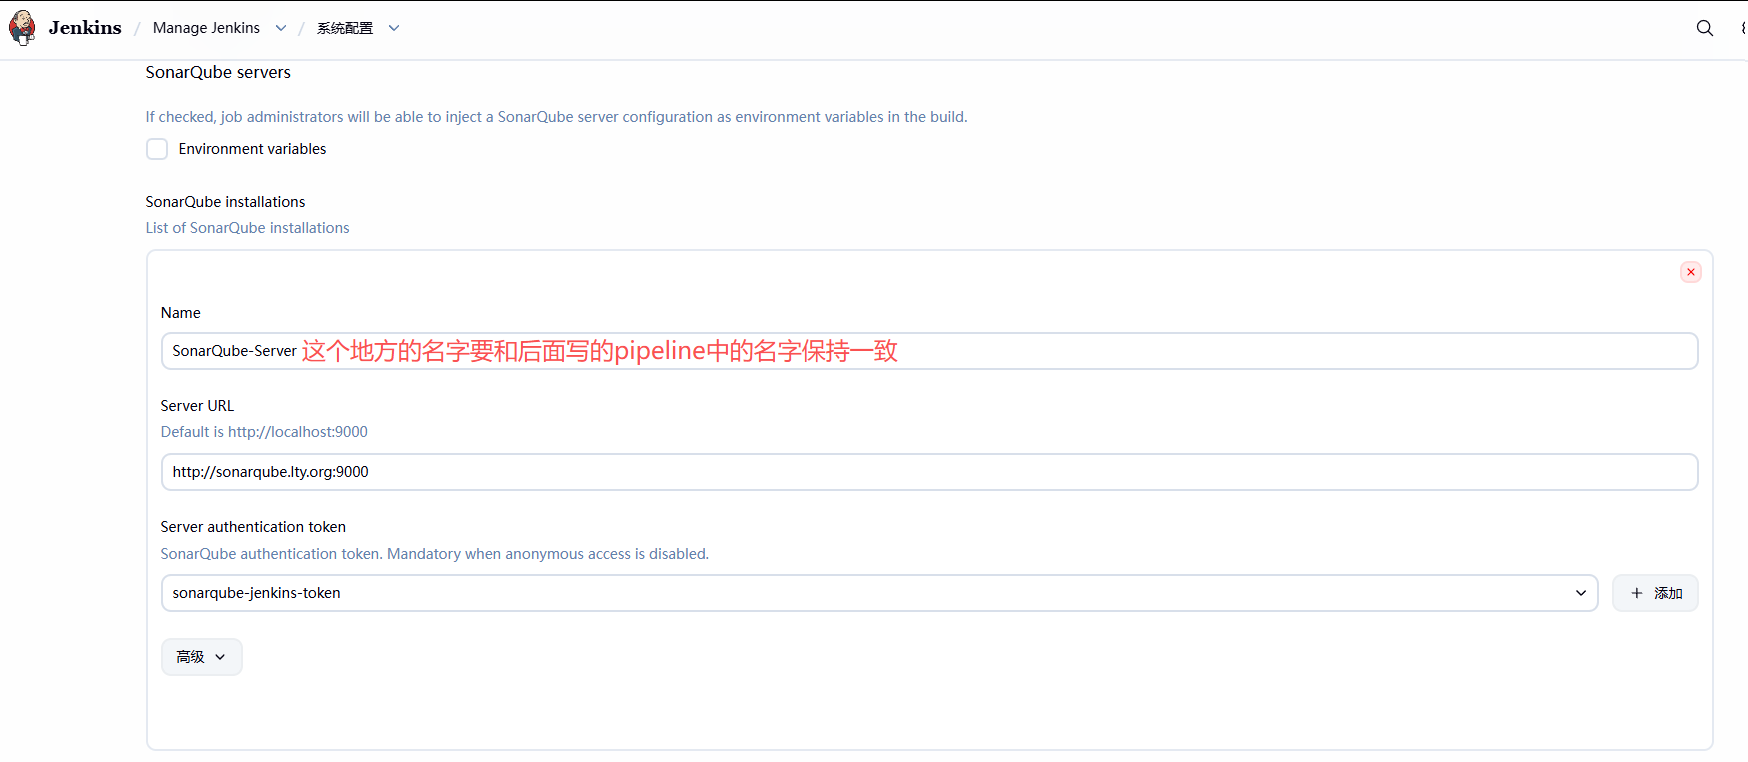
添加上面的凭据
5.准备测试代码和配置文件
sonar-scanner 扫描的代码需要提前在项目的根目录下准备名称为sonar-project.properties的文件,内容如下
root@ubuntu10:  cat  sonar-project.properties
sonar.projectKey=wheel            #必须要加这个多个项目的唯一标识
root@ubuntu10:~  git clone git@gitlab.lty.org:devops/wheel.git
root@ubuntu10:~  cd wheel/
root@ubuntu10:~/wheel  ls
images  index.html  js  sonar-project.properties
root@ubuntu10:~/wheel  /usr/local/sonar-scanner/bin/sonar-scanner
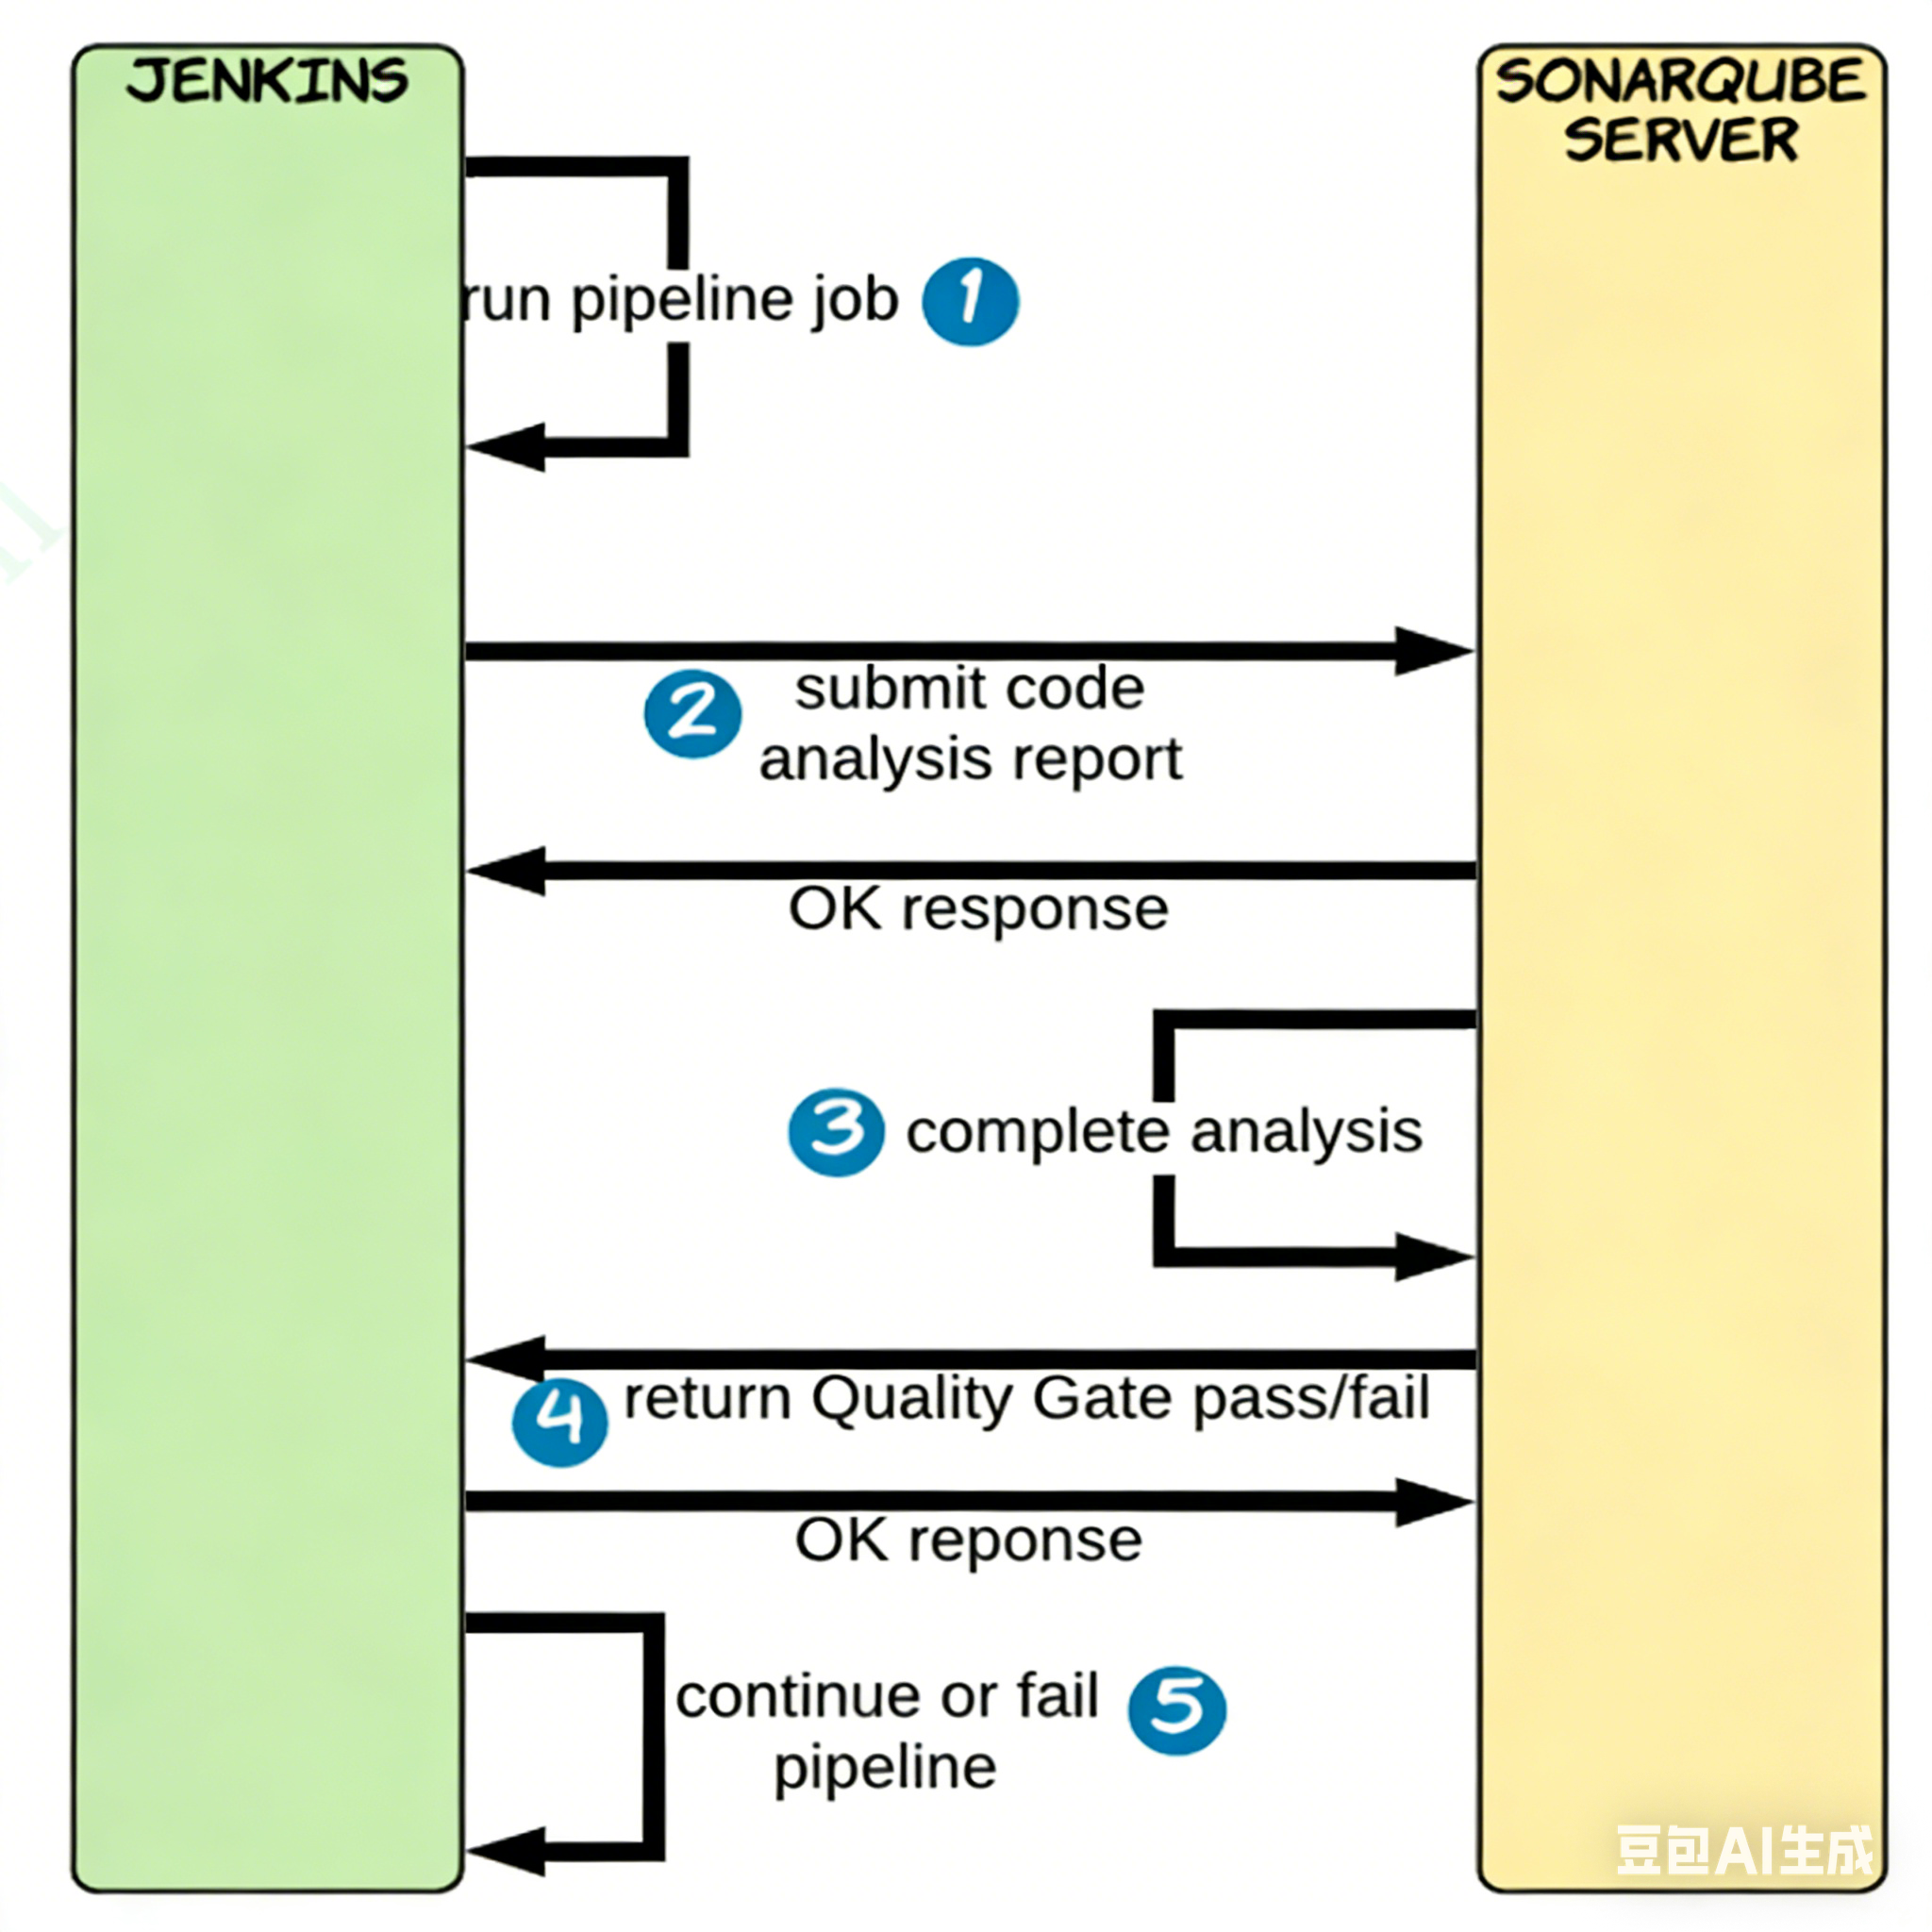
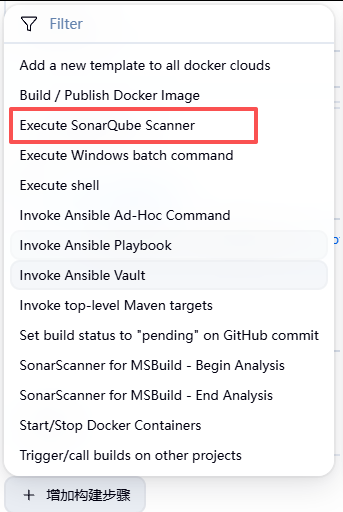
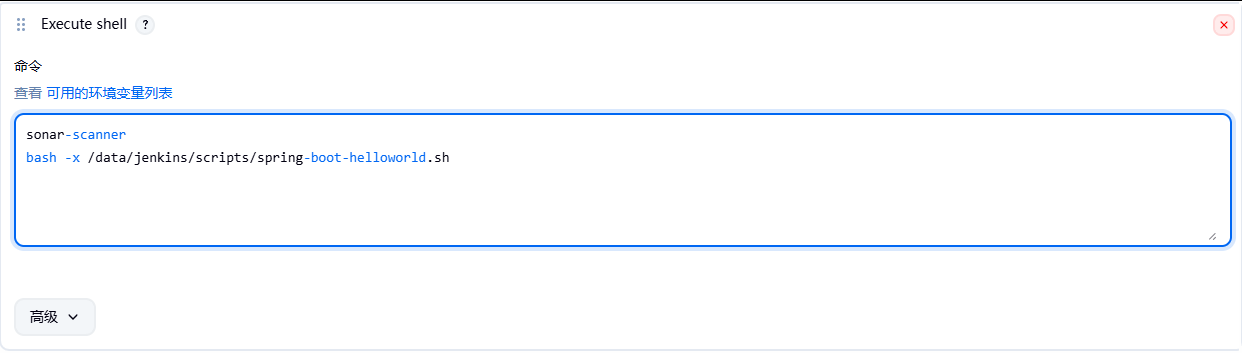
6.在自由风格的任务构建步骤中添加 Execute Sonarqube Scanner
新建自由风格的项目---增加构建步骤---选择“Execute Sonarqube Scanner”,并将Execute Sonarqube Scanner框,拖至执行shell 的前面,即先扫描再执行构建
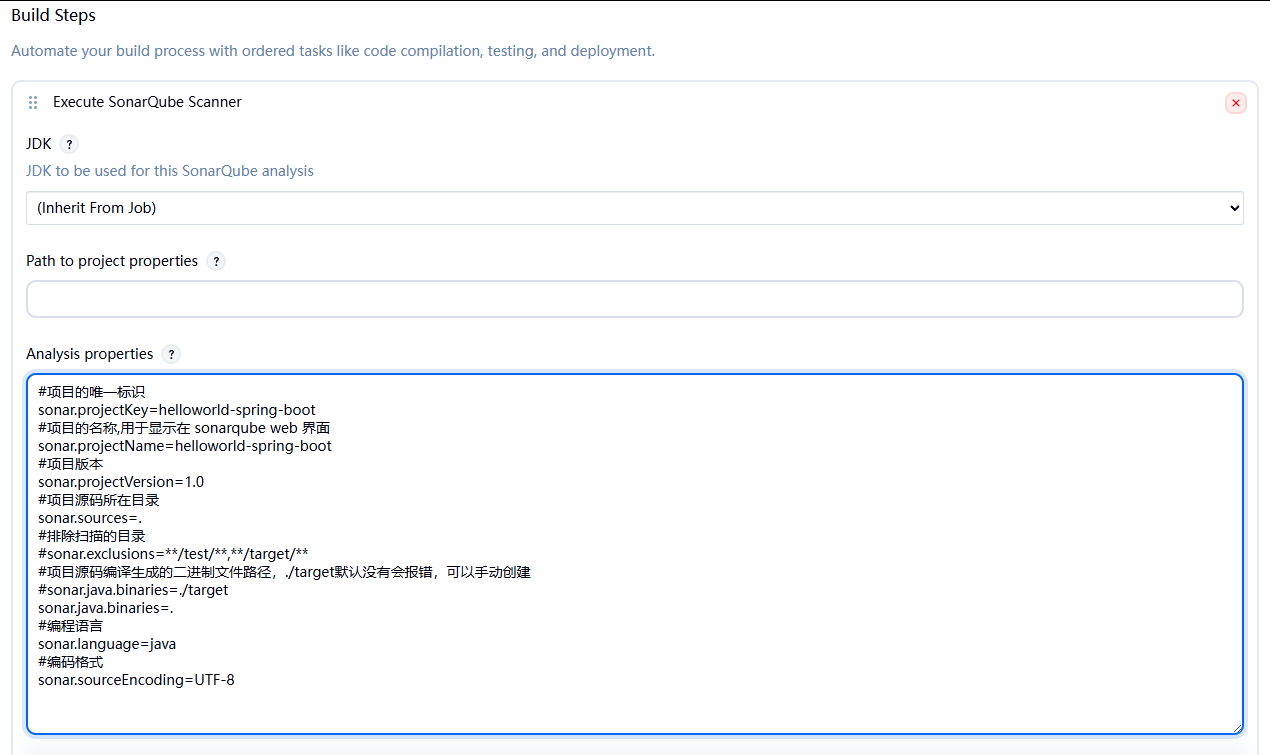
root@ubuntu10:~/spring-boot-helloworld cat sonar-project.properties
#项目的唯一标识
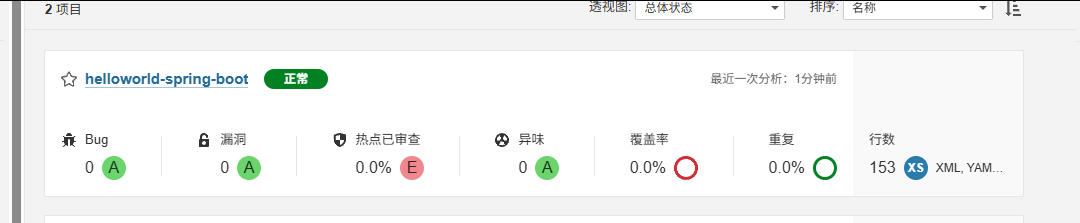
sonar.projectKey=spring-boot-helloworld
#项目的名称,用于显示在 sonarqube web 界面
sonar.projectName=spring-boot-helloworld
#项目版本(可选)
sonar.projectVersion=1.0
#项目源码所在目录
sonar.sources=.
#排除扫描的目录
sonar.exclusions=**/test/**,**/target/**
#项目源码编译生成的二进制文件路径,./target默认没有会报错,可以手动创建
#sonar.java.binaries=./target
sonar.java.binaries=.
#编程语言(可选)
sonar.language=java
#编码格式(可选)
sonar.sourceEncoding=UTF-8修改脚本在里面加入 sonar-scanner 检测命令
#!/bin/bash

# 提前在目标服务器上手动创建下面目录(若未创建,脚本会自动创建)
# 项目核心配置变量(集中定义,后续修改仅改此处)
APP=spring-boot-helloworld
APP_PATH=/data/${APP}

# 远程部署目标主机列表
HOST_LIST="
10.0.0.11
10.0.0.12
"
# 项目运行端口
PORT=80

#加入检测命令
sonar-scanner
# 本地Maven打包,跳过测试用例(加快构建速度)
mvn clean package -Dmaven.test.skip=true

# 遍历远程主机,执行批量部署
for host in ${HOST_LIST};do
    ssh root@$host "docker rm -f ${APP} && docker run --name ${APP} -p ${PORT}:8888 -d ${HARBOR}/${PROJECT}/${APP}:${TAG}"
    ssh root@${host} killall -9 java &> /dev/null
    scp target/${APP}-*-SNAPSHOT.jar root@${host}:${APP_PATH}/${APP}.jar
    ssh root@${host} "nohup java -jar ${APP_PATH}/${APP}.jar --server.port=${PORT} &>/dev/null &"
done
如果在仓库里面没有 sonar-project.properties 文件就需要在这里编写相关内容
如果仓库里面有 sonar-project.properties 这个文件也可以直接如下调用

腾讯云面向开发者汇聚海量精品云计算使用和开发经验,营造开放的云计算技术生态圈。
更多推荐
 36
36 0
0- 0


 已为社区贡献4条内容

所有评论(0)