Python》》FastAPI 异步框架 接口 pymysql【同步】 aiomysql【异步】
【代码】Python》》FastAPi 接口。
·
from fastapi import FastAPI,Query,Path,Body
from pydantic import BaseModel,Field

#  路径参数
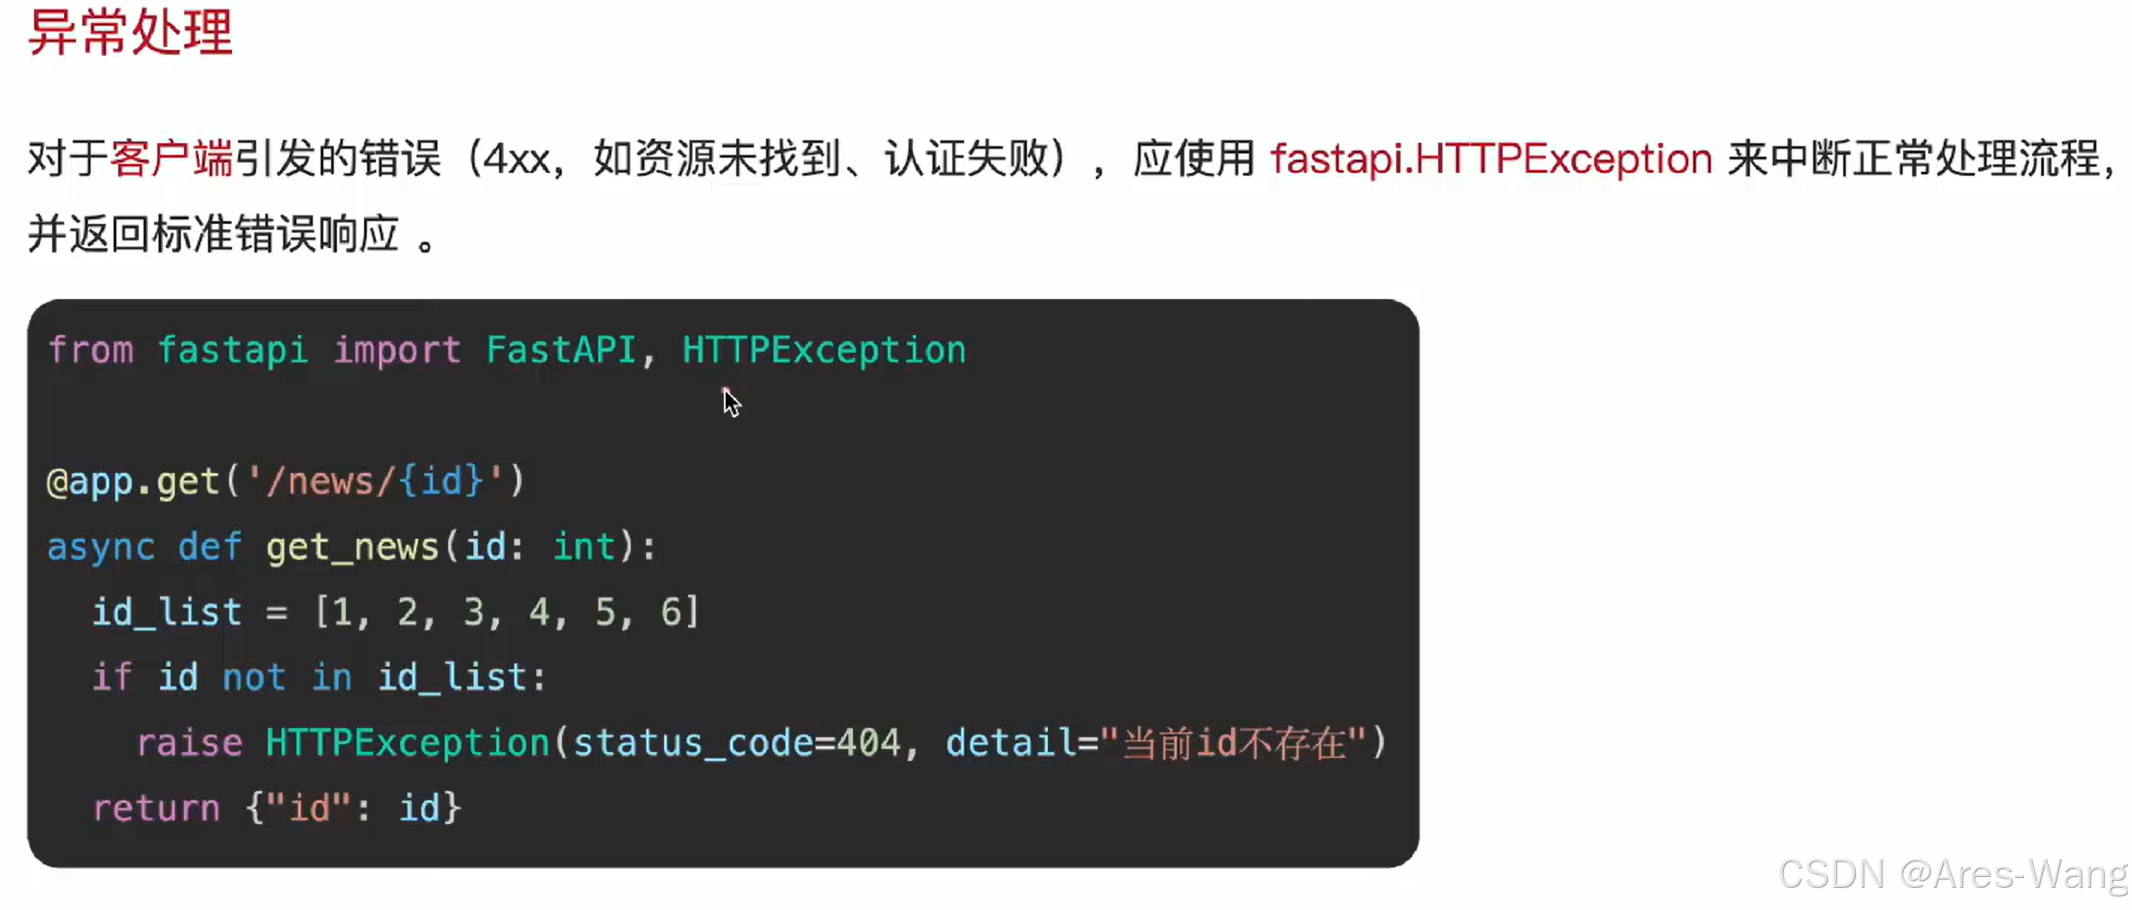
@app.get("/get/{id}")
async def get(id: int = Path(..., gt=0,lt=3)):
    return {"method": "Hello get "+str(id)}
# url:   /get/xx

#  查询参数
@app.get("/get1")
async def get1(id: str = Query(..., gt=0,lt=3)):
    return {"method": "Hello get "+str(id)}
# url:   /get?id=xxx

#  请求体参数
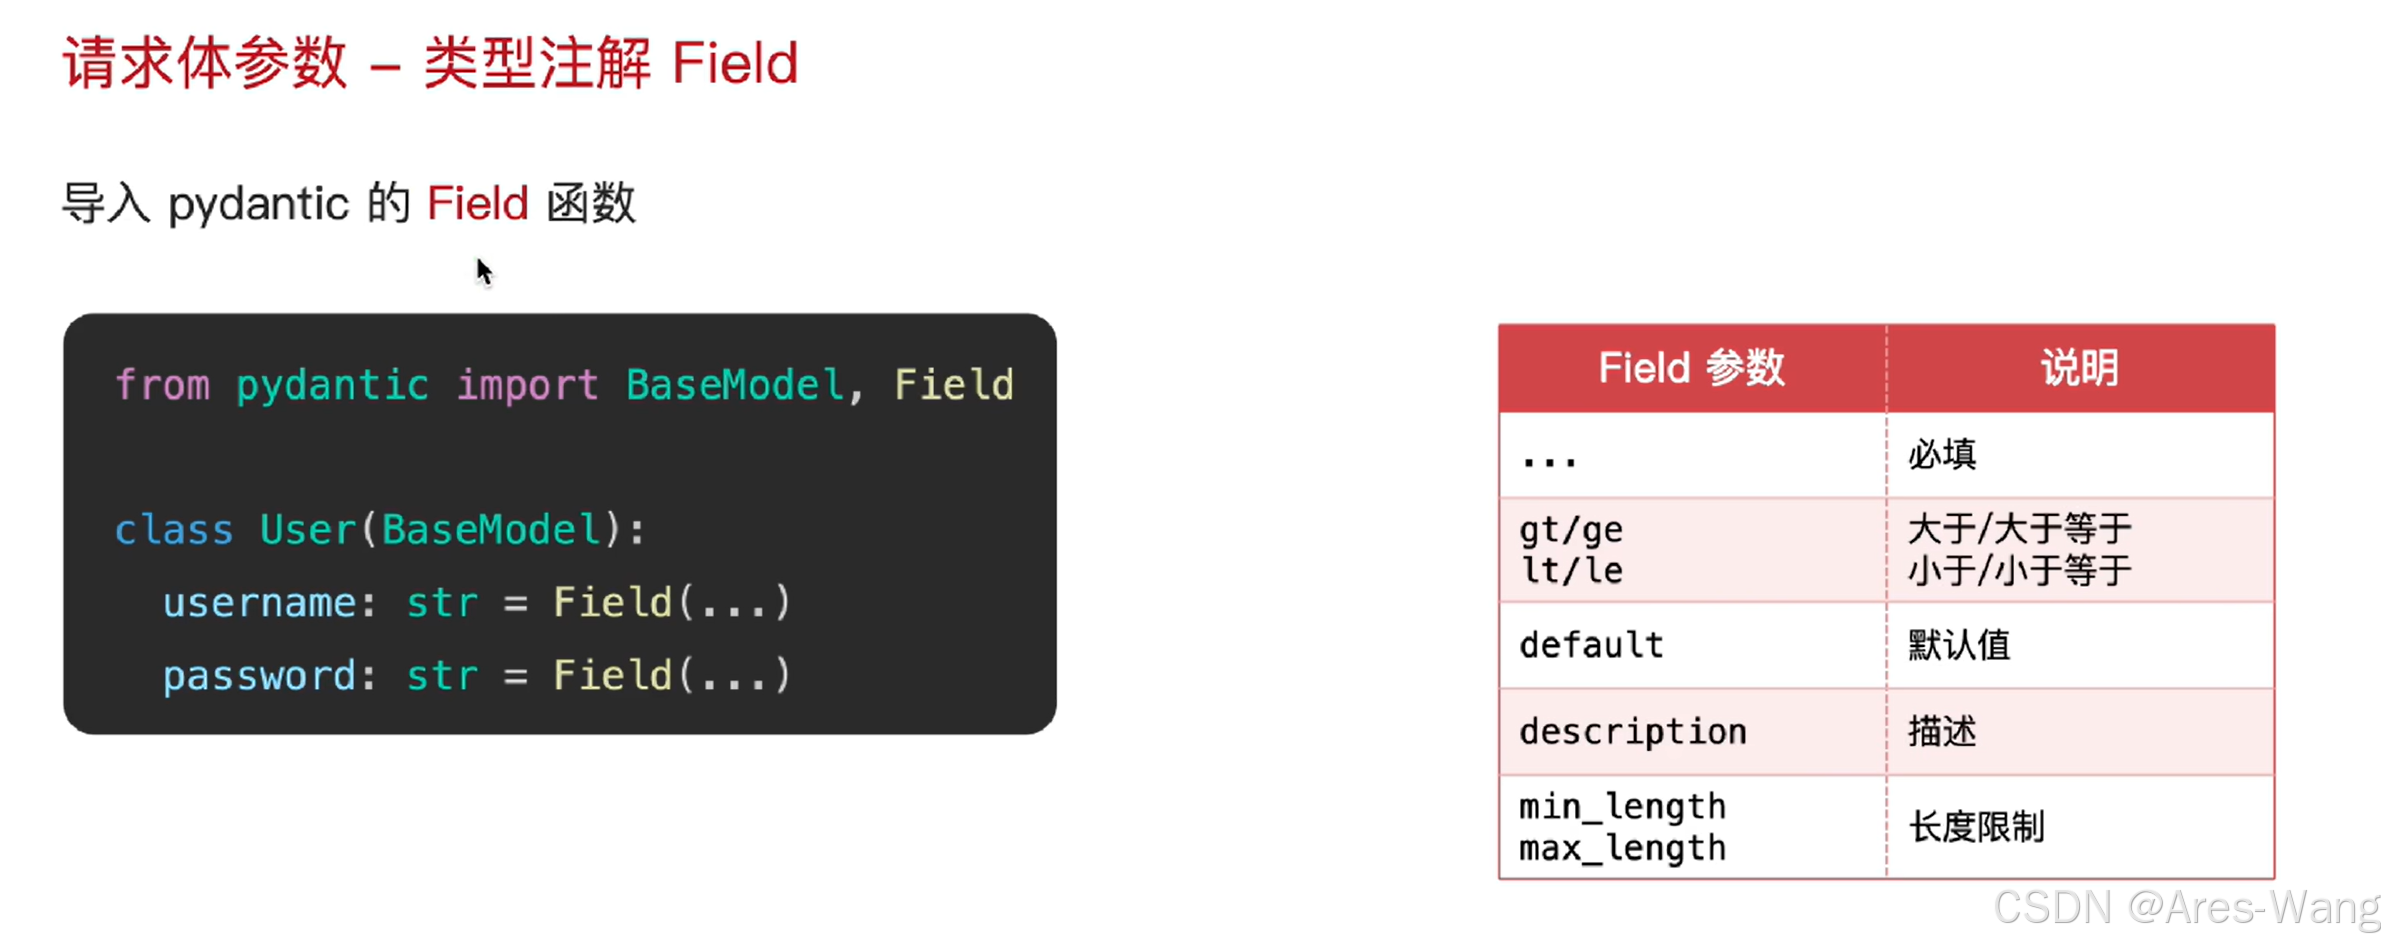
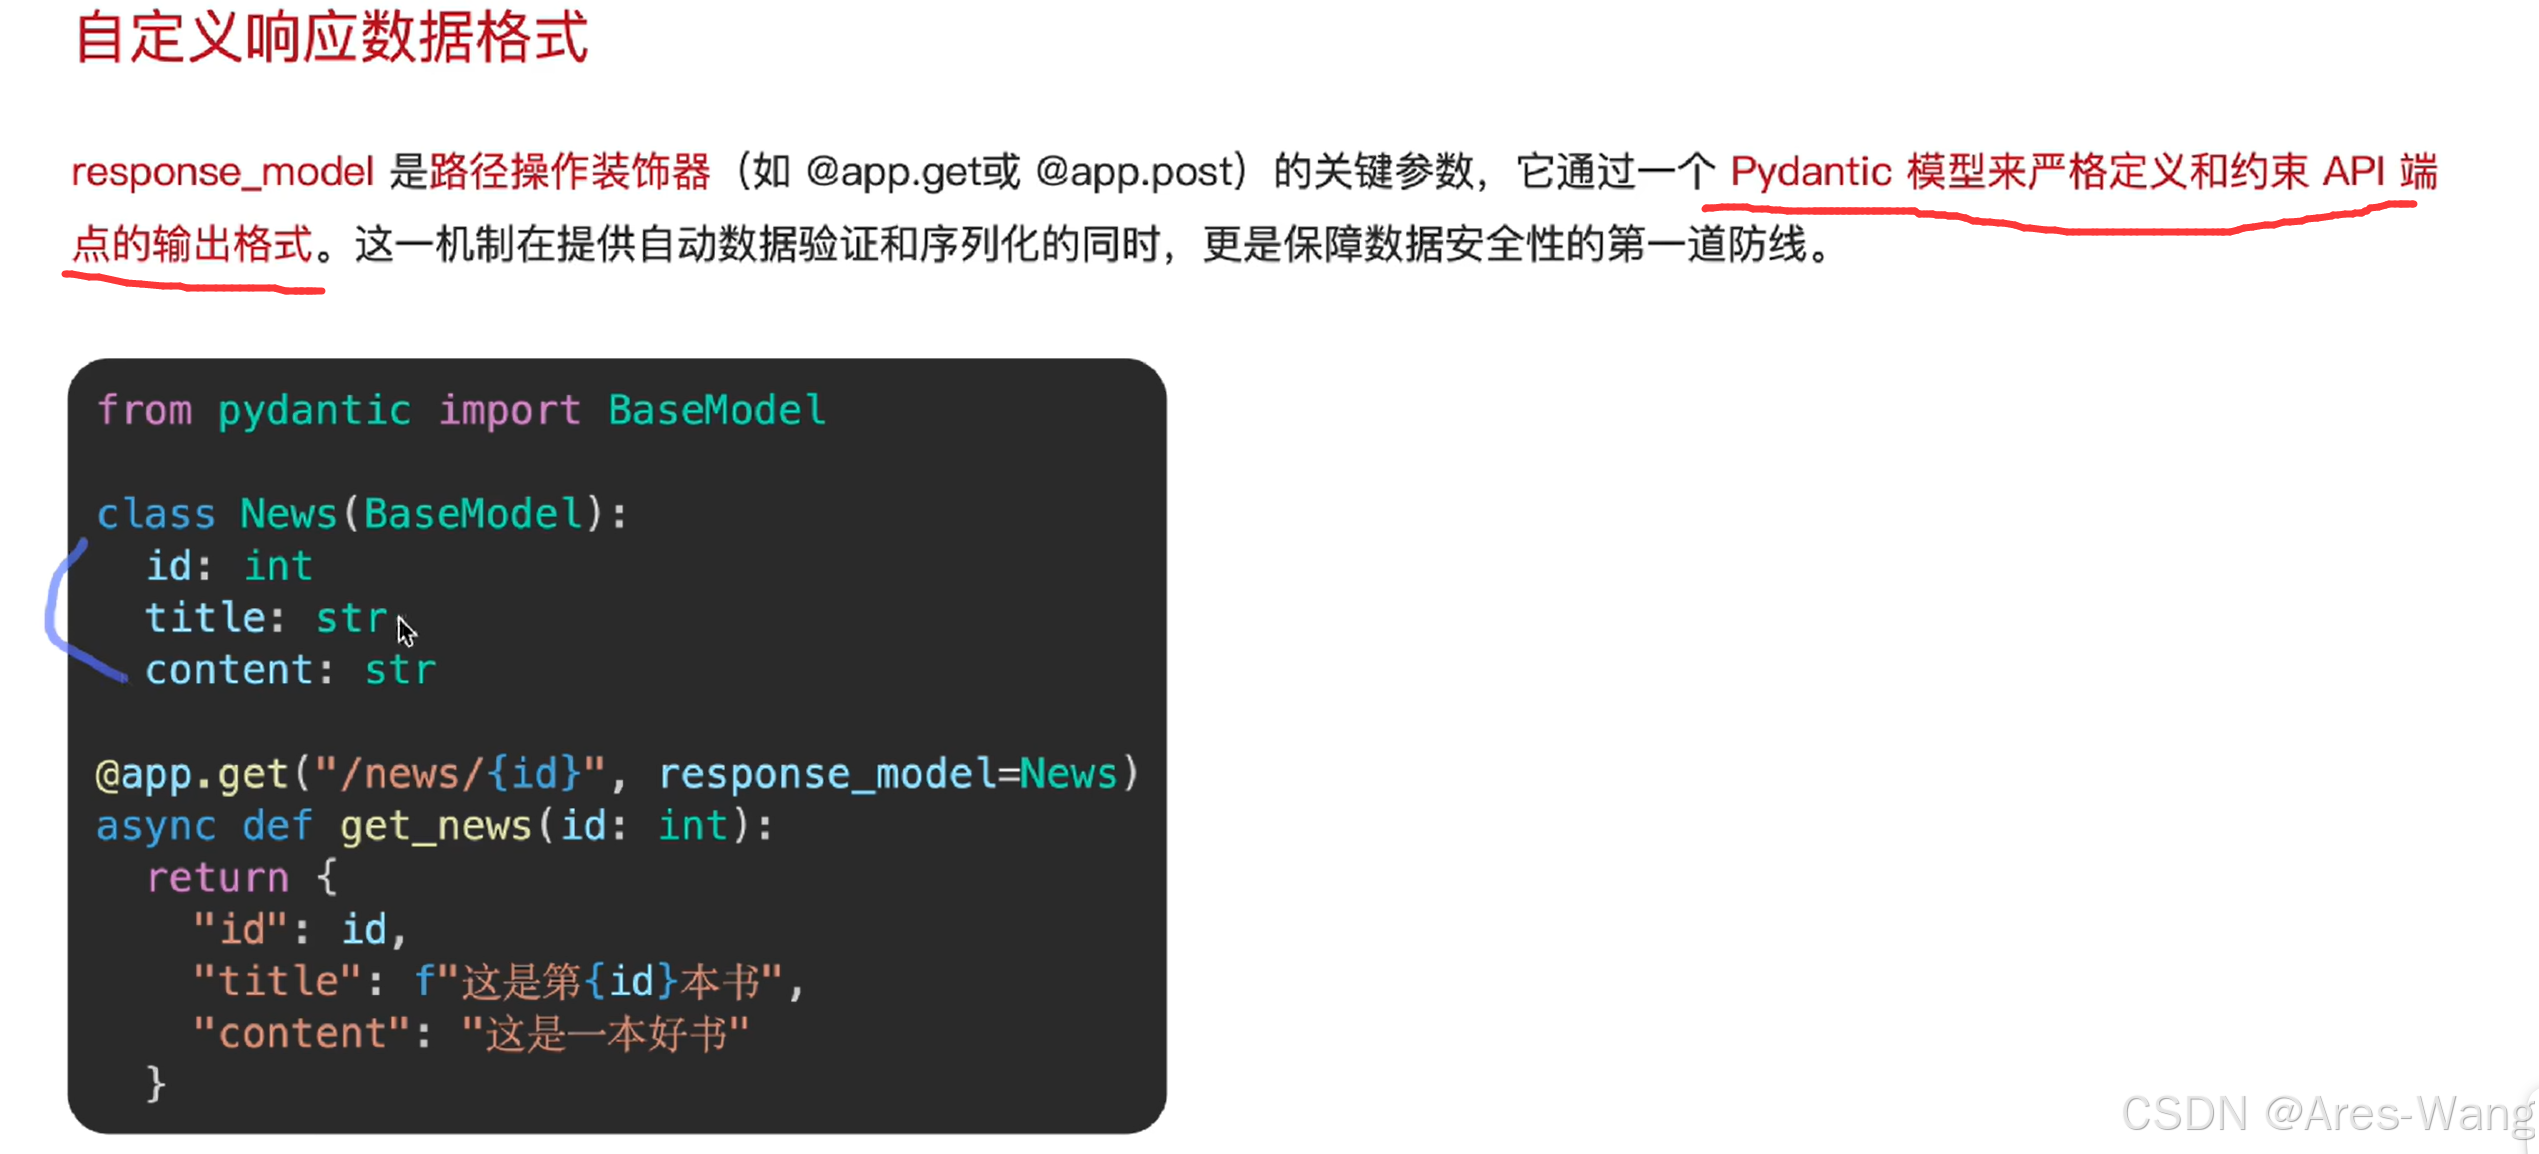
class Person(BaseModel):
    name: str=Field(...,min_length=3,max_length=20)
    age: int
@app.post("/post")
async def post(p: Person):
    return p
# 导入 FastAPI 类
import uvicorn
from fastapi import FastAPI,Query,Path,Body,responses
from pydantic import BaseModel,Field
from starlette.responses import HTMLResponse

# 实例化 FastAPI类
app = FastAPI()

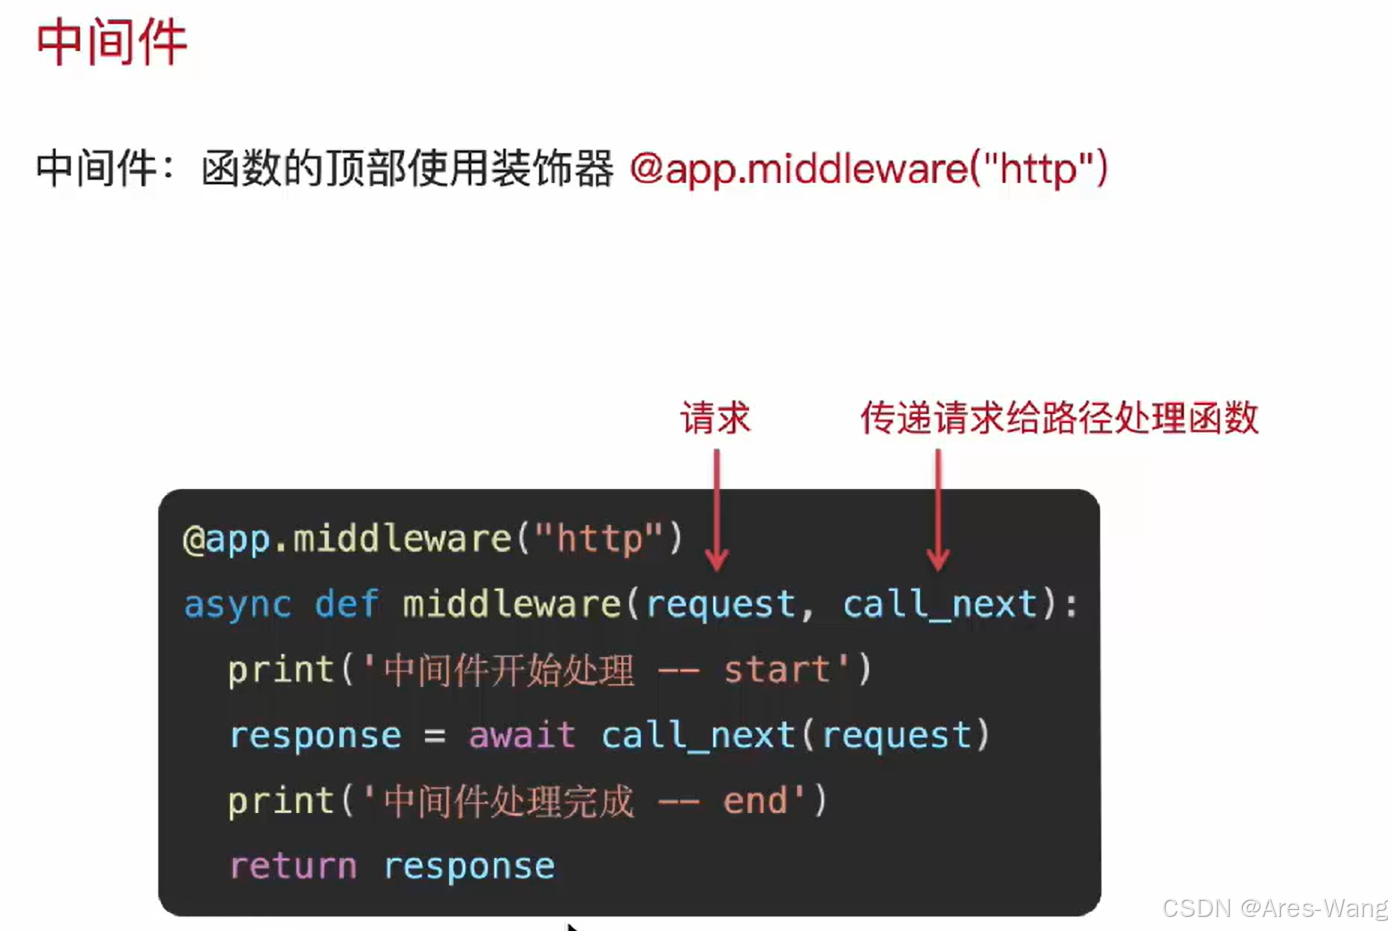
@app.middleware("http")
async def middleware1(request, call_next):
    print("中间件1-----开始")
    response = await call_next(request)
    print("中间件1------结束")
    return response
@app.middleware("http")
async def middleware2(request, call_next):
    print("中间件2-----开始")
    response =await call_next(request)
    print('中间件2----end')
    return response
@app.get("/")
async def root():
    return {"message": "Hello get-root"}

# 启动应用
if __name__ == "__main__":
    # reload:自动刷新
    uvicorn.run(app, host="127.0.0.1", port=8000)


=======结果(多个中间件 执行顺序  自下而上)=============
中间件2-----开始
中间件1-----开始
中间件1------结束
中间件2----end
INFO:     127.0.0.1:65241 - "GET / HTTP/1.1" 200 OK
依赖注入
# 导入 FastAPI 类
import datetime
import uvicorn
from fastapi import FastAPI,Query,Depends
# 实例化 FastAPI类
app = FastAPI()
@app.get("/")
async def root():
    return {"message": "Hello get-root"}
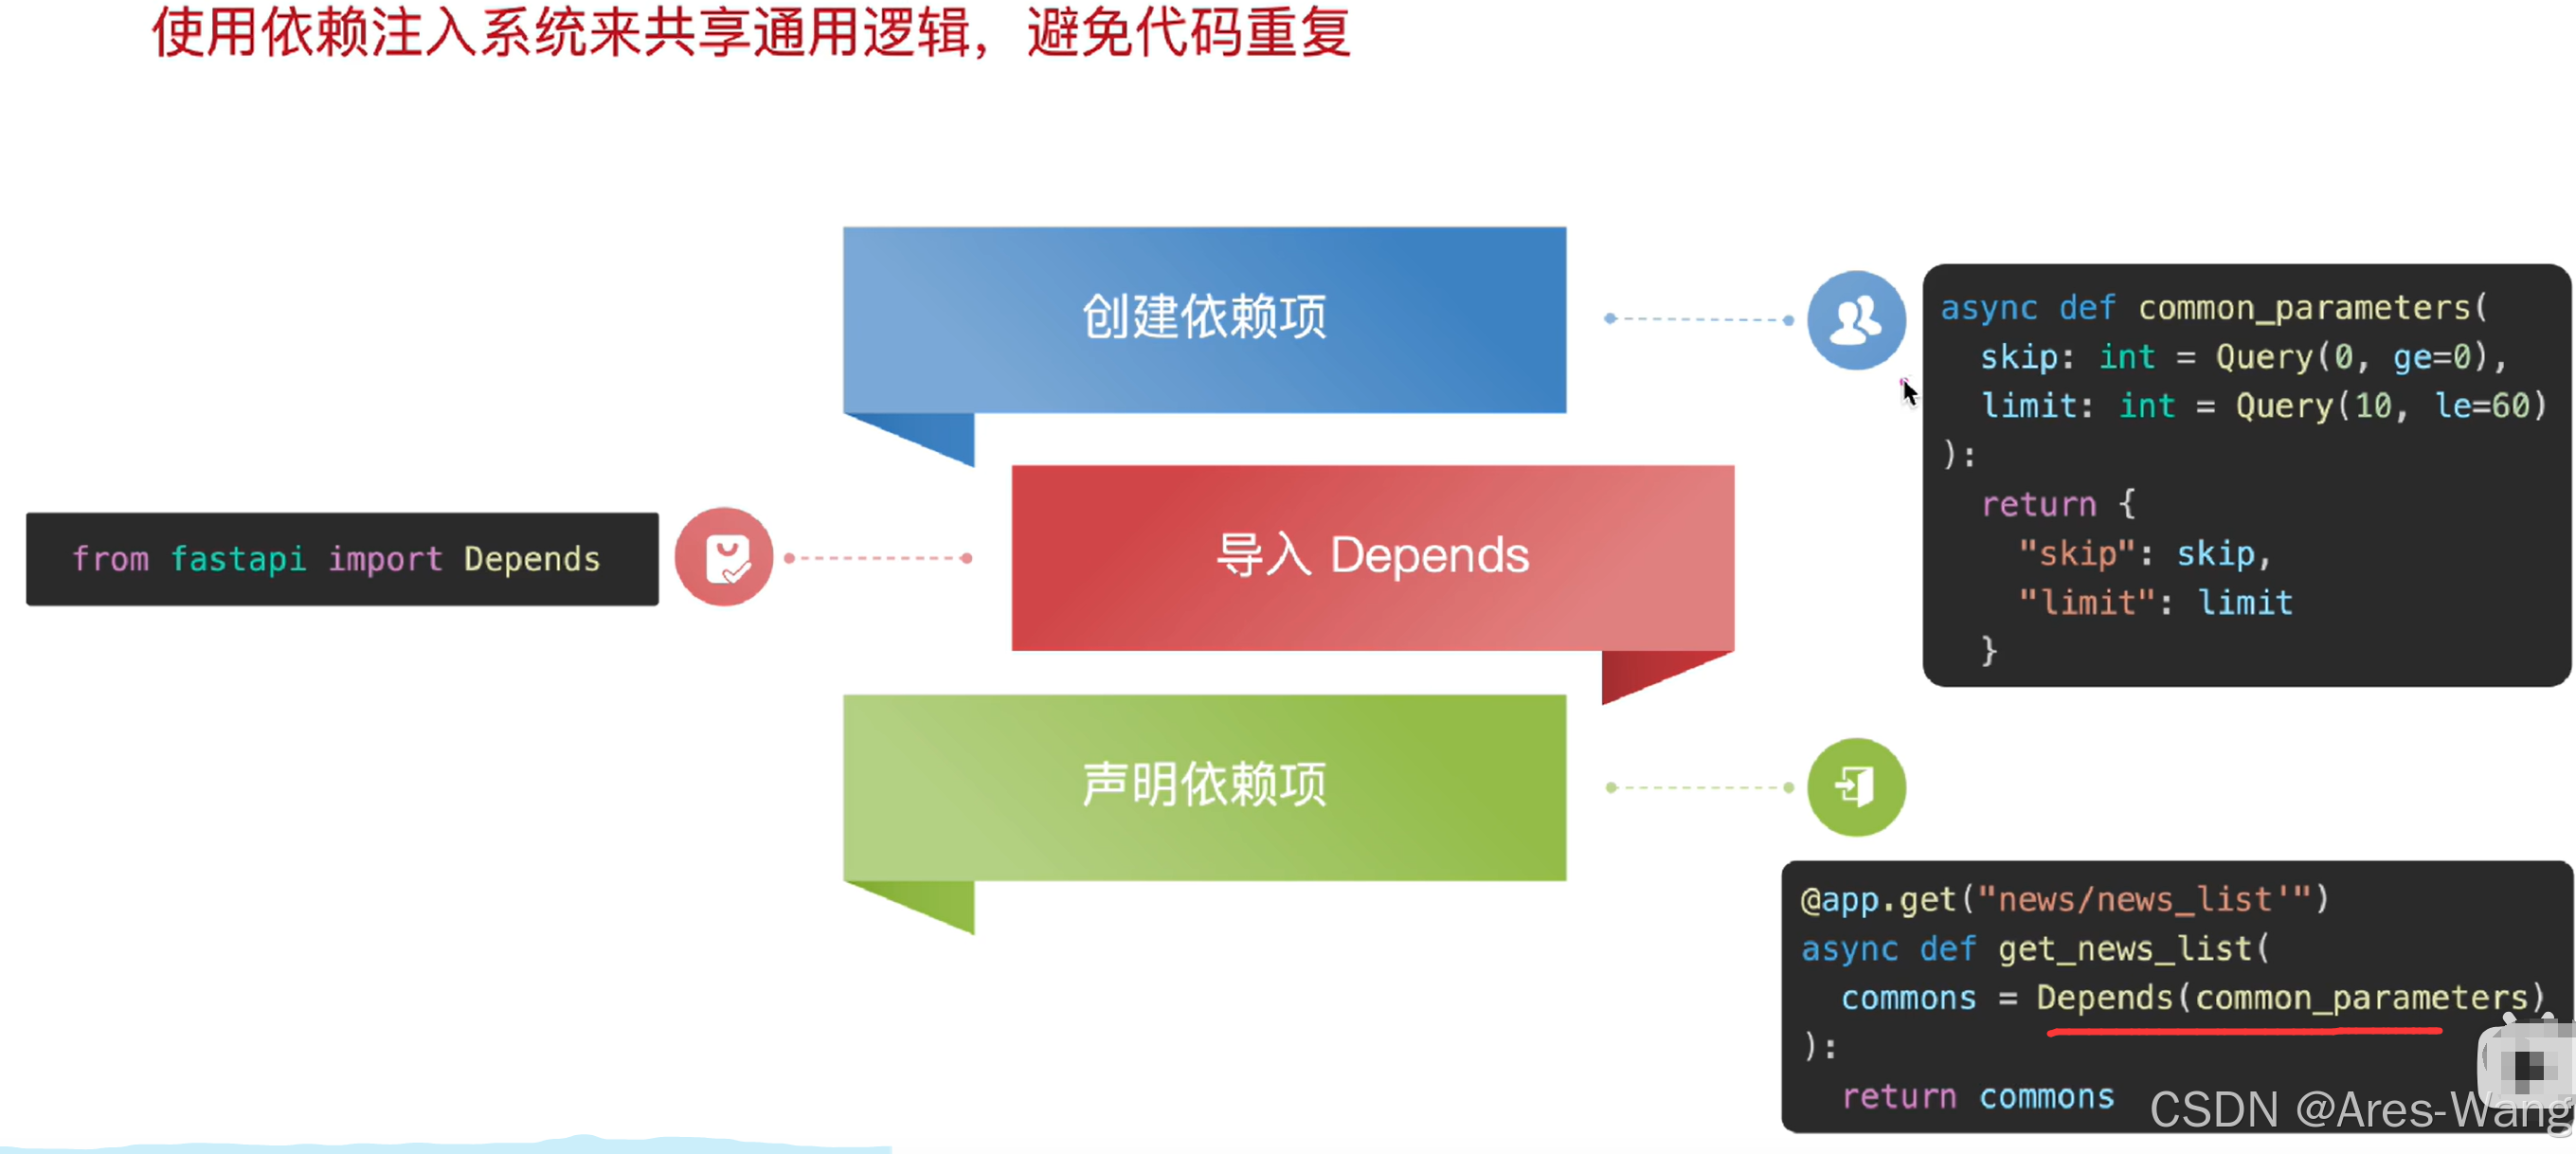
# 定义依赖项
async  def log(date:datetime.datetime = Query(default=datetime.date.today()), State:str=Query(default='ERROR')
      ):
    return {"date":date,"state":State}
# 注入依赖项
@app.get("/info")
async def info(log= Depends(log)):
    return {"log":log}
# 启动应用
if __name__ == "__main__":
    # reload:自动刷新
    uvicorn.run(app, host="127.0.0.1", port=8000)
ORM sqlalchemy
#   flask 》》 中  ORM  sqlalchemy  安装方法
>安装 flask_sqlalchemy (用于ORM)
>pip install flask_ sqlalchemy -i https://pypi.douban.com/simple
>安装 flask_migrate (用于数据迁移 把数据库模型迁移到数据库中)
>pip install flask_ migrate -i https://pypi.douban.com/simple
>安装 pymysql (mysql 驱动)
>pip install pymysql -i https://pypi.douban.com/simple

#   fastAPI》》 中  ORM  sqlalchemy[asyncio]  安装方法
>pip install sqlalchemy[asyncioio] aiomysql
>pip install aiomysql
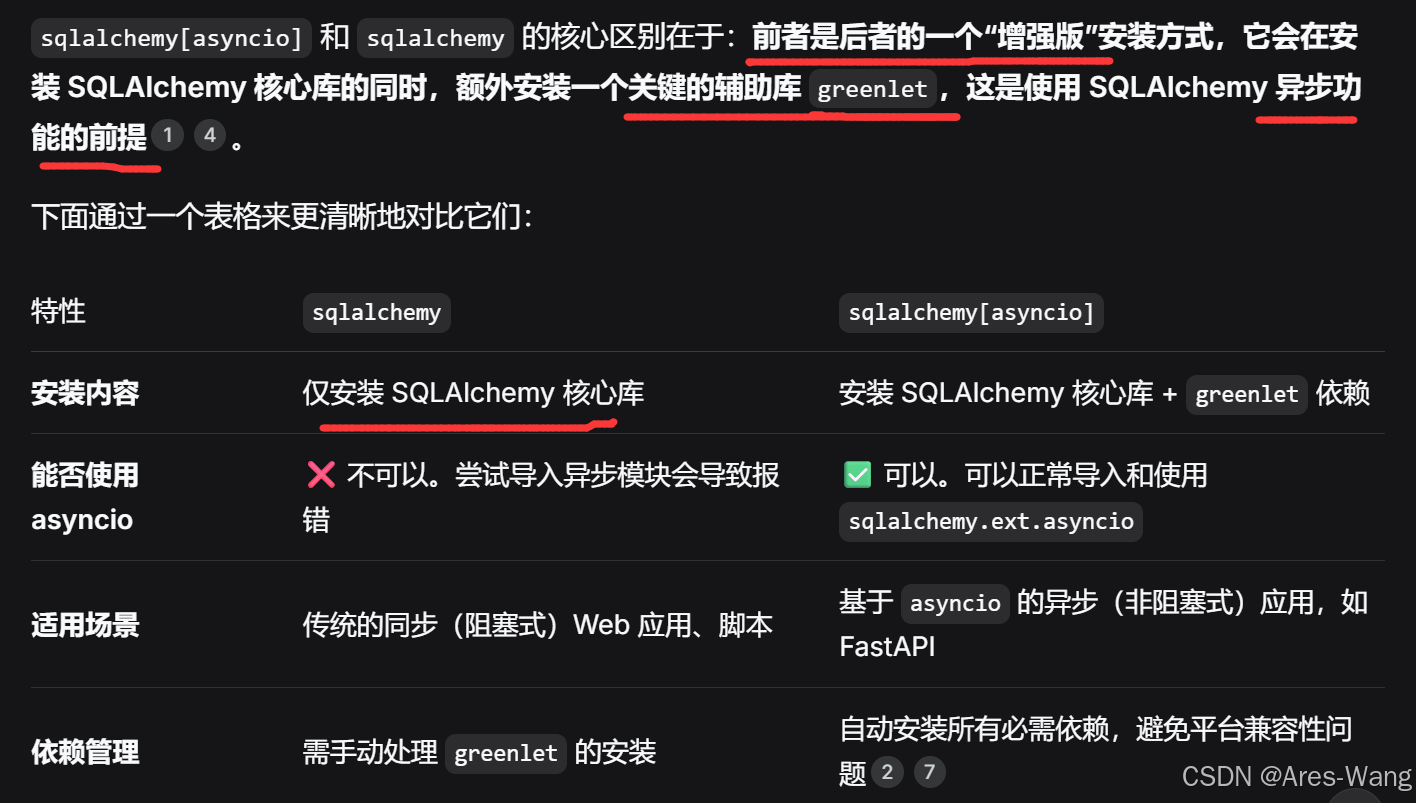
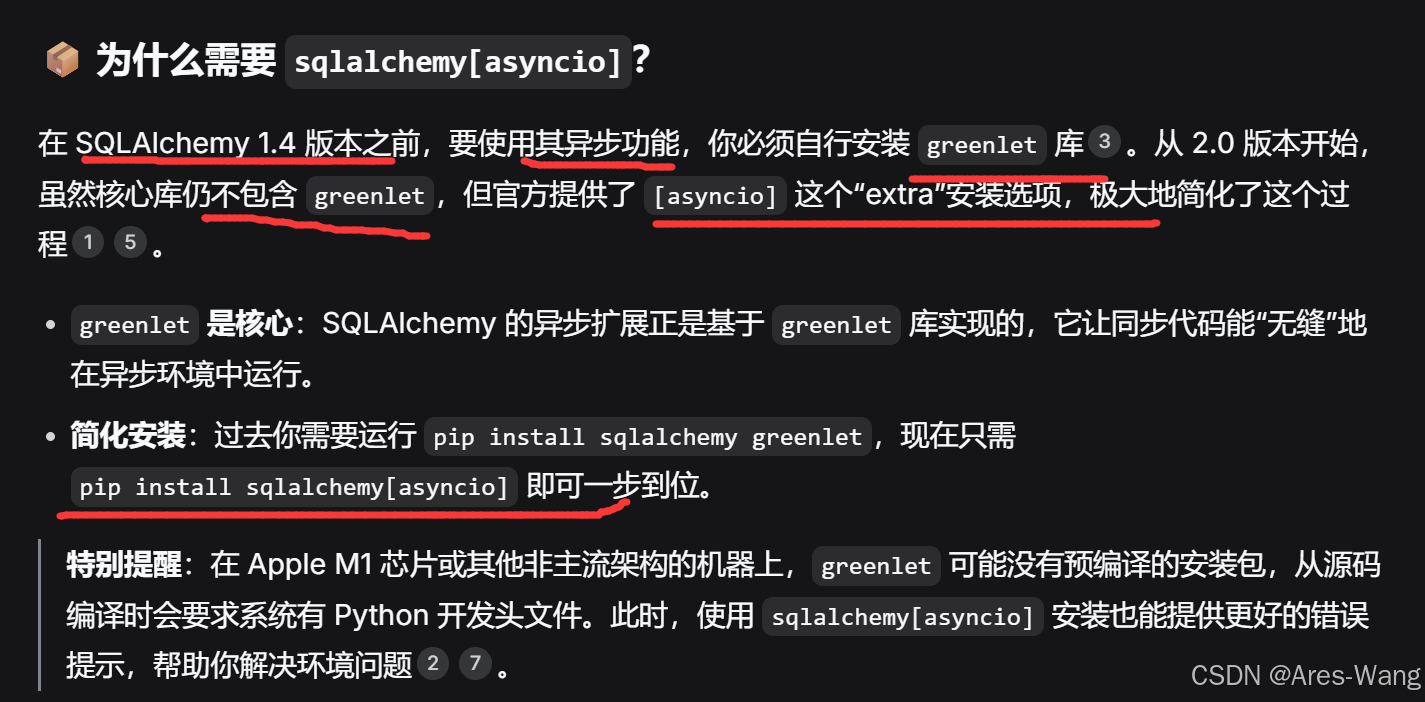

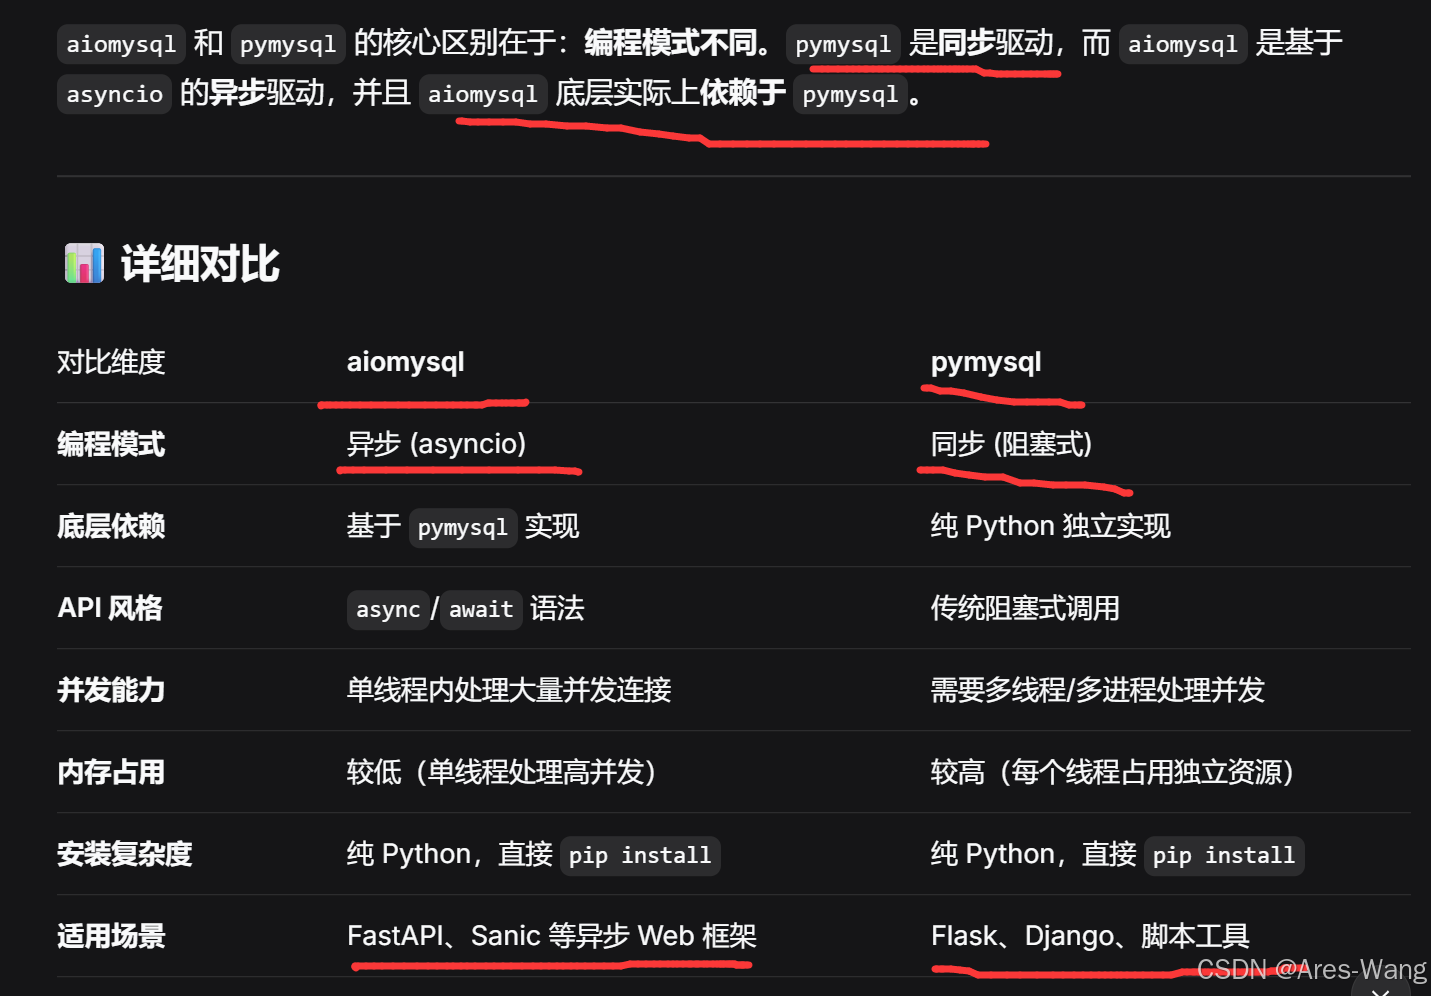
异步版本
from fastapi import FastAPI
from sqlalchemy.ext.asyncio import create_async_engine,async_sesstionmaker,AsyncSession
from sqlalchemy import DateTime,func,String,Float
from sqlalchemy.orm import DeclarativeBase,Mapped,mapped_column

app = FastAPI()
# 异步数据库 URL   数据库要先存在哦
#DATABASE_URL = "postgresql+asyncpg://user:pass@localhost/dbname"
DATABASE_URL = "mysql+asyncmy://账号:密码@IP地址:3306/数据库"

# 创建异步引擎
engine = create_async_engine(
    DATABASE_URL,
    echo=True,  			 # 可选,打印 SQL 日志语句
    pool_size=20,			 # 设置连接池活跃的连接数
    max_overflow=10    # 允许额外的连接数
)

# 定义模型类
#      》》基类,要继承DeclarativeBase ,共有的、通用的属性、字段放在基类
#      》》 模型要继承 基类

class Base(DeclarativeBase):
	create_time:Mapped[datetime] = mapped_column(DateTime,insert_default=func.now().default=datetime.now,comment='创建时间')
	update_time:Mapped[datetime] = mapped_column(DateTime,insert_default=func.now(),onupdate=func.now(),default=datetime.now,comment="修改时间")
#继承 基类,book表对应的模型类
class Book(Base):
	__tablename__="book"
	id:Mapped[int] = mapped_column(primary_key=True,comment="书籍的编号")
	bookname:Mapped[str] = mapped_column(String(200),comment="书名")
	author:Mapped[str] = mapped_column(String(50),comment="作者")
	price:Mapped[float] = mapped_column(Float,comment="售价")
	publisher:Mapped[str] = mapped_column(String(200),comment="出版社")

# 创建表:定义函数建表-》FastAPI 启动的时候调用建表的函数
async def create_tables():
	#获取异步引擎,创建事务,建表
	async with async_engine.begin() as conn:
	   # Base 模型类的元数据创建  创建所有表
		await conn.run_sync(Base.metadata.create_all)
		# 或删除重建
    # await conn.run_sync(Base.metadata.drop_all)
    # await conn.run_sync(Base.metadata.create_all)
# 在应用启动时运行
@app.on_evnet("startup")
async def start_envent():
 await create_tables()

@app.on_event("shutdown")
async def shutdown():
    await engine.dispose()
# 创建异步会话工厂  异步数据库依赖
AsyncSessionLocal = async_sessionmaker(
	bind = async_engine, # 绑定数据库引擎
	class_ = AsyncSession, # 指定会话类
	expire_on_commit =False # 会话对象不过期,不重新查询数据库
)
# 依赖项 用于获取数据库会话
async def get_database():
	async with AsyncSessionLocal() as session:
		try:
			yield sesion # 返回数据库会话给路由处理函数
			await session.commit() # 无异常,提交事务
		except Exception:
			await session.rollback() # 有异常则回滚
			raise
		finally:
		 await session.close() # 关闭会话
@app.get("/book/books")
async def get_book_list(db:AsyncSession = Depends(get_database)):
	#查询所有书籍
	#》获取所有数据
	result = await db.execute(select(Book)) # Book 模型类   返回ORM对象
	book= result.scalars().all()
	# 获取单条数据  方法1
	result = await db.get(Book,ident:5) # Book 模型类  ident:主键
	book= result
	# 获取单条数据  方法2
	result = await db.execute(select(Book)) # Book 模型类  ident:主键  返回ORM对象
	book= result.scalars().first()
	return book
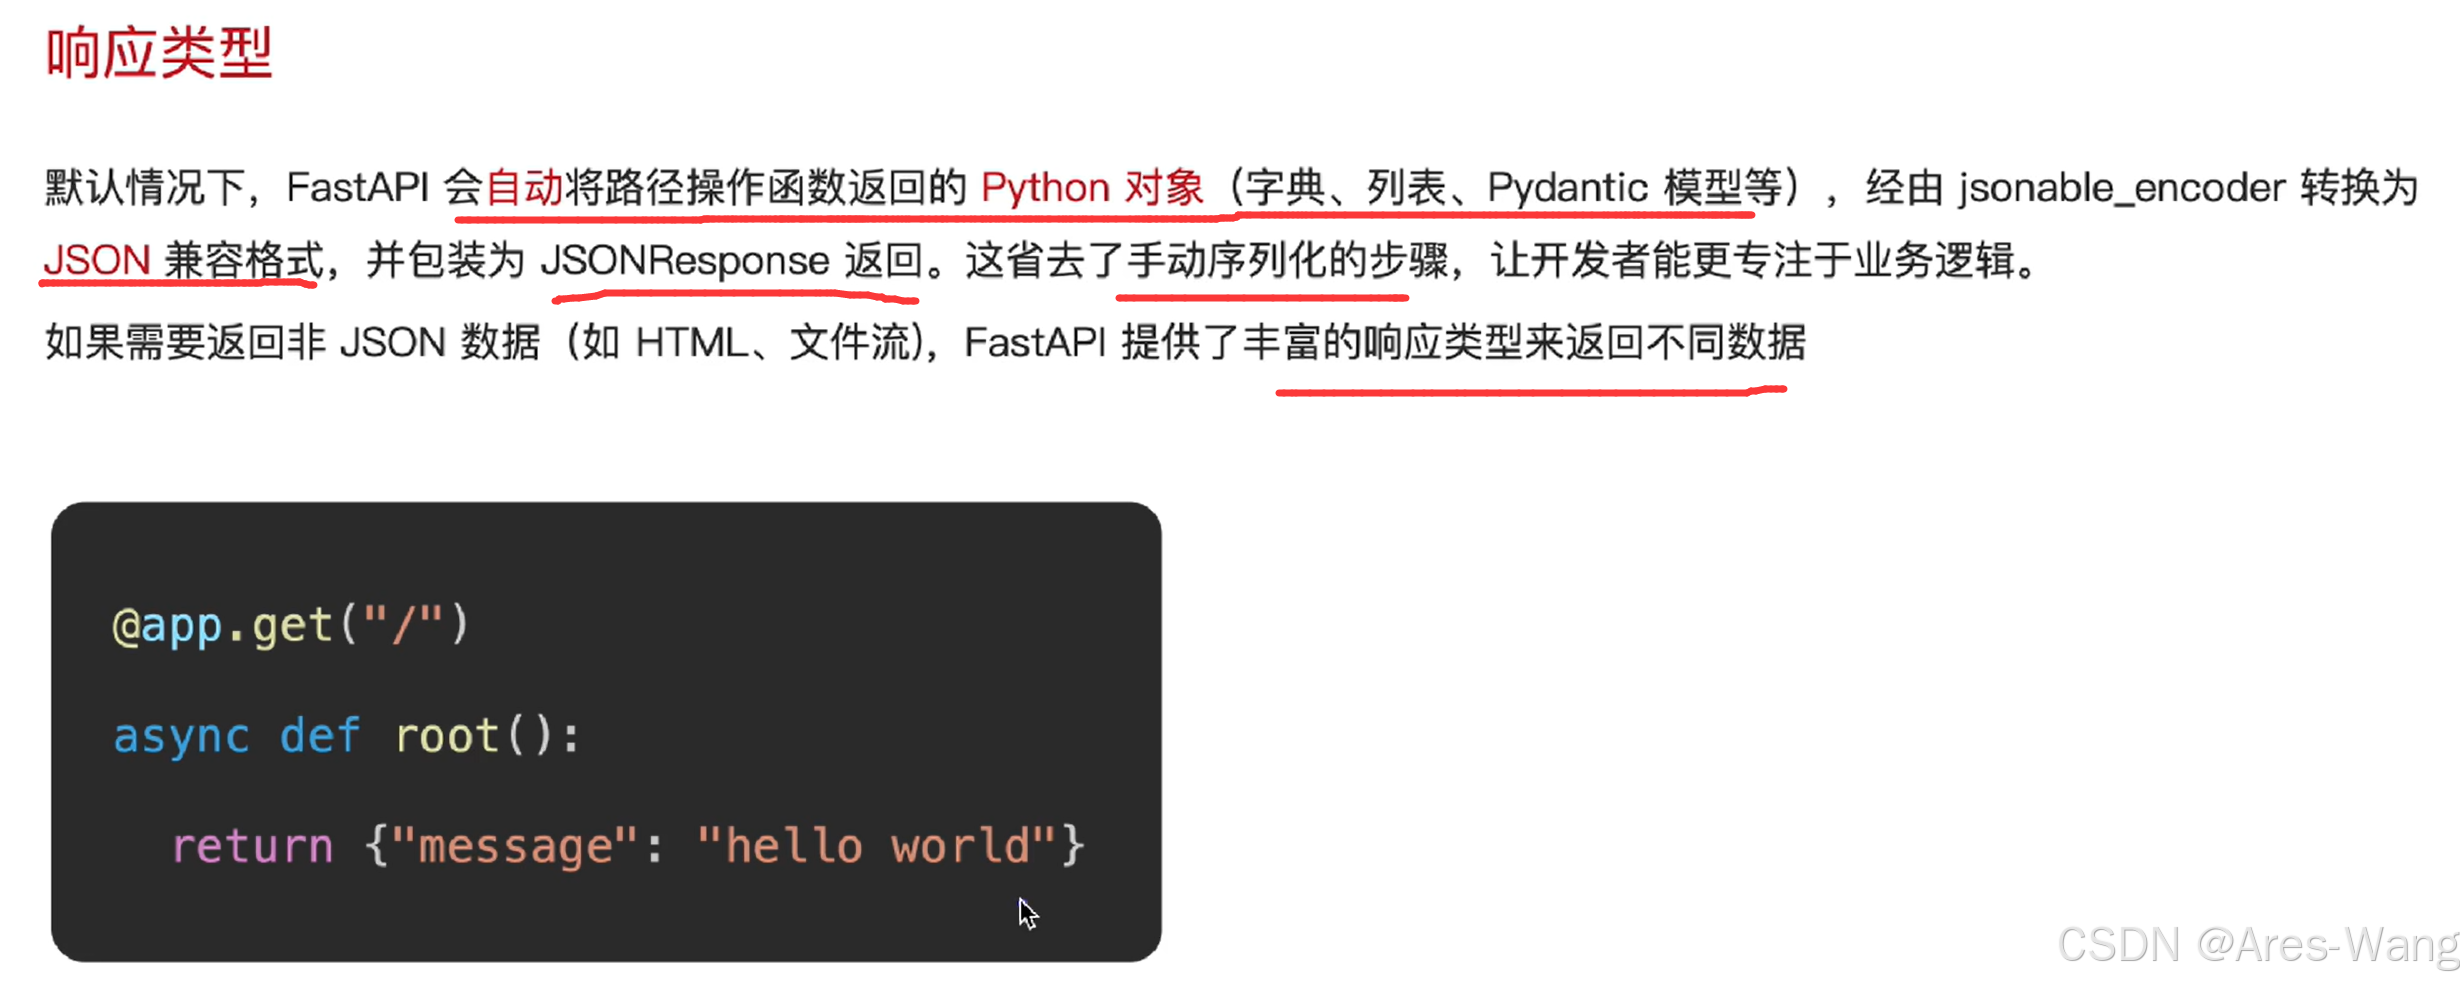
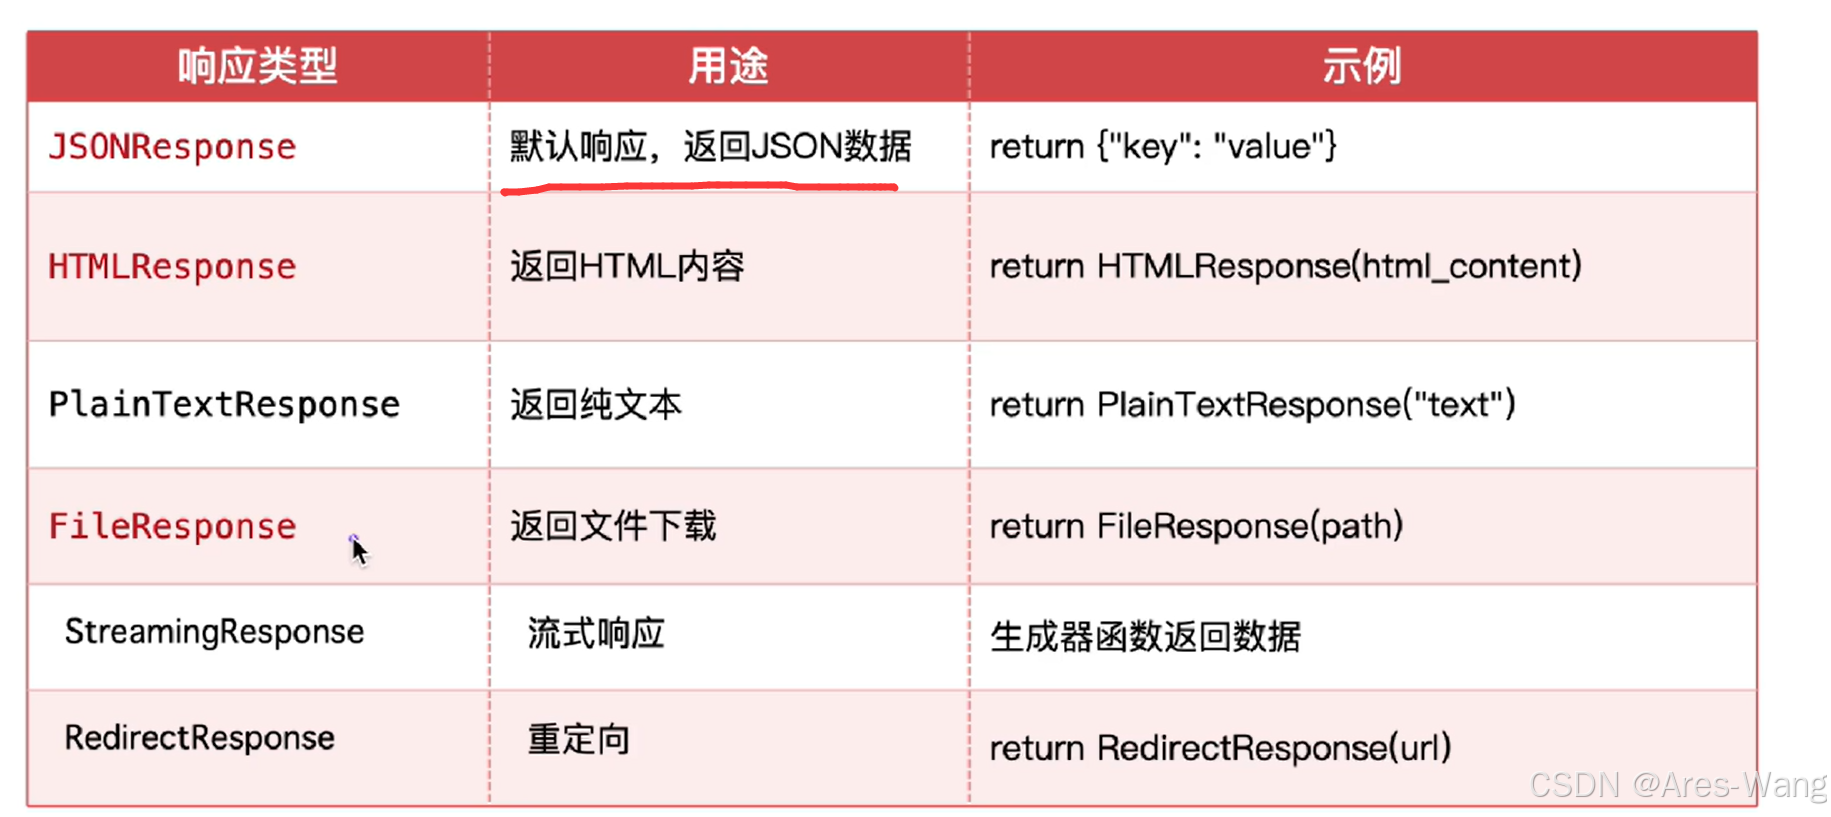
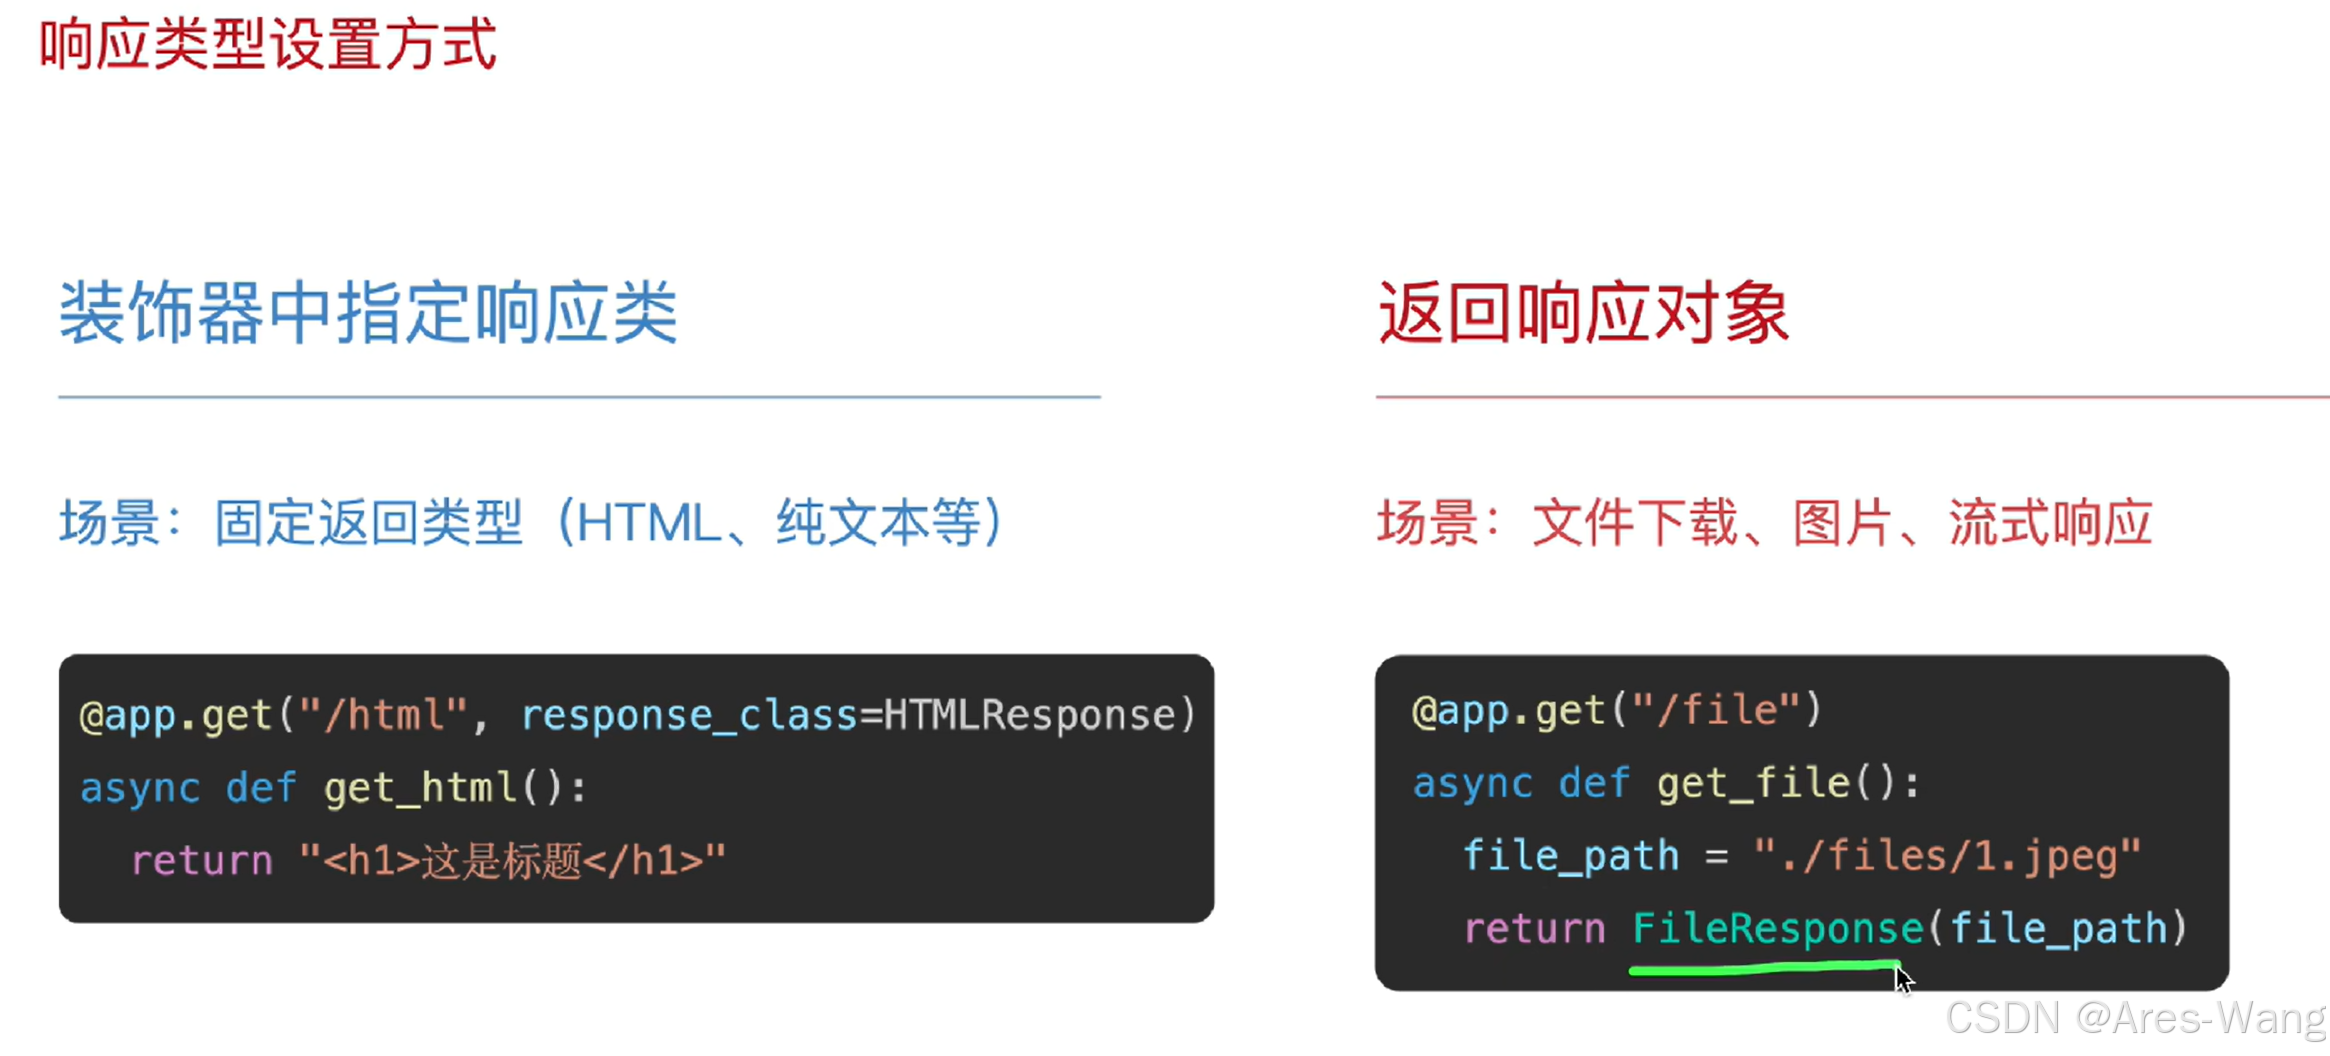
封装通用成功响应格式
# 抽取响应结果   放在 utils/xx.py
def success_response(message:str = "success",data=None):
	content = {"code":200,"message":message,"data":data}
	# 把任何FastAPI、Pydantic、ORM对象 转换可以被Json安全序列化的数据结构
	return JSONResponse(content = jsonable_encoder(content))

# 在pydantic中 定义
from pydantic import BaseModel,Field
class UserRequest(BaseModel):
   pass
# data 数据类型
class UserRequestResponse(UserRequest):
	username:str = Field(...,alias="User_Name")
	nickname:str = Field(...,alias="Nick_Name")
	model_config = ConfigDict(
	  populate_by_name=True
		from_attributes = true  # 允许从ORM对象属性中取值
	)

# 在使用的地方  一般在路由中
@app.get('/user/<id>')
async def getUser(id)
  user = await xxx(id)
	response_data =  UserRequestResponse(use.username,user.nickname)
	success_response(message="xxxx",data=response_data )
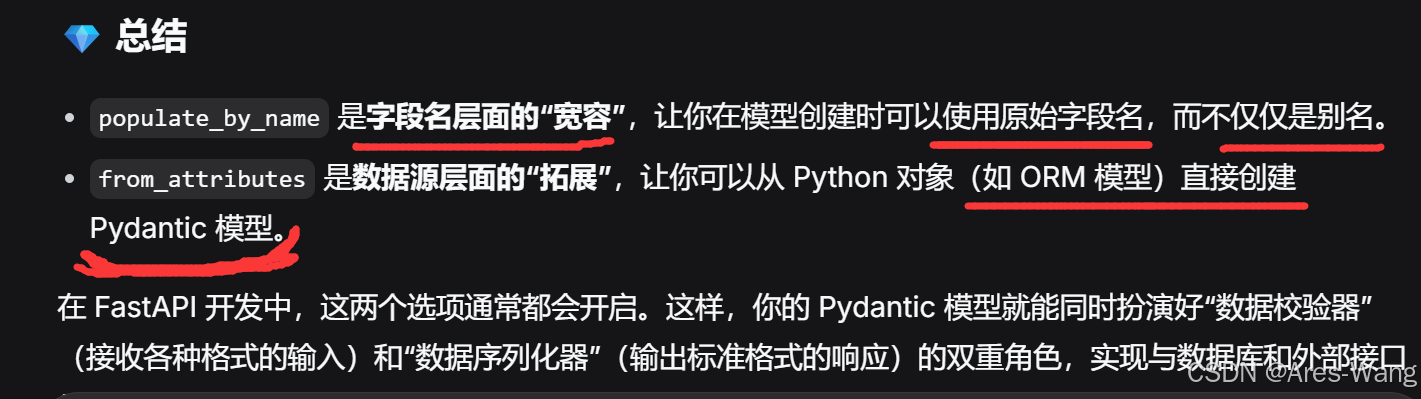
populate_by_name 控制字段别名的使用 from_attributes 实现 ORM 对象到 Pydantic 模型的转换
from pydantic import BaseModel, ConfigDict, Field

# 假设需要兼容前端传过来的 'userName' 字段,但内部希望使用 'user_name'
class User(BaseModel):
    # 这里的 'user_name' 是 Python 代码中访问的属性名
    user_name: str = Field(..., alias='userName')
    # 模型配置将影响实例化时的行为
    model_config = ConfigDict(populate_by_name=True)

# ✅ 使用别名 'userName' 实例化
user1 = User(userName='Alice')
print(f"user1.user_name: {user1.user_name}")
# 输出: user1.user_name: Alice

# ✅ 使用原始字段名 'user_name' 实例化 (因为 populate_by_name=True)
# 如果设置为 False,此行会出错
user2 = User(user_name='Bob')
print(f"user2.user_name: {user_name}")
# 输出: user2.user_name: Bob


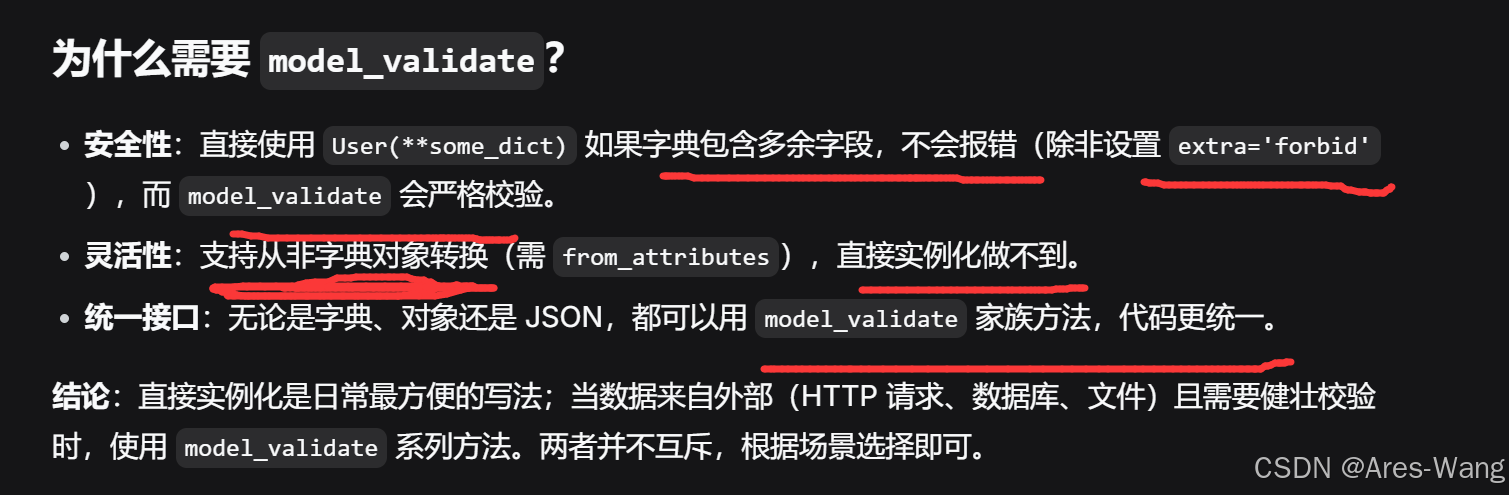
开启 populate_by_name,为使用原始字段名 user_name 提供了便利。否则,只能用别名 userName 来实例化


这是 FastAPI 中最核心的用法,展示如何从 SQLAlchemy 模型实例直接创建 Pydantic 模型
from pydantic import BaseModel, ConfigDict

# 1. SQLAlchemy ORM 模型(假设已定义)
class UserORM:
    def __init__(self, id, name, email):
        self.id = id
        self.name = name
        self.email = email

# 2. Pydantic 模型(用于 API 响应)
class UserResponse(BaseModel):
    id: int
    name: str
    email: str
    # 关键配置:告诉 Pydantic,可以从任意对象的属性中读取数据
    model_config = ConfigDict(from_attributes=True)

# 3. 模拟从数据库查询到的 ORM 对象
user_from_db = UserORM(id=1, name='Charlie', email='charlie@example.com')

# 4. 直接转换,无需手动 user_from_db.__dict__
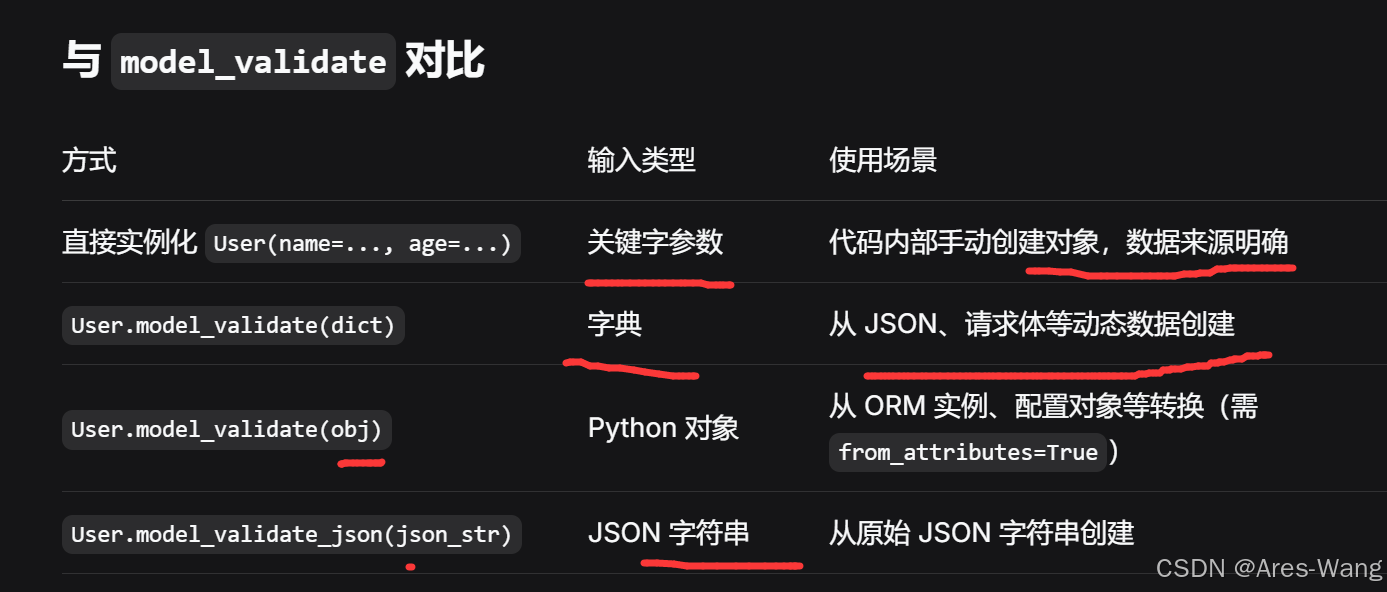
# 可以直接实例化 Pydantic 模型,只需要传入字段值即可。model_validate 用于从字典、其他对象等灵活创建。
user_response = UserResponse.model_validate(user_from_db)
print(user_response)
# 输出: id=1 name='Charlie' email='charlie@example.com'
# 1. 直接实例化(最常见)
user1 = User(name="Bob", age=25)

# 2. 从字典创建
data = {"name": "Charlie", "age": 28}
user2 = User.model_validate(data)   # 等价于 User(**data),但会经过完整验证

# 3. 从 ORM 对象创建
class UserORM:
    def __init__(self, name, age):
        self.name = name
        self.age = age

orm_obj = UserORM("David", 32)
user3 = User.model_validate(orm_obj, from_attributes=True)

# 4. 从 JSON 字符串创建
json_str = '{"name": "Eve", "age": 35}'
user4 = User.model_validate_json(json_str)

腾讯云面向开发者汇聚海量精品云计算使用和开发经验,营造开放的云计算技术生态圈。
更多推荐
 0
0 0
0- 0


 已为社区贡献10条内容

所有评论(0)