Flutter OpenHarmony 三方库 palette_generator 调色板生成适配详解
是 Flutter 官方提供的调色板生成库,能够从图片中提取突出的颜色,生成可用于用户界面的配色方案。该库基于 Median-cut 算法的变体,通过颜色量化技术从图片中提取出最具代表性的颜色组合。在 OpenHarmony 环境下,从图片中提取主色调,自动生成应用主题色生成多种风格的配色方案(鲜艳、柔和、明亮、深沉等)为图片生成对比度合适的文字颜色实现智能主题切换功能是一个函数签名,接收一个HS
欢迎加入开源鸿蒙跨平台社区: https://openharmonycrossplatform.csdn.net
1. 简介
palette_generator 是 Flutter 官方提供的调色板生成库,能够从图片中提取突出的颜色,生成可用于用户界面的配色方案。该库基于 Median-cut 算法的变体,通过颜色量化技术从图片中提取出最具代表性的颜色组合。
在 OpenHarmony 环境下,palette_generator 可以完美运行,帮助开发者实现:
- 从图片中提取主色调,自动生成应用主题色
- 生成多种风格的配色方案(鲜艳、柔和、明亮、深沉等)
- 为图片生成对比度合适的文字颜色
- 实现智能主题切换功能
核心特性
- 六种预设调色目标:vibrant(鲜艳)、lightVibrant(明亮鲜艳)、darkVibrant(深沉鲜艳)、muted(柔和)、lightMuted(明亮柔和)、darkMuted(深沉柔和)
- 自动文字颜色生成:为每个调色颜色生成适合阅读的标题和正文文字颜色
- 自定义调色目标:支持创建自定义的调色目标,满足特殊需求
- 颜色过滤:支持过滤不需要的颜色(如纯黑、纯白、低饱和度红色等)
- 区域提取:支持指定图片的特定区域进行颜色提取
适用场景
- 音乐播放器根据专辑封面生成主题色
- 图片浏览器根据图片动态调整界面配色
- 社交应用根据用户头像生成个性化主题
- 电商应用根据商品图片生成推荐配色
源码仓库
- AtomGit: https://atomgit.com/openharmony-tpc/flutter_packages.git
2. 核心 API 讲解
2.1 创建调色板生成器
2.1.1 PaletteGenerator.fromImageProvider
static Future<PaletteGenerator> fromImageProvider(
  ImageProvider imageProvider, {
  Size? size,
  Rect? region,
  int maximumColorCount = 16,
  List<PaletteFilter> filters = const <PaletteFilter>[
    avoidRedBlackWhitePaletteFilter
  ],
  List<PaletteTarget> targets = const <PaletteTarget>[],
  Duration timeout = const Duration(seconds: 15),
})
参数说明:
| 参数名 | 类型 | 必填 | 默认值 | 说明 |
|---|---|---|---|---|
imageProvider |
ImageProvider |
是 | - | 图片提供者,如 FileImage、AssetImage、NetworkImage 等 |
size |
Size |
否 | null |
图片尺寸,用于指定提取颜色时的图片大小 |
region |
Rect |
否 | null |
指定图片的区域,只提取该区域的颜色 |
maximumColorCount |
int |
否 | 16 |
最大返回颜色数量,默认 16 个 |
filters |
List<PaletteFilter> |
否 | avoidRedBlackWhitePaletteFilter |
颜色过滤器列表,用于过滤不需要的颜色 |
targets |
List<PaletteTarget> |
否 | PaletteTarget.baseTargets |
自定义调色目标列表 |
timeout |
Duration |
否 | 15秒 |
图片加载超时时间 |
功能说明:
这是最常用的创建方法,直接从 ImageProvider 创建调色板。支持各种图片源,包括本地文件、资源文件、网络图片等。
使用场景:
- 从本地图片文件生成调色板
- 从网络图片生成调色板
- 从应用资源图片生成调色板
使用示例:
// 从本地文件生成调色板
final paletteGenerator = await PaletteGenerator.fromImageProvider(
  FileImage(File('/path/to/image.jpg')),
  maximumColorCount: 20,
);

// 从网络图片生成调色板
final paletteGenerator = await PaletteGenerator.fromImageProvider(
  NetworkImage('https://example.com/image.jpg'),
  size: const Size(200, 200),
);

// 从资源图片生成调色板
final paletteGenerator = await PaletteGenerator.fromImageProvider(
  const AssetImage('assets/images/sample.jpg'),
);
2.1.2 PaletteGenerator.fromImage
static Future<PaletteGenerator> fromImage(
  ui.Image image, {
  Rect? region,
  int maximumColorCount = 16,
  List<PaletteFilter> filters = const <PaletteFilter>[
    avoidRedBlackWhitePaletteFilter
  ],
  List<PaletteTarget> targets = const <PaletteTarget>[],
})
参数说明:
| 参数名 | 类型 | 必填 | 默认值 | 说明 |
|---|---|---|---|---|
image |
ui.Image |
是 | - | dart:ui 中的 Image 对象 |
region |
Rect |
否 | null |
指定图片的区域 |
maximumColorCount |
int |
否 | 16 |
最大返回颜色数量 |
filters |
List<PaletteFilter> |
否 | avoidRedBlackWhitePaletteFilter |
颜色过滤器列表 |
targets |
List<PaletteTarget> |
否 | PaletteTarget.baseTargets |
自定义调色目标列表 |
功能说明:
从 dart:ui.Image 对象创建调色板。适用于已经从其他途径获取到 ui.Image 对象的场景。
使用场景:
- 从相机预览帧提取颜色
- 从自定义图片解码器获取的图片
- 从视频帧提取颜色
使用示例:
// 从 ui.Image 生成调色板
final ImageProvider imageProvider = const AssetImage('assets/sample.jpg');
final ImageStream stream = imageProvider.resolve(ImageConfiguration.empty);
final Completer<ui.Image> completer = Completer<ui.Image>();

stream.addListener(ImageStreamListener((ImageInfo info, bool _) {
  completer.complete(info.image);
}));

final ui.Image image = await completer.future;
final paletteGenerator = await PaletteGenerator.fromImage(
  image,
  maximumColorCount: 10,
);
2.1.3 PaletteGenerator.fromByteData
static Future<PaletteGenerator> fromByteData(
  EncodedImage encodedImage, {
  Rect? region,
  int maximumColorCount = 16,
  List<PaletteFilter> filters = const <PaletteFilter>[
    avoidRedBlackWhitePaletteFilter
  ],
  List<PaletteTarget> targets = const <PaletteTarget>[],
})
参数说明:
| 参数名 | 类型 | 必填 | 默认值 | 说明 |
|---|---|---|---|---|
encodedImage |
EncodedImage |
是 | - | 编码后的图片数据,包含 ByteData、width、height |
region |
Rect |
否 | null |
指定图片的区域 |
maximumColorCount |
int |
否 | 16 |
最大返回颜色数量 |
filters |
List<PaletteFilter> |
否 | avoidRedBlackWhitePaletteFilter |
颜色过滤器列表 |
targets |
List<PaletteTarget> |
否 | PaletteTarget.baseTargets |
自定义调色目标列表 |
功能说明:
从原始字节数据创建调色板。这个方法可以在非主 isolate 中使用,因为它不涉及 dart:ui 库的交互。
使用场景:
- 在后台 isolate 中处理图片颜色
- 从自定义图片格式提取颜色
- 高性能批量处理图片
使用示例:
// 从 ByteData 生成调色板
final ByteData byteData = await image.toByteData();
final encodedImage = EncodedImage(
  byteData,
  width: image.width,
  height: image.height,
);

final paletteGenerator = await PaletteGenerator.fromByteData(
  encodedImage,
  maximumColorCount: 12,
);
2.1.4 PaletteGenerator.fromColors
PaletteGenerator.fromColors(
  this.paletteColors, {
  this.targets = const <PaletteTarget>[],
})
参数说明:
| 参数名 | 类型 | 必填 | 默认值 | 说明 |
|---|---|---|---|---|
paletteColors |
List<PaletteColor> |
是 | - | 调色颜色列表 |
targets |
List<PaletteTarget> |
否 | [] |
调色目标列表 |
功能说明:
直接从已有的颜色列表创建调色板。适用于你有自己的颜色信息源,只想使用 palette_generator 的目标选择和评分方法的场景。
使用场景:
- 从其他颜色提取算法获取颜色后,使用 palette_generator 的评分系统
- 自定义颜色量化算法后,使用 palette_generator 进行目标选择
使用示例:
// 从自定义颜色列表生成调色板
final List<PaletteColor> colors = [
  PaletteColor(const Color(0xFFE91E63), 100),
  PaletteColor(const Color(0xFF2196F3), 80),
  PaletteColor(const Color(0xFFFFC107), 60),
];

final paletteGenerator = PaletteGenerator.fromColors(
  colors,
  targets: PaletteTarget.baseTargets,
);
2.2 调色目标(PaletteTarget)
2.2.1 预设调色目标
palette_generator 提供了六种预设的调色目标,每种目标都有不同的饱和度和亮度范围:
| 目标名称 | 说明 | 饱和度范围 | 亮度范围 | 适用场景 |
|---|---|---|---|---|
vibrant |
鲜艳颜色 | 0.35 - 1.0 | 0.3 - 0.7 | 主色调、强调色 |
lightVibrant |
明亮鲜艳 | 0.35 - 1.0 | 0.55 - 1.0 | 背景色、高亮色 |
darkVibrant |
深沉鲜艳 | 0.35 - 1.0 | 0.0 - 0.45 | 深色主题、文字背景 |
muted |
柔和颜色 | 0.0 - 0.4 | 0.3 - 0.7 | 辅助色、边框色 |
lightMuted |
明亮柔和 | 0.0 - 0.4 | 0.55 - 1.0 | 浅色背景、卡片背景 |
darkMuted |
深沉柔和 | 0.0 - 0.4 | 0.0 - 0.45 | 深色背景、阴影色 |
2.2.2 PaletteTarget 构造函数
PaletteTarget({
  this.minimumSaturation = 0.0,
  this.targetSaturation = 0.5,
  this.maximumSaturation = 1.0,
  this.minimumLightness = 0.0,
  this.targetLightness = 0.5,
  this.maximumLightness = 1.0,
  this.isExclusive = true,
})
参数说明:
| 参数名 | 类型 | 默认值 | 说明 |
|---|---|---|---|
minimumSaturation |
double |
0.0 |
最小饱和度值(0.0 - 1.0) |
targetSaturation |
double |
0.5 |
目标饱和度值 |
maximumSaturation |
double |
1.0 |
最大饱和度值 |
minimumLightness |
double |
0.0 |
最小亮度值(0.0 - 1.0) |
targetLightness |
double |
0.5 |
目标亮度值 |
maximumLightness |
double |
1.0 |
最大亮度值 |
isExclusive |
bool |
true |
是否独占颜色,为 true 时该颜色不会被其他目标选中 |
功能说明:
创建自定义调色目标。通过设置饱和度和亮度的范围,可以精确控制要提取的颜色类型。
使用场景:
- 创建特定风格的颜色目标
- 提取特定范围的颜色
- 实现自定义颜色提取逻辑
使用示例:
// 创建自定义目标:提取中等饱和度和亮度的颜色
final customTarget = PaletteTarget(
  minimumSaturation: 0.4,
  targetSaturation: 0.6,
  maximumSaturation: 0.8,
  minimumLightness: 0.3,
  targetLightness: 0.5,
  maximumLightness: 0.7,
  isExclusive: true,
);

final paletteGenerator = await PaletteGenerator.fromImageProvider(
  FileImage(file),
  targets: [customTarget],
);
2.3 调色颜色(PaletteColor)
2.3.1 基本属性
PaletteColor(this.color, this.population);
属性说明:
| 属性名 | 类型 | 说明 |
|---|---|---|
color |
Color |
颜色值 |
population |
int |
该颜色在原图中代表的像素数量 |
titleTextColor |
Color |
适合用于标题文字的颜色 |
bodyTextColor |
Color |
适合用于正文文字的颜色 |
功能说明:
PaletteColor 表示从图片中提取的一个调色颜色,包含了颜色值、像素数量以及自动生成的文字颜色。
使用示例:
// 获取鲜艳颜色
final vibrantColor = paletteGenerator.vibrantColor;
if (vibrantColor != null) {
  print('颜色: ${vibrantColor.color}');
  print('像素数量: ${vibrantColor.population}');
  print('标题文字颜色: ${vibrantColor.titleTextColor}');
  print('正文文字颜色: ${vibrantColor.bodyTextColor}');
}
2.4 调色板生成器属性
2.4.1 获取调色颜色
// 获取鲜艳颜色
PaletteColor? get vibrantColor

// 获取明亮鲜艳颜色
PaletteColor? get lightVibrantColor

// 获取深沉鲜艳颜色
PaletteColor? get darkVibrantColor

// 获取柔和颜色
PaletteColor? get mutedColor

// 获取明亮柔和颜色
PaletteColor? get lightMutedColor

// 获取深沉柔和颜色
PaletteColor? get darkMutedColor

// 获取主导颜色(像素数量最多的颜色)
PaletteColor? get dominantColor
功能说明:
这些属性返回对应目标选中的调色颜色。如果找不到合适的颜色,可能返回 null。
使用示例:
final paletteGenerator = await PaletteGenerator.fromImageProvider(
  FileImage(file),
);

// 获取各种调色颜色
final vibrant = paletteGenerator.vibrantColor?.color;
final lightVibrant = paletteGenerator.lightVibrantColor?.color;
final darkVibrant = paletteGenerator.darkVibrantColor?.color;
final muted = paletteGenerator.mutedColor?.color;
final lightMuted = paletteGenerator.lightMutedColor?.color;
final darkMuted = paletteGenerator.darkMutedColor?.color;
final dominant = paletteGenerator.dominantColor?.color;
2.4.2 获取所有颜色
// 获取所有调色颜色列表(按像素数量排序)
final List<PaletteColor> paletteColors

// 获取所有颜色值(Iterable<Color>)
Iterable<Color> get colors

// 获取选中的调色目标映射
final Map<PaletteTarget, PaletteColor> selectedSwatches
功能说明:
paletteColors 返回所有提取的颜色,按像素数量从多到少排序。colors 是便捷属性,直接返回颜色迭代器。selectedSwatches 包含每个目标选中的颜色。
使用示例:
// 遍历所有颜色
for (final color in paletteGenerator.colors) {
  print('颜色: $color');
}

// 获取前 5 个主导颜色
final topColors = paletteGenerator.paletteColors.take(5).toList();
for (final color in topColors) {
  print('颜色: ${color.color}, 像素数量: ${color.population}');
}
2.5 颜色过滤器(PaletteFilter)
2.5.1 avoidRedBlackWhitePaletteFilter
bool avoidRedBlackWhitePaletteFilter(HSLColor color)
功能说明:
默认的颜色过滤器,会过滤掉白色、黑色和低饱和度的红色。这是 palette_generator 的默认过滤器。
使用示例:
// 使用默认过滤器
final paletteGenerator = await PaletteGenerator.fromImageProvider(
  FileImage(file),
  filters: const <PaletteFilter>[
    avoidRedBlackWhitePaletteFilter
  ],
);

// 不使用任何过滤器
final paletteGenerator = await PaletteGenerator.fromImageProvider(
  FileImage(file),
  filters: const <PaletteFilter>[],
);
2.5.2 自定义过滤器
typedef PaletteFilter = bool Function(HSLColor color);
功能说明:
PaletteFilter 是一个函数签名,接收一个 HSLColor 参数,返回 true 表示允许该颜色,返回 false 表示过滤掉该颜色。
使用示例:
// 自定义过滤器:过滤掉蓝色
bool noBlueFilter(HSLColor color) {
  return color.hue < 180 || color.hue > 260;
}

// 自定义过滤器:只保留高饱和度颜色
bool highSaturationFilter(HSLColor color) {
  return color.saturation > 0.6;
}

// 使用自定义过滤器
final paletteGenerator = await PaletteGenerator.fromImageProvider(
  FileImage(file),
  filters: <PaletteFilter>[
    highSaturationFilter,
  ],
);
2.6 其他辅助类
2.6.1 EncodedImage
const EncodedImage(
  this.byteData, {
  required this.width,
  required this.height,
});
属性说明:
| 属性名 | 类型 | 说明 |
|---|---|---|
byteData |
ByteData |
图片字节数据 |
width |
int |
图片宽度 |
height |
int |
图片高度 |
功能说明:
用于 fromByteData 方法,封装图片的字节数据和尺寸信息。图片编码必须是 RGBA 格式,每通道 8 位。
3. 使用示例
3.1 基础使用:从图片提取调色板
import 'dart:io';
import 'package:flutter/material.dart';
import 'package:palette_generator/palette_generator.dart';

Future<void> extractColors(File imageFile) async {
  final PaletteGenerator paletteGenerator =
      await PaletteGenerator.fromImageProvider(
    FileImage(imageFile),
  );

  print('鲜艳颜色: ${paletteGenerator.vibrantColor?.color}');
  print('柔和颜色: ${paletteGenerator.mutedColor?.color}');
  print('主导颜色: ${paletteGenerator.dominantColor?.color}');
}
3.2 指定区域提取颜色
import 'dart:io';
import 'package:flutter/material.dart';
import 'package:palette_generator/palette_generator.dart';

Future<void> extractRegionColors(File imageFile) async {
  final PaletteGenerator paletteGenerator =
      await PaletteGenerator.fromImageProvider(
    FileImage(imageFile),
    size: const Size(800, 600),
    region: const Rect.fromLTWH(100, 100, 300, 300), // 只提取中心区域
    maximumColorCount: 10,
  );

  print('区域颜色数量: ${paletteGenerator.colors.length}');
}
3.3 自定义调色目标
import 'dart:io';
import 'package:flutter/material.dart';
import 'package:palette_generator/palette_generator.dart';

Future<void> customTargets(File imageFile) async {
  // 创建自定义目标:提取暖色调
  final warmTarget = PaletteTarget(
    minimumSaturation: 0.4,
    targetSaturation: 0.7,
    maximumSaturation: 1.0,
    minimumLightness: 0.3,
    targetLightness: 0.6,
    maximumLightness: 0.8,
    isExclusive: true,
  );

  final PaletteGenerator paletteGenerator =
      await PaletteGenerator.fromImageProvider(
    FileImage(imageFile),
    targets: [warmTarget],
  );

  print('暖色调: ${paletteGenerator.selectedSwatches[warmTarget]?.color}');
}
3.4 获取文字颜色
import 'dart:io';
import 'package:flutter/material.dart';
import 'package:palette_generator/palette_generator.dart';

Future<void> getTextColors(File imageFile) async {
  final PaletteGenerator paletteGenerator =
      await PaletteGenerator.fromImageProvider(
    FileImage(imageFile),
  );

  final vibrantColor = paletteGenerator.vibrantColor;
  if (vibrantColor != null) {
    print('背景颜色: ${vibrantColor.color}');
    print('标题文字颜色: ${vibrantColor.titleTextColor}');
    print('正文文字颜色: ${vibrantColor.bodyTextColor}');
  }
}
4. 完整代码
4.1 智能主题色生成器
import 'dart:io';
import 'package:flutter/material.dart';
import 'package:image_picker/image_picker.dart';
import 'package:palette_generator/palette_generator.dart';
void main() {
runApp(const MyApp());
}
class MyApp extends StatelessWidget {
const MyApp({super.key});
Widget build(BuildContext context) {
return MaterialApp(
title: '智能主题色生成器',
debugShowCheckedModeBanner: false,
theme: ThemeData(
colorScheme: ColorScheme.fromSeed(seedColor: Colors.deepPurple),
useMaterial3: true,
brightness: Brightness.light,
),
home: const ThemeGeneratorScreen(),
);
}
}
class ThemeGeneratorScreen extends StatefulWidget {
const ThemeGeneratorScreen({super.key});
State<ThemeGeneratorScreen> createState() => _ThemeGeneratorScreenState();
}
class _ThemeGeneratorScreenState extends State<ThemeGeneratorScreen> {
final ImagePicker _picker = ImagePicker();
File? _selectedImage;
PaletteGenerator? _paletteGenerator;
bool _isAnalyzing = false;
Future<void> _pickImage(ImageSource source) async {
final XFile? image = await _picker.pickImage(source: source);
if (image != null) {
setState(() {
_selectedImage = File(image.path);
_isAnalyzing = true;
});
await _analyzeImage();
}
}
Future<void> _analyzeImage() async {
try {
final palette = await PaletteGenerator.fromImageProvider(
FileImage(_selectedImage!),
maximumColorCount: 20,
);
setState(() {
_paletteGenerator = palette;
_isAnalyzing = false;
});
} catch (e) {
setState(() {
_isAnalyzing = false;
});
if (mounted) {
ScaffoldMessenger.of(context).showSnackBar(
SnackBar(content: Text('分析失败: $e')),
);
}
}
}
void _showImageSourceDialog() {
showDialog(
context: context,
builder: (context) => AlertDialog(
title: const Text('选择图片来源'),
content: Column(
mainAxisSize: MainAxisSize.min,
children: [
ListTile(
leading: const Icon(Icons.photo_library, color: Colors.blue),
title: const Text('从相册选择'),
onTap: () {
Navigator.pop(context);
_pickImage(ImageSource.gallery);
},
),
ListTile(
leading: const Icon(Icons.camera_alt, color: Colors.green),
title: const Text('拍照'),
onTap: () {
Navigator.pop(context);
_pickImage(ImageSource.camera);
},
),
],
),
),
);
}
Widget build(BuildContext context) {
return Scaffold(
body: CustomScrollView(
slivers: [
// 顶部应用栏
SliverAppBar(
expandedHeight: 200,
floating: false,
pinned: true,
flexibleSpace: FlexibleSpaceBar(
title: const Text(
'智能主题色生成器',
style: TextStyle(
fontWeight: FontWeight.bold,
shadows: [
Shadow(
color: Colors.black54,
blurRadius: 4,
offset: Offset(0, 2),
),
],
),
),
background: _selectedImage != null
? Image.file(
_selectedImage!,
fit: BoxFit.cover,
)
: Container(
decoration: BoxDecoration(
gradient: LinearGradient(
begin: Alignment.topLeft,
end: Alignment.bottomRight,
colors: [
Colors.deepPurple.shade400,
Colors.purple.shade300,
Colors.pink.shade300,
],
),
),
child: const Center(
child: Icon(
Icons.palette_outlined,
size: 80,
color: Colors.white70,
),
),
),
),
actions: [
if (_selectedImage != null)
IconButton(
icon: const Icon(Icons.refresh),
onPressed: _analyzeImage,
tooltip: '重新分析',
),
],
),
// 内容区域
if (_isAnalyzing)
const SliverFillRemaining(
child: Center(
child: Column(
mainAxisAlignment: MainAxisAlignment.center,
children: [
CircularProgressIndicator(),
SizedBox(height: 16),
Text(
'正在分析图片...',
style: TextStyle(fontSize: 16, color: Colors.grey),
),
],
),
),
)
else if (_selectedImage == null)
SliverFillRemaining(
child: Center(
child: Column(
mainAxisAlignment: MainAxisAlignment.center,
children: [
Container(
padding: const EdgeInsets.all(32),
decoration: BoxDecoration(
color: Colors.grey.shade100,
shape: BoxShape.circle,
),
child: const Icon(
Icons.image_search,
size: 100,
color: Colors.grey,
),
),
const SizedBox(height: 24),
const Text(
'选择一张图片生成主题色',
style: TextStyle(
fontSize: 18,
color: Colors.grey,
),
),
const SizedBox(height: 32),
ElevatedButton.icon(
onPressed: _showImageSourceDialog,
icon: const Icon(Icons.add_photo_alternate),
label: const Text('选择图片'),
style: ElevatedButton.styleFrom(
padding: const EdgeInsets.symmetric(
horizontal: 32,
vertical: 16,
),
),
),
],
),
),
)
else if (_paletteGenerator != null)
SliverPadding(
padding: const EdgeInsets.all(16),
sliver: SliverList(
delegate: SliverChildListDelegate([
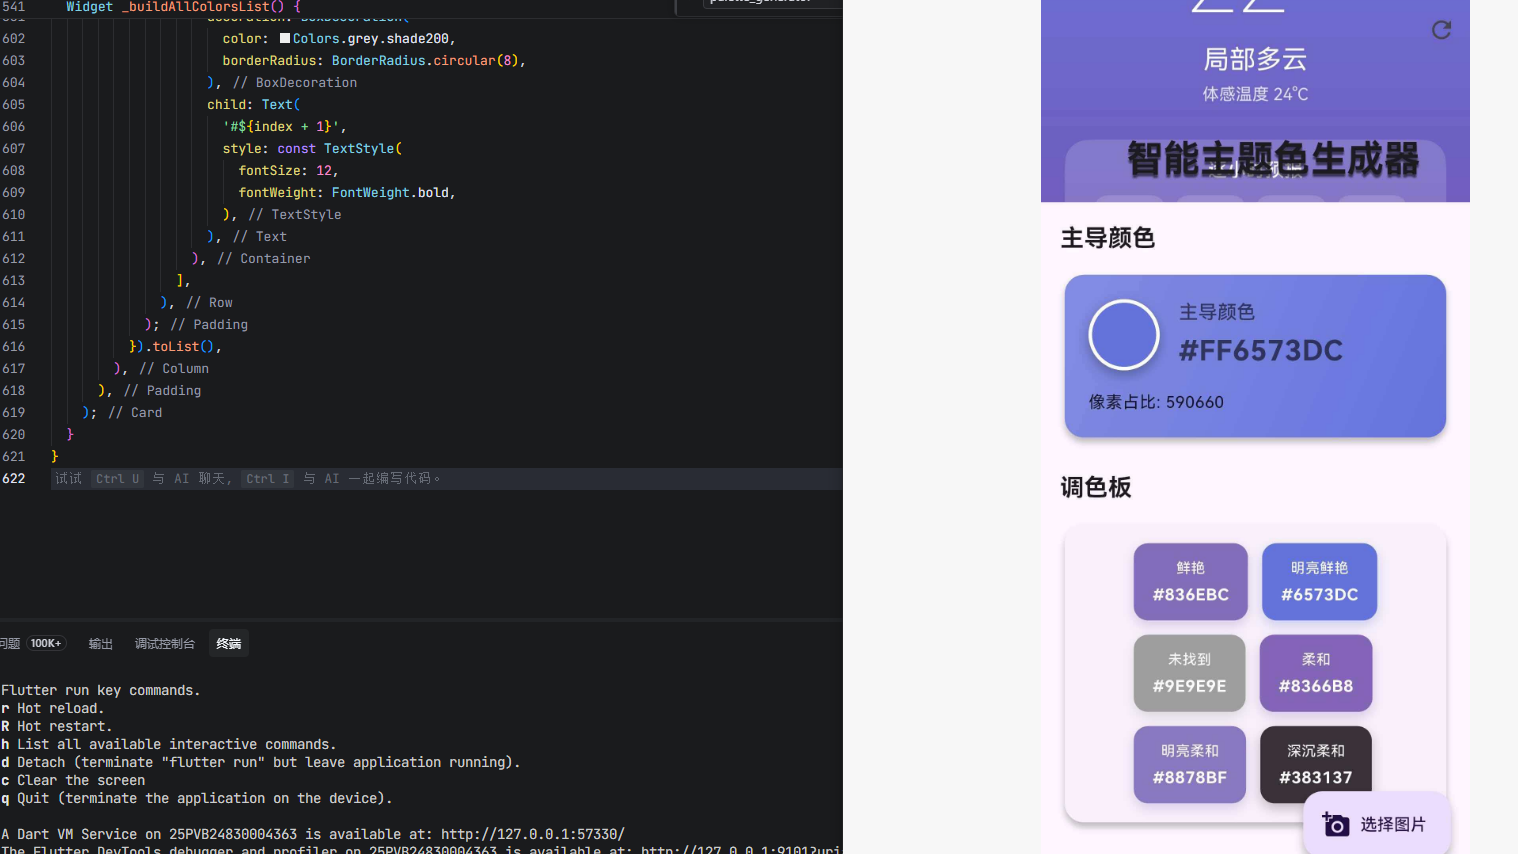
// 主导颜色展示
_buildSectionTitle('主导颜色'),
_buildDominantColorCard(),
const SizedBox(height: 24),
// 调色板展示
_buildSectionTitle('调色板'),
_buildPaletteCard(),
const SizedBox(height: 24),
// 主题预览
_buildSectionTitle('主题预览'),
_buildThemePreview(),
const SizedBox(height: 24),
// 所有颜色列表
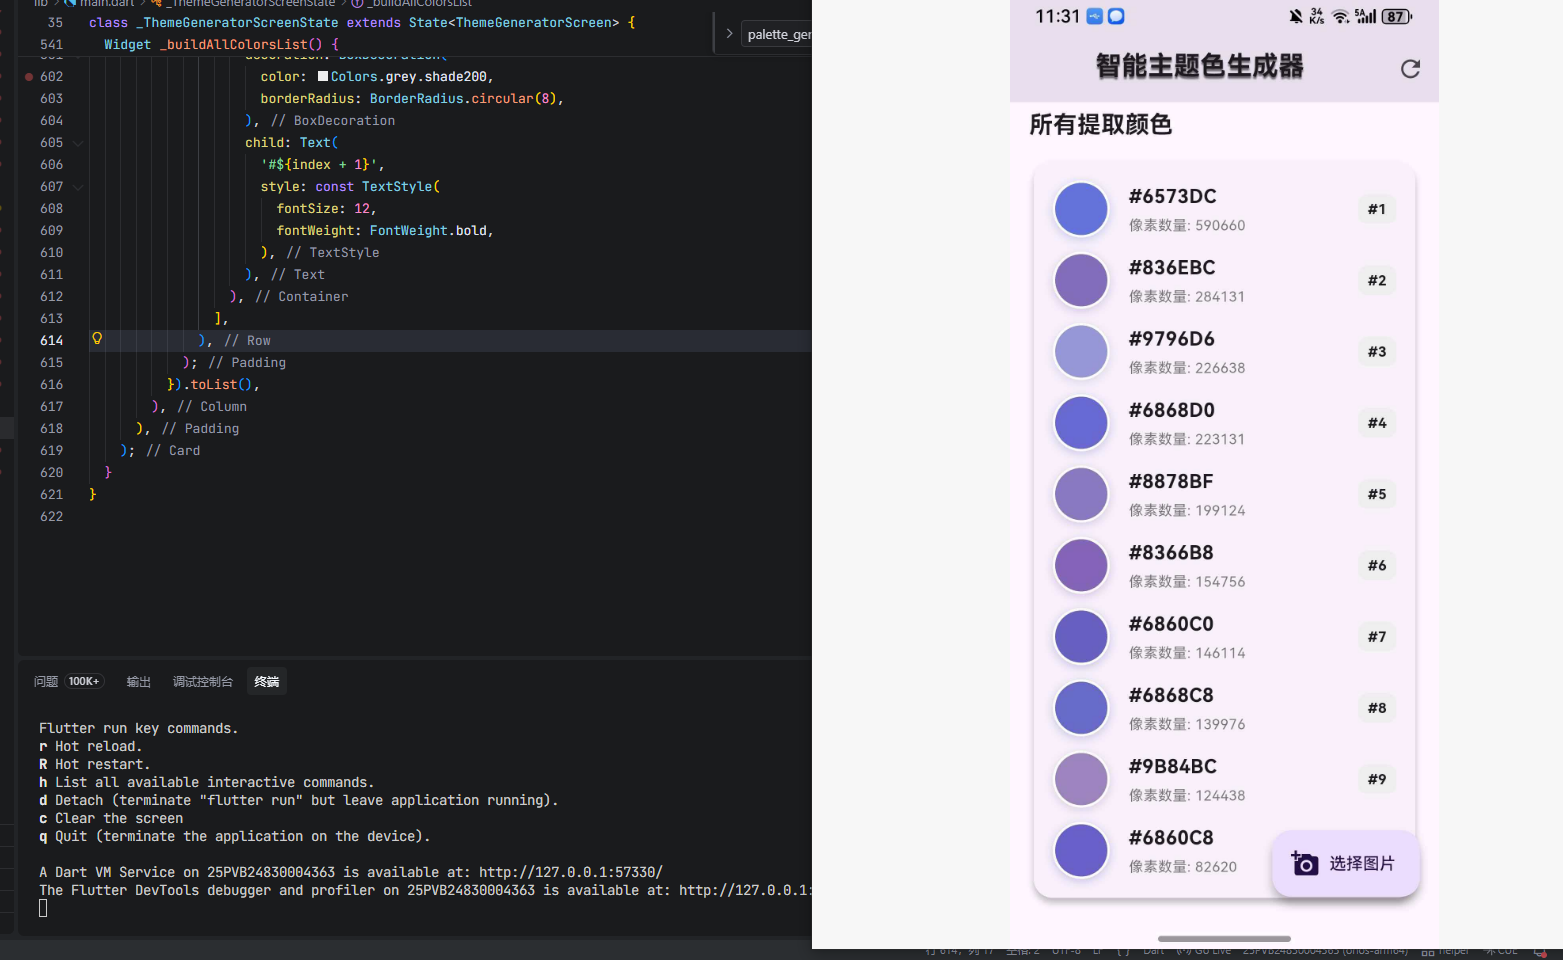
_buildSectionTitle('所有提取颜色'),
_buildAllColorsList(),
const SizedBox(height: 100),
]),
),
),
],
),
floatingActionButton: FloatingActionButton.extended(
onPressed: _showImageSourceDialog,
icon: const Icon(Icons.add_a_photo),
label: const Text('选择图片'),
),
);
}
Widget _buildSectionTitle(String title) {
return Padding(
padding: const EdgeInsets.only(bottom: 12),
child: Text(
title,
style: const TextStyle(
fontSize: 20,
fontWeight: FontWeight.bold,
),
),
);
}
Widget _buildDominantColorCard() {
final dominantColor = _paletteGenerator!.dominantColor;
if (dominantColor == null) {
return const Card(
child: Padding(
padding: EdgeInsets.all(16),
child: Text('未找到主导颜色'),
),
);
}
return Card(
elevation: 4,
shape: RoundedRectangleBorder(borderRadius: BorderRadius.circular(16)),
child: Container(
padding: const EdgeInsets.all(20),
decoration: BoxDecoration(
borderRadius: BorderRadius.circular(16),
gradient: LinearGradient(
begin: Alignment.topLeft,
end: Alignment.bottomRight,
colors: [
dominantColor.color.withOpacity(0.8),
dominantColor.color,
],
),
),
child: Column(
crossAxisAlignment: CrossAxisAlignment.start,
children: [
Row(
children: [
Container(
width: 60,
height: 60,
decoration: BoxDecoration(
color: dominantColor.color,
shape: BoxShape.circle,
border: Border.all(color: Colors.white, width: 3),
boxShadow: [
BoxShadow(
color: Colors.black26,
blurRadius: 8,
offset: const Offset(0, 4),
),
],
),
),
const SizedBox(width: 16),
Expanded(
child: Column(
crossAxisAlignment: CrossAxisAlignment.start,
children: [
Text(
'主导颜色',
style: TextStyle(
fontSize: 16,
color: dominantColor.titleTextColor,
fontWeight: FontWeight.w500,
),
),
const SizedBox(height: 4),
Text(
'#${dominantColor.color.value.toRadixString(16).padLeft(8, '0').toUpperCase()}',
style: TextStyle(
fontSize: 24,
fontWeight: FontWeight.bold,
color: dominantColor.titleTextColor,
),
),
],
),
),
],
),
const SizedBox(height: 16),
Text(
'像素占比: ${dominantColor.population}',
style: TextStyle(
fontSize: 14,
color: dominantColor.bodyTextColor,
),
),
],
),
),
);
}
Widget _buildPaletteCard() {
final colors = [
{'name': '鲜艳', 'color': _paletteGenerator!.vibrantColor?.color},
{'name': '明亮鲜艳', 'color': _paletteGenerator!.lightVibrantColor?.color},
{'name': '深沉鲜艳', 'color': _paletteGenerator!.darkVibrantColor?.color},
{'name': '柔和', 'color': _paletteGenerator!.mutedColor?.color},
{'name': '明亮柔和', 'color': _paletteGenerator!.lightMutedColor?.color},
{'name': '深沉柔和', 'color': _paletteGenerator!.darkMutedColor?.color},
];
return Card(
elevation: 4,
shape: RoundedRectangleBorder(borderRadius: BorderRadius.circular(16)),
child: Padding(
padding: const EdgeInsets.all(16),
child: Column(
children: [
Wrap(
spacing: 12,
runSpacing: 12,
children: colors.map((item) {
if (item['color'] == null) {
return _buildColorChip('未找到', Colors.grey);
}
return _buildColorChip(
item['name'] as String,
item['color'] as Color,
);
}).toList(),
),
],
),
),
);
}
Widget _buildColorChip(String label, Color color) {
return Container(
padding: const EdgeInsets.symmetric(horizontal: 16, vertical: 12),
decoration: BoxDecoration(
color: color,
borderRadius: BorderRadius.circular(12),
boxShadow: [
BoxShadow(
color: color.withOpacity(0.3),
blurRadius: 8,
offset: const Offset(0, 4),
),
],
),
child: Column(
children: [
Text(
label,
style: TextStyle(
fontSize: 12,
color: _getTextColor(color),
fontWeight: FontWeight.w500,
),
),
const SizedBox(height: 4),
Text(
'#${color.value.toRadixString(16).padLeft(8, '0').substring(2).toUpperCase()}',
style: TextStyle(
fontSize: 14,
fontWeight: FontWeight.bold,
color: _getTextColor(color),
),
),
],
),
);
}
Color _getTextColor(Color bgColor) {
final luminance = bgColor.computeLuminance();
return luminance > 0.5 ? Colors.black87 : Colors.white;
}
Widget _buildThemePreview() {
final vibrantColor = _paletteGenerator!.vibrantColor?.color ?? Colors.blue;
final lightColor =
_paletteGenerator!.lightVibrantColor?.color ?? Colors.blue.shade100;
final darkColor =
_paletteGenerator!.darkVibrantColor?.color ?? Colors.blue.shade900;
return Card(
elevation: 4,
shape: RoundedRectangleBorder(borderRadius: BorderRadius.circular(16)),
child: Padding(
padding: const EdgeInsets.all(16),
child: Column(
children: [
// 模拟应用栏
Container(
width: double.infinity,
padding: const EdgeInsets.all(16),
decoration: BoxDecoration(
color: vibrantColor,
borderRadius: const BorderRadius.vertical(
top: Radius.circular(12),
),
),
child: Row(
children: [
Icon(Icons.menu, color: _getTextColor(vibrantColor)),
const SizedBox(width: 16),
Text(
'应用栏预览',
style: TextStyle(
fontSize: 18,
fontWeight: FontWeight.bold,
color: _getTextColor(vibrantColor),
),
),
],
),
),
const SizedBox(height: 16),
// 模拟卡片
Container(
width: double.infinity,
padding: const EdgeInsets.all(16),
decoration: BoxDecoration(
color: lightColor.withOpacity(0.3),
borderRadius: BorderRadius.circular(12),
border: Border.all(color: lightColor),
),
child: Column(
crossAxisAlignment: CrossAxisAlignment.start,
children: [
Text(
'卡片标题',
style: TextStyle(
fontSize: 16,
fontWeight: FontWeight.bold,
color: darkColor,
),
),
const SizedBox(height: 8),
Text(
'这是卡片内容预览,展示主题色在实际界面中的应用效果。',
style: TextStyle(
fontSize: 14,
color: Colors.grey.shade700,
),
),
const SizedBox(height: 12),
Row(
children: [
ElevatedButton(
onPressed: () {},
style: ElevatedButton.styleFrom(
backgroundColor: vibrantColor,
foregroundColor: _getTextColor(vibrantColor),
),
child: const Text('主要按钮'),
),
const SizedBox(width: 12),
OutlinedButton(
onPressed: () {},
style: OutlinedButton.styleFrom(
foregroundColor: vibrantColor,
side: BorderSide(color: vibrantColor),
),
child: const Text('次要按钮'),
),
],
),
],
),
),
],
),
),
);
}
Widget _buildAllColorsList() {
final topColors = _paletteGenerator!.paletteColors.take(10).toList();
return Card(
elevation: 4,
shape: RoundedRectangleBorder(borderRadius: BorderRadius.circular(16)),
child: Padding(
padding: const EdgeInsets.all(16),
child: Column(
children: topColors.asMap().entries.map((entry) {
final index = entry.key;
final paletteColor = entry.value;
return Padding(
padding: EdgeInsets.only(bottom: index < topColors.length - 1 ? 12 : 0),
child: Row(
children: [
Container(
width: 48,
height: 48,
decoration: BoxDecoration(
color: paletteColor.color,
shape: BoxShape.circle,
border: Border.all(color: Colors.white, width: 2),
boxShadow: [
BoxShadow(
color: paletteColor.color.withOpacity(0.3),
blurRadius: 6,
offset: const Offset(0, 2),
),
],
),
),
const SizedBox(width: 16),
Expanded(
child: Column(
crossAxisAlignment: CrossAxisAlignment.start,
children: [
Text(
'#${paletteColor.color.value.toRadixString(16).padLeft(8, '0').substring(2).toUpperCase()}',
style: const TextStyle(
fontSize: 16,
fontWeight: FontWeight.bold,
),
),
const SizedBox(height: 4),
Text(
'像素数量: ${paletteColor.population}',
style: TextStyle(
fontSize: 12,
color: Colors.grey.shade600,
),
),
],
),
),
Container(
padding: const EdgeInsets.symmetric(
horizontal: 8,
vertical: 4,
),
decoration: BoxDecoration(
color: Colors.grey.shade200,
borderRadius: BorderRadius.circular(8),
),
child: Text(
'#${index + 1}',
style: const TextStyle(
fontSize: 12,
fontWeight: FontWeight.bold,
),
),
),
],
),
);
}).toList(),
),
),
);
}
}
4.2 依赖配置
在 pubspec.yaml 中添加以下依赖:
dependencies:
  flutter:
    sdk: flutter
  palette_generator:
    git:
      url: https://atomgit.com/openharmony-tpc/flutter_packages.git
      path: packages/palette_generator
      ref: master
  image_picker:
    git:
      url: https://atomgit.com/openharmony-tpc/flutter_packages.git
      path: packages/image_picker/image_picker
      ref: master
注意:palette_generator 是纯 Dart 库,在 OpenHarmony 环境下可以直接使用,但为了保持项目依赖的一致性,建议从 AtomGit 的 OpenHarmony 适配仓库引入。
5. 注意事项
- 图片大小:建议处理前将图片缩放到合适大小(如 200x200),可以提高分析速度
- 异步操作:
PaletteGenerator的创建是异步操作,需要使用await - 空值处理:某些调色目标可能找不到合适的颜色,返回
null,需要做好空值判断 - 颜色过滤:默认会过滤掉黑色、白色和低饱和度红色,如需保留可自定义过滤器
- 内存管理:处理大图片时注意内存使用,建议限制
maximumColorCount - 区域提取:使用
region参数时需要同时指定size参数 - 超时设置:网络图片加载可能超时,可适当调整
timeout参数
6. 总结
palette_generator 是 Flutter 官方提供的强大调色板生成库,在 OpenHarmony 环境下可以完美运行。通过本文章的学习,我们掌握了:
- 四种创建调色板的方法:
fromImageProvider、fromImage、fromByteData、fromColors - 六种预设调色目标的使用场景和特性
- 自定义调色目标和颜色过滤器的实现方式
PaletteColor的属性,包括自动生成的文字颜色- 完整的"智能主题色生成器"应用实现
通过 palette_generator,你可以轻松实现图片主题色提取、智能配色、动态主题切换等功能,为应用增添更多个性化色彩。

腾讯云面向开发者汇聚海量精品云计算使用和开发经验,营造开放的云计算技术生态圈。
更多推荐
 12
12 0
0- 0


 已为社区贡献22条内容

所有评论(0)