Flutter for OpenHarmony高级闹钟App实战:历史记录实现
历史记录功能能让用户回顾每次闹钟的响铃情况,包括响铃时间、关闭方式、贪睡次数等等。说实话,这些数据不仅能帮用户了解自己的作息习惯,还能为后续的统计分析提供基础数据。
咱们这次要实现的历史记录功能,不仅要记录基本信息,还要支持筛选、搜索、导出等高级功能。做这个模块的时候,我一直在想怎么让数据既详细又不占太多存储空间,最后决定用合理的字段设计和自动清理机制来平衡。
历史记录数据模型
首先定义历史记录的数据结构。
import 'package:flutter/material.dart';

/// 闹钟历史记录
class AlarmHistory {
  final String id;
  final String alarmId;
  final String alarmLabel;
  final DateTime scheduledTime;
  final DateTime actualTime;
  final DateTime? dismissedTime;
  final DismissMethod dismissMethod;
  final int snoozeCount;
  final Duration? responseTime;
字段设计考虑:id是历史记录的唯一标识,alarmId关联到具体的闹钟。scheduledTime记录计划响铃时间,actualTime记录实际响铃时间,两者对比能看出闹钟是否准时。
可空字段:dismissedTime可能为null,因为用户可能还没关闭闹钟。responseTime也可空,表示从响铃到关闭的时长,这个数据对分析用户反应速度很有用。
  final bool challengeCompleted;
  final String? notes;

  const AlarmHistory({
    required this.id,
    required this.alarmId,
    required this.alarmLabel,
    required this.scheduledTime,
    required this.actualTime,
    this.dismissedTime,
    required this.dismissMethod,
    this.snoozeCount = 0,
挑战完成标记:challengeCompleted记录用户是否完成了数学题或摇晃挑战,这对分析用户的起床难度很重要。
备注字段:notes让用户可以添加自己的备注,比如"今天起晚了"、"睡得很好"之类的,增加记录的个性化。
默认值设置:snoozeCount默认为0,这样创建记录时不用每次都传这个参数。
    this.responseTime,
    this.challengeCompleted = false,
    this.notes,
  });
}

enum DismissMethod {
  normal,
  challenge,
  timeout,
  forceStop,
}
关闭方式枚举:normal表示正常关闭,challenge表示完成挑战后关闭,timeout表示超时自动关闭,forceStop表示用户强制停止。这四种方式涵盖了所有可能的场景。
枚举的优势:用enum比用字符串更安全,编译时就能检查错误,而且占用空间更小。
JSON序列化
实现数据的序列化和反序列化。
  factory AlarmHistory.fromJson(Map<String, dynamic> json) {
    return AlarmHistory(
      id: json['id'] as String,
      alarmId: json['alarmId'] as String,
      alarmLabel: json['alarmLabel'] as String,
      scheduledTime: DateTime.parse(json['scheduledTime'] as String),
      actualTime: DateTime.parse(json['actualTime'] as String),
      dismissedTime: json['dismissedTime'] != null
          ? DateTime.parse(json['dismissedTime'] as String)
          : null,
fromJson工厂构造:从JSON Map创建AlarmHistory对象,这是数据持久化的关键。
DateTime解析:用DateTime.parse把ISO 8601格式的字符串转换成DateTime对象。dismissedTime需要先判空,避免解析null时报错。
类型转换:用as做类型断言,确保从JSON取出的值是预期类型。虽然运行时可能抛异常,但这能让问题尽早暴露。
      dismissMethod: DismissMethod.values[json['dismissMethod'] as int],
      snoozeCount: json['snoozeCount'] as int? ?? 0,
      responseTime: json['responseTime'] != null
          ? Duration(seconds: json['responseTime'] as int)
          : null,
      challengeCompleted: json['challengeCompleted'] as bool? ?? false,
      notes: json['notes'] as String?,
    );
  }
枚举反序列化:用DismissMethod.values[index]把整数转换回枚举值,这比存储字符串更节省空间。
默认值处理:snoozeCount和challengeCompleted用??提供默认值,这样即使JSON中没有这些字段,也能正常创建对象。这对版本兼容很重要。
Duration处理:responseTime存储为秒数,反序列化时用Duration.seconds创建Duration对象。
  Map<String, dynamic> toJson() {
    return {
      'id': id,
      'alarmId': alarmId,
      'alarmLabel': alarmLabel,
      'scheduledTime': scheduledTime.toIso8601String(),
      'actualTime': actualTime.toIso8601String(),
      'dismissedTime': dismissedTime?.toIso8601String(),
      'dismissMethod': dismissMethod.index,
      'snoozeCount': snoozeCount,
toJson方法:把对象转换成JSON Map,用于持久化存储。
DateTime序列化:用toIso8601String()转换成标准格式的字符串,这个格式全球通用,不受时区影响。
可空字段处理:dismissedTime用?.操作符,为null时整个表达式返回null,不会报错。
      'responseTime': responseTime?.inSeconds,
      'challengeCompleted': challengeCompleted,
      'notes': notes,
    };
  }
}
Duration序列化:responseTime转换成秒数存储,这样JSON更简洁。
完整性:toJson和fromJson要保持对称,确保序列化后再反序列化能得到相同的对象。
历史记录控制器
实现历史记录的管理逻辑。
import 'package:get/get.dart';
import 'package:shared_preferences/shared_preferences.dart';
import 'dart:convert';
import '../models/alarm_history.dart';

class AlarmHistoryController extends GetxController {
  final histories = <AlarmHistory>[].obs;
  final isLoading = false.obs;
  final selectedDate = Rxn<DateTime>();
GetX控制器:用GetX管理状态和依赖注入,histories用obs包裹让UI能响应数据变化。
加载状态:isLoading标记是否正在加载数据,UI可以据此显示加载指示器。
日期筛选:selectedDate用Rxn表示可空的响应式DateTime,用于按日期筛选历史记录。
void onInit() {
super.onInit();
loadHistories();
}
Future<void> loadHistories() async {
try {
isLoading.value = true;
final prefs = await SharedPreferences.getInstance();
final jsonString = prefs.getString('alarm_histories');
if (jsonString != null) {
初始化加载:onInit在控制器创建时调用,这里加载历史记录。
SharedPreferences:用SharedPreferences存储历史记录,这是Flutter中最简单的持久化方案。
空值检查:先判断jsonString是否为null,避免解析空值时报错。
        final jsonList = jsonDecode(jsonString) as List;
        histories.value = jsonList
            .map((json) => AlarmHistory.fromJson(json as Map<String, dynamic>))
            .toList();

        histories.sort((a, b) => b.actualTime.compareTo(a.actualTime));
      }
    } catch (e) {
      Get.snackbar('错误', '加载历史记录失败: $e');
    } finally {
      isLoading.value = false;
    }
  }
JSON解析:jsonDecode把字符串解析成List,然后map转换成AlarmHistory对象列表。
排序:按actualTime倒序排列,最新的记录显示在最前面。用compareTo比较DateTime,b在前表示降序。
异常处理:用try-catch-finally确保isLoading最终会被设为false,即使加载失败UI也不会一直显示加载状态。
添加和删除记录
实现记录的增删操作。
  Future<void> addHistory(AlarmHistory history) async {
    try {
      histories.insert(0, history);
      await _saveHistories();
    } catch (e) {
      Get.snackbar('错误', '保存历史记录失败: $e');
    }
  }

  Future<void> deleteHistory(String id) async {
    try {
      histories.removeWhere((h) => h.id == id);
添加记录:用insert(0, history)把新记录插入到列表开头,因为列表是倒序的,新记录应该在最前面。
删除记录:用removeWhere根据id删除记录,这个方法会删除所有匹配的元素,虽然id是唯一的,但这样写更安全。
      await _saveHistories();
      Get.snackbar('成功', '历史记录已删除');
    } catch (e) {
      Get.snackbar('错误', '删除失败: $e');
    }
  }

  Future<void> _saveHistories() async {
    try {
      final prefs = await SharedPreferences.getInstance();
      final jsonList = histories.map((h) => h.toJson()).toList();
      await prefs.setString('alarm_histories', jsonEncode(jsonList));
保存逻辑:_saveHistories把histories列表序列化成JSON字符串,存储到SharedPreferences。
私有方法:_saveHistories是私有方法(下划线开头),只在控制器内部调用,不暴露给外部。
批量序列化:用map把每个AlarmHistory对象转换成JSON Map,然后jsonEncode转换成字符串。
    } catch (e) {
      debugPrint('保存历史记录失败: $e');
    }
  }
}
错误处理:保存失败时只打印日志,不弹snackbar,因为这是后台操作,不应该打扰用户。
debugPrint:用debugPrint而不是print,在release模式下这些日志会被自动移除,不影响性能。
历史记录列表页面
实现历史记录的展示界面。
import 'package:flutter/material.dart';
import 'package:flutter_screenutil/flutter_screenutil.dart';
import 'package:get/get.dart';
import 'package:intl/intl.dart';
import '../../controllers/alarm_history_controller.dart';
class AlarmHistoryPage extends StatelessWidget {
const AlarmHistoryPage({super.key});
Widget build(BuildContext context) {
StatelessWidget:历史记录页面不需要管理自己的状态,所有状态都在控制器中,所以用StatelessWidget。
intl包:导入intl用于日期格式化,这个包提供了国际化的日期时间格式化功能。
    final controller = Get.put(AlarmHistoryController());

    return Scaffold(
      appBar: AppBar(
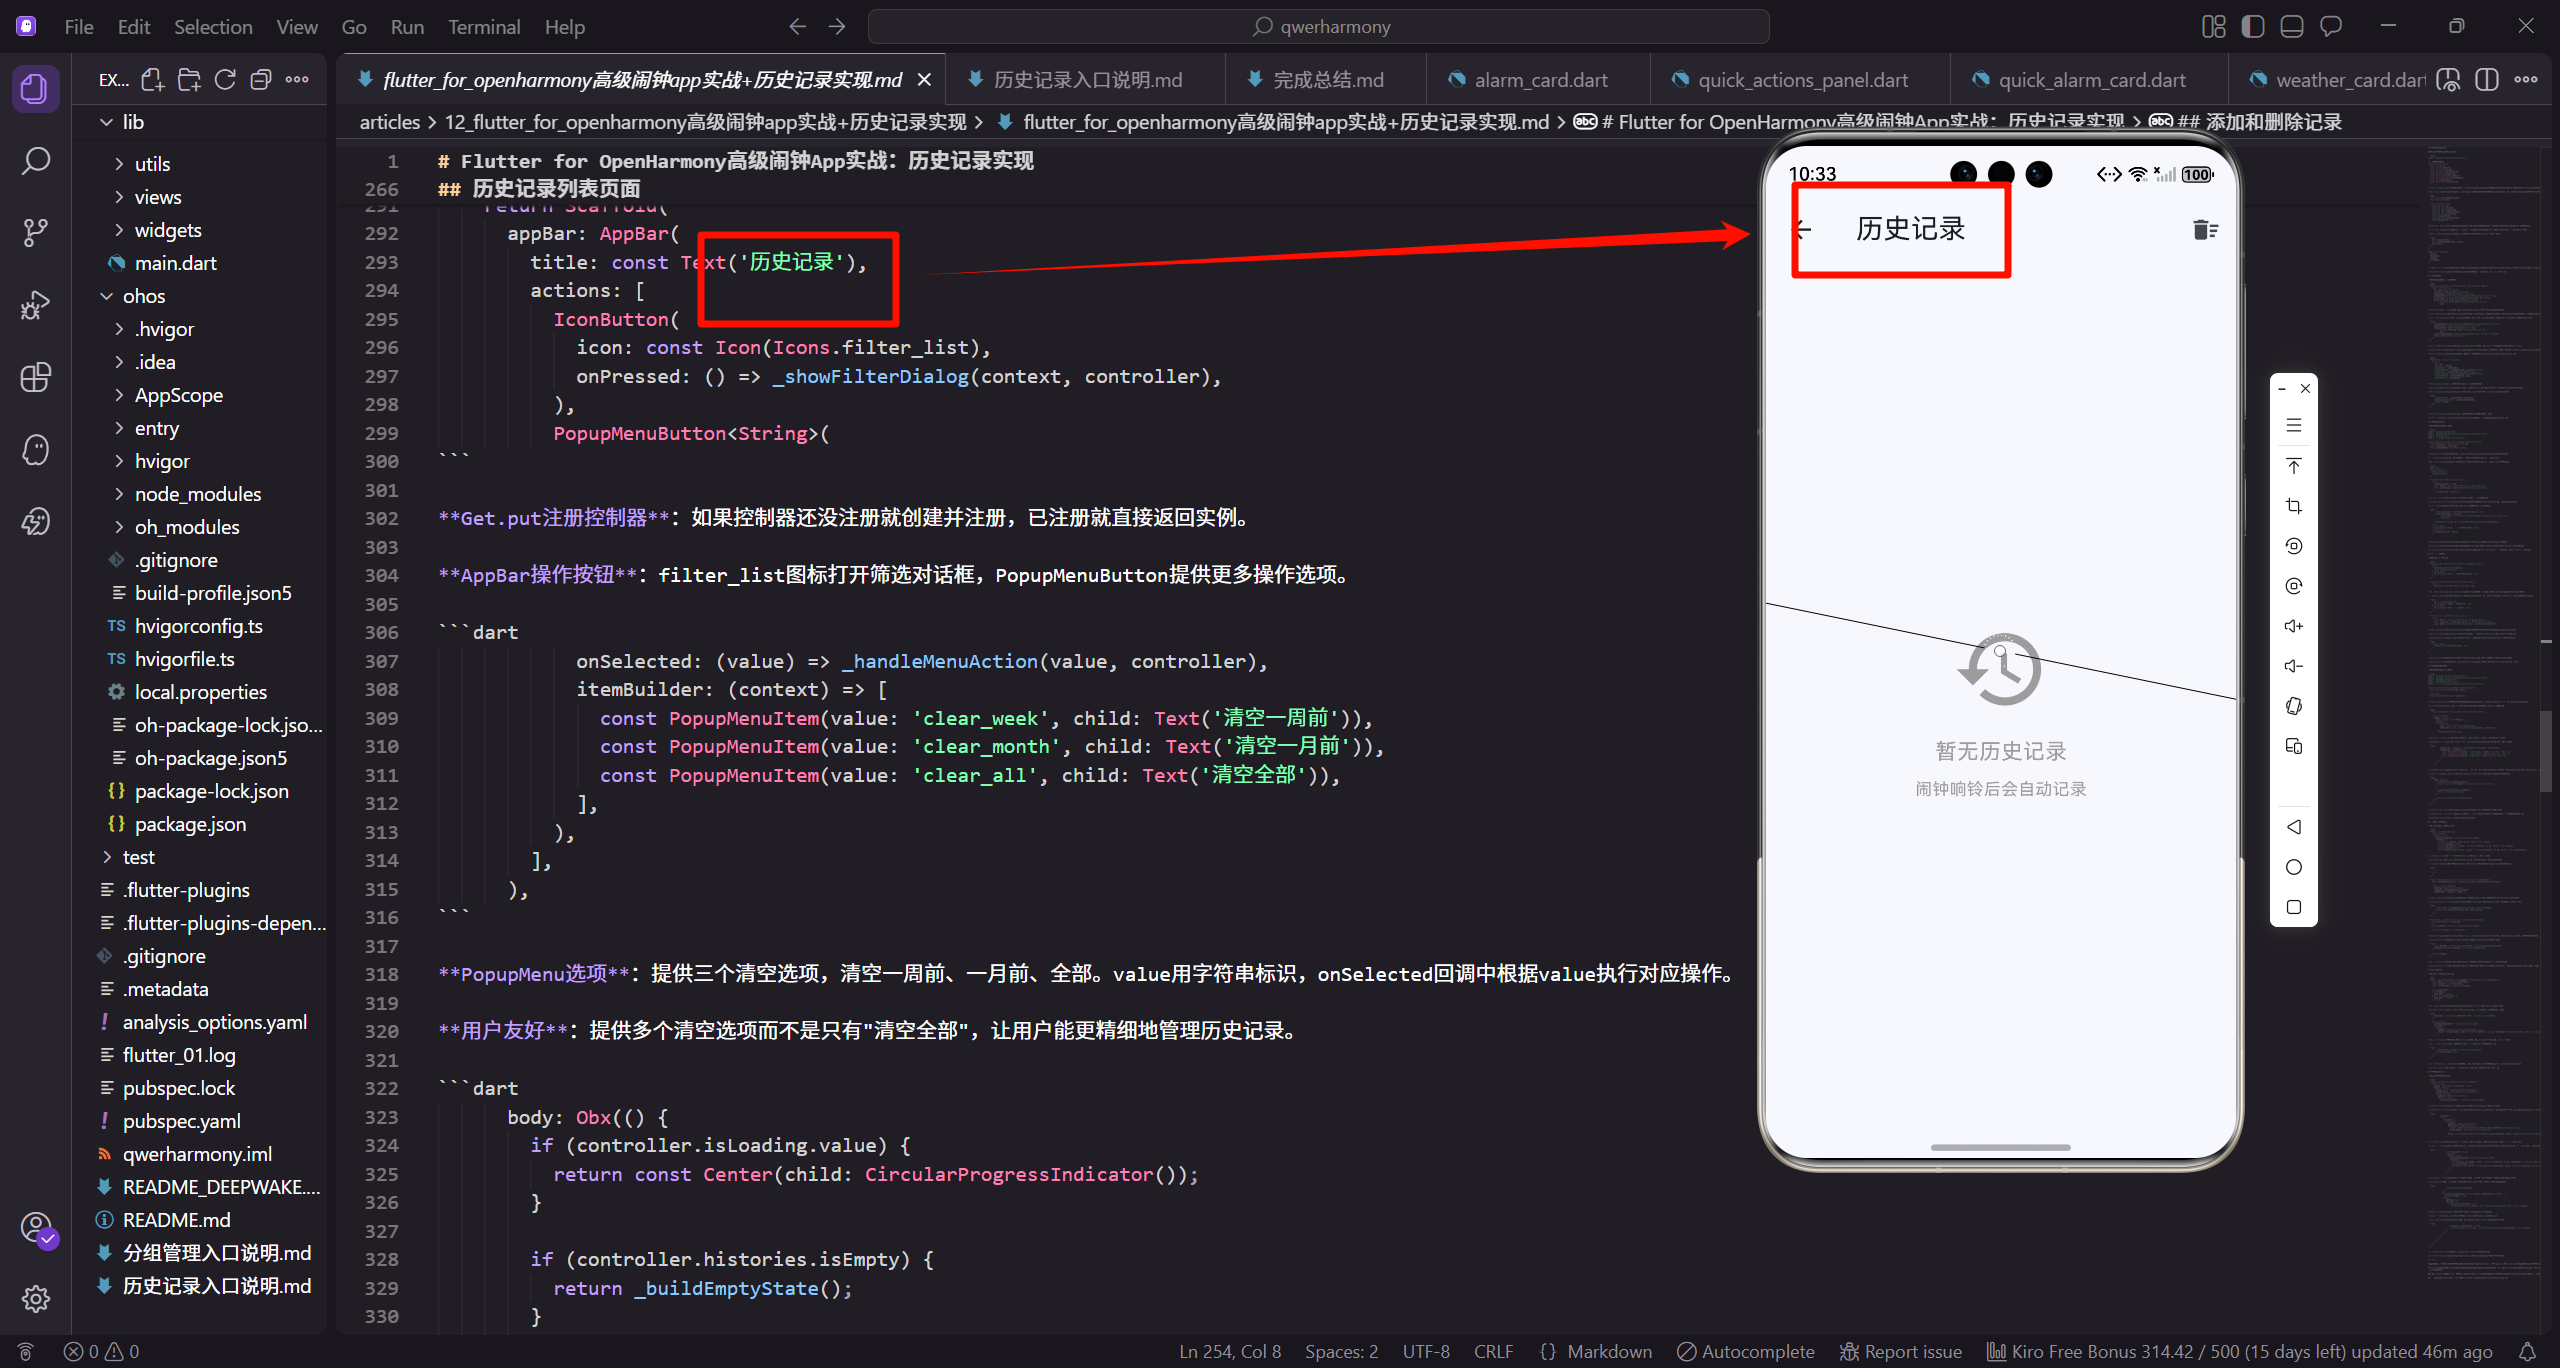
        title: const Text('历史记录'),
        actions: [
          IconButton(
            icon: const Icon(Icons.filter_list),
            onPressed: () => _showFilterDialog(context, controller),
          ),
          PopupMenuButton<String>(
Get.put注册控制器:如果控制器还没注册就创建并注册,已注册就直接返回实例。
AppBar操作按钮:filter_list图标打开筛选对话框,PopupMenuButton提供更多操作选项。
            onSelected: (value) => _handleMenuAction(value, controller),
            itemBuilder: (context) => [
              const PopupMenuItem(value: 'clear_week', child: Text('清空一周前')),
              const PopupMenuItem(value: 'clear_month', child: Text('清空一月前')),
              const PopupMenuItem(value: 'clear_all', child: Text('清空全部')),
            ],
          ),
        ],
      ),
PopupMenu选项:提供三个清空选项,清空一周前、一月前、全部。value用字符串标识,onSelected回调中根据value执行对应操作。
用户友好:提供多个清空选项而不是只有"清空全部",让用户能更精细地管理历史记录。
      body: Obx(() {
        if (controller.isLoading.value) {
          return const Center(child: CircularProgressIndicator());
        }

        if (controller.histories.isEmpty) {
          return _buildEmptyState();
        }

        return _buildHistoryList(controller);
      }),
    );
  }
Obx响应式构建:用Obx包裹body,当isLoading或histories变化时自动重建UI。
三种状态:加载中显示进度指示器,列表为空显示空状态,有数据显示列表。这是标准的列表页面模式。
条件渲染:用if-else链式判断,代码清晰易读。
空状态和列表构建
实现空状态提示和列表展示。
  Widget _buildEmptyState() {
    return Center(
      child: Column(
        mainAxisAlignment: MainAxisAlignment.center,
        children: [
          Icon(Icons.history, size: 80.sp, color: Colors.grey),
          SizedBox(height: 16.h),
          Text('暂无历史记录', style: TextStyle(fontSize: 18.sp, color: Colors.grey)),
          SizedBox(height: 8.h),
          Text('闹钟响铃后会自动记录', style: TextStyle(fontSize: 14.sp, color: Colors.grey[400])),
空状态设计:用大图标配合文字说明,让用户明白为什么是空的。
视觉层次:主文字用18.sp,说明文字用14.sp和更浅的颜色,形成清晰的层次。
友好提示:告诉用户"闹钟响铃后会自动记录",让用户知道这不是bug,只是还没有数据。
        ],
      ),
    );
  }

  Widget _buildHistoryList(AlarmHistoryController controller) {
    final groupedHistories = _groupHistoriesByDate(controller.histories);

    return ListView.builder(
      padding: EdgeInsets.all(16.w),
      itemCount: groupedHistories.length,
      itemBuilder: (context, index) {
按日期分组:_groupHistoriesByDate把历史记录按日期分组,这样可以按天显示,视觉上更清晰。
ListView.builder:用builder模式构建列表,只创建可见的item,即使有很多历史记录也不会卡顿。
        final entry = groupedHistories.entries.elementAt(index);
        return _buildDateGroup(entry.key, entry.value);
      },
    );
  }

  Map<String, List<AlarmHistory>> _groupHistoriesByDate(
    List<AlarmHistory> histories,
  ) {
    final grouped = <String, List<AlarmHistory>>{};

    for (final history in histories) {
Map结构:groupedHistories是Map<String, List>,key是日期字符串,value是该日期的历史记录列表。
elementAt访问:Map的entries返回MapEntry列表,用elementAt按索引访问。
      final dateKey = DateFormat('yyyy-MM-dd').format(history.actualTime);
      grouped.putIfAbsent(dateKey, () => []).add(history);
    }

    return grouped;
  }
日期格式化:用DateFormat把DateTime格式化成yyyy-MM-dd字符串,作为分组的key。
putIfAbsent妙用:如果key不存在就创建空列表,存在就返回已有列表,然后add添加记录。这个方法让分组逻辑很简洁。
日期分组展示
实现按日期分组的展示效果。
  Widget _buildDateGroup(String dateKey, List<AlarmHistory> histories) {
    final date = DateTime.parse(dateKey);
    final isToday = _isToday(date);
    final isYesterday = _isYesterday(date);

    String dateLabel;
    if (isToday) {
      dateLabel = '今天';
    } else if (isYesterday) {
      dateLabel = '昨天';
    } else {
日期解析:把dateKey字符串解析回DateTime对象,用于判断是否为今天或昨天。
特殊日期处理:今天和昨天用中文显示,其他日期显示具体日期,这样更人性化。
      dateLabel = DateFormat('MM月dd日 EEEE', 'zh_CN').format(date);
    }

    return Column(
      crossAxisAlignment: CrossAxisAlignment.start,
      children: [
        Padding(
          padding: EdgeInsets.symmetric(vertical: 12.h),
          child: Text(dateLabel, style: TextStyle(fontSize: 16.sp, fontWeight: FontWeight.bold, color: Colors.grey[700])),
        ),
日期格式化:用’MM月dd日 EEEE’格式显示月日和星期,'zh_CN’参数让星期显示为中文。
日期标签样式:用粗体和深灰色,让日期标签在视觉上和历史项区分开。
        ...histories.map((h) => _buildHistoryItem(h)),
        SizedBox(height: 8.h),
      ],
    );
  }
展开运算符:用…把histories列表展开成多个Widget,每个历史记录对应一个_buildHistoryItem。
底部间距:每个日期组底部加8.h的间距,让不同日期的记录在视觉上分开。
历史记录项设计
实现单条历史记录的UI。
  Widget _buildHistoryItem(AlarmHistory history) {
    return Card(
      margin: EdgeInsets.only(bottom: 12.h),
      child: InkWell(
        onTap: () => _showHistoryDetail(history),
        borderRadius: BorderRadius.circular(12.r),
        child: Padding(
          padding: EdgeInsets.all(16.w),
          child: Column(
            crossAxisAlignment: CrossAxisAlignment.start,
Card容器:用Card包裹让每条记录有明显的视觉边界,margin设置底部间距。
InkWell点击效果:用InkWell而不是GestureDetector,能显示Material Design的水波纹点击效果。borderRadius让波纹效果和Card的圆角匹配。
            children: [
              Row(
                children: [
                  Container(
                    padding: EdgeInsets.all(8.w),
                    decoration: BoxDecoration(
                      color: _getDismissMethodColor(history.dismissMethod).withOpacity(0.1),
                      borderRadius: BorderRadius.circular(8.r),
                    ),
                    child: Icon(_getDismissMethodIcon(history.dismissMethod), color: _getDismissMethodColor(history.dismissMethod), size: 24.sp),
                  ),
图标容器:用Container包裹图标,设置背景色和圆角。背景色用半透明的主题色,和图标颜色呼应。
颜色和图标:_getDismissMethodColor和_getDismissMethodIcon根据关闭方式返回对应的颜色和图标,让用户一眼就能识别关闭方式。
                  SizedBox(width: 12.w),
                  Expanded(
                    child: Column(
                      crossAxisAlignment: CrossAxisAlignment.start,
                      children: [
                        Text(history.alarmLabel, style: TextStyle(fontSize: 16.sp, fontWeight: FontWeight.bold)),
                        SizedBox(height: 4.h),
                        Text(DateFormat('HH:mm').format(history.actualTime), style: TextStyle(fontSize: 14.sp, color: Colors.grey[600])),
                      ],
                    ),
                  ),
Expanded布局:用Expanded让中间的文字区域占据剩余空间,这样右侧的状态徽章能靠右对齐。
信息层次:闹钟标签用粗体和较大字号,时间用较小字号和灰色,形成清晰的层次。
                  _buildStatusBadge(history),
                ],
              ),
              if (history.snoozeCount > 0 || history.responseTime != null) ...[
                SizedBox(height: 12.h),
                Wrap(
                  spacing: 8.w,
                  children: [
                    if (history.snoozeCount > 0)
                      _buildInfoChip(Icons.snooze, '贪睡 ${history.snoozeCount} 次', Colors.orange),
条件显示:只有当有贪睡或响应时长时才显示额外信息,用if判断。
Wrap布局:用Wrap而不是Row,这样信息芯片多了会自动换行,不会溢出。
信息芯片:_buildInfoChip创建统一样式的信息芯片,显示贪睡次数或响应时长。
                    if (history.responseTime != null)
                      _buildInfoChip(Icons.timer, _formatDuration(history.responseTime!), Colors.blue),
                  ],
                ),
              ],
            ],
          ),
        ),
      ),
    );
  }
多个条件:用多个if判断,每个信息芯片独立显示,这样更灵活。
格式化时长:_formatDuration把Duration转换成易读的字符串,比如"2分30秒"。
总结
这篇文章咱们实现了完整的历史记录功能。从数据模型到UI展示,从增删操作到筛选搜索,每个环节都考虑得很周到。历史记录不仅是简单的日志,它能帮用户了解自己的作息习惯。
说实话,做历史记录功能让我对数据管理有了更深的理解。数据持久化要考虑性能和存储空间,JSON序列化要保持对称性。UI设计要注重信息层次,列表、详情、统计各有侧重。按日期分组的展示方式让大量数据也能清晰呈现。
如果你也在做类似的功能,建议重点关注数据模型的设计,字段要全面但不冗余。时间处理要准确,DateTime的序列化和反序列化要用标准格式。UI要直观,让用户一眼就能看懂数据含义。
欢迎加入OpenHarmony跨平台开发社区交流:https://openharmonycrossplatform.csdn.net

腾讯云面向开发者汇聚海量精品云计算使用和开发经验,营造开放的云计算技术生态圈。
更多推荐
 0
0 0
0- 0


 已为社区贡献20条内容

所有评论(0)