YOLOv8_obb自采数据集训练+Pyside6页面集成+摄像头推理
工作之余闲来无事,把大学时期做过的一些工作以笔记的形式写出来,这篇博客的主要内容是协助同学完成毕设时的一些工作。由于间隔时间较长,一些内容难免模糊,如有疏漏请见谅。
工作之余闲来无事,把大学时期做过的一些工作以笔记的形式写出来,这篇博客的主要内容是协助同学完成毕设时的一些工作。由于间隔时间较长,一些内容难免模糊,如有疏漏请见谅。
1. YOLOv8_obb
YOLO系列算法已经成为业界学界主流的视觉算法,主要任务包括检测、分割、分类、姿态估计等。这篇博客使用YOLOv8_obb算法进行超市商品检测,该算法通过引入定向边界框(Oriented Bounding Box, OBB),来解决传统水平框在识别倾斜目标时的“多余空间”问题,让检测框更贴合实际物体轮廓。
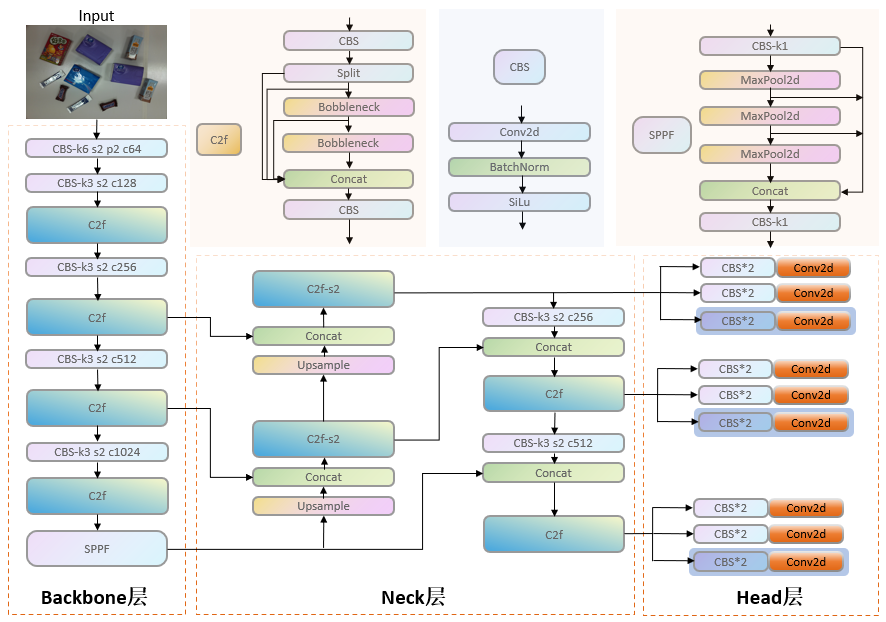
YOLOv8_OBB同样包含四个核心模块:包括输入端(Input)、骨干网络(Backbone)、颈部(Neck)和检测头(Head)。网络结构上相比于原始YOLOv8只是Head层会有区别,区别有一点:三个尺度的特征图在Head层除了生成3个预测Box的特征图和3个预测CLs的特征图,还会另外生成3个通道数均为1,用来预测旋转角度的特征图,Angle分支为下图中Head层浅蓝色部分。
这部分只要简单的概述,详细的改动部分就不赘述了,可以去翻找源码进行学习,这篇博客更偏向于实际需要操作的内容,涉及算法改进的部分可以参考其他博主的内容,网上大把。
2. 数据集制作
2.1. 采集
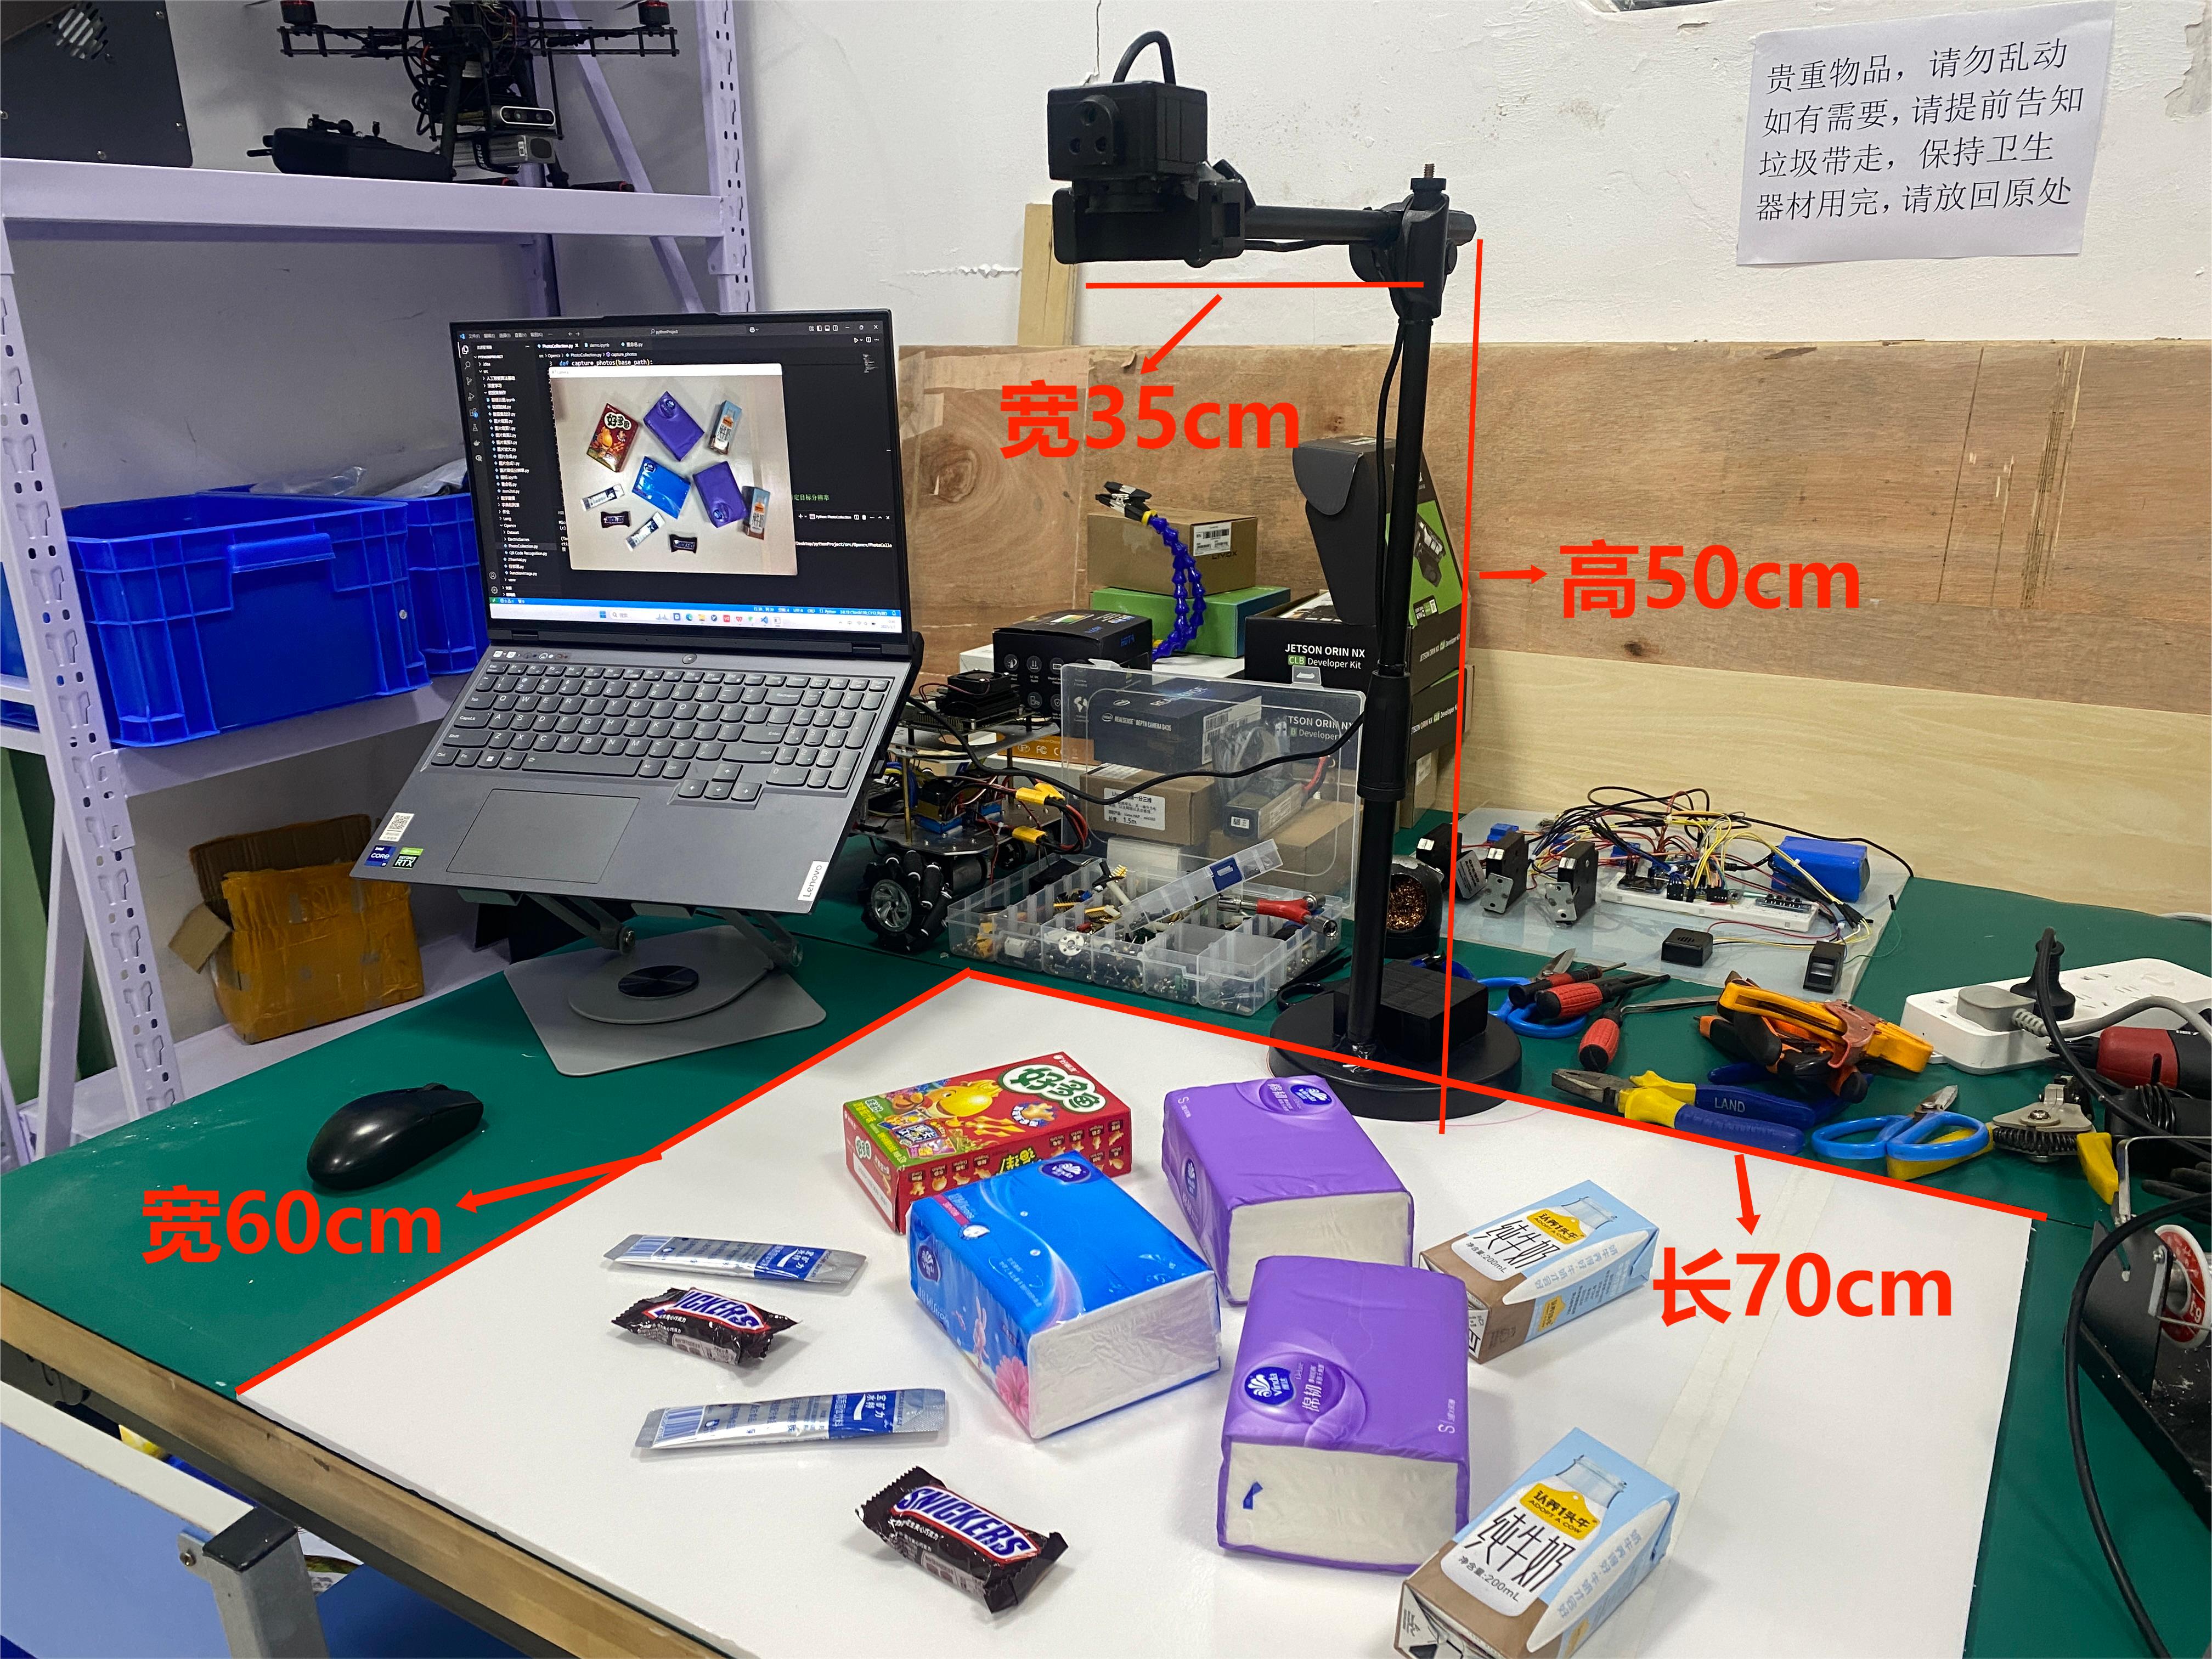
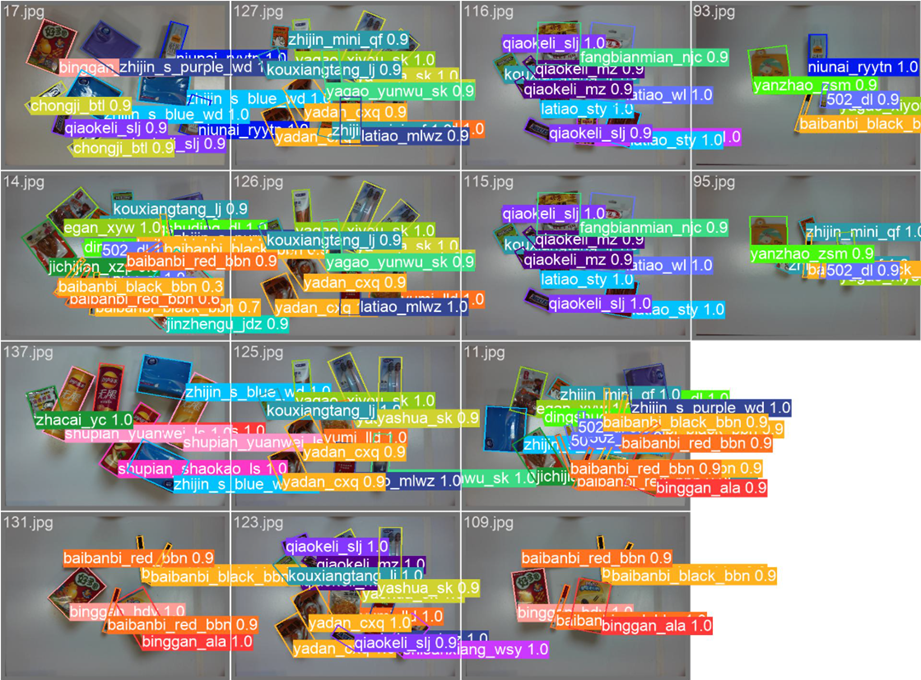
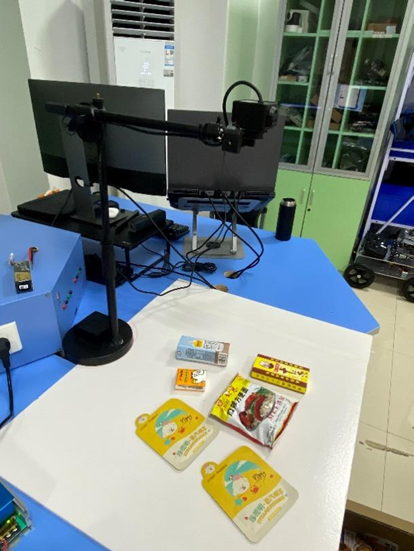
数据集是通过电脑外接USB摄像头进行采集的,模拟了一个简单的超市商品结算场景,为了减少误识别在下面放置了一片PVC材质的白色背景板哈哈哈哈哈,非常管用,采集了身边有的一些零食、日用品及饮料等,一共32种商品类别,采集了150张4000*3000像素的原始图像,下图为拍摄环境。
采集图像的代码比较简单,AI一下就都可以解决。
def capture_photos(base_path):

    cap = cv2.VideoCapture(1)

    if not cap.isOpened():
        print("无法打开摄像头")
        return

    print("按 's' 键拍照,按 'q' 键退出...")
    photo_count = 0

    while True:
        ret, frame = cap.read()

        if not ret:
            print("无法读取摄像头帧。")
            break

        resized_display_frame = cv2.resize(frame, (800, 600))
        cv2.imshow('Camera', resized_display_frame)

        key = cv2.waitKey(1)

        if key == ord('s'):
            photo_count += 1
            photo_name = f"{base_path}{photo_count}.jpg"

            # 保存原始分辨率的照片
            # cv2.imwrite(photo_name, frame)

            # 或保存缩放后的照片
            resized_save_frame = cv2.resize(frame, (4000, 3000))  # 指定目标分辨率

            cv2.imwrite(photo_name, resized_save_frame)

            print(f"照片已保存到 {photo_name}")
        elif key == ord('q'):
            break

    cap.release()
    cv2.destroyAllWindows()
2.2. 标注
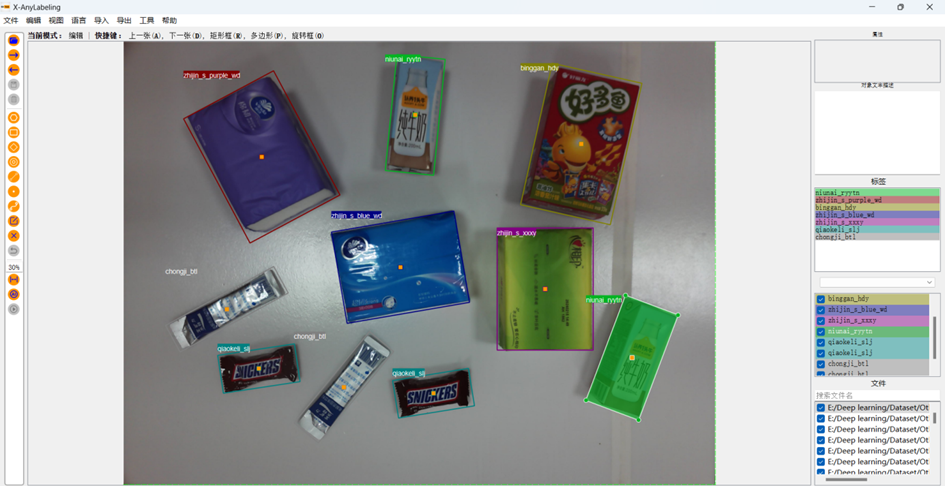
标注使用的是X-AnyLabeling工具,下载地址如下:https://github.com/CVHub520/X-AnyLabeling。不同版本会有出入,如需本文使用的版本或无法挂梯子,可以私信我。该工具支持以四参数旋转矩形框(中心点坐标(x,y)、宽度w、高度h、旋转角度θ)的几何表示形式对商品目标进行精确标注,标注数据以.json文件的格式进行存储。首先在页面中点击左上角“文件夹Logo”选择数据集图像的路径。再点击左上角“文件”中的“更改输出目录”来进行保存标注好的文件。最后,采用旋转框标注的方式标注商品图像区域,标注效果如下图。
2.3. 格式转换
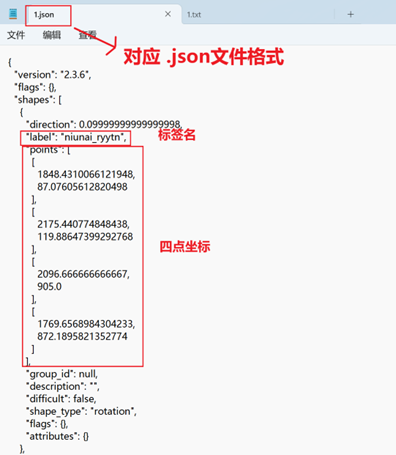
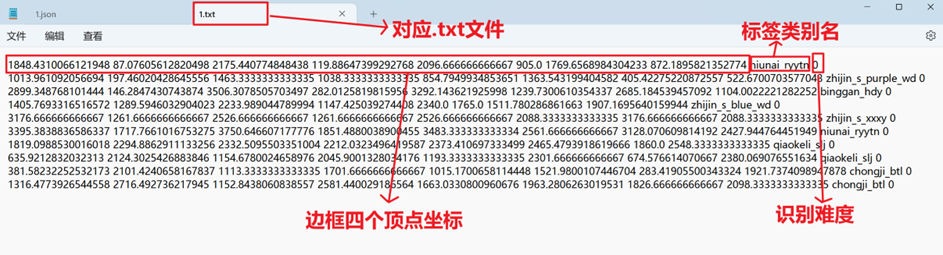
标注生成的.json文件格式对应如下图,文件内完整记录了矩形坐标及类别信息。
随后通过该软件的格式转换模块,将标注信息转换为符合DOTA数据集标准的.txt文本格式如下图,每个文本文件对应一张图像标注,其内容按“x1 y1 x2 y2 x3 y3 x4 y4 类别名 识别难度”格式排列。
随后,采用脚本文件实施数据集划分通过随机抽样方式将全部数据按8:2比例划分为训练集与验证集。
import os, shutil
from sklearn.model_selection import train_test_split

val_size = 0.2
postfix = 'jpg'
imgpath = r'D:\Desktop\uav_datasets\images'
txtpath =  r'D:\Desktop\uav_datasets\labels'

output_train_img_folder =r'D:\Desktop\uav_datasets\images\train'
output_val_img_folder =  r'D:\Desktop\uav_datasets\images\val'
output_train_txt_folder =  r'D:\Desktop\uav_datasets\labels\train'
output_val_txt_folder =  r'D:\Desktop\uav_datasets\labels\val'

os.makedirs(output_train_img_folder, exist_ok=True)
os.makedirs(output_val_img_folder, exist_ok=True)
os.makedirs(output_train_txt_folder, exist_ok=True)
os.makedirs(output_val_txt_folder, exist_ok=True)

listdir = [i for i in os.listdir(txtpath) if 'txt' in i]
train, val = train_test_split(listdir, test_size=val_size, shuffle=True, random_state=0)

for i in train:
    img_source_path = os.path.join(imgpath, '{}.{}'.format(i[:-4], postfix))
    txt_source_path = os.path.join(txtpath, i)

    img_destination_path = os.path.join(output_train_img_folder, '{}.{}'.format(i[:-4], postfix))
    txt_destination_path = os.path.join(output_train_txt_folder, i)

    shutil.copy(img_source_path, img_destination_path)
    shutil.copy(txt_source_path, txt_destination_path)

for i in val:
    img_source_path = os.path.join(imgpath, '{}.{}'.format(i[:-4], postfix))
    txt_source_path = os.path.join(txtpath, i)

    img_destination_path = os.path.join(output_val_img_folder, '{}.{}'.format(i[:-4], postfix))
    txt_destination_path = os.path.join(output_val_txt_folder, i)

    shutil.copy(img_source_path, img_destination_path)
    shutil.copy(txt_source_path, txt_destination_path)
这部分代码是将像素坐标转换为基于图像宽高的归一化相对坐标,这种格式优化提升了模型训练时的数据解析效率,转换时需要注意文件目录的格式,运行完还需进行标签的映射(根据自己的标签进行修改)。

from pathlib import Path
from ultralytics.utils import TQDM
import cv2
import os
def convert_dota_to_yolo_obb(dota_root_path: str,class_mapping:dict):

    """
    Converts DOTA dataset annotations to YOLO OBB (Oriented Bounding Box) format.

    The function processes images in the 'train' and 'val' folders of the DOTA dataset. For each image, it reads the
    associated label from the original labels directory and writes new labels in YOLO OBB format to a new directory.

    Args:
        dota_root_path (str): The root directory path of the DOTA dataset.

    Notes:
        The directory structure assumed for the DOTA dataset:

            - DOTA
                ├─ images
                │   ├─ train
                │   └─ val
                └─ labels
                    ├─ train_original
                    └─ val_original

        After execution, the function will organize the labels into:

            - DOTA
                └─ labels
                    ├─ train
                    └─ val
    """
    dota_root_path = Path(dota_root_path)

    class_mapping = class_mapping

    def convert_label(image_name, image_width, image_height, orig_label_dir, save_dir):
        """Converts a single image's DOTA annotation to YOLO OBB format and saves it to a specified directory."""
        orig_label_path = orig_label_dir / f"{image_name}.txt"
        save_path = save_dir / f"{image_name}.txt"

        with orig_label_path.open("r") as f, save_path.open("w") as g:
            lines = f.readlines()
            for line in lines:
                parts = line.strip().split()
                if len(parts) < 9:
                    continue
                class_name = parts[8]
                class_idx = class_mapping[class_name]
                coords = [float(p) for p in parts[:8]]
                normalized_coords = [
                    coords[i] / image_width if i % 2 == 0 else coords[i] / image_height for i in range(8)
                ]
                formatted_coords = ["{:.6g}".format(coord) for coord in normalized_coords]
                g.write(f"{class_idx} {' '.join(formatted_coords)}\n")
    #转换label数据为yolo格式
    for phase in ["train", "val"]:

        image_dir = dota_root_path / "images" / phase
        orig_label_dir = dota_root_path / "labels" / f"{phase}_original"
        save_dir = dota_root_path / "labels" / phase
        save_dir.mkdir(parents=True, exist_ok=True)
        image_paths = list(image_dir.iterdir())
        for image_path in TQDM(image_paths, desc=f"Processing {phase} images"):

            image_name_without_ext = image_path.stem
            img = cv2.imread(str(image_path))
            h, w = img.shape[:2]
            convert_label(image_name_without_ext, w, h, orig_label_dir, save_dir)

    #生成训练用的yaml文件
    yaml_path = "E:/Deep learning/Dataset/Other/CommodityDataset/YOLODataset/dataset.yaml"
    with open(yaml_path, 'w+') as yaml_file:
        yaml_file.write('train: %s\n' % \
                        os.path.abspath(os.path.join(dota_root_path, "images", "train")))
        yaml_file.write('val: %s\n\n' % \
                        os.path.abspath(os.path.join(dota_root_path, "images", "val")))
        yaml_file.write('nc: %i\n\n' % len(class_mapping.keys()))
        names_str = ''
        for label in class_mapping.keys():
            names_str += "'%s', " % label
        names_str = names_str.rstrip(', ')
        yaml_file.write('names: [%s]' % names_str)
3. 训练
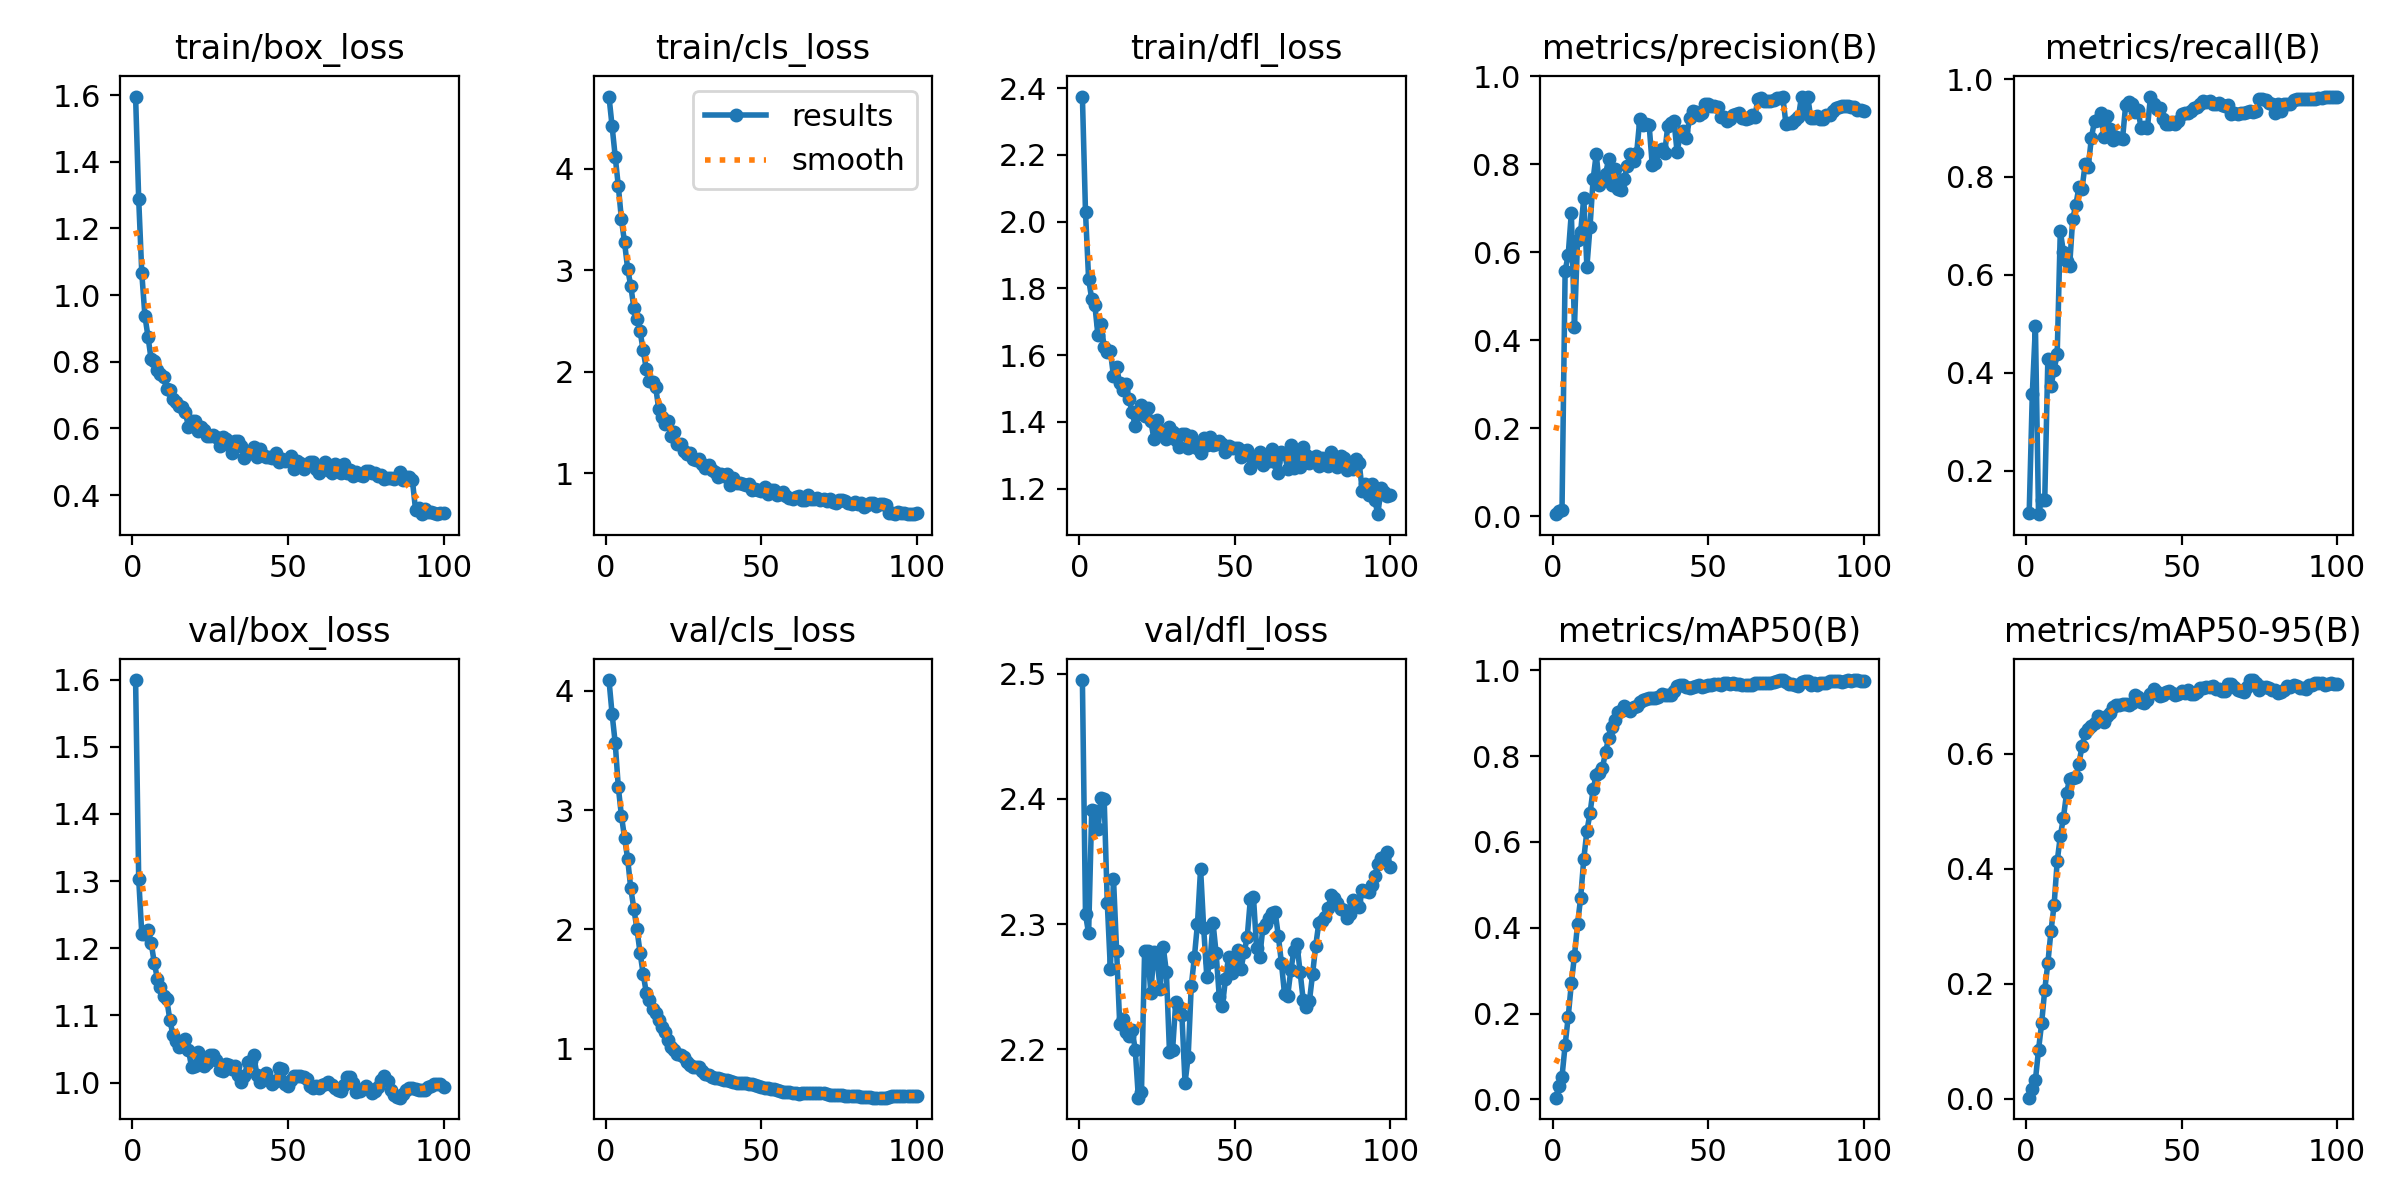
训练需要安装Pytorch、CUDA等环境,因为这部分工作已经是几年前做的,好多都记不清了,所以建议这部分内容可以在网上搜索,详细的教程有很多。这部分就展示下训练的results图与验证集效果图,如下。
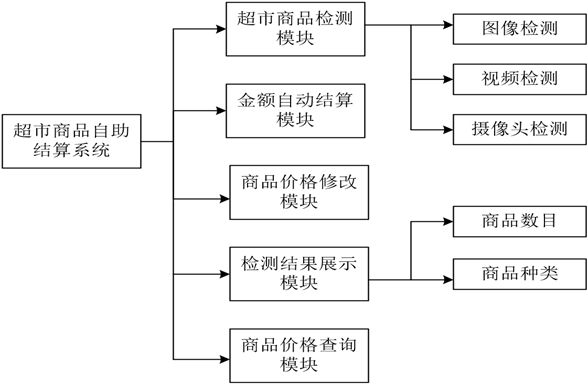
4. 结算系统页面设计
自助结算系统有如下功能:商品检测功能、检测结果展示功能、自助计算金额功能、修改商品价格功能与商品价格查询功能,总架构如下:
4.1. 商品检测代码
主要分为图像检测、视频流检测和摄像头实时检测三种模式。其中视频流与摄像头实时检测共用一个推理函数,通过启动一个独立的线程来处理视频流中的每一帧图像,确保视频与摄像头的功能测试能够实时进行。具体实现过程中,首先通过启动一个后台线程 frameAnalyzeThreadFunc 来处理视频与摄像头帧分析。在该线程内,系统不断监测是否有待处理的图像帧,如果当前没有图像帧,则线程会暂停5毫秒,再继续检查。若检测任务已经停止,线程也会停止处理。
Thread(target=self.frameAnalyzeThreadFunc, daemon=True).start()
def frameAnalyzeThreadFunc(self):
    while True:
        frame = self.frameToAnalyze[0]
        results = self.model(frame, verbose=False)[0]
        img = results.plot(line_width=1)
        img = cv.cvtColor(img, cv.COLOR_BGR2RGB)
        qImage = QtGui.QImage(img.data, img.shape[1], img.shape[0],
                              QtGui.QImage.Format_RGB888)
self.label_treater.setPixmap(QtGui.QPixmap.fromImage(qImage))
        self.frameToAnalyze.pop(0)
4.2. 结果展示代码
在商品检测完成后,系统需要统计并展示每种商品的数量。YOLOv8模型返回的检测结果中包含每个框的类别信息。我们通过遍历检测框结果,将每个商品的类别计数,并实时更新显示在UI界面上。
# 使用 YOLOv8 模型进行目标检测
results = self.model(frame)[0]
img = results.plot(line_width=1)            # 获取带标注的图片
img = cv.cvtColor(img, cv.COLOR_BGR2RGB)    # 转换 BGR 到 RGB 颜色格式

detected_classes_count.clear()

for box in results.obb.data:                # 遍历每个检测框
    class_id = box[6:7]
    class_name = results.names[int(class_id)]  # 获取类别名称

    # 统计类别出现次数
    if class_name in detected_classes_count:
        detected_classes_count[class_name] += 1
    else:
        detected_classes_count[class_name] = 1

# 构建显示文本
display_text = "超市商品检测结果如下:\n\n"
for class_name, count in detected_classes_count.items():
    display_text += f"{class_name}: {count}\n"
4.3. 自助结算代码
自助结算程序主要功能是根据图像或视频流中当前帧的商品识别结果,结合商品的价格字典表进行结算。用户点击“结算”按钮后,系统会根据识别出的商品种类和数量,计算出每个商品的总价,并最终显示账单详情,包括商品类别、购买数量、单价、总价以及最终的合计总价。detected_classes_count 记录了每种商品的数量,product_prices 是一个字典,存储了商品名称与其对应价格。对每个商品类别,系统检查是否存在价格信息,若存在,则计算商品的总价,并累加到 total_price 中。最后,输出所有商品的结算情况,并显示合计总价。
display_text = "超市商品结算情况如下:\n\n"
total_price = 0
for class_name, count in detected_classes_count.items():
if class_name in product_prices:
				price = product_prices[class_name]
				item_total = price * count
				total_price += item_total
display_text += f"{class_name}: {count} 个,    单价: {price}元,
			总价: {item_total}元\n"
		else:
				display_text += f"{class_name}: {count} 个 (没有价格信息)\n"
display_text += f"\n合计总价:    {total_price}    元"
4.4. 价格查询代码
价格查询程序的功能是根据用户输入的关键字查询商品的价格。如果用户输入了商品名称或关键字,系统会显示匹配的商品及其价格;如果没有输入关键字,则显示所有商品的价格列表。keyword.strip().lower() 将用户输入的关键字去除空格并转为小写,便于进行不区分大小写的匹配。如果用户输入了关键字,系统会遍历 product_prices 中所有商品名称,筛选出包含该关键字的商品,并显示其名称和价格。若没有关键字,系统调用 displayAllProducts 方法展示所有商品。
def performSearch(self, keyword):
		keyword = keyword.strip().lower()
		self.textLogMiddle.clear()
if keyword:  # 用户输入了搜索关键字
				results = [f"{product}: {price:.2f} RMB"
								for product, price in product_prices.items() if keyword in 											product]
				if results:
						self.textLogMiddle.append("搜索结果如下:\n")
						self.textLogMiddle.append("\n".join(results))
				else:
						self.textLogMiddle.append("没有找到符合条件的商品!")
		else:  # 没有输入搜索关键字,显示所有商品
				self.displayAllProducts()
4.5. 修改价格代码
修改价格程序用于更新商品价格。用户输入商品名称和新的价格后,系统会验证商品是否存在,并且检查输入的价格是否有效。若验证通过,则更新该商品的价格并显示成功提示。productNameInput.text() 和 productPriceInput.text() 分别获取用户输入的商品名称和新的价格。系统首先检查商品是否存在,如果不存在则弹出警告框。然后,尝试将用户输入的价格转换为 float 类型,若失败则提示用户重新输入有效价格。最后,更新商品的价格,并弹出信息框提示更新成功。
def update_price(self):
		product_name = self.productNameInput.text().strip()
		new_price = self.productPriceInput.text().strip()
		if product_name not in product_prices:
				QtWidgets.QMessageBox.warning(self, "错误", "商品不存在!")
				return
		try:
				new_price = float(new_price)
		except ValueError:
				QtWidgets.QMessageBox.warning(self, "错误", "请输入有效的价								格!")
				return
		product_prices[product_name] = new_price
		QtWidgets.QMessageBox.information(self, "成功", f"商品 												{product_name} 的价格已更新为 {new_price} RMB!")
		self.parent().displayAllProducts()
一些文字是论文中的内容,有些啰嗦,代码比较简,可以对着下面的参考链接详细学习,总代码如下:
class MWindow(QtWidgets.QMainWindow):

    def __init__(self):
        super().__init__()

        self.setupUI()

        # 创建帧率显示标签并设置位置和样式
        self.label_fps = QtWidgets.QLabel(self)
        self.label_fps.setGeometry(10, 10, 200, 30)  # 设置位置和大小
        self.label_fps.setStyleSheet("color: white; font-size: 16px;")  # 设置样式
        # self.label_fps.setText("帧率: 0 FPS")  # 初始文本

        # 按键信号
        self.imageBtn.clicked.connect(self.chooseImageFile)
        self.videoBtn.clicked.connect(self.chooseVideoFile)
        self.camBtn.clicked.connect(self.startCamera)
        self.countBtn.clicked.connect(self.startCount)
        self.stopBtn.clicked.connect(self.stop)
        self.modifyPriceBtn.clicked.connect(self.show_modify_price_dialog)

        #定义定时器,用于控制显示视频的帧率
        self.timer_camera =QtCore.QTimer()
        #定时到了,回调 self.show_camera
        self.timer_camera.timeout.connect(self.show_camera)

        # 加载训练好的 v8 模型
        self.model = YOLO('100_best.pt')

        # 要处理的视频帧图片队列
        self.frameToAnalyze = []
        self.detectionRunning = True  # 控制视频分析是否运行
        self.should_clear_log = True

        # 启动处理视频独立帧线程
        Thread(target=self.frameAnalyzeThreadFunc, daemon=True).start()

    def displayAllProducts(self):
        """显示所有商品及价格"""
        self.textLogMiddle.clear()
        price_text = "商品价格表\n"
        for product, price in product_prices.items():
            price_text += f"{product} : {price:.2f} RMB\n"
        self.textLogMiddle.setText(price_text)

    def performSearch(self, keyword):
        """根据关键词进行模糊搜索"""
        keyword = keyword.strip().lower()
        self.textLogMiddle.clear()

        if keyword:  # 用户输入了搜索关键字
            results = [f"{product}: {price:.2f} RMB"
                        for product, price in product_prices.items() if keyword in product]
            if results:
                self.textLogMiddle.append("搜索结果如下:\n")
                self.textLogMiddle.append("\n".join(results))
            else:
                self.textLogMiddle.append("没有找到符合条件的商品!")
        else:  # 没有输入搜索关键字,显示所有商品
            self.displayAllProducts()

    def setupUI(self):
        self.resize(1200, 800)

        self.setWindowIcon(QIcon('./photo/title.png'))
        self.setWindowTitle('超市商品自助结算系统')

        # central Widget
        centralWidget = QtWidgets.QWidget(self)
        self.setCentralWidget(centralWidget)
        # central Widget 里面的 主 layout
        mainLayout = QtWidgets.QVBoxLayout(centralWidget)

        # 页面上半部分 : 图形展示部分
        topLayout = QtWidgets.QHBoxLayout()
        self.label_ori_video = QtWidgets.QLabel(self)
        self.label_treater = QtWidgets.QLabel(self)
        self.label_ori_video.setMinimumSize(580,400)
        self.label_treater.setMinimumSize(580,400)
        self.label_ori_video.setStyleSheet('border:1px solid #D7E2F9;')
        self.label_treater.setStyleSheet('border:1px solid #D7E2F9;')
        topLayout.addWidget(self.label_ori_video)
        topLayout.addWidget(self.label_treater)
        mainLayout.addLayout(topLayout)

        # 页面下半部分
        groupBox = QtWidgets.QGroupBox(self)
        bottomLayout = QtWidgets.QHBoxLayout(groupBox)

        # 添加三个文本框
        self.textLogLight = QtWidgets.QTextBrowser()
        self.textLogMiddle = QtWidgets.QTextBrowser()
        self.textLogRight = QtWidgets.QTextBrowser()
        self.textLogLight.setStyleSheet('border:1px solid #D7E2F9;')
        self.textLogMiddle.setStyleSheet('border:1px solid #D7E2F9;')
        self.textLogRight.setStyleSheet('border:1px solid #D7E2F9;')

        # 在 textLogMiddle 上方添加搜索框
        self.searchBox = QtWidgets.QLineEdit()
        self.searchBox.setPlaceholderText("请输入商品名称关键字进行搜索...")
        middleLayout = QtWidgets.QVBoxLayout()
        middleLayout.addWidget(self.searchBox)
        middleLayout.addWidget(self.textLogMiddle)

        # 绑定搜索功能
        self.searchBox.textChanged.connect(self.performSearch)
        bottomLayout.addWidget(self.textLogLight)
        bottomLayout.addLayout(middleLayout)
        bottomLayout.addWidget(self.textLogRight)
        mainLayout.addWidget(groupBox)

        # 按键
        btnLayout = QtWidgets.QVBoxLayout()
        self.imageBtn = QtWidgets.QPushButton('🖼️图片文件')
        self.videoBtn = QtWidgets.QPushButton('🎞️视频文件')
        self.camBtn   = QtWidgets.QPushButton('🎦 摄像头')
        self.countBtn = QtWidgets.QPushButton('🧮 结  算')
        self.stopBtn  = QtWidgets.QPushButton('🛑 停  止')
        self.modifyPriceBtn = QtWidgets.QPushButton('💸修改价格')
        btnLayout.addWidget(self.imageBtn)
        btnLayout.addWidget(self.videoBtn)
        btnLayout.addWidget(self.camBtn)
        btnLayout.addWidget(self.countBtn)
        btnLayout.addWidget(self.stopBtn)
        btnLayout.addWidget(self.modifyPriceBtn)
        bottomLayout.addLayout(btnLayout)

        # 在中间文本框显示价格表
        self.displayAllProducts()

    def startCamera(self):
        # 打开指定编号的摄像头,1为第二个摄像头(默认0为电脑自带摄像头)
        self.cap = cv.VideoCapture(1, cv.CAP_DSHOW)
        if not self.cap.isOpened(): # 检查摄像头是否成功打开
            print("摄像头打开失败!")
            exit()      # 退出程序

        # 设置摄像头帧率
        desired_fps = 30
        self.cap.set(cv.CAP_PROP_FPS, desired_fps)

        # 实际应用的帧率
        actual_fps = self.cap.get(cv.CAP_PROP_FPS)
        print(f"实时帧率: {actual_fps}")

        # 如果定时器未启动(即定时器还没有开始捕获视频帧)
        if self.timer_camera.isActive() == False:
            self.timer_camera.start(30)      # 启动定时器,间隔30毫秒,定时器会周期性地调用显示视频的函数

    def show_camera(self):
        # 从视频流中读取一帧
        ret, frame = self.cap.read()   # ret表示是否成功读取到一帧,frame表示读取到的图像
        if not ret:     # 如果未成功读取帧
            return      # 返回,不进行后续处理

        # 将捕获到的帧的大小调整为580x400,适应显示窗口的尺寸
        frame = cv.resize(frame, (580,400))
        frame_detection = frame     # 这里frame_detection用于后续的图像处理

        # 视频色彩转换回RGB,这样才是现实的颜色
        frame = cv.cvtColor(frame, cv.COLOR_BGR2RGB)
        qImage = QtGui.QImage(frame.data, frame.shape[1], frame.shape[0],
                                 QtGui.QImage.Format_RGB888) # 变成QImage形式
        # 往显示视频的Label里 显示QImage
        self.label_ori_video.setPixmap(QtGui.QPixmap.fromImage(qImage))

        # 获取当前的帧率并更新显示
        actual_fps = self.cap.get(cv.CAP_PROP_FPS)
        self.label_fps.setText(f"帧率: {actual_fps:.2f} FPS")  # 更新帧率标签

        # 如果当前没有待处理的帧(即没有正在分析的帧)
        if not self.frameToAnalyze:
            self.frameToAnalyze.append(frame_detection) # 将当前帧添加到待分析的帧队列中

    def frameAnalyzeThreadFunc(self):
        while True:

            if not self.detectionRunning:  # 如果检测停止了,则跳出循环
                time.sleep(0.01)
                continue

            if not self.frameToAnalyze:
                time.sleep(0.01)
                continue

            if self.should_clear_log:
                QtCore.QMetaObject.invokeMethod(self.textLogRight, "clear")  # 清空内容
                self.should_clear_log = False  # 清空一次后设置为 False,防止重复清空

            frame = self.frameToAnalyze[0]
            results = self.model(frame, verbose=False)[0]
            img = results.plot(line_width=1)
            img = cv.cvtColor(img, cv.COLOR_BGR2RGB)
            qImage = QtGui.QImage(img.data, img.shape[1], img.shape[0],
                                QtGui.QImage.Format_RGB888)
            self.label_treater.setPixmap(QtGui.QPixmap.fromImage(qImage))

            detected_classes_count.clear()

            for box in results.obb.data:  # 遍历每个检测框
                class_id = box[6:7]     # 类别 ID 在最后一列
                class_name = results.names[int(class_id)]  # 获取类别名称

                # 统计类别出现次数
                if class_name in detected_classes_count:
                    detected_classes_count[class_name] += 1
                else:
                    detected_classes_count[class_name] = 1

            # 构建显示文本
            display_text = "超市商品检测结果如下:\n\n"
            for class_name, count in detected_classes_count.items():
                display_text += f"{class_name}: {count}\n"

            # 清空并刷新 textLogLight 内容
            QtCore.QMetaObject.invokeMethod(
                self.textLogLight, "clear"  # 清空内容
            )
            QtCore.QMetaObject.invokeMethod(
                self.textLogLight, "append",
                QtCore.Q_ARG(str, display_text)  # 显示新内容
            )
            self.frameToAnalyze.pop(0)

    def chooseVideoFile(self):
        file_filter = "视频文件 (*.mp4 *.avi *.mov *.mkv)"
        file_path, _ = QtWidgets.QFileDialog.getOpenFileName(self, "选择文件", "", file_filter)

        if not file_path:  # 如果未选择文件,直接返回
            return

        self.cap = cv.VideoCapture(file_path)
        if not self.cap.isOpened():
            self.textLog.append(f"无法打开视频文件: {file_path}")
            return

        if self.timer_camera.isActive() == False: # 若定时器未启动
            self.timer_camera.start(30)

    def chooseImageFile(self):
        file_filter = "图片文件 (*.jpg *.jpeg *.png *.bmp)"
        file_path, _ = QtWidgets.QFileDialog.getOpenFileName(self, "选择文件", "", file_filter)

        if not file_path:  # 如果未选择文件,直接返回
            return

        # 读取图片
        frame = cv.imread(file_path)
        frame = cv.resize(frame, (580,400))

        # 转换 BGR 到 RGB 颜色格式
        frame_rgb = cv.cvtColor(frame, cv.COLOR_BGR2RGB)
        # 加载并显示原始图片
        qImage = QtGui.QImage(frame_rgb.data, frame_rgb.shape[1], frame_rgb.shape[0],
                                    QtGui.QImage.Format_RGB888)
        self.label_ori_video.setPixmap(QtGui.QPixmap.fromImage(qImage))

        # 使用 YOLOv8 模型进行目标检测
        results = self.model(frame)[0]
        img = results.plot(line_width=1)            # 获取带标注的图片
        img = cv.cvtColor(img, cv.COLOR_BGR2RGB)    # 转换 BGR 到 RGB 颜色格式

        detected_classes_count.clear()

        for box in results.obb.data:                # 遍历每个检测框
            class_id = box[6:7]
            class_name = results.names[int(class_id)]  # 获取类别名称

            # 统计类别出现次数
            if class_name in detected_classes_count:
                detected_classes_count[class_name] += 1
            else:
                detected_classes_count[class_name] = 1

        # 构建显示文本
        display_text = "超市商品检测结果如下:\n\n"
        for class_name, count in detected_classes_count.items():
            display_text += f"{class_name}: {count}\n"

        # 清空并刷新 textLogLight 内容
        QtCore.QMetaObject.invokeMethod(
            self.textLogLight, "clear"  # 清空内容
        )

        QtCore.QMetaObject.invokeMethod(
            self.textLogLight, "append",
            QtCore.Q_ARG(str, display_text)  # 显示新内容
        )

        # 加载并显示识别后的图片
        qImage = QtGui.QImage(img.data, img.shape[1], img.shape[0],
                                    QtGui.QImage.Format_RGB888)
        self.label_treater.setPixmap(QtGui.QPixmap.fromImage(qImage))

    def startCount(self):

        """ 停止摄像头并保存当前帧 """
        self.timer_camera.stop()        # 关闭定时器
        if hasattr(self, 'cap') and self.cap is not None:
            self.cap.release()          # 释放视频流

        # 初始化显示文本
        display_text = "超市商品结算情况如下:\n\n"

        total_price = 0     # 总价
        for class_name, count in detected_classes_count.items():
            # 获取商品的单价
            if class_name in product_prices:
                price = product_prices[class_name]
                item_total = price * count
                total_price += item_total  # 累加总价
                display_text += f"{class_name}: {count} 个,    单价: {price}元,    总价: {item_total}元\n"
            else:
                display_text += f"{class_name}: {count} 个 (没有价格信息)\n"

        display_text += f"\n合计总价:    {total_price}    元"

        detected_classes_count.clear()

        # 清空并刷新 textLogRight 内容
        QtCore.QMetaObject.invokeMethod(
            self.textLogRight, "clear"  # 清空内容
        )
        QtCore.QMetaObject.invokeMethod(
            self.textLogRight, "append",
            QtCore.Q_ARG(str, display_text)  # 显示新内容
        )

    def stop(self):
            self.timer_camera.stop()        # 关闭定时器
            if hasattr(self, 'cap') and self.cap is not None:
                self.cap.release()          # 释放视频流
            self.label_ori_video.clear()    # 清空视频显示区域
            self.label_treater.clear()      # 清空视频显示区域
            self.textLogLight.clear()       # 清空左下页面结果内容
            # 清空显示     多线程冲突,使用延时代替锁机制
            QTimer.singleShot(100, self.textLogLight.clear)  # 100ms 后清空
            QTimer.singleShot(100, self.textLogRight.clear)  # 100ms 后清空

    def show_modify_price_dialog(self):
        # 弹出修改价格对话框
        dialog = PriceUpdateDialog(product_prices, self)
        dialog.exec_()

class PriceUpdateDialog(QtWidgets.QDialog):
    def __init__(self, product_prices, parent=None):
        super().__init__(parent)
        self.setWindowTitle("修改商品价格")

        # 商品名称输入框
        self.productNameLabel = QtWidgets.QLabel("商品名称:")
        self.productNameInput = QtWidgets.QLineEdit(self)

        # 商品价格输入框
        self.productPriceLabel = QtWidgets.QLabel("新价格 (RMB):")
        self.productPriceInput = QtWidgets.QLineEdit(self)

        # 提交修改按钮
        self.updatePriceButton = QtWidgets.QPushButton("修改价格", self)
        self.updatePriceButton.clicked.connect(self.update_price)

        # 布局
        layout = QtWidgets.QVBoxLayout()
        layout.addWidget(self.productNameLabel)
        layout.addWidget(self.productNameInput)
        layout.addWidget(self.productPriceLabel)
        layout.addWidget(self.productPriceInput)
        layout.addWidget(self.updatePriceButton)

        self.setLayout(layout)

    def update_price(self):
        product_name = self.productNameInput.text().strip()
        new_price = self.productPriceInput.text().strip()

        # 输入检查
        if product_name not in product_prices:
            QtWidgets.QMessageBox.warning(self, "错误", "商品不存在!")
            return

        try:
            new_price = float(new_price)
        except ValueError:
            QtWidgets.QMessageBox.warning(self, "错误", "请输入有效的价格!")
            return

        # 更新商品价格
        product_prices[product_name] = new_price

        # 显示成功消息
        QtWidgets.QMessageBox.information(self, "成功", f"商品 {product_name} 的价格已更新为 {new_price} RMB!")

        # 更新UI中的商品价格显示
        self.parent().displayAllProducts()  # 调用父窗口的更新显示方法
5. 功能测试
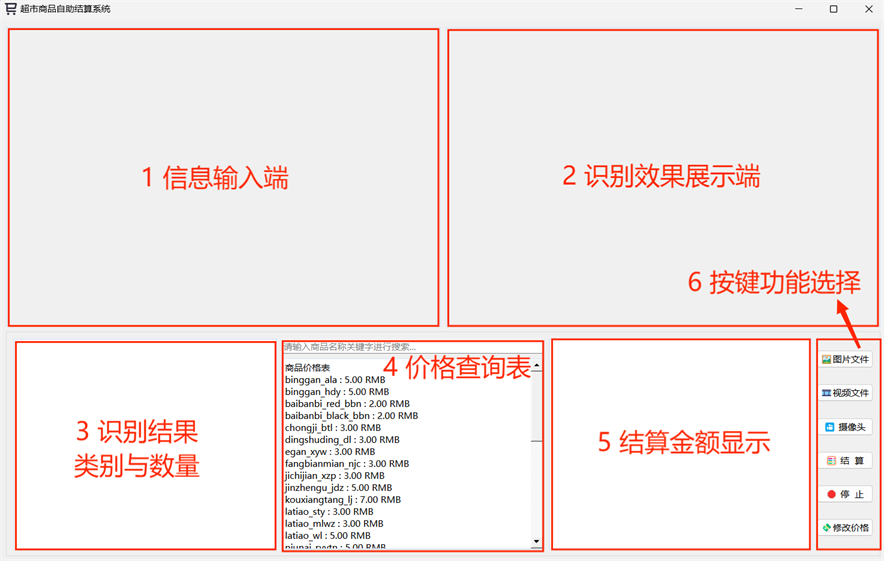
5.1. 初始化页面
初始化主界面如下,主要由六大模块构成:信息输入端、识别效果展示区、识别结果的类别与数量、价格查询、结算金额显示以及按键功能选择区。
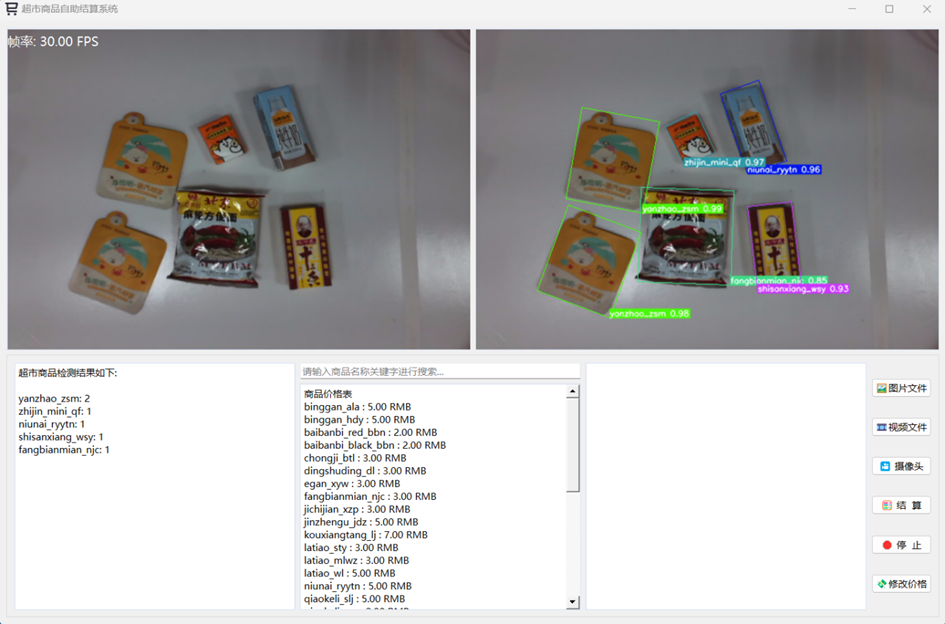
5.2. 图像检测功能
用户通过主页面上的“图片文件”按键功能选择并导入商品图片,系统会自动进行图像识别处理。识别的结果会实时展示在右上角的效果框中,图像中被识别出的商品类别及其对应的置信度等信息也会一并显示。与此同时,左下角区域会列出识别到的商品种类及其数量

5.3. 视频流与摄像头检测功能
用户可以通过点击“视频文件”或“摄像头”按钮来选择导入视频文件或打开摄像头进行实时视频流的检测。当用户选择视频文件后,系统会加载视频内容,并对每一帧进行处理,展示实时识别效果,识别的过程和图像检测功能相一致,即能够实时显示每帧图像中的目标及其相关信息。对于摄像头实时视频流的检测,系统会通过调用设备的摄像头接口,实时获取视频数据,并进行逐帧处理和目标检测。
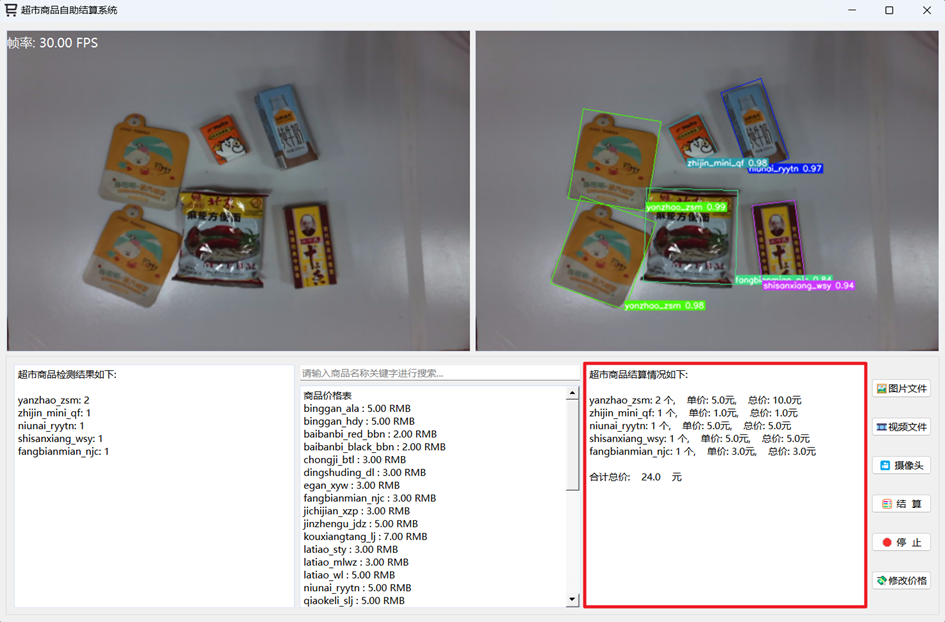
5.4. 自助结算功能
用户通过摄像头实时识别获取目标信息后,能够顺利进入自助结算流程。在此过程中,当用户点击“结算”按钮时,系统会自动根据摄像头视频流中的当前帧进行实时识别和计算。此时,系统会依据当前帧所检测到的目标,完成相关数据的自动识别与处理,确保结算计算的准确性与时效性。结算操作完成后,系统会生成账单,并将结算结果显示在结算金额区域。账单内容会实时更新,显示识别到的目标及其对应的费用。
5.5. 价格修改及查询功能
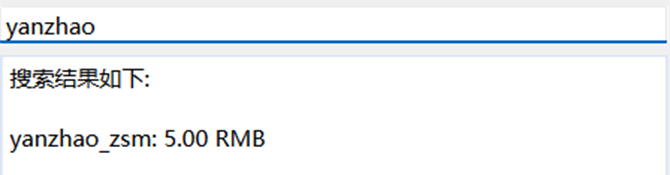
如上图,系统初步识别了购物车中的商品种类与数量,包括眼罩(数量2)、方便面、纸巾、十三香与牛奶。根据初步设定,商品的定价分别为:眼罩5元、方便面3元、纸巾1元、十三香5元、牛奶5元,合计总金额为24元。为了测试系统的价格修改与查询功能,本次选取了眼罩作为修改对象,修改价格前对眼罩进行价格查询,如下图。
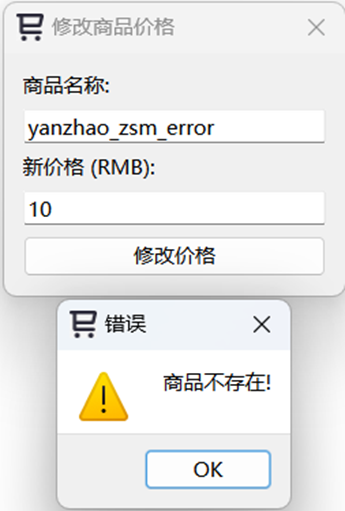
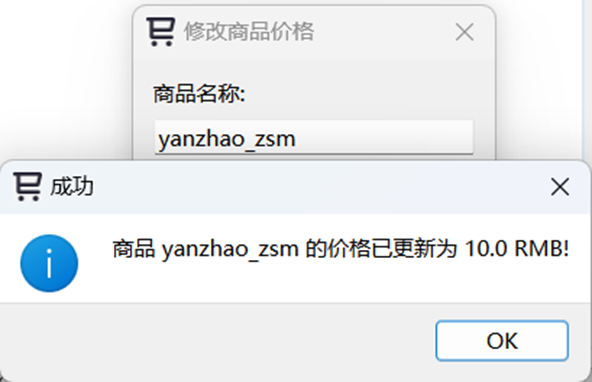
用户在结算界面点击“修改价格”按钮后,系统会弹出修改界面,如所示,界面中显示了商品名称及当前价格,用户可以根据需要输入新的定价。当输入新的价格后,系统会验证该商品是否存在,并根据验证结果决定是否进行修改。若商品存在,系统会自动完成价格修改,修改失败与修改成功的情况如下图。
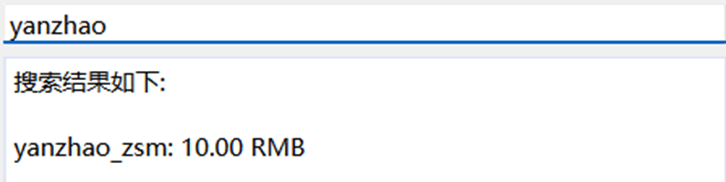
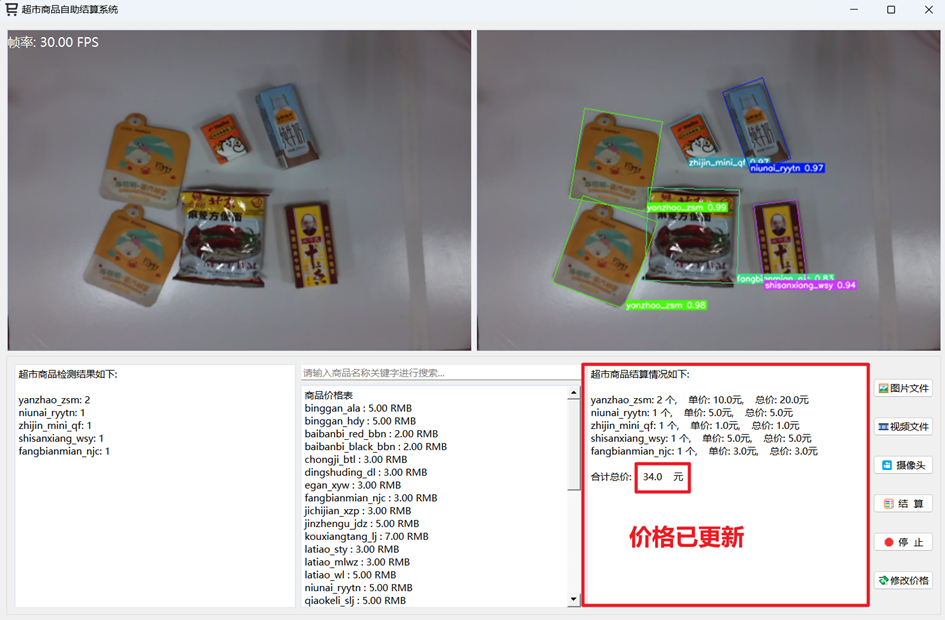
在成功修改眼罩的定价后,用户可重新进行结算操作。系统根据新的价格对账单进行更新,并实时显示修改后的总金额。经过修改,眼罩的定价变更后,价格查询情况如下图1。同时,商品总金额重新计算,总金额变为34元,系统如下图2显示了新的账单结果。
设计模型的各种参数计算和各种模块的缝合改进,如有时间后面文章再进行讲解。
参考:
https://space.bilibili.com/306852711?spm_id_from=333.337.0.0
https://space.bilibili.com/401981380?spm_id_from=333.788.upinfo.detail.click

腾讯云面向开发者汇聚海量精品云计算使用和开发经验,营造开放的云计算技术生态圈。
更多推荐
 7
7 0
0- 0


 已为社区贡献1条内容

所有评论(0)