基于 PipeLine 实现 JAVA项目集成 SonarQube 代码检测通知 Jenkins
准备相关服务器,并实现各个服务器的域名解析
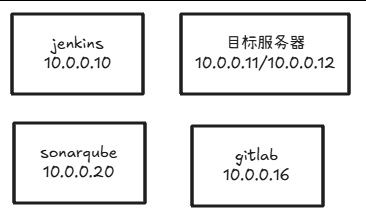
我这里就配hosts文件,生产中可以配置DNS服务器,参考:配置DNS
root@ubuntu10:~/spring-boot-helloworld  cat /etc/hosts

10.0.0.16 gitlab.lty.org
10.0.0.10 jenkins.lty.org redis.lty.org harbor.lty.org
10.0.0.11  mysql.lty.org
10.0.0.20 sonarqube.lty.org
一、安装 GitLab 和准备项目
安装Gitlab ,并准备JAVA项目,参考:GITLAB还没换
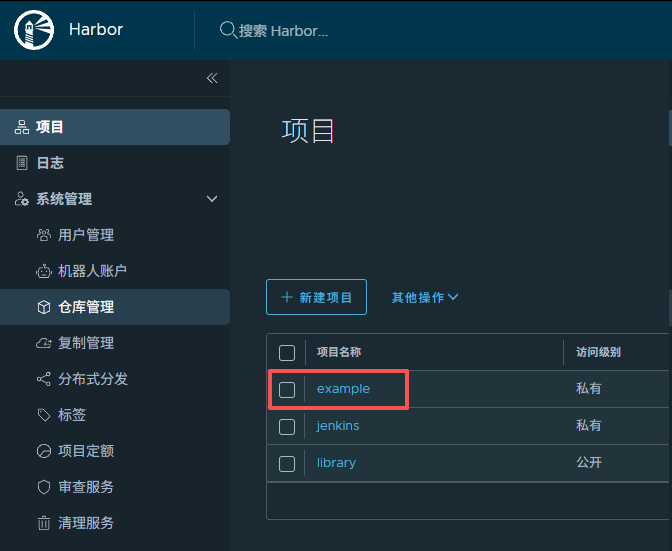
二、安装 Harbor 并配置 Jenkins 连接 Harbor
(一)安装harbor
参考:安装配置harbor
创建一个example的项目
在 Jenkins 服务器安装 Docker,并配置连接 Harbor
apt update && apt -y install docker.io

root@ubuntu10:~  cat /etc/docker/daemon.json
{
    "registry-mirrors": [
        "https://docker.m.daocloud.io",
        "https://docker.1panel.live",
        "https://docker.1ms.run",
        "https://docker.xuanyuan.me"
    ],
    "experimental":true,
    "insecure-registries": ["harbor.lty.org"]
}

systemctl restart docker
三、安装 Jenkins 并安装相关插件
GitLab,pipeline,Pipeline Stage View,Blue Ocean,Qy Wechat Notification
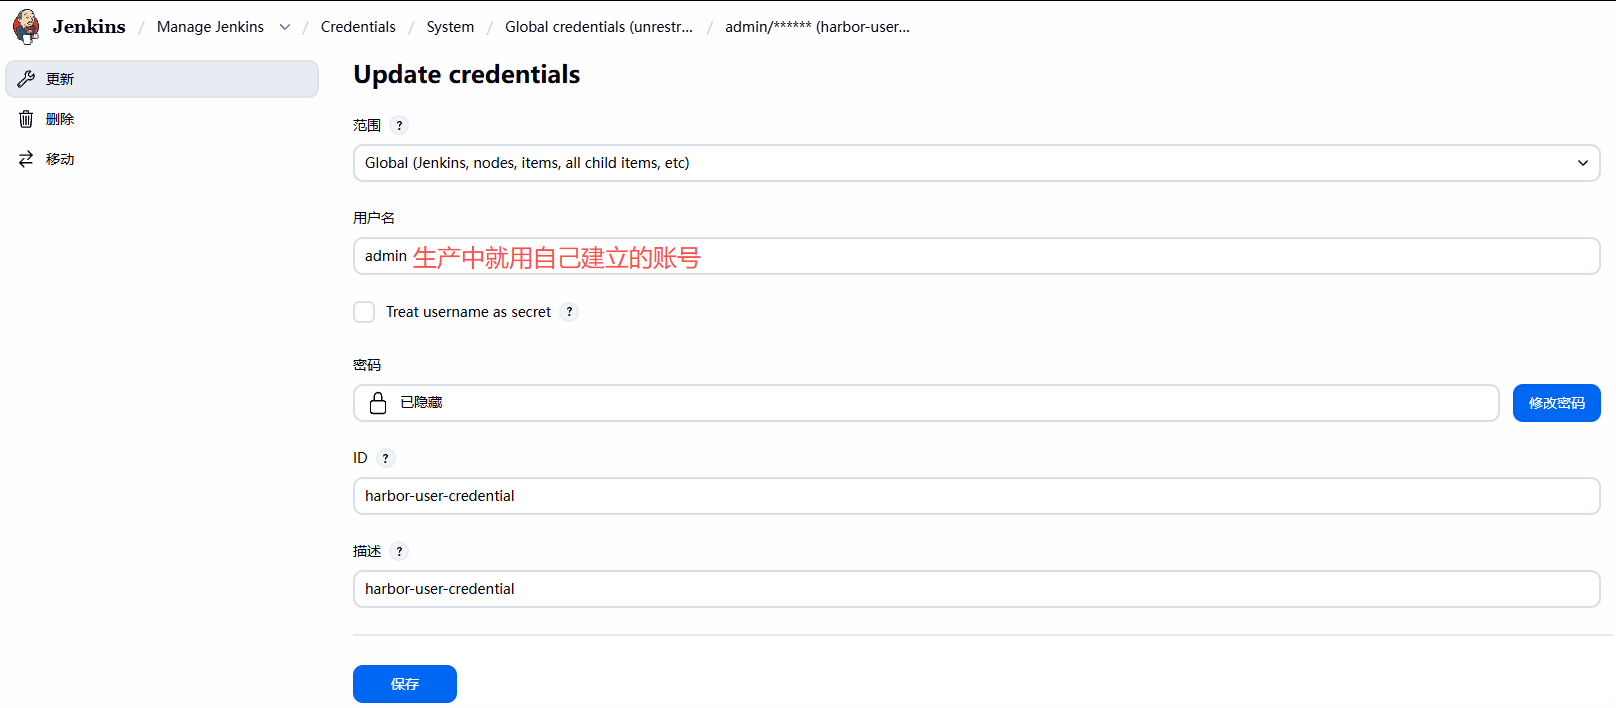
四、在 Jenkins 创建凭据连接 Harbor
五、在 Jenkins 安装 Maven 工具
apt update && apt -y install maven
root@ubuntu10:~/ mvn -v
Apache Maven 3.8.7
Maven home: /usr/share/maven
Java version: 21.0.10, vendor: Ubuntu, runtime: /usr/lib/jvm/java-21-openjdk-amd64
Default locale: zh_CN, platform encoding: UTF-8
OS name: "linux", version: "6.14.0-37-generic", arch: "amd64", family: "unix"
#配置maven的加速
vim /etc/maven/settings.xml
……
<mirror>
<id>nexus-aliyun</id>
<mirrorOf>*</mirrorOf>
<name>Nexus aliyun</name>
<url>http://maven.aliyun.com/nexus/content/groups/public</url>
</mirror>
</mirrors>
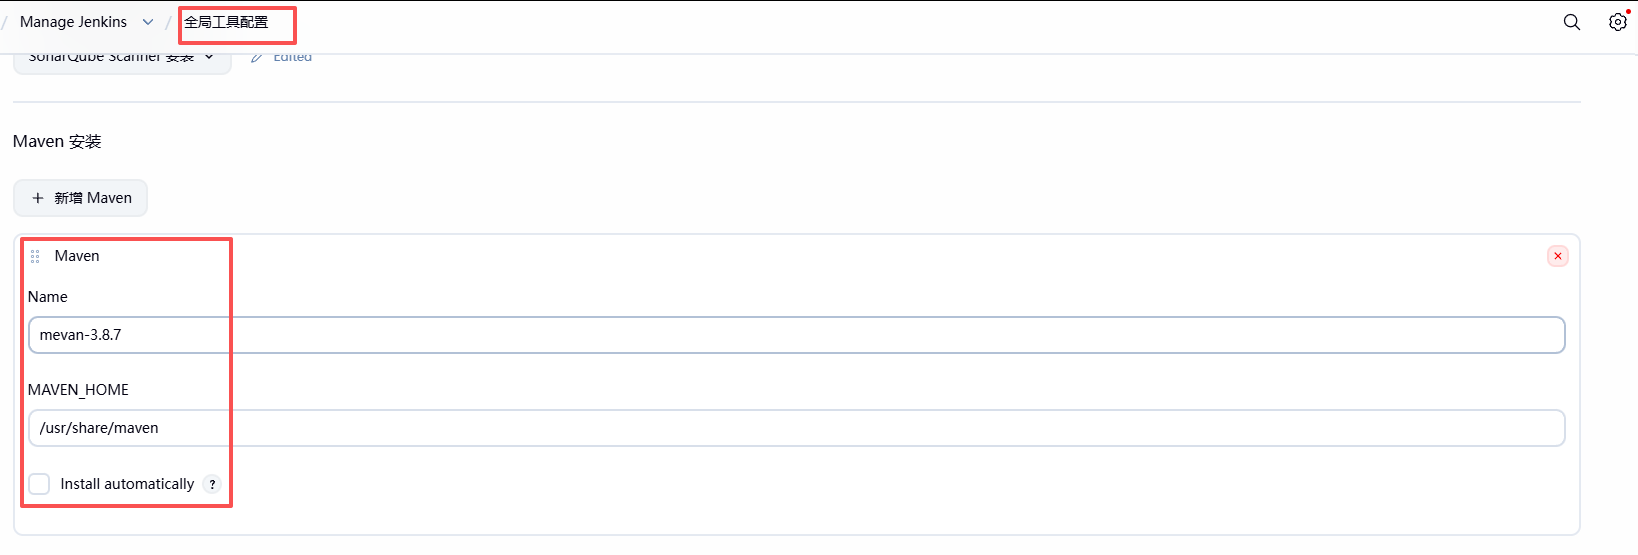
……六、在 Jenkins 上配置 Maven 环境
(一)手动安装的Maven
Mange Jenkins --- Global Tool configuration -- Maven
根据上面的 mvn -version 命令结果,填写 MAVEN_HOME 的路径
(二)自动安装Maven
jenkins也提供了安装Maven的方式

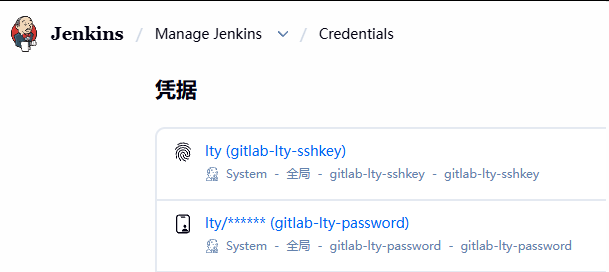
七、在 Jenkins 创建连接 GitLab 的凭据
八、在 Jenkins 上修改 Docker 的 socket 文件权限
把jenkins 账号放到 docker 组里
usermod -G docker jenkins
root@ubuntu10:~/  su - jenkins
jenkins@ubuntu10:~$ id jenkins
uid=123(jenkins) gid=125(jenkins) 组=125(jenkins),124(docker)
jenkins@ubuntu10:~$ exit

systemctl restart jenkins
九、安装 SonarQube 并创建用户和令牌
安装 Sonarqueb Server ,并在 Sonarqube 创建用户并授权
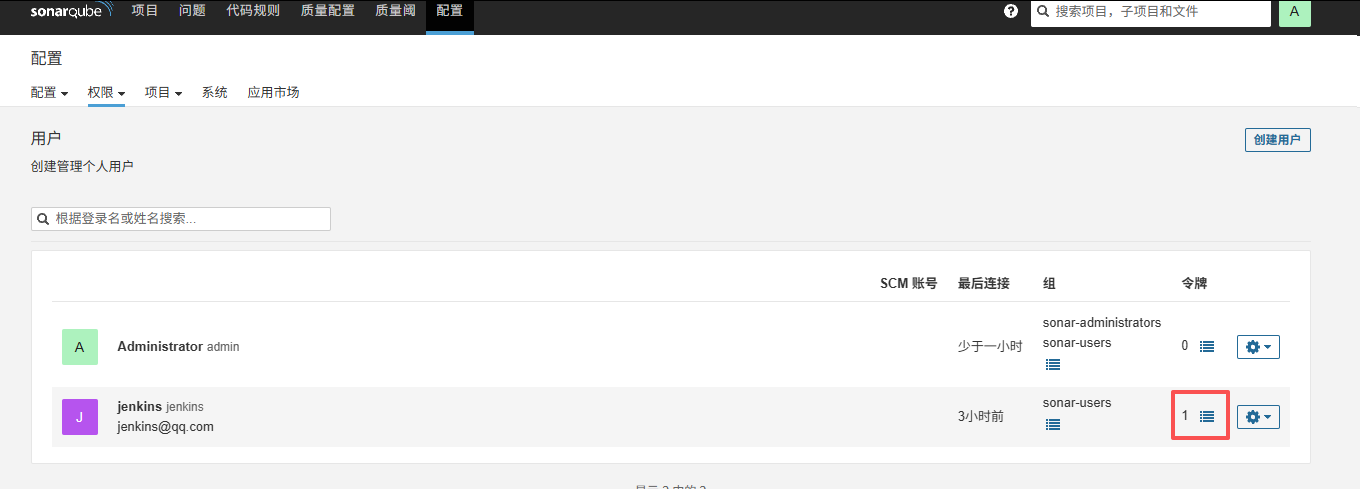
复制生成的令牌token,注意:此token 只能复制一次,后面看不到了
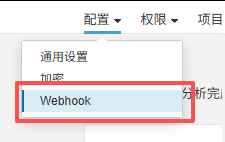
十、在 SonarQube Server 添加 Jenkins 的回调接口
在SonarQube上添加webhook(网络调用),以便于Jenkins通过SonarQube Quality Gate插件调用其"质量阈"信息,决定是否继续执行下面的构建步骤
配置 --- 网络调用 webhook --- 创建
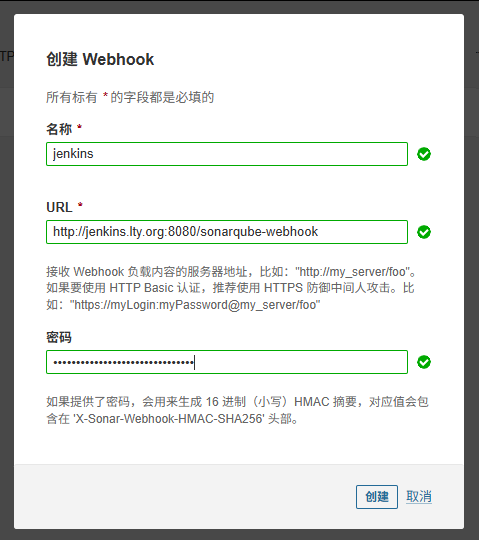
到sonarqube服务器上测试一下没有报错

http://jenkins.lty.org:8080/sonarqube-webhook,URL必须是这种格式http://域名或者IP:8080/sonarqube-webhook,密码可以随机生成一个 openssl rand -base64 21 OktNRIrQclpcHsQng1wKCMUxj+56
十一、在 Jenkins 安装 SonarQube Scanner 插件
Jenkins—系统管理--插件管理;安装插件 SonarQube Scanner
十二、在 Jenkins 创建访问 Sonarqube 的令牌凭据
用前面小节生成的Sonarqube中用户令牌,在Jenkins 创建凭据
squ_37fd0d75733da5da555091201958fe5063ab0cff
参考:jenkins高级功能还未改

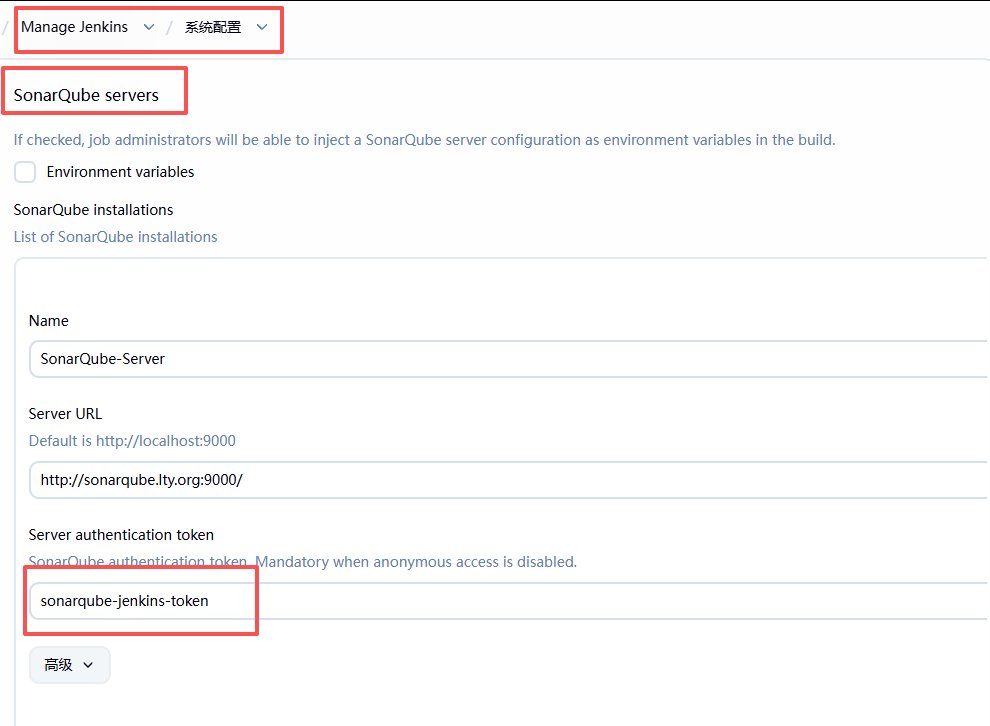
十三、在 Jenkins 上配置系统的 SonarQube 服务器信息
Manage Jenkins -- Configure System
注意:Name名称区分大小写;pipeline的脚本需要用到
注意:http://sonarqube.wang.org:9000 地址最后不能加/ ,新版无此有要求
否则会报错误 hudson.remoting.ProxyException: net.sf.json.JSONException: Invalid JSON String
十四、在 Jenkins 上安装 SonarQube Scanner
Jenkins 上安装 SonarQube Scanner 以便在构建任务中调用,有两种方式
在 Jenkins 手动安装 sonarqube-scanner
Jenkins 全局工具配置中配置安装 sonar-scanner
Manage Jenkins >全局工具配置
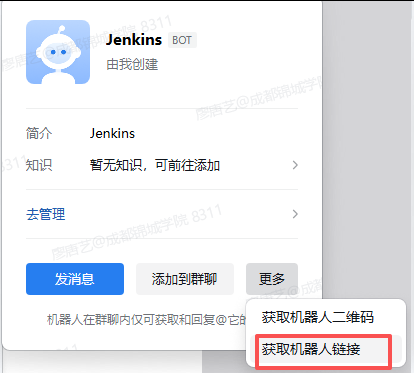
十五、准备微信机器人
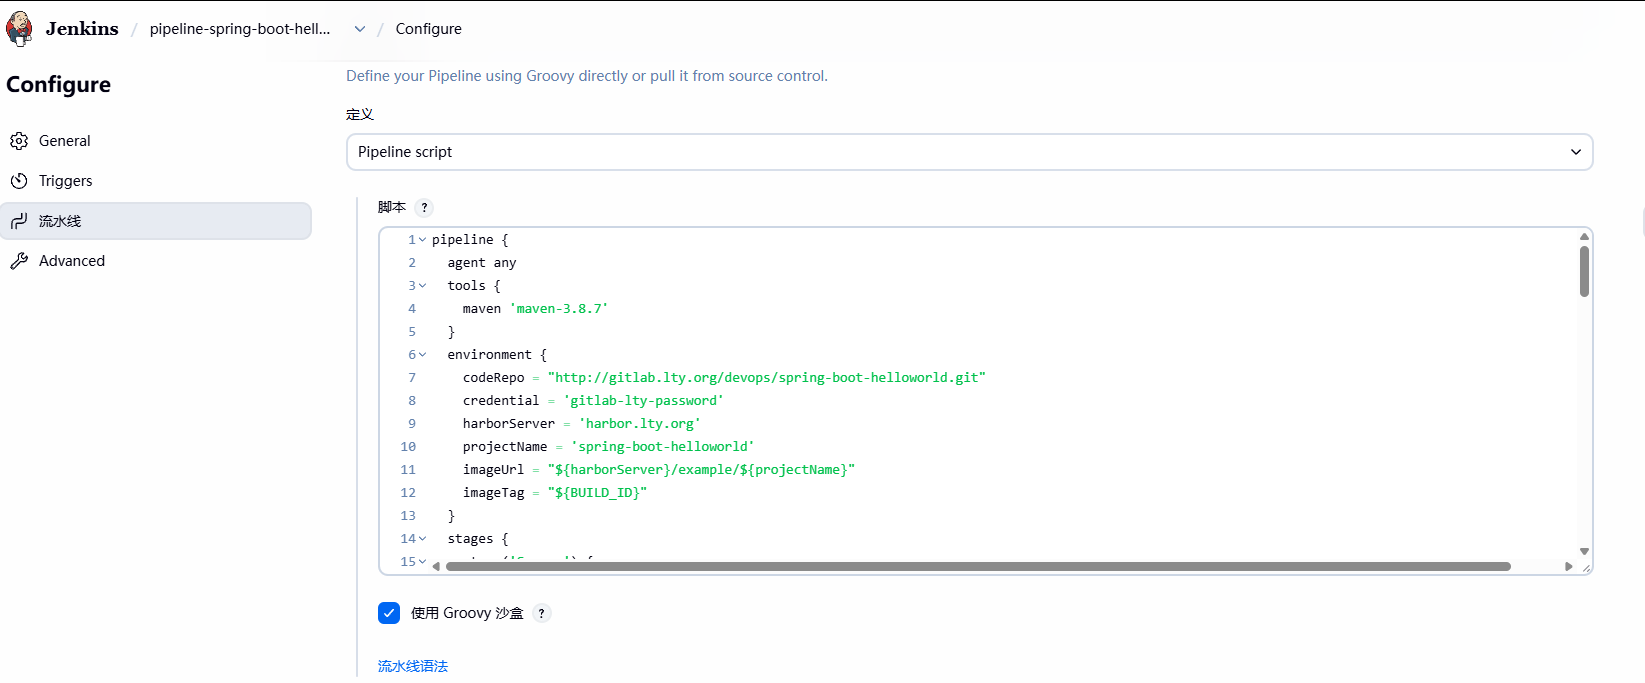
十六、创建Pipeline任务
pipeline {
agent any
tools {
maven 'maven-3.8.7'
}
environment {
codeRepo = "http://gitlab.lty.org/devops/spring-boot-helloworld.git"
credential = 'gitlab-lty-password'
harborServer = 'harbor.lty.org'
projectName = 'spring-boot-helloworld'
imageUrl = "${harborServer}/example/${projectName}"
imageTag = "${BUILD_ID}"
}
stages {
stage('Source') {
steps {
git branch: 'main', credentialsId: "${credential}", url: "${codeRepo}"
}
}
stage('Test') {
steps {
sh 'mvn test'
}
}
stage("SonarQube Analysis") {
steps {
withSonarQubeEnv('SonarQube-Server') { #这里的名字要和上面SonarQube中配置的名字对应
sh 'mvn sonar:sonar'
//sh 'sonar-scanner'
//sh 'mvn sonar:sonar -Dsonar.java.binaries=./'
}
}
}
stage('Quality Gate') {
steps {
timeout(time: 30, unit: 'MINUTES') {
waitForQualityGate abortPipeline: true
}
}
}
stage('Build') {
steps {
//sh 'mvn -B -DskipTests clean package'
sh 'mvn -Dmaven.test.skip=true clean package'
}
}
stage('Build Docker Image') {
steps {
sh 'docker image build . -t "${imageUrl}:${imageTag}"'
// input(message: '镜像已经构建完成,是否要推送?')
}
}
stage('Push Docker Image') {
steps {
withCredentials([usernamePassword(
credentialsId: 'harbor-user-credential', #这里的凭据名称一定要正确
passwordVariable: 'harborPassword',
usernameVariable: 'harborUserName'
)]) {
sh "docker login -u ${env.harborUserName} -p ${env.harborPassword} ${harborServer}"
sh "docker image push ${imageUrl}:${imageTag}"
}
}
}
stage('Run Docker') {
steps {
sh 'ssh root@10.0.0.11 "docker rm -f ${projectName} && docker run --name ${projectName} -p 80:8888 -d ${imageUrl}:${imageTag}"'
sh 'ssh root@10.0.0.12 "docker rm -f ${projectName} && docker run --name ${projectName} -p 80:8888 -d ${imageUrl}:${imageTag}"'
//sh "docker -H 10.0.0.202:2375 rm -f ${projectName} && docker -H 10.0.0.202:2375 run --name ${projectName} -p 80:8888 -d ${imageUrl}:${imageTag}"
//sh "docker -H 10.0.0.203:2375 rm -f ${projectName} && docker -H 10.0.0.203:2375 run --name ${projectName} -p 80:8888 -d ${imageUrl}:${imageTag}"
}
}
}
post {
success {
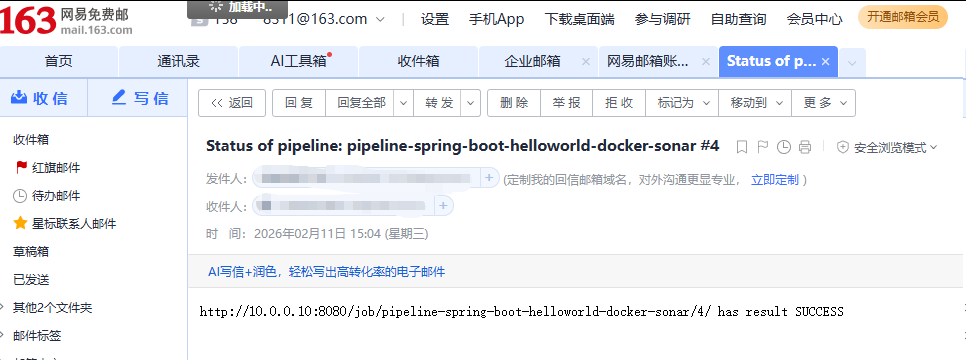
mail to: '你的邮箱',
subject: "Status of pipeline: ${currentBuild.fullDisplayName}",
body: "${env.BUILD_URL} has result ${currentBuild.result}"
}
failure {
qywechatNotification failNotify: true, webhookurl: 'https://work.weixin.qq.com/wework_admin/common/openBotProfile/24afe4f26e2296f07447eeadc1e97f9a31' #上面微信机器人的地址
}
}
}
十七、执行构建验证结果

腾讯云面向开发者汇聚海量精品云计算使用和开发经验,营造开放的云计算技术生态圈。
更多推荐
 11
11 0
0- 0


 已为社区贡献4条内容

所有评论(0)