“YOLO26-obb+语音控制” 机械臂抓取方案(一、自动化采集数据脚本)
·
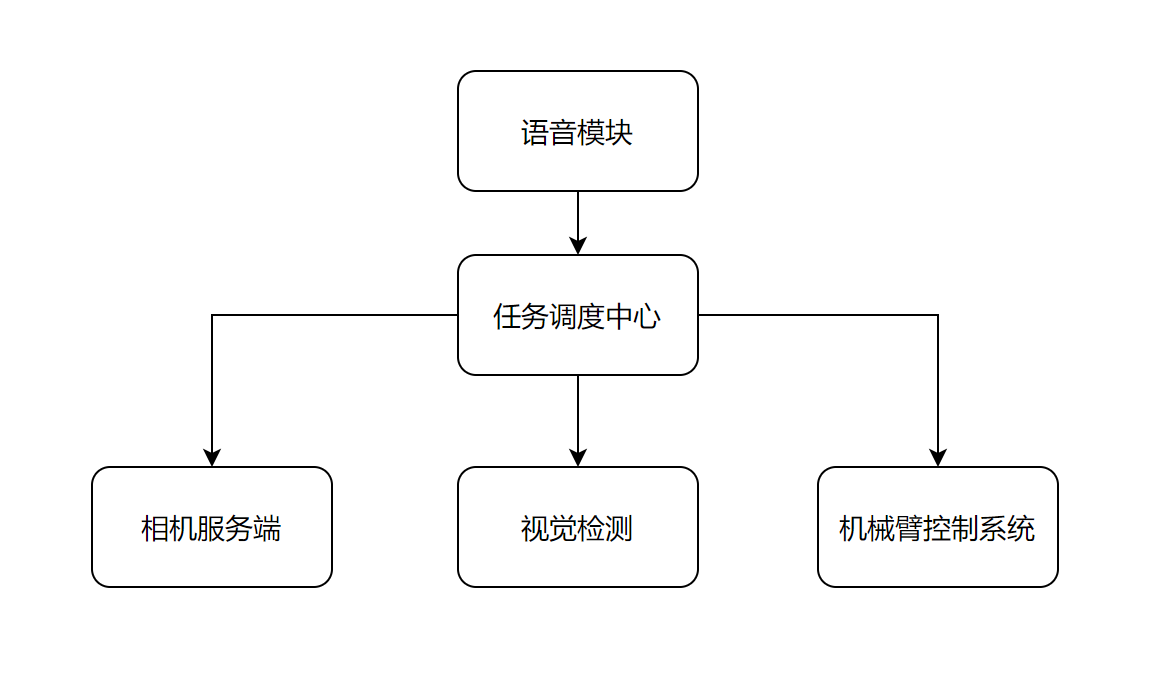
我们今天开始进行简易的Yolo26-obb+语音控制的机械臂抓取方案,首先确定以下我们的思路。
1、我们采用的模型为Yolo26-obb(后续会再做模型的选择,如DINO)
2、沿用之前的相机服务端框架
3、沿用之前的机械臂控制系统
4、做一个任务调度中心,将服务端与机械臂控制集成管控
5、语音模块,目前先采用离线Vosk的方式来进行(后面会一步步优化!!)
以下为简略架构图:
模型训练
当使用到yolo时,我们避免不了要去接触模型训练的步骤,其实我们做基础的模型训练是一件很简单的事情,我们做一件事情的时候一定要想好大概的框架,再去做增删改查,大家一起跟着我的思路来看看吧。
数据采集
模型训练的前提就在于需要有相应的数据来作支撑,如果你连数据都没有,模型是不可能训练出来的,那么我们这里做一下基础和进阶的两种方式。
采集方案一
方案一我们使用机械臂处于固定拍照姿态,相机保持不动,仅移动物体的摆放位置及姿态,通过命令行按键的方式触发拍照。
优点:由于桌面级任务,采集时的图像与实际任务时拍摄的图像重合度高,训练出来的模型识别率高,更有效更直观。
缺点:模型存在过拟合的问题,由于一直在同一画面内拍摄的图像,当物体处于其他背景下时,识别的结果会降低。同时如果有采集数据量的要求,此等方案耗时较大。
collect_images_normal.py
import pyrealsense2 as rs
import numpy as np
import cv2
import os

# =========================
# 保存路径
# =========================
IMG_DIR = "dataset/images/train"
DEPTH_DIR = "dataset/depth/train"

os.makedirs(IMG_DIR, exist_ok=True)
os.makedirs(DEPTH_DIR, exist_ok=True)

# 自动编号
img_id = len(os.listdir(IMG_DIR))

# =========================
# RealSense 初始化
# =========================
pipeline = rs.pipeline()
config = rs.config()

config.enable_stream(rs.stream.color, 640, 480, rs.format.bgr8, 30)
config.enable_stream(rs.stream.depth, 640, 480, rs.format.z16, 30)

pipeline.start(config)

# 对齐
align = rs.align(rs.stream.color)

print("相机已启动")
print("按 [Space] 保存 | 按 [q] 退出")

try:
    while True:
        frames = pipeline.wait_for_frames()
        aligned_frames = align.process(frames)

        color_frame = aligned_frames.get_color_frame()
        depth_frame = aligned_frames.get_depth_frame()

        if not color_frame:
            continue

        color_image = np.asanyarray(color_frame.get_data())
        depth_image = np.asanyarray(depth_frame.get_data())

        # 深度可视化
        depth_vis = cv2.applyColorMap(
            cv2.convertScaleAbs(depth_image, alpha=0.03),
            cv2.COLORMAP_JET
        )

        # 拼接显示
        display = np.hstack((color_image, depth_vis))
        cv2.imshow("RGB | Depth", display)

        key = cv2.waitKey(1) & 0xFF

        # =========================
        # 保存(空格键)
        # =========================
        if key == 32:  # Space
            name = f"{img_id:06d}"

            cv2.imwrite(f"{IMG_DIR}/{name}.jpg", color_image)
            cv2.imwrite(f"{DEPTH_DIR}/{name}.png", depth_image)

            print(f"保存 {name}")
            img_id += 1

        # =========================
        # 退出
        # =========================
        if key == ord('q'):
            break

finally:
    pipeline.stop()
    cv2.destroyAllWindows()
    print("相机关闭")
采集方案二
由于我们的抓取方案不变,依旧是眼在手上的方案,所以我们采集方案二中使用机械臂点位运动来拍摄图像,针对不同拍摄角度来采集数据。
前提条件:我们提前需要自定义8-12个拍照点位,1个初始点位
collect_images_auto.py
import os
import cv2
import time
import random
import logging
import lebai_sdk
import numpy as np
import pyrealsense2 as rs


lebai_sdk.init()
logger = logging.getLogger(__name__)

# todo 机械臂相关配置
ROBOT_IP = '192.168.55.100'
mode = False
acc_speed = 5
v_speed = 0.5
move_t = 0
move_r = 0

# todo 自定义10个拍照点位,PHOTO_POS1作为初始点
PHOTO_POS1 = {"x": 0.121, "y": -0.186, "z": 0.533, "rx": 0, "ry": 0.0, "rz": 0}
PHOTO_POS2 = {"x": 0.121, "y": -0.100, "z": 0.533, "rx": 0, "ry": 0.0, "rz": 10}
PHOTO_POS3 = {"x": 0.121, "y":  0.000, "z": 0.533, "rx": 0, "ry": 0.0, "rz": -10}
PHOTO_POS4 = {"x": 0.200, "y": -0.186, "z": 0.533, "rx": 0, "ry": 0.0, "rz": 20}
PHOTO_POS5 = {"x": 0.200, "y": -0.100, "z": 0.533, "rx": 0, "ry": 0.0, "rz": -20}
PHOTO_POS6 = {"x": 0.200, "y":  0.000, "z": 0.533, "rx": 0, "ry": 0.0, "rz": 30}
PHOTO_POS7 = {"x": 0.280, "y": -0.186, "z": 0.533, "rx": 0, "ry": 0.0, "rz": -30}
PHOTO_POS8 = {"x": 0.280, "y": -0.100, "z": 0.533, "rx": 0, "ry": 0.0, "rz": 15}
PHOTO_POS9 = {"x": 0.280, "y":  0.000, "z": 0.533, "rx": 0, "ry": 0.0, "rz": -15}
PHOTO_POS10 = {"x": 0.160, "y": -0.050, "z": 0.500, "rx": 0, "ry": 0.0, "rz": 0}


IMG_DIR = "../dataset/images/train"
DEPTH_DIR = "../dataset/depth/train"

os.makedirs(IMG_DIR, exist_ok=True)
os.makedirs(DEPTH_DIR, exist_ok=True)

img_id = len(os.listdir(IMG_DIR))

# =========================
# RealSense 初始化
# =========================
pipeline = rs.pipeline()
config = rs.config()

config.enable_stream(rs.stream.color, 640, 480, rs.format.bgr8, 30)
config.enable_stream(rs.stream.depth, 640, 480, rs.format.z16, 30)

pipeline.start(config)
align = rs.align(rs.stream.color)

print("相机启动成功")

# todo 乐白机械臂连接
def connect_robot(ip):
    global robot, is_connected
    try:
        robot = lebai_sdk.connect(ip, mode)
        robot.start_sys()
        is_connected = True
        print("机械臂连接成功")
        logger.info("机械臂连接成功,并以启动")
        return True
    except Exception as e:
        print(f"连接失败: {e}")
        logger.info(f"连接失败: {e}")
        is_connected = False
        return False


def disconnect_robot():
    global robot, is_connected
    if robot and is_connected:
        try:
            robot.stop_sys()
        except Exception as e:
            print(f"停止系统出错: {e}")
            logger.info(f"停止系统出错: {e}")
        is_connected = False
        print("已断开连接")
        logger.info("已断开连接")


# todo 初始化时就连接机械臂
connect_robot(ROBOT_IP)
print("机械臂初始化成功")


# todo 机械臂运动控制函数(笛卡尔位姿运动) (代码复用)
def move_robot(pose, wait=True):
    """
    移动到指定位姿(笛卡尔)
    pose: dict {'x':, 'y':, 'z':, 'rx':, 'ry':, 'rz':}
    wait: 是否等待完成
    """
    if not is_connected:
        raise RuntimeError("机械臂未连接")
    try:
        move_id = robot.movel(pose, acc_speed, v_speed, move_t, move_r)
        if wait:
            robot.wait_move(move_id)
        time.sleep(1)
        return True
    except Exception as e:
        print(f"运动失败: {e}")
        return False


# =========================
# 采集轨迹(你可以自己改)
# =========================
poses = [
    PHOTO_POS1,
    PHOTO_POS2,
    PHOTO_POS3,
    PHOTO_POS4,
    PHOTO_POS5,
    PHOTO_POS6,
    PHOTO_POS7,
    PHOTO_POS8,
    PHOTO_POS9,
    PHOTO_POS10,
]

for dx in [0.0, 0.08, 0.16]:
    for dy in [-0.08, 0.0, 0.08]:
        pose = {
            "x": PHOTO_POS1["x"] + dx,
            "y": PHOTO_POS1["y"] + dy,
            "z": PHOTO_POS1["z"],
            "rx": PHOTO_POS1["rx"],
            "ry": PHOTO_POS1["ry"],
            "rz": random.uniform(-25, 25)
        }
        poses.append(pose)

print(f"总采集点位: {len(poses)}")

# =========================
# 开始自动采集
# =========================
try:
    for i, pose in enumerate(poses):
        print(f"\n➡️ 第 {i + 1}/{len(poses)} 个点")

        # 移动机械臂
        move_robot(pose)

        # 等待稳定
        time.sleep(1)

        # 获取图像
        frames = pipeline.wait_for_frames()
        aligned_frames = align.process(frames)

        color_frame = aligned_frames.get_color_frame()
        depth_frame = aligned_frames.get_depth_frame()

        if not color_frame:
            continue

        color_image = np.asanyarray(color_frame.get_data())
        depth_image = np.asanyarray(depth_frame.get_data())

        # 保存
        name = f"{img_id:06d}"

        cv2.imwrite(f"{IMG_DIR}/{name}.jpg", color_image)
        cv2.imwrite(f"{DEPTH_DIR}/{name}.png", depth_image)

        print(f"保存 {name}")

        img_id += 1

        # 可视化
        cv2.imshow("capture", color_image)
        cv2.waitKey(1)

    print("\n自动采集完成")

finally:
    pipeline.stop()
    cv2.destroyAllWindows()
    print("相机关闭")
文件架构应为:

大家可以动手采集一下所需物体的数据,明天我们将开始进行非常痛苦的标注工作

腾讯云面向开发者汇聚海量精品云计算使用和开发经验,营造开放的云计算技术生态圈。
更多推荐
 2
2 0
0- 0


 已为社区贡献2条内容

所有评论(0)