鸿蒙flutter第三方库适配 - 智能家居控制中心
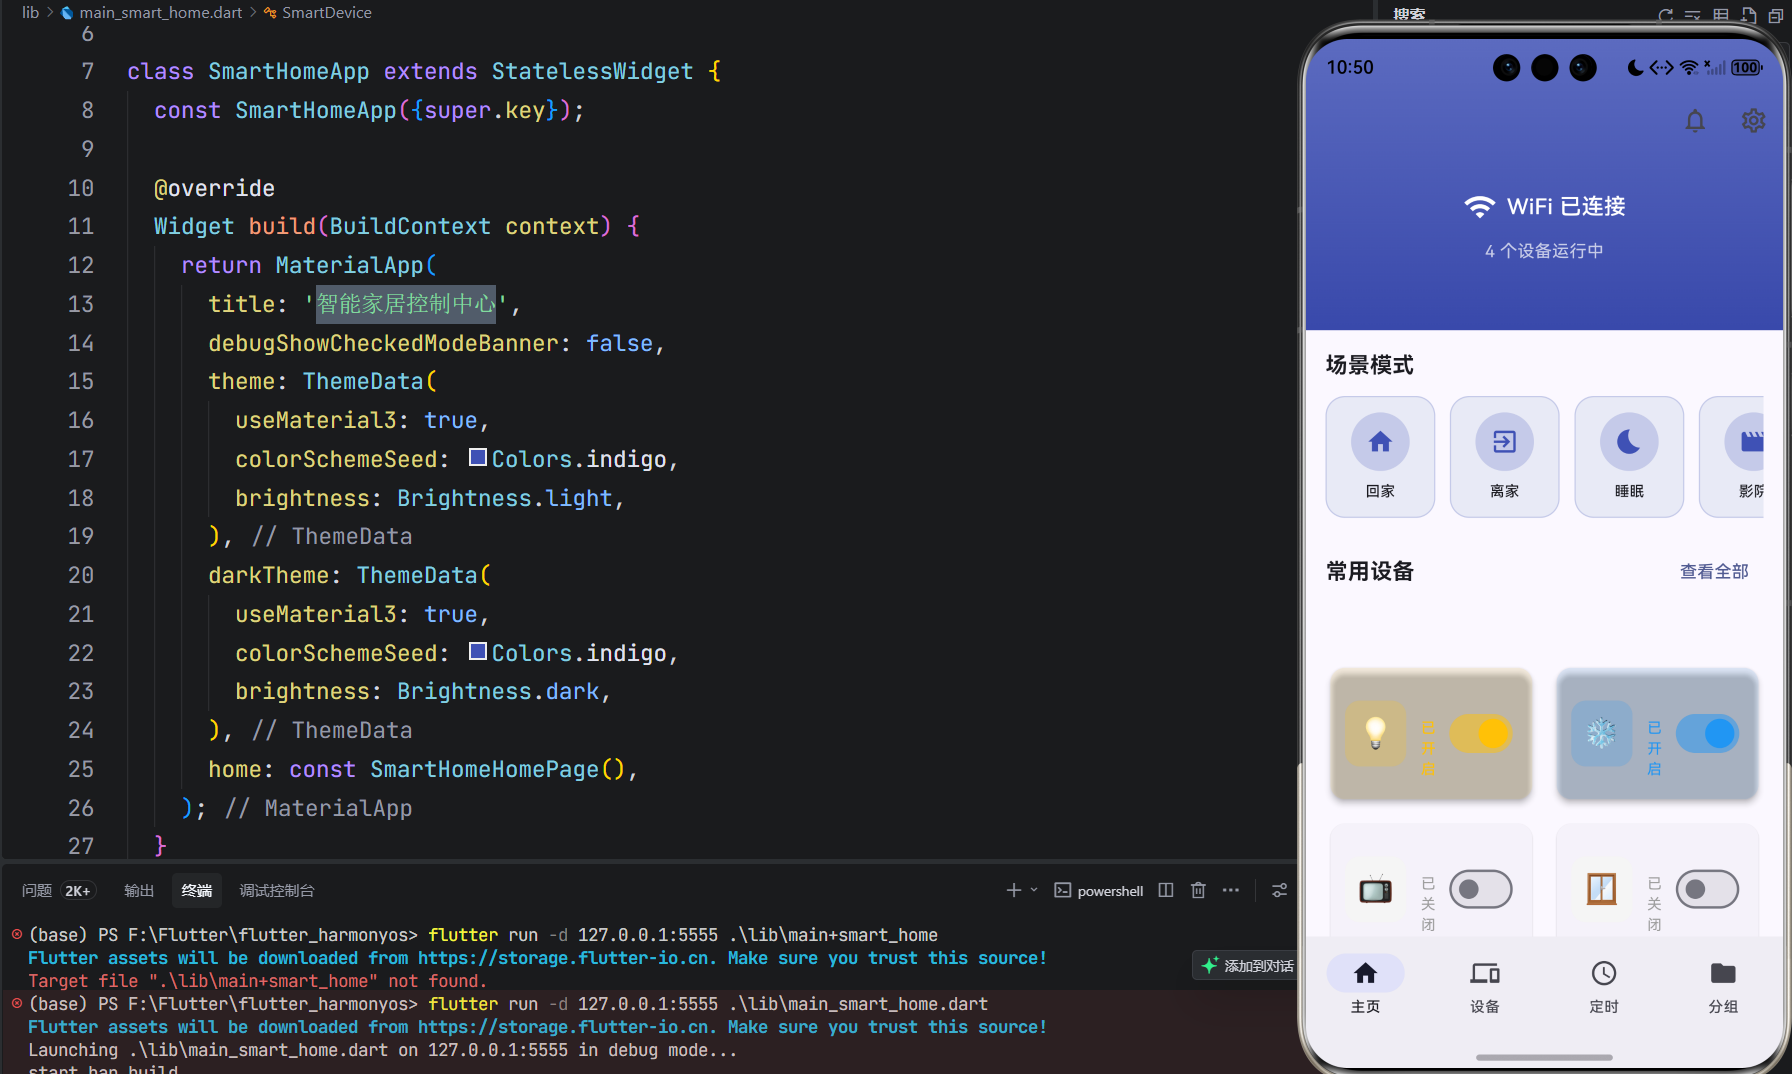
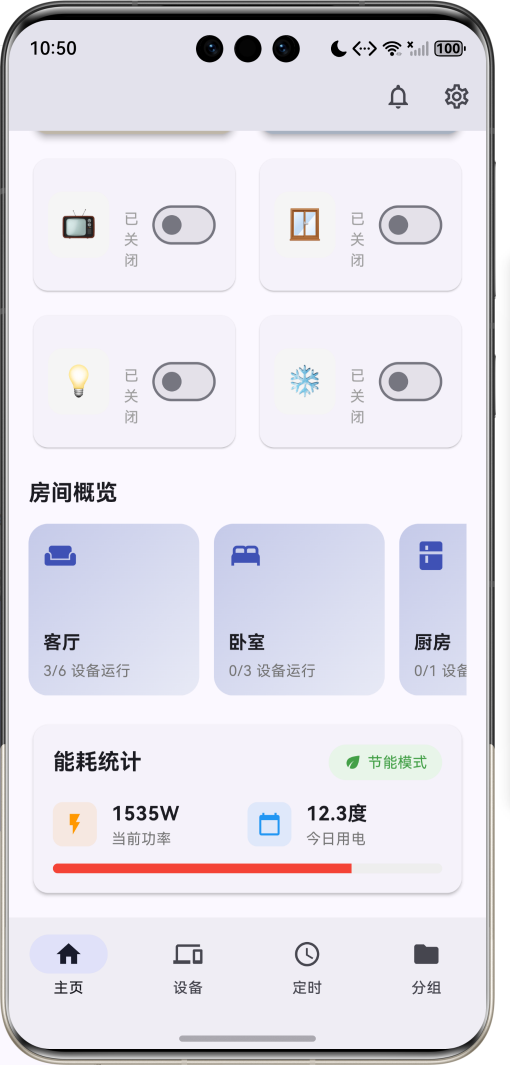
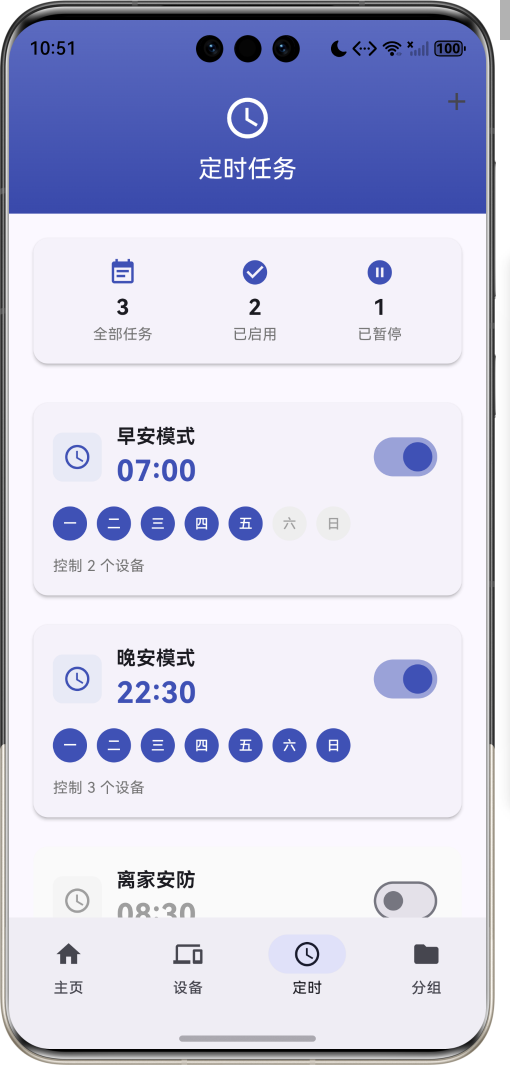
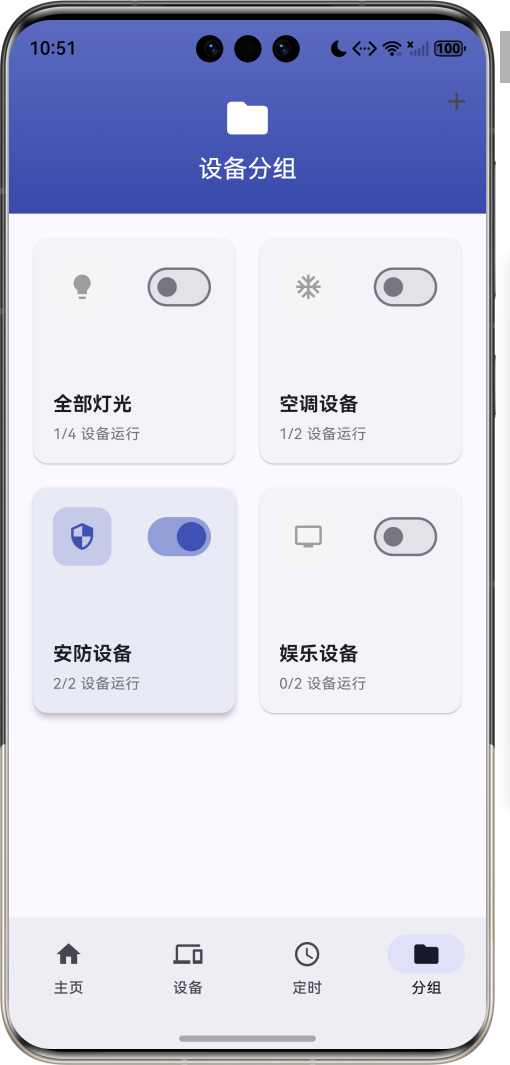
运行效果图智能家居控制中心是一款专注于智能家居设备管理的应用,旨在为用户提供便捷、高效的智能家居控制体验。应用支持多种智能设备的集中管理,提供丰富的场景模式、灵活的定时任务、智能的设备分组功能,让用户轻松掌控全屋智能设备。应用以科技蓝紫为主色调,象征智能与未来。涵盖主页控制、设备管理、定时任务、设备分组四大核心模块。用户可以一键切换场景模式,实时查看设备状态,设置自动化任务,实现智能家居的便捷管理
智能家居控制中心应用
欢迎加入开源鸿蒙跨平台社区:
https://openharmonycrossplatform.csdn.net
适配的第三方库地址:
- connectivity_plus: https://pub.dev/packages/connectivity_plus
- shared_preferences: https://pub.dev/packages/shared_preferences
- flutter_local_notifications: https://pub.dev/packages/flutter_local_notifications
- orientation: https://pub.dev/packages/orientation
一、项目概述
运行效果图

1.1 应用简介
智能家居控制中心是一款专注于智能家居设备管理的应用,旨在为用户提供便捷、高效的智能家居控制体验。应用支持多种智能设备的集中管理,提供丰富的场景模式、灵活的定时任务、智能的设备分组功能,让用户轻松掌控全屋智能设备。
应用以科技蓝紫为主色调,象征智能与未来。涵盖主页控制、设备管理、定时任务、设备分组四大核心模块。用户可以一键切换场景模式,实时查看设备状态,设置自动化任务,实现智能家居的便捷管理。
1.2 核心功能
| 功能模块 | 功能描述 | 实现方式 |
|---|---|---|
| 设备控制 | 远程控制智能设备开关 | 状态管理 |
| 场景模式 | 一键切换预设场景 | 场景引擎 |
| 定时任务 | 设置设备定时操作 | 任务调度 |
| 设备分组 | 按类型分组管理设备 | 分组管理 |
| 网络检测 | 检测设备网络连接状态 | 网络监听 |
| 状态通知 | 设备状态变更推送 | 本地通知 |
| 能耗统计 | 统计设备能耗数据 | 数据计算 |
| 房间管理 | 按房间分类管理设备 | 分类管理 |
1.3 设备类型定义
| 序号 | 设备类型 | Emoji | 描述 | 默认功率 |
|---|---|---|---|---|
| 1 | 灯光 | 💡 | 智能灯具控制 | 15W |
| 2 | 空调 | ❄️ | 空调温度控制 | 1500W |
| 3 | 窗帘 | 🪟 | 电动窗帘控制 | 10W |
| 4 | 电视 | 📺 | 智能电视控制 | 120W |
| 5 | 音响 | 🔊 | 智能音响控制 | 30W |
| 6 | 风扇 | 🌀 | 电风扇控制 | 50W |
| 7 | 门锁 | 🔐 | 智能门锁管理 | 5W |
| 8 | 摄像头 | 📹 | 安防摄像头 | 10W |
1.4 场景模式定义
| 序号 | 场景名称 | 图标 | 描述 | 关联设备 |
|---|---|---|---|---|
| 1 | 回家模式 | 🏠 | 开启客厅灯光、空调,关闭安防 | 灯光、空调、门锁 |
| 2 | 离家模式 | 🚪 | 关闭所有设备,开启安防 | 全部设备 |
| 3 | 睡眠模式 | 🌙 | 关闭灯光,开启夜间模式 | 灯光、空调 |
| 4 | 影院模式 | 🎬 | 调暗灯光,关闭窗帘,开启电视 | 灯光、窗帘、电视 |
| 5 | 派对模式 | 🎉 | 彩色灯光,开启音响 | 灯光、音响 |
| 6 | 阅读模式 | 📖 | 调亮台灯,关闭其他灯光 | 台灯 |
1.5 房间类型定义
| 序号 | 房间名称 | 图标 | 描述 |
|---|---|---|---|
| 1 | 客厅 | 🛋️ | 主要活动区域 |
| 2 | 卧室 | 🛏️ | 休息睡眠区域 |
| 3 | 厨房 | 🍳 | 烹饪饮食区域 |
| 4 | 卫生间 | 🚿 | 洗漱沐浴区域 |
| 5 | 书房 | 📚 | 学习工作区域 |
| 6 | 阳台 | 🌿 | 休闲晾晒区域 |
1.6 定时任务类型
| 序号 | 任务类型 | Emoji | 描述 | 示例 |
|---|---|---|---|---|
| 1 | 单次任务 | ⏰ | 执行一次 | 明早7点开灯 |
| 2 | 重复任务 | 🔄 | 周期执行 | 每天晚上10点关灯 |
| 3 | 条件任务 | 🔀 | 条件触发 | 日落后自动开灯 |
1.7 技术栈
| 技术领域 | 技术选型 | 版本要求 |
|---|---|---|
| 开发框架 | Flutter | >= 3.0.0 |
| 编程语言 | Dart | >= 2.17.0 |
| 设计规范 | Material Design 3 | - |
| 状态管理 | StatefulWidget | - |
| 网络检测 | Connectivity Plus | >= 6.0.0 |
| 数据存储 | SharedPreferences | >= 2.0.0 |
| 本地通知 | FlutterLocalNotifications | >= 15.0.0 |
| 屏幕方向 | Orientation | >= 0.0.1 |
| 目标平台 | 鸿蒙OS / Web | API 21+ |
1.8 项目结构
lib/
└── main_smart_home.dart
    ├── SmartHomeApp                   # 应用入口
    ├── DeviceType                     # 设备类型枚举
    ├── DeviceRoom                     # 房间类型枚举
    ├── SceneMode                      # 场景模式枚举
    ├── SmartDevice                    # 智能设备模型
    ├── ScheduledTask                  # 定时任务模型
    ├── DeviceGroup                    # 设备分组模型
    ├── SmartHomeHomePage              # 主页面(底部导航)
    ├── _buildHomePage                 # 主页
    ├── _buildDevicesPage              # 设备管理页
    ├── _buildSchedulePage             # 定时任务页
    └── _buildGroupsPage               # 设备分组页
二、系统架构
2.1 整体架构图
2.2 类图设计
2.3 页面导航流程
2.4 设备控制流程
三、核心模块设计
3.1 数据模型设计
3.1.1 设备类型枚举 (DeviceType)
enum DeviceType {
  light('灯光', '💡', Colors.amber),
  airConditioner('空调', '❄️', Colors.blue),
  curtain('窗帘', '🪟', Colors.brown),
  television('电视', '📺', Colors.purple),
  speaker('音响', '🔊', Colors.green),
  fan('风扇', '🌀', Colors.cyan),
  lock('门锁', '🔐', Colors.red),
  camera('摄像头', '📹', Colors.teal);

  final String label;
  final String emoji;
  final Color color;
  const DeviceType(this.label, this.emoji, this.color);
}
3.1.2 场景模式枚举 (SceneMode)
enum SceneMode {
  home('回家模式', Icons.home, '开启客厅灯光、空调,关闭安防'),
  leave('离家模式', Icons.exit_to_app, '关闭所有设备,开启安防'),
  sleep('睡眠模式', Icons.bedtime, '关闭灯光,开启夜间模式'),
  movie('影院模式', Icons.movie, '调暗灯光,关闭窗帘,开启电视'),
  party('派对模式', Icons.celebration, '彩色灯光,开启音响'),
  reading('阅读模式', Icons.book, '调亮台灯,关闭其他灯光');

  final String label;
  final IconData icon;
  final String description;
  const SceneMode(this.label, this.icon, this.description);
}
3.1.3 智能设备模型 (SmartDevice)
class SmartDevice {
  final String id;
  final String name;
  final DeviceType type;
  final DeviceRoom room;
  final bool isOnline;
  final bool isOn;
  final int? brightness;
  final int? temperature;
  final int? volume;

  const SmartDevice({
    required this.id,
    required this.name,
    required this.type,
    required this.room,
    required this.isOnline,
    required this.isOn,
    this.brightness,
    this.temperature,
    this.volume,
  });

  SmartDevice copyWith({
    bool? isOn,
    int? brightness,
    int? temperature,
    int? volume,
  }) {
    return SmartDevice(
      id: id,
      name: name,
      type: type,
      room: room,
      isOnline: isOnline,
      isOn: isOn ?? this.isOn,
      brightness: brightness ?? this.brightness,
      temperature: temperature ?? this.temperature,
      volume: volume ?? this.volume,
    );
  }
}
3.1.4 设备状态分布
3.2 页面结构设计
3.2.1 主页面布局
3.2.2 主页结构
3.2.3 设备管理页结构
3.2.4 定时任务页结构
3.3 场景引擎逻辑
3.4 定时任务调度逻辑
四、UI设计规范
4.1 配色方案
应用以科技蓝紫为主色调,象征智能与未来:
| 颜色类型 | 色值 | 用途 |
|---|---|---|
| 主色 | #3F51B5 (Indigo) | 导航、主题元素 |
| 辅助色 | #5C6BC0 | 卡片背景 |
| 第三色 | #7986CB | 进度条背景 |
| 强调色 | #C5CAE9 | 分组页面 |
| 背景色 | #FAFAFA | 页面背景 |
| 卡片背景 | #FFFFFF | 信息卡片 |
| 灯光色 | #FFC107 | 灯光设备 |
| 空调色 | #2196F3 | 空调设备 |
4.2 设备类型配色
| 设备类型 | 色值 | 视觉效果 |
|---|---|---|
| 灯光 | #FFC107 | 金色 |
| 空调 | #2196F3 | 蓝色 |
| 窗帘 | #795548 | 棕色 |
| 电视 | #9C27B0 | 紫色 |
| 音响 | #4CAF50 | 绿色 |
| 风扇 | #00BCD4 | 青色 |
| 门锁 | #F44336 | 红色 |
| 摄像头 | #009688 | 蓝绿色 |
4.3 字体规范
| 元素 | 字号 | 字重 | 颜色 |
|---|---|---|---|
| 页面标题 | 24px | Bold | 主色 |
| 设备名称 | 16px | Medium | #000000 |
| 状态文字 | 12px | Regular | #666666 |
| 温度显示 | 48px | Bold | #000000 |
| 时间显示 | 24px | Bold | 主色 |
| 提示文字 | 14px | Regular | #999999 |
4.4 组件规范
4.4.1 场景模式卡片
┌─────────────────────────────────────┐
│  场景模式                             │
│                                     │
│  ┌──────┐ ┌──────┐ ┌──────┐ ┌──────┐│
│  │ 🏠   │ │ 🚪   │ │ 🌙   │ │ 🎬   ││
│  │ 回家 │ │ 离家 │ │ 睡眠 │ │ 影院 ││
│  └──────┘ └──────┘ └──────┘ └──────┘│
└─────────────────────────────────────┘
4.4.2 设备控制卡片
┌─────────────────────────────────────┐
│  💡 客厅主灯              [开关]    │
│     亮度 80%                        │
│  ═════════════●═══════════════     │
└─────────────────────────────────────┘
4.4.3 房间概览卡片
┌─────────────────────────────────────┐
│  🛋️ 客厅                            │
│                                     │
│  3/4 设备运行                       │
└─────────────────────────────────────┘
4.4.4 定时任务卡片
┌─────────────────────────────────────┐
│  ⏰ 早安模式              [开关]    │
│     07:00                           │
│  ┌─┐┌─┐┌─┐┌─┐┌─┐┌─┐┌─┐           │
│  │一││二││三││四││五││六││日│           │
│  └─┘└─┘└─┘└─┘└─┘└─┘└─┘           │
│  控制 2 个设备                       │
└─────────────────────────────────────┘
4.4.5 设备分组卡片
┌─────────────────────────────────────┐
│  💡 全部灯光              [开关]    │
│                                     │
│  2/4 设备运行                       │
└─────────────────────────────────────┘
五、核心功能实现
5.1 设备管理器实现
class DeviceManager {
  List<SmartDevice> _devices = [];

  void toggleDevice(String deviceId) {
    final index = _devices.indexWhere((d) => d.id == deviceId);
    if (index != -1) {
      _devices[index] = _devices[index].copyWith(
        isOn: !_devices[index].isOn,
      );
    }
  }

  void updateDeviceBrightness(String deviceId, int brightness) {
    final index = _devices.indexWhere((d) => d.id == deviceId);
    if (index != -1) {
      _devices[index] = _devices[index].copyWith(
        brightness: brightness,
      );
    }
  }

  void updateDeviceTemperature(String deviceId, int temperature) {
    final index = _devices.indexWhere((d) => d.id == deviceId);
    if (index != -1) {
      _devices[index] = _devices[index].copyWith(
        temperature: temperature,
      );
    }
  }

  List<SmartDevice> getDevicesByRoom(DeviceRoom room) {
    return _devices.where((d) => d.room == room).toList();
  }

  List<SmartDevice> getDevicesByType(DeviceType type) {
    return _devices.where((d) => d.type == type).toList();
  }
}
5.2 场景引擎实现
class SceneEngine {
  final DeviceManager _deviceManager;

  SceneEngine(this._deviceManager);

  void applyScene(SceneMode scene) {
    switch (scene) {
      case SceneMode.home:
        _applyHomeScene();
        break;
      case SceneMode.leave:
        _applyLeaveScene();
        break;
      case SceneMode.sleep:
        _applySleepScene();
        break;
      case SceneMode.movie:
        _applyMovieScene();
        break;
      case SceneMode.party:
        _applyPartyScene();
        break;
      case SceneMode.reading:
        _applyReadingScene();
        break;
    }
  }

  void _applyHomeScene() {
    _deviceManager.updateDevice('d1', isOn: true, brightness: 80);
    _deviceManager.updateDevice('d2', isOn: true, temperature: 24);
    _deviceManager.updateDevice('d7', isOn: false);
  }

  void _applyLeaveScene() {
    for (final device in _deviceManager.getAllDevices()) {
      if (device.type == DeviceType.light ||
          device.type == DeviceType.airConditioner) {
        _deviceManager.updateDevice(device.id, isOn: false);
      }
      if (device.type == DeviceType.lock ||
          device.type == DeviceType.camera) {
        _deviceManager.updateDevice(device.id, isOn: true);
      }
    }
  }
}
5.3 任务调度器实现
class TaskScheduler {
  final List<ScheduledTask> _tasks = [];
  Timer? _timer;

  void start() {
    _timer = Timer.periodic(const Duration(minutes: 1), (_) {
      _checkTasks();
    });
  }

  void stop() {
    _timer?.cancel();
    _timer = null;
  }

  void _checkTasks() {
    final now = TimeOfDay.now();
    final today = DateTime.now().weekday;

    for (final task in _tasks) {
      if (!task.isEnabled) continue;
      if (!task.repeatDays.contains(today)) continue;

      if (task.time.hour == now.hour &&
          task.time.minute == now.minute) {
        _executeTask(task);
      }
    }
  }

  void _executeTask(ScheduledTask task) {
    for (final deviceId in task.deviceIds) {
      _deviceManager.toggleDevice(deviceId);
    }
    _notificationManager.showTaskNotification(task);
  }

  void addTask(ScheduledTask task) {
    _tasks.add(task);
  }

  void removeTask(String taskId) {
    _tasks.removeWhere((t) => t.id == taskId);
  }
}
5.4 网络检测器实现
class NetworkDetector {
  final Connectivity _connectivity = Connectivity();
  StreamSubscription<ConnectivityResult>? _subscription;
  bool _isConnected = false;
  String _connectionType = '无网络';

  Future<void> initialize() async {
    final result = await _connectivity.checkConnectivity();
    _updateConnectionStatus(result);

    _subscription = _connectivity.onConnectivityChanged.listen(_updateConnectionStatus);
  }

  void _updateConnectionStatus(ConnectivityResult result) {
    switch (result) {
      case ConnectivityResult.wifi:
        _isConnected = true;
        _connectionType = 'WiFi';
        break;
      case ConnectivityResult.mobile:
        _isConnected = true;
        _connectionType = '移动网络';
        break;
      case ConnectivityResult.ethernet:
        _isConnected = true;
        _connectionType = '以太网';
        break;
      default:
        _isConnected = false;
        _connectionType = '无网络';
    }
  }

  bool get isConnected => _isConnected;
  String get connectionType => _connectionType;

  void dispose() {
    _subscription?.cancel();
  }
}
5.5 通知管理器实现
class NotificationManager {
  final FlutterLocalNotificationsPlugin _notifications =
      FlutterLocalNotificationsPlugin();

  Future<void> initialize() async {
    const initializationSettings = InitializationSettings(
      android: AndroidInitializationSettings('@mipmap/ic_launcher'),
      iOS: DarwinInitializationSettings(),
    );

    await _notifications.initialize(initializationSettings);
  }

  Future<void> showDeviceNotification(SmartDevice device) async {
    await _notifications.show(
      device.id.hashCode,
      '${device.name}状态变更',
      device.isOn ? '${device.name}已开启' : '${device.name}已关闭',
      NotificationDetails(
        android: AndroidNotificationDetails(
          'device_channel',
          '设备通知',
          importance: Importance.high,
        ),
      ),
    );
  }

  Future<void> showTaskNotification(ScheduledTask task) async {
    await _notifications.show(
      task.id.hashCode,
      '定时任务执行',
      '${task.name}已执行',
      const NotificationDetails(
        android: AndroidNotificationDetails(
          'task_channel',
          '任务通知',
          importance: Importance.high,
        ),
      ),
    );
  }
}
六、交互设计
6.1 设备控制流程
6.2 场景切换流程
6.3 定时任务创建流程
七、扩展功能规划
7.1 后续版本规划
7.2 功能扩展建议
7.2.1 语音控制
语音功能:
- 语音识别控制设备
- 语音查询设备状态
- 语音场景切换
- 语音助手集成
7.2.2 联动规则
联动功能:
- 条件触发联动
- 多设备联动
- 时间触发联动
- 传感器联动
7.2.3 家庭共享
共享功能:
- 多用户管理
- 权限分配
- 设备共享
- 操作记录
八、注意事项
8.1 开发注意事项
-
网络状态:实时检测网络连接,处理断网情况
-
设备状态同步:确保设备状态与实际设备同步
-
权限管理:正确申请网络、通知等权限
-
数据持久化:设备配置和任务需要本地存储
-
后台运行:定时任务需要支持后台运行
8.2 常见问题
| 问题 | 原因 | 解决方案 |
|---|---|---|
| 设备离线 | 网络问题或设备断电 | 检查网络连接和设备电源 |
| 控制延迟 | 网络延迟或服务器响应慢 | 优化网络连接 |
| 任务不执行 | 任务未启用或时间错误 | 检查任务配置 |
| 通知不显示 | 权限未授予 | 引导用户开启通知权限 |
| 状态不同步 | 数据未及时更新 | 实现状态轮询或推送 |
8.3 使用技巧
🏠 智能家居控制中心使用技巧 🏠
设备管理
- 合理分组设备便于管理
- 定期检查设备在线状态
- 为设备设置易识别的名称
- 及时更新设备固件
场景设置
- 根据生活习惯设置场景
- 场景名称简洁明了
- 定期优化场景配置
- 与定时任务配合使用
定时任务
- 设置合理的执行时间
- 注意重复日期设置
- 定期检查任务状态
- 避免任务冲突
九、运行说明
9.1 环境要求
| 环境 | 版本要求 |
|---|---|
| Flutter SDK | >= 3.0.0 |
| Dart SDK | >= 2.17.0 |
| 鸿蒙OS | API 21+ |
| Android | API 21+ |
| iOS | 12.0+ |
| Web浏览器 | Chrome 90+ |
9.2 依赖配置
在 pubspec.yaml 中添加以下依赖:
dependencies:
  flutter:
    sdk: flutter
  connectivity_plus: ^6.0.0
  shared_preferences: ^2.0.0
  flutter_local_notifications: ^15.0.0
  orientation: ^0.0.1
9.3 权限配置
Android (android/app/src/main/AndroidManifest.xml):
<uses-permission android:name="android.permission.INTERNET" />
<uses-permission android:name="android.permission.ACCESS_NETWORK_STATE" />
<uses-permission android:name="android.permission.ACCESS_WIFI_STATE" />
<uses-permission android:name="android.permission.POST_NOTIFICATIONS" />
<uses-permission android:name="android.permission.VIBRATE" />
<uses-permission android:name="android.permission.RECEIVE_BOOT_COMPLETED" />
iOS (ios/Runner/Info.plist):
<key>UIBackgroundModes</key>
<array>
    <string>fetch</string>
    <string>remote-notification</string>
</array>
9.4 运行命令
# 查看可用设备
flutter devices

# 运行到Web服务器
flutter run -d web-server -t lib/main_smart_home.dart --web-port 8146

# 运行到鸿蒙设备
flutter run -d 127.0.0.1:5555 -t lib/main_smart_home.dart

# 运行到Android设备
flutter run -d android -t lib/main_smart_home.dart

# 代码分析
flutter analyze lib/main_smart_home.dart
十、总结
智能家居控制中心应用通过集中管理智能设备,提供便捷的设备控制体验。应用支持8种设备类型、6种场景模式、灵活的定时任务、智能的设备分组功能,满足用户多样化的智能家居需求。
应用采用 Material Design 3 设计规范,以科技蓝紫为主色调,象征智能与未来。通过本应用,希望能够为用户带来便捷、高效的智能家居控制体验,让生活更加智能、舒适。
智能家居控制中心——一键掌控全屋智能

腾讯云面向开发者汇聚海量精品云计算使用和开发经验,营造开放的云计算技术生态圈。
更多推荐
 9
9 0
0- 0


 已为社区贡献16条内容

所有评论(0)