关于将若依框架VUE部分打包成windows执行文件(electron)
这个后台放到本地使用,既可以方便修改,有能节省服务器资源,适合使用人数少的场景。修改只是在VUE部分,后端JAVA部分不用修改,修改流程如下:
一、解决 Cookie 问题
若依默认使用 Cookies存储登录状态,但在 Electron 中可能失效。建议全局搜索替换:
-
将
Cookies.get()替换为localStorage.getItem() -
将
Cookies.set()替换为localStorage.setItem() -
将
Cookies.remove()替换为localStorage.removeItem()
文件列表如下(4个):
1.- src/utils/auth.js - 核心认证工具
- 移除Cookies导入
- 将Cookies操作替换为localStorage操作
2.- src/views/login.vue - 登录页面
- 移除Cookies导入
- 修改getCookie方法中的Cookies.get为localStorage.getItem
- 修改handleLogin方法中的Cookies.set和Cookies.remove为localStorage.setItem和localStorage.removeItem
3.- src/store/modules/app.js - 应用状态管理
- 移除Cookies导入
- 修改state中的Cookies.get为localStorage.getItem
- 修改mutations中的Cookies.set为localStorage.setItem
4.- src/main.js - 应用入口
- 移除Cookies导入
- 修改Cookies.get为localStorage.getItem
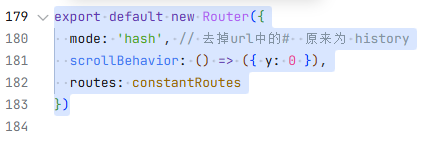
二、修改路由模式(必须改)
打开 src/router/index.js,将路由模式从 history改为 hash,否则打包后页面会空白。大概在文件的最尾部。
三、请求模式
src/utils/request.js
因为electron是file模式,所以在访问的时候 路由是要被改变的。这里也兼容了web网页模式。
// 创建axios实例
const isElectron = () => {
  // 优先使用协议判断
  if (window.location.protocol === 'app:') {
    console.log('✅ 通过app协议检测到Electron')
    return true;
  }

  // 备用判断
  if (window.process && window.process.type === 'renderer') {
    console.log('✅ 通过process.type检测到Electron')
    return true;
  }

  console.log('❌ 未检测到Electron环境')
  return false;
};

const baseURL = isElectron()
  ? 'https://你的域名.com'
  : (process.env.VUE_APP_BASE_API || '/');

console.log('🎯 最终baseURL:', baseURL)
console.log('🎯 当前协议:', window.location.protocol)
console.log('🎯 当前URL:', window.location.href)

const service = axios.create({
  baseURL: baseURL,
  timeout: 10000
})
四、配置打包参数
在 vue.config.js中,添加或修改 electronBuilder配置,任意位置,设置应用名称、图标等:
module.exports = {
  pluginOptions: {
    electronBuilder: {
      builderOptions: {
        appId: 'com.ruoyi.admin',
        productName: '若依管理系统',
        win: {
          icon: 'public/favicon.ico' // 应用图标路径
        },
        nsis: {
          oneClick: false, // 允许用户选择安装目录
          allowToChangeInstallationDirectory: true
        }
      }
    }
  }
}
五、补充下环境
1.electron安装
# 安装 Electron 构建插件
vue add electron-builder
# 或使用 npm 安装
npm install electron electron-builder --save-dev
2.安装与webpack 4兼容的html-webpack-plugin版本
npm install html-webpack-plugin@4.5.2 --save-dev
六、尝试打包
1.尝试运行,看是否有问题,浏览器中没问题下一步
npm run electron:serve
2.打包测试
npm run electron:build
七、打包过程问题一览
1.无法下载包,使用淘宝镜像完整配置
创建 .npmrc文件在项目根目录:
# .npmrc
registry=https://registry.npmmirror.com/
electron_mirror=https://npmmirror.com/mirrors/electron/
electron_builder_binaries_mirror=https://npmmirror.com/mirrors/electron-builder-binaries/
sass_binary_site=https://npmmirror.com/mirrors/node-sass/
phantomjs_cdnurl=https://npmmirror.com/mirrors/phantomjs/
chromedriver_cdnurl=https://npmmirror.com/mirrors/chromedriver/
operadriver_cdnurl=https://npmmirror.com/mirrors/operadriver/
selenium_cdnurl=https://npmmirror.com/mirrors/selenium/
node_inspector_cdnurl=https://npmmirror.com/mirrors/node-inspector/
然后执行:
# 清理缓存
npm cache clean --force

# 删除 node_modules 重新安装
rm -rf node_modules package-lock.json
npm install

# 重新打包
npm run electron:build

腾讯云面向开发者汇聚海量精品云计算使用和开发经验,营造开放的云计算技术生态圈。
更多推荐
 5
5 0
0- 0


 已为社区贡献1条内容

所有评论(0)