古诗词智能检索与推荐系统 - 项目技术阶段性总结报告二
从零手搓:Spring Boot + Vue + DeepSeek 打造懂你的古诗词 AI 系统(保姆级全栈实战)
前言: 很多新手在学完 Java 和 Vue 的基础后,往往会陷入迷茫:“除了做个毫无生气的员工管理系统,我还能做点什么?” 我们将一起从零搭建一个古诗词系统。它不仅能搜索,还能感知你的年龄与当下的季节为你精准推诗;更能接入本地大模型,化身一位读懂你灵魂的“数字雅士”。 跟着这篇教程,哪怕你是第一次建 Spring Boot 项目的小白,也能拥有一个像样的项目。
在上篇文章中我们已经在获得了1000首古诗词,创建了名为poetry的数据库和它的八张表,此外还完成了Elasticsearch索引创建与数据同步。
一、地基的搭建
在我们引入那些炫酷的 AI 和算法之前,我们得先有一块地基。
1. 环境先行
-
后端:JDK 17 + Maven
-
数据库:MySQL 8.0
-
开发工具:IntelliJ IDEA
2. 创建 Spring Boot 项目
创建我们的“古诗词大本营”(新建项目)
我们现在要建一个空壳子,把大本营搭好。
-
在 IDEA 欢迎界面,点击
New Project(新建项目)。 -
在弹出的窗口左侧菜单里,找到并点击
Spring Boot(有时候叫Spring Initializr)。 -
现在右边会出现一些需要填写的格子,像填表格一样:
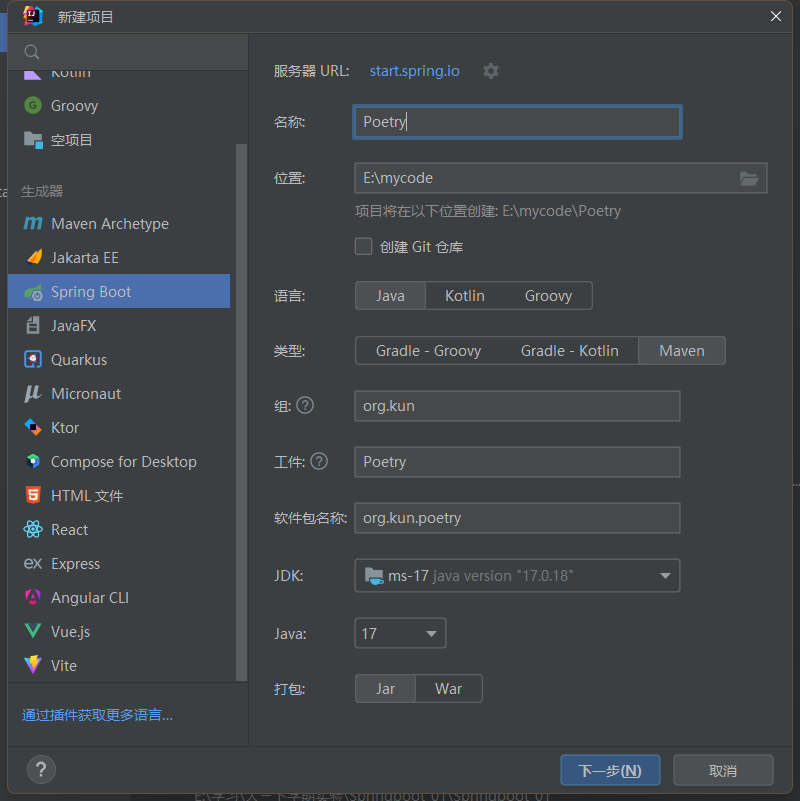
-
选择装备 (Dependencies):
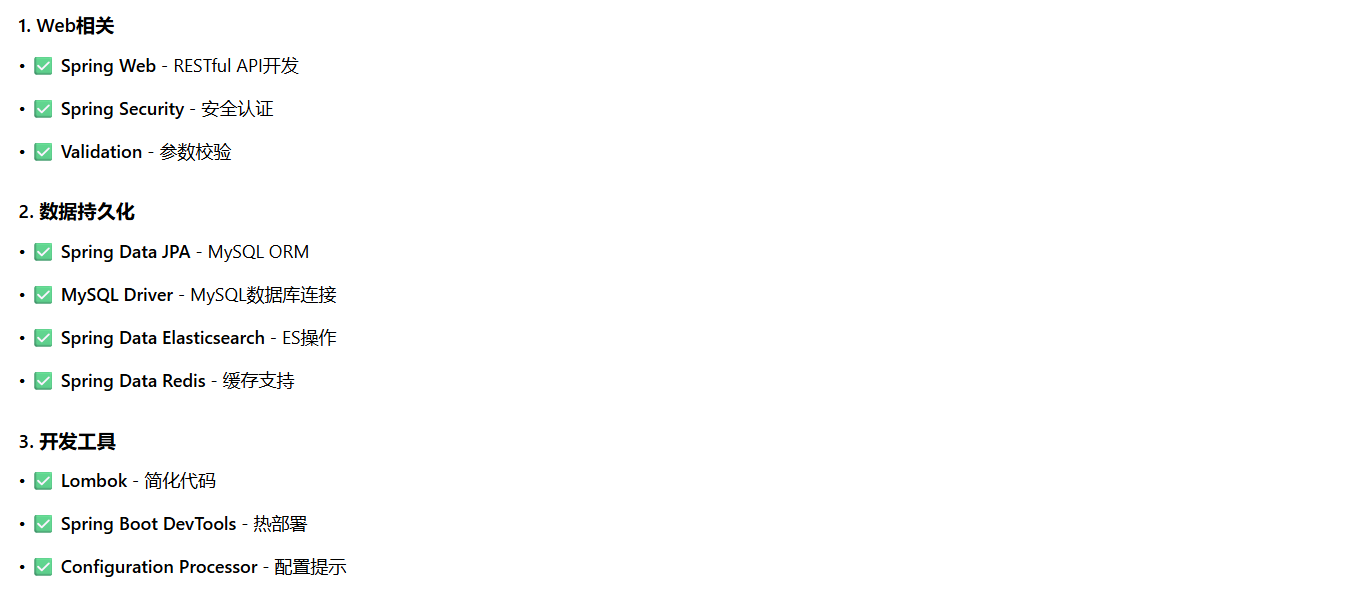
-
点击右下角的
Create(创建)。
下载压缩包,用 IDEA 打开。在 application.properties 中连上我们的数据库。
spring.application.name=poetry-system
spring.datasource.url=jdbc:mysql://localhost:3306/poetry_db?useUnicode=true&characterEncoding=utf-8&serverTimezone=Asia/Shanghai
spring.datasource.username=root
spring.datasource.password=123456
spring.datasource.driver-class-name=com.mysql.cj.jdbc.Driver


#这是后面链接es的可以先写上
spring.elasticsearch.uris=http://localhost:9200
二、基础功能的实现(打造交互式的全文检索平台)
既然咱们的“大本营”已经建好了,而且通过配置,管家也成功连上了你的 MySQL 数据库。那么接下来,我们要干一件激动人心的事情:从你的数据库里,把真正的古诗词拿出来,展示在网页上!
为了完成这个目标,我先给你讲一个非常简单的“餐厅点餐”比喻。在 Spring Boot 里,想要拿到数据,我们需要安排三个岗位的员工:
实体类 (Entity):相当于外卖盒。我们要有一个专门装诗词的盒子,数据库里的一行数据,刚好 能装进这个盒子里。
仓库接口 (Repository):相当于仓库管理员。他懂怎么去数据库的货架上(表里)拿东西。
控制器 (Controller):相当于前台接待员。负责接客人的单,然后去找仓库管理员拿东西,最后给客人。
我们现在的目标是建一个“寻诗大厅”。 很多新手在这里会犯一个错:直接用 MySQL 的 LIKE '%关键字%' 去搜索。这在只有几十条数据时没问题,但如果你有上万首诗,MySQL 会卡到让你怀疑人生。而且,它没法像百度那样,把你搜索的词语高亮显示(标红)。
所以,我们直接上大厂方案:Elasticsearch (ES)。
1. 建立 ES 的数据模型 (Document)
在让 Spring Boot 去 ES 里搜东西之前,我们得先定义好“诗词”在 ES 里长什么样。这和 MySQL 的实体类很像,但注解完全不同。
在项目中新建一个 document 文件夹,创建 PoetryDoc.java:
package org.kun.poetrysystem.document; // 换成你自己的包名

import org.springframework.data.annotation.Id;
import org.springframework.data.elasticsearch.annotations.Document;
import org.springframework.data.elasticsearch.annotations.Field;
import org.springframework.data.elasticsearch.annotations.FieldType;
import java.util.List;

// @Document 告诉 Spring,这是一个要存进 Elasticsearch 的文档,索引名字叫 poetry_index
@Document(indexName = "poetry_index", createIndex = false)
public class PoetryDoc {

    @Id
    private String id;

    // @Field 极其关键!type = FieldType.Text 表示这是一段长文本。
    // analyzer = "chinese_analyzer" 告诉 ES:请用中文分词器把它切开,这样搜“明月”才能搜到“明月几时有”!
    @Field(type = FieldType.Text, analyzer = "chinese_analyzer", searchAnalyzer = "chinese_smart_analyzer")
    private String title;

    @Field(type = FieldType.Text, analyzer = "chinese_analyzer", searchAnalyzer = "chinese_smart_analyzer")
    private String content;

    // FieldType.Keyword 表示这是一个“不可分割”的词,比如作者名叫“李白”,你不能把它切成“李”和“白”去搜。
    @Field(type = FieldType.Keyword)
    private String authorName;

    @Field(type = FieldType.Keyword)
    private String dynastyName;

    @Field(type = FieldType.Keyword)
    private List<String> tags;

    // 🌟 临时口袋:专门用来装 AI 推荐理由,不存入 ES 数据库
    @org.springframework.data.annotation.Transient
    private String recommendReason;

    // ================= 下面是 Getters & Setters,生成它们! =================
    public String getId() { return id; }
    public void setId(String id) { this.id = id; }

    public String getTitle() { return title; }
    public void setTitle(String title) { this.title = title; }

    public String getContent() { return content; }
    public void setContent(String content) { this.content = content; }

    public String getAuthorName() { return authorName; }
    public void setAuthorName(String authorName) { this.authorName = authorName; }

    public String getDynastyName() { return dynastyName; }
    public void setDynastyName(String dynastyName) { this.dynastyName = dynastyName; }

    public List<String> getTags() { return tags; }
    public void setTags(List<String> tags) { this.tags = tags; }

    public String getRecommendReason() { return recommendReason; }
    public void setRecommendReason(String recommendReason) { this.recommendReason = recommendReason; }
}
🤔 为什么要单独建一个 PoetryDoc? 很多新手会偷懒,直接把 MySQL 的 @Entity 和 ES 的 @Document 写在同一个类里。这在后期极其容易引发冲突!把数据库的“实体(Entity)”和搜索引擎的“文档(Document)”物理隔离,是高级架构师的基本素养。并且我们在最后面加了一个 @Transient 的口袋,这是为了后面接 AI 评语留下的伏笔!
2. 后端魔法:给 ES 派一个专属联络员 (Repository)
在 Spring Boot 中,我们不需要写复杂的 ES 查询语句,只需要建一个接口(Interface),Spring 就会自动帮我们搞定一切。
在你的项目中新建一个 repository 文件夹,然后创建 PoetryEsRepository.java:
package org.kun.poetrysystem.repository; // 换成你自己的包名

import org.kun.poetrysystem.document.PoetryDoc;
import org.springframework.data.domain.Pageable;
import org.springframework.data.elasticsearch.annotations.Highlight;
import org.springframework.data.elasticsearch.annotations.HighlightField;
import org.springframework.data.elasticsearch.annotations.HighlightParameters;
import org.springframework.data.elasticsearch.core.SearchPage;
import org.springframework.data.elasticsearch.repository.ElasticsearchRepository;

// 继承 ElasticsearchRepository,告诉它我们要查的是 PoetryDoc (诗词文档),主键是 String 类型
public interface PoetryEsRepository extends ElasticsearchRepository<PoetryDoc, String> {

    // 💡 核心魔法:高亮搜索!
    // 我们在这里配置了高亮标签 <span class='highlight'>,前端一旦碰到这个标签,就会把它变成红色!
    @Highlight(
            fields = {
                    @HighlightField(name = "title"),
                    @HighlightField(name = "content"),
                    @HighlightField(name = "authorName")
            },
            parameters = @HighlightParameters(
                    preTags = "<span class='highlight'>",
                    postTags = "</span>",
                    requireFieldMatch = false // 极其重要:不论关键字出现在标题还是内容里,统统给我标红!
            )
    )
    // 方法名不要随便起!Spring Data 会根据 "findBy..." 自动生成底层查询逻辑
    SearchPage<PoetryDoc> findByTitleOrContentOrAuthorNameOrTags(
            String title, String content, String author, String tags, Pageable pageable);
}
🤔 为什么要这样写? 这个 @Highlight 注解就是全文检索的灵魂!它能让系统在返回数据时,自动把用户搜索的关键词用 <span class='highlight'> 包裹起来,为我们前端的绝美展示打下基础。
3. 后端接待员:编写 Controller 接口
有了联络员,我们需要一个对外暴露的网址(API),让前端能够把搜索词传过来。 新建一个 controller 文件夹,创建 SearchController.java:
package org.kun.poetrysystem.controller;

import org.kun.poetrysystem.document.PoetryDoc;
import org.kun.poetrysystem.repository.PoetryEsRepository;
import org.springframework.beans.factory.annotation.Autowired;
import org.springframework.data.domain.PageRequest;
import org.springframework.data.elasticsearch.core.SearchHit;
import org.springframework.data.elasticsearch.core.SearchPage;
import org.springframework.web.bind.annotation.GetMapping;
import org.springframework.web.bind.annotation.RequestParam;
import org.springframework.web.bind.annotation.RestController;

import java.util.List;
import java.util.stream.Collectors;

@RestController // 告诉 Spring:这是一个接待员,专门返回 JSON 数据
public class SearchController {

    @Autowired
    private PoetryEsRepository poetryEsRepository;

    // 前端访问地址: /search?keyword=李白&page=0
    @GetMapping("/search")
    public List<PoetryDoc> search(
            @RequestParam String keyword,
            @RequestParam(defaultValue = "0") int page // 默认查第 0 页
    ) {
        // 每页查 5 首诗
        PageRequest pageRequest = PageRequest.of(page, 5);

        // 去 ES 里进行高亮搜索
        SearchPage<PoetryDoc> searchPage = poetryEsRepository.findByTitleOrContentOrAuthorNameOrTags(
                keyword, keyword, keyword, keyword, pageRequest);

        // 把高亮的部分(标红的词)替换掉原来的普通文本
        return searchPage.getSearchHits().stream().map(hit -> {
            PoetryDoc doc = hit.getContent();
            if (!hit.getHighlightField("title").isEmpty()) {
                doc.setTitle(hit.getHighlightField("title").get(0));
            }
            if (!hit.getHighlightField("content").isEmpty()) {
                doc.setContent(hit.getHighlightField("content").get(0));
            }
            if (!hit.getHighlightField("authorName").isEmpty()) {
                doc.setAuthorName(hit.getHighlightField("authorName").get(0));
            }
            return doc;
        }).collect(Collectors.toList());
    }
}
4. 前端大揭秘:丝滑的 Vue 3 界面
到了最激动人心的时刻了!很多新手怕写前端,觉得要装 Node.js、配 Webpack/Vite,头都大了。 别怕!我们采用最纯粹的 CDN 方式引入 Vue 3,只需要一个简单的 index.html 文件,双击就能看效果!
在 src/main/resources/static 目录下,新建 index.html。 我们分块来写,先写 CSS 样式(让它看起来有浓浓的中国古典风):
<!DOCTYPE html>
<html lang="zh-CN">
<head>
    <meta charset="UTF-8">
    <title>寻诗大厅</title>
    <script src="https://unpkg.com/vue@3/dist/vue.global.js"></script>
    <style>
        body {
            background: linear-gradient(135deg, #f3ede4 0%, #e8ddcc 100%);
            font-family: '楷体', serif; text-align: center; color: #3e322b; margin: 0; padding-bottom: 50px;
        }
        /* 搜索框样式 */
        .search-box { margin: 60px auto 40px; }
        .search-input {
            padding: 15px 25px; font-size: 22px; width: 450px;
            border: 2px solid #d5c8b6; border-radius: 40px; outline: none;
        }
        button {
            padding: 15px 35px; font-size: 22px; background: #8c222c; color: white;
            border: none; border-radius: 40px; cursor: pointer; margin-left: 15px;
        }

        /* 诗词卡片样式 */
        .poem-card {
            background: rgba(255, 255, 255, 0.8); width: 65%; max-width: 800px;
            margin: 40px auto; padding: 50px; border-radius: 12px; box-shadow: 0 10px 30px rgba(0,0,0,0.05);
        }
        .title { font-size: 32px; font-weight: bold; margin-bottom: 15px; }
        .subtitle { font-size: 18px; color: #7a6e62; margin-bottom: 30px; }
        .content { font-size: 24px; line-height: 2.2; white-space: pre-wrap;}

        /* 核心:高亮标签的样式!后端传来的 <span class='highlight'> 会在这里变红 */
        .highlight { color: #b62836; font-weight: bold; border-bottom: 2px dashed rgba(182, 40, 54, 0.4); }
        .pagination { margin-top: 50px; font-size: 20px; }
    </style>
</head>
紧接着,在下面的html结构和Vue逻辑
<body>
    <div id="app">
        <div class="search-box">
            <input class="search-input" type="text" v-model="keyword" placeholder="搜名句、寻作者..." @keyup.enter="doSearch(0)">
            <button @click="doSearch(0)">寻诗</button>
        </div>

        <div class="poem-card" v-for="poem in poemList" :key="poem.id">
            <div class="title" v-html="poem.title"></div>
            <div class="subtitle">〔{{ poem.dynastyName }}〕 <span v-html="poem.authorName"></span></div>
            <div class="content" v-html="poem.content"></div>
        </div>

        <div class="pagination" v-if="poemList.length > 0">
            <button @click="doSearch(currentPage - 1)" :disabled="currentPage === 0">上一页</button>
            <span style="margin: 0 25px;">第 {{ currentPage + 1 }} 页</span>
            <button @click="doSearch(currentPage + 1)" :disabled="poemList.length < 5">下一页</button>
        </div>
    </div>

    <script>
        const { createApp, ref } = Vue;

        createApp({
            setup() {
                // 定义响应式变量(数据一变,页面跟着变)
                const keyword = ref('');
                const poemList = ref([]); // 存放诗词数据的数组
                const currentPage = ref(0); // 当前页码

                // 核心搜索方法
                const doSearch = (targetPage) => {
                    if (!keyword.value) return; // 没输入就不搜
                    currentPage.value = targetPage;

                    // 用 fetch 去呼叫我们的后端接口
                    fetch(`/search?keyword=${keyword.value}&page=${targetPage}`)
                        .then(response => response.json()) // 把结果转成 JSON
                        .then(data => {
                            poemList.value = data; // 把后端的数据塞进前端变量,页面瞬间更新!
                            window.scrollTo({ top: 0, behavior: 'smooth' }); // 搜完自动滚到顶部
                        });
                };

                return { keyword, poemList, currentPage, doSearch }
            }
        }).mount('#app')
    </script>
</body>
</html>
贴个最终的大概效果,之前的图没了
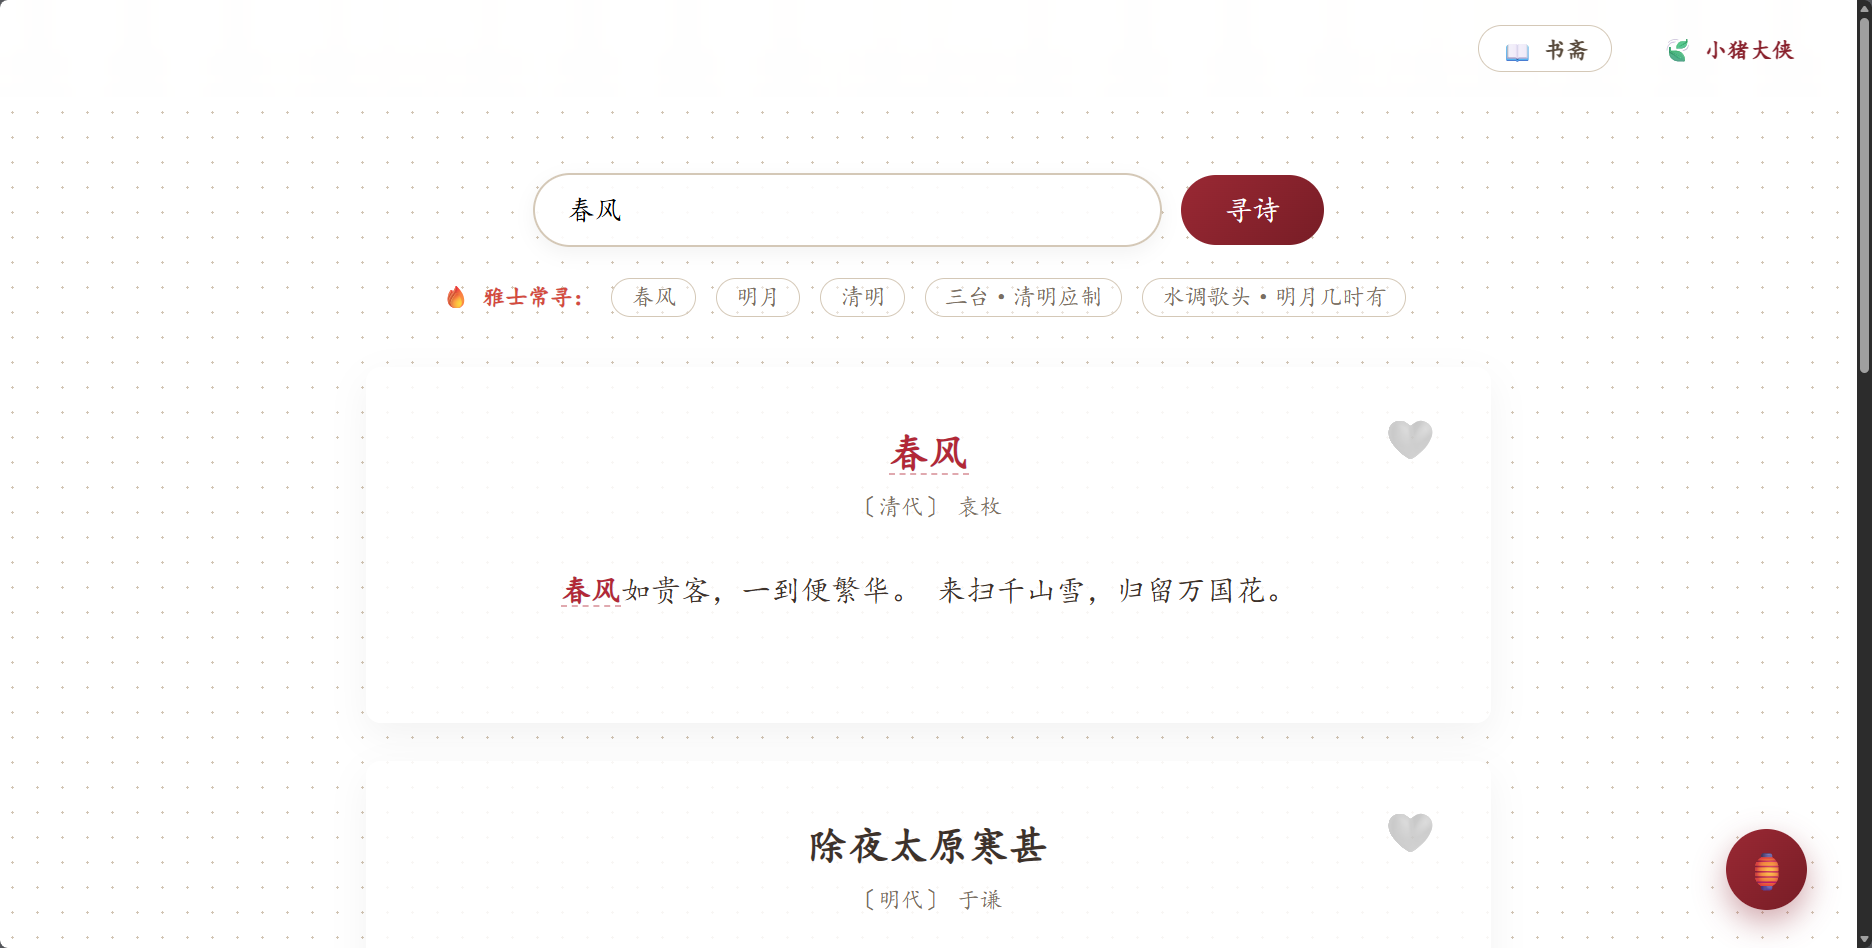
持续更新中!

腾讯云面向开发者汇聚海量精品云计算使用和开发经验,营造开放的云计算技术生态圈。
更多推荐
 8
8 0
0- 0


 已为社区贡献2条内容

所有评论(0)