OpenCV 案例二【车牌识别】
【代码】OpenCV 案例二【车牌识别】
·
一、环境准备
环境配置参考前面章节:
二、代码案例
import cv2
import numpy as np

def detect_license_plate(image_path):
    # 读取图像
    image = cv2.imread(image_path)
    if image isNone:
        print(f"无法读取图像: {image_path}")
        return

    # 获取图像尺寸(image:一个NumPy数组;在图像中,行对应高度(y轴),列对应宽度(x轴);[:2]:切片操作,取前两个值,就是图像高度和宽度)
    height, width = image.shape[:2]

    # 转换为灰度图像
    gray = cv2.cvtColor(image, cv2.COLOR_BGR2GRAY)

    # 高斯模糊
    blurred = cv2.GaussianBlur(gray, (5, 5), 0)

    # Canny 边缘检测
    edged = cv2.Canny(blurred, 50, 150)

    # 查找轮廓
    contours, _ = cv2.findContours(edged.copy(), cv2.RETR_LIST, cv2.CHAIN_APPROX_SIMPLE)

    # 按面积排序轮廓,取前100个
    contours = sorted(contours, key=cv2.contourArea, reverse=True)[:100]

    plate_contour = None
    plate = None

    for contour in contours:
        # 计算轮廓的近似多边形
        peri = cv2.arcLength(contour, True)
        approx = cv2.approxPolyDP(contour, 0.02 * peri, True)

        # 如果近似多边形有4个顶点,则可能是车牌
        if len(approx) == 4:
            x, y, w, h = cv2.boundingRect(contour)
            aspect_ratio = w / float(h)

            # 根据宽高比和面积筛选可能的车牌区域
            if2 < aspect_ratio < 5and w > width * 0.1and h > height * 0.05:
                plate_contour = approx
                plate = gray[y:y + h, x:x + w]
                break# 假设找到第一个符合条件的即为车牌

    if plate_contour isnotNone:
        # 绘制车牌轮廓
        cv2.drawContours(image, [plate_contour], -1, (0, 255, 0), 3)

        # 显示结果
        cv2.imshow("Detected Plate", image)
        cv2.imshow("Plate Region", plate)
        cv2.waitKey(0)
        cv2.destroyAllWindows()

        # 如果需要保存提取的车牌区域
        cv2.imwrite("detected_plate.jpg", plate)
        print("车牌区域已保存为 'detected_plate.jpg'")
    else:
        print("未检测到车牌区域。")

# 替换为你的图像路径
image_path = './datas/images/car.png'
detect_license_plate(image_path)
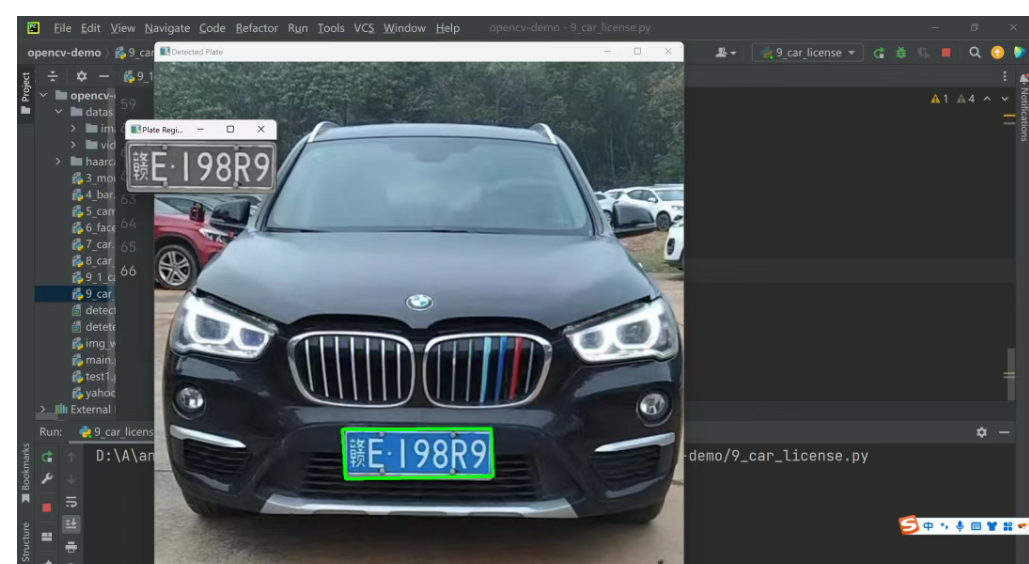
三、运行效果
四、基于百度ocr识别车牌号
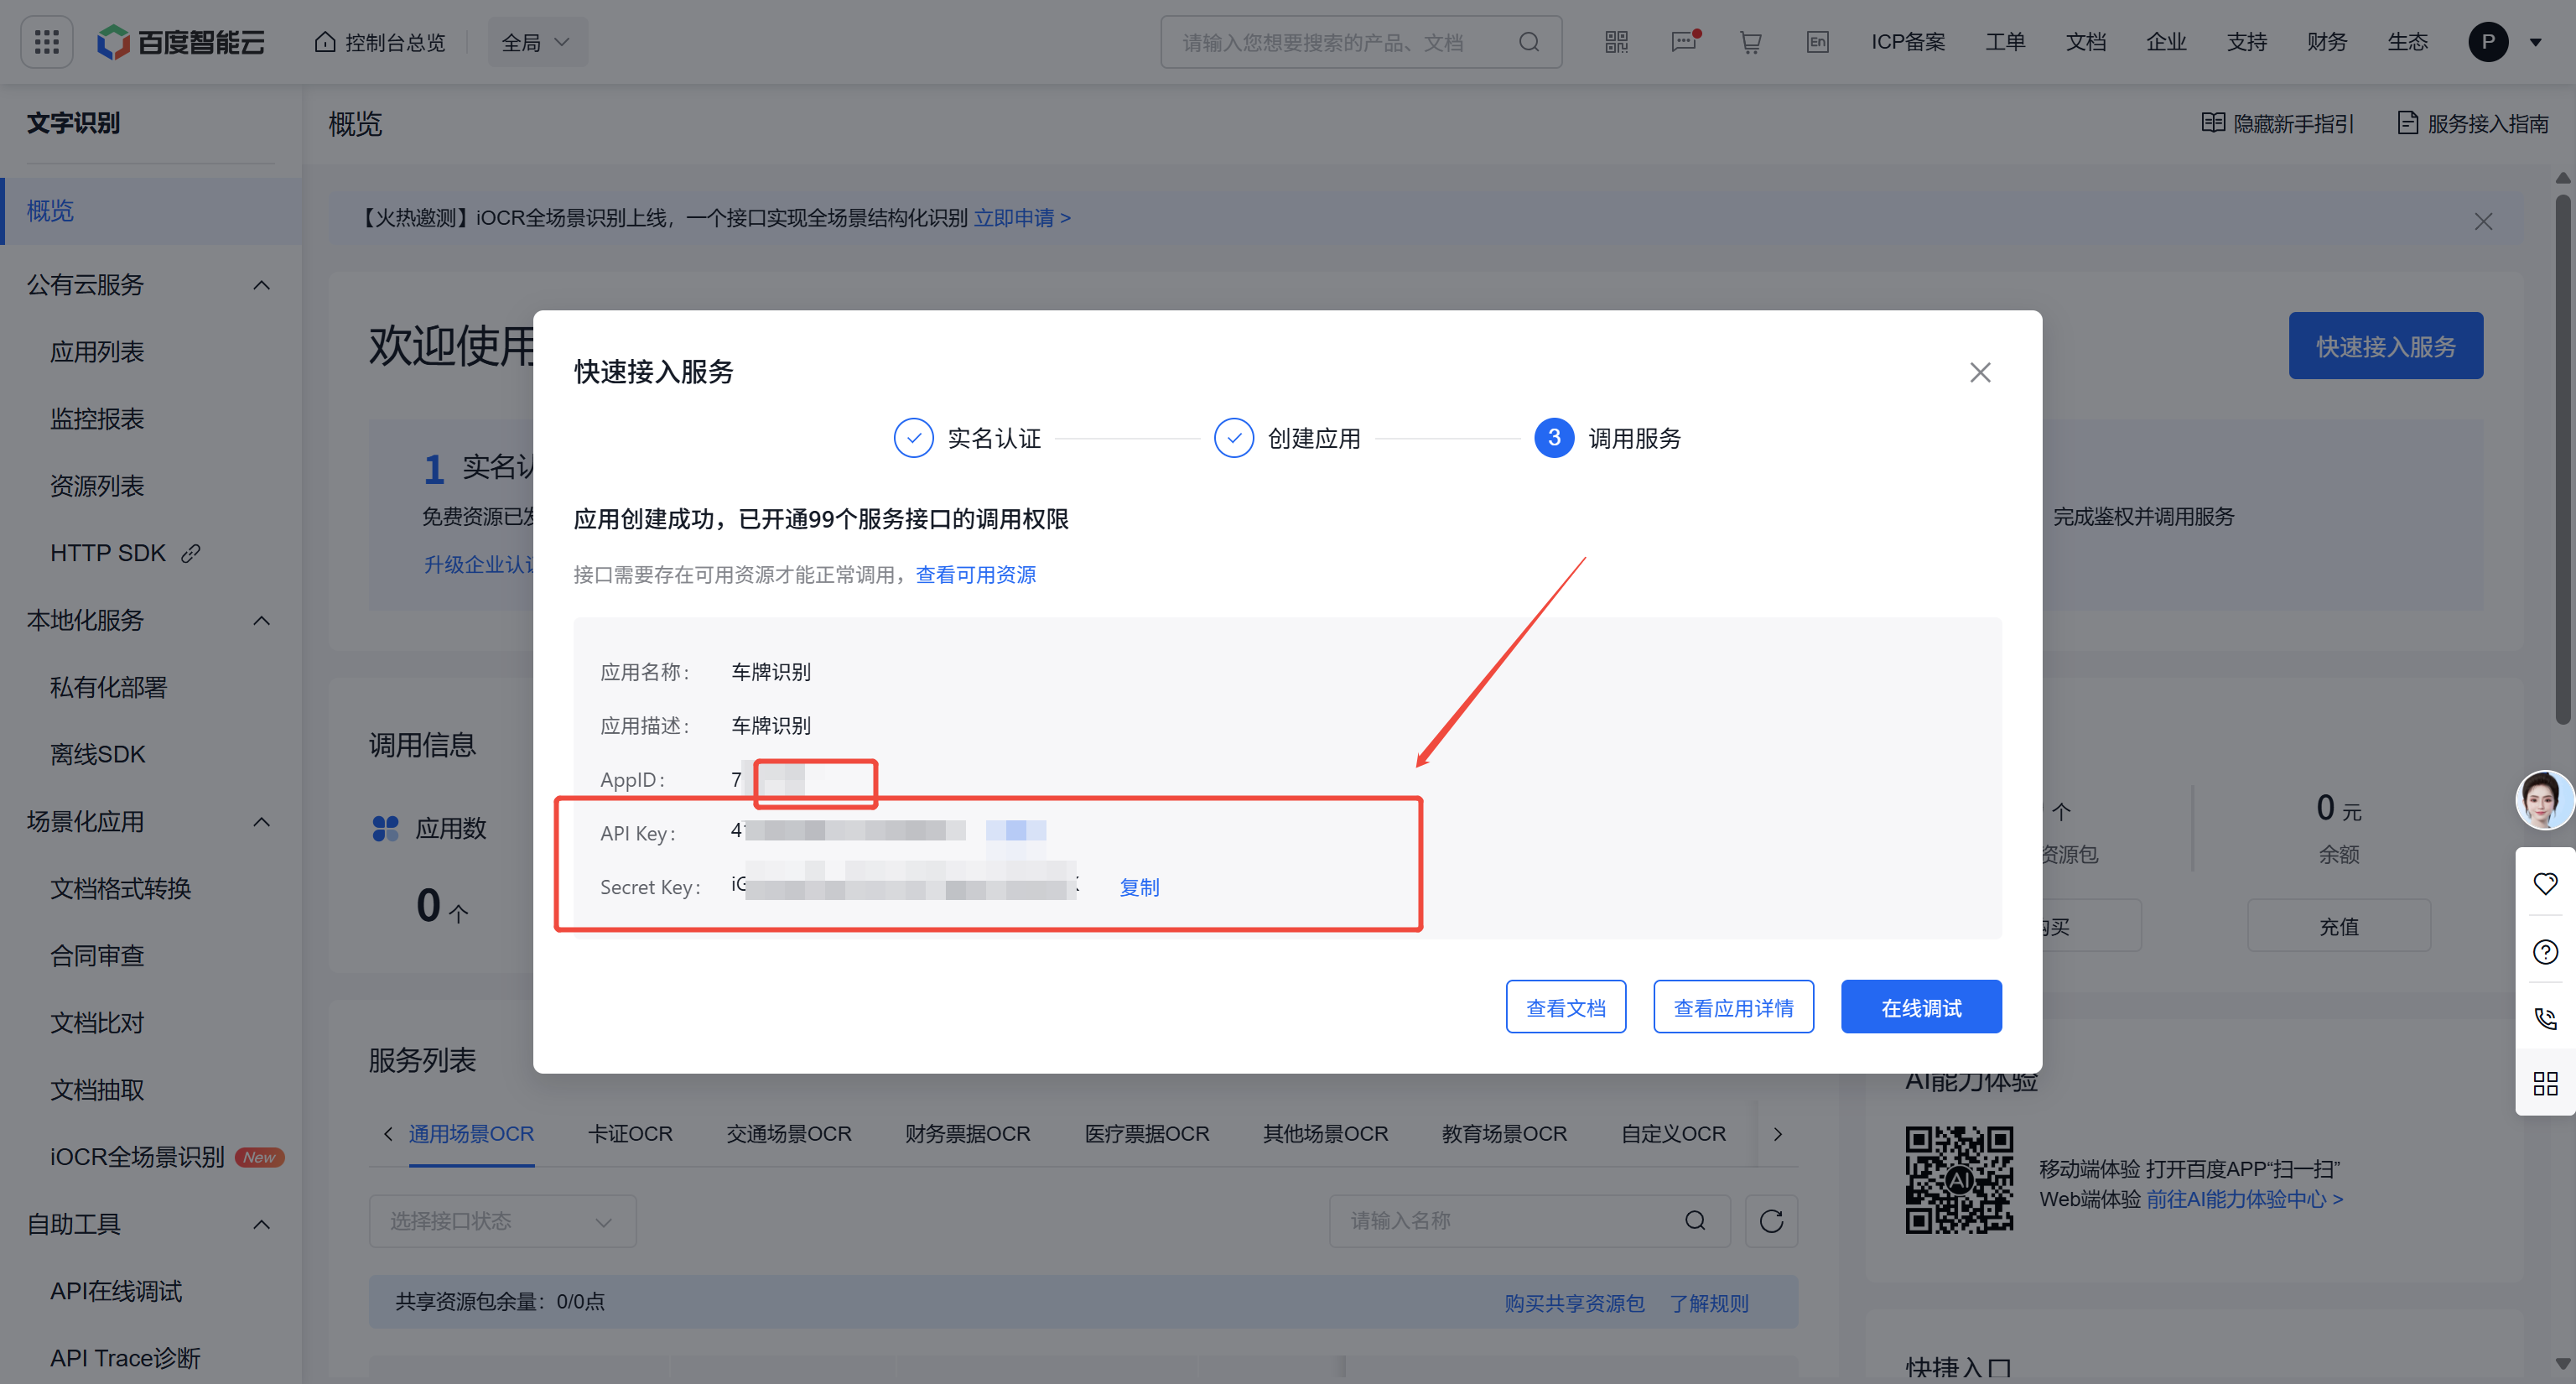
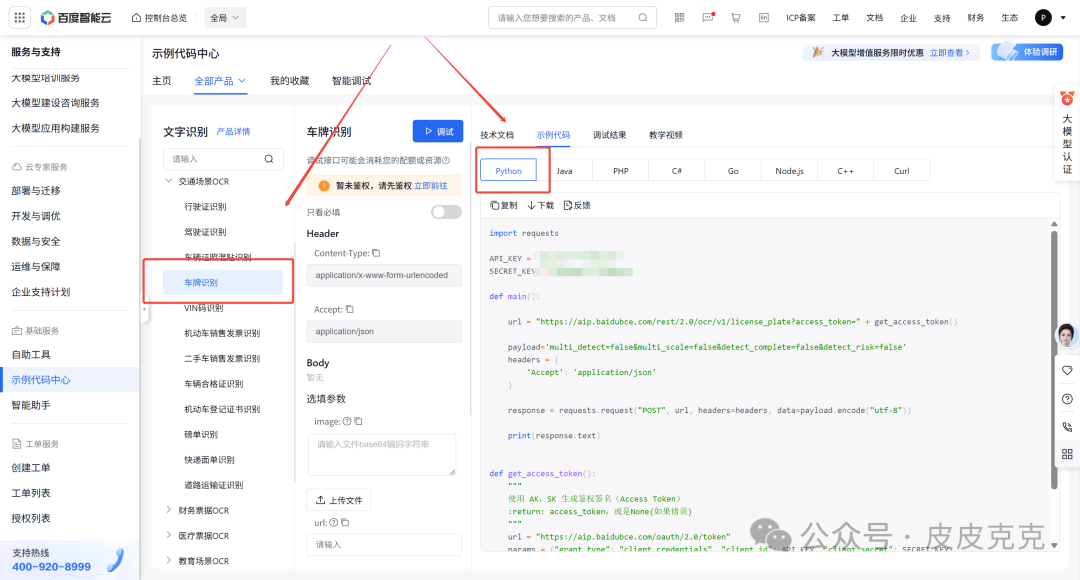
4.1、前置准备
- 登录后进入控制台:https://console.bce.baidu.com/
- 在左侧菜单找到"产品服务" → “人工智能” → “文字识别”
- 点击"创建应用"
- 就会生成专属的 API key和 Secret Key
4.2、代码案例
import requests
import base64
import json

# 请替换为您的实际API Key和Secret Key
API_KEY = "xxxxxxxxxx"
SECRET_KEY = "xxxxxxxxxxxx"


def get_access_token():
    """
    使用 AK,SK 生成鉴权签名(Access Token)
    :return: access_token,或是None(如果错误)
    """
    url = "https://aip.baidubce.com/oauth/2.0/token"
    params = {
        "grant_type": "client_credentials",
        "client_id": API_KEY,
        "client_secret": SECRET_KEY
    }

    try:
        response = requests.post(url, params=params)
        response.raise_for_status()  # 检查请求是否成功
        result = response.json()
        access_token = result.get("access_token")

        if access_token:
            print("成功获取access_token")
            return access_token
        else:
            print(f"获取access_token失败: {result}")
            returnNone

    except Exception as e:
        print(f"获取access_token时发生错误: {e}")
        returnNone


def image_to_base64(image_path):
    """
    将图像文件转换为base64编码
    """
    try:
        with open(image_path, "rb") as image_file:
            image_data = image_file.read()
            base64_data = base64.b64encode(image_data).decode('utf-8')
            return base64_data
    except Exception as e:
        print(f"读取图像文件失败: {e}")
        returnNone


def recognize_license_plate(image_path):
    """
    识别车牌号码
    """
    # 获取access token
    access_token = get_access_token()
    ifnot access_token:
        returnNone

    # 转换图像为base64
    image_base64 = image_to_base64(image_path)
    ifnot image_base64:
        returnNone

    # 构建请求URL
    url = f"https://aip.baidubce.com/rest/2.0/ocr/v1/license_plate?access_token={access_token}"

    # 构建请求数据
    payload = {
        'image': image_base64,
        'multi_detect': 'false',
        'multi_scale': 'false',
        'detect_complete': 'false',
        'detect_risk': 'false'
    }

    headers = {
        'Content-Type': 'application/x-www-form-urlencoded',
        'Accept': 'application/json'
    }

    try:
        # 发送POST请求
        response = requests.post(url, headers=headers, data=payload)
        response.raise_for_status()  # 检查请求是否成功

        result = response.json()

        # 解析结果
        if'words_result'in result:
            plate_info = result['words_result']
            return {
                'success': True,
                'plate_number': plate_info.get('number', ''),
                'color': plate_info.get('color', ''),
                'confidence': result.get('words_result_num', 0),
                'raw_response': result
            }
        else:
            return {
                'success': False,
                'error_msg': result.get('error_msg', '未知错误'),
                'error_code': result.get('error_code', ''),
                'raw_response': result
            }

    except Exception as e:
        return {
            'success': False,
            'error_msg': f"请求过程中发生错误: {e}",
            'raw_response': None
        }


def main():
    # 要识别的图像路径
    image_path = r"xxxxpath/car.png"# 替换为您的图像路径

    print("开始车牌识别...")

    # 识别车牌
    result = recognize_license_plate(image_path)

    # 输出结果
    if result['success']:
        print("识别成功!")
        print(f"车牌号码: {result['plate_number']}")
        print(f"车牌颜色: {result['color']}")
        print(f"置信度: {result['confidence']}")
    else:
        print("识别失败")
        print(f"错误信息: {result['error_msg']}")
        if'error_code'in result:
            print(f"错误代码: {result['error_code']}")

        # 显示原始响应(用于调试)
        if result['raw_response']:
            print("\n原始响应:")
            print(json.dumps(result['raw_response'], indent=2, ensure_ascii=False))

if __name__ == '__main__':
    main()
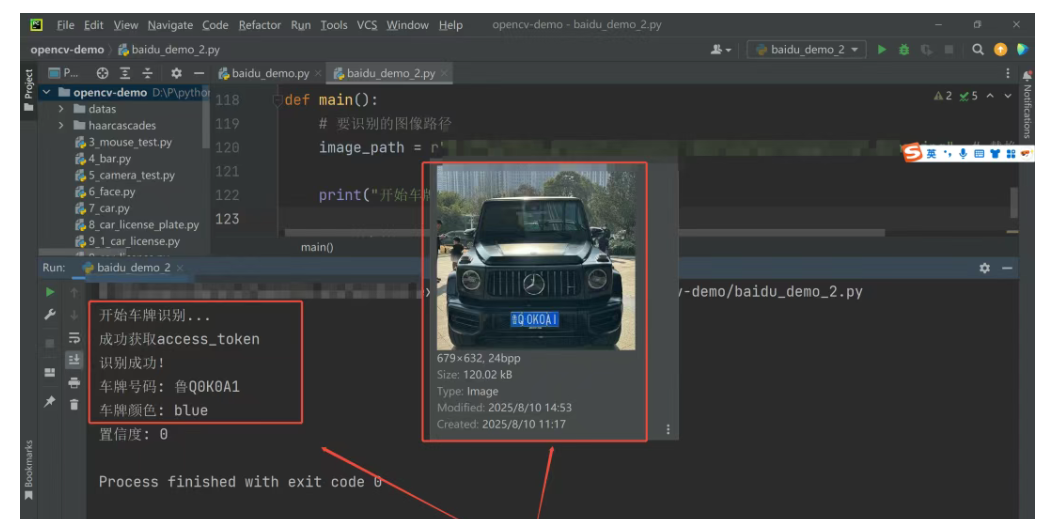
4.3、运行效果

腾讯云面向开发者汇聚海量精品云计算使用和开发经验,营造开放的云计算技术生态圈。
更多推荐
 1
1 0
0- 0


 已为社区贡献21条内容

所有评论(0)