突破验证码限制:captcha-killer-modified 助力登录口令爆破
文章目录
⚠️本博文所涉安全渗透测试技术、方法及案例,仅用于网络安全技术研究与合规性交流,旨在提升读者的安全防护意识与技术能力。任何个人或组织在使用相关内容前,必须获得目标网络 / 系统所有者的明确且书面授权,严禁用于未经授权的网络探测、漏洞利用、数据获取等非法行为。
前言
在渗透测试或安全验证场景中,登录口令爆破是常见的测试手段,但验证码往往成为爆破的最大阻碍——登录请求中验证码会随每次请求动态变化,人工识别和输入无法满足自动化爆破的需求。本文将详细介绍 captcha-killer-modified 这款工具,它适配新版 BurpSuite 接口,集成 ddddocr 验证码识别库,能自动识别多种类型验证码,帮助我们突破带验证码的登录爆破场景限制。
1 工具简介
captcha-killer-modified 源于 captcha-killer,核心优化和新增能力如下:
- 适配新版 Burpsuite 接口(兼容高版本 JDK);
- 新增对
data:image格式图片的识别支持; - 集成验证码识别库 ddddocr;
注意:该工具适用于 Windows 环境,Macbook M1(X) 系列设备暂不兼容。
2 安装步骤
2.1 下载插件包
下载适配的二进制插件包:https://github.com/f0ng/captcha-killer-modified/releases/tag/0.24.7
以 BurpSuite V2026.1.2 为例,推荐使用 captcha-killer-modified-0.24.7-jdk14.jar,下载后在 BurpSuite 中加载插件(如下图):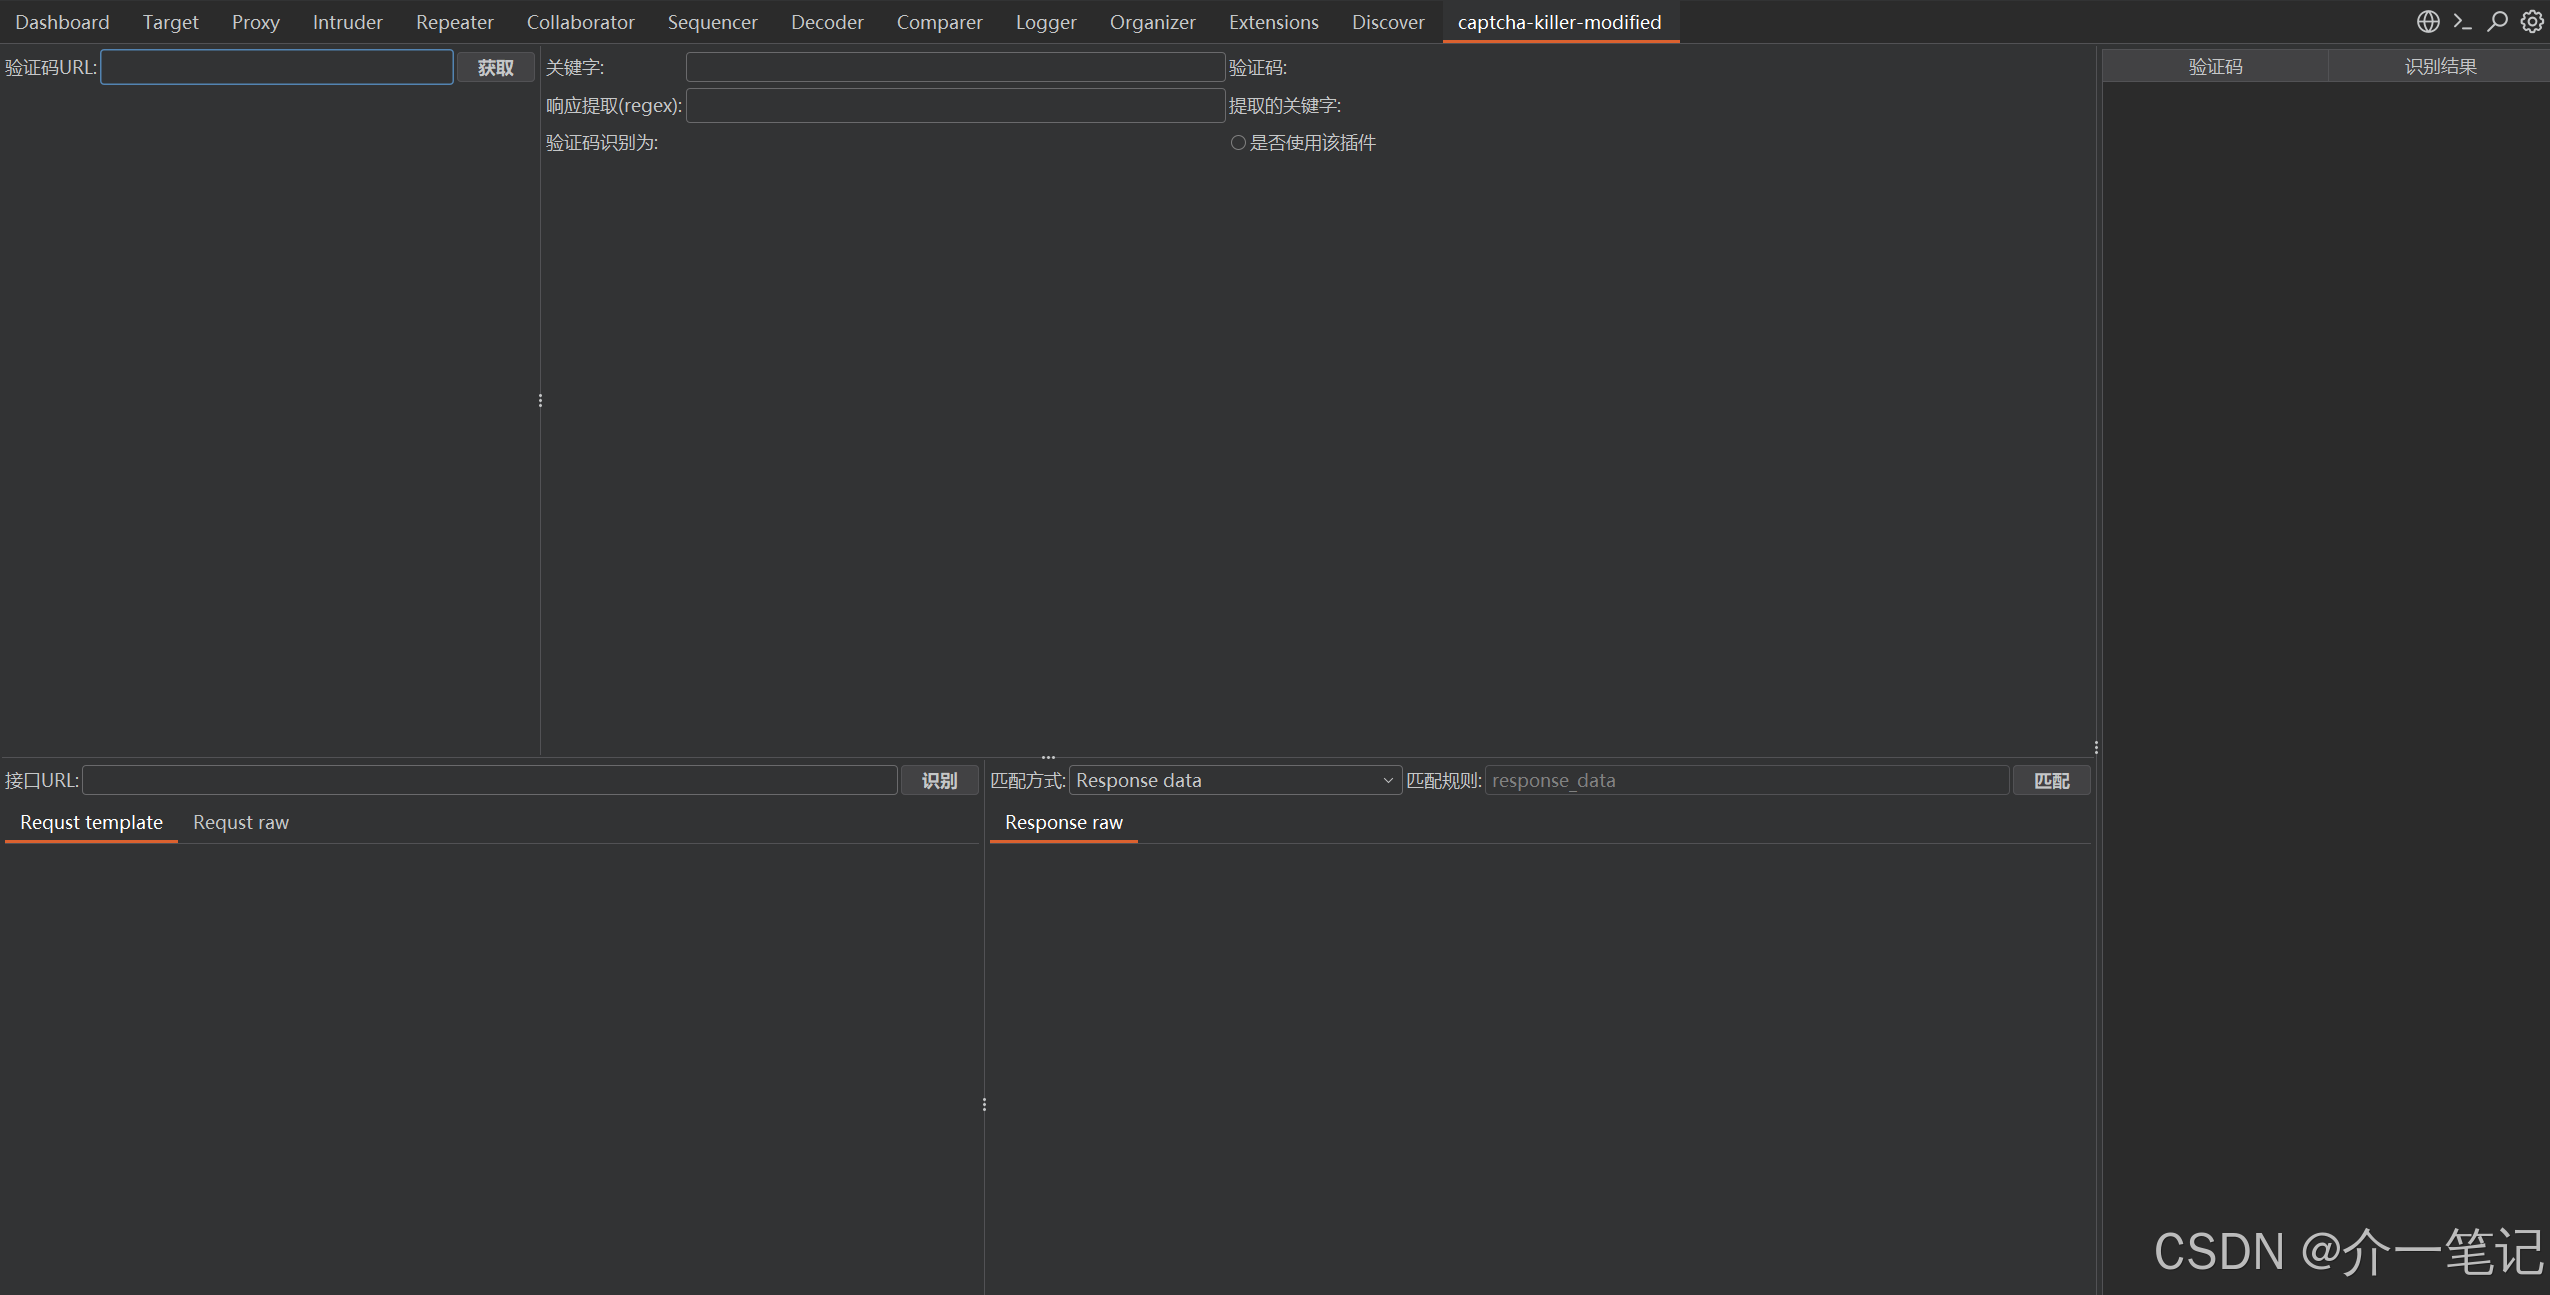
2.2 部署识别脚本
2.2.1 下载源码并安装依赖
git clone https://github.com/f0ng/captcha-killer-modified.git
cd .\captcha-killer-modified\

# 安装脚本依赖
pip install -r requirement.txt
2.2.2 解决Python版本兼容问题
若出现如下报错(Python版本过高导致组件不兼容):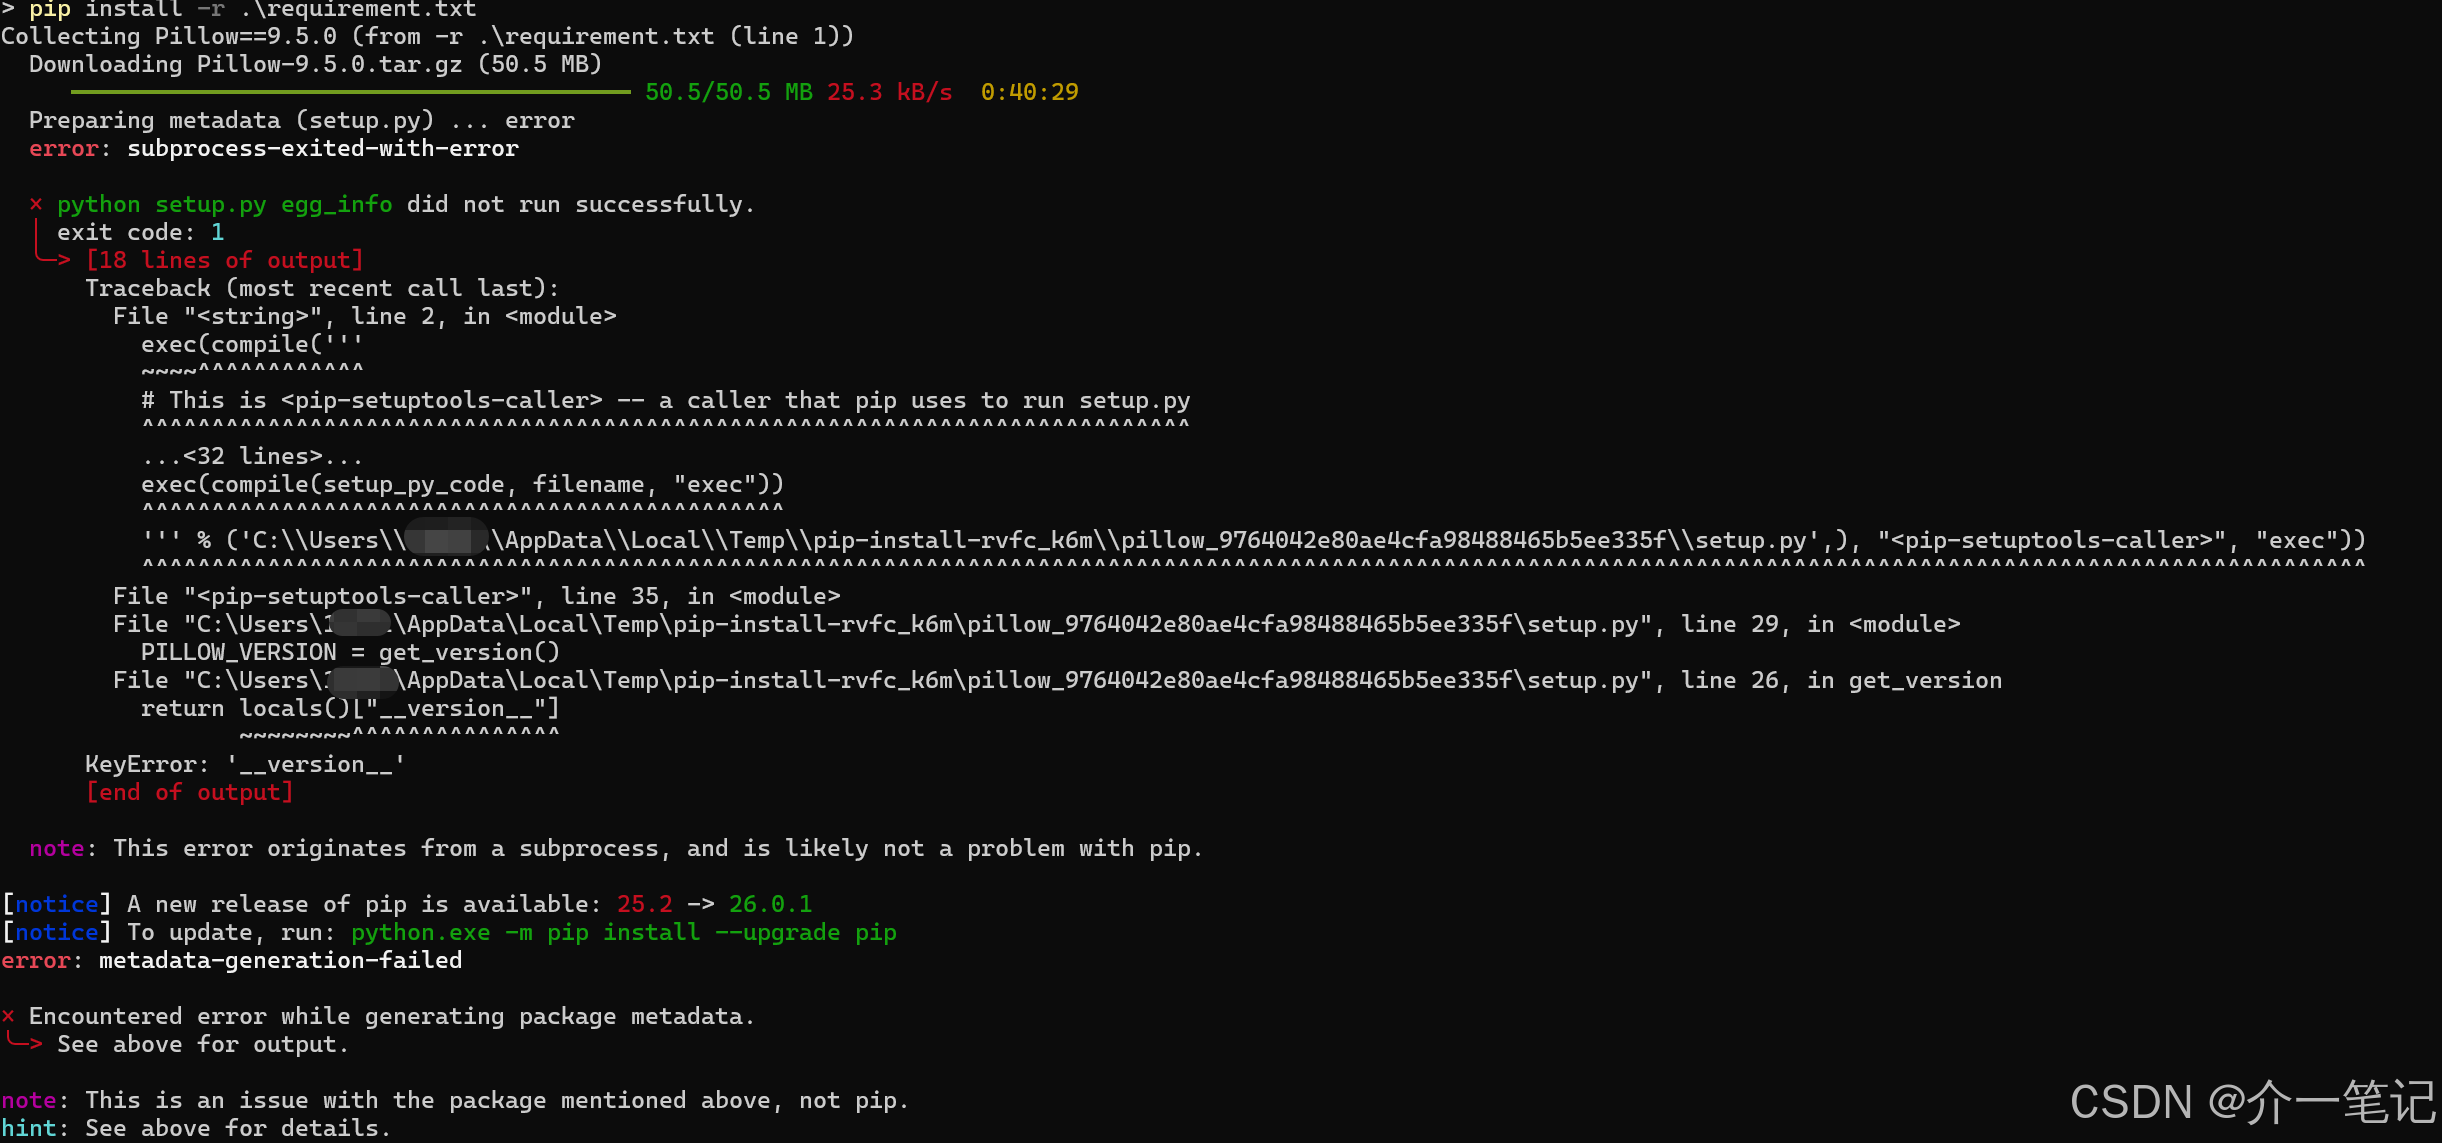
按以下步骤修正:
python -m pip install --upgrade pip setuptools wheel
pip install pillow --upgrade

# 修改 requirement.txt 内容为:
aiohttp
pillow
ddddocr

# 重新安装依赖
pip install -r .\requirement.txt
安装完成后效果如下: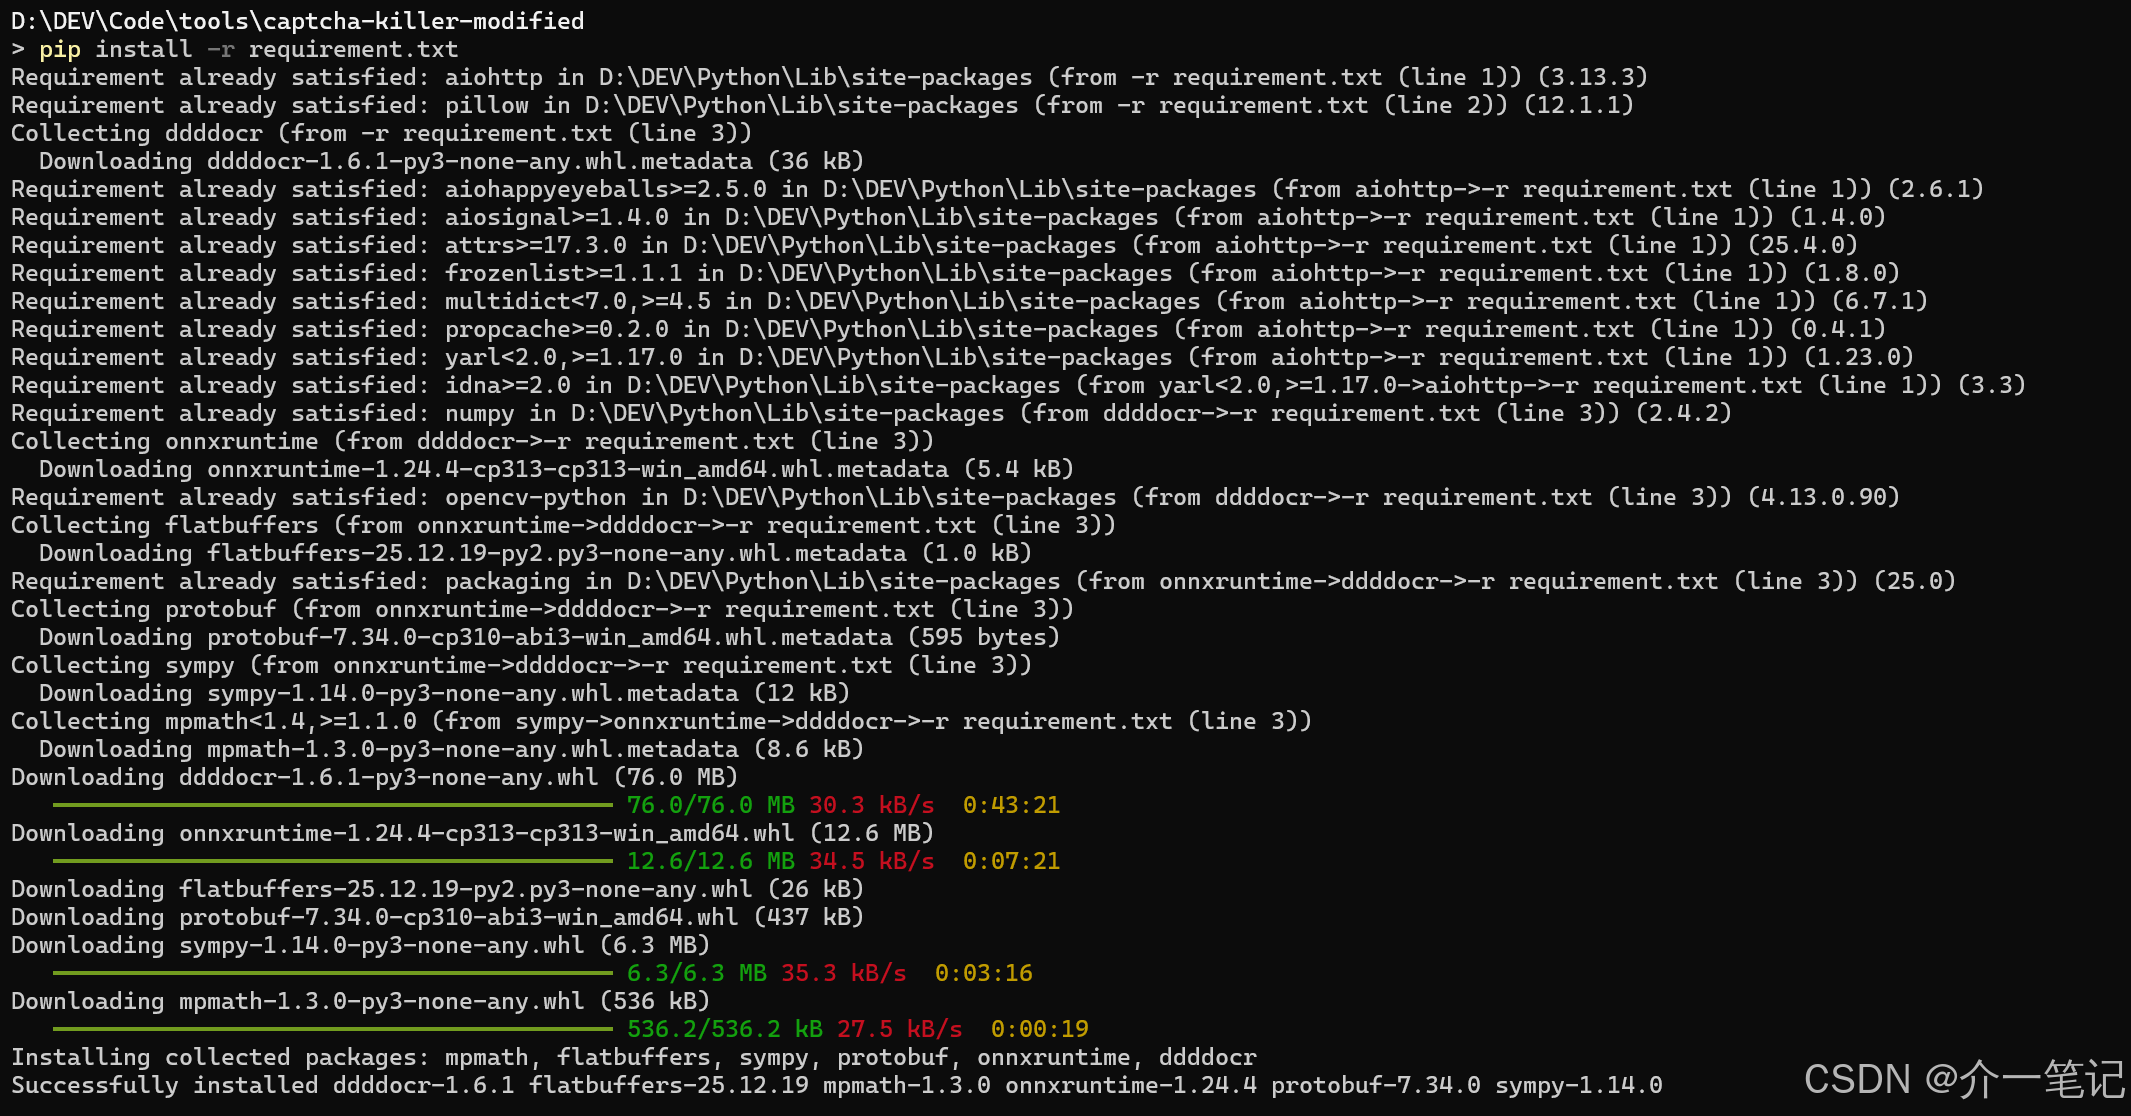
2.2.3 启动识别脚本
将Python脚本单独提取后启动(启动效果如下图):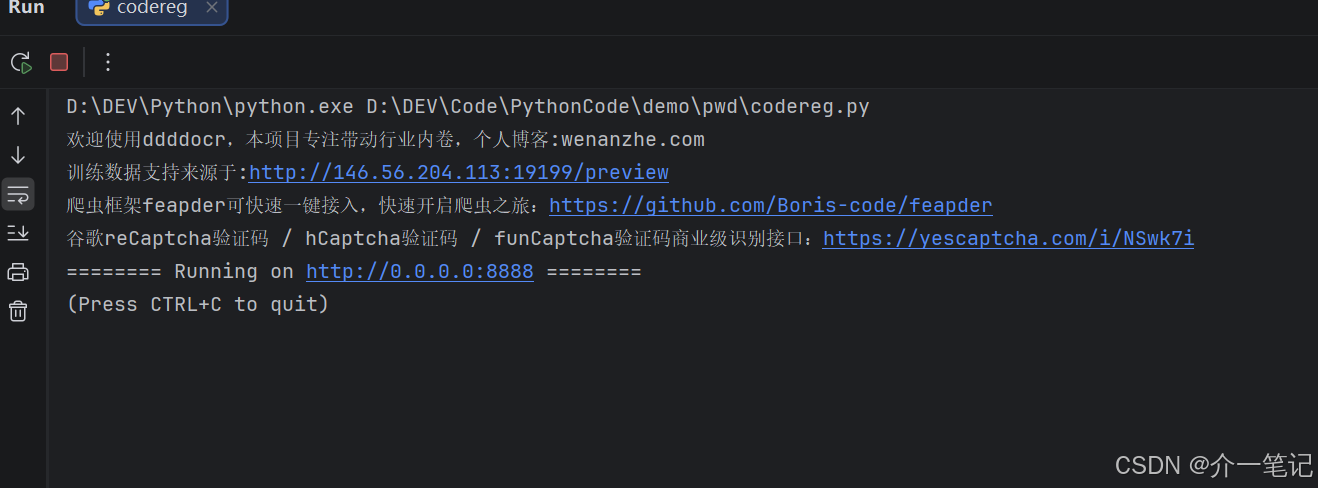
脚本完整代码如下:
import argparse
import ddddocr  # 导入 ddddocr
from aiohttp import web
import base64

parser = argparse.ArgumentParser()

parser.add_argument("-p", help="http port", default="8888")
args = parser.parse_args()
ocr = ddddocr.DdddOcr()
port = args.p

auth_base64 = "f0ngauth"  # 可自定义auth认证


# 识别纯整数0-9
async def handle_cb00(request):
    if request.headers.get('Authorization') != 'Basic ' + auth_base64:
        return web.Response(text='Forbidden', status='403')
    ocr.set_ranges(0)
    img_base64 = await request.text()
    img_bytes = base64.b64decode(img_base64)
    # return web.Response(text=ocr.classification(img_bytes)[0:4]) 验证码取前四位
    # return web.Response(text=ocr.classification(img_bytes)[0:4].replace("0","o")) 验证码取前四位、验证码中的0替换为o
    res = ocr.classification(img_bytes,probability=True)
    s = ""
    for i in res['probability']:
        s += res['charsets'][i.index(max(i))]
    print(s)
    return web.Response(text=s)

# 识别纯小写英文a-z
async def handle_cb01(request):
    if request.headers.get('Authorization') != 'Basic ' + auth_base64:
        return web.Response(text='Forbidden', status='403')
    ocr.set_ranges(1)
    img_base64 = await request.text()
    img_bytes = base64.b64decode(img_base64)
    # return web.Response(text=ocr.classification(img_bytes)[0:4]) 验证码取前四位
    # return web.Response(text=ocr.classification(img_bytes)[0:4].replace("0","o")) 验证码取前四位、验证码中的0替换为o
    res = ocr.classification(img_bytes,probability=True)
    s = ""
    for i in res['probability']:
        s += res['charsets'][i.index(max(i))]
    print(s)
    return web.Response(text=s)

# 识别纯大写英文A-Z
async def handle_cb02(request):
    if request.headers.get('Authorization') != 'Basic ' + auth_base64:
        return web.Response(text='Forbidden', status='403')
    ocr.set_ranges(2)
    img_base64 = await request.text()
    img_bytes = base64.b64decode(img_base64)
    # return web.Response(text=ocr.classification(img_bytes)[0:4]) 验证码取前四位
    # return web.Response(text=ocr.classification(img_bytes)[0:4].replace("0","o")) 验证码取前四位、验证码中的0替换为o
    res = ocr.classification(img_bytes,probability=True)
    s = ""
    for i in res['probability']:
        s += res['charsets'][i.index(max(i))]
    print(s)
    return web.Response(text=s)

# 识别小写英文a-z + 大写英文A-Z
async def handle_cb03(request):
    if request.headers.get('Authorization') != 'Basic ' + auth_base64:
        return web.Response(text='Forbidden', status='403')
    ocr.set_ranges(3)
    img_base64 = await request.text()
    img_bytes = base64.b64decode(img_base64)
    # return web.Response(text=ocr.classification(img_bytes)[0:4]) 验证码取前四位
    # return web.Response(text=ocr.classification(img_bytes)[0:4].replace("0","o")) 验证码取前四位、验证码中的0替换为o
    res = ocr.classification(img_bytes,probability=True)
    s = ""
    for i in res['probability']:
        s += res['charsets'][i.index(max(i))]
    print(s)
    return web.Response(text=s)

# 识别小写英文a-z + 整数0-9
async def handle_cb04(request):
    if request.headers.get('Authorization') != 'Basic ' + auth_base64:
        return web.Response(text='Forbidden', status='403')
    ocr.set_ranges(4)
    img_base64 = await request.text()
    img_bytes = base64.b64decode(img_base64)
    # return web.Response(text=ocr.classification(img_bytes)[0:4]) 验证码取前四位
    # return web.Response(text=ocr.classification(img_bytes)[0:4].replace("0","o")) 验证码取前四位、验证码中的0替换为o
    res = ocr.classification(img_bytes,probability=True)
    s = ""
    for i in res['probability']:
        s += res['charsets'][i.index(max(i))]
    print(s)
    return web.Response(text=s)

# 识别大写英文A-Z + 整数0-9
async def handle_cb05(request):
    if request.headers.get('Authorization') != 'Basic ' + auth_base64:
        return web.Response(text='Forbidden', status='403')
    ocr.set_ranges(5)
    img_base64 = await request.text()
    img_bytes = base64.b64decode(img_base64)
    # return web.Response(text=ocr.classification(img_bytes)[0:4]) 验证码取前四位
    # return web.Response(text=ocr.classification(img_bytes)[0:4].replace("0","o")) 验证码取前四位、验证码中的0替换为o
    res = ocr.classification(img_bytes,probability=True)
    s = ""
    for i in res['probability']:
        s += res['charsets'][i.index(max(i))]
    print(s)
    return web.Response(text=s)


# 识别小写英文a-z + 大写英文A-Z + 整数0-9
async def handle_cb06(request):
    if request.headers.get('Authorization') != 'Basic ' + auth_base64:
        return web.Response(text='Forbidden', status='403')
    ocr.set_ranges(6)
    img_base64 = await request.text()
    img_bytes = base64.b64decode(img_base64)
    # return web.Response(text=ocr.classification(img_bytes)[0:4]) 验证码取前四位
    # return web.Response(text=ocr.classification(img_bytes)[0:4].replace("0","o")) 验证码取前四位、验证码中的0替换为o
    res = ocr.classification(img_bytes,probability=True)
    s = ""
    for i in res['probability']:
        s += res['charsets'][i.index(max(i))]
    print(s)
    return web.Response(text=s)

# 识别自定义字符,默认为识别算术
async def handle_cb000(request):
    if request.headers.get('Authorization') != 'Basic ' + auth_base64:
        return web.Response(text='Forbidden', status='403')
    ocr.set_ranges(request.headers.get('ranges'))
    print(request.headers.get('ranges'))
    img_base64 = await request.text()
    img_bytes = base64.b64decode(img_base64)
    # return web.Response(text=ocr.classification(img_bytes)[0:4]) 验证码取前四位
    # return web.Response(text=ocr.classification(img_bytes)[0:4].replace("0","o")) 验证码取前四位、验证码中的0替换为o
    res = ocr.classification(img_bytes,probability=True)
    s = ""
    for i in res['probability']:
        s += res['charsets'][i.index(max(i))]
    print(s)
    if '+' in s:
        zhi = int(s.split('+')[0]) + int(s.split('+')[1][:-1])
        print(zhi)
        return web.Response(text=str(zhi))
    elif '-' in s:
        zhi = int(s.split('-')[0]) - int(s.split('-')[1][:-1])
        print(zhi)
        return web.Response(text=str(zhi))
    elif '*' in s:
        zhi = int(s.split('*')[0]) * int(s.split('*')[1][:-1])
        print(zhi)
        return web.Response(text=str(zhi))
    elif 'x' in s:
        zhi = int(s.split('x')[0]) * int(s.split('x')[1][:-1])
        print(zhi)
        return web.Response(text=str(zhi))
    elif '/' in s:
        zhi = int(s.split('/')[0]) / int(s.split('/')[1][:-1])
        return web.Response(text=str(zhi))
    else:
        return web.Response(text=s)


# 识别常规验证码
async def handle_cb2(request):
    if request.headers.get('Authorization') != 'Basic ' + auth_base64:
        return web.Response(text='Forbidden', status='403')
    # print(await request.text())
    img_base64 = await request.text()
    img_bytes = base64.b64decode(img_base64)
    # return web.Response(text=ocr.classification(img_bytes)[0:4]) 验证码取前四位
    # return web.Response(text=ocr.classification(img_bytes)[0:4].replace("0","o")) 验证码取前四位、验证码中的0替换为o
    res = ocr.classification(img_bytes)
    print(res)

    return web.Response(text=ocr.classification(img_bytes)[0:10])


# 识别算术验证码
async def handle_cb(request):
    zhi = ""
    if request.headers.get('Authorization') != 'Basic ' + auth_base64:
        return web.Response(text='Forbidden', status='403')
    # print(await request.text())
    img_base64 = await request.text()
    img_bytes = base64.b64decode(img_base64)
    res = ocr.classification(img_bytes).replace("=", "").replace("?", "")
    print(res)
    if '+' in res:
        zhi = int(res.split('+')[0]) + int(res.split('+')[1][:-1])
        print(zhi)
        return web.Response(text=str(zhi))
    elif '-' in res:
        zhi = int(res.split('-')[0]) - int(res.split('-')[1][:-1])
        print(zhi)
        return web.Response(text=str(zhi))
    elif '*' in res:
        zhi = int(res.split('*')[0]) * int(res.split('*')[1][:-1])
        print(zhi)
        return web.Response(text=str(zhi))
    elif 'x' in res:
        zhi = int(res.split('x')[0]) * int(res.split('x')[1][:-1])
        print(zhi)
        return web.Response(text=str(zhi))
    elif '/' in res:
        zhi = int(res.split('/')[0]) / int(res.split('/')[1][:-1])
        return web.Response(text=str(zhi))
    else:
        return web.Response(text=res)


app = web.Application()
app.add_routes([
    web.post('/reg2', handle_cb),  # 识别算数验证码
    web.post('/reg', handle_cb2),  # 识别常规验证码

    web.post('/reg00', handle_cb00),  # 识别纯整数0-9
    web.post('/reg01', handle_cb01),  # 识别纯小写英文a-z
    web.post('/reg02', handle_cb02),  # 识别纯大写英文A-Z
    web.post('/reg03', handle_cb03),  # 识别小写英文a-z + 大写英文A-Z
    web.post('/reg04', handle_cb04),  # 识别小写英文a-z + 整数0-9
    web.post('/reg05', handle_cb05),  # 识别大写英文A-Z + 整数0-9
    web.post('/reg06', handle_cb06),  # 识别小写英文a-z + 大写英文A-Z + 整数0-9
    web.post('/reg000', handle_cb000),  # 识别自定义
])

if __name__ == '__main__':
    web.run_app(app, port=int(port))
3 实操案例
以某登录界面(如下图)为例,演示验证码识别和登录口令爆破的完整流程:
3.1 验证码识别配置
3.1.1 拦截验证码请求
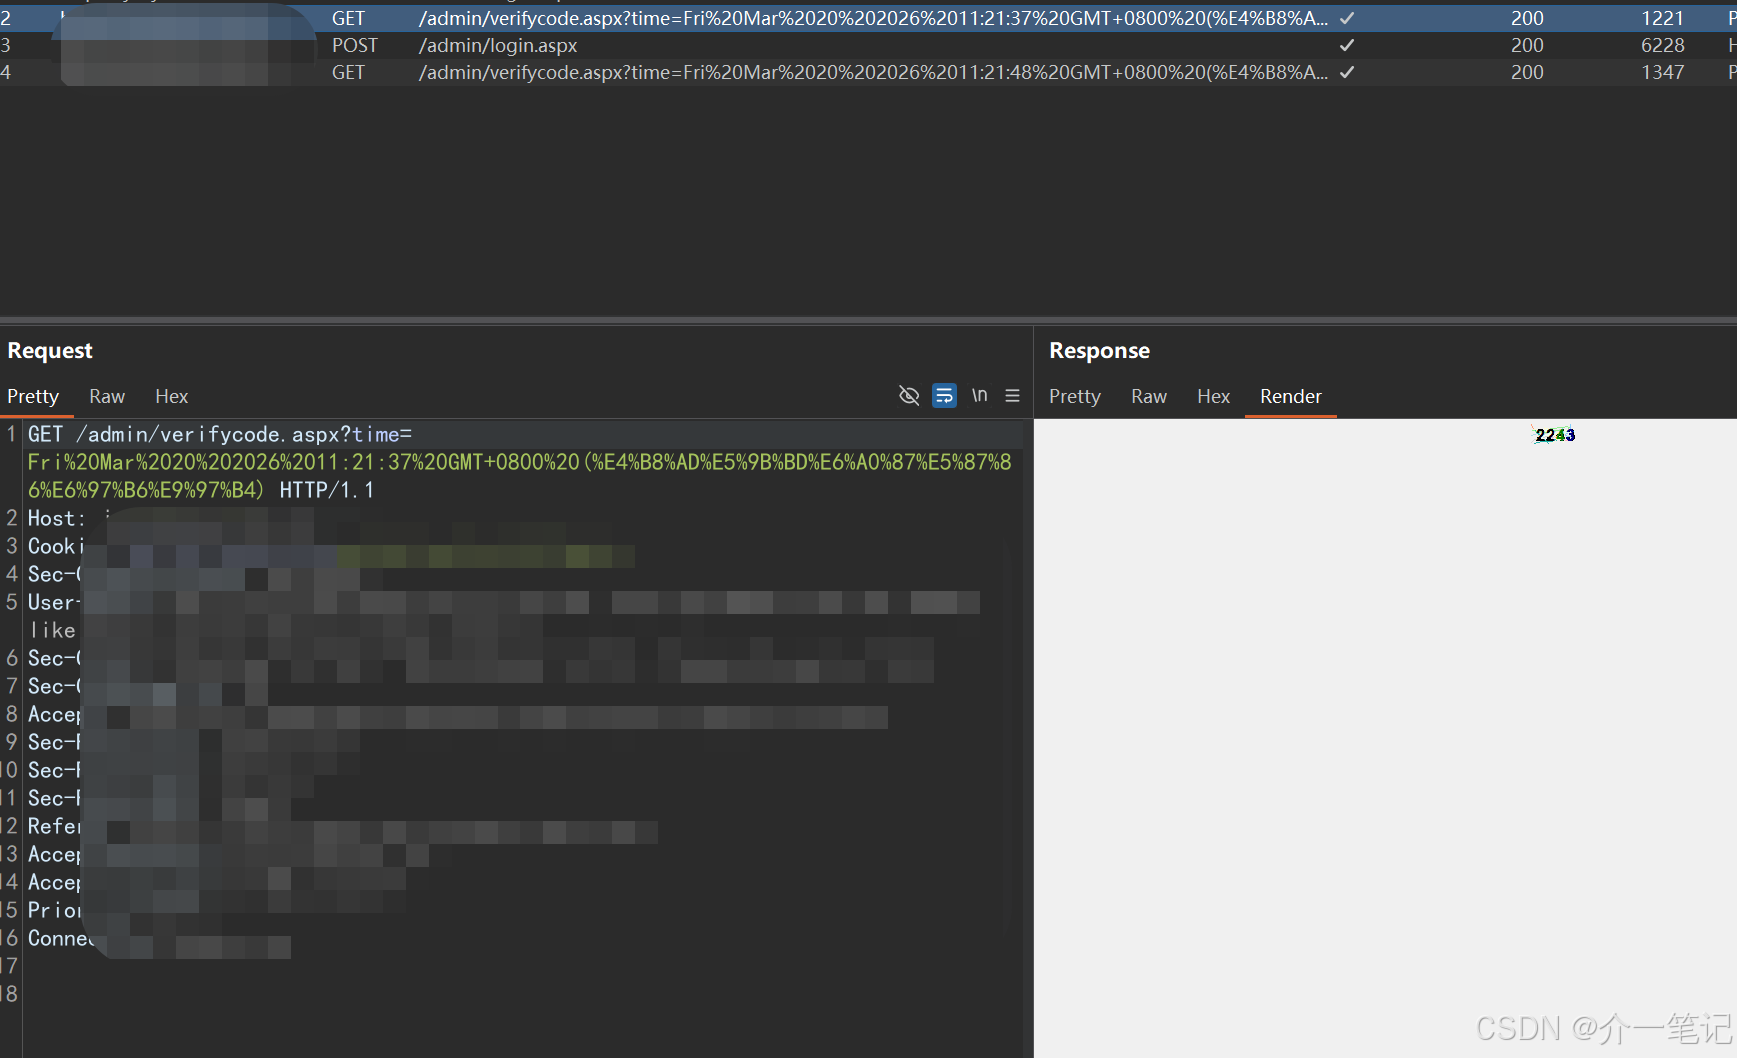
BurpSuite 拦截数据包时,必须勾选 Images 选项,才能捕获到获取验证码的请求(如下图):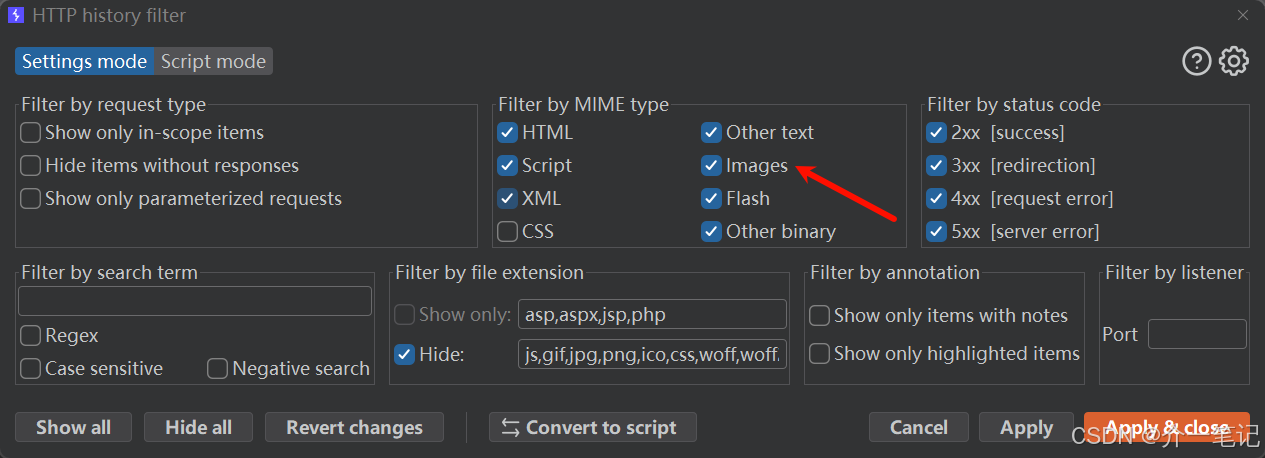
3.1.2 发送请求到插件
将捕获到的验证码请求,发送到 captcha-killer-modified 插件的验证码界面(操作如下图):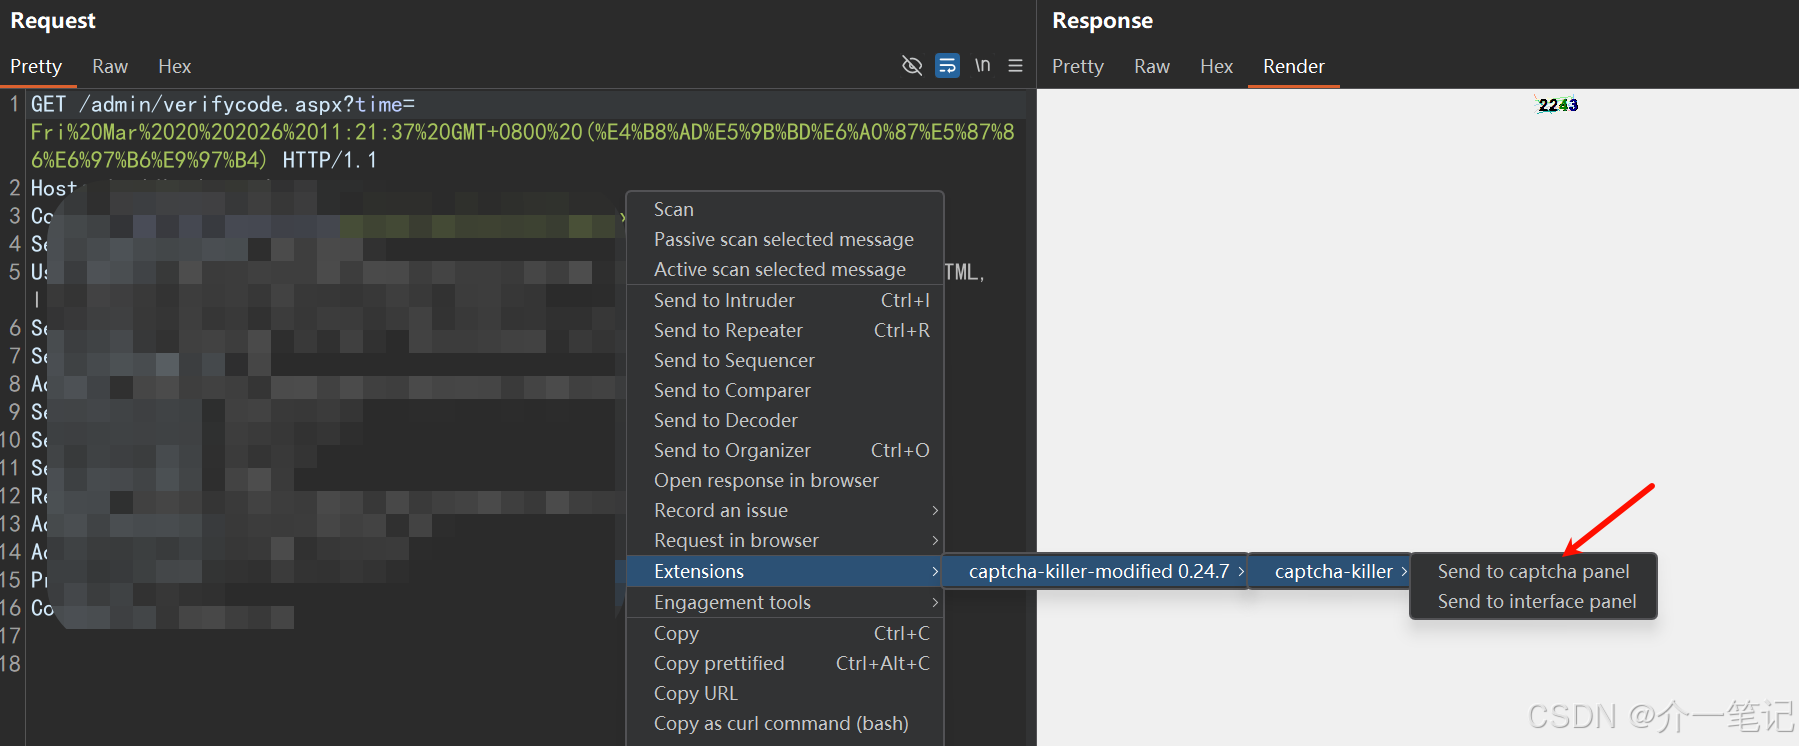
3.1.3 提取并识别验证码
在插件界面找到该请求并点击「提取」(如下图):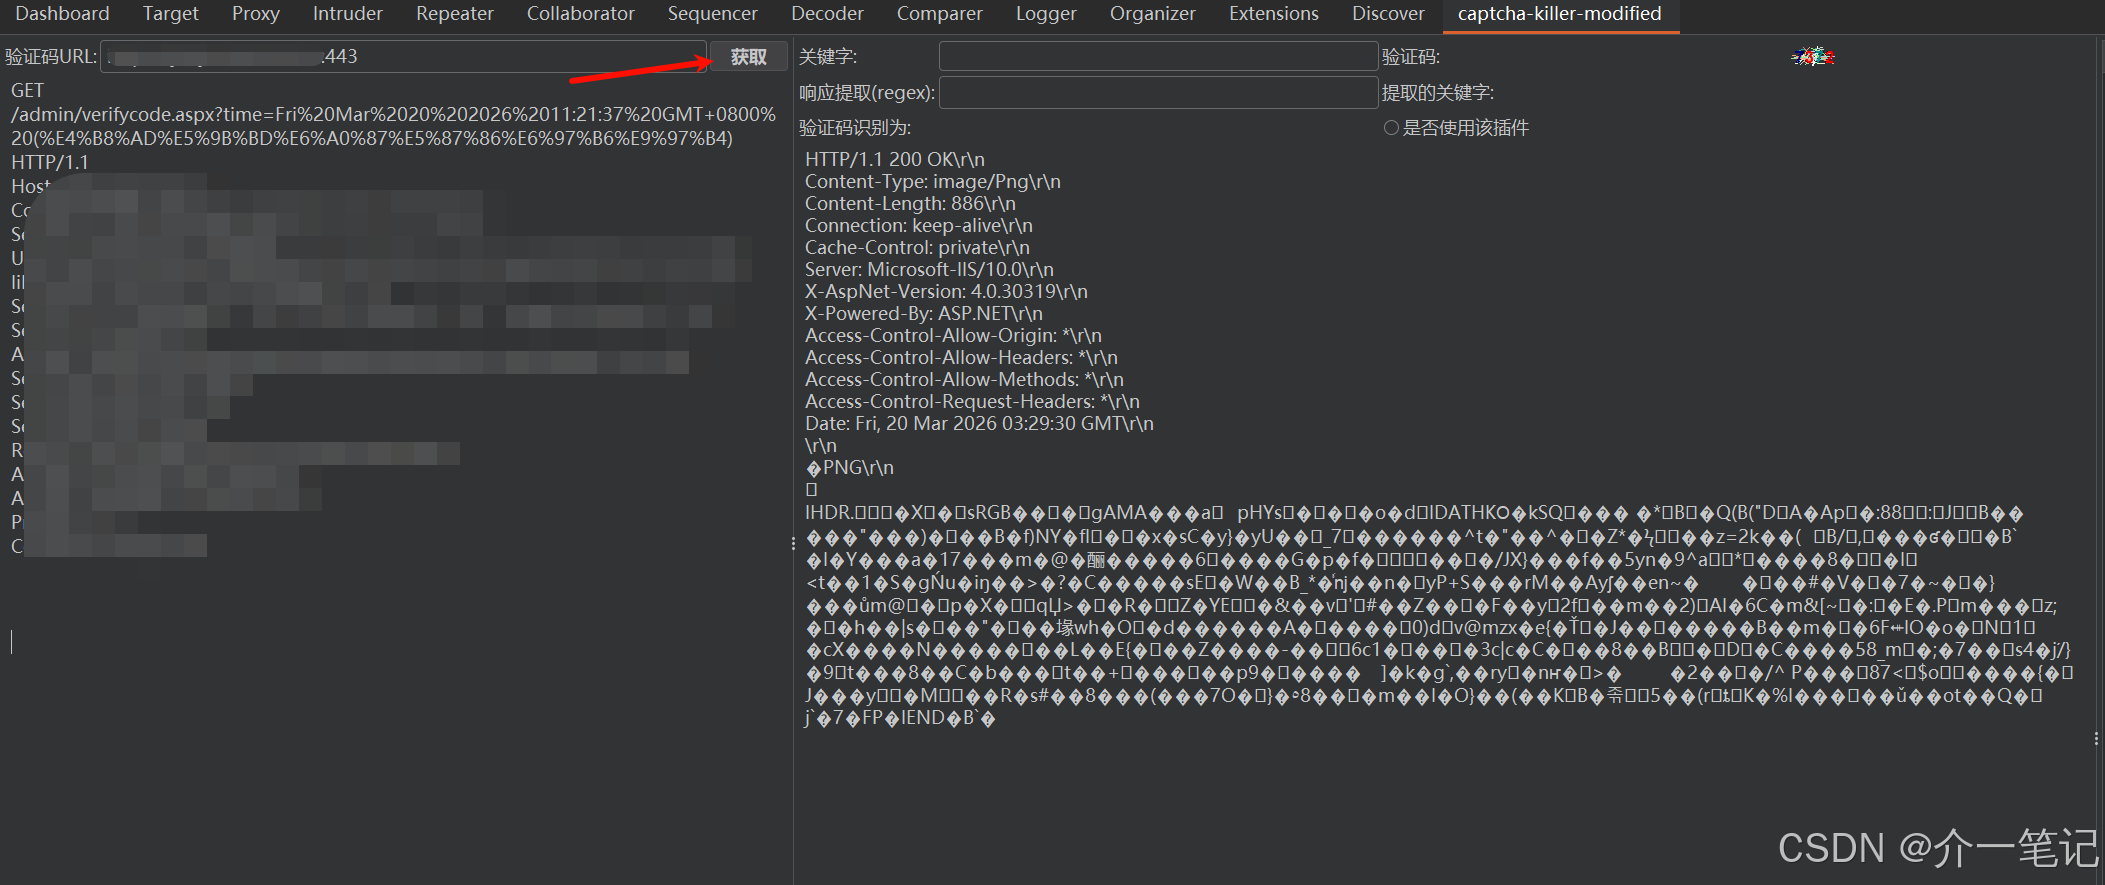
在插件界面下方完成基础配置(如下图):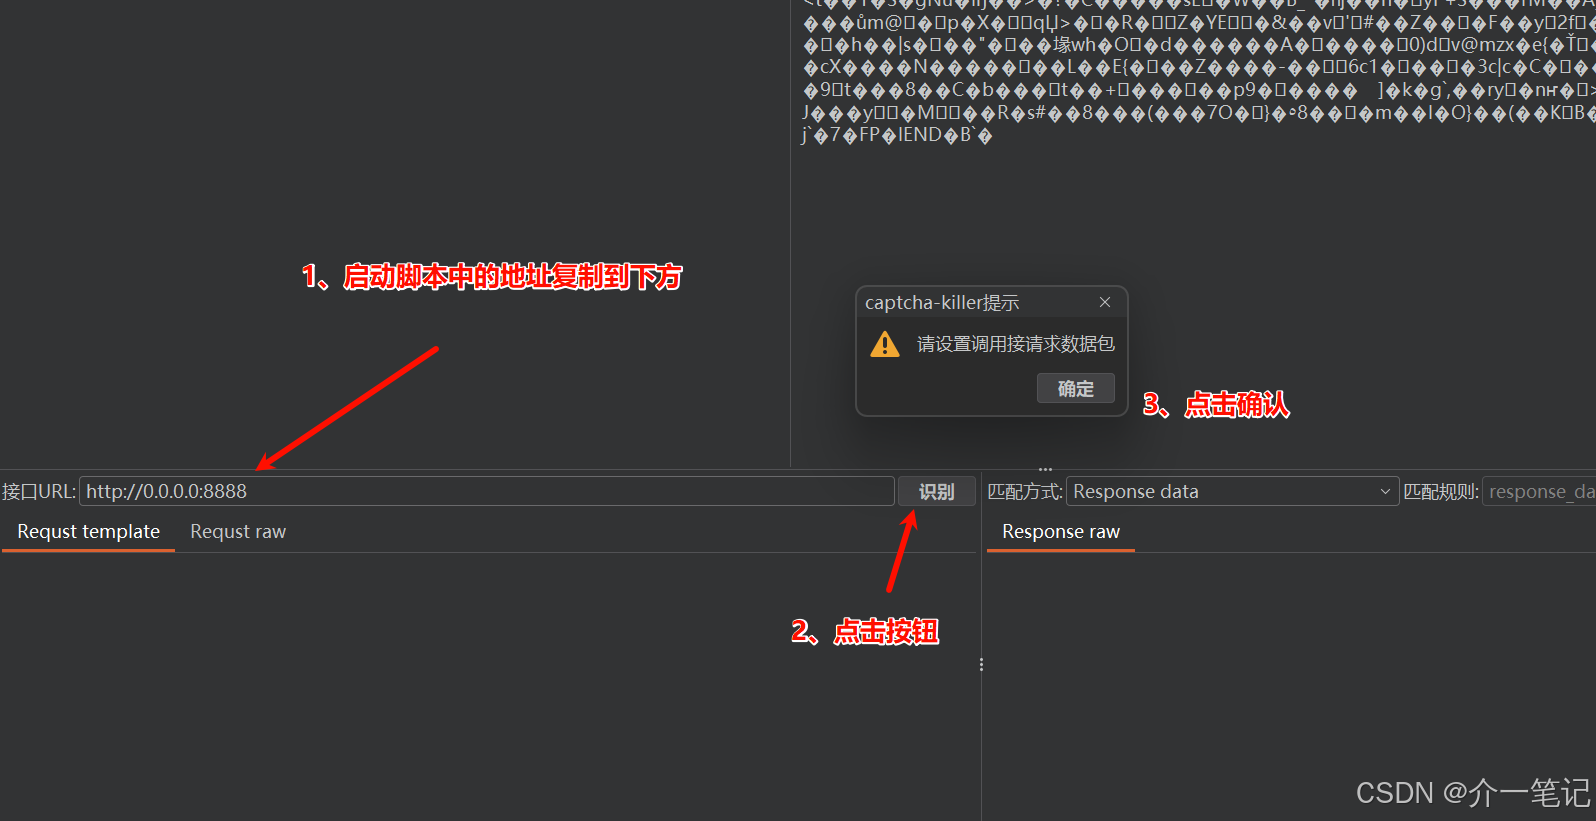
右键启用 ddddocr 模板,插件会自动识别出验证码明文(效果如下图):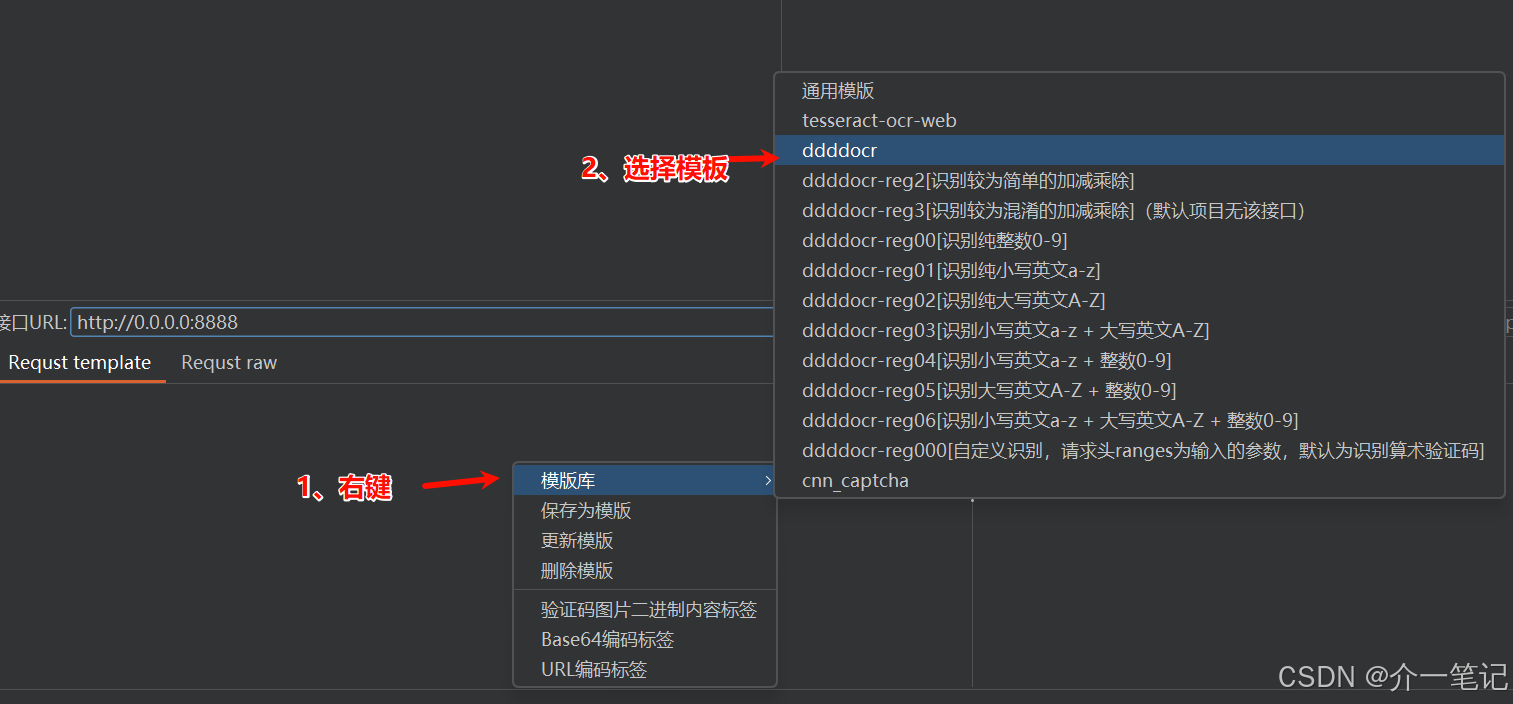
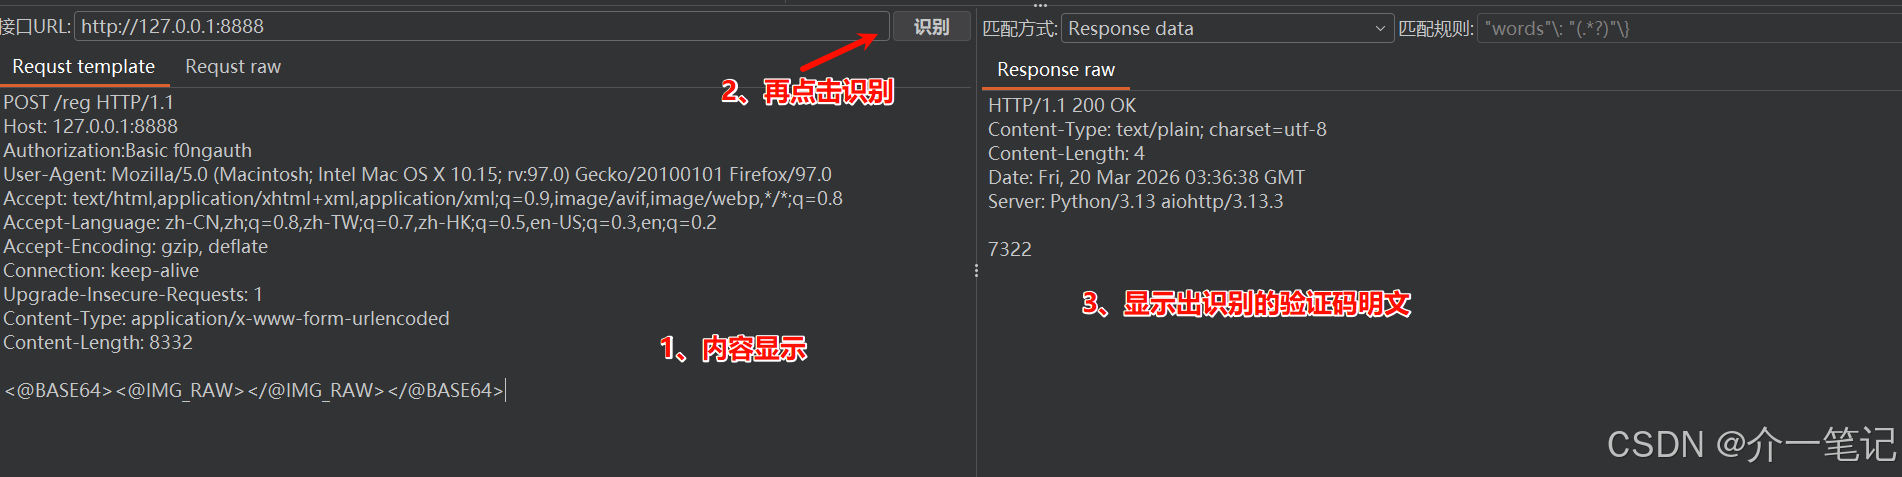
插件右侧面板可查看验证码识别记录(如下图):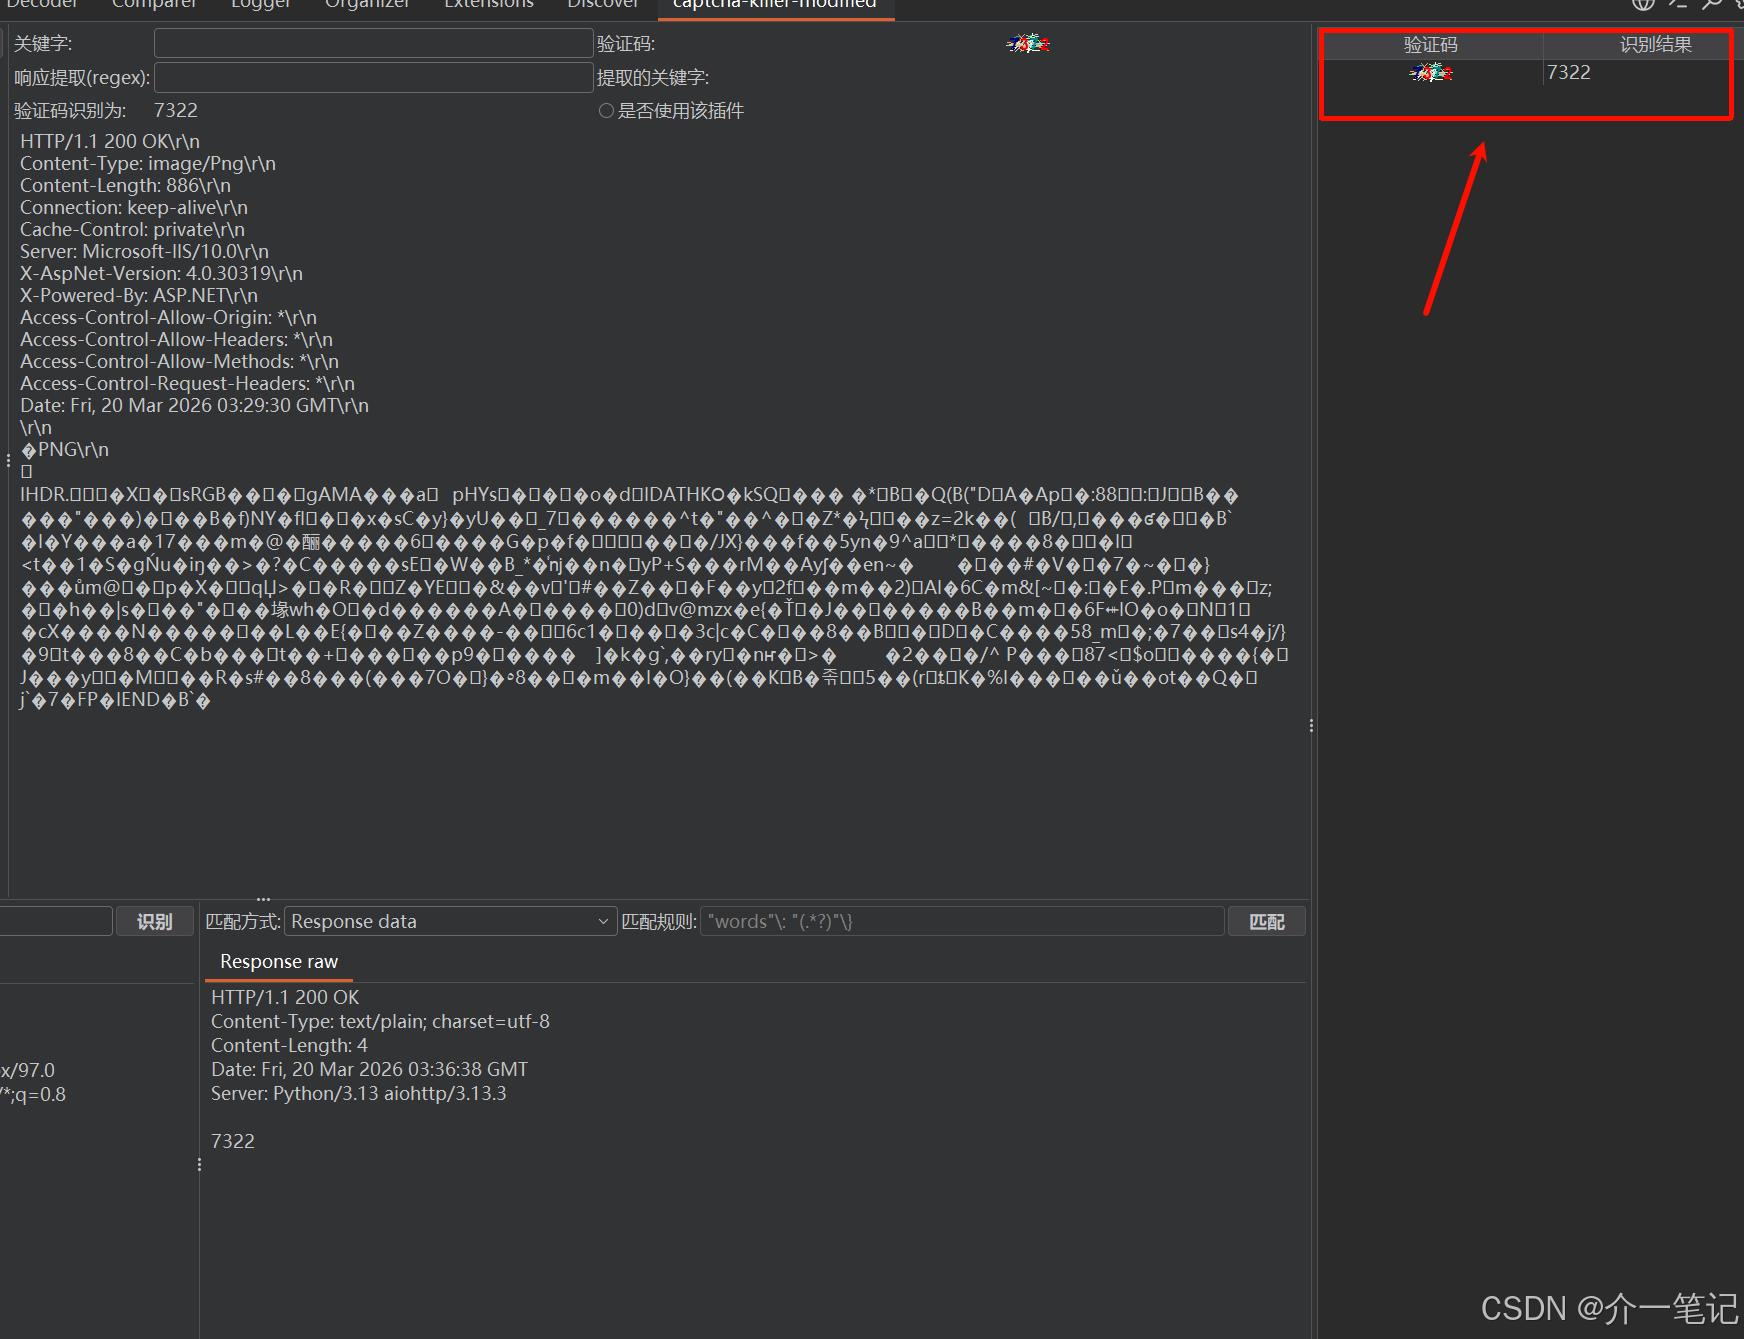
3.2 登录口令爆破
3.2.1 启用插件支持
在 BurpSuite 中勾选「使用插件」,开启验证码自动识别的联动能力(如下图):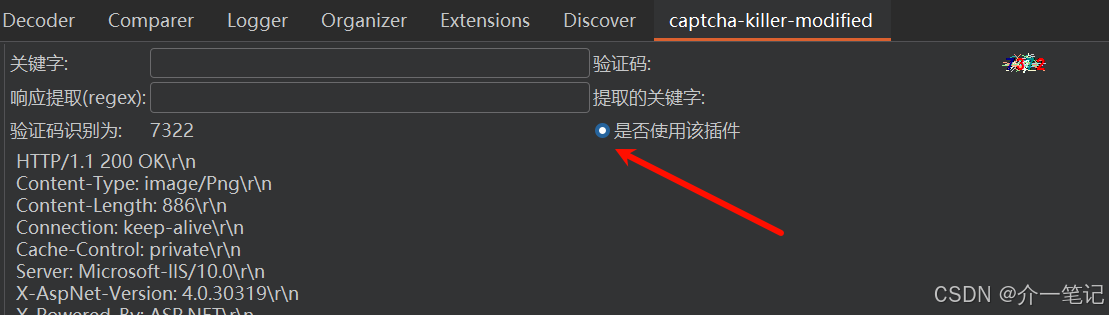
3.2.2 捕获登录请求
开启 BurpSuite 的 intercept 拦截功能,捕获登录请求数据包(如下图):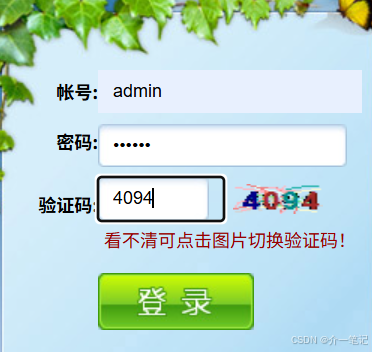
将该请求发送到 BurpSuite 的 Intruder 模块(如下图):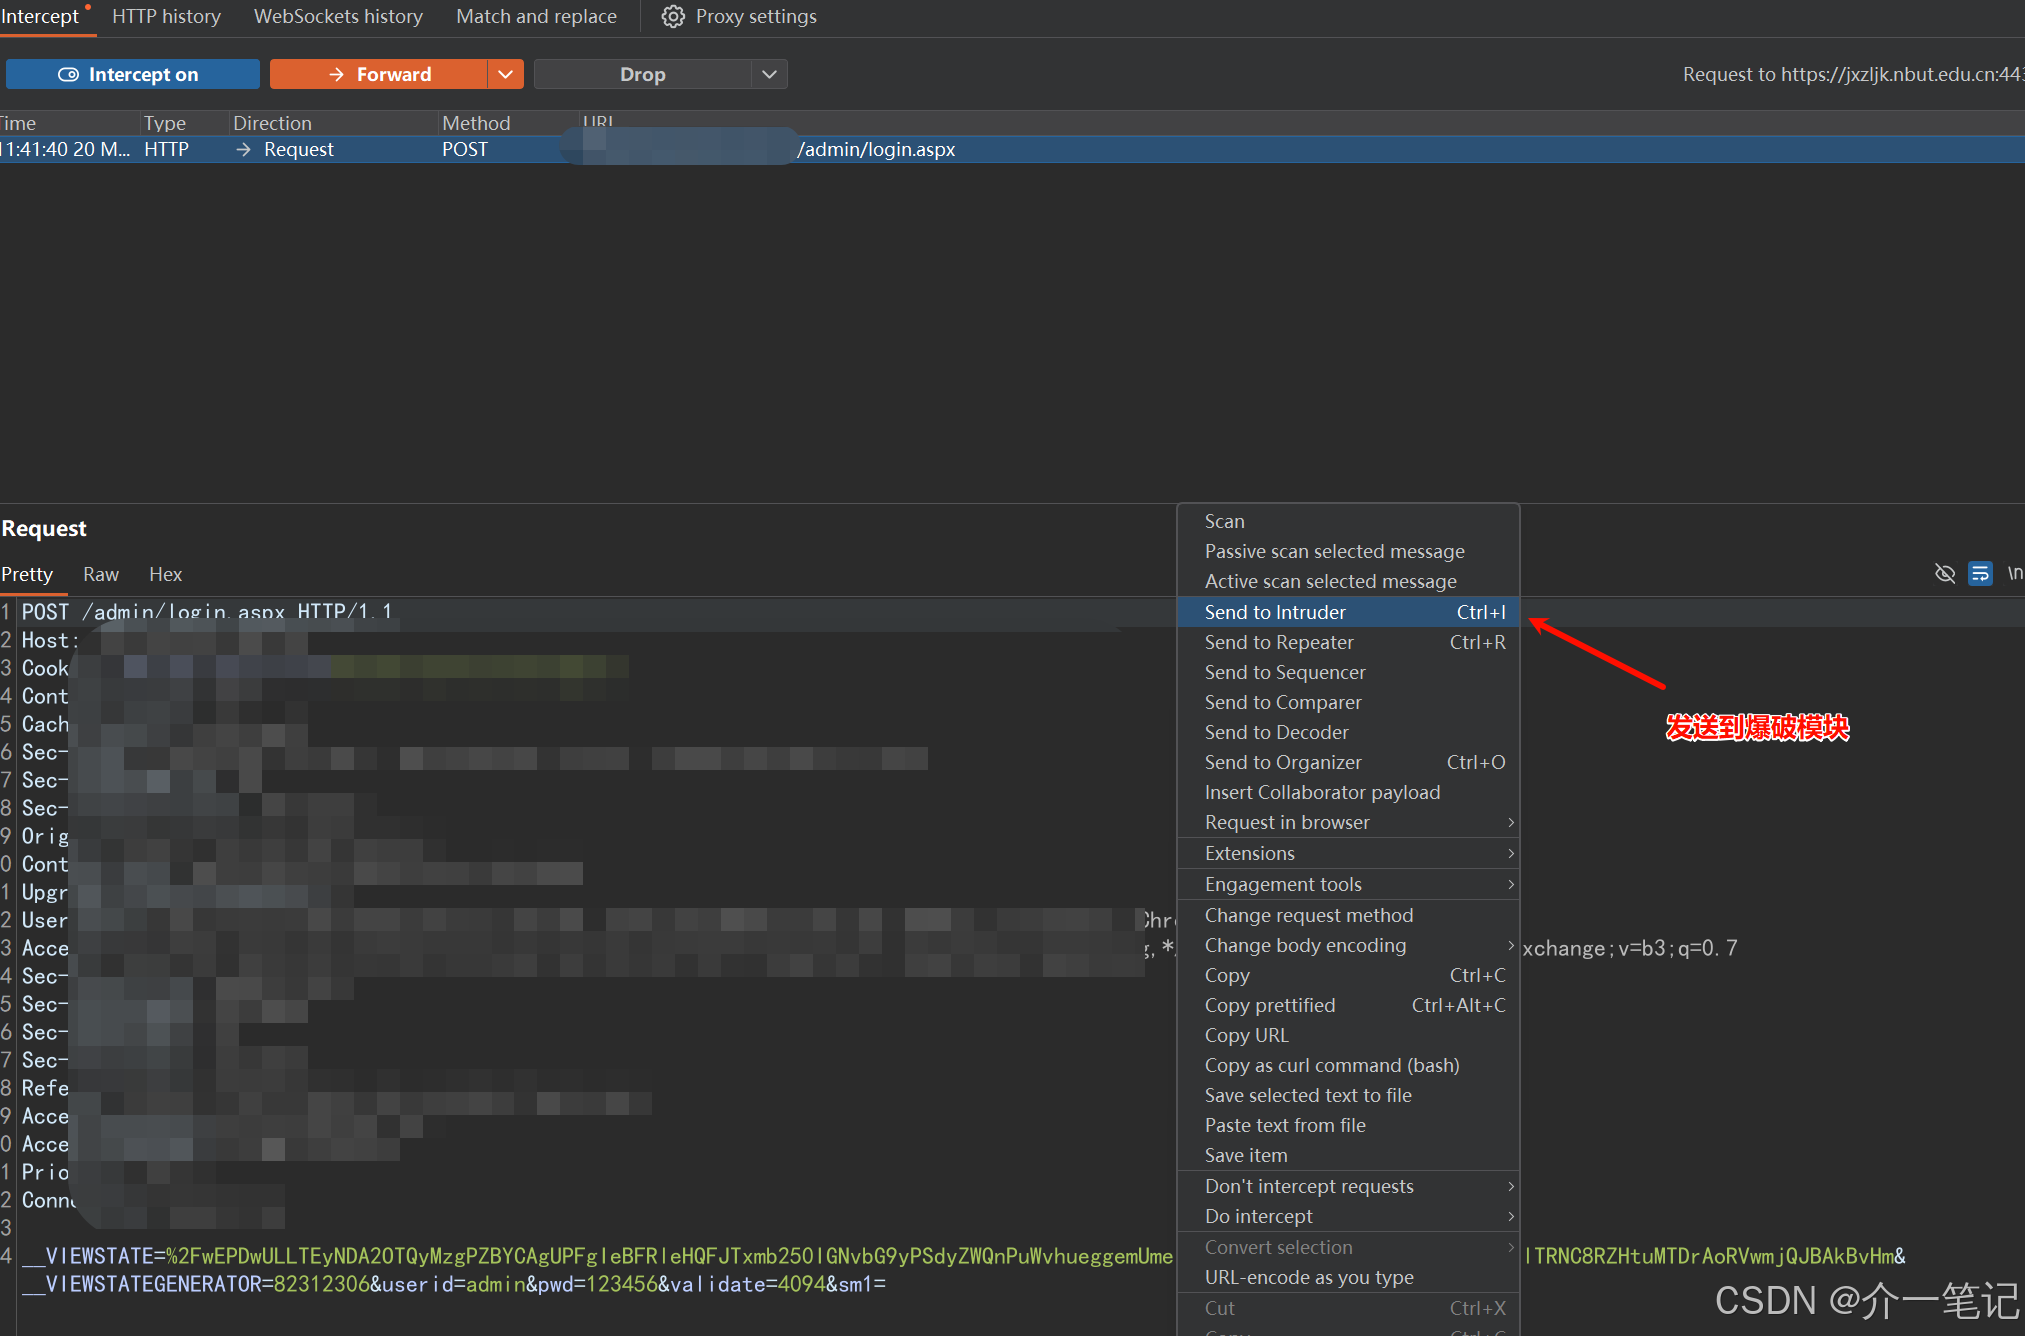
3.2.3 配置爆破参数
-
选择「草叉模式」,第一个参数(密码位)关联自定义密码字典;
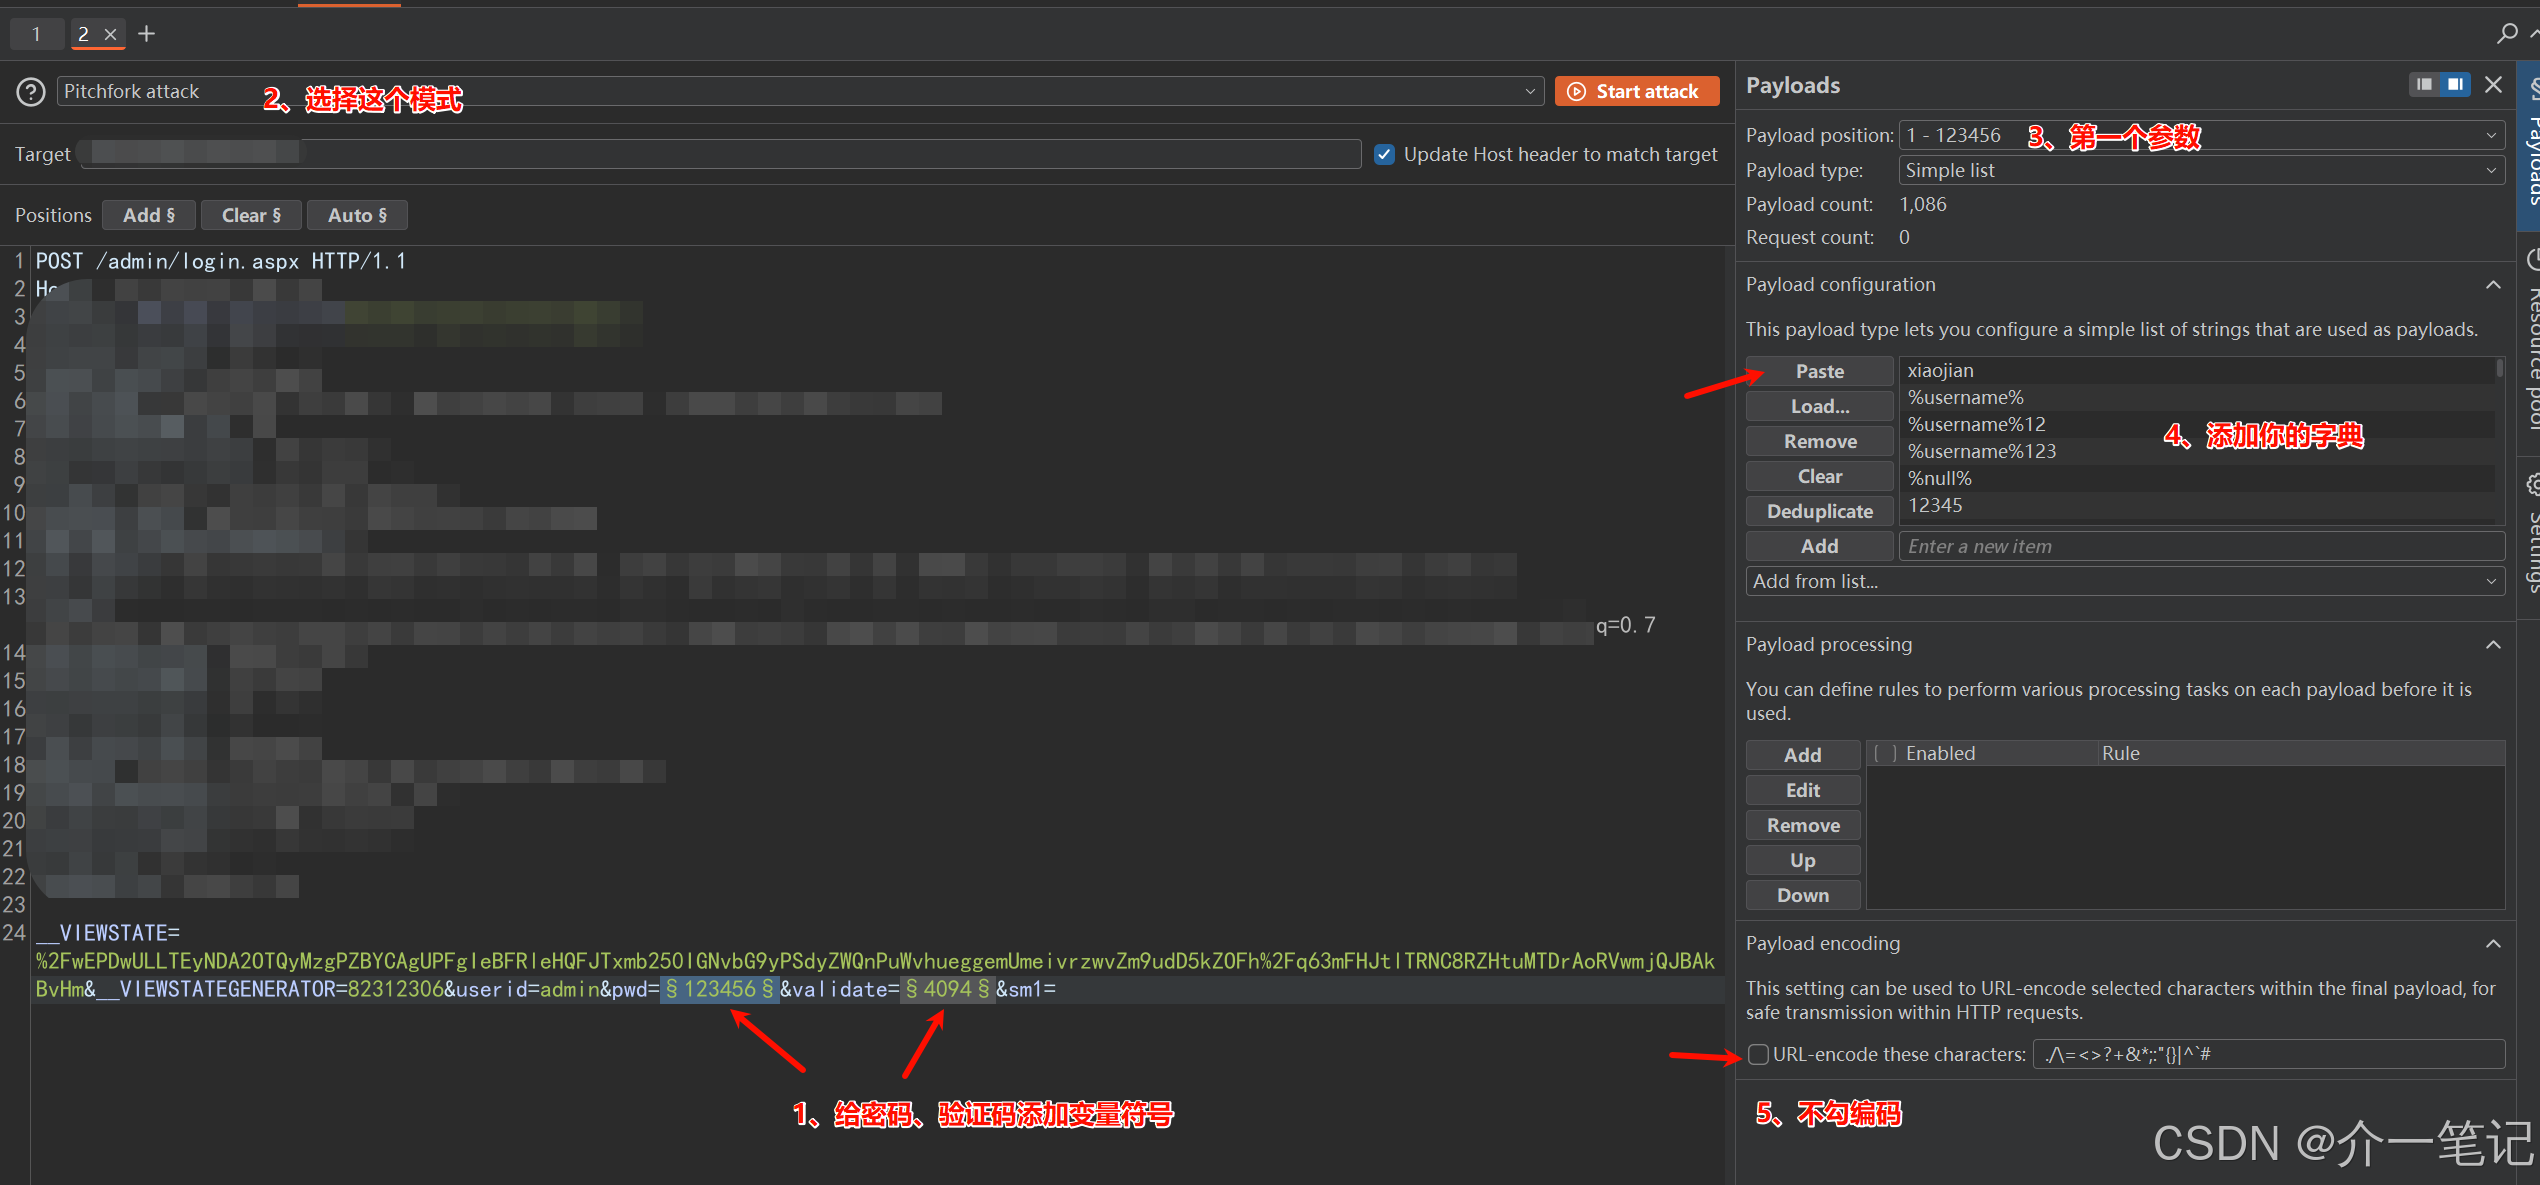
-
第二个参数(验证码位)选择 captcha-killer-modified 插件作为动态生成器;
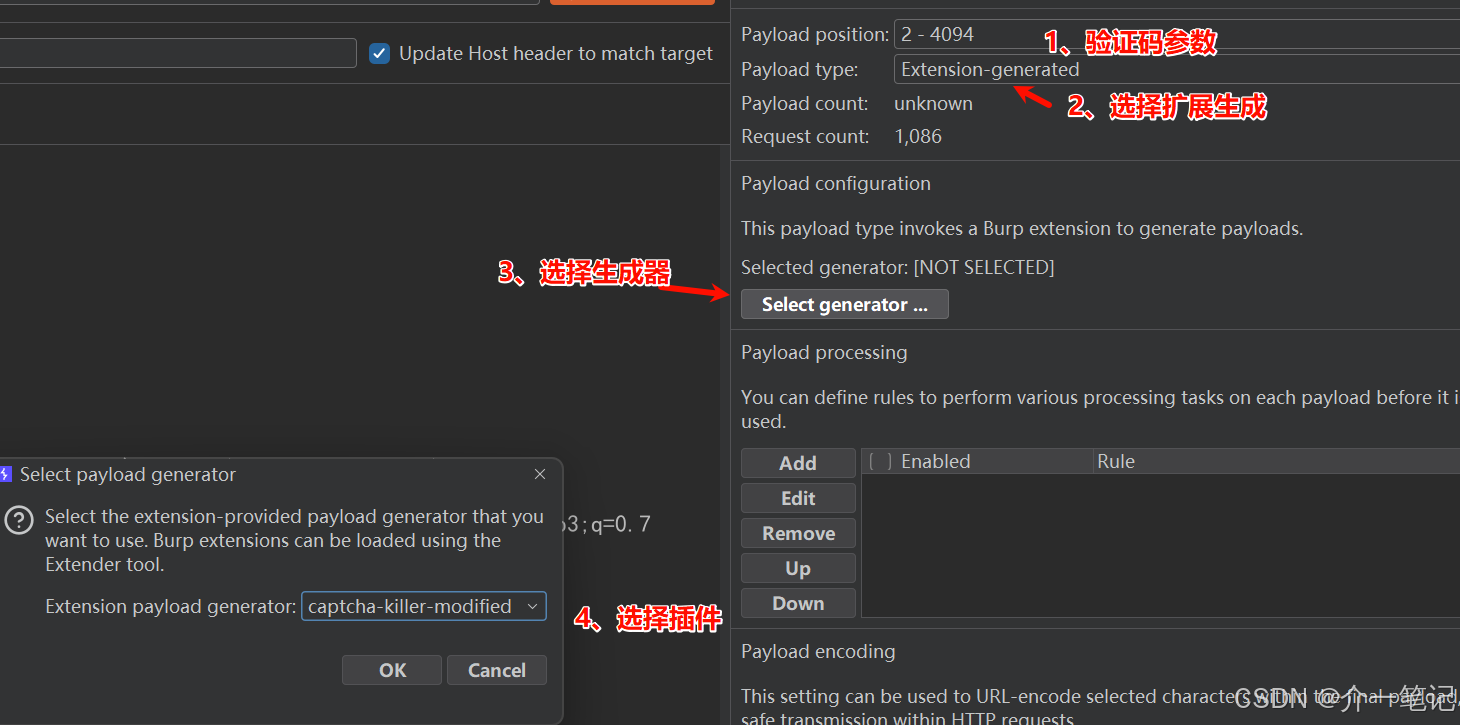
3.2.4 设置爆破线程
根据验证码接口的抗并发能力设置线程数(本文设为1线程,便于观察过程):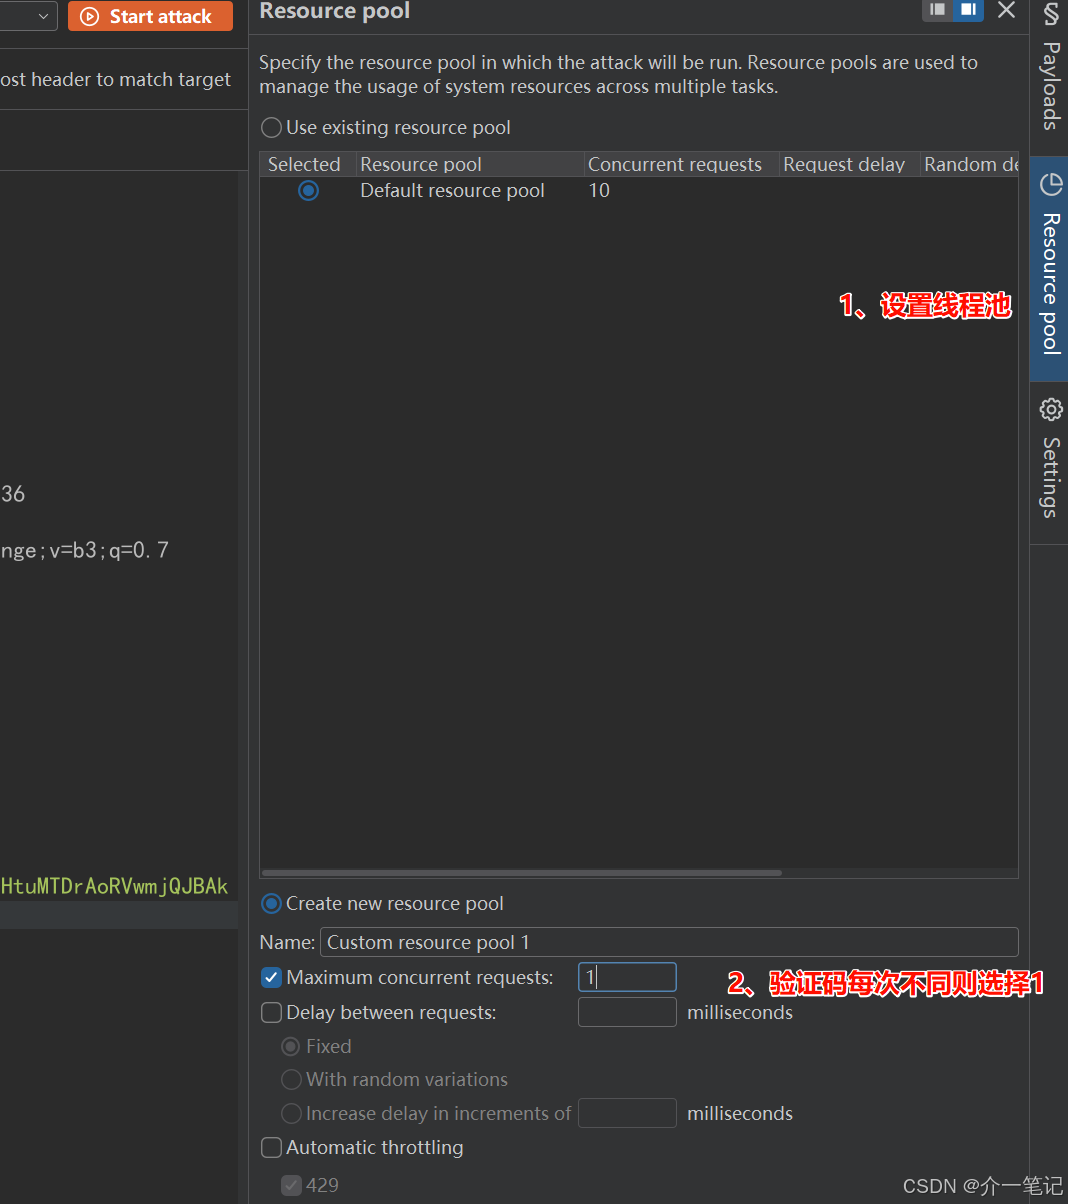
3.2.5 执行爆破
点击 Start attack 启动爆破,可看到每个请求的密码和验证码均为动态变化(如下图):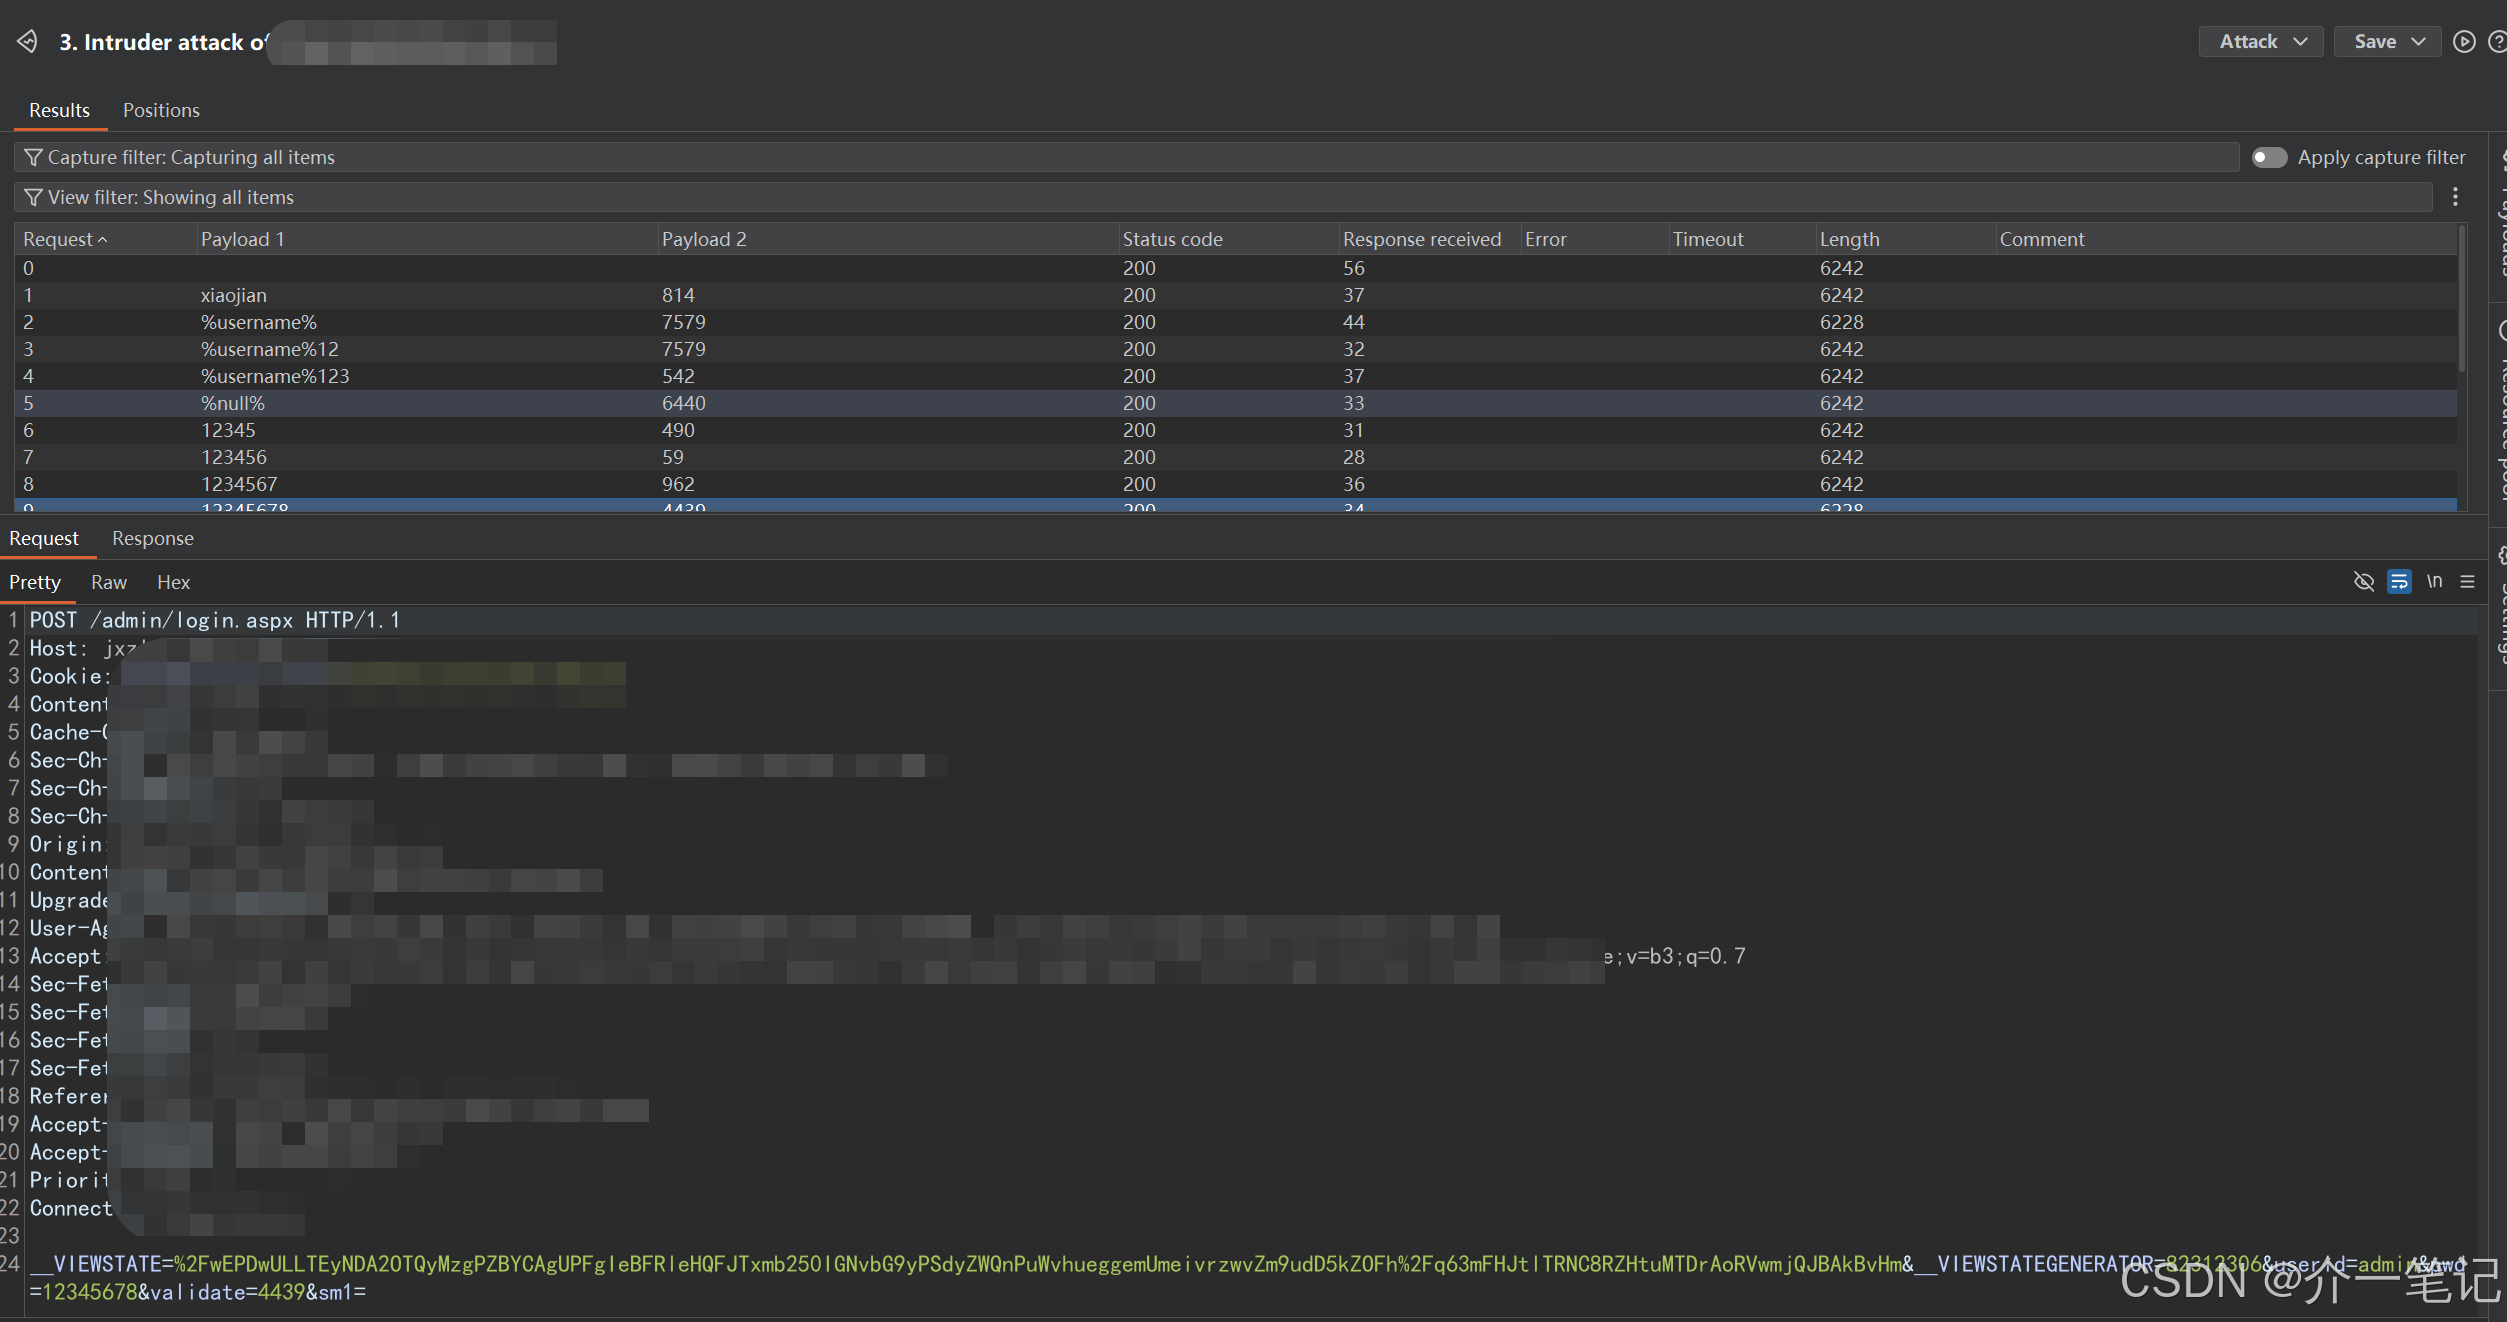
插件右侧面板可同步查看每一次的验证码识别记录(如下图):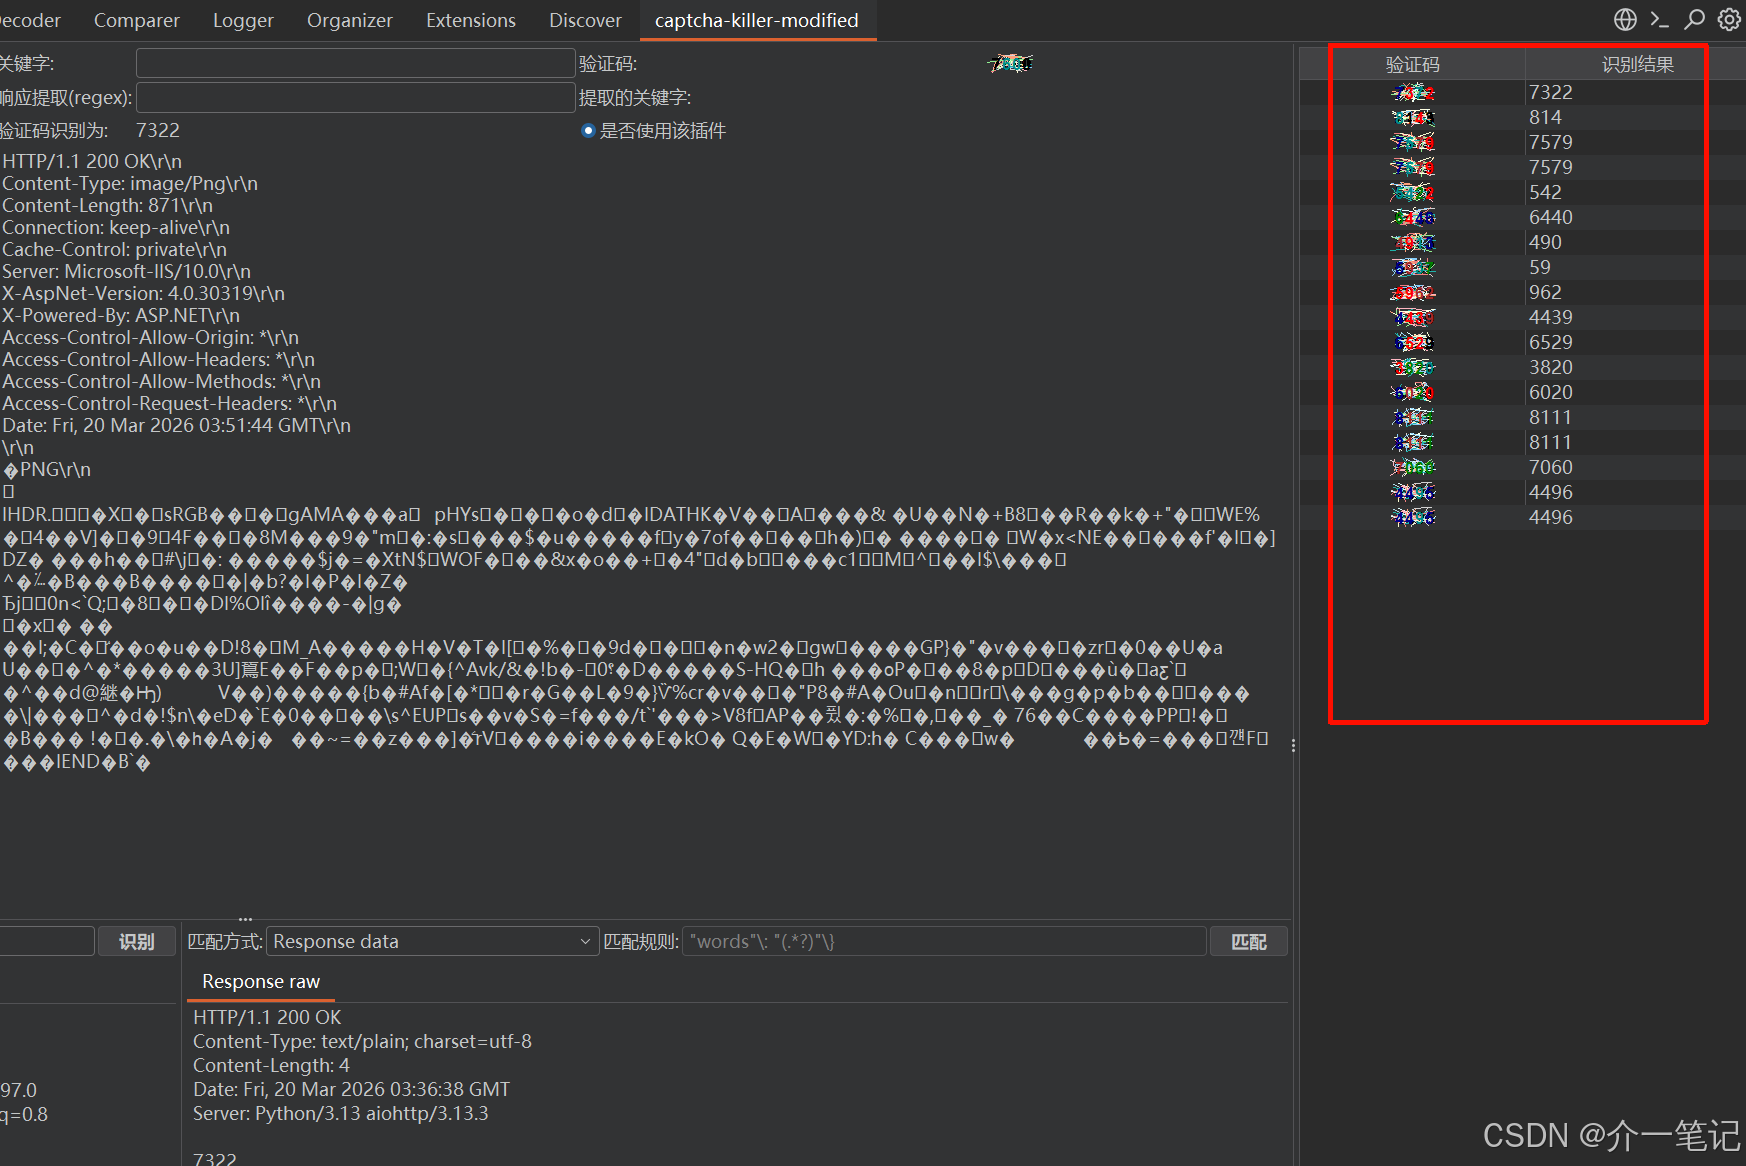
4 工具使用总结
captcha-killer-modified 能有效解决「带验证码的登录口令爆破」场景中,验证码动态变化的核心问题,通过集成 ddddocr 实现多类型验证码的自动识别,降低了爆破的技术门槛。但需注意:
- 爆破效果的核心取决于密码字典的适配度——字典越贴合目标系统的密码规则(如复杂度、常用组合),爆破成功率越高;
- 本文仅演示「明文传输」的登录场景,若目标系统存在前端加密(如密码哈希、验证码签名),需结合其他解密插件/工具先完成加密逻辑还原,再配合本工具实现爆破。

腾讯云面向开发者汇聚海量精品云计算使用和开发经验,营造开放的云计算技术生态圈。
更多推荐
 9
9 0
0- 0


 已为社区贡献5条内容

所有评论(0)